Artists and filmmakers at the Tribeca Film Festival offer differing views on whether virtual reality creates more or less ’empathy’ in viewers than traditional film.
Articles: Digital Photography Review (dpreview.com)
Artists and filmmakers at the Tribeca Film Festival offer differing views on whether virtual reality creates more or less ’empathy’ in viewers than traditional film.
Articles: Digital Photography Review (dpreview.com)
A woman featured in his series ‘In the Shadows of Kolkata’ bears an uncanny resemblance with a subject in a 1978 Mary Ellen Mark photo.
Articles: Digital Photography Review (dpreview.com)
[ By SA Rogers in Art & Street Art & Graffiti. ]

As railway systems decay in the United States and flourish elsewhere in the world, works of art pop up in train cars and along disused tracks, paying tribute to the journey of a transportation system in transition. Painted murals display works of art across long distances, interior installations make trips more engaging and projects reclaiming abandoned tracks mull over their history and the scars they leave on the landscape.

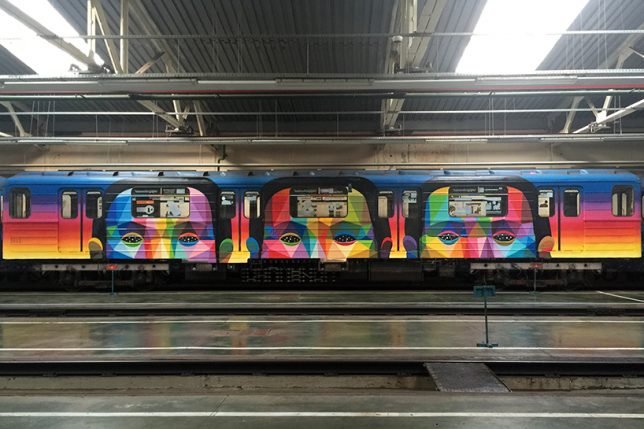


For Ukraine’s Independence Day, street artist Okuda San Miguel painted an entire train from the Kiev metro network in his signature style, full of rainbow geometry and the faces of animals and people.


Chicago’s public transit system was temporarily transformed into a mobile garden for the Art on Track festival, inviting passengers to walk and sit on grass among lush vegetation as they made their way across the city.


Crochet artist Olek yarn-bombed an entire train, working for two days straight with four assistants to cover an entire locomotive in Lodz, Poland with brightly-colored camouflage-pattern crochet.


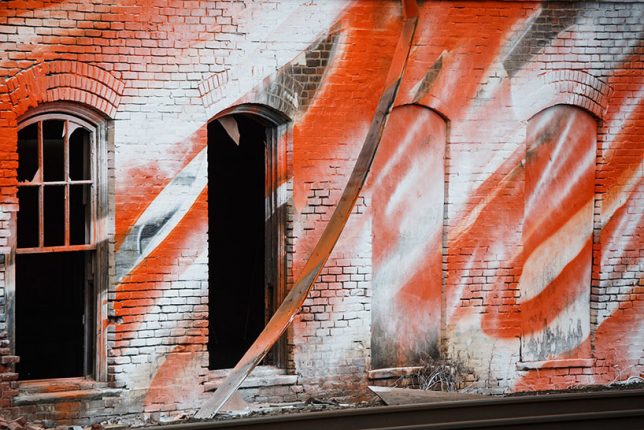
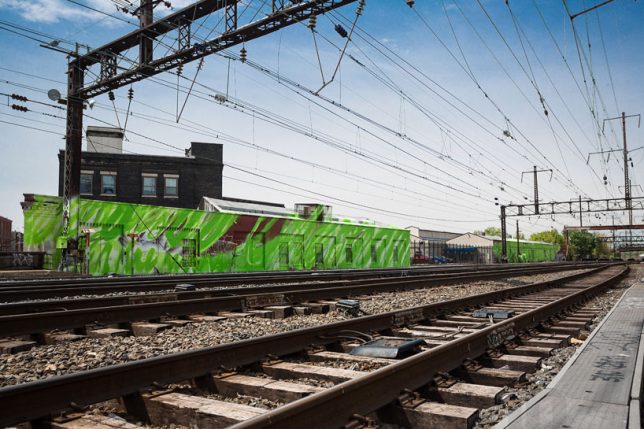

Artist Katharina Grosse spray-painted the landscape of one of Philadelphia’s train routes, including abandoned warehouses and stretches of grass, in seven vibrant colors for her large-scale public artwork ‘Psychylustro.’
![]()


[ By SA Rogers in Art & Street Art & Graffiti. ]
[ WebUrbanist | Archives | Galleries | Privacy | TOS ]
 Every time we ask our readers what post production software they use to edit there portrait photography the most common answer is Lightroom. It’s no surprise either – it’s a powerful tool for editing and organising your photos.
However we know when we talk to our readers about Lightroom that while we all know it’s got amazing power that it can sometimes be overwhelming too. Many of you report knowing you don’t use Lightroom to it’s full potential and wish you had a guide to editing your portraits using the tool.
Today we’re excited to announce our new online course, “Lightroom Mastery: People & Portraits“.
If you’ve ever wanted to discover the secrets professionals use to perfect portraits in Adobe Lightroom, then this course is for you.
And for a limited time, you can access over 4 hours of Lightroom training… that’s 32 step-by-step video modules for a massive 50% off the regular price.
This brand new online course from professional photographer Mike Newton will teach you all the Lightroom secrets the pro’s use to retouch portraits and turn average shots into stunning creations.
Mike is a commercial photographer and has worked with clients ranging from Fortune 500 companies like Bayer and Metlife, technology companies like Uber, and clothing brands like Deckers Outdoor Corporation.
Checkout his intro video below to see what you’ll be learning.
No matter what level of Lightroom user you are, you will walk away from this course with huge improvements in the quality of your portrait edits and the speed of your workflow.
The best part is, Mike makes it super easy to understand.
In this course you’ll learn how to use the very best of Lightroom for photos of people including:
Save 50% on this brand new Lightroom Mastery for Portraits Course for a limited time.
PS: as with all dPS products this course comes with a 30 day satisfaction guarantee. If for any reason you don’t find it suits your needs please contact our support team and we’ll arrange a refund.
The post A Step by Step Guide to Processing Portraits in Lightroom by Darren Rowse appeared first on Digital Photography School.
Author Matthew Walsh voices his concerns about the lack of female surf photographers, and what he’s personally doing to recognize them.
Articles: Digital Photography Review (dpreview.com)
Photographers rarely think twice when it comes to buying expensive camera bodies or high-end lenses, but often seem willing to skimp on a monitor. Why is that? In many cases, it’s because one monitor appears very much like another, especially when purchased over the internet, which is how many of us shop for such things.
This article will help you know what you should look for in a monitor, and show you how to interpret many of the tech specs you’ll see when shopping online. Not so long ago, buying a monitor for photography was an expensive business, but today there is more choice available at every price point.

By Senado Federal
One of the things you must think about when choosing a monitor is panel technology. The “panel” is the main part of the monitor — the screen. It includes polarizing layers, glass substrates, a liquid crystal (LCD) layer, and a color filter. It’s a high-tech sandwich.
The main difference between monitor technologies lies in the way the liquid crystals are oriented, which fundamentally affects the way your monitor behaves. Here are the main three panel types:
These type of panels are often favored by gamers for their fast response times, which reduces unwanted ghosting and blurring effects in moving pictures. The biggest downside of TN panels is that their viewing angles are greatly inferior to other panel types. If you move in front of the screen, the color and contrast are liable to shift in appearance. This flaw varies in severity between monitors.
Be aware that, in monitor specs, viewing angle numbers are highly misleading. They’re based on a lenient contrast test, so you should ignore the common claim that a TN panel has 170/160° horizontal and vertical viewing angles. Those figures bear little relevance to what you’ll experience when editing a photo.
Laptops are almost always made with TN panels, which makes them sub-optimal for photo editing in a perfect world. They’re more usable if you can fix your position in front of the screen and maintain a consistent viewing angle.

Image from Maxpixel CC license.
Plane Switching panels are consistent in appearance from almost all probable viewing angles. In this respect, they are far superior to most TN panels and better than VA panels. IPS panels are also favored for their innately high-quality color reproduction. In most regards, a monitor with an IPS panel is better for photo-editing than one with a TN panel.
A drawback of IPS technology is a phenomenon known as “IPS glow”, which is a glowing effect that appears across much of the panel when viewing dark screens in subdued light. The more money you spend on an IPS monitor, the less likely you are to encounter this, but it’s probably fair to say that it’s more problematic for gamers. IPS glow is different to backlight bleeding, where light appears to seep out from the edges of the screen. That, too, is more likely in budget or mid-priced monitors.
There are various sub-categories of IPS panel, including S-IPS, e-IPS, H-IPS, and P-IPS. The basic benefits of an IPS panel apply to all of them, though the different types may vary in areas like color depth or response time. An e-IPS panel, for instance, is usually cheaper because it typically runs a lower color depth (i.e. 6-bit) than other IPS types. We’ll look at color depth anon.
Proprietary technologies that are similar in behaviour to IPS panels are Super PLS (Samsung) and AHVA (AUO).
These type are not considered as good as IPS in terms of their viewing angles or color reproduction, but better than TN panels in both respects. They are a kind of a happy medium. The technology is relatively rare, but still used by some of the leading manufacturers in a minority of displays (the proper word for monitors).
A VA panel typically has a bigger contrast ratio than an IPS panel, with an ability to display dark tones and blacks very effectively. Big contrast ratios are not always as desirable to photographers as they are to gamers, however, because they make it harder to imitate the dynamic range of a print when soft-proofing.

Image courtesy Wiki-Media Commons.
There is no right or wrong answer when deciding whether you should buy a standard or wide-gamut monitor, but there are pros and cons attached to either choice. Let’s look at some of them:
Pros
Cons
Pros
Cons
Rather oddly, I run standard gamut and wide-gamut monitors side-by-side, and the difference in colors is marked. However, with monitors as with many other things, ignorance is bliss, you don’t miss what you never had.

Image from unsplash CC license.
You’ll find the cheapest monitors typically have a 16:9 aspect ratio, which is fine for watching movies, but a 16:10 aspect ratio is worth aiming for if you can afford it. The latter allows a little more vertical working space and, as Wiki observes, is a closer fit for the classic 3:2 ratio used in many photos.
For many years, a myth circulated that said your photos should have a 72ppi resolution for the web. In fact, as most of us now know, a monitor screen is oblivious to image resolution. This is proven, if proof is still needed, by the fact that Photoshop’s “Save for Web” feature does not attach resolution to images, even though they appear as 72ppi when reopened.

Image courtesy of Wiki-media Commons.
Although several factors may affect the sharpness of an image on your screen (e.g. contrast, anti-glare filters, viewer-to-screen distance), the central thing that dictates sharpness is the monitor’s pixel density, or dot pitch. A greater pixel density or a finer dot pitch is indicative of a sharper onscreen image, all other things being equal. If you google “dot pitch calculator” or “PPI calculator”, you’ll find an easy means of calculating the pixel density of any screen.
As an example, an average desktop monitor might have a pixel density of around 90-100 ppi, while the 27” 5K iMac with Retina display has a pixel density of 217 ppi. That’s impressive in a big screen.
An extremely dense pixel pitch tends to have a flattering effect on photos, just like every photo looks sharp on a smartphone, but isn’t a necessity for efficient photo editing.

Photo from Pixabay, CC0 public domain license.
These days, “bigger is better” seems to be the mantra when it comes to choosing a monitor. Of course, it is pleasant to view your photos on a big screen, but my advice is to buy what you can afford and don’t give precedence to screen size over other important attributes. Also remember that big screens need big resolutions to look as sharp as smaller screens from the same distance, so don’t be deceived by pixel dimensions alone. Scrutinize the pixel density, as outlined above.
Apart from Apple iMacs, nearly all desktop monitors are equipped with anti-glare filters for the obvious purpose of cutting out distracting reflections. This creates a matte finish to the surface of the screen. The degree to which this affects the sharpness of the screen image varies a lot, ranging from imperceptible to adding a noticeable grainy effect. You might make an analogy with glossy versus matte prints; the glossy print typically looks a little sharper.
An anti-glare filter is not something to be avoided in a monitor (almost impossible, anyway), but it is worth researching how much it affects the image in your desired screen before buying. Ideally, of course, it’s a good idea to get a look at a monitor before investing. Always check negative reviews when buying online.

Photo by Rawpixel CC license.
On to a slightly complicated subject, which we’ll attempt to keep simple. Color depth relates to how many distinct colors a monitor can display.
Theoretically, the more colors a monitor can display, the more smoothly it can reproduce gradual changes in tone and the less prone it is to frustrating “banding” or posterization effects (characterized by ugly pixelated blocks of color).
Most monitors on the market have one of the following two specs:
The second of these uses dithering to create colors that aren’t there, which is theoretically inferior to a monitor that can natively display 8-bit color. A monitor with 6-bit color is more prone to banding problems, as previously described.
Note that calibrating a monitor increases the likelihood of banding, so more color depth offsets this and effectively makes a monitor more adjustable. Laptop screens nearly always use 6-bit color, so should ideally be calibrated conservatively.
You may see 10-bit color in more expensive monitors. This, again, could be genuine 10-bit color depth or 8-bit + FRC. Bear in mind that a 10-bit monitor can only display its 1.07 billion colors if 10-bit is supported by your graphics processor, software and video connection.
Hardware LUT calibration is a fancy feature you’ll find in some high-end monitors from Eizo and NEC as well as a few consumer brands.

Image courtesy of Wiki-media Commons.
An LUT is a lookup table, which maps the input signals from your PC into, typically, 8-bit RGB color output from your LCD monitor.
In a monitor, greater color depth allows for smoother, more nuanced tonal transitions without banding. Like a monitor, an LUT may also vary in its color depth; the more colors it can process, the better the monitor will be at displaying smooth tones and precise color.
The above is true even if the final output is an 8-bit monitor, so a 10, 12, 14, or 16-bit LUT produces better color in an 8-bit monitor than an 8-bit LUT. The difference between a 10-bit and 16-bit LUT may be less appreciable.
The type of hardware calibration under discussion here doesn’t refer to use of a hardware device like a Spyder. Instead of storing an 8-bit LUT in your video card, like most monitors do, expensive graphics monitors usually have a high-bit LUT built-in to their own hardware for more refined calibration. You’ll still use a calibration device to measure your monitor’s color, but the final color reproduction should be superior.
Expensive graphics monitors often allow you to store and switch between calibration profiles, so you can alter calibration settings with the click of a mouse using proprietary software. This is impossible in normal monitors, where calibration data is loaded into the video card LUT on startup and not changeable without recalibrating your monitor.
When choosing a monitor for photography, panel type is king. If you buy the best IPS (or equivalent) monitor you can afford, the other features are frosting on the cake. Good luck!
The post How to Choose the Right Monitor for Photo Editing by Glenn Harper appeared first on Digital Photography School.
UK-based filmmaker Nick Driftwood has been busy, making a 360-degree video rig using six Panasonic Lumix GX80 (GX85 in the US) bodies, each fitted with a 3.25mm lens, covering a field of view of 243-degrees. With each camera shooting 4K video, 2880 X 2880px X 6 equals 12K footage. He showed it off to our friends at Photo Gear News last week at the NAB show in Las Vegas.
The super-wide lenses come from Hong Kong 360 company iZugar, and the camera takes advantage of the 1:1 video capability that Panasonic offers in its 4K Photo mode.
Even if you’re not interested in 360-degree video, it’s worth watching just for the guy in the background at 0:53.
A sample of the output from Nick’s 12K rig can be found below.
Articles: Digital Photography Review (dpreview.com)
Henri-Cartier Bresson is well-known for his use of a 50mm lens, a standard lens on a 35mm film camera. If it’s good enough for Henri, then I guess it’s good enough for most modern street and travel photographers. When I worked at EOS magazine (Canon) we published an article about a photographer who traveled to India with nothing but a standard 50mm f/1.2 lens. His photos were beautiful.
But what is it about the standard lens that’s so appealing to street and travel photographers? I’m glad you asked! Let’s take a look.

A standard lens is a prime lens with a focal length roughly equivalent to the length of the diagonal measurement of the sensor (or film). A standard lens on a full-frame camera would have a focal length of 42mm. It is a lens that produces a field of view that is similar to the human eye or appears natural.
In practice, the 50mm lens is considered the standard for full-frame cameras (although Pentax makes a 42mm lens). A 35mm or 28mm lens is standard for an APS-C camera, and a 25mm lens is standard for a Micro Four-Thirds camera.
I made all the photos in this article with a Fujinon 35mm f1.4 lens, a standard lens on my Fujifilm X-T1 camera. Standard lenses have lots of benefits. Here are some of them:

My Fuji 35mm f/1.4 standard lens.
Standard lenses are easy to design and make. The optical quality is superb. They are not big lenses and don’t require as many raw materials as larger lenses. They are inexpensive to manufacturer and the savings are passed onto the buyer.
But that doesn’t mean you should buy the cheapest standard lens you can find. You also need to take build quality, autofocus performance and weatherproofing into account when buying a standard lens. That $ 100 standard lens may look like a bargain, but you could easily end up wishing you had bought something better.
The small size of standard lenses is good news if you are going to be walking around for hours at a time taking photos. The lighter your kit the more energy you will have for photography.
Smaller lenses are also more unobtrusive when taking photos of people in the street. If you use a telephoto lens and point it towards somebody it’s obvious that you are taking a photo of them. But use a standard lens and you could be taking a photo of a building, the street, or the scene in general. You can take a photo of somebody without pointing the camera directly at them (as long as you’re not too close). You are much more likely to be ignored.

I made this photo in Hangzhou, China with a standard lens. The girls didn’t notice me. It helped that they were totally engrossed in what they were doing.
This is good news if you work in low light or like to use wide apertures for creative effect. If you like bokeh you’ll love using a standard lens. I used a wide aperture on my standard lens to make this photo. I deliberately focused on the dragon’s head and blurred the background.

Most standard lenses are capable of focusing quite closely to the subject. That means you can take close-up photos without having to change lenses or use an extension tube or close-up lens. This ability, combined with the wide aperture, make standard lenses incredibly versatile.
You can step back from the subject and take a photo that includes plenty of the scene. Likewise, you can move in close and take a close-up. You can open up the aperture and create bokeh, or stop it down and get much more of the scene in focus.
The close focusing ability of a standard lens helps you create a variety of images that show both the entire scene to small details and everything in-between. It’s a great tool for building a body of work around your subject. I used my standard lens to create both these images below, taken in the same building in Beijing, China.

When you use the same lens for an extended period of time you get to know it really well. You’ll understand how it sees the scene. You’ll know what to expect in terms of perspective and depth of field, and how that changes as you get closer to the subject.
There is nothing wrong with zoom lenses, but they add an extra element to the photo taking process as you have to decide what focal length to use. An 18-55mm kit lens, for example, can be very useful. But there’s also a dramatic difference between the 18mm and 55mm focal lengths in terms of composition and angle of view. Deciding which focal length to use wastes precious time, especially in a situation where something interesting is happening.
For example, in China, I often didn’t have much time to think. Something happened in front of me, like this boy posing for a photo, and I had to react quickly. A prime lens helped me do that as I didn’t have to think about focal length.

With a standard lens (or any prime) you are committed to that focal length. You don’t have the option to zoom in or out. You can only change the framing by moving closer to or farther away from your subject. It simplifies the photo taking process and helps you create photos with simpler, stronger compositions.
Telephoto lenses are great for taking photos of people from a distance, but photos taken with them can lack a feeling of intimacy as they are shot from a distance. It’s also harder to stop down and get the background in focus as well.
Wide-angle lenses are a real challenge as they tend to include too much of the background. It’s hard to create a simplified composition with a wide-angle lens, especially in the street where lots of things happen that are outside your control. You also need to get much closer to your subject, and may need to invade their personal space. It’s hard to do this and not have the subject react to you in some way.
Standard lenses occupy a good middle ground between these two extremes. You can get close to your subject without getting too close. You can create simpler and stronger compositions than you can with a wide-angle lens, but can still stop down and keep the background sharp.
This photo is a good example. I was fairly close to this couple. But, I if had been using a wide-angle lens I would have had to get even closer, invading their personal space and changing the dynamic. A photo taken with a telephoto lens would have a greater sense of distance and separation from the couple. In either case, I wouldn’t have made a photo capturing a candid expression like this.

What lenses do you like to use for street and travel photography? Are standard lenses part of your kit or do you prefer something else? Let us know in the comments – it will be interesting to see which lenses DPS readers prefer to use.
Andrew is the author of the ebook The Candid Portrait.
The post 6 Reasons Why You Should Use a Standard Lens for Street Photography by Andrew S. Gibson appeared first on Digital Photography School.
Imaging Resource took a look at Sigma’s fast 135mm telephoto prime lens, calling it once of the sharpest lenses they’ve ever tested.
Articles: Digital Photography Review (dpreview.com)
You must be logged in to post a comment.