RSS
 

Archive for February, 2017

Throwback Thursday: doing the twist with the Nikon Coolpix 950

03 Feb

Few cameras in the early days of consumer digital photography are as legendary as the Nikon Coolpix 950. This graphic pulled from the DPReview archives says it all:

In case you’re wondering, the answer was ‘yes’. It earned a ‘Highly Recommended’ award, with site founder Phil Askey calling it an ‘important camera at an important time for digital photography.’

The thing about the Coolpix 950 that grabbed the most attention was, of course, its rotating lens (or was it the body that rotated?). It wasn’t Nikon’s first camera to use that design: the original Coolpix 900 has that honor. 

The lens was reasonably fast (F2.6-F4), though its equivalent focal length of 38-115mm didn’t make it a great choice for wide-angle shooters (and forget about selfies which, thankfully, didn’t become a fad for another 15 years or so.) Nikon did offer accessory lenses for the 950: a telephoto adapter that doubled the focal length, a wide-angle adapter that dropped it to 24-72mm and a fisheye adapter with a 183° field-of-view.

The CP950 had a whopping 1/2″, 2.1 Megapixel CCD, which saved those 1600 x 1200 images to a CompactFlash card. Nikon made a lot of noise about the camera’s autofocus system, boasting that it had 4,746 steps, allowing it to be ‘unerringly accurate.’ The CP950 could shoot continuously at a speedy 1.5 fps and featured Best Shot Selector, a feature which Nikon cameras offered for many years, which took three shots in a row and picked the sharpest one. Another feature that was a big deal then was automatic file numbering.

The Coolpix 950 had a magnesium-alloy frame and feels as solid as a modern-era enthusiast camera.  As you can see, it had a built-in flash. What you can’t see is that it also had a flash sync terminal, and Nikon sold a flash bracket for off-camera Speedlights.

As with most cameras those days, it had an optical viewfinder along with a 2″, 130k-dot LCD that doesn’t look very good in 2017. The physical controls and menus may have been competitive then, but they’re baffling now.

The CP950 was priced at $ 899 back in 1999, which is just under $ 1300 in 2017. That would make this Coolpix one of the most expensive fixed-lens cameras on the market. While it’s hard to imaging paying that now, back in ’99 the Coolpix 950 was definitely worth the price.

Read DPReview’s Coolpix 950 review

Articles: Digital Photography Review (dpreview.com)

 
Comments Off on Throwback Thursday: doing the twist with the Nikon Coolpix 950

Posted in Uncategorized


Sigma 85mm F1.4 Art DxO results: a new king is crowned

03 Feb

$ (document).ready(function() { LensWidget({“containerElement”:”#reviewLensWidget”,”allowProductChange”:false,”enableKeyboardShortcuts”:false,”state”:{“lensId”:”sigma_85_1p4_dg_hsm_a”,”cameraId”:”nikon_d810″,”version”:”0″,”view”:null,”aperture”:null,”focalLength”:null}}) })

DxO just published its score for the Nikon mount Sigma 85mm F1.4 DG HSM A. Drumroll please: it received the highest score ever for a lens on DxO, a 50 when mounted to a D810 and a 51 when mounted to the D800E. What’s even more impressive is that it actually scored a perfect 36 P-Mpix for image sharpness on a D810, which has a 36MP sensor.

That’s pretty incredible. We know that sharpness isn’t everything when it comes to shooting portraits, but you have to admire the sheer feat of engineering that Sigma was able to accomplish with this lens. 

See our Sigma Art 85mm F1.4
sample gallery

Articles: Digital Photography Review (dpreview.com)

 
Comments Off on Sigma 85mm F1.4 Art DxO results: a new king is crowned

Posted in Uncategorized


FILM Ferrania P30 black and white film will get a limited ‘ALPHA’ release

03 Feb

FILM Ferrania has announced the ‘rebirth’ of its P30 black and white film, which will be made available soon as a limited ‘ALPHA’ edition. This 80 ISO panchromatic offering is described by FILM Ferrania as ‘motion picture film for still photography,’ reintroducing the P30 stock first launch by the company in the 1960’s. Says Ferrania, P30 ALPHA ‘has no peers in the modern analog film market.’

Ferrania introduced the limited edition product via a tweet yesterday, pointing photographers toward the P30 ALPHA’s product page and a new video (below). According to the company, its pre-production batch of film presents ‘various defects’ like contrast issues and scratches, but these issues will not be present in the finalized commercial film product. ‘That said, this film is an ALPHA edition for a clear reason,’ the company stressed.

The company has released a gallery of photos taken with the pre-production film on its P30 website. Photographer Adam Goldberg has also published a series of photographs taken with the film on his Tumblr. According to Ferrania, sales of the film will start in mid-February; no prices have been revealed.

Via: PetaPixel

Articles: Digital Photography Review (dpreview.com)

 
Comments Off on FILM Ferrania P30 black and white film will get a limited ‘ALPHA’ release

Posted in Uncategorized


COOPH reveals new leather accessory collection

03 Feb

$ (document).ready(function() { SampleGalleryV2({“containerId”:”embeddedSampleGallery_8095115313″,”galleryId”:”8095115313″,”isEmbeddedWidget”:true,”standalone”:false,”selectedImageIndex”:0,”startInCommentsView”:false,”isMobile”:false}) });

Photography accessory and apparel maker COOPH has launched its latest collection of leather accessories. The camera strap, memory card holder and wrist strap are all handmade in Hungary from vegetable-tanned Italian leather and available in a range of colors and sizes.

The leather strap is available in lengths of 98, 108 or 120cm (38.5, 42.5 or 47.2in) and comes with an attached SD-card holder. It retails for €59 ($ 64). The wrist strap is made from padded, natural materials and is built for durability. It will set you back €69 ($ 75). The leather card holders offer space for up to four SD-cards and three credit cards in a compact design. They are also available at €69 ($ 75). More information is available on the COOPH website.

Articles: Digital Photography Review (dpreview.com)

 
Comments Off on COOPH reveals new leather accessory collection

Posted in Uncategorized


How To Cover Everything Ever in Photos!

03 Feb

The Polaroid ZIP Mobile Printer makes super sticky tiny prints of all your best photos.

They’re so sticky in fact, that they can stick to almost anything.

Anything you say?

We couldn’t believe it either, so we took to covering some of our favorite things in our favorite pictures. Ya know, to prove it (not just because we wanted to cover everything in adorable, miniature snapshots).

(…)
Read the rest of How To Cover Everything Ever in Photos! (284 words)


© Meg for Photojojo, 2017. |
Permalink |
No comment |
Add to
del.icio.us

Post tags:


Photojojo

 
Comments Off on How To Cover Everything Ever in Photos!

Posted in Equipment


Invisible Graffiti: Uncanny 3D Overpass Art Simulates Transparency

03 Feb

[ By WebUrbanist in Art & Street Art & Graffiti. ]

2

3D graffiti artist Milane Ramsi has combined two challenging types of urban art into a single installation, making a concrete pillar appear to vanish while producing three-dimensional lettering.

3

The installation wraps a concrete support post for a highway overpass in Karlovy Vary, a city in the Czech Republic. The work spells the artist’s name in reverse, appearing to pierce the pillar thanks to a combination of colors overlaid on a simulated background. The purple gives a general shape to the work while the yellow adds apparent depth and dimension.

3d

His other works range from tags to 3D-looking works that appear to pop off the wall, but this particular piece combines elements that span graffiti types and styles.

tree wrap

In invisibility aspect is reminiscent of another clever work of roadside art, a wrapped tree designed to look like it has been cut across the middle, leaving the top half portion of the trunk and branches to seemingly float on air. And below: Tree Line by photographer Zander Olsen.

tree-line

Share on Facebook


[ By WebUrbanist in Art & Street Art & Graffiti. ]

[ WebUrbanist | Archives | Galleries | Privacy | TOS ]


WebUrbanist

 
Comments Off on Invisible Graffiti: Uncanny 3D Overpass Art Simulates Transparency

Posted in Creativity


First samples from the new Nikon 70-200mm F2.8E FL ED VR

02 Feb
ISO 100, 1/400 sec at F4.5. Photo by Dan Bracaglia

The Nikkor 70-200mm F2.8E FL ED VR is the third version of Nikon’s workhorse telezoom. Most of us on staff have spent a bit of time with the previous two versions, and the latest iteration features a new optical design, improved VR and an electromagnetic diaphragm.

We have not had it in the office long but the impression already is that it’s both impressively sharp and well-stabilized. In short, it’s going to appeal to a wide range of photographers. We’ll be sure to add additional images to this gallery once we’ve had more time with the lens, but for now take a look at some initial samples.

Articles: Digital Photography Review (dpreview.com)

 
Comments Off on First samples from the new Nikon 70-200mm F2.8E FL ED VR

Posted in Uncategorized


4 Beginner Tips for Creating Dramatic Portraits with One Flash

02 Feb

In this article, I will explain how you can use a transmitter/receiver, or transceiver system to achieve simple dramatic portraits using only one flash. Below is a step-by-step guide on how to get you started.

Background

I used to fear using anything other than natural light. One of the reasons was that I had a notion that using artificial lights such as off-camera flash and strobes is too difficult and requires deep technical knowledge. Well, yes and no. To master it, you have to understand lighting ratios and learn to make mental calculations of light from various sources and suchlike. But to start using it, not really.

My first experience of off-camera flash was using the Creative Lighting System (Nikon) capability between my speedlight and my camera. Most of my early attempts were unsuccessful especially with the limitations of the line of sight infrared system. It was unreliable too, especially when shooting under pressure or caught on the hoof. I also used overexposed my light with my very untrained and inexperienced eye when I was just starting out.

4 Beginner Tips for Creating Dramatic Portraits with One Flash

Wireless triggers

Enter wireless radio transmitters and receivers (or transceivers) such as the Pocket Wizard, CyberSyncs, brand’s own (Nikon and Canon) and the super affordable Yongnous. A transmitter which is connected to your camera sends the message to the receiver which is attached to the flash unit. Transceiver units, on the other hand, can act as both receiver and transmitter so that you can use them on either the camera or the speedlight but you would still need one unit to attach to each piece of equipment.

These wireless transceivers are a game changer without a doubt. They are simple to use and are reliable most of the time as well. I use Cybersyncs for my studio strobes and Yongnous for my speedlights and find the Yongnous are incredibly reliable and user-friendly with hardly any misses. However, the Yongnous cannot be used for strobes.

#1 Choose the look and mood for your portrait

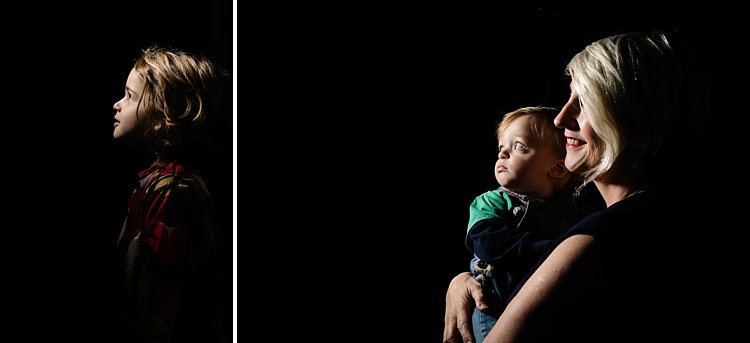
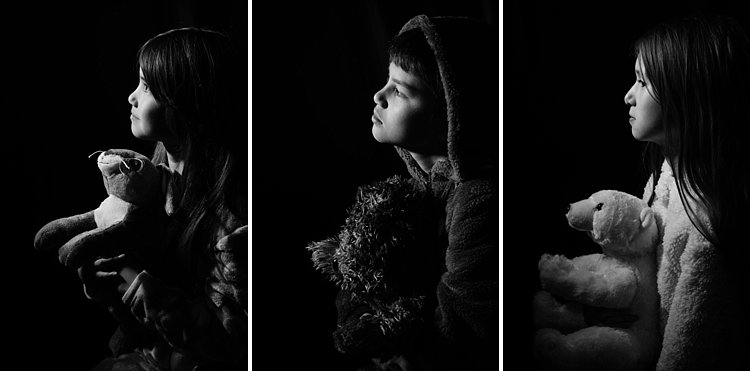
Do you want super dramatic low key portraits or the other end of the spectrum – high key, bright and airy? The mood of your picture will dictate your background and of course the camera and flash settings. I have chosen a black background for these portraits to achieve a high contrast between the brightest parts of the image and the shadows. This will keep the overall mood dramatic and the lighting low key with plenty of black areas.

#2 Set up your equipment

If you have transmitter and receiver units, attach the transmitter to the hotshoe of your camera while the receiver needs to be attached to the flash (speedlight or strobe). If you have a transceiver, this can go on either camera or flash but you still need two units, one on each piece of equipment.

It’s also a good idea to put your flash unit on a light stand. I used a studio strobe mounted on a light stand but attached it to a boom arm for more flexibility in angling the light. Note: A boom arm is not necessary at all for a simple beginner setup. Without a light stand, you can always mount your flash on a cabinet or steady surface, making sure it doesn’t topple over. Most speedlights come with little plastic feet that are handy for this purpose.

4 Beginner Tips for Creating Dramatic Portraits with One Flash

#3 Modify your light

One of my rules is to always modify the light. The only time I shoot with a bare flash is when I use it as a kicker light at wedding receptions or to light a backdrop. At all other times, I will always modify it somehow or bounce it to maximize the softness of the light or to minimize the harshness depending on the situation.

For this look, I wanted the flash to point directly at the subject, in a narrow beam and not have any spill onto the background. A gridded snoot would do the job controlling the light direction, but I didn’t have one. Plus I probably would have found that the light was still a bit harsh without further modification. I ended up McGyvering my own modified snoot using a black card and the diffuser panel of a 5-in-1 reflector. I twisted the reflector (like you would when putting it away) so that it was only a fraction of its size and I then had a 3-layer diffusion panel. This was taped to the strobe and with black card wrapped around it to direct the light onto my subject like a beam.

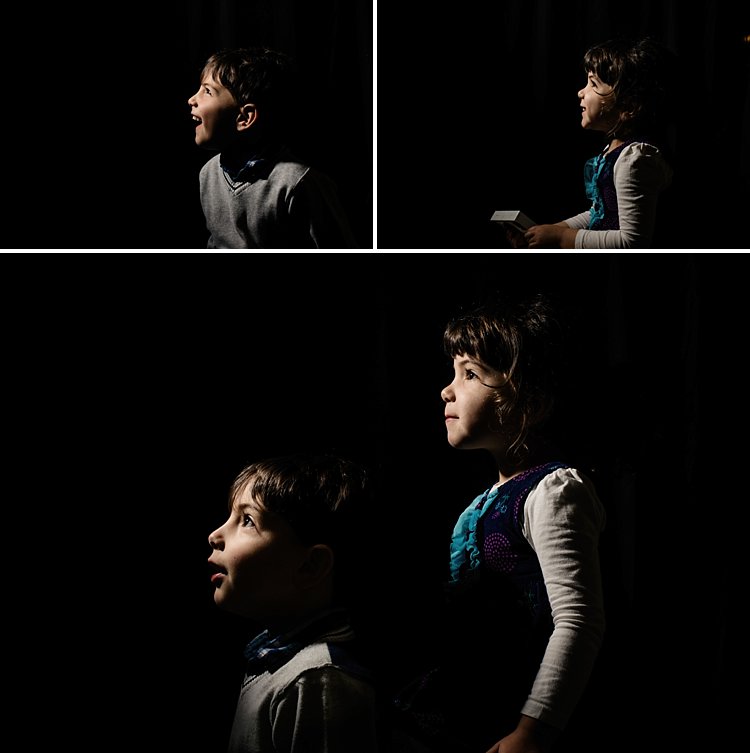
There are two factors that are crucial for getting soft light; the distance between your subject and the light and the size of the light. The closer the light is to the subject, the softer it is. The larger your light source is, the softer it will be. My light source was not very big at all, so to leverage maximum softness I decreased the distance to the subject. The light was positioned about an arm’s length away from the subject, quite high up at a 45-degree angle. This was to mimic natural light coming from a high window.

#4 Try various settings

I wanted to shoot at f/8 so I metered the flash. You don’t require a handheld light meter to do this, by the way, you can just start with a few trial and error test shots to find the correct setting. I started off with the lowest power on my strobe but ended up cranking it up as the 3-layer diffusion cut out quite a lot of the light. My settings for these were: f/8, 1/60th,  ISO 400 and my strobe power high at 7. The strobe settings will vary depending on the brand you are using.

4 Beginner Tips for Creating Dramatic Portraits with One Flash

This is just one of the many ways you can create portraits with one flash. Try it and experiment with other angles, moods, and light settings and you may be amazed at what one light can do!

Share your portraits here too in the comments below.

googletag.cmd.push(function() {
tablet_slots.push( googletag.defineSlot( “/1005424/_dPSv4_tab-all-article-bottom_(300×250)”, [300, 250], “pb-ad-78623” ).addService( googletag.pubads() ) ); } );

googletag.cmd.push(function() {
mobile_slots.push( googletag.defineSlot( “/1005424/_dPSv4_mob-all-article-bottom_(300×250)”, [300, 250], “pb-ad-78158” ).addService( googletag.pubads() ) ); } );

The post 4 Beginner Tips for Creating Dramatic Portraits with One Flash by Lily Sawyer appeared first on Digital Photography School.


Digital Photography School

 
Comments Off on 4 Beginner Tips for Creating Dramatic Portraits with One Flash

Posted in Photography


Plant Patterns: Living Roots Manipulated Into Nature-Based Art

02 Feb

[ By SA Rogers in Art & Sculpture & Craft. ]

plant-root-art

The intricacies of a plant’s secret life beneath the soil, where its roots grow and change almost constantly, become a true work of art when manipulated into specific patterns. Artist Diana Scherer collaborated with biologists and ecologists at Radboud University in Nijmegen, The Netherlands to develop a system that can create the same kinds of spirals and other motifs found in traditional woven textiles.

plant-root-art-2

Subterranean templates act like molds as the root systems expand, channeling them in certain ways to form thick mats, almost like living fabric. As the roots grow, they curl and braid around themselves, becoming stronger and reinforcing the patterns.

plant-root-art-3

plant-root-art-4

“In my work I explore the relationship man has with his natural environment and his desire to control nature,” says Scherer. “For the past few years my fascination has mainly been focused on the dynamics of below ground plant parts. I’ve been captivated by the root system, with its hidden, underground processes; it is considered to be the brain of the plant by plant neurobiologists.”

plant-root-art-5

“Charles Darwin was the first to watch the behavior of the plant roots. In his book The Power of Movements of Plants, he describes how roots do not passively grow down, but move and observe. A root navigates, knows what’s up and down, observes gravity and localizes moisture and chemicals. Darwin discovered that plants are a lot more intelligent than everybody thought. For contemporary botanists, this buried matter is still a wondrous land. There is a global investigation to discover this hidden world. I also want to explore it and apply the ‘intelligence’ of plants in my work.”

Share on Facebook


[ By SA Rogers in Art & Sculpture & Craft. ]

[ WebUrbanist | Archives | Galleries | Privacy | TOS ]


WebUrbanist

 
Comments Off on Plant Patterns: Living Roots Manipulated Into Nature-Based Art

Posted in Creativity


Apple emphasizes iPhone 7 low light capabilities in “One Night” ad campaign

02 Feb

$ (document).ready(function() { SampleGalleryV2({“containerId”:”embeddedSampleGallery_7980537670″,”galleryId”:”7980537670″,”isEmbeddedWidget”:true,”standalone”:false,”selectedImageIndex”:0,”startInCommentsView”:false,”isMobile”:false}) });

Apple’s ‘Shot on iPhone’ ads have been a familiar sight on billboards and on TV for quite some time now. For the latest round of advertising Apple is now focusing on the iPhone 7’s low light capabilities. The campaign’s title is ‘One Night,’ because all images were taken by a group of photographers around the world on the night of November 5th, 2016.

The group captured life around them from dusk to dawn, only using the iPhone’s camera. Like most smartphone cameras, with its small image sensor the mobile device has a distinct disadvantage compared to DSLRs and other system cameras in low light, but with its fast F1.8 aperture, improved optical image stabilization and a clever multi-frame mode, it’s a step into the right direction and a noticeable improvement over the previous iPhone 6 generation. 

You can read and view the samples in our own comprehensive review of the iPhone 7 Plus or view a selection of the campaign images in full size in our gallery above. 

Articles: Digital Photography Review (dpreview.com)

 
Comments Off on Apple emphasizes iPhone 7 low light capabilities in “One Night” ad campaign

Posted in Uncategorized