RSS
 

Archive for February, 2017

Fujifilm XF 23mm F2 R WR sample gallery

16 Feb

Not only does it not often snow in Seattle, it’s not often sunny either. Nor does it often rain babies. Precious babies made by staff members. So when you get a bit of all three, you can bet we’re out there with a camera and lens. A weather resistant one, capable of subject isolation, and to-die-for sunstars no less. Have a look here to see how the weather-resistant, baby-friendly 23mm F2 R WR did paired with the sturdy X-T2, both in indoors and outdoors shots.

Oh, and thank you, Fujifilm color science.

$ (document).ready(function() { SampleGalleryStripV2({“galleryId”:”3541606881″}) })

Sample photoSample photoSample photoSample photoSample photo

See our Fujifilm 23mm F2 R WR sample gallery

Articles: Digital Photography Review (dpreview.com)

 
Comments Off on Fujifilm XF 23mm F2 R WR sample gallery

Posted in Uncategorized


Throwback Thursday: the Nikon D80

16 Feb
Ten megapixels ought to be enough for anybody.

It was ten years ago this past September that Nikon introduced its 10 megapixel, twin-dial D80 DSLR. It was also ten years ago that my dad picked up a shiny new example of one to act as a backup to his workhorse studio camera, the D200. I didn’t really know all that much about photography at the time, but that didn’t stop me from drooling over it.

Apart from the increase in resolution, the D80 was otherwise a significant step up from the D70S that it effectively replaced. It offered a smaller, lighter body, bigger and brighter viewfinder, larger rear screen and an all-new autofocus system borrowed from the D200. Unfortunately, it lost out on the CCD electronic shutter option from the D70S, and the flash sync speed dropped from 1/500 sec to 1/250 sec.

After finally getting my hands on one, the D80 quickly became my constant companion, accompanying me on a six week trip to Nepal in 2010. I wish I had brought a faster lens, though. Nikon AF-S 18-135mm F3.5-5.6. ISO 1600, 1/15 sec, F3.5. Photo by Carey Rose

Years later, my dad found himself with a D300, and I found myself borrowing the D80 for the beginning photojournalism class I’d signed up for. I never gave it back. He has since forgiven me for that.

The D80 was a near-perfect camera to really get into photography with. The twin dials made it exceptionally easy to control, it was built well, and in good light, took great images. But as I saw my friends around me graduating to new D700’s, 5D Mark II’s and even D90’s, my little D80 began to feel a bit inadequate. Since I was basically living off of student loans at the time, I had a hard time justifying any upgrade.

I still see people raving about the color and tonality of older CCD sensors, and in good light, the D80 did well in this regard even at moderately high ISO values. Shame about the (very) clipped highlights, though. Nikon AF-D 80-200mm F2.8 ‘push-pull.’ ISO 800, 1/320 sec, F4. Photo by Carey Rose

As a photojournalism student in northern Washington state in the winter time, there wasn’t an abundance of great light…or any light…during much of my time shooting for school publications. So, while the D80 could reach ISO 3200, it was so noisy that it up being a setting that I reserved for dire emergencies only.

The D80 could also shoot continuously at 3 fps, which more than respectable when it arrived in 2006, but by the time I began shooting more seriously in 2010, newer models, such as the D7000, had arrived that could shoot at double that speed (to say nothing of existing D300 and D200 models).

The concert venues in Bellingham didn’t always have the best lighting, either. Through some strange process, the EXIF doesn’t show the ISO, but I’d be willing to bet I was bumping up to 3200 here. Nikon AF-D 80-200mm F2.8 ‘push pull.’ ISO 1600-3200, 1/100 sec, F2.8. Photo by Carey Rose

Okay, so these days the D80 doesn’t really hold up as an ideal action or low light camera. That said, working around these limitations proved educational to some degree – instead of firing away at 8 fps during a basketball game, I would do my best to anticipate peak action and capture it with one or two quick frames. Without any stabilized lenses or in-body stabilization, I really had to work on my shooting technique to take sharp shots with slower shutter speeds.

Looking back through a handful of images from my early photographic days with the D80 reminded me of something that I too often forget, especially in my current career. While it’s true that in many situations a nicer, newer camera would have made certain photographs easier for me to get, the D80 wasn’t really the limiting factor. I was.

The D80 was even there for when I photographed my first wedding. Nikon AF-D 80-200mm F2.8 ‘push pull.’ ISO 400, 1/1600 sec, F2.8. Photo by Carey Rose

I don’t really need the D80 these days to be honest, but I hold onto it as a fun camera to go out with every so often. And as with so many of these older APS-C DSLRs, it can be had at an absolute bargain these days if you’re chiefly concerned with just taking pictures instead of examining a spec sheet. The D80 is still a highly capable camera for beginners and advanced users alike.

What was the first camera you acquired when you got ‘serious’ about photography? Let us know in the comments!

Read our full Nikon D80 Review

If you’re okay carrying a medium-sized DSLR, the D80 still makes for a great, low-investment travel camera. Nikon AF-S 35mm F1.8G DX. ISO 100, 1/1600 sec, F2.8. Photo by Carey Rose

Nikon D80 review sample gallery

$ (document).ready(function() { SampleGalleryV2({“containerId”:”embeddedSampleGallery_0484646418″,”galleryId”:”0484646418″,”isEmbeddedWidget”:true,”standalone”:false,”selectedImageIndex”:0,”startInCommentsView”:false,”isMobile”:false}) });
Articles: Digital Photography Review (dpreview.com)

 
Comments Off on Throwback Thursday: the Nikon D80

Posted in Uncategorized


Extremely dramatic video touts Canon’s CMOS technology

16 Feb

No doubt, Canon’s CMOS sensors are capable of capturing some amazing low light video footage. And it’s true that Canon cameras can create usable footage in literal darkness. But this new video from Canon… maybe takes it all a bit too seriously. Here’s a glance at what the script (probably) looks like:

[Title: Moonbow / a rainbow born of moonlight]

[Scene opens with a dramatic time-lapse sunset over a mountain. Cue the strings.]

[Narrator, in very Movie Trailer Guy voice]: Have you ever seen a rainbow… in the light of the moon?

That’s just the first ten seconds. Do yourself a favor and watch the full 4+ minutes to enjoy the full effect of the soaring music, dramatic CGI models and lines like ‘By uncovering an unseen world, Canon CMOS sensors contribute to the creation of a prosperous society.’

In all seriousness, the CMOS technology Canon references does push the envelop for extreme low light shooters. Take a look at how one filmmaker uses the ME20F-SH to record video of a meteor shower.

Articles: Digital Photography Review (dpreview.com)

 
Comments Off on Extremely dramatic video touts Canon’s CMOS technology

Posted in Uncategorized


6 Tips for Shooting Long Exposure Night Photographs

16 Feb

In this article I am going to share with you six tips that I have found to produce amazing long exposure night photographs. I have learned the hard way by making every mistake possible and through that finding what really does work.

So here are the 6 tips to make your long exposure photographs at night:

6 Tips for Shooting Long Exposures at Night

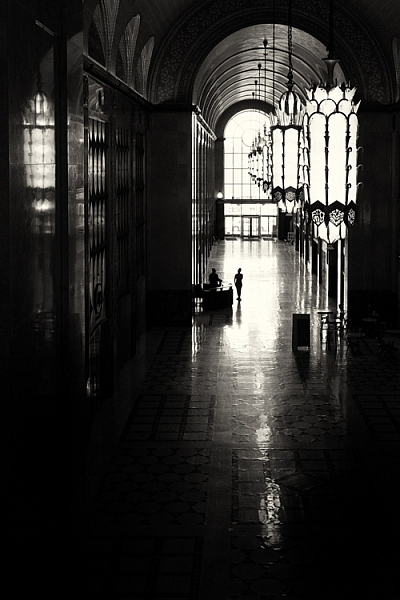
Tip #1: Try to avoid using a Neutral Density filter

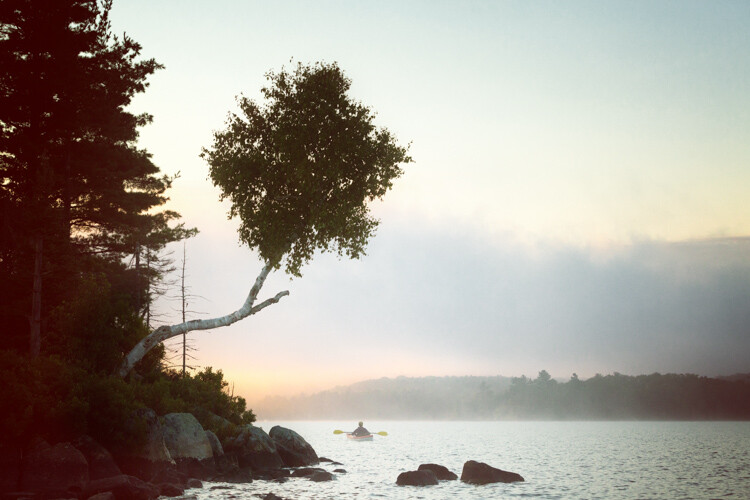
On this photo (below) I did a 25 second exposure. That is quite a long exposure and to help prevent it from blowing out, I took the photo right at the end of sunset. There was less light, so that I didn’t have to put an ND Filter on.

6 Tips for Shooting Long Exposures at Night

If you put an ND filter on it is going to give you a color cast during long exposures. Yes you can use a polarizer, but avoid Neutral Density filters. Shoot when the sun is going down and keep your camera at a low ISO like 100 or 200. Don’t get me wrong, I love ND filters but not at night.

Tip #2: The best time for long exposures is 25 seconds

I know that’s a bold statement. Not as bold as stating that French food is the best in the world, but still a bold statement. Here is why I recommend this; I’ve found that when I shoot at 25 seconds it makes the water silky and the clouds stretchy and this has a beautiful look that sells well. Obviously it’s also an artistic choice, but as a photographer you likely want people to buy your photos. The best indicator that people like your photos is that they buy them.

Here is an example:

6 Tips for Shooting Long Exposures at Night

First I started with a 6 second exposure.

Now, in taking the photo I exposed the image for the highlights. So when you open up the shadows, bring down the highlights, and boost the exposure a little bit like so:

6 Tips for Shooting Long Exposure Night Photographs

I do have all the details of the photo, but the only problem is that the clouds were not moving and the water is not silky.

6 Tips for Shooting Long Exposure Night Photographs

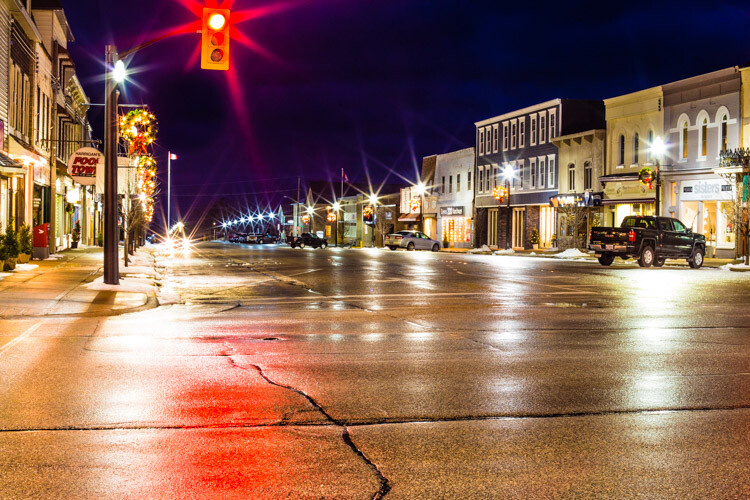
So I went ahead and put the exposure time to 25 seconds. Now it does seem like the highlights in the photos are a little burnt, but I have found that on city lights it doesn’t really matter that much because it still works great on a print.

To conclude; 25 seconds is the best long exposure, you don’t even need a remote, you just need to put your camera on the 2-second timer and go into manual shooting mode, use a low ISO, and an aperture that is going to work like f/7 or f/8.

If your photo is too bright you can adjust the aperture to f/14 and if it is too dark you can even put your aperture to f/4. Just make sure you check your focus to ensure the background is sharp.

Tip #3: Try different exposures of the same scene

Even though I said that 25 seconds exposure is the best, it’s always good to shoot different exposures because this may be different for your situation. For example, I thought that this first image was my go-to photo.

6 Tips for Shooting Long Exposure Night Photographs

But in the end the one that I am going to retouch and going to send to the gallery is this one.

6 Tips for Shooting Long Exposure Night Photographs

So you already have your camera setup and on a tripod. Go ahead and try 8 seconds, 15 seconds, 25 seconds all without touching the tripod and then when you are evaluating your photos for retouching you will have several options.

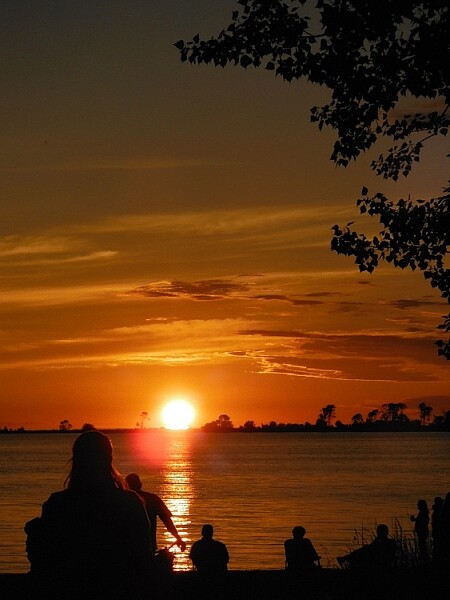
Tip #4: Shoot towards the sun

When you are doing a long exposure without an ND filter (so as to avoid the color cast, tip #1), a good thing to do is to shoot toward the sun. When it is behind the horizon line it will always give you a nice sky with lots of color and gradations.

You can see on this photo that the sun is setting on the left.

6 Tips for Shooting Long Exposure Night Photographs

And as I turn the camera more away from the sun and back towards the city you get this view.

6 Tips for Shooting Long Exposure Night Photographs

You can see that we get less and less details in the sky. But if you shoot where the sun sets you will always have great details even after sunset, and it is the right time for these type of photos.

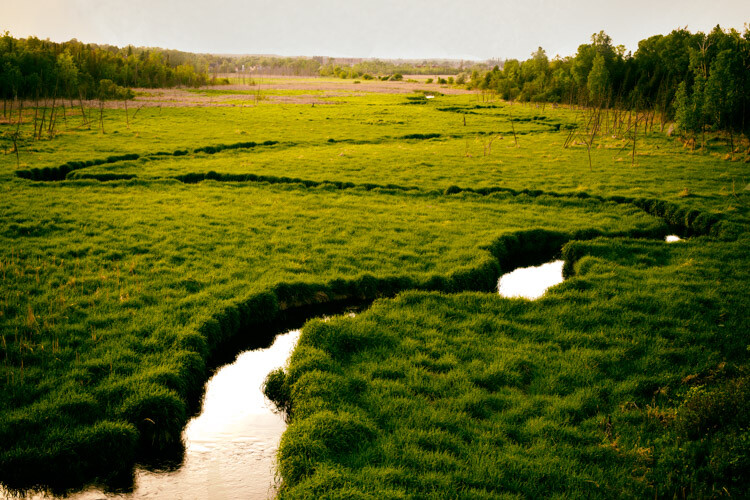
Tip #5: Make sure you have water and the sky in your photo

Those are two important things for a long exposure which help to really elevate your photos into what I like to call miracle photos.

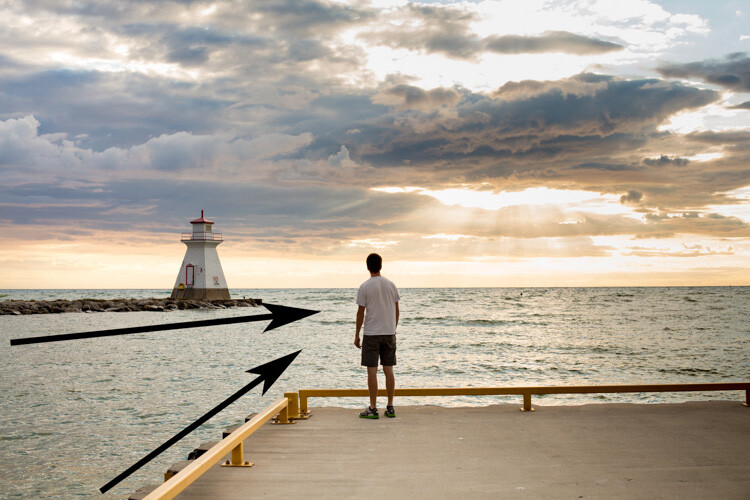
Tip #6: Try to get the clouds coming towards you

You can study meteorological information to get a sense of which direction the clouds are moving and try to position your shot accordingly. There are even a few apps which great for this.

As I said, this is not always easy but I got lucky on this one. The clouds are going to be stretchy and create leading lines and that help make this photo really interesting.

6 Tips for Shooting Long Exposure Night Photographs

I hope this helped you and you will be able to capture beautiful places at the perfect time. Please share your long exposure night photos in the comments below.

** NOTE ** If you’d like to know more about this subject, learn more about my brand new course on night photography here, so you can take stunning night photos too!

googletag.cmd.push(function() {
tablet_slots.push( googletag.defineSlot( “/1005424/_dPSv4_tab-all-article-bottom_(300×250)”, [300, 250], “pb-ad-78623” ).addService( googletag.pubads() ) ); } );

googletag.cmd.push(function() {
mobile_slots.push( googletag.defineSlot( “/1005424/_dPSv4_mob-all-article-bottom_(300×250)”, [300, 250], “pb-ad-78158” ).addService( googletag.pubads() ) ); } );

The post 6 Tips for Shooting Long Exposure Night Photographs by Serge Ramelli appeared first on Digital Photography School.


Digital Photography School

 
Comments Off on 6 Tips for Shooting Long Exposure Night Photographs

Posted in Photography


5 Simple Techniques for Leading the Viewer’s Eye in Your Images

16 Feb

As photographers, it’s easy for us to make conscious composition choices that allow us to balance our photographs or to create harmony within them. It’s is more difficult however to try and lead viewers through your photographs. We rarely consider how to influence the viewers of our photographs. When composing images, we don’t think about the different elements in our images and the order by which we want viewers to see those elements.

This is a common tactic in classic painting, but not used readily by photographers. The reality is it’s hard to influence viewers and to dictate the ways in which they view our photographs.

The lines of the creek lead the viewer’s eye through and into the image.

In many cases, the subject matter we are shooting just happens too fast for us to consciously compose images with the intention of leading the viewer through our photographs. It’s much easier to lead the eye through images we construct like still life or landscape photos. In the case of sports photography, this would only happen by sheer luck or happy accident. But when you have the opportunity, think about using techniques that lead viewers to specific parts of your images.

#1 – Use a brightness gradient

One of my favorite techniques for leading the eye is to use a brightness gradient. The human eye is drawn to the brighter elements, and if you position an area of brightness within your image, the eye will be drawn to that location.

It is important, however, to remember that the key to this technique is to use a gradient of brightness. Small bright areas amidst darker tones will not achieve the same kind of effect. The idea is to make the progression of highlights subtle, like a path through your image. Of course, this technique will not be possible in all situations but if it’s available considering using this method.

5 Simple Techniques for Leading the Viewer's Eye in Your Images

Shot from a kayak during sunrise I wasn’t intending to shoot this image with a brightness gradient. Instead, it’s a happy accident.

#2 – Linear perspective

When using a wide angle lens, you can consciously create linear perspective within images. This technique might be one of the more easily attainable methods of leading the eye. The wide angle lens will exaggerate lines and lead the eye fairly directly through the photograph. You can compose your photographs in such a way that buildings or other architectural features draw viewers through your photograph.

5 Simple Techniques for Leading the Viewer's Eye in Your Images

The line of lights and the line of buildings lead the eye through the photo. The viewer should be stopped by the bright spots of light within the image but then continue on through the rest of the photograph.

I’ve added some arrows to this image so you can see how the lines of the pier point the viewer into the photograph. The teenager in the image is a second way of directing the eye as he stops to view the sunset.


#3 – Use shafts of light

Using shafts of light is another technique for pointing viewers in the right direction. The conditions are very specific, and shafts of light are not always readily available, but they can be a useful tool for pointing out specific directions or objects within a photograph.

The photograph below was taken by my son. His plan when composing was to have the ray of light point towards the people. I must admit I didn’t think of composing in such a manner and when I asked him later he said it was “the natural choice”. Since that time I’ve made conscious decisions to look for and incorporate rays of light into my images.

5 Simple Techniques for Leading the Viewer's Eye in Your Images

There’s a fairly strong lens flare in this image but my son made a conscious choice in how he composed his photograph and I’m proud of him for his decisions.

#4 – Use a blur gradient

Using a blur gradient (shallow depth of field) is another method of leading the eye. I will admit that I don’t use this technique much. I even struggled to find images to use as examples for the article. Part of my reasoning is that I hope I will now be forced to experiment more with this technique.

Using a focus gradient can lead the eye to the important elements of the photograph. Setting up a shot in which the foreground is blurred and slowly recedes through the image to the point of sharp focus will draw viewers to specific objects within the frame.

I used a fairly large aperture here and while the blur gradient isn’t as obvious it is still present in the image.

#5 – Use more than one technique

You can also combine these techniques to help influence eye movement throughout your images. In these two images, the eye moves through the image the light gradient is the most obvious technique but lines of architecture within the building help to draw the viewer down the tunnel. The lights hanging at the top of the image are an obvious line that directs the eye.

Similarly, this image of the couple walking through the image adds to the movement within the photograph. The lines of the path reinforce the direction the viewer should take within the image.

Shot at a provincial park this image combines elements like linear perspective and vectors.

Conclusion

Leading the eye through a photograph is not an exact science. You can’t force viewers to follow the path you set for them. Each person approaches the artwork in different ways. If your use some of the techniques outlined here, it will help you to create compelling compositions. The more thought and purpose we put into creating our images the better they will be. While there may not always be time to use these techniques, it’s always handy to keep them in the back of your mind and use them when the time is right.

The more thought and purpose you put into creating your images the better they will be. While there may not always be time to use these techniques, it’s handy to keep them in the back of your mind and use them when the time is right.

The eye-leading techniques used in this image are a little harder to spot. I used the lines of the barrels and rays of light to direct the viewer’s eye into the center of the image.

googletag.cmd.push(function() {
tablet_slots.push( googletag.defineSlot( “/1005424/_dPSv4_tab-all-article-bottom_(300×250)”, [300, 250], “pb-ad-78623” ).addService( googletag.pubads() ) ); } );

googletag.cmd.push(function() {
mobile_slots.push( googletag.defineSlot( “/1005424/_dPSv4_mob-all-article-bottom_(300×250)”, [300, 250], “pb-ad-78158” ).addService( googletag.pubads() ) ); } );

The post 5 Simple Techniques for Leading the Viewer’s Eye in Your Images by Erin Fitzgibbon appeared first on Digital Photography School.


Digital Photography School

 
Comments Off on 5 Simple Techniques for Leading the Viewer’s Eye in Your Images

Posted in Photography


The People’s Fridge: Free Excess Food for Anyone Who Needs It

16 Feb

[ By SA Rogers in Destinations & Sights & Travel. ]

people's fridge

Considering that the United Kingdom leads the European Union in food waste at over 15 million tons per year, spreading the concept of free community refrigerators could make a huge impact. Households in the UK toss out an average of 24 edible meals every month, and those figures are even worse in the United States, where about 40 percent of all food goes to waste. One project in London aims to prove just how powerful diverting that waste could be with ‘The People’s Fridge,’ where anyone can donate food or take what they need.

people's fridge 2

Located in Brixton, South London and open to the public, The People’s Fridge is run by a group of volunteers aiming to help tackle food poverty and cut food waste all at once. The crowdfunded project joins similar campaigns launched in Spain, Germany and India as well as other cities in the UK.

The folks running the project have a few simple rules to keep things fresh and manageable: offer prepared and cooked foods from certified businesses only as well as fruits, vegetables, bread and unopened packaged foods. Homemade foods, raw meat and seafood and opened milk are not allowed to prevent issues with spoilage and ensure that all ingredients are known.

So far, photos of the fridge on the project’s Twitter show the shelves brimming with fresh produce, beverages, sandwiches, cake and other treats. Employees at Pop Brixton, the venue where the fridge is located, clean and organize the contents daily.

“We want more people to be talking about cutting food waste!” says Olivia Haughton, a member of The People’s Fridge team. “In the process of saving food from the bin we provide a source of fresh food for anyone who needs it. The fridge works really simply. People with food to donate can bring it at any time during the day. All they have to do is fill in a quick register of what they’re donating and when, then anyone can come and help themselves. There is no policing of who benefits from the fridge, all we ask is that people don’t take food if they suffer from any food allergies and that they sign the food out of the fridge when they take it.”

Share on Facebook


[ By SA Rogers in Destinations & Sights & Travel. ]

[ WebUrbanist | Archives | Galleries | Privacy | TOS ]


WebUrbanist

 
Comments Off on The People’s Fridge: Free Excess Food for Anyone Who Needs It

Posted in Creativity


Fancy is a pocketable smartphone gimbal

16 Feb

Smartphone stabilizers are a great tool for capturing professional-looking video footage on your mobile device and are getting more powerful with every new generation. However, most current models have one thing in common: they are not really pocketable, making them more of a dedicated tool for serious video shooters rather than an everyday item for the average consumer. 

The Fancy Stabilizer is now out to change this. It is an electronic smartphone gimbal that takes up less space than the smartphone it is attached to. The makers of the Fancy, Chinese company Wewow, is currently running an Indiegogo campaign to fund the production of the device and claims it is the currently smallest and lightest smartphone gimbal on the market.

With just 43.5mm (1.7 in) wide, about 118mm (4.4 in) tall and 23mm (0.9 in) thick in its folded state, the Fancy Stabilizer easily fits in any small bag or even jacket pocket when not in use. It weighs just 180 grams. The phone is attached via an adjustable clip and an electronic stabilization system keeps your smartphone steady while walking or otherwise moving. Thanks to a standard tripod mount the device can also be attached to selfie sticks or most other types of camera support. 

In addition, Fancy comes with a LED light for added illumination and a small selfie mirror on the back. The built-in battery provides energy for eight hours of stabilization or alternatively can charge your smartphone. If this all sounds interesting to you, you can now reserve a Fancy Stabilizer for $ 89 on Indiegogo. The retail price is expected to be $ 128.

Articles: Digital Photography Review (dpreview.com)

 
Comments Off on Fancy is a pocketable smartphone gimbal

Posted in Uncategorized


Canon EOS-1D X Mark II firmware updated to version 1.1.3

16 Feb

Canon has released firmware version 1.1.3 for the Canon EOS-1D X Mark II DSLR. The latest firmware version is a relatively small update, bringing a bug fix that corrects an issue displaying the drive mode icon, as well as improving USB communication reliability with a function in EOS Utility 3 and increasing the maximum ‘release cycles’ number displayed in the ‘Camera system information’ menu.

The latest firmware is available to download for macOS and Windows via Canon’s support website.  The full change log is below.

Changes in the Firmware

Firmware Version 1.1.3 incorporates the following improvements to enhance functions.

  • Corrects a phenomenon in which the drive mode icon is not correctly displayed when using custom shooting modes (C1/C2/C3).
  • Changes the maximum number of “Release cycles” displayed from 1,000,000 cycles to 9,999,000 cycles. This value can be checked under the “Camera system information” menu.
  • Improves the reliability of communication via USB cable when using the Lens Data Registration function within EOS Utility 3 software.

The Version 1.1.3 firmware being released at this time is for cameras with Firmware Version 1.1.2 or earlier. If the camera’s firmware is already Version 1.1.3, it is not necessary to update the firmware.

When updating the firmware of your camera, please first go over the instructions thoroughly before you download the firmware. The firmware update takes approximately six minutes.

Note:

  • (1) Once the EOS-1D X Mark II is updated to Version 1.1.2 (or later), it cannot be restored to a previous firmware version (Version 1.0.0 to 1.0.2).
  • (2) Camera settings files created using a camera running Firmware Version 1.0.2 (or earlier) cannot be used on a camera running Firmware Version 1.1.2 (or later).
  • (3) Please use the latest EOS Utility version with the EOS-1D X Mark II after the camera has been updated to Firmware Version 1.1.2 (or later). The latest version of EOS Utility can be downloaded from Canon’s Web site.
  • (4) Accompanying functional improvements of Firmware Version 1.1.2 (or later), the instructional manual has been revised. The latest version of the instruction manual can be downloaded from Canon’s Web site, so please download the instruction manual together with the new firmware.

Via: Canon Rumors

Articles: Digital Photography Review (dpreview.com)

 
Comments Off on Canon EOS-1D X Mark II firmware updated to version 1.1.3

Posted in Uncategorized


Leica tweaks handling of its new M10 with firmware 1.3.4.0

16 Feb

Leica has introduced new firmware for its latest M series digital rangefinder that aims to improve a number of aspects of the camera’s handling and operation. Firmware version 1.3.4.0 is said to reduce the duration of the black-out time between frames when using the M10 in Live View mode so the camera is ready to shoot again more quickly.

The new firmware also makes scrolling through the menu system quicker as users can now press the Menu button again to shift from page to page. The Favourites Menu has been expanded by one item to allow up to 15 oft-used features to sit there, and this menu will now divided into two pages when more than seven items are consigned to it.

Photographers making use of the optional Visoflex EVF can now have the camera automatically preview just-captured images there instead of only on the rear screen, and the battery and SD card status bars are now color-coded – from green to yellow to red – to give users an idea of remaining capacity.

For more information see the Leica website and the support download section.

Press release

Firmware update now available for the Leica M10

Leica Camera has released a firmware update for the Leica M10, downloadable from the Leica web site from today.

Firmware version 1.3.4.0 adds numerous improvements to the camera’s handling. These include optimised colour-coding of the status bar for SD memory cards and battery level, which now change from green to yellow to red as the battery charge level reduces or the card becomes full.

The ‘Favourites Menu’ has also been revised: up to 15 menu entries can now be created and a second Favourites page opens after adding more than seven entries. Furthermore, with this update, M10 owners have even faster access to the main menu – it can now be opened by pressing the Menu button in the Favourites Menu. The same button can also be used for page-by-page scrolling.

An additional new feature enables the selection of the target display for automatic review on the monitor screen. The menu entry now offers the alternatives ‘Auto’, ‘EVF’ or ‘Display’ as target options, while ‘Edit Favourites’ allows the activation of direct access to ‘M-ISO’ as a Favourites Menu item. The firmware update also brings a further significant reduction in the lag (dark screen) between exposure and display when taking pictures in Live View mode.

Articles: Digital Photography Review (dpreview.com)

 
Comments Off on Leica tweaks handling of its new M10 with firmware 1.3.4.0

Posted in Uncategorized


Worlds Under Glass: 33 Miniature Cities & Architectural Sculptures

16 Feb

[ By SA Rogers in Art & Sculpture & Craft. ]

thomas doyle 7

Sheltered by glass vessels like tiny self-contained biomes, these miniature buildings and cities seem to have their own atmospheres and variable gravity, with houses teetering on the edges of cliffs or springing out of clouds in the sky. Artists craft small-scale structures from balsa wood, paper, cardboard and other materials and house them under domes, bottles, teapots and Victorian terrariums.

Balsa Wood Architecture by Vera van Wolferen

wolferen 1

wolferen 2

wolferen 3

wolferen 4

Often incorporated into animations, Vera van Wolferen’s tiny balsa wood structures can also be structures telling their own stories. A recent series of structures perches tiny dwellings on stilts or stretches them several stories into the ‘sky’ beneath a glass dome, often emerging from cotton ‘clouds.’

Paper Cities by Ayumi Shibata

ayumi shibata 1

ayumi shibata 2

ayumi shibata 3

ayumi shibata 4

Slivers of two-dimensional cities and landscapes curl around each other within glass vessels in rosebud-like arrangements or stack up into faux hillsides to create a three-dimensional whole in these works by Ayumi Shibata. The artist uses traditional Japanese paper cutting techniques, noting that the Japanese word for ‘paper’ is ‘Kami,’ which can also mean ‘god,’ ‘spirit’ or ‘divinity.’

“Kami move freely beyond time, universe and places, appearing during events, as well as in our houses and our bodies,” she says. “These spirits also dwell in paper. In the religion of Shinto, white paper is considered a sacred material.”

Micro Matter by Rosa de Jong

rosa de jong 1

rosa de jong 2

rosa de jong 3

rosa de jong 4

rosa de jong 5

rosa de jong 6

Enclosed within glass domes or test tubes, Rosa de Jong’s ‘Micro Matter’ sculptures bring unfathomably small worlds to life, each one seemingly floating in its own low-gravity atmosphere. The works often feature dilapidated homes, farm buildings, mines and construction sites, exploring the ways in which built environments interact with nature. The sculptures are created in a way that’s similar to building a ship in a bottle, snugly inserting the pieces to fit their vessels just right.

Next Page – Click Below to Read More:
Worlds Under Glass 33 Miniature Cities Architectural Sculptures

Share on Facebook


[ By SA Rogers in Art & Sculpture & Craft. ]

[ WebUrbanist | Archives | Galleries | Privacy | TOS ]


WebUrbanist

 
Comments Off on Worlds Under Glass: 33 Miniature Cities & Architectural Sculptures

Posted in Creativity