RSS
 

Archive for November, 2016

VLC 3.0 technical preview launches with 360 video and photo support

29 Nov

VideoLan has launched VLC 360, a new version of the media player that supports 360-degree videos and images. The current release is a technical preview; all of its features are slated for inclusion with the final VLC 3.0 release across all platforms. VLC 360 Technical Preview is currently only available for macOS 10.10 or later and Windows 7 or later.

VideoLan teamed up with Giroptic to introduce these new features, which include the ability to play 360-degree video and photos, display 360 content with ‘Zoom,’ ‘Little Planet,’ and ‘Reverse Little Planet’ modes, and control content using both a mouse and keyboard. Future mobile versions of VLC with 360 will also support control using a phone’s built-in sensors.

VLC’s makers plan to release future versions of its software with 360-degree features for Xbox One, iOS, and Android. As well, VideoLan says the media player ‘will probably support’ virtual reality headsets like the Oculus Rift and Google Daydream View starting next year. VideoLan is also working on 3D audio playback support.

Via: VideoLan

Articles: Digital Photography Review (dpreview.com)

 
Comments Off on VLC 3.0 technical preview launches with 360 video and photo support

Posted in Uncategorized


RNI’s Colibri app gives your digital images a slide-film look

29 Nov

If you think your smartphone photos and other digital images look a little bland straight out of camera, you now have one more app at your disposal to give them more of a film-like appearance. London-based app maker RNI has launched its new Colibri app. Colibri is essentially an image filter app for the iPhone, albeit a slightly special one. The filter algorithms behind the app use machine learning and its makers say Colibri has been fed some of the ‘finest slide film scans’ to create its range of filter options. 

Colobri’s ‘more color, less editing’ tagline indicates that the app is not meant to be an all-purpose editor but instead puts a focus on enhancing the image’s color and tonal properties to simulate a slide-film look. That said, there are cropping and rotation tools available and you can adjust the intensity of your filters, brightness and contrast using a range of sliders.

Of course it’s all a matter of taste, but some the image samples on the RNI website look quite promising. So, if you like this type of effect, Colibri might be well worth its download price of $ 1. If you like this type of film simulation apps but would prefer a little bit more control over the conversion process, you could also have a look at the Filmborn app we reported on recently.  

Articles: Digital Photography Review (dpreview.com)

 
Comments Off on RNI’s Colibri app gives your digital images a slide-film look

Posted in Uncategorized


How to Be Invisible: 15 Anti-Surveillance Gadgets & Wearables

29 Nov

[ By SA Rogers in Gadgets & Geekery & Technology. ]

anti-surveillance-prosthetic-mask-2

We don’t have to wait for a dystopian future in which our faces are scanned as we walk down the sidewalk and our every movement is logged – we willingly carry personally identifiable tracking devices in our pockets everywhere we go, and cameras are everywhere. What’s the average law-abiding citizen concerned with privacy to do, let alone activists and protesters seeking to exercise their constitutional rights? These wearable counter-surveillance designs, including drone-evading cloaks, signal-blocking phone cases and fingerprint spoofers aim to provide us with privacy-preserving tools in the age of Big Brother.

Edward Snowden’s ‘Snitch’ iPhone Case & The Tunnel Case

anti-surveillance-phone-case-edward-snowden

anti-surveillance-phone-case

Designed by the infamous whistleblower Edward Snowden himself, who knows a thing or two about the NSA, this modified iPhone 6 case features a screen that monitors when an iPhone is transmitting, covers the rear camera and triggers alerts when the phone is transiting data via radio signals that can make a user detectable.

“If you have a phone in your pocket that’s turned on, a long-lived record of your movements has been created,” Snowden explained while presenting the case at MIT’s Media Lab via video connection from Russia. “As a result of the way the cell network functions your device is constantly shouting into the air by means of radio signals a unique identity that validates you to the phone company. And this unique identity is not only saved by that phone company, but it can also be observed as it travels over the air by independent, even more dangerous third parties.”

A lower tech option with similar albeit less robust features, called the Tunnel case, provides similar benefits and is available now, unlike Snowden’s concept. It’s a signal-jamming copper-lined sleeve that blocks all electromagnetic frequencies within ten seconds, making you untraceable.

URME Anti-Surveillance Prosthetic Mask

anti-surveillance-prosthetic-mask

anti-surveillance-prosthetic-mask-2

There’s no denying that this 3D-printed resin prosthetic mask is creepy looking – especially the way the wearer’s eyes tend not to line up correctly with the eye holes. But wearing another man’s face can help you slip past biometric scanners without revealing your true identity. Artist Leo Selvaggio has lent us all the use of his visage so facial detection software identifies the wearer as him. The mask is also available in a budget-friendly, printable paper version.

“Our world is becoming increasingly surveilled,” reads the URME website offering the mask. “For example, Chicago has over 25,000 cameras networked to a single facial recognition hub. We don’t believe you should be tracked just because you want to walk outside and you shouldn’t have to hide either. Instead, use one of our products to present an alternative identity when in public.”

Fingerprint-Spoofing Strips

anti-surveillance-fingerprint-spoofing

The IDENTITY kit by Mian Wei is a ‘fingerprint substitute’ you apply to the tips of your fingers like band-aids. Since fingerprints are biological identifiers that we can’t change, they can be used against us, and the rise of consumer devices requiring a fingerprint passcode can put this crucial piece of identity verification at risk. The black prosthetics are made of a mixture of conductive silicone and fibers so you can assign ‘false fingerprints’ to your iPhone and other devices, and so your ‘fingerprint’ can’t be molded and used as a key to your life.

Makeup That Thwarts Facial Detection

anti-surveillance-makeup-1

anti-surveillance-makeup-2

anti-surveillance-makeup-3

For now, facial detection software still isn’t quite advanced enough to recognize human faces that significantly depart from the usual symmetric arrangement of features. That’s where the ‘anti-face’ comes in, a way of altering your appearance via hairstyles and cosmetics to fool computers into thinking they’re looking at something other than a face. The CVDazzle project explores this idea with a series of six style tips for reclaiming privacy, explaining how to foil detection via makeup, obscuring the nose bridge and eyes as well as the elliptical shape of your face, modifying contrast and avoiding symmetry.

Next Page – Click Below to Read More:
How To Be Invisible 15 Anti Surveillance Designs Installations

Share on Facebook


[ By SA Rogers in Gadgets & Geekery & Technology. ]

[ WebUrbanist | Archives | Galleries | Privacy | TOS ]


WebUrbanist

 
Comments Off on How to Be Invisible: 15 Anti-Surveillance Gadgets & Wearables

Posted in Creativity


Review and Field Tests of the new Canon 5D Mark IV – Is it Worth Upgrading?

28 Nov

Canon recently announced the new incarnation of its 5D lineup, the Canon 5D Mark IV. I myself have owned the 5D Classic (Mark I), and I currently own the Mark III. Personally, I don’t have any plans to upgrade as I went another way instead, choosing to shift to the Fuji X-series as they are smaller and lighter for traveling. However, I am eyeing the new X-T2!

For those of you considering an upgrade on your Canon camera body, here are some reviews and field tests I found for the 5D Mark IV. Whether you’re going from an APS-C camera up to full frame, or just looking to upgrade from an older 5D model, do your own testing and decide if it’s the right move for you.

The Camera Store Guys

This store is in Calgary, AB, Canada – a mere four hours drive from my city. Not the place you’d expect world class camera reviews to come from – but these guys really do some great tests, in real-world situations and they produce some great videos that are totally impartial. If they find a flaw or sticky bit, they will tell you about it. I like that.

Let’s see what they had to say about the Canon 5D Mark IV:

Hmmm, interesting! Watch to the end where Chris sums up his thoughts on the 5D Mark IV they may surprise you. He’s very honest about it.

PhotoRec TV – Comparison of three cameras

The Canon 5D Mark IV, 5D Mark III and the Sony A7RII

Toby from PhotoRec TV has some notes for you comparing three different cameras including the 5D Mark IV’s predecessor, and the Sony A7RII full frame camera. He talks about what’s new and improved from the Mark III and how it compares to the Sony.

Dphog discusses the new dual-pixel RAW capability

This is a new introduction by Canon, dual-pixel RAW format. What does that mean? Quoted from Canon’s UK site:

Using the Dual Pixel RAW Optimizer in Digital Photo Professional software, users can make use of the Dual Pixel data recorded with the Dual Pixel RAW image for micro-adjustments of the position of maximum sharpness using the depth information contained within the file.

Is it worth it? Would you use this feature?

Pye from SLR Lounge shot a wedding with the Mark IV

Pye has done quite a few articles for us here on dPS, so you may be familiar with him. He took this camera to a wedding shoot and put it to work. He pushed the limits on it in many areas and tested ISO, dynamic range, the new dual-pixel RAW and some of the great new focus features.

Conclusion

So are you considering buying the Canon 5D Mark IV? If so you can price them out here:

  • On Amazon.com
  • On B&H Photo’s site

I would be remiss if I didn’t mention there have been some reported issues with the 5D Mark IV. So do some research and due diligence if you are thinking about buying this camera.

Have you tried one of these cameras out yet? Give us your thoughts in the comments below.

googletag.cmd.push(function() {
tablet_slots.push( googletag.defineSlot( “/1005424/_dPSv4_tab-all-article-bottom_(300×250)”, [300, 250], “pb-ad-78623” ).addService( googletag.pubads() ) ); } );

googletag.cmd.push(function() {
mobile_slots.push( googletag.defineSlot( “/1005424/_dPSv4_mob-all-article-bottom_(300×250)”, [300, 250], “pb-ad-78158” ).addService( googletag.pubads() ) ); } );

The post Review and Field Tests of the new Canon 5D Mark IV – Is it Worth Upgrading? by Darlene Hildebrandt appeared first on Digital Photography School.


Digital Photography School

 
Comments Off on Review and Field Tests of the new Canon 5D Mark IV – Is it Worth Upgrading?

Posted in Photography


Video: Shooting Dog Portraits with the Sony a6300

28 Nov

Here at DPReview, we love dogs. They’re great. But they’re notoriously hard to photograph. Even the best-trained are unpredictable and fast-moving, and when they’re not running around they’re unable to sit still.

In this video, DPReview’s Sam Spencer takes one of our favorite cameras – the Sony a6300 – to shoot some of our favorite pups. During a busy day of shooting, we gave both the animals and the a6300 a good workout, culminating in a studio portrait session for the lucky dogs at the Motley Zoo animal rescue center, in Seattle.


This is sponsored content, created in partnership with Sony. What does this mean?

Articles: Digital Photography Review (dpreview.com)

 
Comments Off on Video: Shooting Dog Portraits with the Sony a6300

Posted in Uncategorized


How to Use Light Painting to Take Incredible Car Photos

28 Nov

Whether you drive a beat up station wagon from the 80s or a finely tuned Porsche, light painting is an excellent way to photograph your car and truly make it shine! Light painting results in incredibly unique and impressive images. With a bit of persistence and creativity, you can create pictures that look like commercial photoshoots – even without heavy editing.

A photo of a car taken using the light painting style

The reason that a light painted picture looks so incredible is because the light is literally wrapping around the subject. Normally, we see objects lit from only one angle, often the sun, which can get a bit dull at times. In addition, there will be cool reflections on the body of the car that trace the path of your light, giving the shot a highly commercial look.

Getting started

What’s the first step? Clean the car! Light makes every speck of dirt and grime become immediately visible. Unless you are going for a grungy style, you’ll want to make sure the car is squeaky clean.

Since light painting involves leaving the shutter of the camera open for some time, you will need to wait until it is dark outside. If you try light painting during the day, you will get a completely white image as the sensor collects all the sunlight.

Alternatively, if you have room in your garage, you could park your car in there and cover all windows so that there is no ambient light.

Your light source

One of the cool things about light painting is that you don’t need to invest thousands or even hundreds of dollars in equipment to get started. Literally, any light source can be used, whether it is a professional video light or simply a flashlight app on your mobile phone.

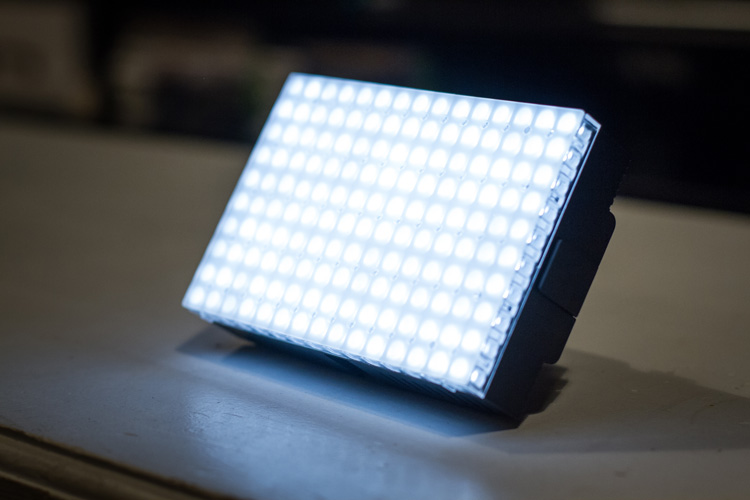
For my example picture, I will be using an LEDGo Portable Video Light, which is a small but powerful light that I can hold in my hand.

video-light-for-light-painting-1

video-light-for-light-painting-2

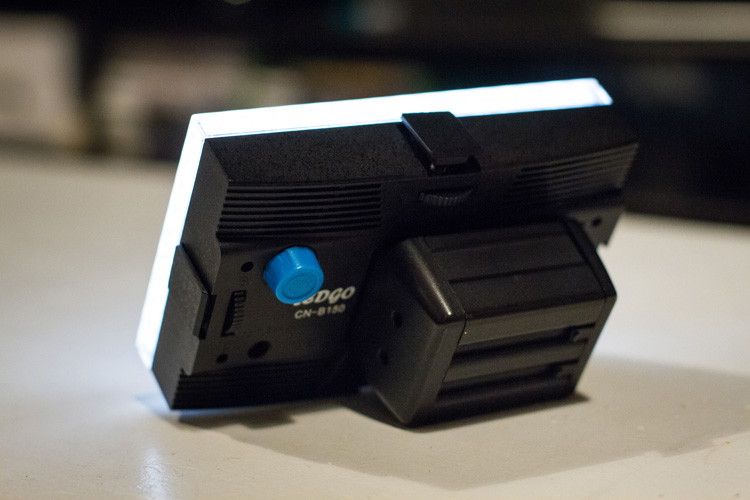
One drawback of this type of light source is that it throws light everywhere, including back at the camera. If possible, you will want to find some way to shield the light so that it is directed only at your subject. Professional light painting lights, like the Westcott Ice Light, have flaps that prevent the light from spilling everywhere.

A light painted car where the light source is visible

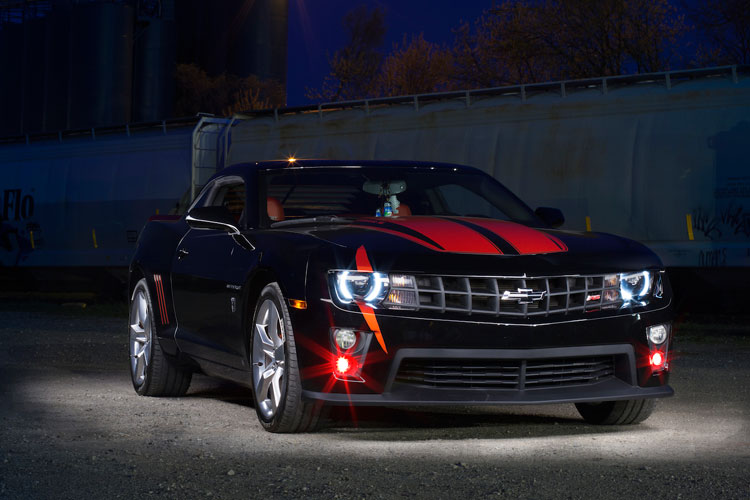
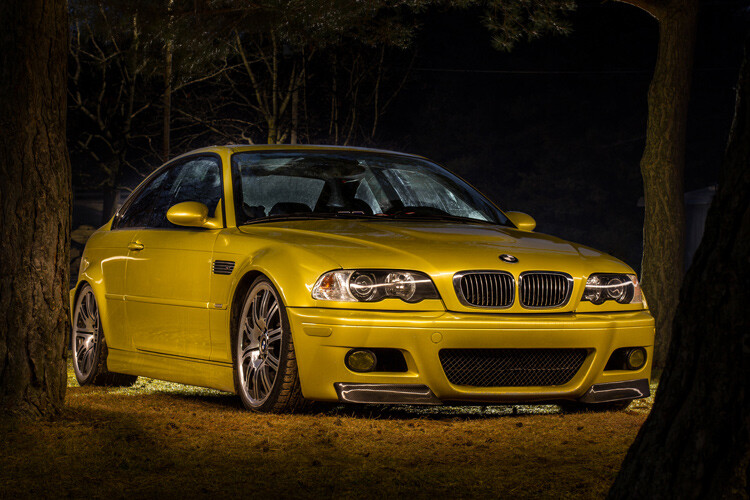
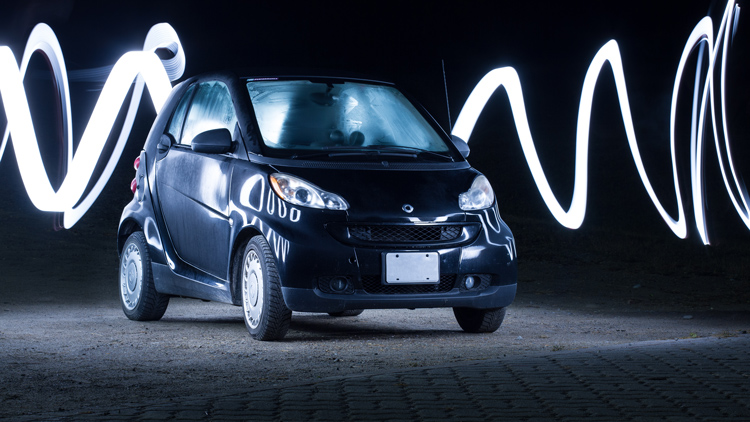
In this example, the light source was seen by the camera, which created a unique halo effect around the car.

A light painted car with the light source not visible in the final image

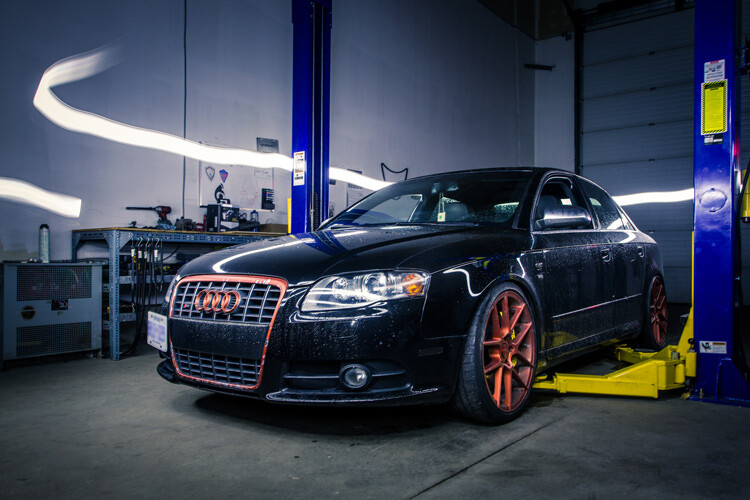
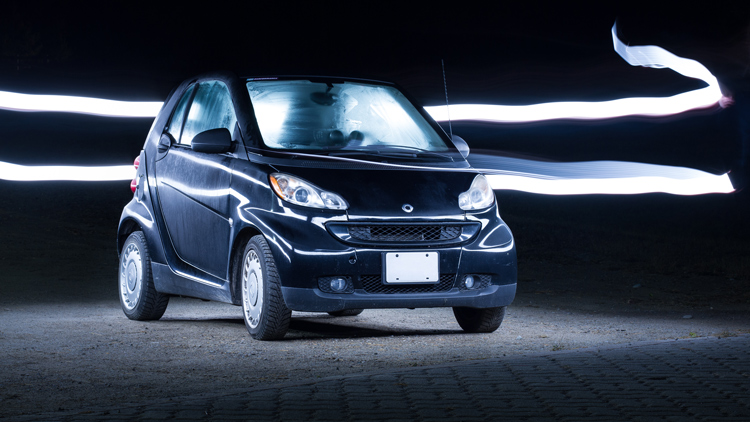
In this image, the light was shielded from the camera and pointed only at the car, so that the light path isn’t visible.

Setting up the shot

Perhaps the most important piece of equipment you will need for light painting is a sturdy tripod. This is because you will be taking a picture that lasts for many seconds. A tripod that shifts over the course of the picture, or that is blown around by wind, will result in some serious frustration and blurry images.

You don’t need a special or expensive lens for light painting – any lens will do! When you are setting up your tripod, remember how zoom influences a picture. Shooting from close with a wide angle lens will make the car look fatter. Shooting from a distance with a bit of zoom will lessen the distortion.

Behind the scenes of light painting car photography

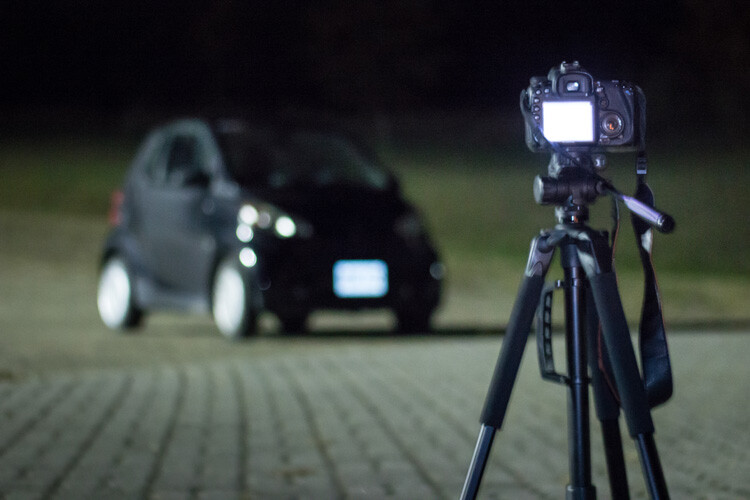
Behind the scenes of the setup. There is some light filtering in from the left from a streetlight, but I can use my camera settings to reduce the effect of that ambient light.

Exposure settings

The first goal will be to get a base exposure. This requires that you go full manual on the settings. If you leave the camera on auto, it will try to compensate for the low light and may pop up the flash.

To make an image with a black background like the one in my example, you will want your base exposure to be very dark. If you want more of the surroundings to be visible, you can make your base exposure lighter. Be aware, however, that will mean that you are more likely to show up in the final image as you walk around the car with your light.

  1. First, select a low ISO so the sensor doesn’t collect much light from the surrounding area. As an added benefit, using a low ISO will also result in a very high-quality image.
  2. Next, you will want to choose a fairly narrow aperture. This will keep a large portion of the image in focus. It will also help to make the image darker, as needed.
  3. Last, choose a shutter speed that gives you a bit of time to paint the car. For my purpose, I chose 25 seconds.

As you can see below, this base image is nearly completely dark. This is perfect. Now the final image will only be what I paint with my light.

The base exposure for a light painting car image

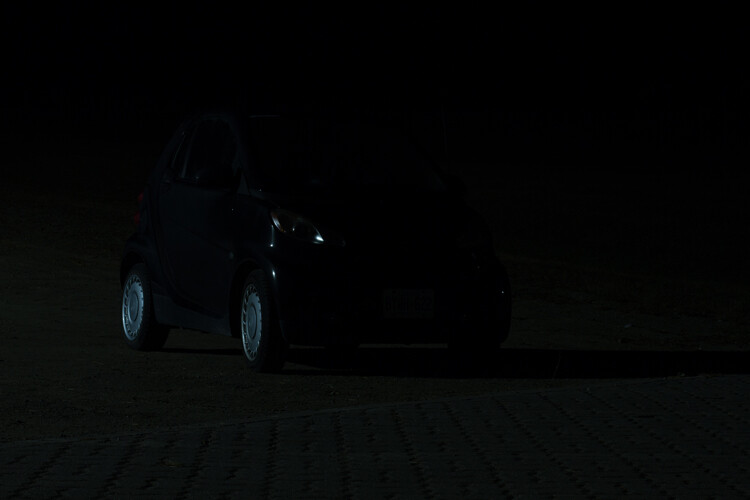
The base exposure for my image was ISO 100, f/9, 25 seconds.

Let there be light (painting)

Now we’re ready to start painting!

You can either have a friend press the shutter button, or you can put the camera on a short timer so that you can start light painting immediately after the shutter releases.

There will inevitably be a bit of trial and error as you try to find the right angles at which to paint the car. Pay close attention to how the light is reflecting in the body of the car and try to find ways to make it look flattering. Typically this involves moving the light at a uniform level so that there is a clean and crisp line of light reflected on the car.

light-painting-example

Chances are you’ll have to throw away a lot of images because parts of the car weren’t lit well enough, or the reflections looked messy. Don’t let this discourage you. The more you practice, the more you will get a feel for how to move the light.

Don’t forget to play a little bit. Waving your light around in circles, for example, can make some cool light trails and some memorable images.

A light painted car with light trails

A light painted car with light trails

How come you don’t show up in the final image?

A camera can only see objects that have light shining on them. When you aim the light source away from yourself and keep moving the entire time the picture is being taken, you simply won’t be in one place long enough for the camera to record your image.

If you do see yourself faintly in the final image, this can be due to one of three things:

  • You might have been caught in the light reflecting off of the car (or accidentally lit yourself up).
  • There might be too much ambient light. Try adjusting the settings to make your base exposure a bit darker.
  • You stood still in one place for too long, keep moving.

Typically, these ghostly appearances can be fixed easily enough with Photoshop later on, though you may want to adjust some settings to save yourself some time in the editing room.

Controlling the power of your light

If you find that your light isn’t having so much of an effect on the final image, there are two ways to control this.

To effectively make your light more powerful, you can choose a wider aperture (lower f-stop number) or raise the ISO. Either of these options will make the camera more sensitive to all light, including the light in your hand. Be aware that these changes will also affect your base exposure for the ambient light conditions. So you may also need to change the length of the shutter speed in order to keep the image properly dark.

If all else fails, your last option might be to simply to purchase a more powerful light. Yes, it is possible to do light painting with a small flashlight, but if you are serious about light painting, it might be a good idea to upgrade to something with a bit more power and control.

Making some final edits

Often, light painted pictures look pretty awesome right out of the camera. By pulling the picture into an editing program like Lightroom, you can make some simple tweaks to complete the image.

The original, straight from camera image of a light painted car

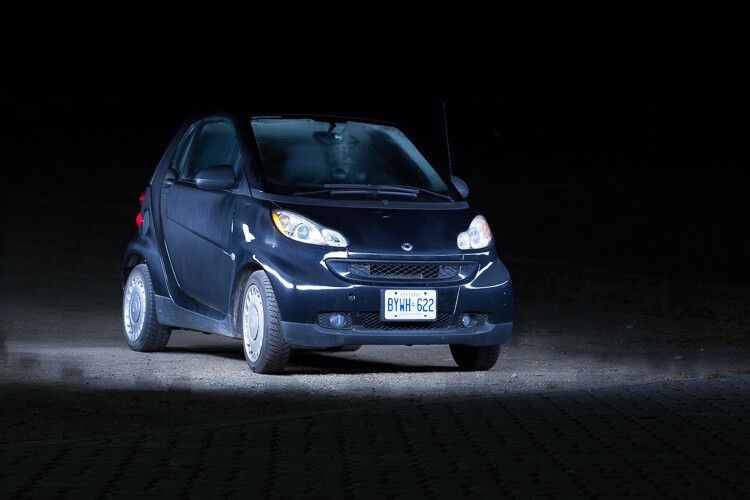
This is the image straight from the camera. It has a really unique look, even before we do any edits. You can see that my feet were caught in the reflected light and will need to be edited out.

It’s a good idea to shoot your light painting images in RAW. Shooting in RAW as opposed to JPG gives you some extra flexibility when it comes time to edit.

General adjustments

First, you’ll want to find a nice looking white balance. Light painted cars often look very sleek with a steely, cold white balance, but you can experiment to find a nice balance for the car you are working with.

As I mentioned earlier, it’s important to make sure the car is clean before you photograph it. Any minor imperfections or dirty spots that might still be visible can be removed using the spot healing tool in Photoshop or similar editing programs. You may also want to use this tool to reduce or remove bright and distracting glare reflecting off the car. I used this method to remove a harsh reflection in the example picture just above the front wheel.

Selective adjustments

Next, you may want to take some time to selectively lighten or darken parts of the image. In the course of your light painting, it is possible that you might have spilled some light into an area of the picture that you wanted to leave dark. You can control this by using gradients or adjustment brushes to precisely control the amount of light on different areas of the image.

For my picture, I wanted the light to quickly fall off around the car. I was able to emphasize this by using gradients and a vignette to darken the edges of the image.

The final edited image of a light painted car

As you can see, the final image isn’t drastically different than what came out of the camera! This final image in a combination of two of the images, borrowing some features from both shots.

Get out there and start light painting

Light painting is a very fun, simple and rewarding style of photography. It doesn’t take any special equipment to get some incredible and truly creative results that will amaze your friends. Give it a try and share your light painted car images in the comments below.

googletag.cmd.push(function() {
tablet_slots.push( googletag.defineSlot( “/1005424/_dPSv4_tab-all-article-bottom_(300×250)”, [300, 250], “pb-ad-78623” ).addService( googletag.pubads() ) ); } );

googletag.cmd.push(function() {
mobile_slots.push( googletag.defineSlot( “/1005424/_dPSv4_mob-all-article-bottom_(300×250)”, [300, 250], “pb-ad-78158” ).addService( googletag.pubads() ) ); } );

The post How to Use Light Painting to Take Incredible Car Photos by Frank Myrland appeared first on Digital Photography School.


Digital Photography School

 
Comments Off on How to Use Light Painting to Take Incredible Car Photos

Posted in Photography


Cantilevered Cabin: Dizzying Alpine Shelter Hangs Off the Edge of a Cliff

28 Nov

[ By WebUrbanist in Boutique & Art Hotels & Travel. ]

cantilevered-cabin

Even someone brave enough to overcome fears of heights and climb a mountain may not have the stomach to spend the night in this suspended shelter on the edge of a vertigo-inducing abyss.

cabin-on-cliff

mountain-cabin-prefab-view

Designed by OFIS Arhitekti (images by Janez Martincic), this precariously-perched space sits on Slovenian-Italian border and boasts 360-degree views over the landscapes of both countries. Inside, a series of resting platforms and a few pieces of minimalist rustic decor are the extent of the amenities provided.

cabin-at-night

Despite its fragile appearance, the cabin was (of course) constructed to deal with the extreme conditions of the location’s altitude and weather exposure on Mount Kanin. Indeed, it took multiple attempts for a helicoptered construction crew to get the prefab structure in place and tether it to the surrounding stone.

sleeping-spaces-wood

cabin-interior

The cozy refuge from wind, snug and landslides (overnight guests may not want to know) is intended in part as a test of the materials, to see how they will stand up over time.

extreme-mountain-cabin

“The challenge is to install real objects remote sites … and study their response to extreme weather, radical temperature shifts, snow and rugged terrain” say the designers. “The harsh conditions of wind, snow, landslides, terrain, and weather require a response of specific architectural forms, structures and concept.” Despite those daunting challenges, the space is intended to “become a destination for hikers, climbers, cavers, mountaineers, nature lovers and romantics.”

Share on Facebook


[ By WebUrbanist in Boutique & Art Hotels & Travel. ]

[ WebUrbanist | Archives | Galleries | Privacy | TOS ]


WebUrbanist

 
Comments Off on Cantilevered Cabin: Dizzying Alpine Shelter Hangs Off the Edge of a Cliff

Posted in Creativity


Kid Stuffed: 10 More Eerie Abandoned Orphanages

28 Nov

[ By Steve in Abandoned Places & Architecture. ]

more-abandoned-orphanages-2a

Little orphans any? Not so much these days thanks to fostering and improved economies, the result being many former orphanages have been left eerily abandoned.

more-abandoned-orphanages-2b

more-abandoned-orphanages-2c

While many orphanages were built from scratch back in the day, others (mainly in the UK) occupied vacant country homes sold by latter-day aristocrats laid low by falling incomes and rising tax rates. Such was the case of the now-abandoned Bramham Children’s Home in West Yorkshire, England.

more-abandoned-orphanages-2e

more-abandoned-orphanages-2d

more-abandoned-orphanages-2f

Dating from 1806, the building was owned by the Ramsden family until 1947 when they sold the rambling pile to the West Riding County Council Children’s Department for the princely sum of £8,000 (roughly $ 10,000 at the time)… about £350,000 ($ 435,000) in today’s money. In its new incarnation as the Bramham Children’s Home, the orphanage only housed 35 children in 1970 cared for by about 16 staff. Not too shabby! By the early 1980s the orphanage had closed yet the building still stands, as photo-documented by Imgur user LeeRielly in August of 2016.

Freinetschool Kasteel De Wip

more-abandoned-orphanages-3b

more-abandoned-orphanages-3a

more-abandoned-orphanages-3c

The Freinetschool Kasteel De Wip, located in Wezemaal, Belgium operated for well over a century: from 1880 through 2008 to be exact. At the time of its closing due to dangerous structural decay, the building housed 54 live-in students divided into 3 preschool classes and 6 primary school classes.

more-abandoned-orphanages-3f

more-abandoned-orphanages-3e

more-abandoned-orphanages-3d

For the past 8-odd years, this exquisite little “castle” has continued to deteriorate with camera-toting explorers such as urbex.nl having to deal with rotten floors, the state of which worsened between visits in 2011 and 2014.

Silverlands

more-abandoned-orphanages-1a

more-abandoned-orphanages-1b

more-abandoned-orphanages-1c

Silverlands, located in Chertsey, Surry, UK can trace its roots back to 1814 when a local brewer invested his prodigious profits in a grand country home. In 1938, The Actor’s Orphanage backed by none other than Noël Coward took over the home but by 1958 the cost of urgent structural repairs had made the orphanage economically non-viable.

more-abandoned-orphanages-1e

more-abandoned-orphanages-1f

more-abandoned-orphanages-1d

In the late 1990s, local governmental authorities floated a proposal to re-establish Silverlands as a live-in clinic for pedophiles. Local residents opposed to the plan mounted a candlelight vigil (presumably they were fresh out of torches and pitchforks) and got the council to change their minds. Photographers Stacey Louise and Tim Barber visited the still-magnificent remains of Silverlands in early 2015, returning with a visual record of its former opulence.

Next Page – Click Below to Read More:
Kid Stuffed 10 More Eerie Abandoned Orphanages

Share on Facebook


[ By Steve in Abandoned Places & Architecture. ]

[ WebUrbanist | Archives | Galleries | Privacy | TOS ]


WebUrbanist

 
Comments Off on Kid Stuffed: 10 More Eerie Abandoned Orphanages

Posted in Creativity


Five reasons to buy the Sony RX100 V (and four reasons to reconsider)

27 Nov

Introduction

The Sony RX100 V is the world’s most advanced pocketable camera with a 1″-type sensor, and it’s also the most expensive. With a spec sheet that is unmatched in its segment (and in some cases, in the entire market), the RX100 V is going to be looked at by a great many folks, and is indeed going to be a great camera for a wide variety of photographers. But there are also photographers for whom the RX100 V is probably not your best choice – so we’ve put together some reasons you might want to pick one up, and also reasons you might want to save those pennies for something else. Let’s dive in.

Reason to buy: You need to capture very fast things

The 24 fps burst rate lets you capture just the right moment. Photo by Rishi Sanyal

You might be interested in an RX100 V if you photograph or record very fast-moving things, primarily because of the camera’s ridiculous 24 fps burst speed for stills and 960 fps mode for slow-motion video. But because of the zoom range, you’ll have to be fairly close to the action – our own Barney Britton has been saying the V is the world’s best crash cam. Or maybe you’re a watermelon-exploding enthusiast. Okay, or maybe you want to catch just the right moment of your kid’s break dancing class. Whatever it is, kick the AF into continuous and ‘Wide’ area, the burst rate into 24 fps, and motor away.

Reason to reconsider: Postage-stamp-sized batteries

CIPA-rated to 220 shots, the battery life is, generally speaking, a weak point on the RX100 V.

The Sony RX100 V soldiers on with the same NP-BX1 battery pack that the very first RX100 used, and with the massive increases in processing power and capability that Sony has shoehorned into the body, the claimed battery life is a third less than the original model. What’s more, the RX100 V continues Sony’s tradition of slow battery discharge if the battery is left in the camera, so if you’re only looking to use the camera occasionally, you may find you’re all ready to capture the moment, but the camera isn’t ready for anything but a charge.

And if the RX100 V is already proving difficult to fit into your pocket (I can’t be the only guy wearing skinnier-than-normal jeans these days), you might be loathe to carry another battery or two as well.

Reason to buy: You need a B video cam that can run and gun or be built up as needed

You could conceivably use the HDMI out on the RX100 V to build a rig up, or just use it as a run-and-gun pocket video cam.

The RX100 V is probably not the best choice out there for a primary video cam for most people (though this is not always going to be true), but with 4K video, focus peaking, zebra, log gamma and oversampled 4K, the only thing you’ll be missing is better audio – and there’s always an external solution for that.

Don’t discount that you can also do clean HDMI out, and then combined with said external audio solution, have a pretty powerful package, even if it takes some work to get there.

Reason to reconsider: You have big hands

If Sasquatch was after a camera, it wouldn’t likely be the RX100-series (a big, double-grip DSLR might be a better bet). The RX100 V comes, out of the box, with no grip, a slippery casing, and buttons smaller than the sensors of point and shoots of yester-decade. Although a touchscreen isn’t always the answer, we feel that being able to utilize such a big block of space on the rear of the camera as a control point is something Sony will have to do sooner or later to improve usability as the features keep coming. 

Reason to buy: You want the best point-and-shoot there is

The RX100 V’s 315 on-sensor phase-detect AF points cover 65% of the frame.

With AF-C in wide mode and rapid continuous shooting in Raw + JPEG, the only thing between you and something you want to photograph is the RX100 V’s startup time, which isn’t too bad (unless you’ve just changed the battery).

Sony’s told us that plenty of folks buying their RX100 cameras are actually mid-to-high end DSLR owners. And while there’s an argument that that demographic may want maximum control all the time, there’s also something to be said for leaving the big camera at home and just focusing on a moment in front of you as it unfolds instead of prepping settings and always watching, and always re-prepping, and repeat.

Reason to reconsider: You just don’t need it

Stock up on storage if you plan on using those 24 fps bursts.

I will confess – the allure of 24 fps burst shooting while at the Sony launch event for the RX100 V was somewhat tempered by the 128GB memory card I used, as well as the total picture count at the end of the night – near 3,000. That ended up being more than I would shoot with any other camera, simply because I could. One thing’s for sure – there’s no arguing that 24 fps will help you catch just the right moment in the middle of whatever is happening in front of you. But there’s also no arguing that it will just be overkill for many people, and many people’s hard drives. Even dropping the burst rate to 10 fps ended up being enough for me.

Reason to buy: You want the best image quality in the smallest pocketable package

You already have a cell phone with you all the time anyway, and it probably takes decent pictures. Well, the RX100 V will at least fit into a coat pocket (or cargo pants…those are still around, right?) and take photos that will blow any smartphone out of the water.

True, ‘digital bokeh’ simulations are catching on, and will actually offer more blur artificially than the RX100 V can manage optically. But they still can’t match the dynamic range, sharpness and sophisticated JPEG performance in low light that the RX100 V offers. Digital bokeh or not, physics is still physics, and the 1″-type sensor will collect way more total light than any current cell phone.

(There’s also one smaller 1″-type sensor camera on the market, the Canon G9 X, which is capable of good stills quality – but with a necessarily slower lens and less processing power to keep the whole package more compact.)

Reason to reconsider: You just need more zoom

The 24-70mm equivalent zoom lens on the RX100 V may be quite bright, but it may be too short for many people. If you’re hoping to shoot your kids’ soccer matches from the sidelines, there are way better options out there (the Panasonic ZS/TZ100 comes to mind).

Sure, the 24-70mm focal length is an absolute staple for professional wedding and press photographers, but you also often see those very same photographers carrying another huge camera with a 70-200mm equivalent zoom, just to cover absolutely everything. You can get by for a great many things with the RX100 V, but if you’re planning on getting one single camera to do it all, from travel photography to portraits to landscapes, there is probably a better option out there for you.

Reason to buy: You absolutely must have a viewfinder

All RX100 models since the Mark III have had a built-in, pop-up electronic viewfinder.

The RX100 V (and Mark III/IV) are the only truly pocketable 1″-type sensor compact cameras with a decent built-in viewfinder. Panasonic’s ZS100/TZ100 is also a fairly compact camera, but its field-sequential EVF is pretty lackluster. If you do lots of shooting in bright light outdoors, or just find that framing your masterpiece with fingerprint smudges and facial oils overlaying it is unacceptable, the RX100 V’s pop-up viewfinder is worth a peek.

Articles: Digital Photography Review (dpreview.com)

 
Comments Off on Five reasons to buy the Sony RX100 V (and four reasons to reconsider)

Posted in Uncategorized


Cut Grass: Sutured Landscape Installation Stitches Open Lawn Back Together

27 Nov

[ By WebUrbanist in Art & Installation & Sound. ]

ground-stitching-art

Ground Operation is a conceptually simple earthwork: an incision made in a grassy landscape is pealed back then stitched back together, much like an open wound after an injury or surgery.

earthwork-stitching-ground

French artist Estelle Chrétien sliced open the ground then wrapped electrical cables through it like shoelaces, either in the process of being tied or becoming undone (a mystery left for the observer to unravel, as it were). Her use of cabling is also very intentional, meant to raise questions about what we put into the Earth and how we use it — a surfacing of the secret infrastructure that lurks below.

boot-on-tree

Similar techniques, themes and materials can be found in other works by the same artist, who has wrapped hay bales in crocheted covers and put boots on trees.

crocheted-hay-bale

“While in Portugal, I learned how to crochet, and I had this piece of blue agricultural baler twine in a box and the idea of [making a hay bale wrap] came to me,” she says. “When I went back to France, I made it and put it in a field just before farmers stored their bales. I liked working in the middle of a barley field, but most of the work was made at home, so I decided to work outside with my hands more often after that.”

Share on Facebook


[ By WebUrbanist in Art & Installation & Sound. ]

[ WebUrbanist | Archives | Galleries | Privacy | TOS ]


WebUrbanist

 
Comments Off on Cut Grass: Sutured Landscape Installation Stitches Open Lawn Back Together

Posted in Creativity