RSS
 

Archive for September, 2016

How to Use 1 Natural Light Setup to Create 3 Different Portrait Looks

22 Sep

As a portrait photographer, the majority of my work is shot on location. This can be outdoors or in my clients’ homes or places of business. I mostly shoot using natural light and have become adept at finding the best light source in any location as well as creating backgrounds that won’t interfere with the subjects. In this tutorial, I want to show you an easy, natural light portrait setup you can recreate in your own home. Simply by repositioning yourself and your model, you can create three distinctly different portraits from this one setup.

one natural light setup - 3 looks

No special lighting or fancy equipment is needed, and the techniques are straightforward and easy to master. Experiment to create different looks using various backdrops such as plain walls or sheets, or different outfits for your subject. You can also get different effects by changing your lens, distance to the subject, and experimenting with different apertures.

Equipment

Below is a list of the items I have used for this setup and suggested substitutes:

  • SHEER CURTAIN or FABRIC: You can buy a sheer curtain or length of fabric from any fabric or haberdashery store. I picked this one up from the clearance table at my local Spotlight store (Australia) for under $ 20.
Image showing basic natural light portrait setup using a white cloth

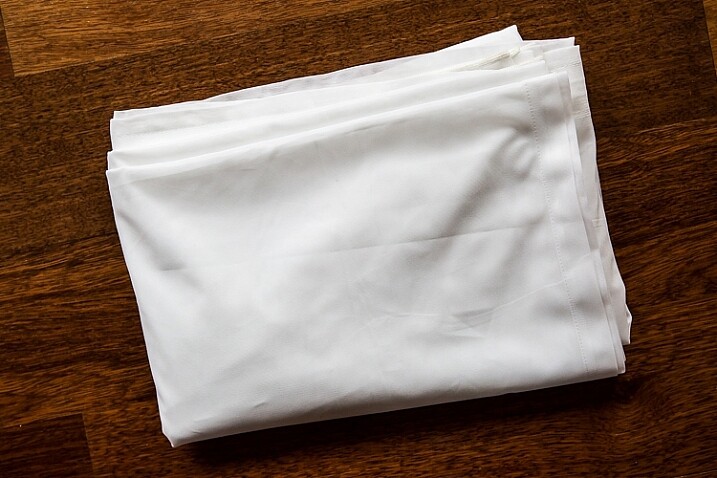
A white sheer curtain or large sheet of sheer fabric will filter the window light.

  • REFLECTOR: I have a circular, five-way reflector that follows me everywhere. Each side has a different colour; white, silver, gold, and black, plus a diffuser. It folds into a neat little disc, is lightweight, and can be thrown into the back of my car. You will get endless use out of a portable reflector, and at around $ 30 from Amazon, it’s a worthwhile investment. However, if you don’t want to rush out and buy a reflector (or wait for your order to arrive before you start shooting) a large piece of white card, polystyrene, or foam board, will work equally well.
Image showing basic natural light portrait set-up with a reflector

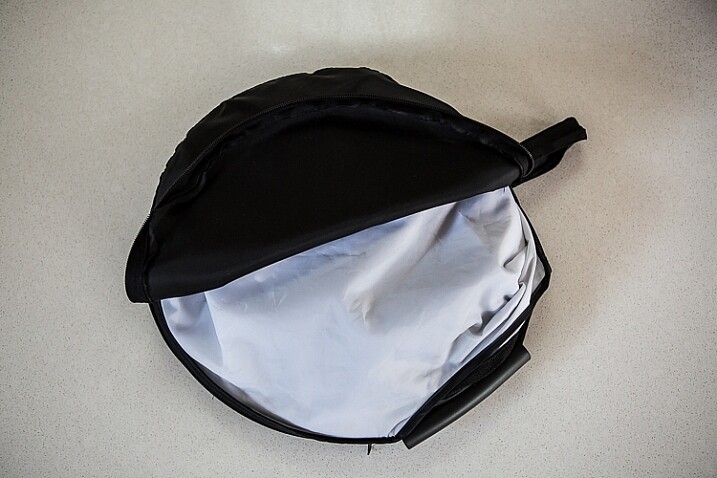
This reflector was a great investment at around $ 30. It is lightweight and folds up compact to the size of a dinner plate.

  • BACKDROP CLAMPS: another Ebay or Amazon purchase, my backdrop clamps come in packs of 12 for under $ 20. These are infinitely useful for creating makeshift studios. In this instance, I used them to attach the sheer curtain to the rolled-up window blind. You can also use masking tape to stick the curtain directly onto the window, or use heavy-duty stationery clips.
clamps can be helpful for a natural light portrait setup

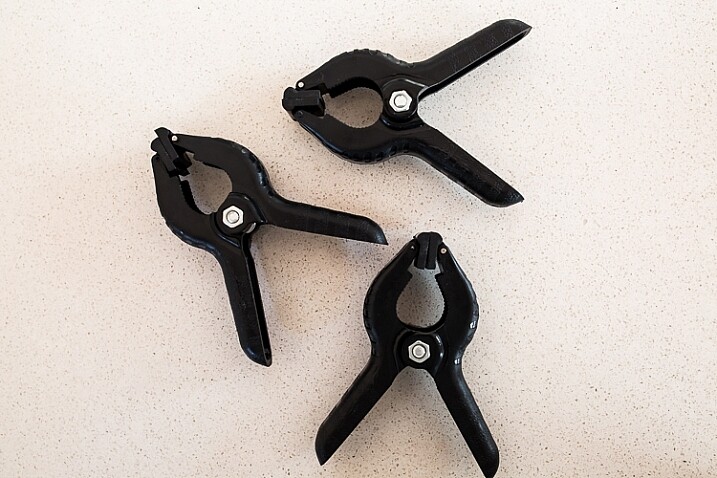
Backdrop clamps can be purchased inexpensively from Ebay or Amazon and similar.

Lens

My favourite portraiture lens is the Canon EF 85mm f/1.8, but you can use a 50mm, a 100mm – whatever works in the space you have. A tighter space will require a shorter focal length.

Basic portrait setup

Look for a window or glass door with a good strong light source coming through, so that you can shoot at the lowest possible ISO. If the window has a sheer curtain, pull it across to filter the light. If there is no curtain, you can attach a piece of sheer fabric to the window using the backdrop clamps or masking tape.

As you can see, the setup couldn’t be simpler. This is the corner of my living room, with sliding glass doors to the left of the shot. The strong afternoon light is filtered with a sheer curtain clipped to the bottom of the roller blinds. I have closed the curtains in the adjoining room to create a dark background for my subject. If your room layout doesn’t allow this, you can hang a sheet or large piece of coloured fabric behind your subject, or just use a plain wall.

natural light portrait setup background

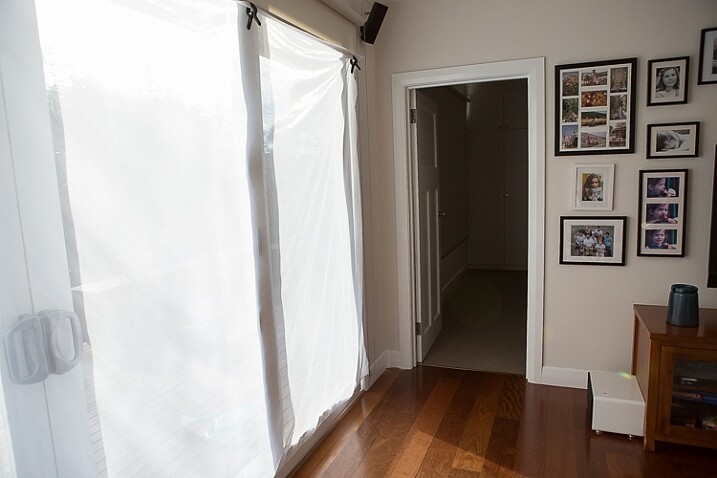
The setup couldn’t be simpler.

As you can see in the setup below, I brought my model forward (away from the open door behind her). This is to ensure she has good light on her face, and that there is sufficient distance between her and the room behind her to make sure it is completely out of focus. In this pull-back shot, you can see some detail in the room behind her. However, in the first pair of portraits, further along, you can see no background detail. The room behind looks like a studio backdrop.

Add a reflector

If you are going to use a reflector, you’ll need someone to hold it for you. If there is no-one to help, try propping it on a chair. Let your creative photographer’s brain get to work and figure out a creative solution.

natural light portrait setup reflector and assistant

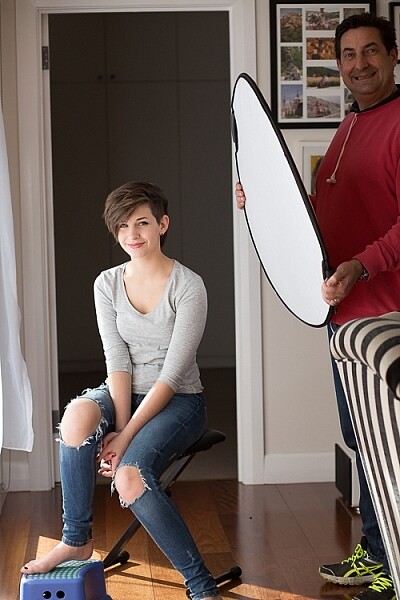
You’ll need an extra person to hold the reflector – in this case, my husband!

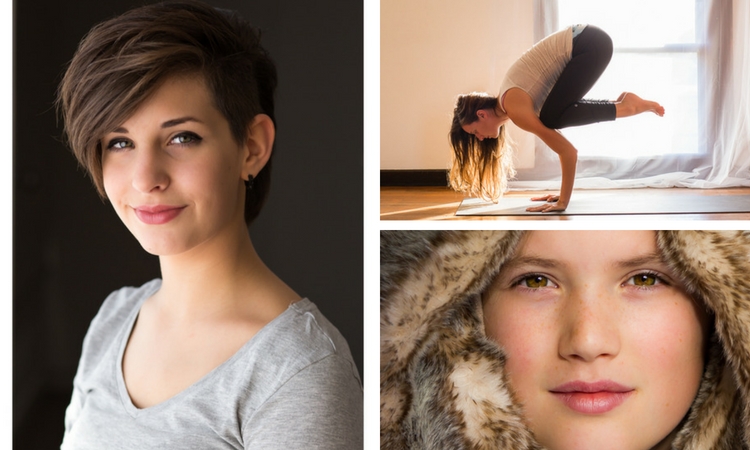
Portrait #1: side lighting and a reflector

This is my most-used natural light setup. Side lighting contours and shapes the face, and is flattering for most subjects. If your subject is male, or if you want to create a moodier portrait, you can try moving the reflector further away from your model or removing it altogether. This creates more contrast by increasing shadow on one side of the face.

Your model can sit, stand, or even lie on the floor if the window is low enough. How you position your model’s face and body is up to you. To recreate the look below, your model’s face needs to be at a 90° angle to the main light source (the window). Her body turns 45º away from you. The door behind my model is opened and I darkened the background room to minimize distracting elements. Position the reflector on the shadowed side of her face, to bounce the light back and fill in the shadows

In the photos below, the image on the left is shot without a reflector. The one on the right is shot with a reflector. The effect in this example is subtle because the light in this room is already balanced somewhat by small, high windows on the opposite wall to the main window. In the photo on the right, you can see how the reflector brightens the face and fills in the shadows, particularly the under-eye shadow of her left eye. It also brings out more detail and highlights in her hair and improves separation from the background.

natural light portrait setup with and without reflector

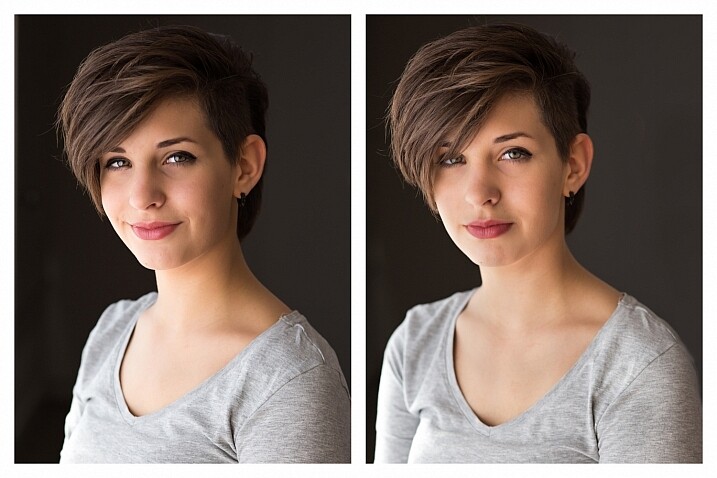
Left (no reflector): ISO 320, f/4, 1/200th. Right (with reflector): ISO 320, f/4, 1/320th.

Portrait #2: shooting into the backlight

I love this technique for photographing women and girls. It creates soft, non-directional  lighting on the face, so is flattering to every age group. And the backlighting creates a gorgeous halo around the hair. This works especially well if the model wears her hair out, or wears a dress with some sheer elements – think darling little girls in fairy costumes and tutus!

Technique for backlighting

Using the same window setup as before, your model sits or stands with her back to the window. Position the reflector in front of her, bouncing the light back into her face. Your light meter will try to read the light coming from the window, and will underexpose your model’s face. You can obtain the correct exposure by getting in close to her face to set your exposure. You might also bracket your exposures and check the back of the camera until you’re happy with the result (review the histogram but note that the background area may show clipping – that’s okay). To get the exposure right on the face, you will lose detail in the background, which is the idea!

natural light portrait setup backlighting

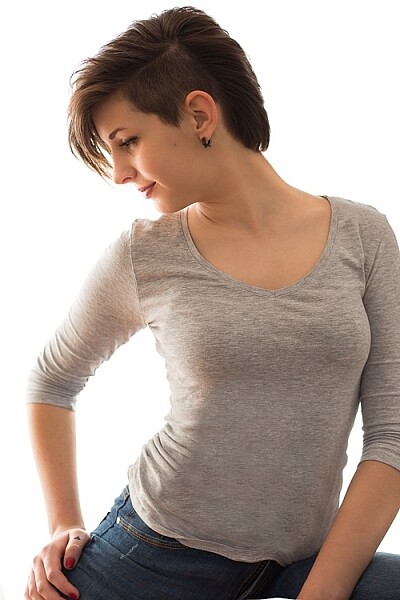
ISO 320, f/4, 1/160th

The photo below is a yoga instructor posing in front of a window on the floor of her studio. The backlighting is beautiful through her hair, and the warm tones of the timber floor reflect back on her skin to give her a golden hue. The lighting technique is identical to the previous photo. But in this photo, I have allowed the curtain and window to be visible as I think it adds something to the scene.

natural light portrait setup backlighting

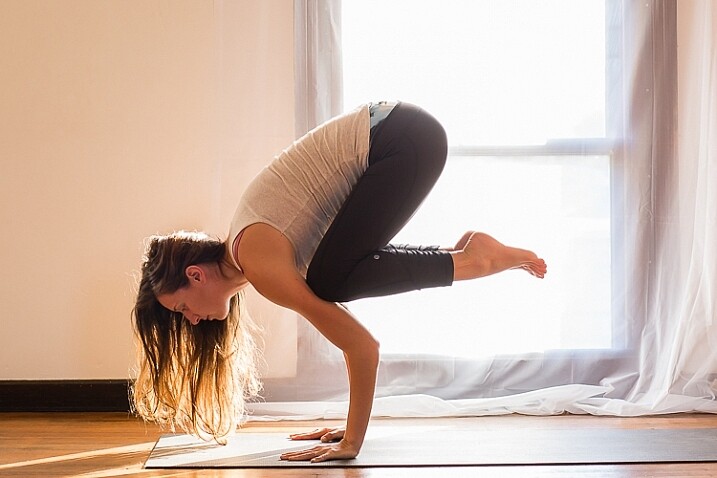
ISO 500, f/5, 1/80th.

Portrait #3: shooting with front-on light

For this set-up, the sheer curtain remains in place. Your model faces the window, and you position yourself between your model and the window. If you are taking a wider shot than the example below, you may be able to bounce light into the back of her hair with a reflector.

Frontal lighting removes virtually every shadow on the face. It brings out detail and colour in the eyes, and can be quite striking with the right subject. However, this technique is not for everyone. It can give the face a flat, two-dimensional appearance, and if the light source is too strong, your subject will squint. This lighting tends to highlight every imperfection, which is fine if your subject happens to be young and gorgeous. But, it can be too harsh for a mature model, or someone with a lot of blemishes.

Examples of front lighting

The photo below of a young girl snuggled into a faux-fur hood has been enduringly popular on my social media sites. It was shot using this lighting technique in warm, late-afternoon light.

natural light portrait setup front lighting

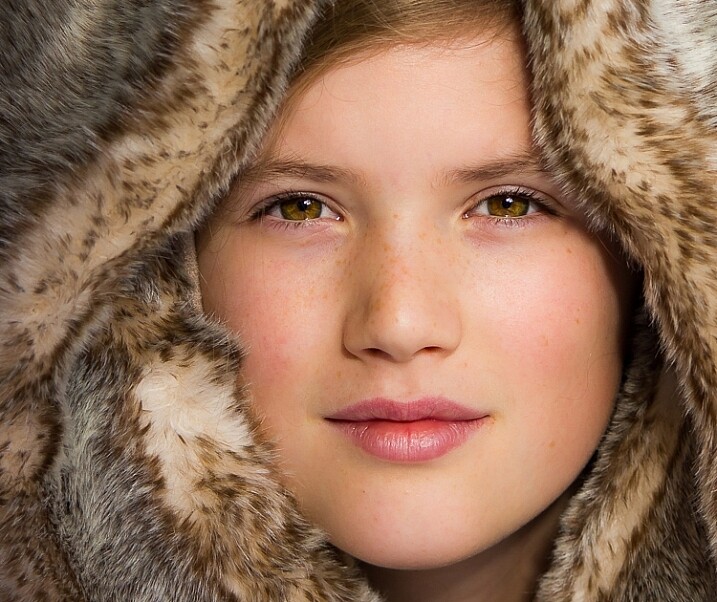
ISO 400, f/4.5, 1/200th.

The photo below of my daughter, sun-kissed after a day at the beach, was photographed with front-on lighting. As we were  on vacation and I didn’t have my usual bag of tricks at hand, I didn’t use a sheer curtain to filter the light. As you can see, the highlights are more pronounced than those in the first photo, but the effect is similar.

natural light portrait setup front lighting

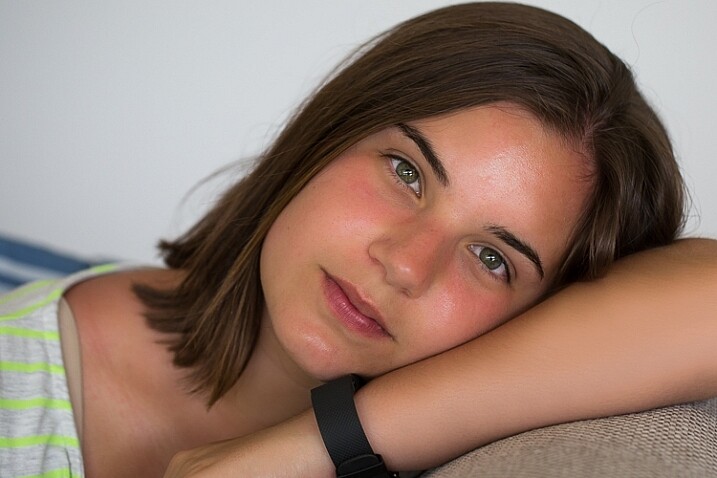
ISO 250, f/3.5, 1/125th.

Now it’s your turn

I’d love to hear how you get on trying this setup at home. Please post any questions, comments or examples of your portraits in the comments section below.

Don’t forget, there is also our dPS Facebook Group, which you can join to share your photos and get a critique from other dPS readers.

googletag.cmd.push(function() {
tablet_slots.push( googletag.defineSlot( “/1005424/_dPSv4_tab-all-article-bottom_(300×250)”, [300, 250], “pb-ad-78623” ).addService( googletag.pubads() ) ); } );

googletag.cmd.push(function() {
mobile_slots.push( googletag.defineSlot( “/1005424/_dPSv4_mob-all-article-bottom_(300×250)”, [300, 250], “pb-ad-78158” ).addService( googletag.pubads() ) ); } );

The post How to Use 1 Natural Light Setup to Create 3 Different Portrait Looks by Karen Quist appeared first on Digital Photography School.


Digital Photography School

 
Comments Off on How to Use 1 Natural Light Setup to Create 3 Different Portrait Looks

Posted in Photography


Instax goes luxury with Michael Kors collaboration

22 Sep

Instax has been in the news in the past couple of weeks – first for the announcement of its monochrome instant mini film, and again with the announcement of a square format film and camera in the works. Now they’ve got something else cooking: a collaboration with fashion designer Michael Kors. The limited edition Kors-branded Instax Mini 70 is metallic gold with the designer’s signature printed on the back panel and the brand logo on the front. 

The Michael Kors edition Instax Mini 70 will be sold bundled with film and is expected to be available in late October through the holiday season.

Press release

FUJIFILM AND MICHAEL KORS COLLABORATE ON INSTAX AT PHOTOKINA 2016

Valhalla, N.Y., September 21, 2016 – Providing the total imaging solution for photographers, FUJIFILM North America Corporation will announce a new, one-of-a-kind collaboration with the world-renowned and award-winning fashion designer, Michael Kors. Known for luxury accessories and ready-to-wear fashion, Michael Kors produces a wide range of globally recognized products.

MICHAEL KORS x FUJIFILM INSTAX Mini 70 Revealed
FUJIFILM and Michael Kors are pleased to announce a new collaboration that captures the creativity of the fashion and photography worlds with the launch of a limited-edition INSTAX Mini 70 instant film camera.

“Fashion and photography are about giving a voice to individuals as they express themselves, and this exclusive INSTAX Mini 70 by Michael Kors is the pinnacle of style and substance,” said Mark Yamamoto, President and CEO, FUJIFILM North America Corporation, and President, FUJIFILM Holdings America Corporation. “We are seeing an explosion of excitement in instant photography today, and now consumers can make a stylish statement with the combination of INSTAX and the luxury of the Michael Kors brand.”

The new MICHAEL KORS x FUJIFILM INSTAX Mini 70 camera comes in an exclusive gold metallic color that captures the jet-set Michael Kors aesthetic. The Michael Kors brand logo is printed on the front of the case body, and to make it even more special, the designer’s signature is showcased in the same gold hue on the camera door for a stamp of approval from Michael Kors himself.

Celebrated for its ability to produce sharp, physical photos in an instant, the INSTAX Mini 70 features a sleek design, special selfie mode and high-performance flash that automatically calculates surrounding brightness and adjusts shutter speeds accordingly. As an added bonus, the camera has a smart selfie mode that automatically adjusts settings to capture picture-perfect selfies—a functionality that is sure to be a hit at parties or when hanging out with friends. Simply check your framing with the front-facing mirror next to the lens, and snap.

The exclusive MICHAEL KORS x FUJIFILM INSTAX Mini 70 camera will be conveniently sold as a bundle, including ready-to-use film, and will be available for a limited time beginning in late October and through the Holiday season.

Articles: Digital Photography Review (dpreview.com)

 
Comments Off on Instax goes luxury with Michael Kors collaboration

Posted in Uncategorized


In Stitches: 45+ Artistic Embroidered & Cross-Stitched Creations

21 Sep

[ By SA Rogers in Art & Sculpture & Craft. ]

cross-stitch-pockets-1

This is definitely not your grandmother’s embroidery. It’s stitched into the helmets of soldiers, onto car doors and fences, producing cats that pop out of shirt pockets and portraits so painterly, it’s hard to believe they’re made of thread. In fact, needlework stands in for everything from spray-painted street art to living moss in these extraordinarily artistic stitch-based creations.

Floral Cross-Stitch Urban Murals by Raquel Rodrigo

cross-stitch-raquel-rodrigo-1

cross-stitch-raquel-rodrigo-2

cross-stitch-raquel-rodrigo-3

Cross-stitched street art is in bloom all over Madrid this week thanks to floral creations by artist Raquel Rodrigo, who wraps thick string around a wire mesh form and then affixes it to urban surfaces.

Cross-Stitched Microbes by Alicia Watkins

cross-stitch-microbes-1

cross-stitch-microbes-2

cross-stitch-microbes-3

Rather than flowers and the other pretty things that are typically stitched within an embroidery hoop, artist Alicia Watkins puts the spotlight on nasty germs and microbes ranging from the measles to mad cow disease.

Pets in Pockets by Hiroko Kubota

cross-stitch-pockets-2

cross-stitch-pockets-4

cross-stitch-pockets-1

Adorable, strikingly realistic cats and puppies pop out of pockets in this fun clothing line by Hiroko Kubota called Go!Go!5. The project started when the Japanese embroidery artist’s son asked for a custom cat-adorned shirt, and took off from there. You can even have a custom pet portrait created just for you.

Embroidery Gone Wild by Danielle Clough

cross-stitch-clough-1

cross-stitch-clough-2

cross-stitch-clough-3

cross-stitch-clough-4

cross-stitch-clough-5

Virtually anything that can be punctured or woven with embroidery floss is fair game for Danielle Clough, whose wildly unique creations have appeared on tennis rackets, shoes and fences.

Splotchy Embroidered Fashion by Olya Glagoleva and Lisa Smirnov

cross-stitch-fashion-1

cross-stitch-fashion-2

cross-stitch-fashion-3

What appears, from a distance, to be splotches of paint roughly applied to textured textiles turns out to be hyper-detailed embroidery in abstract forms. Russian artist Lisa Smirnova paired up with fashion designer Olya Glagoleva to collaborate on this fun project for the eco-friendly clothing line GO!

Next Page – Click Below to Read More:
In Stitches 45 Artistic Embroidered Cross Stitched Creations

Share on Facebook


[ By SA Rogers in Art & Sculpture & Craft. ]

[ WebUrbanist | Archives | Galleries | Privacy | TOS ]


WebUrbanist

 
Comments Off on In Stitches: 45+ Artistic Embroidered & Cross-Stitched Creations

Posted in Creativity


How Playing With Manual Mode Can Help You Learn Exposure Faster

21 Sep

I have a disclaimer before I even begin this article. I shoot much more often in Shutter or Aperture Priority than I do in Manual mode. I save Manual mode specifically for studio shooting, for some tripod work where I have a lot of time to get the settings perfect, or for situations where the lighting is very consistent.

Subways in Motion, New York

Learn Manual Mode to better understand exposure

However, I think it is immensely important for you to try to periodically shoot in Manual early on, especially if you’re just learning. Take a look at your camera. How many buttons does it have on it? New cameras these days can have 20 or more buttons on them all doing different things, but in reality, there are only three settings that make the photograph: the ISO, the Shutter speed, and the Aperture.

Central Park, New York

Before you even go out, turn your camera to Manual mode and figure out the fastest and most comfortable way to change each of these settings. You’re going to do a lot of that in Manual.

Understanding shutter speed

The next step is to understand a couple of important points. The shutter speed always needs to be at least one over your focal length to offset handheld camera shake. So if you are at 50mm (on a full-frame camera), then your shutter speed needs to be 1/50th of a second. To freeze the motion of moving subjects such as people, I like a shutter speed of around 1/250th or 1/320th of a second, but you can get away with a little slower than that. You will need a faster shutter speed to freeze faster moving subjects like cars, etc.

Understanding aperture

For your aperture, the lower the number (such as f/2.8), the less depth of field and more bokeh there will be. This is counterintuitively called a large aperture because the size of the aperture hole in the lens is actually larger. This will also let in a lot of light due to the size of the hole. A small aperture (such as f/11 or f/16) will create a much larger depth of field, but the tradeoff is that it will let in less light.

Waiting in Grand Central Terminal, New York

Understanding ISO

The ISO is the sensitivity of your camera’s sensor to light. The higher the number, the more noise that an image will have, but the more sensitive to light it will be. Newer cameras can make beautiful photos up to ISO 3200 or even 6400, but older or entry level cameras can have a lower limit of around ISO 1600 (test your camera to find your comfort zone with its upper ISO limits).

If you want a lot of bokeh in your image, and you set your lens to f/2.8, that means the camera will be letting in so much light that you will usually want a low ISO. However, if you are shooting street photography, fast moving subjects, you want a shutter speed of 1/250th or faster, and/or a smaller aperture such as f/11 – unless you are in bright sunlight, you will often have to raise your ISO to be able to let in enough light to use those settings. In general, if it’s darker out, then your ISO will often have to go up unless you are on a tripod.

Now play with them

Those are the main considerations that you need to learn; now just walk out the door and mess around with your settings. Screwing around with the settings in Manual is the fastest way to start to learn them well. Start off with your aperture. How much depth of field do you want in the image? Once you pick that, then take a guess at the shutter speed and ISO and see how it looks. View the back of the screen, look at the histogram, and zoom in on the details.

If an image is too dark, then slow the shutter speed, raise the ISO, or use a larger aperture. If the main subject is too blurry, then speed up the shutter speed.

Couple in Sheep Meadow, New York

Try different lighting scenarios

Explore different lighting situations. Paying attention to lighting is the first thing that you should do before you take a photograph. How strong is the light? Where is the sun or artificial light in relation to what you are shooting? The strength of the light will be the number one factor in helping you figure out your settings. From there, you can figure out the depth of field that you want and if you need to freeze the motion of your subjects or not.

Get comfortable walking from one lighting situation to another. If you walk from the sun into the shade, what will you need to change to expose the scene correctly? Pay attention to scenes with both bright highlights and darker shadows. With these scenes you need to figure out which is most important to expose correctly. If the shady area is more important, then let in more light. If the highlights are the most important, then darken the scene so they are correctly exposed and the shadows are closer to black. If you are in sunlight, learn how your settings will change if you are shooting into the sun versus shooting away from it.

Smokestack and Graffiti, New York

Go out in the morning, in the middle of a sunny day, at dusk, or in light rain. Learn how your settings change in each of these lighting situations.

Most digital cameras will show you the light meter reading for what they believe will correctly expose your image. For instance, if you choose the three settings, the light meter might show you that it thinks you are underexposed by one stop (look in your viewfinder for a + 0 – scale, press the shutter button part-way down to activate it). Keep an eye on this because it can help you, but also try to not pay too much attention to it. The point of Manual shooting is to learn the numbers yourself without relying on the camera. You can rely more on the camera later.

Conclusion and practice

The only way to learn these things is to experiment and do them. Shooting in Manual at first will make you screw up much more than in Shutter or Aperture Priority, but a handful of dedicated days of doing this will have you understanding the settings in a much more intuitive way. Then if you decide to shoot in Shutter or Aperture Priority, you will have a strong understanding of how to use those modes to the best of their ability.

SoHo at Night

googletag.cmd.push(function() {
tablet_slots.push( googletag.defineSlot( “/1005424/_dPSv4_tab-all-article-bottom_(300×250)”, [300, 250], “pb-ad-78623” ).addService( googletag.pubads() ) ); } );

googletag.cmd.push(function() {
mobile_slots.push( googletag.defineSlot( “/1005424/_dPSv4_mob-all-article-bottom_(300×250)”, [300, 250], “pb-ad-78158” ).addService( googletag.pubads() ) ); } );

The post How Playing With Manual Mode Can Help You Learn Exposure Faster by James Maher appeared first on Digital Photography School.


Digital Photography School

 
Comments Off on How Playing With Manual Mode Can Help You Learn Exposure Faster

Posted in Photography


Photokina 2016: Nikon stand report video

21 Sep

Nikon may have introduced the D5 and D500 many months ago in anticipation of the 2016 Olympic Games in Rio, but that doesn’t mean they’re out of new releases for Photokina 2016. The ambitious KeyMission lineup shows that Nikon is taking the 360 and action camera market awfully seriously, while the D3400 should continue to offer entry-level DSLR users impressive image quality. Lastly, the Nikkor AF-S 105mm F1.4 is a gorgeous piece of glass that we can’t wait to get out into the real world with.

Watch as DPReview’s Barney Britton talks with Steve Heiner, Nikon’s senior technical manager, about these new products (and even a new market segment) from Nikon.

Articles: Digital Photography Review (dpreview.com)

 
Comments Off on Photokina 2016: Nikon stand report video

Posted in Uncategorized


Where to Get Income When You’re New to Photography

21 Sep

Photography as a career is extremely challenging and rewarding at the same time. On the one hand, photographers seem to be blessed people, because they do what they love. On the other hand, it sometimes gets very hard to make money on doing what you love – especially when you’re a freelance photographer. Luckily, there are some ways to effortlessly Continue Reading

The post Where to Get Income When You’re New to Photography appeared first on Photodoto.


Photodoto

 
Comments Off on Where to Get Income When You’re New to Photography

Posted in Photography


Video: First look at the Panasonic G85/G80

21 Sep

The Panasonic G85 is the successor to the Panasonic G7 and shares its DSLR-style design with twin control dials and fully articulating touch display. It also uses the same sensor as the G7, but with no AA filter. The G85 receives a new 2.36M dot OLED electronic viewfinder with increased magnification over the G7. The camera also gains in-body 5-axis image stabilization and Dual I.S. 2 as well as weather and dust-sealing.

The camera also uses an electromagnetic shutter and features a new in-camera focus-stacking mode. Like its predecessor it is 4K-capable, has built-in Wi-Fi and utilizes Panasonic’s Depth from Defocus AF. Get a glimpse of its capabilities in our quick First Look video, or head to our First Impressions if you’re looking for in-depth analysis.

Read our Panasonic Lumix DMC-G85 First Impression Review

Articles: Digital Photography Review (dpreview.com)

 
Comments Off on Video: First look at the Panasonic G85/G80

Posted in Uncategorized


Adobe Lightroom CC 2015.7 and Lightroom 6.7 available now

21 Sep

Adobe has launched Lightroom CC 2015.7 and Lightroom 6.7, saying the new versions bring bug fixes including compatibility solutions for newly released macOS Sierra, as well as additional lens profile and Raw support. MacOS users are encouraged to update to the latest version of Lightroom before updating to version 10.12 Sierra.

In addition to the new camera support listed below, Lightroom CC now allows users to submit their photos to Adobe Stock Contributor via Adobe Stock Publish Service, more easily sync content between devices using drag-and-drop into ‘All Synced Photographs,’ and to always use Smart Previews in the Develop Module (regardless of whether the original files are available).

New camera support:

  • Apple iPad Pro 9.7? (wifi and cellular)
  • Apple iPhone 6s Plus
  • Apple iPhone 6s
  • Apple iPhone 7
  • Apple iPhone 7 Plus
  • Apple iPhone SE
  • Canon EOS 5D Mark IV*
  • Casio EX-ZR4000 (EX-ZR5000)
  • GoPro HERO5 Black
  • Hasselblad H6D-100c
  • Nikon D3400
  • Panasonic DMC-G8 (DMC-G80, DMC-G81, DMC-G85)
  • Panasonic DMC-LX9 (DMC-LX10, DMC-LX15)

*Please note that we support the import and editing of jpegs, raw files and dual pixel raw files from this camera model. We do not support any specific dual pixel raw functionality. If you are planning to use Dual Pixel raw files, please read Limitations with Canon Dual Pixel raw files in Camera Raw and Lightroom.

**We added new versions of Adobe Standard color profiles for the Canon EOS 5DS and Canon EOS 5DS R cameras. These versions are denoted as V2, and the v2 profiles have lower contrast than the original Adobe Standard (v1) camera profiles.

The list of new camera lens profile support can be found at Adobe’s Lightroom blog.

Articles: Digital Photography Review (dpreview.com)

 
Comments Off on Adobe Lightroom CC 2015.7 and Lightroom 6.7 available now

Posted in Uncategorized


The Racetrack Playa in Death Valley National Park marred by vandals

21 Sep

Landscape photographer Kurt Lawson captured these images while on a photography trip to complete a special project about this area.

Check out his Website, Facebook, Flickr and 500px.  

It seems like only yesterday, a few weeks ago really, that we were writing about the vandalism at Cape Kiwanda on the Oregon coast. Yet here we are again with yet another case of vandalism – this time in Death Valley, California’s Racetrack playa. The area is known for its ‘moving stones’ and it appears that vandals have driven onto the playa and caused irreparable damage to the landscape.

The Racetrack in Death Valley National Park is a protected area in which large stones seem to move of their own accord across the playa. In reality they move whenever it rains – as the rain water freezes and winds cause the rocks (sometimes boulders of up to 600lbs) to move across the playa floor leaving a meandering trail behind them. Evidence of this was actually captured for the first time back in 2014. There are only two places in the world where this occurs naturally.

As he documented on his blog, landscape photographer Kurt Lawson was in the area scouting shooting locations for a project when he discovered the damage. He entered the protected area in the park and began to notice car tracks. It appeared that a group of individuals had driven a car across the the playa, thus carving car tracks permanently into an area where rain is a rarity.

Deep tracks were carved across the rock trails that take years to form.

What this means is that these tracks will be there for a very, very long time – if not forever. Some of the tire tracks cross trails made by the rocks. There are three parking lots in the Racetrack area, so vandals would have likely ignored the signs and at each one of them in order to carve their own paths through the playa as they left the designated parking areas. 

What appear to be initials have been chiseled about 1/8″ deep into the rock.

The type of damage that they caused isn’t repairable. What’s even more concerning is that whoever is responsible for it more than likely knew exactly what they were doing – there are ‘No motor vehicles beyond this point’ signs posted at every parking lot and along the roads between them. 

The area that was vandalized is well marked with these ‘No motor vehicle’ signs. You can see tire tracks off in the distance.  

After Cape Kiwanda, Yellowstone and now this – I’m really starting to question if what we’re doing to protect these areas is enough. Only time will tell.

Articles: Digital Photography Review (dpreview.com)

 
Comments Off on The Racetrack Playa in Death Valley National Park marred by vandals

Posted in Uncategorized


HumanEyes Technologies shows off Vuze VR 360 degree 3D camera

21 Sep

At HumanEyes Technologies’ Photokina booth we had the chance to look at some of the first production models of the Vuze VR 3D 360 degree cam, first announced at the Cannes Festival in May. The camera uses 8 Full-HD cameras with wide-angle lenses that are arranged in pairs on the corners of the device to record 360 degree video in 3D. Of course you can also record standard 2D footage at a 4K output resolution and 30 frames per second. Each lens covers a 120 degree angle of view horizontally and 180 degree vertically.

A standard tripod mount allows for easy mounting to any camera support, including the combined tripod/grip that comes in the package. The camera is operated via a single button on the device and settings can be changed via the Vuze App on any smartphone. The app also allows for management of footage that has already been saved on the microSD card and for a preview of the final video. 

Stitching and editing of recorded footage is done in the Vuze Studio software on a PC or Mac and final results can be viewed on the included VR headset that is compatible with most smartphones. The Vuze will be available soon for $ 799.

Articles: Digital Photography Review (dpreview.com)

 
Comments Off on HumanEyes Technologies shows off Vuze VR 360 degree 3D camera

Posted in Uncategorized