RSS
 

Archive for September, 2016

VW Doubleback: Hacked Camper Van Unfolds into Huge Mobile Home

09 Sep

[ By WebUrbanist in Technology & Vehicles & Mods. ]

doubleback huge

The recent comeback of modernized (and modified) mobile homes has seen many novel transformations of cars and trucks into various sizes of living space, but the Doubleback may have more secret additional area than any other vehicle of its size and class.

These modified T5 transports have a pop-up top, but also a slide-out back adding up to six feet of extra length – each of these extensions can sleep two people.

doubleback diagram

Self-leveling feet drop down from the rear extension, making sure the cantilevered zone remains level at all times, including on variegated terrain.

doubleback rear

Further exterior space can be covered as well via a roll-out canopy top or custom flip-up door, turning parking lots and campgrounds into cookout spaces and backyards.

doubleback interior

Various configurations are possible, sleeping up to four people (drop-down beds in the back and additional sleeping space above) and seating depending on the design details. Newer models also include space for a camping toilet and cooking amenities.

Share on Facebook


[ By WebUrbanist in Technology & Vehicles & Mods. ]

[ WebUrbanist | Archives | Galleries | Privacy | TOS ]


WebUrbanist

 
Comments Off on VW Doubleback: Hacked Camper Van Unfolds into Huge Mobile Home

Posted in Creativity


Getting the Right Timing for Great Outdoor Photographs by Planning Ahead

09 Sep

There is more to taking great outdoor photographs than a pleasing composition and the correct exposure. There is another important aspect. One that is too often overlooked when trying to capture a beautiful scenic subject or vista. The right timing is required to get great photographs.

Often on social media sites, images are posted that show ideal composition and exposure. But they are not photographed at the best time of day to capture the most attractive and interesting image. Some say that taking the most eye-catching photos is only about luck; being in the right place at the right time. But with the proper preparation, the odds of creating an exceptional photo can be increased. Certainly, without any pre-planning, you may be able to create “okay” images on a regular basis, but let’s examine the role timing takes in capturing more stunning images.

Here shooting toward the east in the evening produced some nice light on this image.

Shooting toward the east in the evening produced some detail-revealing light on this image.

Research

Much preparation for an outdoor photo shoot can be done from your computer, before even leaving the house. Listed here are three very effective tools that can help you find great shots. They can show you where you want to be, and when you want to be there:

  • Google Earth: The Google Earth software provides street views of any location on earth. This is very useful, as you can literally see and plan a shot from your computer before leaving to shoot. Google Earth gives you the ability to determine the best location, and its ideal angle to capture before even arriving!
  • GPS: Use GPS devices to help navigate to the exact location where you plan to shoot.
  • The Photographer’s Ephemeris: TPE is a very useful on-line tool to help plan outdoor photography. Its maps show how natural light falls on the earth both day and night for any location on earth, and for any time or day in the future!

    Screen capture from TPE showing the direction of the sun at the time the image of the statue and church was captured.

    A screen capture from TPE shows the direction of the sun when the above image of the statue and church was captured.

Time of day

Photographing at the right time of day is a big factor to getting the right light for a special image. It is a well-known fact among serious art-driven photographers, that some of the best light for making great outdoor images, happens early in the morning and late in the afternoon. These are called the “golden hours”.

But in addition to shooting during those times, notice should be taken as to where the sun is casting its light. Shooting into the light will mean that your subject will be in the shadows, or even silhouetted. Yes, the exposure can be compensated in this situation, but watch what happens to the sky in the image. It will be blown out and colorless. There are times when this shot may work, but the point here is to always be aware of the direction of light.


Same location as above, but this time it was shot in the morning. Notice how the sky is completely blown out when getting the exposure on the statue. Even tho this is nearly the same image as above, it doesn't have near the impact.

Same location as above, but taken facing into the morning sun. Notice how the sky is completely blown out when the exposure is set for the statue. Even though this is almost the same image as above, it doesn’t make near the same visual impact.

Don’t leave this factor to luck. When planning a trip, try to schedule the day around good light. Shoot westward in the morning, and toward the east in the late afternoon and early evening. Midday light in most cases is very harsh, and produces very contrasty images and deep shadows. Again, producing arresting images in this light is possible, but is also definitely more challenging.

So what does one with a camera do in the middle of the day? Rest or travel! The bottom line is, that if you are on vacation, with an open agenda, and are looking to take great photos of the sights, plan around the light to get the best results.

Using TPE I was able to determine the exact day that the sunrise would aline with the bridge to capture a one of a kind image.

Using TPE I was able to determine the exact day that the sunrise would aline with the bridge to capture a one of a kind image.

Season

Considering the season of the year can make a great difference in your photos. The angle of the sun changes from season to season. For instance, photographing a deep canyon in the winter will produce a much different image than one taken in the summer. Because of the lower angle of winter sun, light won’t reach the canyon floor as it would in summer.

Besides the change in light, there is the obvious a variation of foliage colors (or the absence thereof) from one season to the next, that can completely change the image captured at a given location. Sometimes it is fun to capture a four-season image of the same subject and location.

Weather

Weather conditions are a great factor when it comes to capturing the perfect scene. They should always be considered, even though they can’t be planned.

Overcast days, while not great for sky images, often produce very nice even lighting. This is ideal for shooting things like waterfalls. Bright sunlight can make it almost impossible to capture the scene without blowing out the water, and making it necessary to use a Neutral Density filter. Don’t look at dreary weather as always being a negative; rather, turn those negative conditions into a positive result. For instance, a foggy morning may mess with a pre-visualized image in one location, but an alternative location nearby may be perfect for foggy conditions.

This waterfalls was captured while the sun was shining. Notice the hot spots created by the sun on the water.

These waterfalls were captured while the sun was shining. Notice the hot spots created by the sun on the water.

Same waterfalls as above by this time captured in cloudy conditions allowed for a long exposure with out the hot spots or a ND filter.

Cloudy, overcast conditions allowed for a long exposure of the same waterfalls, removing the hot spots or need for an ND filter.

Rainy conditions may also produce pleasing effects on the subjects being photographed, darkening bright rocks and saturating foliage. However, it may be necessary to use a polarizing filter to reduce glare.  Also, when faced with unexpected weather conditions, be patient! Some rather fantastic shooting conditions occur following storms. Watching and waiting for just the right weather-related effects can provide an opportunity to capture a unique image, of even the most commonly photographed locations.

Special Occurrences

You could be out all night. Your tripod and camera all set up to watch the skies to photograph a meteor shower, and not see a single streak of light!  But with a little research you can ascertain when the next large meteor shower will occur. Thus the chance to capture the desired photos will be increased. To take the meteor shower experience one step farther, look for a night without a moon. This will help the stars to appear more vividly in the photographs. Use The Photographer’s Ephemeris to find special occurrences of the moon or sun, or look for times when the sun or moon rise or set may be in line with a special location. This a fun and creative way to produce a fascinating image, instead of an ordinary one.

Using TPE to reseach is image I knew the exact time an location of the full moon rising. What really made this image was the sunset at my back that was casting some fantastic light on the city. Knowing this facts allowed me to create a one of a kind image of Marietta Ohio. One that I have sold many times.

Knowing when and where the moon would rise allowed me to plan and be ready to capture a unique image of Marietta, Ohio. Using TPE to research this image, I knew the exact time and location of the full moon rising. The sunset light behind me cast fantastic light on the city, that absolutely defined the shot, prints of which I have successfully marketed.

Day of the week

Every photo event timing factor considered so far has had something to do with light and lighting. But timing also includes the aspect of planning a less stressful, more convenient, and possibly more productive photo shoot. The day of the week is one such factor.

Time off from day-to-day activities often happen for many individuals and families on the weekends. Many are out visiting popular locales en force on those days. High traffic photo sites are best visited mid-week. There will be a better chance of having more room to work, free of other photographers attempting to get the same shot.

Conclusion

To wrap up this article on timing and preparation, remember the five P’s of capturing that great image:

Proper Planning Prevents Poor Photographs

Whether just taking a day trip or a long vacation, planning your photographs around the best available light will increase your chances of capturing a memorable image.

Do you have any tips for planning for the best light? Please leave them in the comments below.

googletag.cmd.push(function() {
tablet_slots.push( googletag.defineSlot( “/1005424/_dPSv4_tab-all-article-bottom_(300×250)”, [300, 250], “pb-ad-78623” ).addService( googletag.pubads() ) ); } );

googletag.cmd.push(function() {
mobile_slots.push( googletag.defineSlot( “/1005424/_dPSv4_mob-all-article-bottom_(300×250)”, [300, 250], “pb-ad-78158” ).addService( googletag.pubads() ) ); } );

The post Getting the Right Timing for Great Outdoor Photographs by Planning Ahead by Bruce Wunderlich appeared first on Digital Photography School.


Digital Photography School

 
Comments Off on Getting the Right Timing for Great Outdoor Photographs by Planning Ahead

Posted in Photography


6 Reasons Why an iPad Makes a Good Photography Companion

08 Sep

I have an iPad Air 2 and I simply love it. It’s my portable digital workhouse. I can pop into most cafés where free wi-fi is the norm. I can enjoy a delicious cup of java, while checking my inbox, or pen a draft for my next article for dPS.
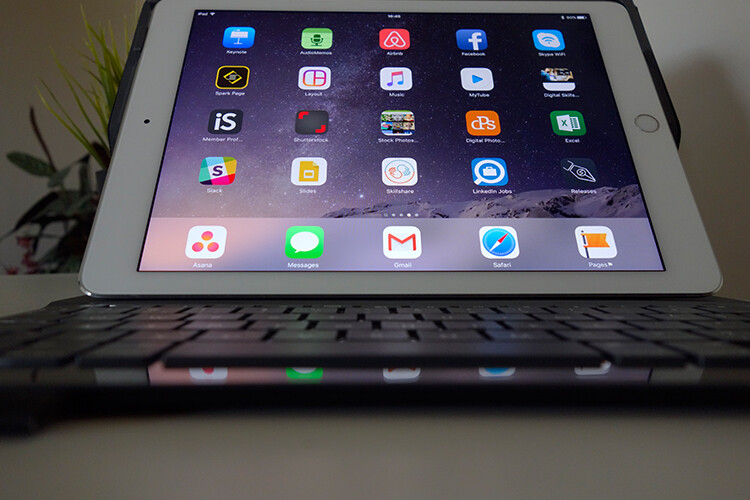
iPad Air 2

iPad Air 2

My main reason for purchasing the iPad was that I went back to college recently. I thought about buying a laptop. After a bit of research, I decided an iPad, paired with a keyboard case, essentially turned it into a mini laptop of sorts. Plus it was less expensive and more portable. I’ve completed the course, but the iPad has now become a great companion for my photography.

I was recently in a cafe waiting to meet a client, when an idea started to take shape about the advantages of having an iPad as a photographer. Following on from a previous article I wrote on “Can an iPad be used as a softbox or custom background?“, I realized that I am using my iPad more and more in my photography work than ever before.

ipad-paired-with-keyboard-open

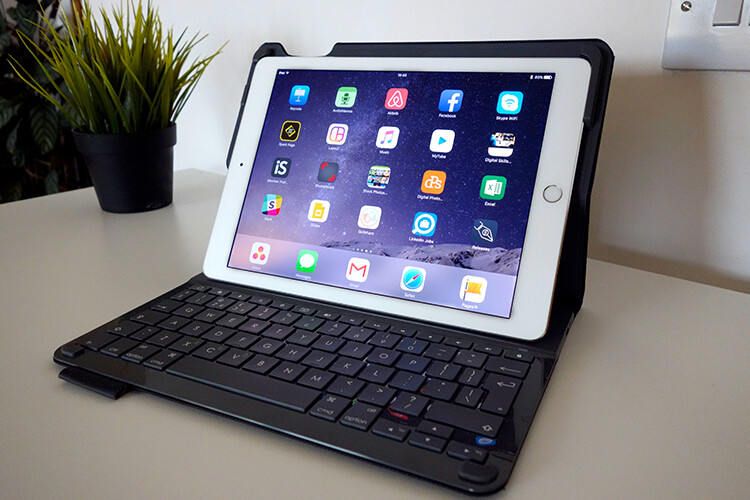
iPad Air 2 paired with a Logitech keyboard

I could go on at length, extolling the many virtues of having an iPad/tablet as a photographer. Instead, I’ll limit my list for now to just six.

Here are my top six reasons an iPad makes a good photography companion

  1. Portability makes it handy to take anywhere
  2. Displaying your work or portfolio makes you look good
  3. Editing and sharing images is easy
  4. Reading and learning
  5. Spoiled for choice with so many Apps
  6. Google Drive

1. Portability of the iPad

The iPad Air 2 and other tablets are just so light, and even more portable than most laptops. The iPad Air for me is the ultimate Digital Briefcase! The dimensions are 9.4 x 6.6 x 0.24 inches (240 x 169.5 x 6.1 mm). It weighs just 0.96 pounds (436 grams). I feel like James Bond! (sorry Jane Bond)

portability

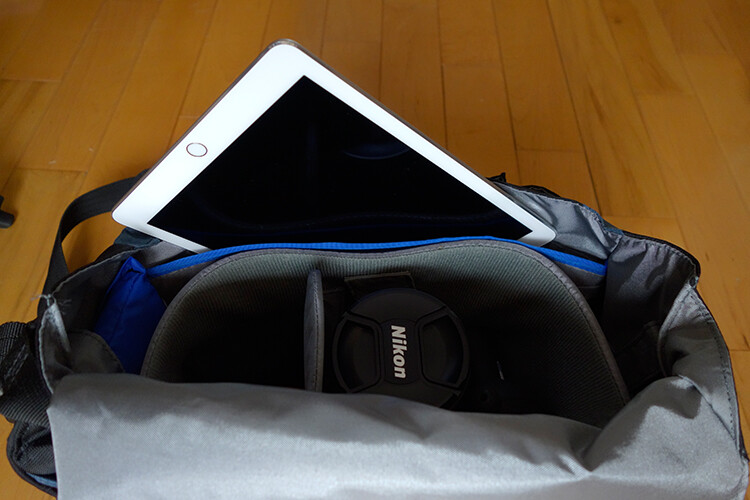
The iPad fits snugly into my camera bag.

2. To display your work

As a photographer, your work should speak for itself. As a commercial photographer, it’s what gets you your next gig. Now more than ever, there are so many ways to get your work online.

The first option is to have a personal website. But this does mean paying for a domain name and hosting. So what if you don’t want to invest in a website? If you are just starting out in your photography career or you’re a keen hobbyist? Again there are many ways to showcase your portfolio online and in most cases for free. For example there is Behance Display, Flickr, 500px and Morpholio to name just a few.

The retina display on the iPad allows maximum clarity of your photos, and makes it very easy for the viewer to look at the details by easily “zooming in” by pinching the screen. Also, flicking through your images or albums with a swipe of a finger, makes the experience much more tactile and hands-on. Similar to flipping pages of a book.

Recently, I met with a client and I needed to bring a digital portfolio with me. I don’t have my full range of work online. I also couldn’t rely on a solid wifi connection. So I put together a portfolio, saved it out as a PDF, and synced it to iBooks on the iPad. A typical page layout program, such as InDesign would be used to put a portfolio together. However, if you just have Photoshop, then here is a great way to create your own portfolio PDF for your iPad from multiple pages.

Creating a PDF portfolio from multiple pages in Photoshop

Open Photoshop and create all your pages the same size, 2048 X 1536 pixels. Place each image and text on a separate page. You can determine how many pages that you want in your portfolio. A general guide is 15-20 pages.

Go up to File>Automate>PDF Presentation. Check this box, “Add Open Files”, and click Save. Name your file and Save it to a location on your computer.

File-Automate-PDF-Presentation

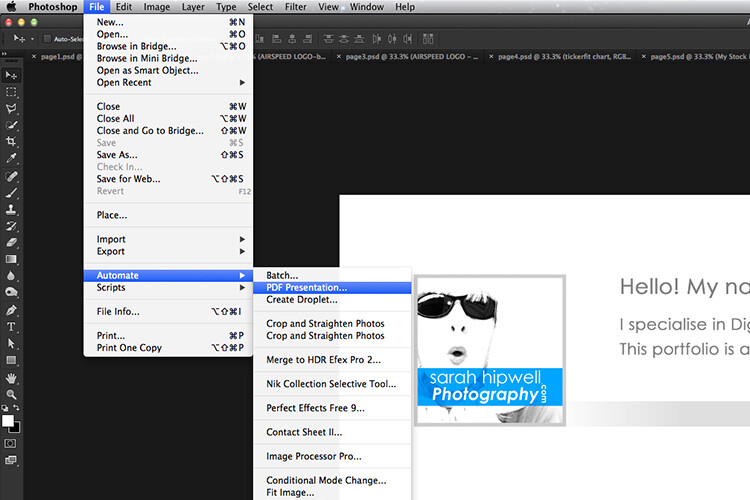
This is handy tip in creating a pdf file from multiple pages or images in Adobe Photoshop.

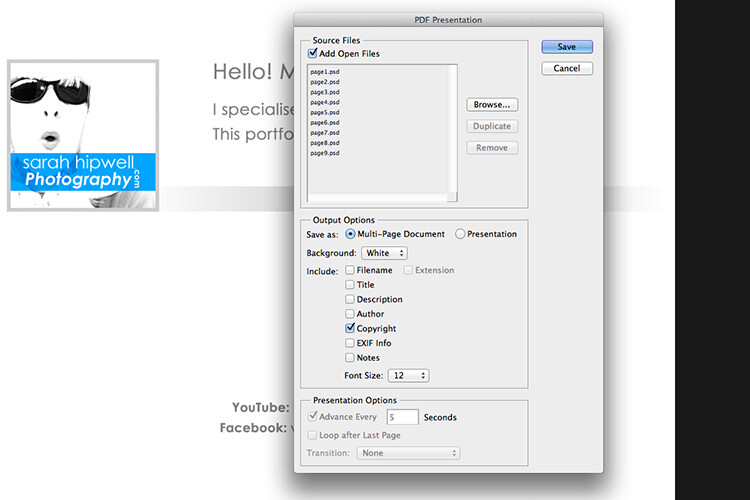
Make sure to check the Add Open Files box.

When another dialog box appears, make sure Optimize for Fast Web Preview is checked.

Optimize-for-fast-webpreview

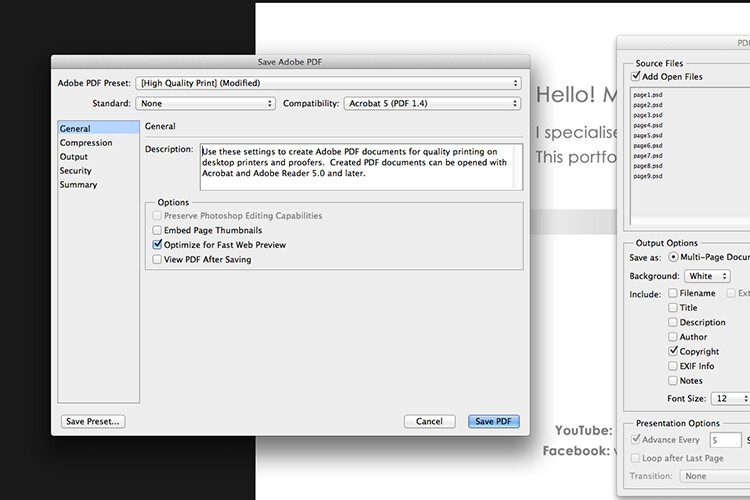
Make sure that the Optimize for Fast Web preview box is ticked.

Click on Compression under General (on the left side, see below screenshot). At the top, change the Adobe PDF Preset to High Quality Print, and next to Image Quality, change the setting from Maximum to Medium. Then click on the Save PDF button.

Compression-image-quality-medium

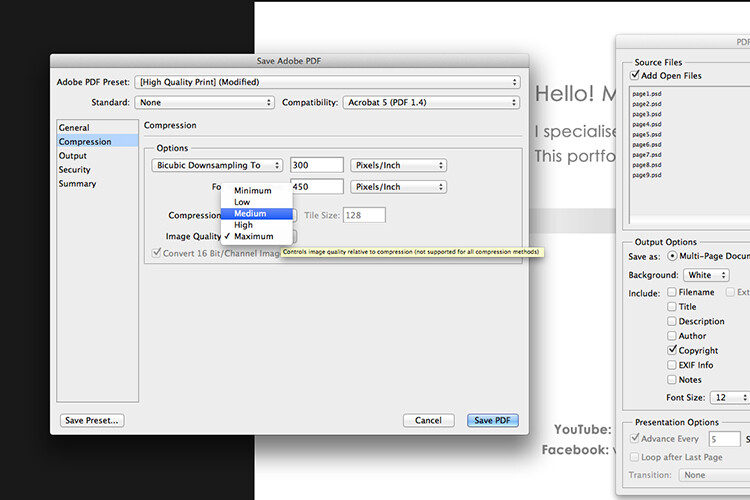
Choose the High Quality Print from the Adobe PDF Preset at the top. Then change Maximum beside Compression to Medium.

Tip: Try and keep the file size below 5mb so as you can email it to potential employers or clients. If you can’t optimize the file size to less than 5mb, then create another portfolio with less pages. PDF files can be viewed on a Mac or PC.

If you don’t have Photoshop, then read on to number six below, and I’ll show you how to create a PDF portfolio using Google Slides.

3. Editing and sharing images is easy

I haven’t done a lot of editing on the iPad. I prefer to do my post-processing at my desktop, where I have the big monitor and stylus. However, I think the iPad Pro could possibly change my mind.

I did try Snapseed. It’s impressive, so intuitive, and free. Other free editing apps are VSCO, Adobe Photoshop Express, and Instagram. What also makes these apps powerful is the ease with which you can share your images online to your social media accounts, or upload them to the cloud.

4. Reading and learning

I’m coming around to reading ebooks and PDFs on my iPad rather than a book. Although, you can’t beat a physical book in your hand. That said, from a practical point of view when travelling, carrying just one book takes up so much room!

I now have my Nikon D750 user manual downloaded on the iPad. This manual alone, although relatively compact in size, still has 507 pages and weighs 310g (11oz).

Tip: If you are using the Safari browser and open a PDF file, you can save it straight to iBooks.

5. Choice of Apps for the iPad

Given the array of apps already in the app store, it’s just not possible to run the gauntlet on them all. Here are a few that popped up on my radar.

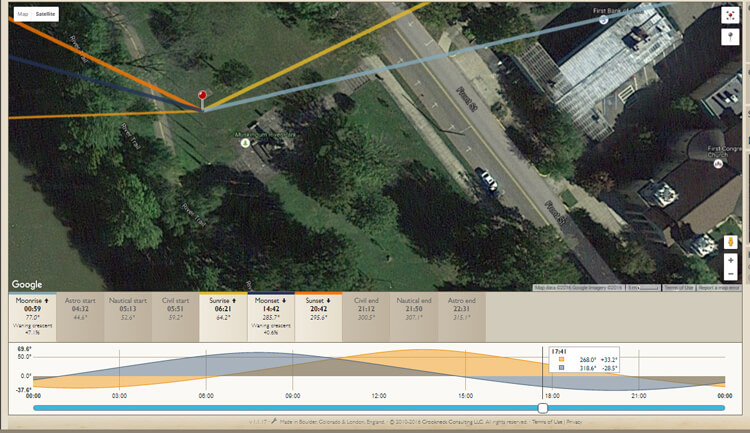
  • LightTrac ($ 8.99): LightTrac calculates and plots the angle of Sun and Moon on top of a map, for any location.
  • The Photographer’s Ephemeris ($ 8.99):  TPE  shows you which direction the sun is shining at any given time during the day, no matter what location you choose.
  • Pocket Light Meter (FREE): A light meter that is always in your pocket. It is indispensable for film photography with a manual camera. Measures reflected light, and allows reciprocity calculations.
  • Simple DoF Calculator ($ 1.99): Simple DoF Calculator allows you to calculate the depth of field and hyperfocal distance for any given settings.
  • Take notes to a new level with Evernote (FREE), the productivity app that keeps your projects, ideas, and inspiration handy across all your digital devices.
  • Photography Releases – 500px has a free one. If you shoot Stock photography, a model/property release is a must have.
  • Snapwire also has a free model/property release. I downloaded this app and found it really useful, especially as it stores the photographer’s information. No need to keep filling in this info for every release. Plus it has the templates for all of the major stock sites.

6. Google Drive

What’s not to like about Google Drive? Google Drive is a complete office suite with Google Docs, Sheets, and Slides. Plus you get 15 GB free storage online. In Google Photos, images not exceeding 2048 x 2048 pixels, and videos shorter than 15 minutes ,also do not count towards this limit. It is hard to find fault with this setup when it’s all free!

It is really a Digital Photo Assistant. You can access email, write and publish blog posts, keep track of your schedule and contacts. Share out documents and collaborate with clients online. I also love that you can work with Google docs offline. This has proven as a great time saver if your internet connection is poor, or you simply don’t have access to an internet connection when you need it.

Google Slides is Microsoft’s version of Powerpoint. Here’s an animated gif to illustrate how easy it is to create your PDF portfolio. It’s well worth giving it a go.

animated-gif-slides-portfolio

An animated gif illustrating how easy it is to use Google Slides to create a PDF portfolio for the iPad.

To sum it all up

It was a challenge to keep this list to just six things. I know this could change over the next few months as I continue to use the iPad.

I didn’t mention uploading your photos from your camera directly onto the iPad. You can, but you need the Lightning to SD Card Camera Reader – $ 29.00 or the Lightning to USB Camera Adaptor – $ 29.00.
I only mentioned a mere smidgen of available apps, and most of those were free. This is only a tip of the app-iceberg-store. Some of the paid apps look interesting too.

It’s mind boggling just keeping up with trends. With the recent launch of the iPad Pro. It won’t be long before the iPad has morphed into a real contender, in place of a laptop, for the photographer out in the field.

Do you have an iPad or tablet? What apps do you use? Please share in the comments below.

googletag.cmd.push(function() {
tablet_slots.push( googletag.defineSlot( “/1005424/_dPSv4_tab-all-article-bottom_(300×250)”, [300, 250], “pb-ad-78623” ).addService( googletag.pubads() ) ); } );

googletag.cmd.push(function() {
mobile_slots.push( googletag.defineSlot( “/1005424/_dPSv4_mob-all-article-bottom_(300×250)”, [300, 250], “pb-ad-78158” ).addService( googletag.pubads() ) ); } );

The post 6 Reasons Why an iPad Makes a Good Photography Companion by Sarah Hipwell appeared first on Digital Photography School.


Digital Photography School

 
Comments Off on 6 Reasons Why an iPad Makes a Good Photography Companion

Posted in Photography


Throwback Thursday: Sony Cyber-shot DSC-F707

08 Sep

Sony’s camera designers have never been shy about trying something different, which explains a lot about the DSC-F707. Introduced in 2001, it was a follow-up to the DSC-F505V, running with that camera’s ‘swiveling lens attached to a body’ design. The F707 appears to be more lens than camera, resulting in what we called ‘a surprisingly usable and ergonomic design’ when we reviewed it. Here’s what the F707 had going for it:

  • 5MP 2/3″ CCD sensor
  • 38-190mm equiv. F2-2.4 lens
  • 1.8″, 123k-dot LCD
  • Built-in EVF
  • 2.8 fps burst (capped at 3 frames)
  • ISO 100-400
  • Memory Stick slot

The F707 had more than a few tricks up its sleeves, something you might guess from its Swiss Army Knife-like appearance. So just what set it apart?

Frickin’ laser beams

The camera was capable of focusing in total darkness thanks to a Hologram AF feature, which throws a Class 1 laser pattern onto its subject and uses that to acquire focus. We found it required some workarounds when trying to focus on certain subjects. And sure, AF assist lamps get the job done now reasonably well, but they’re not nearly as cool as lasers (though nearly as blinding.)

The F707 projected a cross-type pattern with its onboard laser, which it used to focus. The top two “holes” on the list are IR blasters, while the laser can be found toward the right side.

Sadly, NightShot disappeared after the DSC-F717 that followed the F707. Why that happened is unclear, though one wonders if people just didn’t feel comfortable having a laser shined in their eyes.

Night vision… sure, that’s not creepy

The F707 offered Night Framing and Night Shot modes, flipping the Infrared filter out of the way and engaging two IR lamps on the front of the lens. The image on the LCD would turn green, just like night-vision goggles. NightShot mode actually took ‘green’ photos which, while cool, was of limited use. Night Framing, on the other hand, could capture regular color (flash) photos in total darkness. You composed your shot in ‘green’ and when you pressed the shutter release, up came the flash and a color photo was taken.

Here’s the NightShot version of a sunflower, taken in total darkness. Photos by Jeff Keller. And here’s the results you get using Night Framing.

NightShot is probably most famous – or infamous – for different reasons. Sony camcorders (and the F707/F717) equipped with NightShot could be modified to ‘see through’ clothing and other objects. So, if you happen to see an F707 with a dark IR filter on it, run the other way.

Is it a lens? Is it a camera?

Is it a lens? Is it a camera?

The F707 offered an unusual camera-to-lens ratio, which at first seemed unwieldy. But when you stopped fighting the F707’s unconventional design, you found a camera that was surprisingly comfortable to use. Like we said in our review, ‘You find yourself carrying the camera by the lens and using the rear ‘body’ more as a viewing / control platform, which was after all the design aim.’ We chalked it up as a ‘love it or hate it’ feature in our conclusion, ultimately coming down on the side of ‘love it.’

We may have taken a shine to it, but the design eventually trended toward the DSLR-shaped ultrazoom we know today – the DSC-F828 took another stab at the swiveling lens, but 2005’s DSC-R1 embraced a traditional, non-swiveling design. You’ve got to hand it to Sony, though. They haven’t all enjoyed longevity in the market, but some of their ideas have certainly looked well outside of the box.

$ (document).ready(function() { SampleGalleryV2({“containerId”:”embeddedSampleGallery_8204641098″,”galleryId”:”8204641098″,”isEmbeddedWidget”:true,”standalone”:false,”selectedImageIndex”:0,”startInCommentsView”:false,”isMobile”:false}) });
Articles: Digital Photography Review (dpreview.com)

 
Comments Off on Throwback Thursday: Sony Cyber-shot DSC-F707

Posted in Uncategorized


LG V20 comes with dual-cam and stereo sound recording

08 Sep

LG has unveiled the V20, a smartphone with a focus on audiovisual performance that is also the first device to come with Google’s Android 7.0 operating system. The latter brings with it the new multi-window mode, a new notification system, improvements to battery management and the in-app search application, which allows for content search from third-party apps. Thanks to LG’s UX 5.0+ launcher the interface looks very similar to the LG G5’s. 

Also pretty much identical to the G5 is the V20’s camera specification. Like its smaller cousin the new model uses a dual-camera setup. A 16MP sensor is combined with a fast F1.8 aperture and optical image stabilization in the main camera, which is joined by an 8MP/F2.4 unstabilized wide-angle module. There is also on-sensor phase detection and laser assistance for AF. In video mode the new device can record up to 4K resolution and comes with Qualcomm’s new Steady Record 2.0 electronic image stabilization which optimizes synchronization between the image and the device’s gyro. At the front there is a 5MP camera with F1.9 aperture.

In addition, thanks to a built-in 32-bit Hi-Fi Quad DAC, the V20 can record high-quality stereo sound with its videos and eliminate background noise. Recorded images and video can be viewed on a 5.7″ Quad HD display that, like on the predecessor V10, features a secondary small display for quick access to apps, notifications and quick settings.

The Android OS is powered by a Snapdragon 820 chipset and 4GB of RAM. 64GB of expandable storage are on board and the 3200 mAh battery is removable. It also supports Quick Charge 3.0 via a USB Type-C connector. All the components are wrapped up in a smooth-surfaced metal body. The LG V20 will first be released in Korea later this month but availability in other regions, including the US, should be announced soon. 

Articles: Digital Photography Review (dpreview.com)

 
Comments Off on LG V20 comes with dual-cam and stereo sound recording

Posted in Uncategorized


Tamron 18-270mm travel zoom lens gets slight update with fluorine coating

08 Sep
 Tamron’s new 18-270mm…  …and the previous version.

Tamron has introduced an updated version of its 18-270mm travel zoom lens, the Tamron 18-270mm F3.5-6.3 Di II VC PZD model B008TS. Unlike the previous version (model B008), the B008TS features a fluorine coating on the front lens element, in addition to the existing Broad-Band Anti Reflection coating. With the fluorine coating, Tamron says the lens element is water and oil-repellant and less likely to be harmed by dirt, fingerprints, moisture, and dust.

While the fluorine coating is the new model’s biggest change, the folks at Imaging Resource have pointed out some minor cosmetic changes, as well. The gold trim ring found on the previous lens model has been replaced with a silver ring; as well, the overall lens design has been simplified, with both the zoom ring’s and focus ring’s styles being altered. According to Tamron, these changes ‘create an external design with a high-grade feel.’

According to Tamron’s website, the new lens will launch tomorrow in Japan with Canon and Nikon mounts for ¥83,000 before tax.

Articles: Digital Photography Review (dpreview.com)

 
Comments Off on Tamron 18-270mm travel zoom lens gets slight update with fluorine coating

Posted in Uncategorized


Scratching the Surface: Expressive Portraits Chip Away at City Walls

08 Sep

[ By SA Rogers in Art & Street Art & Graffiti. ]

vhils scratched mural 10

Set in neglected parts of the city, scratched into deteriorating surfaces, expressive portraits loom large, often created with nothing more than a chisel. Alexandre Farto, better known as Vhils, creates art through destruction in a process some might consider vandalism – but this is street art, so what else is new? Vhils first caught the public eye when one of his portraits appeared beside a work by Banksy at London’s Cans Festival in 2008, and since then, he’s been taking his work to the next level.

vhils scratched mural 1

vhils scratched mural 2

The portraits splash the faces of anonymous city residents onto concrete, brick, plaster and other surfaces on buildings and walls throughout the world, particularly in the artist’s home city of Lisbon, Portugal. Nobody else is creating large-scale urban artwork quite like this.

vhils scratched mural 5

The process literally cuts through the outermost layers of wall surface, often utilizing scraps of faded billboards to provide contrast with the rougher surfaces hidden underneath. Sometimes, a little bit of paint is strategically used to highlight the image. Some of the works are even applied on top of much older murals completed way back in the ‘70s and ‘80s after the Carnation Revolution, as if the remains of the older ones are fertilizing new growth.

vhils scratched mural 6

vhils scratched mural 7

“As a kid, I remember seeing how these murals would peel,” says Vhils in an interview with The Atlantic. “I started thinking about how my work could use the layers of the past to reflect the city, to show people living in it and how their identity was lost, or forgotten. I started to paint these billboards white, then carve away the negative spaces. It’s not illegal, because that sort of advertising was illegal already. Carving these walls, peeling away these layers, it’s like contemporary archaeology.”

vhils scratched mural 9

vhils scratched mural 8

Vhils divides the images into three colors to create a three-dimensional effect, scratching out the darkest parts of the portraits and highlighting the lightest. Electric drills and chisels make the process easier on hard walls, and in one extreme example, the artist even used explosives to break away some of the plaster, capturing the process for a music video called M.I.R.I.A.M. Follow Vhils on Instagram to catch his latest works.

Share on Facebook


[ By SA Rogers in Art & Street Art & Graffiti. ]

[ WebUrbanist | Archives | Galleries | Privacy | TOS ]


WebUrbanist

 
Comments Off on Scratching the Surface: Expressive Portraits Chip Away at City Walls

Posted in Creativity


Tips for Stress-Free Wedding Photography

08 Sep

As wedding photographers, we love to think photography is the most important element of a bride and groom’s wedding day. Surely they want fabulous wedding photography, so certainly they will give us all the time in the world to create beautiful images.

But it doesn’t really work that way. Weddings are busy. Often you are scrambling to get all the images you need really quickly, leaving no time for the fun, romantic images you really want to create for the couple. Worse yet, someone springs a pose list on you that you weren’t expecting, or changes the location everyone is meeting for family portraits.

Bride groom romantic location photograpy

The easiest way to make sure you have enough time for all the photographs you want to create on the wedding day, is to know how much time you need and to be prepared.

Know how much time you really need

Depending on their style and process, every photographer needs a different amount of time to take photographs at a wedding. As well every wedding is different, with unique locations, bridal parties, and families.

If you are not certain how long it takes you to create the images you need, time yourself. When you know your own process, you will be better able to help the bride and groom accurately schedule enough time for all the photographs.

wedding-flower-bouquets-dresses

Can you travel to the beautiful park the couple wants to use for photographs between the ceremony and reception? Or did they forget to allow for the time it actually takes to drive there? Do you need 20 minutes to photograph the family, or is it really more like 45 minutes when you include the set up of lighting equipment?

Look for open pockets of time in their schedule during the day. You may not get all the photography time together in one block, but when you know how long you need for each session, you can schedule it to work within the couple’s timeline.

Tips for finding enough photography time on the wedding day

outdoor-location-ceremony-barn-wedding

Pre-Wedding planning consultation

Have a pre-wedding consultation. A final consultation one to two weeks before the wedding is a perfect time to go over details. Discussing the timeline with the bride and groom before the wedding will let you see where photography will best fit into the day. It will also help them see how much time you need to do your job well. This is close enough to the big day that they should know all the details, yet far enough out that they can tweak schedules, if need be.

Bride bridesmaids posed wedding

Ask about other wedding vendors. Find out how everyone from the florist to the caterer will also fit into the couple’s day. The follow questions may help you:

  • Ask when hair and make-up appointments are scheduled to be done and where.
  • Find out where the flowers are being delivered and at what time.
  • Ask how long the ceremony will last and how they plan to personalize it.
  • Know if the couple will do a receiving line, or somehow greet guests formally right after the ceremony.
  • Confirm what time they want to arrive at the reception.
  • What time will dinner be served,
  • When would the DJ or band like to start the dance.

Wedding idea list for photographers

Knowing when the other professionals need the attention of the bride and groom will help you know when it’s your turn.

Plan for family portraits. Many photographers balk at the “dreaded pose list,” but capturing family photographs is an important part of wedding photography. To make the process of organizing family portraits easier, find out who’s in the their families, and what groupings are important to the couple. When you set the time for the wedding photographs, have the bride and groom inform everyone of the timeline, so they will be ready when it’s time to start.

Remember to add in travel time. Often the ceremony and reception are in different locations, and sometimes the couple likes to stop off at a third spot just for photographs. Make sure to add in the time that it will take to drive to these places into the schedule.

Wedding planning worksheets photogfaphers examples

Know the sunset time. Whether you want to make sure you have enough light for evening portraits or for sunset images, knowing beforehand when sunset is that day, let’s you plan accordingly.

bride-groom-sunset-romantic-wedding-location

Before the wedding day

Pre-scout your locations. Go to the wedding venues a day or two beforehand, to look over the locations for possible photography backdrops. If you can’t scout before the wedding day, plan to arrive early at the venues to find the spots you will use for photography.

Have the bridal details lined up beforehand. Let the bride and groom know if you’ll want to photograph cufflinks, rings, shoes, jewelry and such details before they get dressed. Having these together and ready saves time.

outdoor-wedding-ceremony-vintage-sign-theme

Consider a “first look.” If your time between ceremony and reception is tight, it can be hard to get all the photographs done. Allowing a special moment for the bride and groom to see each other for the first time at the beginning of the day, can open the couple up to the idea of doing photographs before the ceremony.

On the wedding day

Know how to pose people. Brides and grooms are usually not experienced at posing themselves for photographs. If they aren’t sure how they look, it can take longer for them to get comfortable in front of the camera. When you already have a variety of flattering poses in mind, you are able to quickly move through the session.

Bride groom wedding location photography

Avoid backtracking. Whether you need to set up lighting equipment, gather family for portraits, or go to a cool location with the couple and the whole wedding party, do it only once. When you consolidate, you save time and hassle for everyone.

For example, it’s much easier to ask grandparents, or small nieces and nephews, to attend just one photography session on the wedding day. Pick a time when both the bride and groom will be ready for photographs, and plan to do all the different combinations you need to do at once. There’s no need to ask Grandma to arrive two hours before the ceremony for one photograph, if she needs to stick around after the ceremony for one more.

When the couple does a “first look,” before the ceremony, it can work well to take all the family portraits at that time a as well. Otherwise, immediately after the ceremony is a good time to do them, before people wander off to the reception and start mingling.

Wedding party posed garden

Work down from the biggest groups to the smallest groups. When you have large, extended family photographs to organize, get those done first. It allows people that only need to be present for one or two photographs to leave, letting you focus on the smaller groups with less chaos.

Summary

When you look at all the elements that go into the schedule on the wedding day, you can be prepared. When the bride and groom see how the photography fits into their schedule, they can make sure they have allowed enough time for you to do your job.

wedding-party-bride-groom-kissing

Do you have other tips to add? How do you carve out enough time for photographs on the wedding day?

googletag.cmd.push(function() {
tablet_slots.push( googletag.defineSlot( “/1005424/_dPSv4_tab-all-article-bottom_(300×250)”, [300, 250], “pb-ad-78623” ).addService( googletag.pubads() ) ); } );

googletag.cmd.push(function() {
mobile_slots.push( googletag.defineSlot( “/1005424/_dPSv4_mob-all-article-bottom_(300×250)”, [300, 250], “pb-ad-78158” ).addService( googletag.pubads() ) ); } );

The post Tips for Stress-Free Wedding Photography by Becky Appleby appeared first on Digital Photography School.


Digital Photography School

 
Comments Off on Tips for Stress-Free Wedding Photography

Posted in Photography


Nikon offers ¥500,000 and D5 for its 100th Anniversary prize in annual photo competition

08 Sep

Nikon has announced the opening of the 36th Nikon Photo Contest and is giving away cash as well as a collection of top end DSLR cameras to winners. As the company is celebrating its 100th anniversary it has introduced a special category, the prize for which is ¥500,000 (approx $ 4900) and a Nikon D5 with the AF-S Nikkor 24-70mm F2.8E ED VR lens. A further category in addition to the usual Open section is designed for photographers under the age of 30.

The Grand prize will be a D5 with AF-S Nikkor 24-70mm F2.8E ED VR, while the most popular entry will win a D810 with the same lens. The first prize for each category is the same D810 kit, while 21 second prizes will be awarded of D500 bodies with AF-S DX NIKKOR 16-80mm F2.8-4E ED VR lenses. A total of 35 D5500 bodies will be given away to 3rd placed entries along with a AF-S DX Nikkor 18-55mm F3.5-5.6G VR II each.

The theme for the 100th Anniversary category is ‘Celebration’, and entrance is via a single image that must have been taken on Nikon equipment. The Next Generation category, for under 30s, and the Open category have the theme ‘Future’ and require two to five images per entry or a video of six to 180 seconds. Any brand of camera may be used for these categories.

Entry is free and works may be submitted between 17th October 2016 and 27th January 2017. For more information see the Nikon Photo Contest website.

Press release

Call for entries for Nikon Photo Contest 2016-2017

Neville Brody inaugurated as Lead Judge and two new categories introduced

Nikon is pleased to announce that entries for the Nikon Photo Contest 2016-2017 will be accepted between October 17, 2016 and January 27, 2017.

One of the world’s largest international photo contests since its inception in 1969, the 36th Nikon Photo Contest sees the addition of two new categories. The ‘Nikon 100th Anniversary’ category celebrates Nikon’s upcoming 100th birthday in 2017, and the ‘Next Generation’ category, for anyone under the age of 30, looks to encourage the talent of the next generation of photographers.

World renowned graphic designer and art director, Neville Brody, has been chosen as Lead Judge due to his huge influence on artists, including photographers, both young and old. He says of his role, “The Nikon Photo Contest is recognised globally as a key place to discover new and rising talent, searching out rich, imaginative power and inspiration. As Lead Judge, I feel it is my responsibility to continue this great tradition by selecting works that represent new ideas and superior quality. I am excited to see just how participants express their wonderful ideas and creativity through the works they submit.”

The Nikon Photo Contest 2016-2017 photography and video categories will accept entries recorded with any digital device, including smart devices*, and video entries with a length of six to 180 seconds.

The winners of the Nikon Photo Contest 2016-2017 will be announced in July 2017, with an awards ceremony in Japan, home of Nikon Corporation.

Articles: Digital Photography Review (dpreview.com)

 
Comments Off on Nikon offers ¥500,000 and D5 for its 100th Anniversary prize in annual photo competition

Posted in Uncategorized


Apple unveils iPhone 7 and dual-cam iPhone 7 Plus

08 Sep

Apple has today unveiled the iPhone 7 and iPhone 7 Plus. As with previous generations, the main differences between the two models are screen size and the camera. The 4.7″ 1334 x 750 pixel Retina display in the iPhone 7 is 25% brighter than before and offers a wider color gamut. As before, it supports 3D touch. The iPhone 7 Plus screen offers the same characteristics but is 5.5″ large and comes with a 1920 x 1080 resolution. 

Like its predecessor, the iPhone 7 comes with a 12MP camera. However, the new model features optical image stabilization and sensor readout is 60% faster than before. At F1.8 the aperture of the six-element lens is wider and the new true-tone flash comes with 4 LEDs for more power output and better color balance. There is also a new flicker-sensor that can detect flickering in ambient light and correct for it at image capture. 

Apple claims the new in-house designed ISP is faster than before and can complete tasks, such as noise reduction, image stacking and exposure control in approximately 25ms. The moving Live Photos are now captured using video image stabilization and the 7th iPhone generation is the first capable of saving Raw data in DNG format. There is also 4K video and both 1080p and 720p slow-motion modes. At the front the pixel count has been increased from 5 to 7MP.

Next to the standard 28mm module is a 56mm tele-lens with its own 12MP sensor

The larger iPhone 7 Plus model’s camera comes with all the iPhone 7 features but adds a second camera module. Next to the standard 28mm module is a 56mm tele-lens with its own 12MP sensor, and this dual cam implementation is predominantly used for zooming. In the camera app you can tap a zoom button to change to the 2x lens, and drag it all the way up to a 10x magnification. After 2x magnification the zoom applies digital magnification, but given the ‘base image’ captured by the tele-lens uses a longer focal length than other smartphone cameras, the quality of digitally zoomed images should be better than normal.

The camera’s second headline feature is a shallow-depth-of-field simulation as we’ve seen it on several other devices before. The mode is automatically activated in the Portrait scene mode. ‘Depth Mode’ will be provided via a software update later this year, so we’ll have to wait a little while to find out if it performs better than the systems we’ve seen so far. 

The home button has been improved and provides haptic feedback for notifications and other events. Additionally, the iPhone 7 models are the first ones to come with stereo speakers which provide twice the volume and a higher dynamic range than the previous generation. The devices are powered by Apple’s new A10 Fusion 64-bit four-core chipset, of which Apple says it is 40% faster than the previous A9 chip. Thanks to a new GPU graphics power has been increased by 50% as well.  

In terms of design, the new models come with a similar basic shape to the previous generation but the antennae are now embedded in the enclosure and therefore almost invisible. The new models are also available in a new high-gloss finish which goes through an anodization process for protection. The body is water and dust resistant in line with the IP67 standard and will be available in jet-black, black (blasted aluminum), gold, silver or rose gold. There will be 32, 128 and 256GB storage options for both new models and pre-ordering starts on September 9. Start of shipping is scheduled for September 16.

The iPhone 7 starts at $ 649 for the 32GB version, for the Plus model you’ll have to invest at least $ 769.

Articles: Digital Photography Review (dpreview.com)

 
Comments Off on Apple unveils iPhone 7 and dual-cam iPhone 7 Plus

Posted in Uncategorized