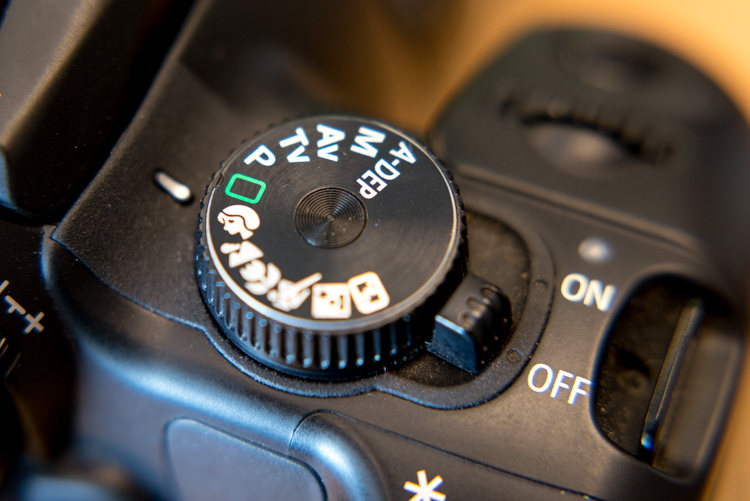
If you have a more advanced camera like a DSLR or mirrorless, or even a high-end pocket model, it’s a good bet that somewhere on the top of the camera body you will find a circular dial (the camera mode dial) with a whole lot of strange letters like: M, Tv (or S), Av (or A), P, and maybe even a U1 or U2 (or C1, C2) thrown in for good measure. There is also a friendly safe green option, that may say Auto, or depending on the type of camera you have, is just represented by a green rectangle.
Most beginners know this option the best, since it essentially puts your camera in the driver’s seat, and forces it to do all the heavy lifting of figuring out the exposure, while all you need to do is point your camera in the right direction. If you like shooting in Auto and you are happy with your pictures, then don’t let anyone tell you that you need to change, or that you aren’t a good photographer.
However, if you would like to branch out a little bit, and learn to make your camera do what you want in order to make the photos you desire, then the mode dial is your key to a whole new world of photographic creativity. It can be somewhat daunting, and those strange letters don’t inspire much confidence for beginners who already feel overwhelmed. So I’ll walk you through the basic functions of the mode dial one by one, and give you the information you need to start experimenting with some of your camera’s more advanced settings.
Auto Mode
This one might seem fairly self-explanatory, but I’d like to offer some detail about what Auto mode actually does. In most situations, your camera is going to do whatever it can to make sure the pictures you take are properly exposed (in other words, not too dark nor too bright). There are three main things that govern exposure (Aperture, Shutter, and ISO – otherwise known as the Exposure Triangle) and Auto mode takes care of setting the values of all three of these elements for you. If your camera has a flash, it may decide to fire it, order to brighten up a scene that is quite dark, which often happens indoors or at night. Auto generally does a good job at allowing you to take decent photos in a variety of situations.
Sometimes Auto mode is all you need to get the pictures you want.
P: Program Auto Mode
When you want to branch out from Auto mode, this is a good place to start. Program Auto does exactly the same thing as the familiar, comfortable green Auto mode, but with a twist – you can change a few settings if you want. Using Program Auto allows you to do things like decide whether you want the flash to automatically pop-up or turn off altogether, as well as change the ISO and the White Balance.
It really gets interesting when you turn the rotating circular dial (called a control wheel) on the top or back of your camera, which lets you take some degree of control back from your camera. In Program Auto your camera will always try to maintain a properly-exposed picture, but you can use the dial to change the aperture and shutter speed at the same time. It’s a fun way to experiment with your camera while being reasonably certain that you will still get good pictures, and also start to notice some of the effects that changing the aperture and shutter speed has on your final images.
Program Auto can be a great way to help you get the shot you want by changing the shutter speed and aperture with a simple flick of your thumb.
Av (or A): Aperture Priority Mode
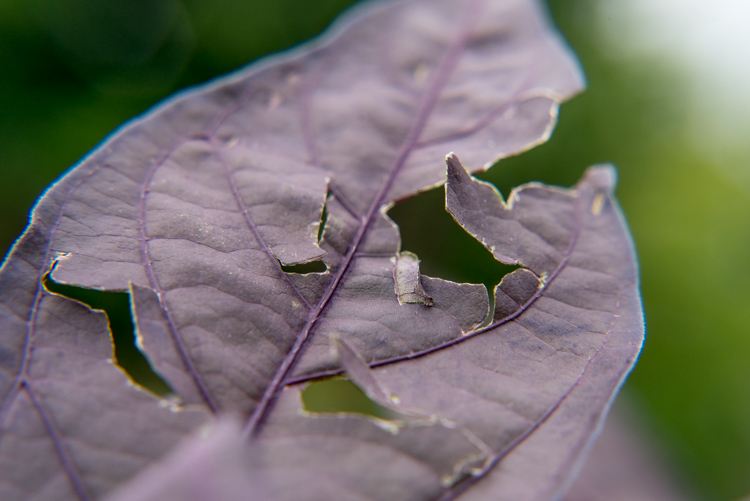
When you want to have full control over the aperture in your lens (and thus also control the depth of field), this is the mode to use. It lets you turn the control wheel on your camera in order to adjust the aperture alone, while the camera decides what ISO (if you use auto ISO) and shutter speed to use.
If you have plenty of available light this is a fantastic mode to be in, because you can choose whether you want a wide depth of field (i.e. everything in focus) or a shallow depth of field (just your subject in focus, with foreground/background elements blurry) and know that the shutter speed and ISO will be set automatically to get the shot you want. However if you are shooting in low light, you might end up in a situation where you set the aperture you want, but your camera chooses a shutter speed that is too slow, or an ISO (again only if you are using Auto ISO, if you are manually setting the ISO you will still have to adjust that yourself) that is too high for your liking.
My personal favorite mode to shoot in is Aperture Priority with Auto-ISO, which means my camera won’t use a shutter speed that’s too slow (you can usually set the parameters for minimum shutter speed in your camera’s settings via the menu options – consult your user manual if you aren’t sure), and will instead raise the ISO.
I knew I wanted a shallow depth of field for this shot, so I used Aperture Priority mode to select a wide aperture, and let my camera figure out the rest.
Tv (or S): Shutter Priority Mode
You may have already guessed what this mode does, based on the explanation of Aperture Priority above. Shutter Priority Mode is essentially the opposite. In this mode you tell the camera what shutter speed to use, and let it calculate the aperture and ISO (when using Auto ISO). It is particularly useful if you are shooting fast action like a race or sporting event, because you can set your shutter speed to be fast enough to freeze the motion of the subjects, and know that your camera will select whatever aperture and ISO values are needed to get the shot. Most cameras can shoot as fast as 1/4000th of a second which is plenty for freezing motion, or as slow as 30 seconds, which can be fun for nighttime photography and capturing light trails.
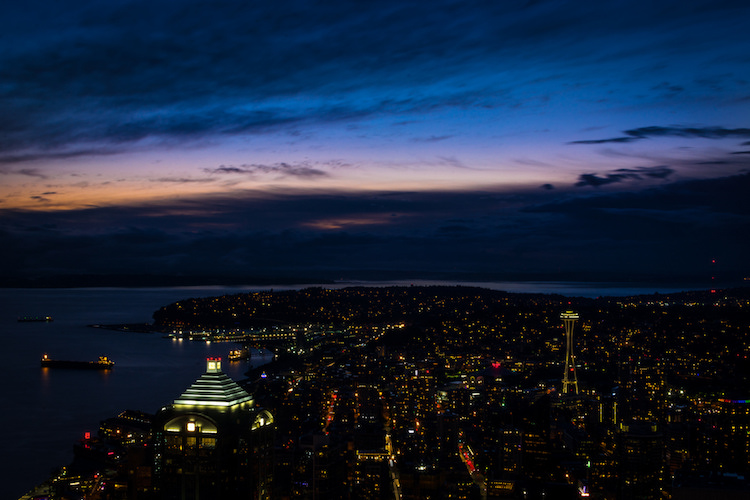
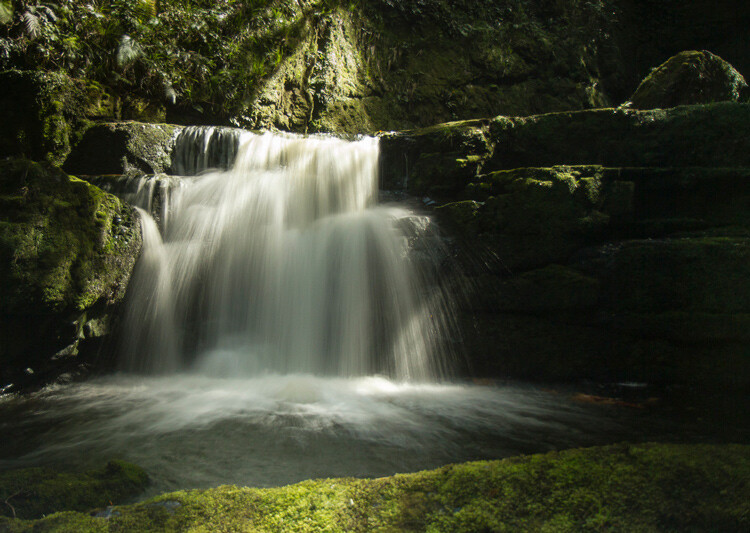
I used Shutter Priority with a value of 30 seconds to get this shot of the Seattle skyline, from the Columbia Tower Observation Deck.
M: Manual Mode
This is the granddaddy of all camera modes, because you have to choose all three settings: Aperture, Shutter Speed, and ISO. Shooting in manual can be a little scary at first, but the trick here is to learn to use your camera’s light meter, which will tell you if your picture will be over, or under-exposed. When you put your camera in Manual ode, the control wheel will only change one parameter of the three aforementioned settings at a time, so you may need to press another button while turning the wheel, or navigate to one of your camera’s menus in order to select a different value. With enough practice you will easily get the hang of it.
Shooting in Manual can be challenging, but intensely rewarding, as you learn exactly how to control your camera to get precisely the picture you want. Any situation can be good for Manual, provided you are well acquainted with your camera and how it operates.
Learning to shoot in Manual mode may seem daunting at first, but it’s incredibly liberating when you learn how to take full control over every element of exposure.
U1 (or C1): Storing custom user settings
Not all cameras have these options, but if yours has the ability to save custom user settings, you may want to investigate it a little more to start taking advantage of how this can help you. These custom settings allow you to specify a set of parameters, not just for exposure, but for other options like: shooting in JPG or RAW, shooting mode, White balance, enabling Auto ISO, and others – then instantly switch to those settings with just a click of your dial.
One thing I find these user storage banks useful is for having U1 (may be called C1 or something else on your camera) store a set of parameters that is a good starting point for indoor photography, such as a wider aperture and higher ISO, and then using U2 for outdoor pictures. The values and parameters can all be changed once you click over to a U1 or U2 storage bank, but it’s an incredibly handy to instantly change to a specific custom baseline for shooting different types of scenes.
Other things you could use it for are: saving settings for panning, bracketing for HDR shots, low light photography, portrait settings, landscape settings, etc. Use them for the types of things you do most often, or need to access quickly.

I have U1 configured to be ideal for outdoor portraits, so no matter what I’m doing I can instantly switch over to those settings to get the shot I want.
Preset Program Modes
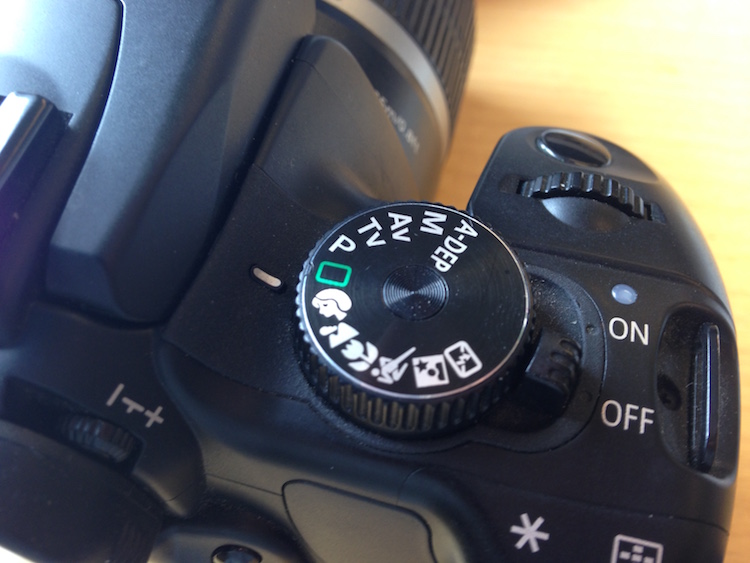
Think of these as custom Auto settings, each one suited for a different type of photography (look for the mountain, flower, person or sports figure on your mode dial). If you are perfectly happy shooting in Auto mode, but get frustrated when it doesn’t always give you the results you want, you might want to try using one of these instead.
Each option includes a specific set of parameters, kind of like the U1/U2 storage banks, that is ideal for taking pictures in certain types of settings. If you like going outdoors and taking shots of landscapes, twist the dial away from Auto, and over to the mountain icon, which will force your camera to use smaller apertures and lower ISO values that are suited for this type of photography. If you are watching your kids play football or run around at the park, use the icon with a person running, which will make your camera use faster shutter speeds and higher ISO values, if necessary, to freeze the action.
Each one of these icons is calculated and calibrated by your camera’s manufacturer to deliver good results in various types of situations, and they often deliver better images than just shooting in Auto mode.

Using the icons on your camera can help you get the specific type of picture you want; the Portrait mode worked here because it forced the camera to choose a wider aperture, resulting in a blurry background behind the subjects.
Other Common Modes
There are plenty of other modes you might find on any given camera, and each manufacturer includes a slightly different set of options, so it’s difficult to make a list that includes an explanation of all available functions. Here are just a few more that you might find, along with brief explanations. If your camera has something that’s not on this list, it may well be worth your time to open up your user manual and investigate. You may find some very useful modes for helping you take better pictures that were hidden in plain sight all along!
A-Dep: A fully automatic mode that lets you pick two points (in the foreground and background) that you want to be in focus, and your camera selects the aperture needed to get everything between those two points in sharp focus. The abbreviation stands for Automatic Depth of Field and it’s fun to play with, but doesn’t always work out so well in practice.
Box with Lightning Symbol Crossed Out: Another automatic mode that also disables the flash. It’s good if you want to shoot in low-light situations and only use available light, but your pictures may come out grainy or blurry.
Flower (macro): This is useful for shooting subjects at close range, such as flowers, or other small objects. It doesn’t affect the properties of your lens, which are far more important when shooting close-up subjects, but merely tells your camera to set the focus priority on things that are closer instead of farther away.
SCN/SCENE: Similar to the icons you may find on a mode dial, this lets you choose from several built-in scene examples, in order to help your camera figure out the appropriate shooting parameters to use.
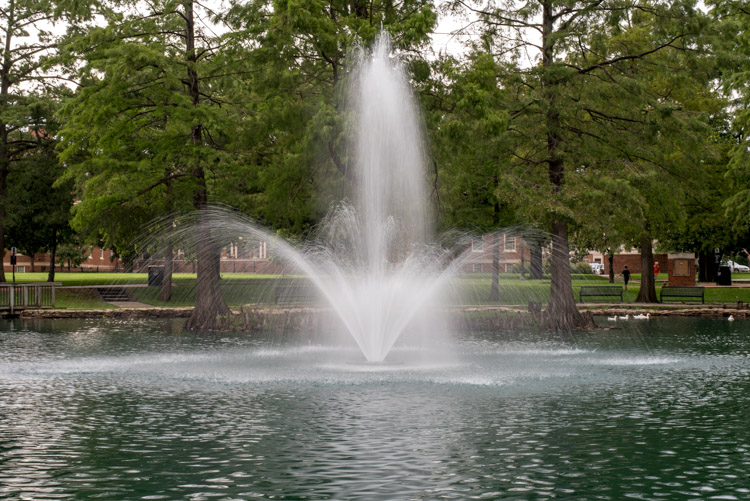
Though I shot this in the day, the nighttime scene mode worked well because it forces the camera to use a slow shutter speed, which resulted in a nice blurry fountain.
Do you like using the mode dial on your camera, or do you prefer to leave it in just one position for all your shooting needs? Do you have any other tips or tricks you have learned from using the various functions on your mode dial? Did I leave out any critical information you think might be useful to someone learning to use the mode dial? Please leave your thoughts in the comments below.
googletag.cmd.push(function() {
tablet_slots.push( googletag.defineSlot( “/1005424/_dPSv4_tab-all-article-bottom_(300×250)”, [300, 250], “pb-ad-78623” ).addService( googletag.pubads() ) ); } );
googletag.cmd.push(function() {
mobile_slots.push( googletag.defineSlot( “/1005424/_dPSv4_mob-all-article-bottom_(300×250)”, [300, 250], “pb-ad-78158” ).addService( googletag.pubads() ) ); } );
The post A Simple Explanation of the Camera Mode Dial by Simon Ringsmuth appeared first on Digital Photography School.


You must be logged in to post a comment.