RSS
 

Archive for August, 2016

How to Shoot Real Estate Photography Using Natural Light

14 Aug

There’s something about the way sunlight illuminates a room. The light pours over surfaces, metal fixtures gleam, wood detail shines, and the edges of furniture upholstery glows. Natural shadows produced by different objects convey a sense of depth. A naturally-lit image gives you a feel for what it would be like to see the space in person.

1 dining

The following will give you a basic understanding of equipment needs, how to manage contrast and mixed lighting in a room, and HDR shooting techniques to get you started doing real estate photography using natural light.

Equipment

Shooting with natural light has the benefit of a short equipment list. A camera, tripod, and wide angle lens is all you need.

  • Camera: A DSLR with auto-bracketing will increase your shooting speed and ease.
  • Tripod: Your tripod should be sturdy enough that your camera will stay put if you need to manually adjust camera settings, while shooting a series of bracketed images.
  • Wide Angle Lens (with lens hood): For cropped sensor cameras, the Tokina 11-16mm is a fantastic choice for real estate photography. The Canon 10-22mm is also a great option. You’ll be able to handle just about any real estate shooting situation with either of these aspherical lenses. For full frame cameras you’ll want a lens in the 16-35mm range. A lens hood is necessary to prevent lens flare.
  • Not required, but definitely a bonus: Circular Polarizer. In addition to deepening blue skies, a circular polarizer can be very helpful in reducing glare on windows, foliage and pool surfaces.

Sunlight on the exterior

A sunny day is the best canvas for your exterior shots. Try to schedule your shoot during a time of day when the sun will be shining on the front of the house. Ask your client (or check Google Maps) to see which direction the house faces. You want capture the front exterior in its best light, as it’s almost always used as the featured image for the property’s listing.

2 exterior sun darlene

If it’s not possible to shoot the exterior in sunlight, don’t fret. Shooting HDR (explained later on) will help perk up a shady exterior.

851 Cabrillo Ave 05 Exterior print

4036 Baldwin Lane 01 ExteriorFront

Camera position within a room

There’s usually one ideal spot in a room, to position your camera to showcase the best angle. A room’s best angle usually shows:

  1. As much of the room as possible.
  2. The most aesthetically pleasing furniture and/or architectural elements.

For the natural light photographer, finding that spot depends on two things: available space, and window brightness.

Most importantly, you need to pick a space you can physically occupy. For smaller houses and rooms, quite often your only choice is the doorway, as it is likely to be the only spot where you can fit behind the tripod, and still squeeze enough of the room into your shot. Capturing three walls in your shot will give the viewer a better idea of the size and space of the room.

Rooms large enough to offer more than one shooting location often have windows lacking shades or blinds. Pick a spot in which extremely bright windows are angled more than 45 degrees away from center of your lens’ field of view. Doing so will help you avoid a high-contrast shooting situations and potential lens flare, which will in turn reduce your time spent in post-production.

4 side light

The shooting location for this image placed the bright window at a 90-degree angle to the lens, minimizing contrast, as well as producing a pleasantly side-lit scene. An out of frame kitchen window, provided supplemental light from the right.

5 low contrast window

This room’s patio doors looked directly onto a foliage-covered hillside, resulting in a reduced contrast between interior and exterior, and less work required in post-production.

Working with windows

The windows in smaller rooms, such as bedrooms and bathrooms (in which your shooting position is limited) usually have blinds or shades. If the windows are bright, consider closing them at least partially, to reduce contrast between the interior and exterior – especially if the view outside is not an additional selling point for the house. This cuts down on the overall contrast of the scene, while still illuminating the room. It also prevents direct light from hitting your lens, minimizing flare and ghosting.

6 bed shades

Blinds are angled at 45 degree to cut down on scene contrast.

7 living partial

Blinds on the brightest window are partially closed, whereas the patio door blinds were left open.

Shooting HDR

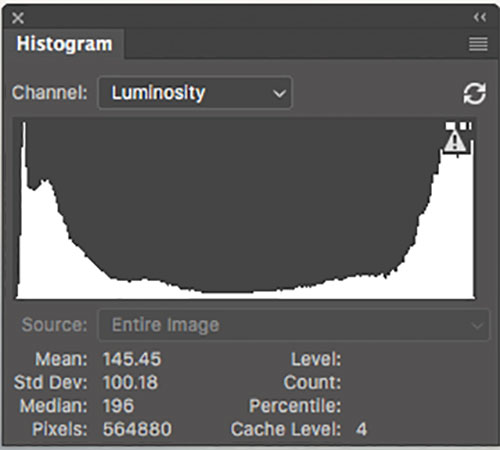
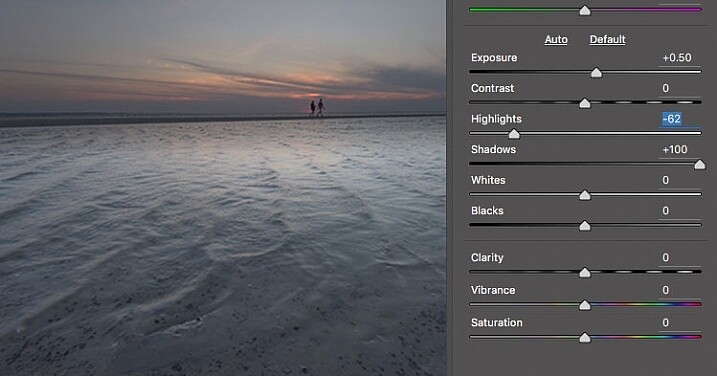
Natural light can create beautiful images, but they do require some extra work in post-production. Rarely can a single exposure handle the range of contrast produced by an interior space with windows. HDR techniques will help remedy shadowy corners and bright windows, properly exposing all parts of the space.

8 bed no hdr

From a single exposure.

9 bed hdr

HDR composite created with nice bracketed images.

To create an HDR image, you’ll need to shoot a series of bracketed images. Tiny rooms without any windows, such as washrooms and closets, usually require three images bracketed by 1-1.5 stops. In most rooms 5-7 images will do the trick. High-contrast spaces containing bright interior lighting and/or windows, may require nine bracketed images. For rooms with exterior views, sometimes HDR programs have difficulty rendering the contrast, no matter how many bracketed images you shoot, and the composite starts to look unnatural.

In general, it’s difficult to achieve a natural look within an image that contains a room with a view. For finer control over this interior/exterior blending process, consider shooting an image to expose for the view out the window, then using Photoshop to mask the view into the HDR composite image of the room.

10 view hdr

HDR composite image.

11 view hdr+extra image
HDR composite with an additional image exposed for the view masked into the windows with Photoshop (above). Even though the change is subtle, the potentially distracting overexposed window scene is now closer to proper levels, making it easier for the viewer’s eye to move from the interior to exterior, and back again.

Mixed lighting inside

One of the difficulties of working with natural light, is dealing with mixed lighting situations. If enough light is coming in through the windows, you can choose to leave interior lights off, resulting in a single daylight color temperature throughout the image. Leaving interior lights off works especially well when window light is sufficiently illuminating the room, the light fixtures themselves aren’t in the frame, and the palette of the room is mostly white.

12 bath sunlight only

Lights off in this bathroom resulted in a fresh and clean look.

13 bed sunlight only

The window light was so abundant in this bedroom that turning the interior lights on could have arguably made the scene look unnatural.

14 living sunlight only

The interior lights were kept off to avoid mixing tungsten with daylight for this shot. Turning them on wouldn’t have added much illumination, as the sunlight was quite bright on its own.

If the room isn’t bathed in sunlight, or contains light fixtures like pendants or chandeliers that should be on display, make sure to turn them on. You’ll end up with multiple color casts that will require correction later, but there’s a point at which simplifying the lighting just to speed up post-production, starts to undermine the ambiance of the room.

15 living mixed

Mixed lighting in the living room above, and the bedroom below, required a significant amount of color correction in production, but resulted in more inviting and warmer looking spaces.

16 bedroom mixed

You can reduce your color correcting time by masking in the lights, the same way you would the view outside a window. Shoot the room with the lights off, then with the lights on. Create two HDR composites of each lighting situation, then mask in the illuminated lights. This works well with fixtures that don’t provide much illumination but should be seen turned on.

17 dining chandelier off

HDR composite with chandelier off.

18 dining chandelier on

HDR composite with the illuminated chandelier masked in with Photoshop.

Conclusion

Shooting real estate with only sunlight and interior lighting lends a beautiful, natural aesthetic to your images. When setting out, remember:

  • A wide angle lens is a must-have, along with camera and tripod.
  • Shoot the exterior bathed in sunlight, if possible.
  • Avoid shooting directly into extremely bright windows.
  • Adjust shades and blinds to control contrast within a room.
  • Decide how to deal with mixed lighting, and shoot different variations to give yourself plenty of options in post-production later.

Please post your questions and share your real estate photos in the comments below.

googletag.cmd.push(function() {
tablet_slots.push( googletag.defineSlot( “/1005424/_dPSv4_tab-all-article-bottom_(300×250)”, [300, 250], “pb-ad-78623” ).addService( googletag.pubads() ) ); } );

googletag.cmd.push(function() {
mobile_slots.push( googletag.defineSlot( “/1005424/_dPSv4_mob-all-article-bottom_(300×250)”, [300, 250], “pb-ad-78158” ).addService( googletag.pubads() ) ); } );

The post How to Shoot Real Estate Photography Using Natural Light by Lauren Schroeder appeared first on Digital Photography School.


Digital Photography School

 
Comments Off on How to Shoot Real Estate Photography Using Natural Light

Posted in Photography


Scan & Draw: Color-Mixing Pen Can Make 16 Million Hues & Shades

14 Aug

[ By WebUrbanist in Design & Products & Packaging. ]

color scanning pen

A new pen aims to take art to the next level, letting users scan colors from their surroundings and deploy them, all via a single gadget. The Cronzy can be employed to scan plants, walls, cloth, and other surfaces; a connected app can then save, collect and use these colors on the go.

color draw pen

The scan-and-draw concept has been around for years, but getting this versatility and complexity into a single small and portable device has been a challenge. Some tools on the market can deploy present mixes and others can scan natural and built environments. This one taps your smartphone’s computing power to speed up and scanning and combines it with a cartridge-enabled drawing device.

The scanned colors, tints and shades are converted into CYMK (matching the swappable cartridges) or RGB formats so they can be deconstructed, remixed or adjusted according to an artist’s whim on a connected device. The gadgets comes with a portable case and charger and works with Android, IOS and Windows phones.

color draw app

Naturally, they can be shared with other users as well this way, allowing people to create and distribute custom palettes for further use. For now, the device is in crowdfunding, but its makers aim to have a consumer model on the market by early 2017. If the prototypes are any indicator, this could be the best one-stop digital-plus-physical drawing tool to date.

Share on Facebook


[ By WebUrbanist in Design & Products & Packaging. ]

[ WebUrbanist | Archives | Galleries | Privacy | TOS ]


WebUrbanist

 
Comments Off on Scan & Draw: Color-Mixing Pen Can Make 16 Million Hues & Shades

Posted in Creativity


Using a Flat Picture Style for Better Finished Images

13 Aug

During my career in photography, I’ve continued to evolve, both my shooting and editing styles, to achieve the results I wanted. Several years ago, while working with film editors on a cinema project, I came across a concept that I decided to apply to my own photography, and I have to say, it has improved my final images a great deal. Let me explain about using flat picture styles.

Finished-Image

When Hollywood studios film a movie using a digital cinema camera, many times the camera will be set to record what is known as Log Gamma. This is similar to the picture styles that we DSLR and camera users have come to know and love. But while picture styles or picture controls are for the most part intended to provide a finished look, Log Gamma does just the opposite. A video file shot using Log Gamma will be very flat, with little contrast and color saturation. The purpose of shooting video this way, is so that it retains as much information as possible about the range of tones in the image, so the colorists who work on the video later can bring out that detail, and create a visual look to the film. This process is called color grading.

As I began to understand what the colorists were doing, I adjusted my workflow to allow me to take advantage of the same concepts. I find that by using a flat, low contrast, low saturation picture style, when I process the RAW file I can bring out better detail and contrast, and avoid clipping in the highlights and shadows.

Choosing a Flat Picture Style

Before Image With Histogram

A flat or neutral picture style will give you an image with the least contrast, maintaining better highlight and shadow detail. This allows you to bring out those details in processing. The histogram on your camera, and later in Photoshop or Lightroom, allows you to see where your highlight and shadow tones fall, to avoid clipping.

I had been shooting RAW for some time, but have left the Picture Style set to Standard or Landscape, for the most part. Once I saw this technique, I decided to change my picture style on my camera to Neutral (for Canon cameras) or Flat (on newer Nikons).

Canon Picture Style

Canon Picture Style

The reason is that the histogram shown on the back of the camera, as well as the image preview, reflect the selected picture style. The result is that if the picture style selected is a more contrasty one, such as Landscape, the histogram will reflect that, and may indicate clipping of highlights or shadows, especially in a contrasty scene.

Clipped Histogram

This histogram shows clipped highlights, meaning detail is lost in the brightest areas of the image.

On my Nikon D810, I use the Flat picture control, because it is the best choice for capturing the full range of tones in the scene, and those tones are reflected on the histogram on the back of the camera when I review the shots. This is important because I need an accurate indication of where the highlights and shadows in a scene fall in my histogram.

Nikon 810 Flat Picture Control

Nikon 810 Flat Picture Control

Nikon picture control

Nikon picture control – if you do not have Flat, choose Neutral or Faithful

The histogram on your camera is a graphed indication of where the pixels in your image fall in relation to highlights and shadows. The left edge represents blacks, the mid-left represents shadows, the middle is midtones, the mid-right is highlights, and the far right is whites. While not all cameras have a Flat picture control or style, most have a Neutral or Faithful picture style or control, that works similarly. Also, most cameras give you the ability to edit the picture styles, so you can turn down the contrast if you like, ensuring that you capture more highlight and shadow detail, and reducing the chances of clipping highlights or shadows.

When you clip highlights, objects in the scene that are clipped will show as pure white with no detail. When shadows are clipped, objects in those areas will show as pure black in the scene, also with no detail. When viewing the histogram, if the squiggly lines that make up the graph are pushed up against either the left or the right side, that is called clipping. When that happens, you are losing detail in the shadows if it’s pushed against the left, and in the highlights if the graph is pushed against the right. By reducing the contrast in the picture style, you’ll reduce the chances of losing detail in the scene.

Shooting RAW, and knowing I’ll be making adjustments in post, it doesn’t really matter what picture style I use, because I can change that when processing the RAW file. But it’s essential to be able to see an accurate histogram on my camera, to ensure I’ve captured as much tonal range as possible.

Processing the RAW File

Image photographed using flat picture control

This image was shot using the Flat picture control, and then the highlight and shadow sliders in Adobe Camera RAW were adjusted to further reduce contrast.

Once I begin processing the RAW file, I’ll do even more, if necessary, to flatten the image and compress the range of tones within the histogram. This includes using the Highlights and Shadows sliders in Adobe Camera RAW to bring out details on both ends of the histogram.  You can watch the histogram change in Adobe Camera Raw or Lightroom as you do so, to be sure you don’t go too far. If the highlights begin to look muddy, you’ve gone too far. By the same token, if the shadows start to look washed out, that’s probably too far as well. You want to maintain detail in each, but not lose the depth of tone completely. It’s important to note that this adjustment will vary for different images, depending on where the highlights and shadows fall in the images.

In addition to adjusting the highlights, shadows, and contrast here, I will use the Dehaze slider, Lens Correction, and Spot Removal brush in Adobe Camera RAW. If you prefer, you can use the Vibrance, Saturation, and Adjustment Brush to complete the image in Adobe Camera RAW or Lightroom, but my preference is to work in Photoshop. There I can use a Layers workflow along with masking and Adjustment Layers and with various plugins, to achieve my final image.

Building Up Color and Contrast

Using Adjustment Layers

Using Adjustment Layers in Photoshop, I built up the color saturation and contrast to achieve the final image.

Once I have the image at the desired level of flatness, I then go about building up color saturation and contrast, or in Hollywood terms, color grading my image. After bringing the image into Photoshop, there are a number of ways you can go about this. The first is to use adjustment layers so that you can continually adjust each layer as desired, until you flatten the image for your final output. In addition, if you’re making an adjustment that you only want to apply in certain areas, you can use layer masks to hide or reveal it as desired.

Many of these adjustments will be to personal taste. I personally prefer my images to have punchy color and contrast. So a set of adjustment layers I might use would be Vibrance, Exposure, Hue/Saturation, Curves, and Exposure.  The flexibility of using adjustment layers allows me to direct adjustments where I need them, rather than being forced to make them globally.

Image processed with Nik Color Efex Pro

This is the same image, but I used Nik Color Efex Pro to achieve the final image instead of adjustment layers.

If adjustment layers aren’t your thing, perhaps using a plugin such as Google’s Nik Efex Pro. It’s now available at no cost, and is a software package I highly recommend. I’ve created several presets in Color Efex Pro, and will also use Viveza and its control points to further adjust my image. For landscapes, in Color Efex I have created a preset using Brilliance/Warmth, Pro Contrast, Skylight Filter, Detail Extractor, and Vignette:Lens, that I find to be pleasing for a majority of my landscape images. Depending on the image, I will tweak these settings to meet my vision.

Summing Up

Before and After

On the left is the image with its tones flattened and desaturated, using a Flat picture control and adjusting highlights and shadows as needed. On the right is the image fully processed building contrast and color saturation.

By starting with a flattened file, you give yourself room in the range of tones to build contrast and saturation, without clipping highlights, shadows, or any of the color channels. While shooting with a more finished picture style may look more pleasing on the camera’s LCD screen, or upon import into Lightroom or Photoshop, the contrast has already been adjusted to give it a pleasing look. Any adjustments to Saturation or color may result in a file that at the very least looks overcooked, and at worst, shows evidence of clipping highlights, shadows, or color channels.

An image showing before and after color grading.

On the right is the image with the flat picture style, while the left has been “color graded” in Photoshop.

Building-contrast-2

googletag.cmd.push(function() {
tablet_slots.push( googletag.defineSlot( “/1005424/_dPSv4_tab-all-article-bottom_(300×250)”, [300, 250], “pb-ad-78623” ).addService( googletag.pubads() ) ); } );

googletag.cmd.push(function() {
mobile_slots.push( googletag.defineSlot( “/1005424/_dPSv4_mob-all-article-bottom_(300×250)”, [300, 250], “pb-ad-78158” ).addService( googletag.pubads() ) ); } );

The post Using a Flat Picture Style for Better Finished Images by Rick Berk appeared first on Digital Photography School.


Digital Photography School

 
Comments Off on Using a Flat Picture Style for Better Finished Images

Posted in Photography


The good, the bad and the ugly of aerial photography – part 2: aircrafts

13 Aug
My favorite image from the Holuhraun volcanic eruption, Iceland. Not only did I shoot multiple versions, I also asked the pilot to fly as slowly as possible and to return to this angle repeatedly so I could make sure I have the composition just right. This was easily done with the helicopter.

In the previous article I talked about some of the advantages of aerial photography. Now we’ll talk about some logistics, starting with the aircraft. There are two main options here: a light airplane or a helicopter. Yes, you can shoot from a hot air balloon but that’s not really an option in most places, plus it’s far less maneuverable, so I’ll gently disregard it. Also, while drones are taking the world of aerial photography by storm, the considerations discussed in this series don’t really relate to them, and so I won’t be talking about them at all.

It will probably come as no surprise when I say that a helicopter is the better way to go, by far. It might cost a bit (or a lot) more, but the advantages it offers make for a very different, vastly superior experience. 

Perhaps the greatest advantage is that some helicopters allow the doors to be opened or even completely removed for the flight

A helicopter is a flexible craft: it can fly slower than a plane or even hover in place, which gives you much more time to shoot a desired composition. But that’s not all: perhaps the greatest advantage is that some helicopters allow the doors to be opened or even completely removed for the flight. Once the door is off, you have a huge field of view, and wide-angle shooting is possible. You need to be careful not to have the rotor in the shot, but that can generally be avoided when pointing the camera downward.

The huge field of view also means that you have the option to try the same shot more than once should the first try fail, and you can shoot different angles of the same subject even after you’ve moved ahead. That’s a critical advantage which can make the difference between getting a shot and losing it.

Huge icebergs finally released from Kangia Fjord after floating there for years. Can you spot the (fairly large) boat?

Disko Bay, Greenland.

The most common helicopter for aerial photography is the Robinson R44. It’s a small helicopter fit for a pilot plus three passengers, and you can take both doors off in a minute, which is crucially important for getting crisp images without reflections or aberrations (if the pilot refuses to take the door off don’t even bother). Its small size also makes it relatively cheap to fly and maintain (emphasis on relatively).

What’s considered cheap? Well, one of my R44 flights cost me $ 850 (around €760) an hour, the other €1500 (around $ 1670) an hour. It really depends on where you fly, and costs worldwide can vary even more than that in both directions, but primarily upward. In places where a small, cheap helicopter isn’t available, costs can rise quite ludicrously. For example, I’ve recently gotten a quote of $ 4200 an hour for a larger heli in a place whose name I won’t mention. That’s $ 70 a minute. Yes, my reaction was similar to yours.

In the image below you can see a wide-angle shot of the dunes of Sossusvlei, Namibia, taken from an R44 helicopter with the doors taken off. It’s quite striking to see these intricate dunes from this angle, and the helicopter allowed me to take a very wide shot and include the entire dune, which is a huge advantage.

Shooting from a light plane is different. You usually shoot from an open window, and that’s in the best case scenario: about a year ago I did a photography flight in Greenland in which I had the dubious pleasure of shooting through a 15cm hatch in the front window. This means that shooting-angle selection was extremely limited (forget about ultra-wide lenses), and that once you pass a good shooting angle, the shot is gone unless you circle back. This disadvantage is emphasized by the faster movement speed, which frankly gives you a feeling of anxiety to be ready and shoot before it’s all gone.

To sum it up, though cheaper than a helicopter, a light plane with a small hatch (as opposed to a large window) is very limited in shooting angles, supplies less opportunities to get the right shot, and as a result yields much less keepers when the flight is done. I’d seriously reconsider before ever doing it again.

A Cessna with a large window you can open is a very different story. Shooting is much more comfortable and angle choice much less limiting. If you lean back (careful not to push against the poor pilot! I know I did that a few times…), no wind interferes with your lens and stability is quite good. I shot from such a Cessna in the Lofoten Islands and the experience was wonderful. 

Kjerkfjord, surrounded by mountains struck by beautiful pink light. Shot from a Cessna during sunset on my Lofoten Islands workshop this January.

In the next article I’ll discuss technicalities and parameter selection for aerial photography.


Erez Marom is a professional nature photographer, photography guide and traveler based in Israel. You can follow Erez’s work on Instagram, Facebook and 500px, and subscribe to his mailing list for updates.

If you’d like to experience and shoot some of the most fascinating landscapes on earth with Erez as your guide, you’re welcome to take a look at his unique photography workshops around the world:

Land of Ice – Southern Iceland
Winter Paradise – Northern Iceland
Northern Spirits – The Lofoten Islands
Giants of the Andes and Fitz Roy Hiking Annex – Patagonia
Tales of Arctic Nights – Greenland

More in This Series:

The good, the bad and the ugly of aerial photography – Part 1: Why shoot aerials?

Selected articles by Erez Marom:

  • Behind the Shot: Dark Matter
  • Mountain Magic: Shooting in the Lofoten Islands
  • Behind the Shot: Nautilus
  • Behind the Shot: Lost in Space
  • Behind the Shot: Spot the Shark
  • Quick Look: The Art of the Unforeground
  • Whatever it Doesn’t Take
  • Winds of Change: Shooting changing landscapes
  • On the Importance of Naming Images
  • Parallelism in Landscape Photography

Articles: Digital Photography Review (dpreview.com)

 
Comments Off on The good, the bad and the ugly of aerial photography – part 2: aircrafts

Posted in Uncategorized


Cascable remote control app adds support for 50 cameras

13 Aug

Cascable, a Wi-Fi-based camera remote control app for Apple devices, has been updated to version 2.0. This update is a major one, adding both new features and additional support over the previous version. Most notably, Cascable 2.0 now supports 50 camera models from Sony, Canon, Nikon and Olympus. It also adds a new Night Mode dark theme, faster image previews and better photo management.

According to Cascable, user feedback indicated that version 1.0’s photo preview method was too cumbersome. To remedy this, Cascable 2.0 automatically provides a preview of a shot as soon as it is taken, though at a lower resolution than the original photo. Photo management has also been improved by showing the most recent photos first, and any photo can now be quickly previewed using Force Touch or a tap.

Finally, Cascable says the latest software version has better handling of RAW + JPEG workflows, namely via the elimination of duplicate images. Users can zoom into images at a 1:1 resolution, and metadata with a histogram is now presented during fullscreen photo viewing.

Cascable 2.0 uses a different payment structure compared to the 1.x versions, being made available as a free base app with ‘Pro’ feature packs that cost $ 9.99 individually (there are three total) or $ 24.99 as a bundle. The update is free to all existing customers. Cascable 2.0 is available to download now from iTunes.

Via: Cascable Blog

Articles: Digital Photography Review (dpreview.com)

 
Comments Off on Cascable remote control app adds support for 50 cameras

Posted in Uncategorized


Kipon introduces reducer to fit Nikon F and Leica R lenses to Micro Four Thirds bodies

13 Aug

Japanese lens and accessory maker Kipon has introduced a pair of focal length reducers that allow users to mount Nikon F and Leica R lenses to Micro Four Thirds cameras to give a 1.4x crop factor. The company says that the Kipon Baveyes NIK-m4/3 0.7x and Baveyes L/R-m4/3 0.7x reducers make a 50mm lens designed for full-frame systems act as a 70mm equivalent once the focal length doubling effect of the Micro Four Thirds system is taken into account. Kipon also claims that the reducer makes the mounted lenses a stop faster too.

Without the lenses in the reducer a 50mm Nikkor lens mounted on a Micro Four Thirds camera would behave as a 100mm due to the smaller size of the system’s sensors, so the wide-angle elements in the adapters reduce the apparent crop factor applied to the adapted lens. The company gives an example of a 35mm lens mounted via the adapter producing the angle of view one would expect from a 49mm lens on a full-frame body.

The price of the adapters has only been released in Japanese Yen, and is quoted as ¥23,000 plus tax, which is approximately $ 230/£180.

For more information see the Kipon website and a translated version the press release.

Articles: Digital Photography Review (dpreview.com)

 
Comments Off on Kipon introduces reducer to fit Nikon F and Leica R lenses to Micro Four Thirds bodies

Posted in Uncategorized


Weekly Photography Challenge – Wide Angle

13 Aug

Shooting with a wide angle can be challenging – to create an image that is engaging and has a good focal point. Check out these examples.

Magnus Wrenninge

By Magnus Wrenninge

Aotaro

By aotaro

Weekly Photography Challenge – Wide Angle

Here is some help for you if you need ideas:

  • Wide Angle Versus Telephoto Lenses for Beautiful Landscape Photography
  • How to Use a Wide-angle Lens with Wildlife for a New Perspective
  • How to Create Compelling Wide-Angle Portraits Using One Off-Camera Flash
  • 10 Tips for Photographing Wide-Angle Landscapes
  • How to Use a Wide-Angle Lens for People Photography
Lee

By lee

Mariusz Kluzniak

By mariusz kluzniak

Giuseppe Milo

By Giuseppe Milo

Share your images below:

Simply upload your shot into the comment field (look for the little camera icon in the Disqus comments section) and they’ll get embedded for us all to see or if you’d prefer upload them to your favourite photo sharing site and leave the link to them. Show me your best images in this week’s challenge. Sometimes it takes a while for an image to appear so be patient and try not to post the same image twice.

Share in the dPS Facebook Group

You can also share your images on the dPS Facebook group as the challenge is posted there each week as well.

googletag.cmd.push(function() {
tablet_slots.push( googletag.defineSlot( “/1005424/_dPSv4_tab-all-article-bottom_(300×250)”, [300, 250], “pb-ad-78623” ).addService( googletag.pubads() ) ); } );

googletag.cmd.push(function() {
mobile_slots.push( googletag.defineSlot( “/1005424/_dPSv4_mob-all-article-bottom_(300×250)”, [300, 250], “pb-ad-78158” ).addService( googletag.pubads() ) ); } );

The post Weekly Photography Challenge – Wide Angle by Darlene Hildebrandt appeared first on Digital Photography School.


Digital Photography School

 
Comments Off on Weekly Photography Challenge – Wide Angle

Posted in Photography


Getty employs robots for underwater shots in Rio

13 Aug

Prior to the start of the games in Rio we got a glimpse of the gear that Getty photographers are using to cover the Olympics. This week, we’ve seen a couple more of the tools the organization is using – a pair of robotic underwater camera housings. 

Veteran Getty photographer Al Bello talks about using the robotic camera housing with CNN Money, and says that they give an obvious advantage over the static underwater systems that they’ve used in the past. The robotic system allows him to pan, tilt and zoom a Canon EOS-1D X II enclosed safely in the housing as athletes pass by overhead, eliminating the guesswork that the static system required. 

You can see more of Bello’s work above and below the water in Rio by following him on Twitter and Instagram.

Articles: Digital Photography Review (dpreview.com)

 
Comments Off on Getty employs robots for underwater shots in Rio

Posted in Uncategorized


Amphibious Folding Motorcycle from Russia Fits in the Trunk of a Car

12 Aug

[ By SA Rogers in Technology & Vehicles & Mods. ]

folding motorcycle 8

“How long I’ve wanted this dream to come true,” wails Twisted Sister as a motorcycle zips through a mud pit that’s snatching the boots of its rider in this frankly ridiculous video of the Russian motorbike Taurus 2×2. The video shows the bike zooming through giant puddles, pulling a trailer piled with hay bales and even giving a second motorcycle a lift like it weighs next to nothing. Designed specifically for agricultural purposes and recreation in rural Russia, the bike definitely shows off what it can do, leaving no doubt that it can tackle some serious tasks.

folding motorcycle 1

folding motorcycle 4

folding motorcycle 6

Perhaps the most jaw-dropping moment is when the rider drops the Taurus right into a body of water and it gently bobs to the surface thanks to those bulbous tires and its mere 181-pound weight. It’s extra-light, amphibious and takes just five minutes to dismantle for transport inside another vehicle. It’s not street legal, however – riders have to stick to the back roads of Russia, but that’s really where the Taurus shines.

folding motorcycle 3

folding motorcycle 9

It may not be pretty, but it’s impressively aggressive, navigating landscapes that even the toughest dirt bikes wouldn’t dare take on. Can’t you just imagine shirtless Vladimir Putin on the back of this thing? The Taurus is currently only available in Russia, but its creators say they’re hoping to sell it internationally sometime soon.

Share on Facebook


[ By SA Rogers in Technology & Vehicles & Mods. ]

[ WebUrbanist | Archives | Galleries | Privacy | TOS ]


WebUrbanist

 
Comments Off on Amphibious Folding Motorcycle from Russia Fits in the Trunk of a Car

Posted in Creativity


A photographer’s guide to Cuba

12 Aug

$ (document).ready(function() { SampleGalleryV2({“containerId”:”embeddedSampleGallery_1774365849″,”galleryId”:”1774365849″,”isEmbeddedWidget”:true,”standalone”:false,”selectedImageIndex”:0,”startInCommentsView”:false,”isMobile”:false}) });

Veteran traveler and photographer Michael Bonocore returned from a recent trip to Cuba thoroughly enchanted by the country. Photographers have long been drawn to Cuba’s breathtaking scenery, historic architecture and friendly locals, and in the U.S. in particular, interest in traveling to the island nation is at a high as restrictions on travel have been relaxed somewhat.

It’s becoming easier than ever to get to Cuba, but a few pointers can help set travelers in the right direction – especially those looking to photograph the country’s vibrant towns and landscapes. Bonocore has shared some tips for getting around the country and making the most of your time there over on Resource Travel. Even if you’re not planning a trip to Cuba, you might find yourself seriously considering one after you’ve looked through his photos.

Resource Travel: The Untold Culture of Cuba

Have you photographed Cuba? Have any tips to share? Leave them in the comments below.

Articles: Digital Photography Review (dpreview.com)

 
Comments Off on A photographer’s guide to Cuba

Posted in Uncategorized