RSS
 

Archive for May, 2016

Two Photographers Go Head to Head in the Small Studio Challenge

16 May

I found these videos on the Adorama TV channel and thought this is a great idea to learn how photographers work.

Wallace vs Hoey : Small Studio Challenge

In these two videos Mark Wallace and Gavin Hoey go head to head in a small studio challenge to see what they can do with the same gear, in the same small space, with the same model – in 20 minutes or less. Let’s see what they each come up with.

Mark goes first:

Then it’s Gavin’s turn:

Which final image do you prefer? What did you learn by watching how they each approach the subject and make decisions? What would you have done?

small-studio-shootout

googletag.cmd.push(function() {
tablet_slots.push( googletag.defineSlot( “/1005424/_dPSv4_tab-all-article-bottom_(300×250)”, [300, 250], “pb-ad-78623” ).addService( googletag.pubads() ) ); } );

googletag.cmd.push(function() {
mobile_slots.push( googletag.defineSlot( “/1005424/_dPSv4_mob-all-article-bottom_(300×250)”, [300, 250], “pb-ad-78158” ).addService( googletag.pubads() ) ); } );

The post Two Photographers Go Head to Head in the Small Studio Challenge by Darlene Hildebrandt appeared first on Digital Photography School.


Digital Photography School

 
Comments Off on Two Photographers Go Head to Head in the Small Studio Challenge

Posted in Photography


Readers’ Showcase: Arek Halusko

16 May

Readers’ Showcase: Arek Halusko

Roxy and Chili taking a break in the sun. Surrey BC, June 2007. Photo by Arek Halusko

For DPR reader Arek Halusko, photography is a form of stress relief. Based in BC, Canada, he runs his own business and finds himself drawn to photographing urban scenes, where there’s always something to shoot around the corner. Take a look at some of his work.

Interested in having your work featured in an upcoming Readers’ Showcase? Let us know! Include your DPR user name a link to your online portfolio.

Readers’ Showcase: Arek Halusko

Staircase downtown Vancouver BC. May 2005. Photo by Arek Halusko

Where are you from, and how did you get into photography?

Originally I’m from Poland and my family emigrated to Canada in 1984. We ended up in Kamloops BC and then I moved to the Lower Main Land of BC in 1995. I took up photography in 2001 as a way to relieve stress while working at a very fast growing local ISP. After 15 years it’s still the best way to clear my mind from stress, although this time it’s from running my own business.

Readers’ Showcase: Arek Halusko

Tin Solder New Westminster Quay, May 2005. Photo by Arek Halusko

What was your first camera?

I was given a camera when I was about 9 years old until I bent the shutter blades trying to see what was inside this mechanical wonder. It wasn’t until about 20 years later when I got a Pentax Spotmatic, although don’t remember which model/year.

Readers’ Showcase: Arek Halusko

Little house on a foggy morning in Glen Valley BC. Jan 2010. Photo by Arek Halusko

What cameras and lenses do you use now?

99% of the time I use an Olympus E5 and once in a while Olympus E1. The E1 for me has the ultimate in ergonomics. Lens-wise I mostly use the Zuiko 12-60mm and own Zuiko 4:3 8mm FE, Zuiko 4:3 50-200mm. 

Readers’ Showcase: Arek Halusko

New Westminster BC parkade on Columbia St. Sept 2004 . Photo by Arek Halusko

Do you have a favorite focal length, or are there a few that you tend to prefer?

Wide-angle is my preference. I really got hooked on wide-angle when I got a Kiron 24mm for my Pentax MZ3 in the early 2000’s and then the Zuiko 4:3 11-22mm for my Olympus E1.

Readers’ Showcase: Arek Halusko

Fishing on a foggy morning in front of Pattullo Bridge in Surrey BC. Feb 2007. Photo by Arek Halusko

Most of your photos seem to be taken not too far from your home in BC. Do you ever travel to take photos or do you tend to stay close to home?

Unfortunately I haven’t had a chance to travel outside of Canada so all of my images are either from BC or Alberta. I’m planning on taking cross Canada trips starting next year when me and my wife plan to drive from Vancouver area to Inuvik and if the Dempster highway extension is finished then on to Tuktoyaktuk. I always stick to urban/city scenes as I’m drawn to the structural patterns and cityscapes, and there’s always something to shoot around the corner.

Readers’ Showcase: Arek Halusko

Sky Strain bridge leading from New Westminster BC over the Fraser River To Surrey BC. Jan 2005. Photo by Arek Halusko

What are some of your favorite locations to shoot?

Vancouver city, and the interior of BC – especially the Cache Creek/Ashcroft/Fraser Canyon area. Last summer I did a lot of day/weekend trips to the interior of BC so have lots of locations marked to come back to and shoot this summer. For me this is a bit of a shooting style/subject change as I haven’t had a chance to get out to downtown Vancouver much in the last few years.

Readers’ Showcase: Arek Halusko

Golden Ears bridge in Surrey/Maple Ridge BC. Jan 2010. Photo by Arek Halusko

Do you set goals or create projects for yourself as a photographer, or is it more free-form?

It’s 99% free-from although did a lot of experiments when I was still in the early stages of photography, from product shots to night club photography. The last project I did was to see what I could do in dreary/foggy weather since the West Coast of Canada is like that from October to May. It turned out better than I expected.

Readers’ Showcase: Arek Halusko

Sky Strain and Pattullo Bridge in Surrey BC. Sept 2009. Photo by Arek Halusko

In your opinion, what’s been the most important technological advancement in photography since you started shooting?

Without a doubt, the introduction of the affordable Canon D30. For me, going from a film Pentax MZ3 to a D30 was a 180 degree change in what I could accomplish in one day of shooting. Also, the CPU race between AMD and Intel at around the same time, which brought huge computing power to allow cheap and powerful digital darkrooms for every photographer.

Readers’ Showcase: Arek Halusko

Old car doors in Spences Bridge BC. July 2015. Photo by Arek Halusko

What’s the best advice you’ve been given as a photographer?

When you are looking for/at the scene/subject visualize it like you would see it in the viewfinder, it takes some time but eventually it’ll click in like your first balanced bike ride.

Articles: Digital Photography Review (dpreview.com)

 
Comments Off on Readers’ Showcase: Arek Halusko

Posted in Uncategorized


American Idle: 12 Weird & Wacky Drive-Thru Businesses

15 May

[ By Steve in Culture & History & Travel. ]

drive-thru-0
Drive-thru is all about fast food, fast service & fast company though getting what you want without ever leaving your ride can get a little weird at times.

drive-thru-1a

drive-thru-1b

Drinking and gunplay: two things that should never be done in a hurry, not to mention together. That’s what makes “Double Shot Liquor & Guns Drive Thru” so disturbingly delightful. While far from being the only drive-thru booze & boomstick emporium – think about THAT, if you dare – the Schulenburg, Texas business stands out thanks to its creative name and the ever-changing messages on its sign.

Mourning Commute

drive-thru-2a

drive-thru-2c

It’s not just life in the fast lane anymore. Sure, funerals can be uncomfortable and “viewings” are a tad creepy. That’s still no excuse for- er, actually it IS an excuse for drive-thru windows at funeral homes! Obviously there’s some demand for this feature, as the Paradise Funeral Chapel in Saginaw, Michigan has drive-thru counterparts in California, South Carolina and Virginia. When drivers pull up to the bulletproof glass (why bulletproof?) window, a motion sensor draws back the curtains allowing mourners to pay their final respects to the en-casketed loved one. Would you like flies with that?

Fastest Cash

drive-thru-3a

We’ll bet this is one of Chumlee’s ideas. If you’re looking to hock the family jewels on your way outta Dodge, then Dean’s Drive-Thru Pawn Shop in Oklahoma City is your one-stop-shop for a quick (and hopefully lucrative) getaway. All bets are off, however, if your clever plan involves driving in and pawning your car.

Fool Injection

drive-thru-4a

drive-thru-4b

A tattoo may be forever but ain’t nobody got time for that. Good thing there’s Outlaw Tattoo, your Route 66 headquarters for while-u-wait permanent body illustration. At least there was – the Tucumcari, New Mexico landmark appears to have been driven out of business, possibly by dissatisfied customers who own rough-idling vehicles. Kudos to Todd Longwood of A Love Of Two Brains for exposing this dist-inked drive-thru concept.

drive-thru-4c

Oh, and for those who feel drive-thru tattooing isn’t too far of a stretch… yeah, what could possibly go wrong?

Next Page – Click Below to Read More:
American Idle 12 Weird Wacky Drive Thru Businesses

Share on Facebook


[ By Steve in Culture & History & Travel. ]

[ WebUrbanist | Archives | Galleries | Privacy | TOS ]


WebUrbanist

 
Comments Off on American Idle: 12 Weird & Wacky Drive-Thru Businesses

Posted in Creativity


Rice Hill: Shooting in Riisitunturi National Park

15 May

$ (document).ready(function() { SampleGalleryV2({“containerId”:”embeddedSampleGallery_1500727350″,”galleryId”:”1500727350″,”isEmbeddedWidget”:true,”standalone”:false,”selectedImageIndex”:0,”startInCommentsView”:false,”isMobile”:false}) });

Riisitunturi is a national park in the Posio municipality in Finnish Lapland. It is situated in the south of Lapland and sports a sub-Arctic climate, but due to its inland location it can get extremely cold. I spent a few weeks scouting the area in early 2015 and 2016 to prepare for my workshop there, and I have to admit I fell in love with it.

Covering an area of 77 square kilometers, the park is in a mountainous area and lies almost entirely at an altitude of over 300 meters above sea level. It is most known for its twin hills (Riisitunturi means ‘Rice Hill’ in Finnish), home to a forest of spruce trees, the main (winter) photographic attraction in the area. There are also multiple swamps in the park.

‘The one-hour, mildly-strenuous hike to the top
is very rewarding’

In winter, due to heavy precipitation and a very humid climate, the spruce trees are covered in a thick white blanket of frost-snow. When climbing up the trails to the hilltop, the snow gets deeper and the trees shorter and more sparse. And that is exactly the point: while the trees at the bottom are full-sized and usually too big to capture, the hilltop trees are more manageable and beautifully isolated, and retain their white cover even when the lower trees are stripped bare on a windy or warm day. The one-hour, mildly-strenuous hike to the top is very rewarding.

The spruce trees typical to Lapland’s forests are tall and close together, making them impossible to isolate and hard to photograph.

Due to the unending variety of both the trees and the weather conditions one can witness on the hilltop, I’d definitely recommend spending multiple days exploring the park. The snow-laden trees assume a myriad of shapes and forms, often imitating worldly scenes incredibly accurately.

A completely different atmosphere on a gloomy day. The snow-laden spruces barely stand out from the similarly-colored background, contributing to the magical feel of the image.

The trees look very different during a clear sunrise compared to a foggy day, changing their appearance once more under a cloudy gloom. And once the sun comes out, it’s a whole new ballgame. The colors change – no longer pink and red, but a new element enters the equation and your images can benefit from it.

The star-burst works best when located in small openings – and the snow-laden trees have plenty of those.

I hope you agree the park is amazingly beautiful and photogenic. But what do you need to know and be prepared for in order to shoot there? First of all, be ready for extreme cold. It may not be the case (global warming takes its toll on Lapland, with weather conditions ever more volatile), but early in winter temperatures can sometimes plummet to -30 degrees Centigrade or so.

‘Several thermal layers and
a heavy down jacket are essential’

It is indeed very, very cold, so make sure you’re well dressed. Several thermal layers and a heavy down jacket are essential. Warm gloves and good thermal boots are also needed if you’re to spend several hours shooting the trees.

Secondly, you have to have either snow-shoes or skis. The snow might be packed at the bottom, but the higher up you venture up the hill, the deeper and fluffier it is. Without a way of spreading your weight, you’ll simply sink down to your waist, which makes walking utterly impossible.

Yours truly struggling up the hill. If you look carefully, you can see snow stuck throughout the length of my trousers, remnants of sitting (and occasional sinking) in the snow. Image courtesy of Tiina Törmänen.

While I tend to shoot ultra-wide most often, in Riisitunturi I found myself mostly shooting with a 24-70mm lens, for several reasons.

Firstly, the sheer effort of moving. Snow-shoeing is physically demanding, and sometimes good conditions come and you simply don’t have the time to move to the right location – a task which would require long minutes. A longer focal length gives you a bit more flexibility and the opportunity to get closer without wasting precious time. Please note that I’m not saying that a 24-70 can replace an ultra wide lens – just that it can sometimes be more practical when time is of the essence and movement is problematic. I do use my 16-35mm in Riisitunturi, more and more as time passes.

‘Shooting from farther away gives you the ability to better balance the image’

Secondly, while the spruces on top of the hill are much shorter than the ones below, they are still often higher than a human. This means a lot of perspective issues if you shoot them up close, and potentially having a large part of your image as empty space. Shooting from farther away gives you the ability to better balance the image, and produce more realistic, less contorted shots.

Regarding technique – Riisitunturi has a very special trait which makes shooting with a tripod hard, sometimes impossible. The snow, in some places, is just too darn deep, and tripod legs sink in and can’t be stabilized. The simple solution is to shoot hand-held (or use a monopod), which works pretty well most of the time, especially if you have a stabilized lens. It’s not the end of the world if you need to use higher ISO and a wider aperture to get the shot. It obviously doesn’t work at night or at other low-light scenes, so sometimes you’ll have to fight with the tripod.

All in all, Riisitunturi is a wonderful location for winter photography. It’s not too hard to access, there are decent accommodation options in the area and you can easily spend a few days exploring it, either alone or with a group. I hope this article gives you the needed motivation and knowledge to do so. Enjoy!


Erez Marom is a professional nature photographer, photography guide and traveler based in Israel. You can follow Erez’s work on Instagram, Facebook and 500px, and subscribe to his mailing list for updates.

If you’d like to experience and shoot some of the most fascinating landscapes on earth with Erez as your guide, you’re welcome to take a look at his unique photography workshops around the world:

White Wonderland – Lapland
Land of Ice – Southern Iceland
Winter Paradise – Northern Iceland
Northern Spirits – The Lofoten Islands
Giants of the Andes and Fitz Roy Hiking Annex – Patagonia
Tales of Arctic Nights – Greenland
Earth, Wind and Fire – Ethiopia

Selected articles by Erez Marom:

  • Behind the Shot: Dark Matter
  • Mountain Magic: Shooting in the Lofoten Islands
  • Behind the Shot: Nautilus
  • Behind the Shot: Lost in Space
  • Behind the Shot: Spot the Shark
  • Quick Look: The Art of the Unforeground
  • Behind the Shot: Watery Grave
  • Whatever it Doesn’t Take
  • Winds of Change: Shooting changing landscapes
  • On the Importance of Naming Images
  • Hell on Earth: Shooting in the Danakil Depression
  • Parallelism in Landscape Photography

Articles: Digital Photography Review (dpreview.com)

 
Comments Off on Rice Hill: Shooting in Riisitunturi National Park

Posted in Uncategorized


The 6 Most Important Things You Need to Know about Lightroom’s Develop Module

15 May

Lightroom is powerful, but it’s also complex and has a steep learning curve. If you feel overwhelmed by all the options, there’s great value in taking a simple approach and learning to use the tools that are most useful first. Leave the more advanced features until you have more experience.

With that in mind, I’ve put together this list of the six most important things you need to know about Lightroom’s Develop module. Learn these and you will be well on the way to Lightroom mastery.

1. Backup your catalog regularly

This is the most crucial thing to set up, as everything you do to your photos in the Develop module (not to mention metadata changes like Collections, flags and keywords) is stored in the catalog. It would be a disaster to lose your catalog (and consequently all your hard work) to hard drive failure, so you need to make sure that Lightroom is backing it up regularly to an external hard drive.

To do so, go to:

  • For Windows users: Edit > Catalog Settings > Back up catalog
  • For Mac users: Lightroom > Catalog Settings > Back up catalog

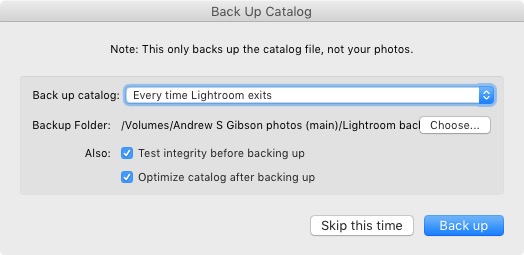
I have mine set to: Every time Lightroom exits – some photographers find that Once a week, when exiting Lightroom is enough.

When you exit Lightroom, a dialog window appears that shows you where Lightroom is going to save the backup Catalog. Click Choose to change the location if you need to. Note: this is the only time you can select the destination where the backup will be saved.

Make sure the Test integrity before backing up and Optimize catalog after backing up boxes are both ticked. This slows down the back up process, but it’s worth it because it helps ensure that your catalog remains free from corruption, and is optimized for speed.

Lightroom Develop module

Please note: The Catalog doesn’t contain any of your photos. Backing up your Catalog doesn’t back up your photos, only the information that Lightroom contains about them. Photo backups need to be managed separately.

2. Profile is the most important setting in the Develop module

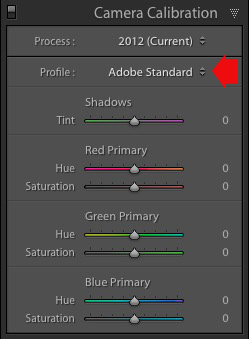
The Profile menu is tucked away in the Camera Calibration panel, at the bottom of the right-hand panels in the Develop module. The default profile setting is Adobe Standard (circled below). This profile was created specifically for your camera by Adobe. Pick that one for accurate colors.

You will also find the color profile settings specific to your camera (Landscape, Portrait, and so on). You can pick one of these if you prefer the look to Adobe Standard.

Lightroom Develop module

The profile affects both color and contrast, so from a practical point of view it’s important to select the right one, before you start adjusting contrast and white balance in the Basic panel. Get the profile right, and it makes all subsequent processing steps much easier. Get it wrong, and it makes them more difficult.

For example, if you apply a profile intended for landscape photos to a portrait, then you could end up with over-saturated colors and unnatural skin tones. Then you might try and fix that by playing with the Basic panel sliders or other color controls. This approach rarely works, it’s far better to select the most appropriate profile from the start.

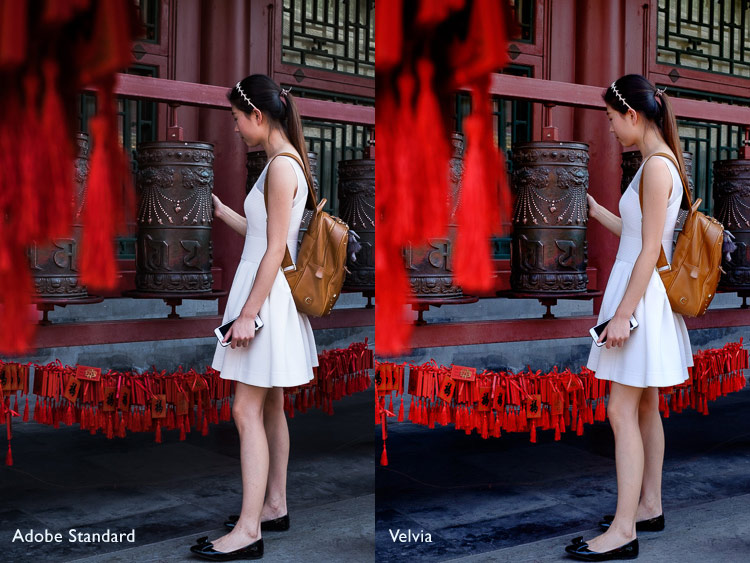
These two photos show the difference between the Adobe Standard and Velvia profiles on a Fujifilm X-T1 camera. The Velvia profile saturates colors, the Adobe Standard profile looks more natural.

Lightroom Develop module

3. Use Lens Corrections to correct distortion and eliminate chromatic aberrations

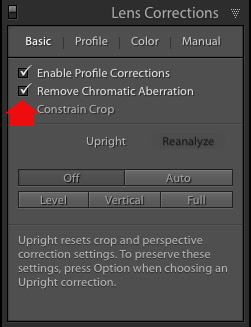
No lens is perfect, and most have at least a little distortion and chromatic aberration. One of the benefits of digital photography is that you can eliminate these in the processing stage, so they are not the problem they once were. Go to the Basic tab in the Lens Correction panel, select Enable Profile Corrections and Remove Chromatic Aberration in order to do so.

Lightroom Develop module

This comparison shows the result on a photo taken with a zoom lens producing barrel distortion.

Lightroom Develop module

Lightroom Develop module

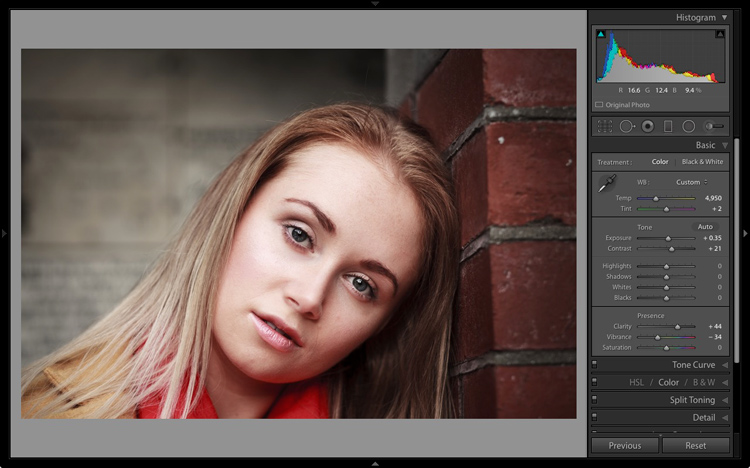
4. You can carry out 80% of your processing in the Basic panel

Once you have selected a Profile, and applied Lens Corrections, you can go to the Basic panel to start making any adjustments required to the photo’s brightness, contrast, and color.

The sliders in the Basic panel are extremely powerful. Take the time to get to know what each one does, and how the settings affect your images. Once you get the hang of these sliders it’s quite possible that you can do all of your global adjustments (those that affect the entire image) here, and not have to touch the Tone Curve or HSL / Color / B&W panels at all.

This photo is a good example. Virtually all the processing was done in the Basic panel, made possible by selecting the most appropriate profile first. The only additional thing I did was add a vignette using the Effects panel.

Lightroom Develop module

My article Steps for Getting Started in the Lightroom Develop Module goes into this in more detail.

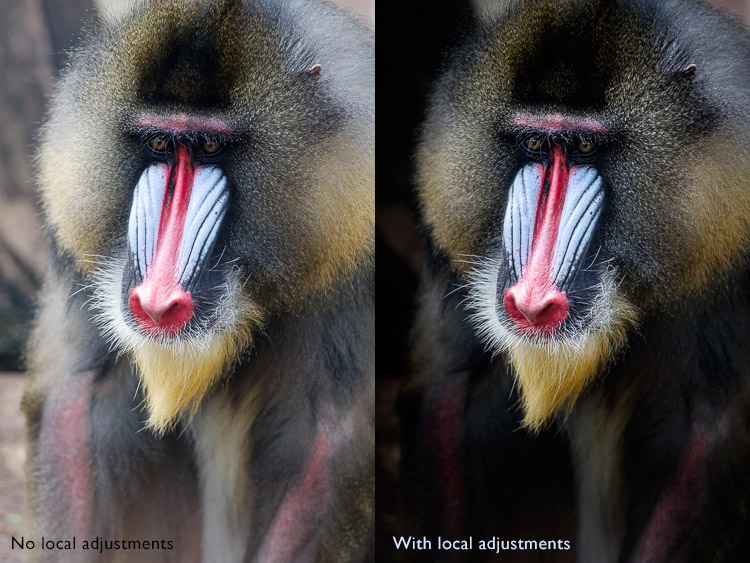
5. Learn to use local adjustments wisely

It wasn’t so long ago that many professional photographers would send their negatives to master printers who used dodging, burning, and other fancy darkroom techniques, to create a far better print than the photographer ever could. These local adjustments – those applied to only part of the image, rather than all of it – are often vital for bringing the best out of your Raw files in Lightroom.

Lightroom has three tools for making local adjustments – the Adjustment Brush, Radial Filter and Graduated Filter. They allow you to selectively adjust brightness, contrast, and other tone and color settings. Each tool has its own idiosyncrasies, so take the time to get to know each one in turn.

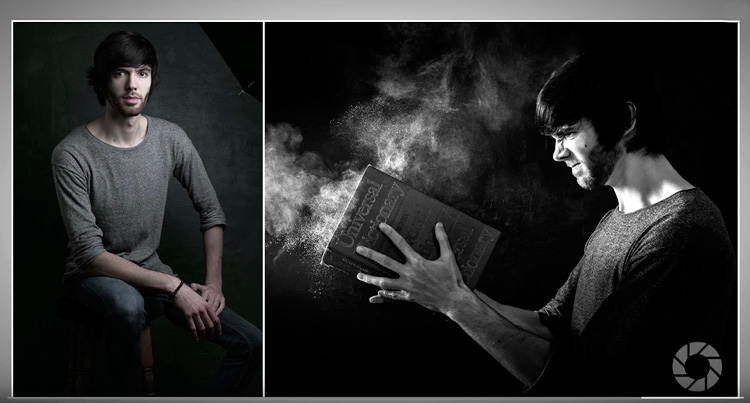
This example shows the difference that local adjustments make. I used a combination of all three of Lightroom’s tools to turn the image on the left, into the one on the right.

Lightroom Develop module

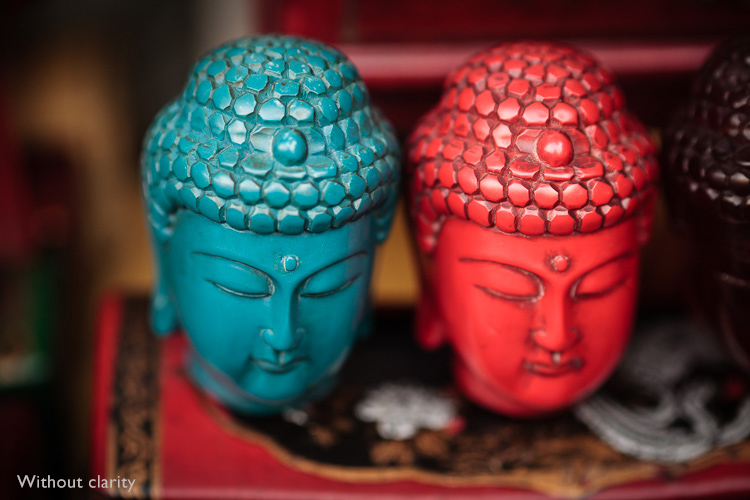
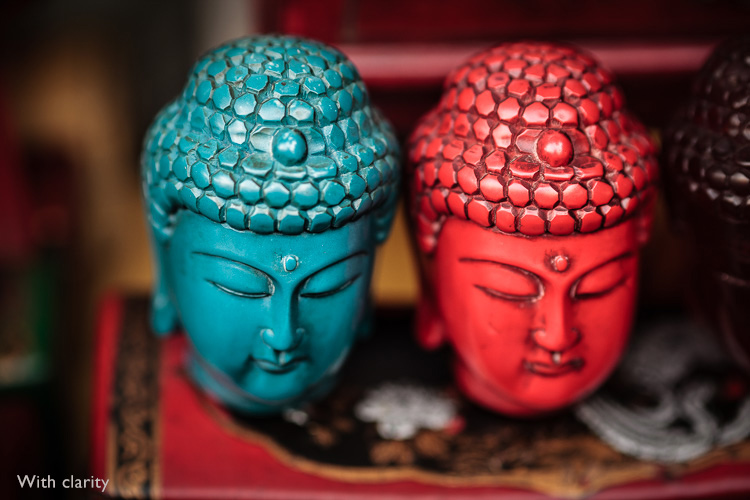
6. Don’t overlook the Clarity slider

The Clarity slider is extremely useful as both a local, and global adjustment. It’s primary use is to enhance texture, and it does so by increasing edge contrast (the spots where dark and light areas meet). You do have to be careful not to overuse it, but judicious applications of texture enhancement can help bring the best out of any photo. Clarity is also an ideal tool for enhancing black and white images, which often rely on texture to add impact.

The following photos show the effect of adding Clarity. I used the Radial filter to apply Clarity to the Buddha heads to bring out the texture.

Lightroom Develop module

Lightroom Develop module

These six items are not a comprehensive list of what you can do in Lightroom’s Develop module, but they will certainly get you started, and simplify the process of learning to use it.

What do you think are the most important tools to master in the Develop module? Do you agree with my selection? Please let me know in the comments below. And if you want to learn more about Lightroom then please check out my Mastering Lightroom ebooks.

googletag.cmd.push(function() {
tablet_slots.push( googletag.defineSlot( “/1005424/_dPSv4_tab-all-article-bottom_(300×250)”, [300, 250], “pb-ad-78623” ).addService( googletag.pubads() ) ); } );

googletag.cmd.push(function() {
mobile_slots.push( googletag.defineSlot( “/1005424/_dPSv4_mob-all-article-bottom_(300×250)”, [300, 250], “pb-ad-78158” ).addService( googletag.pubads() ) ); } );

The post The 6 Most Important Things You Need to Know about Lightroom’s Develop Module by Andrew S. Gibson appeared first on Digital Photography School.


Digital Photography School

 
Comments Off on The 6 Most Important Things You Need to Know about Lightroom’s Develop Module

Posted in Photography


Long Exposure Fire Photography – 5 Tips for Beginners

15 May
tips for long exposure fire photography

ISO 100, f/10, shutter speed 5.0 seconds

A long exposure photo can make flames look soft and feathery, capture spark trails, and be used to create a romantic or cozy mood. The tips in this article will help you get started with long exposure fire photography.

Long exposure fire photography: 5 tips for beginners

Remember to be careful as you practice your fire photography. Fire can be dangerous, and it’s easy to be careless when we’re thinking more about our photography than the fire. Maintaining a safe distance is important for you and your gear.

1. Use a slow shutter speed

To take a long exposure photo, the shutter in your camera needs to be open long enough to blur motion and light. Here are a couple of ways to ensure that the shutter stays open:

  • Shutter Priority: you choose the shutter speed
  • Aperture Priority: the camera chooses the shutter speed

Shutter Priority

Put your camera in Shutter Priority mode, choose your desired shutter speed, and let the camera do the rest.

This will force your camera to let in light for the amount of time you’ve chosen. This means your camera will be choosing your ISO (if it’s set to auto) and your aperture. This will give you varied results depending on how much light is available. Using Shutter Priority in this way can be fun. When you choose a shutter speed of five or six seconds, you can capture interesting flame shapes, and lots of spark trails. The bonfire and torch photos in this article were captured in Shutter Priority mode.

long exposure fire photo

ISO 100, f/11, shutter speed 6.0 seconds

Aperture Priority

You could also put your camera in Aperture Priority, choose a mid-range aperture (f/8 – f/11,) set a low ISO (100 – 200,) and let your camera choose the shutter speed. If you’re shooting at night (when it’s really dark) and the fire is your light source, your camera will choose a slow shutter speed. This should give you a photo with large depth of field, relatively free of grain (noise).

If this causes your shutter to be open for longer than you want, increase the ISO. This will start adding noise, which can be reduced during editing. The card game and match photos in this article were shot using Aperture Priority.

long exposure flame photo

ISO 100, f/11, shutter speed one second

Those are a couple of suggestions to get you started. Long exposure fire photography is all about playing around and having fun. Try lots of different apertures and shutter speeds. If you’re like me, you’ll get excited as you review each shot, and see the interesting shapes you’ve captured.

2. Set your camera on a tripod

When using a long exposure, you’ll want to reduce camera shake which results in blurry photos. Camera shake occurs when the camera moves while the shutter is open. Slow shutter speeds (of more than one second) make it impossible to hand-hold your camera, and still get sharp images. Using a tripod will keep your camera steady.

3. Use a remote shutter release or set the self-timer

Your remote (or the camera’s self-timed shutter release) can also help you cut down on camera shake. When you press the shutter release manually the camera moves a little, this could cause blur in your photo. But when you use a remote shutter release (or set your camera’s self-timer) you don’t have to worry about that. This may seem like a small thing, but it can make a big difference to your image sharpness.

long exposure fire spark trails

Spark trails. ISO 320, f/6.3, shutter speed 6.0 seconds

When capturing match flames the remote works best. It’s super frustrating trying to capture that flame burst while waiting for the camera’s self-timer.

4. Choose your subject

Do you want your main focus to be the fire itself? Or are you trying to capture more of the mood created by the fire? While capturing the mood, it can be tricky to focus on people. It’s not easy to sit still during a long exposure and any movement will create blur in your photo.

The following photos were shot in Aperture Priority mode, with an aperture of f/8. For the first photo, I set the ISO at 100, and my camera chose a shutter speed of 5 seconds. That was too long for my daughter to stay still, so the photo is blurry.

long exposure fire photography tips 3

ISO 200, f/8, shutter speed 5.0 seconds (blurry)

For the second photo, I set the ISO to 400 which cut the shutter speed in half = 2.5 seconds. That was a little easier for her, and the photo is clearer.

long exposure fire photography tips 2

ISO 400, f/8, shutter speed 2.5 seconds

5. Switch to manual focus

Sometimes auto focus doesn’t work well in the dark.

Here’s how to focus on something other than the fire: Shine your flashlight on the subject, and press the shutter release button halfway. When autofocus locks on, turn off the light and switch to manual focus. Without moving or adjusting anything on the camera, take your shot. Your camera will maintain the same focus point – as long as nothing is adjusted.

Note: you could also try back button focus.

Where will you practice?

Do you enjoy a cozy fire at your campsite, or having bonfires at the beach? Do you like candlelit dinners? Or what about backyard marshmallow roasts? All of these would be great places to practice long exposure fire photography.

long exposure bonfire

ISO 160, f/5.6, shutter speed 6.0 seconds

Experimenting with long exposures around a campfire can be a little addictive. I’ll bet the more you practice, the more fun you’ll have.

Don’t forget your flashlight! You’ll need it to see your camera controls, for help with focusing, and to get safely back to your car.

long exposure fire photography tips

ISO 100, f/16, shutter speed 5.0 seconds

Please share your tips and photos by commenting on this article.

googletag.cmd.push(function() {
tablet_slots.push( googletag.defineSlot( “/1005424/_dPSv4_tab-all-article-bottom_(300×250)”, [300, 250], “pb-ad-78623” ).addService( googletag.pubads() ) ); } );

googletag.cmd.push(function() {
mobile_slots.push( googletag.defineSlot( “/1005424/_dPSv4_mob-all-article-bottom_(300×250)”, [300, 250], “pb-ad-78158” ).addService( googletag.pubads() ) ); } );

The post Long Exposure Fire Photography – 5 Tips for Beginners by Dena Haines appeared first on Digital Photography School.


Digital Photography School

 
Comments Off on Long Exposure Fire Photography – 5 Tips for Beginners

Posted in Photography


Swing of Things: Framed Furniture Reveals Hidden Potential

14 May

[ By WebUrbanist in Design & Furniture & Decor. ]

furniture trace

Like door swings on architectural blueprints come to life, these works of metal-framed wood furniture express their embedded potential in physical space.

slideout

furnitureswing

flipdown

The new Trace Collection from Nendo takes the architect’s approach to the next level, physically representing the movements of furniture doors and drawers via three-dimensional frameworks. Their installation was recently featured at the Collective Design Fair in New York.

doubleswing

furniture twist

“Although they may not be visible, we are subconsciously aware of the ‘traces’ of their movements every day,” explains designer Oki Sato. For example, because of that, we do not put a vase in front of a door. It is essential for a person who specializes in space design to be even more aware of this, as they have to portray these ‘traces’ onto drawings.”

swing in motion

furnitureart

furniture swing collection

The visualized actions speak volumes about potential options for opening the various swing, flip and sliding doors in each piece. While the results may not be the most practical furniture, they do cause one to think a bit more about the embedded possibilities of everyday furnishings.

Share on Facebook


[ By WebUrbanist in Design & Furniture & Decor. ]

[ WebUrbanist | Archives | Galleries | Privacy | TOS ]


WebUrbanist

 
Comments Off on Swing of Things: Framed Furniture Reveals Hidden Potential

Posted in Creativity


LG introduces live-streaming action cam with LTE built-in

14 May

Korean electronics manufacturer LG has announced a new action cam that can stream live content to the internet via built-in 3G and LTE connectivity. The LG Action CAM LTE allows users to connect directly from the camera to a chosen video hosting website without using a mobile device as the middle man. The camera will also offer remote access, so it will also function as a CCTV camera or security monitor.

Capable of recording video in up to UHD quality at 30fps and of shooting 12.3MP stills, the Action CAM LTE is dust and weather proof and can cope with being submerged for up to 30 minutes at a depth of 1 meter. It will be available first in Korea, with plans to launch in the rest of the world after. No price information has been released yet.


Press release:

LG INTRODUCES ACTIVE LIFESTYLE CAMERA WITH LIVE STREAMING OVER 4G

Action Camera with LTE is the Latest Addition to the LG Friend Ecosystem

The newest addition to LG Electronics’ (LG) Friend ecosystem is the first action camera to be available globally with LTE connectivity built-in, allowing for users to stream directly to sites such as YouTube Live without a smartphone. The device, LG Action CAMLTE, will launch in South Korea next month followed by key markets worldwide including North America and Europe.

In addition to its live streaming feature, LG Action CAMLTE will offer remote access* functionality via 3G and LTE which will enable the device to be used as a CCTV camera for home monitoring or as an automobile dash camera. Action CAMLTE users can download recorded images and videos on their paired smartphones.

With a rating of IP67, the LG Action CAMLTE is completely protected from dust, sand and can be immersed in up to one meter of water for up to 30 minutes. A completely waterproof case (available in the third quarter) will enable the camera to participate in more vigorous activities such as surfing and scuba diving. With the optional mount, the LG Action CAMLTE can capture smooth videos while attached to helmets, bicycles, cars and other fast moving objects. With a generous 1,400mAh battery the camera boasts an industry-leading Full HD recording time of up to four hours.

“We are committed to expanding the LG Playground ecosystem with both modules and standalone accessories and Action CAMLTE is one of many more that we plan to announce this year,” said Juno Cho, LG Electronics and Mobile Communications Company president. “Action CAMLTE is an example of the kind of innovation we will be bringing to market, devices that offer features unavailable in other competing products.”

Prices, specifications and carrier details will be announced locally at the time of launch.

Key Specifications:

  • Camera: 1/2.3-inch 12.3MP / 1.55 x 1.55?pixels
  • Connectivity: LTE / 3G / Wi-Fi 802.11 b, g, n / USB Type-C 2.0 / Bluetooth 4.1
  • Video Recording: UHD 30fps / FHD 60fps / HD 120fps
  • Video Live Streaming: HD 30fps
  • Memory: 2GB RAM / 4GB ROM (OS only) / microSD (up to 2TB)
  • Size: 35 x 35 x 77.9mm
  • Weight: 95g
  • Battery: 1,400mAh
  • Others: IP67 / GPS / Accelerometer / Gyroscope
  • Color: Light Gray

* Remote access feature available after software update coming in July 2016.

Articles: Digital Photography Review (dpreview.com)

 
Comments Off on LG introduces live-streaming action cam with LTE built-in

Posted in Uncategorized


Stormy weather: Photographer Mike Olbinski captures Oklahoma tornado

14 May

$ (document).ready(function() { SampleGalleryV2({“containerId”:”embeddedSampleGallery_8291029024″,”galleryId”:”8291029024″,”isEmbeddedWidget”:true,”standalone”:false,”selectedImageIndex”:0,”startInCommentsView”:false,”isMobile”:false}) });

After a 10-hour wedding shoot most photographers are ready to head home and put their feet up, but Mike Olbinski isn’t your average wedding photographer. In between portrait and wedding shoots, he drives from his home in Phoenix, Arizona to photograph the powerful tornados that rip through the Great Plains states every summer. So after a recent wedding gig with the threat of severe weather brewing, Olbinski hopped in his car and drove 15 hours to Oklahoma. 

You can see some of the photos from that trip here and read his account of tracking down a dangerous storm over at Resource Travel.

Articles: Digital Photography Review (dpreview.com)

 
Comments Off on Stormy weather: Photographer Mike Olbinski captures Oklahoma tornado

Posted in Uncategorized


SmugMug Films: Passport to Morocco

14 May

SmugMug’s newest film features travel photographer Trey Ratcliff as he explores the Moroccan towns of  Fez and Chefchaouen and discusses his own journey as a photographer. Check out the film to follow along with Trey in Morocco, and learn more about his work, inspiration, and how he got started with his signature HDR photographic style in SmugMug’s interview.

Check out the latest video above and subscribe to the SmugMug Films YouTube channel to get first access to each new episode!

Behind-the-scenes photo of Trey in Chefchaouen by SmugMug employee Ana Pogacar.

Articles: Digital Photography Review (dpreview.com)

 
Comments Off on SmugMug Films: Passport to Morocco

Posted in Uncategorized