RSS
 

Archive for April, 2016

Stronger than Concrete: New Glass Bricks Support Dutch Facade

22 Apr

[ By WebUrbanist in Architecture & Offices & Commercial. ]

glass brick facade

A new type of see-through glass brick used in this Dutch building facade aims to bridge traditional brick with transparency; the assembled bricks have been tested and shown to be as strong as concrete, able to support heavy loads in compression like its opaque competitor.

glass brick assembly

Architecture firm MVRDV applied this new technology to the front of a Chanel shop in Amsterdam that was damaged behind repair, allowing for a see-through storefront that still references local historic brick while using fully-recyclable glass.

glass brick detail

The bricks themselves are held in place with likewise see-through glue and help support the remaining terracotta brickwork on the floor above into which they visually transition. The structurally-sound result stands out against the street, but also lets additional light into the interior of the building.

glass brick details

glass brick in context

This new approach to brick can help mediate between the desire for solidity and openness, providing a cheap alternative to both masonry and glass construction traditions. The construction process was as much a laboratory experiment as an architectural process, involving teams from around the world in different disciplines.

glass brick view

Researchers from Delft University of Technology, engineers at ABT and contractors at Wessels Zeist joined forces to develop and test structural solutions and fabrication techniques, ultimately leading to the development of this new type of brick. The bricks were then cast by a glass company Venice and joined using glue from Delo Industrial Adhesives in Germany. (Photos by Daria Scagliola and Stijn Brakkee).

Share on Facebook


[ By WebUrbanist in Architecture & Offices & Commercial. ]

[ WebUrbanist | Archives | Galleries | Privacy | TOS ]


WebUrbanist

 
Comments Off on Stronger than Concrete: New Glass Bricks Support Dutch Facade

Posted in Creativity


Condition One unveils rugged ‘Bison’ rig for outdoor VR documentaries

22 Apr

$ (document).ready(function() { SampleGalleryV2({“containerId”:”embeddedSampleGallery_3054038307″,”galleryId”:”3054038307″,”isEmbeddedWidget”:true,”standalone”:false,”selectedImageIndex”:0,”startInCommentsView”:false,”isMobile”:false}) });

Production studio and early VR adopter Condition One has created its own rugged VR camera for internal use called ‘Bison,’ a name which references the first thing the company’s founder Danfung Dennis recorded with an early prototype. The camera won’t be put up for sale, and will instead be used to help create future VR features.

The company showcased Bison at NAB recently; the rig features a total of 16 cameras that produce 360-degree stereoscopic 3D videos with 3D positional audio. Videos are recorded at 48 fps with a combined 5.7K resolution. According to Condition One’s website, Bison can shoot footage at distances as close as 60cm/2ft, has a 2 hour recording time, a thermal management system, custom aluminum rig, custom carbon fiber tripod, remote trigger with a 792m/2600ft range and tablet control.

Final footage is created using Condition One’s proprietary 3D 360 stitching algorithms and software; the company describes the process as being ‘a fully automated production pipeline’ that it claims is the fastest and highest quality in the industry. Companies and teams interested in creating movies with Bison will need to team up with the studio to gain access.

Via: Wired

Articles: Digital Photography Review (dpreview.com)

 
Comments Off on Condition One unveils rugged ‘Bison’ rig for outdoor VR documentaries

Posted in Uncategorized


Maximum sharpness: Nikon’s automated AF Fine Tune explained

22 Apr

Among the features introduced in Nikon’s new D5 and D500 DSLRs, we’re very excited by automated AF Fine Tune. This feature allows users to quickly fine-tune their specific camera bodies and lenses, maximising the chances of a sharp shot and avoiding the lengthy process of trial-and-error tuning that was previously necessary. Watch our video and read our in-depth analysis.

What’s the problem?

If you’re a DSLR shooter, you may be acutely aware of consistent front or back-focus issues with some of your lenses, particularly fast ones like F1.4 primes. Mirrorless users tend to not have such issues, because their cameras focus using their image sensors. When a mirrorless camera says it’s achieved focus, generally it’s actually in focus. That doesn’t necessarily hold true with DSLRs, which use a secondary phase-detect sensor under the mirror as a sort of proxy for focus at the imaging plane. This makes DSLR focus sensitive to misalignments between the secondary AF module and the image sensor, and also requires calibration of the optics inside the module itself. Furthermore, the way these phase-detect AF modules makes them sensitive to certain lens aberrations, like spherical aberration.

Manufacturers of DSLR bodies and lenses do a lot of calibrations to make sure that this isn’t an issue, calibrating every AF point at the factory, writing look-up tables into lenses, and more. But the reality of tolerances is such that you’ll be best off if you calibrate your particular copy of a lens and your particular copy of a body yourself. That’s what AF Fine Tune, or AF micro-adjustment as Canon calls it, is all about.

State of the current art…

Up until now, this calibration procedure has required cumbersome procedures for accurate calibration. We’d often set a camera up on a tripod and align it to a LensAlign (which has a sighting tool), then have to change the set up to test different subject distances, lighting, or lenses. Some photographers even try to Fine Tune on the spot by trying different values and seeing if a real-world target looks sharper or not – but this method is extremely prone to error. Solutions like FoCal have tried to automate the procedure, but again, the requirement of a chart and a computer is cumbersome.*

… disrupted

Nikon’s new automated AF Fine Tune makes things as easy as child’s play. It uses contrast-detect AF in live view, which focuses using the image sensor and is nearly always accurate, to calibrate its own phase-detect AF system. Watch our video above to get an idea of just how easy it is to calibrate your lenses on the new D5 and D500 cameras.

A couple of things are worth keeping in mind. For some lenses and systems, the optimal calibration value can change for different subject distances. This isn’t necessarily always the case, but you may wish to calibrate for the subject distances you’re most likely to shoot for any particular lens. For a good all-round calibration, we’re told that using a target approximately 40x the focal length away strikes a good balance.

The key here is to play around a bit. Try a couple different distances, a few different runs, and make sure you’re getting a consistent result. Sometimes we’ve found the optimal value to change with lighting temperature, but this sort of thing is precisely why the automated procedure is so valuable: if you’re running into trouble with focus, you can – right at the wedding reception you’re shooting – set the camera on a table, point it at a static object, and calibrate your camera in under 10 seconds. Yeah, we timed ourselves.

The result

Here’s an example of how Fine Tune helped calibrate our Nikon 24/1.8 to our D5. Roll your mouse over the ‘OFF’ and ‘ON’ buttons to see Sam’s eye sharpen up. If you click on the main image, you can see the full image in a separate window, where you’ll notice that the ‘OFF’ shot is front-focused on Sam’s nose, while the ‘ON’ shot is focused correctly on his eye. We placed a single AF point over Sam’s left eye (on camera right) for focus in both cases.

AF Fine Tune OFF
(focused on nose)
AF Fine Tune ON
(focused on eye)

In this case, for this lens paired to this body, automated AF Fine Tune found a value of +14 was best. This indicates that for correct focus, the camera has to shift focus backward an arbitrary 14 units from the focus reading the phase-detect sensor makes. In other words, out of the box, this lens on our D5 front-focuses. If it had back-focused out-of-the-box by a similar amount, we might have expected the automated procedure to find -14 to be the optimal value.

How we’d like to see this feature evolve

AF Fine Tune currently only writes one global value per lens. This means the calibration value can’t be adjusted for either end of a zoom. Furthermore, only the center point can be calibrated – the camera assumes that the calibration at the factory ensures all points are consistent with one another and, importantly, the center point. Finally, as mentioned earlier, sometimes the optimal value can change based on subject distance.

Canon cameras currently at least offer to microadjustment values for either end of a zoom, but don’t offer any sort of automation to help you out. Sigma and Tamron USB docks allow for calibration at either end of the zoom, and for 3 to 4 different subject distance ranges, allowing for a high degree of accuracy of calibration. Unfortunately, entering 4 different subject distance ranges for two ends of a zoom mean the user has to literally set up the camera 8 times, with some sort of test target for accurate assessment – hardly practical for most working photographers.  

The key here is automation: automating opens up a world of opportunities, and automated Fine Tune is an important first step. We’d even imagine a future implementation where calibration data for all focus points is stored and learned from over time. Every time you calibrate a particular point, the camera could retain subject distance information (passed on to it via the lens), and over time learn the best calibration values for each point, for all subject distances, for different temperatures and lighting as well (the latter are often minor concerns).

To sum up…

Nikon’s automated AF Fine Tune is truly one of the most welcome features we’ve seen added to a DSLR in recent times. We’ve wondered for years why camera companies don’t use their contrast-detect AF to self-calibrate their phase-detect systems, instead relegating calibration to a cumbersome end-user experience.

Automated Fine Tune changes all that. It’s a really useful feature that takes a lot of guesswork and cumbersome aspects of calibrating yourself out of the equation, allowing you to do it on the spot, at an event, anywhere, on the fly. In fact, anyone working with shallow depth-of-field imagery should absolutely perform this procedure. Wedding, newborn, portrait, lifestyle, photojournalist, and even sports photographers: take note.


* We really like Reikan FoCal for research purposes though: you get a plethora of data for how a body/lens combination behaves at different subject distances, on different days, under different lighting, and even a map of the optimal calibration value per AF point. Of course, since you can only enter one global adjustment value into your camera, this information is a bit more academic, but if you want to get an idea of the behavior of your system, there’s probably no more comprehensive tool than FoCal.

Articles: Digital Photography Review (dpreview.com)

 
Comments Off on Maximum sharpness: Nikon’s automated AF Fine Tune explained

Posted in Uncategorized


8 Tips for Photographing Men

22 Apr

When I put my hand up to write an article about photographing men, it didn’t occur to me (until I sat down in front of a blank screen) just how big a topic it actually is. While much could be written about photographing men, from lighting ratios to posing, post-processing and more, there seems to be a drastic imbalance in the amount of material devoted solely to photographing men, as compared to women.

A guide to how lighting ratios can differ for men, women and children are covered in the article Lighting Ratios to Make or Break your Portrait, and  Tips for Posing Men offers suggestions, along with Posing Guide: 21 Sample Poses to get you Started with Photographing Men.

Image showing tips for photographing men

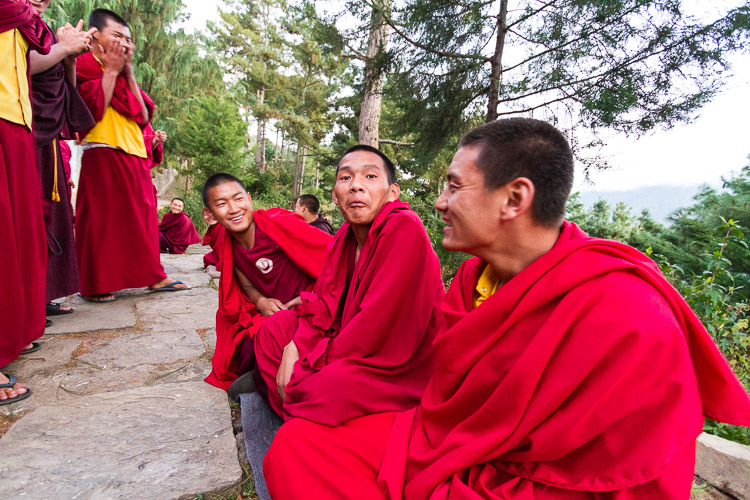
When it comes to context, men are photographed within the genres of photojournalism, fashion, sports, travel, wedding and family photography, and corporate portraiture to name a few. My primary genre is family photography, and I also shoot corporate portraits. There is a growing demand for more relaxed professional portraits for clients to use on their LinkedIn profiles, professional Facebook pages – even online dating sites. Clients want a portrait that flatters, showcases their personality or perhaps the type of work they do, without looking too corporate. For the purpose of this article, I’ll be talking about photographing men mostly within these two contexts.

Tip #1: Include him in the consultation process

This tips sits at number one with good reason. One of the most common complaints I hear in portrait photographers’ forums is that of the reluctant father/husband – the guy who turns up to the family portrait session, looking like it’s the last place on earth he wants to be. His crankiness is infectious, and makes your job of capturing all those joyful family connections close to impossible.

I confess, it was one of my bugbears also until I realized how often I’d been leaving male partners out of the consultation process altogether. In every grumpy dad case I encountered, I had mistakenly assumed that the women I spoke to during consultation would communicate everything to their partners, and in turn, share with me any concerns their partners had.

Following a major light-bulb moment, I started to include men in the process, and it made a world of difference. Turns out, they just want to be heard. The more you engage with a man before the shoot, the more comfortable he will be when you are wielding a camera, and the better the photos you will get. This applies whether you’re photographing a paying client, the guy next door, or your brother.

Ask him if he has any features he’s sensitive about. A prominent nose, a double chin, acne scarring and a bit of a tummy are common sensitivities. Allow him to express his insecurities without feeling silly, and reassure him that you can work around these with posing, camera angles, lighting, and post-processing.

Ask him what kind of clothes he feels good in, and make sure he understands how these may work for or against him in photographs. Tread gently; if it’s a family session, there’s a good chance his partner is already on his case.

Image showing tips for photographing men

If he has made the effort to look good, do him justice in the photographs by paying attention to detail.

If he makes the effort to dress well for your photo shoot, as most men will, show him the same respect by paying attention to detail in the editing process. Zoom in close and check for stray hairs the razor may have missed, a loose thread, or a smudge left by a child’s fingers.

Tip #2: Find purpose and meaning

Following on from tip#1, find out why he wants these photos taken. If it is an individual portrait, what is he using it for? If it’s for professional use, what kind of work does he do? What kind of look does he want? If he is a passionate kite-surfing instructor, he may not appreciate your moody black and whites – he is more likely to want something full of colour and action. However, a budding author may love them.

If it’s a family shoot, ask questions about his family. It sounds like a no-brainer, but you’d be surprised how often this important step is missed. What does the family like to do together? What is special about his partner? What does he love most about his child or grandchild? Dig deep, and listen to his answers. You’ll be surprised at what he reveals.

The photo below of my dad with my eldest daughter is one of my personal favourites. He told me he loves the fact that, even though she is a teenager, she still takes his hand or his arm, when they go for walks together through the forest near his home. I love how the arch of the trees frames them. To me, it suggests they are walking towards the future together.

Image showing tips for photographing men

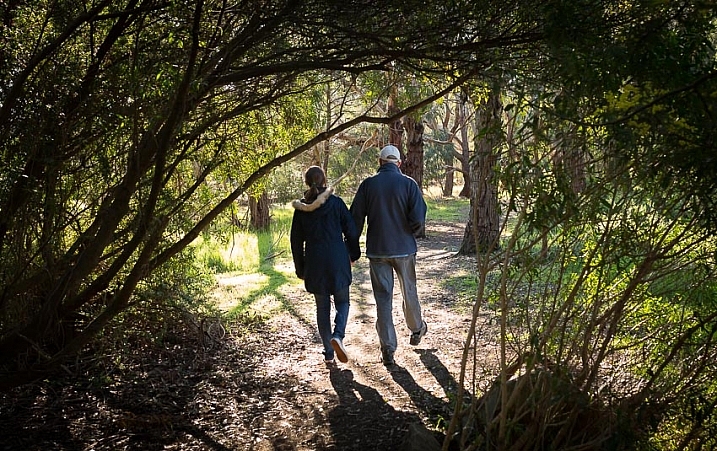
Photograph the connections that are meaningful.

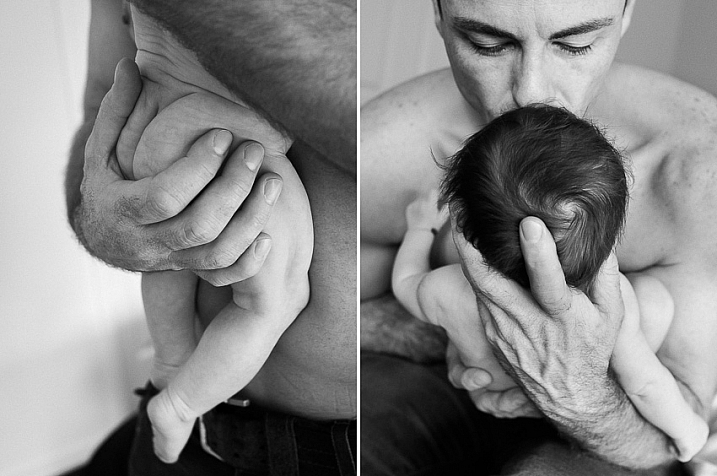
The man in the photos below told me how he marvels at the smallness of his new daughter’s hands and feet. Like many young dads, he is at a very busy stage in his professional life, securing a future for his family. Often his baby is asleep by the time he gets home at night, and so he cherishes the quiet moments they get to spend together.

Image showing tips for photographing men

Image showing tips for photographing men

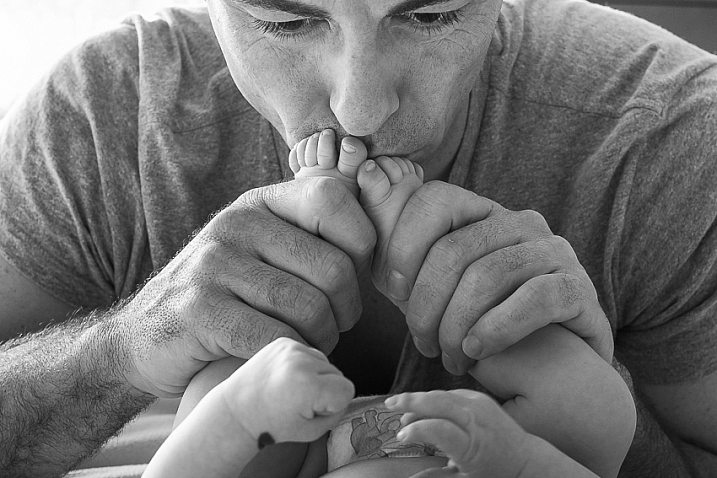
Busy dads cherish those quiet moments with their little ones.

The photo below is of two male cousins. They played together as children, but have lived on separate continents since their families emigrated from their native country when they were young. Remarkable to me was how similar their gestures and body language were, despite having lived apart for most of their lives, and I wanted to capture that in a photograph. The ocean is symbolic in this photo, as it usually separates them. At this moment, they were both on the same side of it.

image showing tips for photographing men

I wanted to capture the similarity between these two cousins who have lived on separate continents most of their lives. The ocean is meaningful in this context: usually it separates them but, at the moment when this photo was taken, they were both on the same side of it.

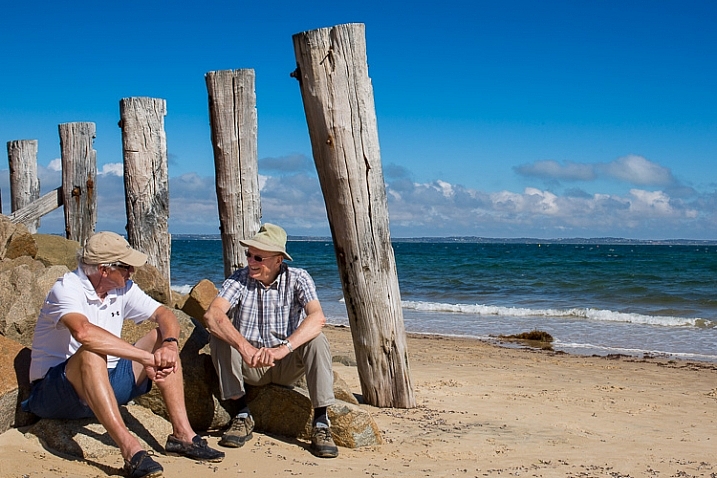
Tip #3: Give him something to lean against or sit on

Regardless of how much prepping you’ve done, many people are profoundly uncomfortable in front of a camera, especially at the start of a shoot. If your subject feels awkward standing in front of the camera, ask him to lean against a vertical surface such as a wall, fence, lamppost, or car. It will help him feel anchored, and will allow him to angle his body without looking unnatural. If he is seated, you’ll be ready for the next tip.

Image showing tips for photographing men

Find a vertical surface for him to lean against.

Tip #4: Minimize a double chin, prominent nose, or heavy jowls

One way to minimize a double chin is to shoot from above eye level, with your subject leaning slightly forward. If he is seated, ask him to rest his forearms on his thighs, and angle his knees 45° away from you.

You can also use lighting to your advantage. Strong, directional light can visually slim a face, or a torso.

The photo below left was shot from below eye level (the subject was taller than me and was standing) and with light falling on both sides of his face. The photo on the right is more flattering. The subject is seated, leaning forward and angled away from the camera. Strong light reflected off a wall in the late afternoon casts his neck and left hand side of his face into shadow.

Image showing tips for photographing men

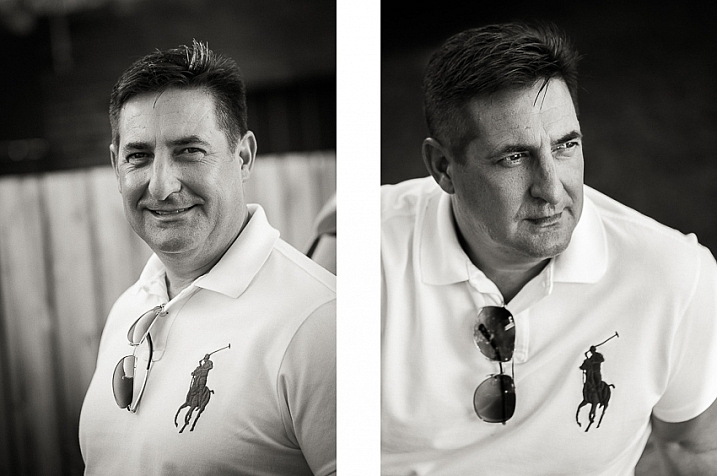
The use of shadow and angle in the photo on the right create a more flattering portrait.

Tip #5: If it bends, bend it

Bent arms and legs make your subject appear more natural and relaxed, and have the added advantage of making the body more compact for the sake of composition.

Tip #6: give him something to do with his hands

“What should I do with my hands?” is a question I am often asked during a session. People become suddenly self-conscious about their hands when they are facing a camera, and arms hanging straight down at the sides look awkward.

If he is standing, ask him to put one or both hands in his pocket(s), or loop his thumb over a belt. If he is sitting, he can interlink his fingers or clasp his hands together. In the case of a family photo, have him hold a baby, or a child’s hand.

Image showing tips for photographing men

Give him something to do with his hands.

Tip #7: Detail and contrast

Details such as eyes, lips, and hands help tell a story, and depict the connections between people. Of all these details, hands are my favourite. Hands are a powerful expression of emotional connection and tenderness. Because of their size, men’s hands are visually striking to photograph in contrast to women’s and children’s hands.

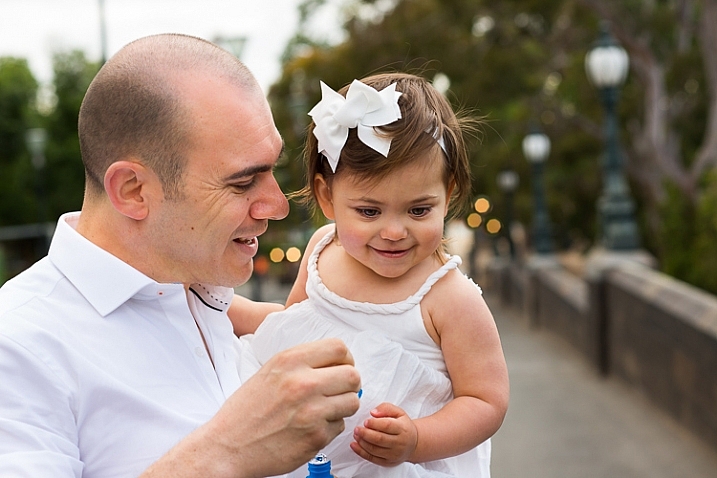
The portrait below shows a tender and playful moment between father and daughter. His hand is large and strong next to hers, and she smiles as he kisses milk froth from her fingertips.

Image showing tips for photographing men

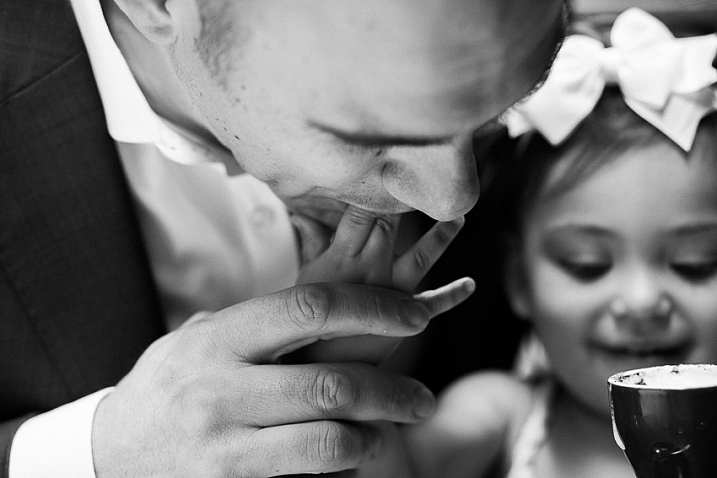
A father playfully kisses milk froth from his daughter’s fingertips.

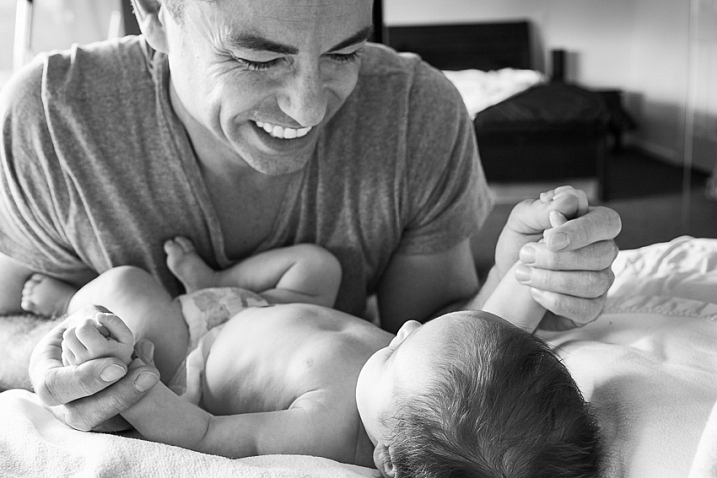
In the photos below of a man with his baby daughter, the size and strength of his hands contrast against the baby’s soft skin and her tiny body. They show how small and vulnerable she is, and depict tenderness and trust.

Image showing tips for photographing men

The size of the man’s hands contrast against the baby, depicting protectiveness and care.

Tip #8: Post-processing

Let’s face it, digital cameras can be brutal. They capture in minute detail all those little imperfections the naked eye doesn’t see, and hold it in a static image for the eye to gaze over.

In some styles of portraiture, this is desirable. Elderly men with craggy faces are popular subjects for travel photographers and photojournalists. However, wrinkles and blemishes are not something you want to draw attention to in family photos or professional head shots, so be kind!

Men will give you clues during the consultation and the shoot. If he cracks jokes such as, “Can you Photoshop me to make me look 10 years younger?” or, “Can you make me look like George Clooney?”, he’s probably only half-kidding. Just because he’s a man doesn’t mean he’s okay with the zit that reared its head yesterday morning, or the hair poking out of his nostril that he missed with the trimmers.

When it comes to editing, much will depend on your personal style. While I’m not a fan of heavily edited portraits, I’ll still follow my basic Lightroom workflow as explained in my article 11 Steps for Basic Portrait Editing in Lightroom. With men, I use the brush tool sparingly to soften skin. The effect should be subtle, and his skin should never appear softer than a woman’s or child’s in the same photo.

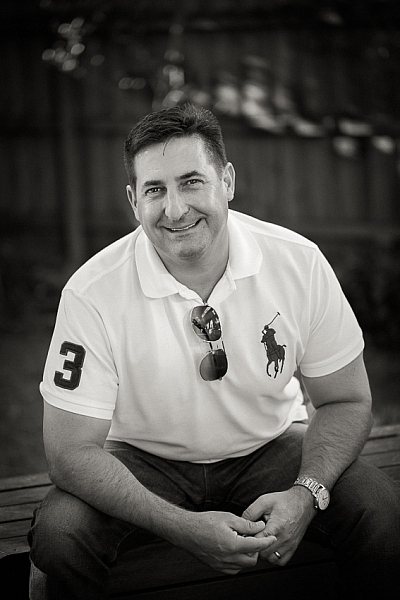
When it comes to blemishes, my rule-of-thumb is to remove any blemish that is temporary. Pimples, scratches, stray hairs – if it’s going to be gone from his face in a fortnight (two weeks for you non-Aussies), I’ll remove it from his face in the post-processing stage. I wouldn’t remove a mole or birth mark unless the client specifically asked me to do so.

image showing tips for photographing men

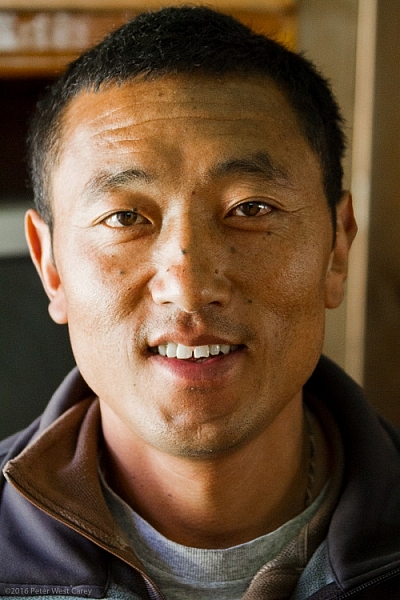
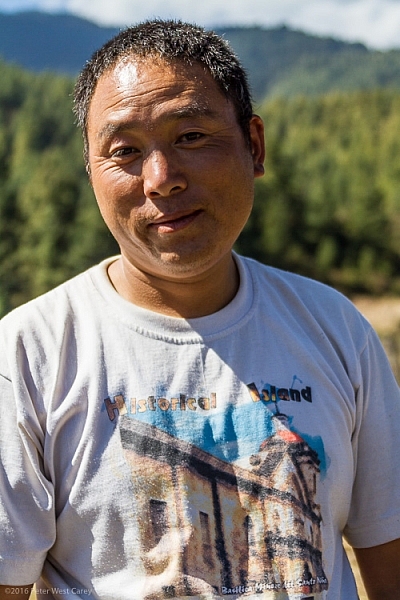
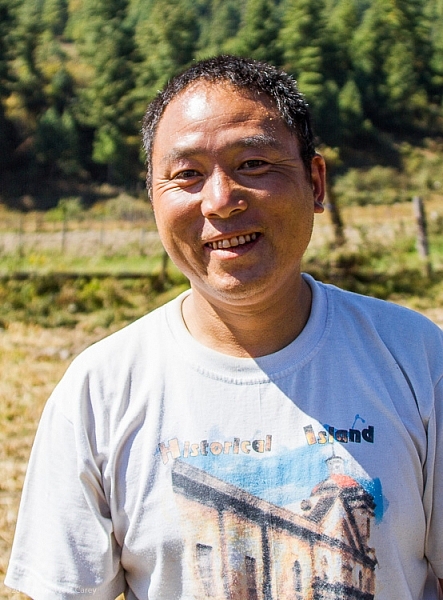
In this casual portrait of my father, I have removed some temporary blemishes, but the portrait retains its authenticity.

Over to you!

This article has only scratched the surface of what is a very broad subject. Tell us about your experiences photographing men. What are some of your triumphs or frustrations, your favourite tips and techniques?

People photography week

This week on dPS we’re featuring articles all about different kinds of people photography including portrait, event and travel photography. See all the previous ones below, and watch for more people photography articles over the next few days.

  • How to Take Low Key Head-shots
  • How to Do a One Light Portrait Setup and Use it as Your Back-up Plan
  • Travel People Photography – Tips and Pitfalls

googletag.cmd.push(function() {
tablet_slots.push( googletag.defineSlot( “/1005424/_dPSv4_tab-all-article-bottom_(300×250)”, [300, 250], “pb-ad-78623” ).addService( googletag.pubads() ) ); } );

googletag.cmd.push(function() {
mobile_slots.push( googletag.defineSlot( “/1005424/_dPSv4_mob-all-article-bottom_(300×250)”, [300, 250], “pb-ad-78158” ).addService( googletag.pubads() ) ); } );

The post 8 Tips for Photographing Men by Karen Quist appeared first on Digital Photography School.


Digital Photography School

 
Comments Off on 8 Tips for Photographing Men

Posted in Photography


Super stable: Panasonic GX85 pre-production sample gallery

21 Apr
Photo by Jeff Keller

The Panasonic Lumix DMC-GX85 / GX80 takes just about everything we like about the GX8 and crams it into a body size that’s a lot more in line with the older GX7. In the shrinking process, you lose the high-res tilting viewfinder, the new 20MP sensor and weather sealing. But don’t think you’re getting a bad deal; you gain Panasonic’s Dual-IS feature while recording 4K video (the first camera to do so), you get an updated 16MP chip that now lacks an anti-aliasing filter, and there’s a new JPEG mode dubbed L. Monochrome.

We’ve taken a pre-production GX85 with us around the Puget Sound region with a variety of lenses to see how it measures up.

Articles: Digital Photography Review (dpreview.com)

 
Comments Off on Super stable: Panasonic GX85 pre-production sample gallery

Posted in Uncategorized


Travel People Photography – Tips and Pitfalls

21 Apr

“Oh the people you will meet!” goes one of Dr. Seuss’ famous lines, speaking to a particular joy of travel. We don’t just travel to see new places, we travel to experience new cultures full of new people – and as photographers, we’re intrigued to take their photo.

Monk, Paro, Bhutan

Yet it’s not as easy as taking photos of foreign mountains or cityscapes. because, gasp!, those people are full of life and feelings and opinions. They might be speaking a language we don’t understand. We are left wondering what they are thinking as we start to bring our camera up to our eye.

I’ve been photographing for 26 years, and traveling regularly for the last eight. I don’t know it all, but I have learned, through trial and error and research, what helps and what hinders travel portrait photography.

The Tips

Watch the light

Photography is about light. You’ve likely heard it a hundred times before. Sometimes we forget that when out of our comfort zone, but it’s important to remember that great photos need great subjects, and great use of light.

PWC-Nepal100509-093652-4565-b

Before raising your camera, know your light. Know what light will be available, and how best to use it. This article: Understanding Natural Light Part 3: Direction of Light – has a wealth of knowledge to get you thinking about the natural light at your location. Of course, you can use a flash as well, but most of us rely on natural light for our travel portraits.

Connect

Hot Button Topic: To connect before or after you take a photo? This decades-old discussion will not be settled here, but I will give my opinion as fuel to the fire.

I believe in give and take. If I’m always taking photos when I travel, I feel more the part of an interloper than a welcome guest. There are irresistible times when someone is doing something soooooo perfect, we have to have a photo, we think. Introducing ourselves will ruin the moment and break the magic we are witnessing.

Monk Debates, Jakar, Bhutan

My advice is to take those photos, but give something back. Approach your subject after the fact and introduce yourself. Smile, make eye contact, promote goodwill, and be nice.

If they are a vendor, buy something they are selling, or at least take a look. Canon, Sony and others now have portable printers you can bring with you, and what better way for give and take than to hand over a printed copy of the portrait you now treasure. It’s more work than just taking photos and continuing on your way, but it is also more rewarding.

PWC-Nepal2011-1001-0530

Get their feedback

Building on the point above, show your subject their portrait. It’s part of giving back. Get their feedback on how they think they look.

You might hear good things or bad, because everyone tends to be their own worst critic. Ask their friends as well, if they are around, to know if you have captured an accurate representation of your new friend.

PWC-Bhutan2013-0317-4766

They may have an idealized portrait they want you to take. What’s the harm in taking the photo they would like and the one you like? The more interaction, the better the portrait.

To smile or not to smile

This argument goes both ways. Some photographers want all smiles, especially if they believe there are in a happy place. Others abhor a grin. What a different story Steve McCurry’s Afghan Girl photo would tell if he was playing the ham and got her to smile!

As artists, we always instill our own bias into our art, that is okay. Sometimes your subject will also instill their bias. For instance, in Bhutan I encountered mostly stern faces when I took portraits, even if the subjects were lively, happy and smiling while I talked to them for a few minutes beforehand. I didn’t feel the stoic portraits the subjects wanted to portray accurately, reflected the warmth I felt while walking the countryside. So, what to do?

I developed a technique on that trip of taking pictures of people’s shoes. This served two purposes; I got images that tell their own story (footwear can tell you a lot about the wearer) and, in that moment when the subject was wondering why the heck is this guy taking pictures of my shoes, they let their guard down and returned to the smile I had encountered until the portrait was taken.

PWC-Bhutan2011-1024-9664

Before shoe photo

PWC-Bhutan2011-1024-9666

PWC-Bhutan2011-1024-9667

After shoe photo

My suggestion is to get to know your subject before taking their portrait. Then find a way to help that personality shine in their portrait.

Let them do their thing

To tell a better story of an individual is to put them in their environment. It helps travel portraits if there is context of the individual, in relation to the space around them.

Interact with your subject, take their posed portrait to your liking, then let them return to what they were doing. This is probably what drew you to them in the first place. Sit, observe, and be patient with your next photos.

Tibetan Shepherds

They might not be classic portraits, subject’s eyes on the lens. To tell the story of the individual in the digital age is to have the ability to show more than one side, more than one image of your subject. You’re not a National Geographic photographer who will only get one image of the person in the magazine. You’re someone with a Facebook or other online account, and you can share both the portrait and the person in their element.

The Pitfalls

The Death Stare

You can probably feel the chill down your spine right now when I mention the Death Stare. Every street photographer has felt it at one point, and most every travel photographer as well.

PWC-Nepal2008-1010-3229

The Death Stare comes when someone sees your camera pointed their way, and fully disapproves of being the object of your desire. It’s important to realize the Death Stare is usually not so much about you, it’s about the situation, and empathy goes a long way to avoiding it. So does the tip above about connecting.

Recovery from the Death Stare can be hard. It chips at your confidence while you are in a foreign environment, already feeling out of place. Now you are unwelcome?

Maasi On The Rim

When I receive the Death Stare, I take a few mental steps backward, and put my camera away for just a bit – maybe 10 minutes, maybe an hour. I spend that time soaking in my surroundings and trying to connect with locals instead of capturing them.

Super posers

Kids are famous posers, but the disease travels across every age range. Some societies are more prone than others to super posing. By super posing I mean the tendency to totally ham it up for the camera. We all like to put on our best face, but the super poser makes almost a 180 degree change from what you first saw in them and wanted to photograph.

Pay Me For Paint, Kathmandu, Nepal

I have watched enough parents try to get their kids to, “smile normally, please?” and spend tens of minutes in frustration at their children being children. My suggestion with travel photos is to not fight the super poser. Accept that the moment you saw in them has passed, and move on.

Only telephoto

Afraid of the Death Stare, or an imaginary worse reaction, the telephoto-only portrait becomes the easy out. If I can shoot from 100 feet away, in obscurity, why get closer?

Because your images will lack intimacy, that’s why. I’m not saying don’t shoot with a telephoto from a distance – but don’t only shoot from a distance. If I peruse your gallery of images from Egypt and only see telephoto attempts at portraits, I’m going to feel as distant as you physically were from your subject.

Boys photographing statue of buddha - Nepal

In my mind, connecting with strangers and only obtaining a few mostly-posed portraits is better than 100 shots from across the street. To me it says, “I traveled to this land, but didn’t really get into it.”

“Please don’t use that”

Following the advice above, you show some shots to your subject. They reply, “Oh, please don’t use any of those. I look horrible!” Now what?

If there is a chance, reshoot the images. If you must move on with your travels, I suggest you take the high road and respect the individual’s wishes. You may think they look perfect. Yet being respectful is more important than impressing your Facebook friends or Instagram followers.

This makes my original advice a bit of a double edged sword. Maybe you shouldn’t show them if there is a chance they will say no? The problem is face recognition software is getting more and more powerful, and Facebook’s (and other companies’) database is getting larger and more accurate. I live of the virtue it is better karma to error on the side of not potentially ticking people off.

Use of the photos after the fact

Ghombu

This brings up a good point about use. What are you going to do with those images?

Again, street photographers know this argument well. “You can’t take my photo!” they have had shouted at them if they have been in the game long enough. While this may be true in certain countries or situations, in most public spaces, especially in the US, you are free to photograph individuals.

What you do with the images after is the key point. Your own personal, artistic use is okay – included in a gallery on Facebook or a post on Twitter, a slideshow presentation at the local social club, or a gallery showing. Commercial use, where a model release is needed (think: ad campaigns, brochures, catalogs, stock), is not. Editorial use in a magazine or newspaper generally is okay.

DPS has some excellent resources, including our article Model Releases: What You Need To Know (with samples).

Conclusion

PWC-Tanzania100321-105740-2967

PWC-Nepal2011-0929-8494

Travel portrait photography can be a tricky world to navigate. You’re out of your comfort zone, you may not speak the language or know the customs, but you want to bring home photos of not just the pretty sites, but the interesting people, too.

Be kind. Treat people as people, not objects. Share your images and take time to connect.

Speaking of sharing, what other advice would you give those wishing to bring back travel portraits?

People photography week

This week on dPS we’re featuring articles all about different kinds of people photography including portrait, event and travel photography. See all the previous ones below, and watch for more people photography articles over the next few days.

  • How to Take Low Key Head-shots
  • How to Do a One Light Portrait Setup and Use it as Your Back-up Plan

googletag.cmd.push(function() {
tablet_slots.push( googletag.defineSlot( “/1005424/_dPSv4_tab-all-article-bottom_(300×250)”, [300, 250], “pb-ad-78623” ).addService( googletag.pubads() ) ); } );

googletag.cmd.push(function() {
mobile_slots.push( googletag.defineSlot( “/1005424/_dPSv4_mob-all-article-bottom_(300×250)”, [300, 250], “pb-ad-78158” ).addService( googletag.pubads() ) ); } );

The post Travel People Photography – Tips and Pitfalls by Peter West Carey appeared first on Digital Photography School.


Digital Photography School

 
Comments Off on Travel People Photography – Tips and Pitfalls

Posted in Photography


Learning curve: LensRentals examines a series of linear focus motors

21 Apr

To the point…

Quick and to the point: that’s the reasoning behind the use of linear focus motors, but it’s less true of the latest blog post on the subject, over on LensRentals.com. That’s what we love about the crew’s in-depth teardowns. In their latest post they tear apart a series of linear drive lenses and discuss the various designs they’ve encountered. Some are pretty robust and others, well, take a look for yourself…

The need for new designs

The ring-type focus motors [pictured above] that were traditionally the default choice for high-end DSLR lenses are not especially well suited to the needs of mirrorless cameras or video shooting. Contrast detection autofocus requires not just being able to move a focus group quickly but also the ability to stop it, then drive it back in the other direction, all with high precision. Video requires silent and carefully-controlled focus drive, to allow smooth refocusing while the camera is recording. These different requirements have prompted the adoption of new types of focus motors.

Linear electromagnetic motors

Among the more popular alternatives to ring-type drive is the linear motor, which features a permanent magnet and a coil of wire that, when electricity is run through it, slides along a bar parallel with the magnet. In principle these fulfill the things demanded of them: fast, precise and quiet (we’ve been very impressed by how fast some of the linear motor lenses we’ve used can be).

Surprisingly, the internet has very few good diagrams of these designs, but you can sometimes recognize lenses that use this type of motor because the focus element rattles around when the camera is switched off. This is because in many linear motor lenses the focus element is only held in position when power is being provided to the focus coil – the rest of the time, the focus carriage can just slide up and down its rails. This isn’t true of the Sony and Zeiss designs that much of the blog post discusses – these appear to have some sort of brake to stop this disconcerting behavior.

Rattle and, er, break

Generally we don’t worry too much about this rattling, but perhaps we should. LensRental’s experience with large numbers of hard-worked lenses reveals that not all linear motor designs are the same. Early Sony motors attach the moving coil to the focus element carriage with just a single blob of glue. Oddly enough, this can fail; leaving the coil racing up and down the rail but with the focus element uncoupled. Later designs do a better job of securing the moving coil to the carriage, prompting Roger Cicala to define two categories within lenses of this kind: Type 1 motors and Type 1a designs that are very similar but don’t break so readily.

No right answer

As well as highlighting a failure mechanism of poor designs, Cicala and Co’s teardowns hint at a fundamental shortcoming of linear motor’s capabilities. Fujifilm’s use of two, three and four linear motors in some lens designs suggests that they struggle to move large, heavy lens elements quickly, taking a brute-force approach.

This is also likely to explain why Sony adopted three different focus drive technologies (linear electromagnetic motor, piezoelectric direct drive and ring-type motors, sometimes in combination) in its recently-announced GM series of lenses: because there isn’t yet a single technology that provides all the necessary characteristics in a way that works for all lens designs.

Results, not technologies

Like LensRentals, we’ve seen very different results between the best and the worst examples of each lens motor type, which is why we try to concentrate on performance, rather than technology, when we write about lenses. We’ve also been lucky not to experience any of the motor failures (perhaps better described as motor detachments), that LensRentals has seen, but it’s interesting to see the designs of lenses improve as manufacturers become more experienced at using each technology. Or, as in the case of the Sony 70-200mm F2.8 pictured here, a mixture of technologies.

We also hope Cicala makes good on his promise to look at other emerging focus technologies, and the ways in which they’re developing, in the coming weeks.

Articles: Digital Photography Review (dpreview.com)

 
Comments Off on Learning curve: LensRentals examines a series of linear focus motors

Posted in Uncategorized


How to Do a One Light Portrait Setup and Use it as Your Back-up Plan

21 Apr

one-light-beauty-setup-3320

When photographing people, every session is different and every subject is different. This leads to a lot of scope when it comes to lighting choices and experimentation. This variety is fantastic, and it’s a large part of why portraiture is such a rewarding pursuit.

Unfortunately, with too much experimentation, it is all too possible to end a session with a collection of sub-standard images. Yes, this exactly how to grow and develop as a photographer, but where does that leave your subject? Often enough, this situation means that you’ve gotten what you need from the session, chiefly experience, but the subject is left with less than stellar photos for their time. This isn’t much of a problem if you’ve wrangled your kids to sit for you, or if you have paid someone else to pose for you. If you’ve been paid for this portrait session, however, this becomes problematic and can be devastating to your future efforts.

A good way to alleviate this is to always include a technique that you’ve practiced thoroughly. Doing this may not ignite your creative spark, but once it’s done, you can experiment until your heart’s content, while safe in the knowledge that you will still have something usable at the end of the day.

one-light-beauty-setup-3251

This article will give you a simple, yet solid, one light technique that works with strobes, flashguns (speedlights) and even window light. It will work with just about any modifier and suits men, women, children, and other subjects just fine.

Equipment

Here’s a list of what you need:

  • A light source: Either flash or window light will work. In terms of modifiers, beauty dishes and softboxes are a great starting point.
  • A white reflector: Don’t have a dedicated reflector? A sheet of white poster board or foam core is a perfect and cheap substitute.

Set up

First, have your subject stand or sit where you need them. If possible, keep them at least five feet from the background. Place your light source directly in front of them, between two and four feet away (60-120cm). Angle the light source (if using flash) so it’s pointing directly at your subject. Watch the shadows falling under their nose and mouth. For this technique, you’re looking to minimize the contrast on your subject’s skin. If the shadows are too long, lower your light source until they are minimized (also make sure you can see the light in their eyes as a catch-light).

Place your reflector directly against your subject, and parallel to the ground at waist level. For ease, you can place it on a stool or a card table. If your subject is sitting, just have them hold it across their knees.

one-light-beauty-setup-diagram

Because the light source will be so close to your subject, you will need to shoot from directly underneath it. Calculate or meter your exposure and take a test shot. If all is well, you should have a good, clean portrait with soft light.

one-light-beauty-setup-3205

Backgrounds

You can change the way your background appears in the image by moving your light source if you’re using flash, or by moving your subject if you’re using window light.

With flash, to get a darker background, you simply move your light source closer to your subject. To get a lighter background, move your light source away from your subject. Moving your light source will require you to change your exposure. You can do this with your aperture settings or on the flashes themselves (turn the power up or down accordingly); it’s your choice.

With window light, you’re forced to move your subject instead. For a darker background move your subject closer to the window. For a lighter background, move them farther away. As with flash, this will also result in changes to your exposure. This time you can choose between shutter speed and aperture.

one-light-beauty-setup-3354-2

Farther from the window

one-light-beauty-setup-3329

Closer to the window

one-light-beauty-setup-comp

You should also be aware that the softness of the light is changed when you adjust the distance between your subject and the light source. If the distance between your light source and your subject decreases, the light will be softer. If that distance increases, the light will be harder.

Tip: If there are shadows falling on the background in your frame, your subject is too close to the background. Try moving your whole setup away from the background a few feet.

Angle of light

You can place your light as high as you want and still get good results; however, for really soft, bright skin you will want to minimize the contrast in blemishes and skin texture. To do this, make sure your light is only slightly higher than your subject, and pointing directly at them. As above, watch for the shadows under the mouth and nose. If they’re long and pronounced, try lowering your light until they disappear.

Window light

If you’re using window light for this technique, the biggest thing to watch out for is you. Because you are lighting your subject from the front, it is all too easy to find yourself blocking your light source. With extremely large windows, this isn’t much of a problem, but with a window in an average home, it can be a pain. One way to sort this is to have your subject sit. That way you can sit, squat or kneel and avoid blocking any light.

In the end

one-light-beauty-setup-3318

This technique may seem simplistic in writing, but it is effective and it yields good results. It also takes only a few attempts to nail down. By adding this technique to your toolkit, you’ll be giving yourself something solid to fall back on, should things not go to plan in other ways.

If you decide to give it a go, please feel free to share your results or ask any questions you may have.

People photography week

This week on dPS we’re featuring articles all about different kinds of people photography including portrait, event and travel photography. See all the previous ones below, and watch for more people photography articles over the next few days.

  • How to Take Low Key Head-shots

googletag.cmd.push(function() {
tablet_slots.push( googletag.defineSlot( “/1005424/_dPSv4_tab-all-article-bottom_(300×250)”, [300, 250], “pb-ad-78623” ).addService( googletag.pubads() ) ); } );

googletag.cmd.push(function() {
mobile_slots.push( googletag.defineSlot( “/1005424/_dPSv4_mob-all-article-bottom_(300×250)”, [300, 250], “pb-ad-78158” ).addService( googletag.pubads() ) ); } );

The post How to Do a One Light Portrait Setup and Use it as Your Back-up Plan by John McIntire appeared first on Digital Photography School.


Digital Photography School

 
Comments Off on How to Do a One Light Portrait Setup and Use it as Your Back-up Plan

Posted in Photography


Huawei clarifies Leica involvement in P9 camera design

21 Apr

Huawei has released a statement clarifying Leica’s involvement in creating its P9 and P9 Plus camera module. Read more

Articles: Digital Photography Review (dpreview.com)

 
Comments Off on Huawei clarifies Leica involvement in P9 camera design

Posted in Uncategorized


When Art Attacks! Giant Spherical Sculpture Escapes Museum

21 Apr

[ By Steph in Art & Installation & Sound. ]

Screen Shot 2016-04-20 at 2.43.25 PM

How do you stop a 15-foot-tall, 250-pound ball when it’s rolling down the street, running over cars and treating the city like a giant pinball machine? Employees at the Toledo Museum in Ohio had to figure out the answer to that question really quickly one day last August when a storm swept through the city, dislodging the giant sculpture from its perch on a downtown rooftop and sending it barreling through the streets as if it had a mind of its own. It even pauses at an intersection and then makes a left turn, as if trying to determine the best escape route, as the frantic museum workers run after it.

An observer who happened to be on an adjacent rooftop captured much of the ensuing chaos and put the clips on Instagram and YouTube. Luckily, the ball is inflatable, so there was no risk of it actually crushing the cars it rolled right over, though it did bend a few street signs and freak out a few drivers. The ball itself, created by artist Kurt Perschke, sustained a little bit of damage on its adventure, but returned to the museum to finish out its residence in Toledo.

redball paris BART Station Market St.

redball project 3

The sculpture has traveled around the world, lodged in every imaginable urban nook and cranny, from alleyways in London and bridges in Paris to the Montreal Biosphere and Chicago’s Grant Park. It’s currently en route to Memphis, Tennessee to begin its next residency.

Bopiliao St in Taipei.

redball project

“Through the RedBall Project I utilize my opportunity as an artist to be a catalyst for new encounters within the everyday,” says Perschke. “Through the magnetic, playful and charismatic nature of the RedBall the work is able to access the imagination embedded in all of us. On the surface, the experience seems to be about the ball itself as an object, but the true power of the project is what it can create for those who experience it. It opens a doorway to imagine what if?”

redball proejct 2 redball chicago

That last statement is especially true when the question is, “What if the ball gets loose and runs around the city?” It’s kind of a shame it didn’t get to travel farther before it was captured and returned.

Share on Facebook


[ By Steph in Art & Installation & Sound. ]

[ WebUrbanist | Archives | Galleries | Privacy | TOS ]


WebUrbanist

 
Comments Off on When Art Attacks! Giant Spherical Sculpture Escapes Museum

Posted in Creativity