RSS
 

Archive for March, 2016

How to Build the Best On-Location Photography Lighting Kit

22 Mar

Digging around the Internet, there are tons of resources available for constructing the perfect studio lighting setup for photographers, but very little is written about the best travel photography lighting kits. As a result, this article is an entirely DIY approach, comprised of lots of sleuthing and trial and error, to create the ideal lighting kit, that’s compact and easy to travel with. Let’s start with the essentials: the lighting gear!
photography lighting equipment

Best Travel Photography Lights

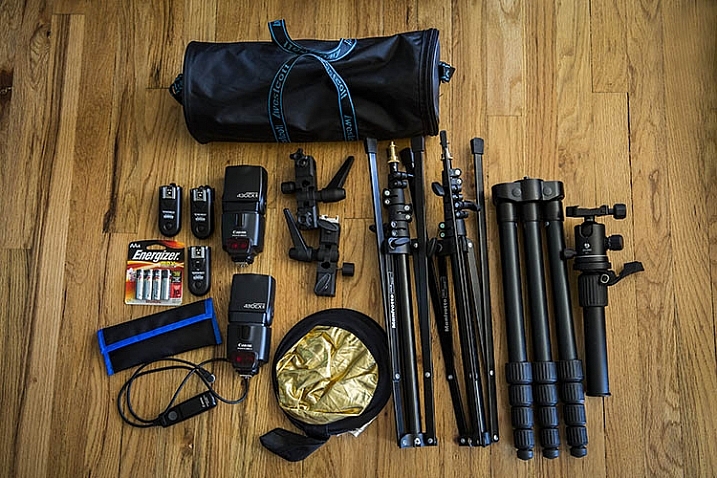
Compared to studio lights, you really can’t go wrong with speedlights when you’re looking for portability. As a Canon shooter, this means having a Canon 580EXII as my main light, and two Canon 430 EXII Speedlites as my secondary lights. A possible lightweight and travel-friendly alternate light source is the Westcott Ice Light, which offers continuous LED lighting, although in general it doesn’t quite have the oomph and output that speedlights do.

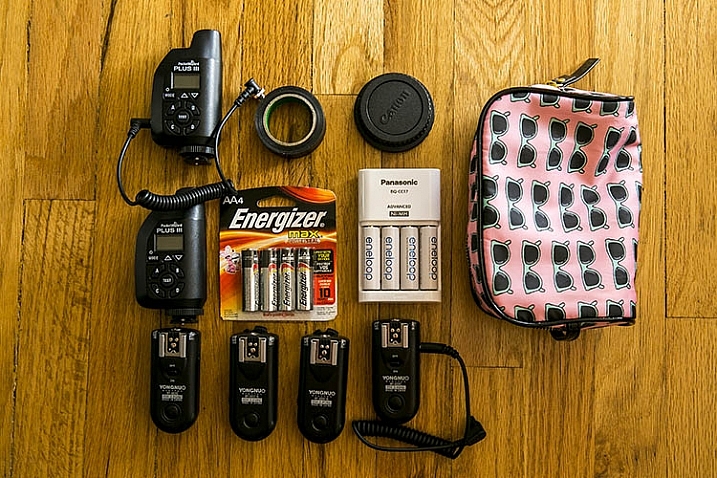
All flashes are powered by Panasonic Eneloop AA batteries, which have been a huge money-saver, thanks to the fact that they are rechargeable, and have all been extremely reliable to date. To sync all three speedlights, I have PocketWizards that I always carry as backups, but primarily rely on Yongnuo RF-603CII-C1 remote flash triggers for two reasons:

  1. They’re small and low-profile
  2. They’re incredibly cheap and affordable

Amazingly, the Yongnuos are also very reliable, and haven’t once failed in two years of constant usage.

Compact Light Stands
photography lighting equipment

Next on the list are light stands in the form of Manfrotto 5001B Nano stands. Weighing in at just 2.2 pounds (1kg) each, these light stands fold down to a mere 19 inches (48cm), while still having a maximum height of 74.4 inches (1.9m). They aren’t the most stable or sturdy light stands out there, but they travel extremely well, and work just fine for simple speedlight setups. Two light stands gets their own umbrella adapter and accompanying umbrella, while one lucky stand is adorned with a Westcott Rapid Box lighting modifier.

Lighting Gear Extras

As with most photo shoots, you never quite know what extra accessories you might need when on location, so my lighting kit varies from shoot to shoot. Some common extras include a a Benro Travel Flat Tripod, Canon shutter release cable, mini gold/silver reflector, speedlight color gels, gaffer’s tape, spare batteries, and camera body and lens rear caps, in case of drops and spills (sad to say these have come in handy more than once).

Bonus tip: I recommend using a lightweight zippered women’s cosmetic bag to hold, and organize, your smaller items such as remote triggers, batteries, front and rear caps, etc. This is the easiest way to keep those items contained in one spot for easy access, with less chance of losing them while at a shoot.
photography lighting equipment

Lighting Gear Bags

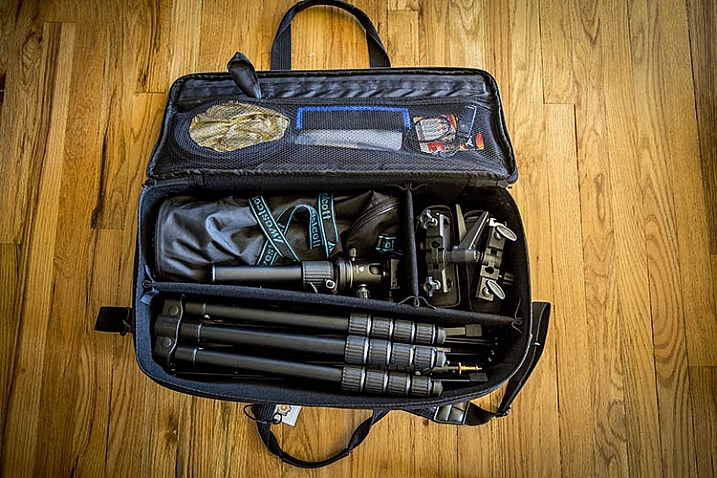
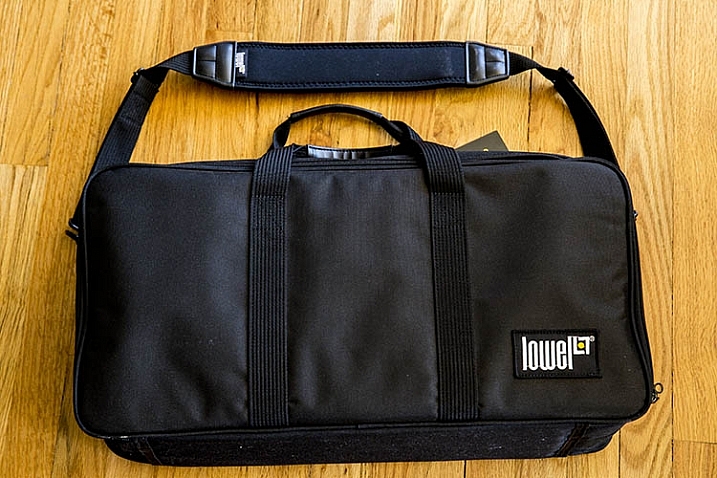
After a huge laundry list of items, you’re probably now wondering how to carry all of this stuff. Finding the perfect lighting gear bag was by far the most challenging part of assembling this DIY kit. But after lots of hunting, I found the best solution to be a Lowel Litebag, which come in a range of sizes.

With a thick and sturdy vinyl exterior and soft interior, this zippered bag has padded partitions that can be removed, or modified to suit a variety of needs. It has an adjustable, nicely padded shoulder strap and handles, making it easy to carry, even when heavy with equipment inside. It isn’t sufficiently padded to take a solid beating, but it will definitely protect your gear to a reasonable extent, without the added bulk and weight. Unfortunately, this bag isn’t the easiest to find, but it is incredibly solid, and holds all of the gear I mentioned above, with room for more!
photography lighting equipment

In Conclusion

As a traveling, or on-location photographer, it’s important to have a go-to travel photography lighting kit that is compact and flexible, while still keeping your gear safe from harm. If you’re searching for a flexible lighting kit, try out the above recommendations, and let me know what you think the comments below! Also, if you have another travel lighting kit setup, I’d love to hear about your own suggestions and modifications.

amzn_assoc_placement = “adunit0”;
amzn_assoc_enable_interest_ads = “true”;
amzn_assoc_tracking_id = “dpsgeneral-20”;
amzn_assoc_ad_mode = “auto”;
amzn_assoc_ad_type = “smart”;
amzn_assoc_marketplace = “amazon”;
amzn_assoc_region = “US”;
amzn_assoc_linkid = “6710d26f550e9793f41475ee806fee9e”;
amzn_assoc_emphasize_categories = “13900861”;
amzn_assoc_fallback_mode = {“type”:”search”,”value”:”digital cameras”};
amzn_assoc_default_category = “Photo”;

googletag.cmd.push(function() {
tablet_slots.push( googletag.defineSlot( “/1005424/_dPSv4_tab-all-article-bottom_(300×250)”, [300, 250], “pb-ad-78623” ).addService( googletag.pubads() ) ); } );

googletag.cmd.push(function() {
mobile_slots.push( googletag.defineSlot( “/1005424/_dPSv4_mob-all-article-bottom_(300×250)”, [300, 250], “pb-ad-78158” ).addService( googletag.pubads() ) ); } );

The post How to Build the Best On-Location Photography Lighting Kit by Suzi Pratt appeared first on Digital Photography School.

Digital Photography School

 
Comments Off on How to Build the Best On-Location Photography Lighting Kit

Posted in Photography


Irix 15mm F2.4 ‘Blackstone’ and ‘Firefly’ lenses for DSLRs to launch this spring

22 Mar

$ (document).ready(function() { SampleGalleryV2({“containerId”:”embeddedSampleGallery_6100492303″,”galleryId”:”6100492303″,”isEmbeddedWidget”:true,”standalone”:false,”selectedImageIndex”:0,”startInCommentsView”:false,”isMobile”:false}) });

Switzerland-based company TH Swiss has introduced the Irix 15mm F2.4 lens for DSLR cameras. The manual focus lens features a ‘neutrino’ coating that helps keep ghosting, color aberration and flare under control.

The 15mm F2.4 is designed for full-frame cameras. It offers a minimum focusing distance of 28cm/11in, and the focus ring provides a ‘click’ tactile feedback when focused to infinity. The lens is composed of 15 elements in 11 groups. Three of the elements have a high refractive index (HRI) elements while another two feature extra-low dispersion (ED) glass. A pair of glass aspherical lenses ensure minimal distortions and aberrations while improving image edge brightness and overall image quality, says the company.

The Irix 15mm is offered in two varieties: ‘Blackstone’ and ‘Firefly.’ The Irix Blackstone features a magnesium and aluminum body able to withstand ‘extreme conditions,’ while the Irix Firefly model is, according to the company, the lightest lens in its class. Both versions of the lens will launch this spring in Canon EF, Nikon F and Pentax K mount; price hasn’t been revealed at this time.


Press release:

Meet the Irix 15mm f/2.4. The photographers dream. Built by engineers and perfected by designers.

The new ultra wide-angle, rectilinear manual lens designed for DSLR cameras guarantees exceptional optical performance.

The Irix 15mm f/2.4 lens is designed to deliver the best optical performance and match full frame DSLR cameras demands. Providing a focal length of 15mm, this new lens model is ideal for outdoor and indoor photography whether it is photojournalism, landscapes or architecture.

From 19 to 22 March, during The Photography Show in Birmingham, TH Swiss will be premiering new family of lenses. Visit Irix at Stand No F121.

Innovative technology

Combining capabilities specific to analogue photography with ingenious technology and solutions, the Irix 15mm f/2.4 is the perfect tool for both professionals and hobbyists. The new special features such as focus lock, infinity click and hyperfocal scale set a new level of manual lens functionality. Focus lock enables to lock the focus ring at any time enssuring the chosen settings. Hyperfocal distance scale gives information about the accessible range for depth of field for a given aperture simply and intuitively. When the focusing ring is set in the “infinity” position, there is a noticeable “click” (infinity click), making it easier to find the value without looking.

Extraordinary optical performance

The Irix 15mm f/2.4 meets the most demanding requirements of modern cameras. Thanks to sophisticated optical construction and special neutrino coating, colour aberration, ghosting and flare effects have been reduced to the absolute minimum, so the lens is ready to meet the requirements of the 50+ megapixel sensors of the newest cameras.

The complex optical system consist of 15 elements in 11 groups. Three of the lens elements have a high refractive index and two others have been made from extra-low dispersion glass. The construction also contains two glass aspherical lenses that are responsible for extremely high image quality and improving image brightness at edges, while minimizing distortions and aberrations at the same time.

With a minimum focusing distance of 0.28 metre and 9 rounded shaped aperture blades, the lens stands for supremely smooth out-of-focus areas. Working with a narrow depth of field it allows the user to fully enjoy the bokeh effect.

Resistant to extreme conditions

Irix 15mm f/2.4 lenses are made with extreme precision, allowing them to be used in even the harshest weather conditions. Each lens is equipped with a weather sealed construction that protects the interior against dust and moisture. Thanks to inner seals they are also protected from accidental water splashes.

Prepare for more and create

Despite its short focal length and large aperture, the Irix 15mm f/2.4 is equipped with not only a front filter mount, but also has a rear gelatin filter slot. The design of the lens allows the use of 95 mm screw-in filters at the front in the petal-shape lens hood and gelatin filters at the back of the lens. This ensures unlimited possibilities for image creation.

Personalize your view

For the comfort of our customers Irix has created two versions of the Irix 15mm f/2.4 to meet their personality and individual taste.

Irix Blackstone: classic design meets maximum functionality, achieving the perfect match of innovative technology. The durable aluminium and magnesium body ensures foolproof protection of your lens, even in extreme conditions. Engraved fluorescent markings that reflect the light enable easy operation in all lighting conditions.

Irix Firefly: high quality mechanism in a handy design. Ergonomic focusing ring offers the freedom to capture the most ideal moment, whether it is big city architecture or wildlife scenery. The most lightweight lens in its class. Challenge accepted.

Irix Swiss Design

Irix Swiss Design stands for minimalism in style while maintaining maximum functionality. It is a perfect mixture of European design combined with Korean precision. The same look and feel of all products in the Irix family. The same consistency, product packaging and complementary elements, all perfectly shaped and fitting one another.

Ultimate precision

Each Irix 15mm f/2.4 lens leaving the factory has been properly calibrated. However, the focus calibration function provides the unique opportunity to adjust the focusing scale for a particular model of camera.

Technical data

  • IMAGE SIZE 35mm “Full Frame”
  • FOCAL LENGTH 15 mm
  • FIELD OF VIEW 110? (diagonal)
  • FOCUSING RANGE 0.28 m (0.92 ft) – ?
  • FOCUSING TYPE manual with lock function
  • APERTURE RANGE f/2.4 – f/22
  • APERTURE CONTROL via camera
  • APERTURE SHAPE 9 rounded blades
  • LENS CONSTRUCTION 15 elements in 11 groups 3x HR, 2x ED, 2x ASP
  • FRONT FILTER THREAD 95 x 1.0 mm
  • REAR GELATIN FILTER SLOT 30 x 30 mm
  • AVAILABLE MOUNTS Canon EF, Nikon F, Pentax K
  • DIMENSIONS (DXH) 114 x 100 mm (4.49” x 3.94”)
  • WEIGHT FIREFLY CANON 608 g (1.34 lbs)
  • NIKON 581 g (1.28 lbs)
  • BLACKSTONE CANON 685 g (1.51 lbs)
  • NIKON 653 g (1.44 lbs)

Pricing and availability:

Spring 2016

Articles: Digital Photography Review (dpreview.com)

 
Comments Off on Irix 15mm F2.4 ‘Blackstone’ and ‘Firefly’ lenses for DSLRs to launch this spring

Posted in Uncategorized


Atomos releases new ‘Flame’ versions of Shogun and Ninja recorders

21 Mar

Atomos, a name synonymous with off-camera video capture, has announced the release of its Atomos Flame series of field monitors, the Shogun Flame and the Ninja Flame. The new series kicks the monitors’ performance up a couple notches with some new features while also addressing some common requests from existing users.

Most notable is support for HDR (high dynamic range) video. The new monitors include the AtomHDR image processing engine which can display 10 stops of dynamic range to match 10-bit Log footage from cameras, revealing details in shadows and highlights that would be clipped on traditional monitors. Log formats from most major camera manufacturers are supported, including Canon, Sony, Panasonic, JVC, Arri, and Red.

HDR is made possible in part by the bright 1500 nit panel, which the company tells us is about four times brighter than existing models. However, even if you’re not shooting HDR this extra brightness could be very helpful. Atomos says it’s so bright that it should allow for easy outdoor monitoring without a hood.

One improvement sure to please a lot of videographers is a hot-swappable dual battery system that lets you keep shooting uninterrupted, along with an improved battery charger which is three times faster. Additionally, both models have ‘battle-ready armor’ to keep working in the field. We’re not sure what ‘battle-ready’ really means when it comes to video gear, but some extra bumpers will definitely let videographers worry a little less about every little bump to their equipment. Both models record 4K/HD to 10-bit 4:2:2 ProRes or DNxHR using standard SSDs.

The Ninja Flame is an HDMI only model with an MSRP of $ 1295. The Shogun Flame supports both SDI and HDMI, including bi-directional conversion, XLR audio inputs and outputs, LTC/Genlock connectivity and Raw to ProRes/DNxHR recording for some Sony and Canon cameras (not specified). It has an MSRP of $ 1695.

The Flame series is expected to ship the week of March 28.


Press release:

Atomos Ignites HDR & High Brightness in the Field: 1500 nits, 10 stops, 10 bit from $ 1295

Melbourne, Australia – 22nd March 2016: In the same way that the original Atomos Shogun helped fast track the transition from HD to 4K filmmaking, Atomos are intent on delivering 4K HDR to everyone with the launch of the Shogun Flame and Ninja Flame.

The Atomos Flame Series delivers the world’s most advanced 7” field monitor, accurately displaying 10 stops of the luminance detail of Log with 10 bit HDR Post Production color accuracy, for the first time in a field monitor. The AtomHDR engine not only resolves HDR brightness detail (dynamic range), with 10-bit color accuracy it also resolves 64 times more color information than traditional 8-bit panels. For Rec709 standard dynamic range scenes, the 1500nits brightness aids with outdoor shooting as does the upgraded continuous power management system that will keep you shooting longer in the field. Of course you also get the professional 4K/HD ProRes/DNxHR Recording, Playback and Editing that has made Atomos famous. Shogun Flame and Ninja Flame are available for sale in quantity week of March 28th, from the authorized Atomos reseller network.

“HDR is simply amazing, it’s the next revolution for filmmaking, once again Atomos are first with the technical solution to make it quicker, easier and more affordable for filmmakers” said Atomos CEO and co-founder Jeromy Young, “Anyone that sees HDR, from content creators to consumers are immediately sold, – more life like shots and real world detail. Our job is to open up HDR to all filmmakers by removing the technical and affordability hurdles that might slow its progress.”

The Flame series of monitor-recorders are equipped with the AtomHDR engine, utilising the power of the 1500nit panel in tandem with Atomos’ patent pending image processing to resolve the brightness detail of Log camera signals with the color accuracy of 10 bit HDR images mastered in post production. This means that the usual complications of exposing Log signals on a washed out image are eliminated – with AtomHDR you simply frame, expose, focus and shoot. All major camera makers log formats are supported – Sony, Canon, Panansonic, Arri, Red and JVC.

The monitor itself is a calibrated 7” 1920×1200 325ppi IPS with upgraded 10-bit color accuracy, resolving 1.07 billion colors compared to the 16.7 million colors of traditional 8-bit panels. This all but eliminates the color branding seen on traditional panels and in tandem with AtomHDR lets you see images as you would with your own eyes.

For existing SDR, Rec709 delivery or scenes that do not have the wide brightness variation required for HDR shooting, switch to traditional video mode (Rec709) and activate a Brightness slider that lets you take advantage of the impressive “Daylight Viewable” 1500nits of brightness emanating from the Flame units. This adds huge versatility for the Flame series – if you have scenes that call for HDR, activate the AtomHDR mode. If you don’t, switch to High Bright mode for outdoor monitoring hood free.

Shogun and Ninja Flame have a rugged built in armour ensuring it is battle-ready for the field and also now inherits the Atomos patented continuous power system pioneered on our HD range.  The hot-swappable dual battery system automatically swaps to the second battery when power is low, allowing hot swapping to new fresh batteries.  This coupled with our new improved battery charger which is 3 times faster means that power is always taken care of. 

The addition of AtomHDR, the 1500nit brightness, 10-bit colour accuracy and Continuous power genuinely positions the Flame Series as the best 7” Field Monitors in the world, but as we know with Atomos they are much more than monitors alone, featuring advanced recording, playback and editing capability as well. Both units record 4K/HD direct from the sensor to 10-bit 4:2:2 Apple ProRes or AVID DNxHR/DNxHD onto affordable yet reliable SSD’s from the world’s leading media brands. They also feature on the fly 3:2 and 2:2 pulldown removal and advanced recording features such as Timelapse & Pre-roll. Playback with controls is possible on screen or out to larger monitors and you can even use the built-in focus, framing and exposure tools to judge the shot and then start tagging to make decision making in Post faster and easier. 

The Ninja Flame is a HDMI only model with all of the above features and ships with a host of accessories including a HRPC hard case, a snap-fast HDR sunhood, fast battery charger, control cable, 2 x NP-F750 4 cell batteries, USB 3 Docking Station, D-Tap Cable, 5 x Master Caddy Cases and a 12 V 3A AC-DC Power Adapter. MSRP is US $ 1295

The Shogun Flame is a HDMI & SDI model with bi-directional SDI/HDMI conversion, Raw to ProRes/DNxHR recording for select Sony and Canon cameras, balanced XLR audio input/output and LTC/Genlock connectivity. It features the same above accessories as well as the XLR breakout cable for an MSRP of $ 1695.

Flame Series Key Features:

  • With a Dynamic range to match that of a 10-bit camera LOG footage, AtomHDR monitors deliver the detail in highlights and shadows usually clipped on traditional monitors.
  • A highly advanced field monitor even in non-HDR scenarios with 1500nits brightness for outdoor shooting, native full HD resolution and optional calibration to ensure natural LCD colour drift can be corrected over time.
  • Record direct from the sensor in pristine 4K UHD (up to 30p) or record high frame rate HD (up to 120p)
  • long with recording the high pixel density of 4K, the Ninja and Shogun Flame also record higher resolution 10-bit colour information and more precise yet efficient 4:2:2 colour encoding.
  • Recording to Apple ProRes and AVID DNxHR visually lossless edit-ready codecs ensure you capture full individual frames like film, providing more flexibility and creativity in post.  Can be delivered to any standard – never worry about having your footage technically rejected due to the format again.
  • Ready for real-word conditions with built-in armour protection, dual battery hot-swappable continuous power system to ensure you always have power and a raft of included accessories including a new fast charger and snap-fast sun hood.
  • Our patented hot-swappable dual battery system for continuous power is backed up with the included power accessories (2 x 4-cell batteries, D-Tap adaptor and blazingly fast battery charger)
  • An arsenal of creative weapons including focus and exposure tools, 3D Custom Looks, Waveforms (LUMA and RGB) and Vector Scopes ensure you set the shot up perfectly every time.
  • XLR audio via breakout cables for Shogun Flame or 3.5mm line level input with audio delay, level adjustment and dedicated audio meters with channel selection for Ninja Flame.
  • We support affordable, readily available SSDs from the world’s most trusted media brands.

The Flame Series is shipping (March 28th) for a MSRP of:

Shogun Flame

  • US:   $ 1,695 ex. TAX
  • EU:   € 1,695 ex. VAT 
  • GBP: £ 1,295 ex. VAT
  • AUD: $ 2,695 Inc. GST

Ninja Flame

  • US:   $ 1,295 ex. TAX
  • EU:   € 1,295 ex. VAT 
  • GBP:  £ 995 ex. VAT
  • AUD: $ 2,049 Inc. GST

About Atomos

Atomos exist to help creative professionals cut through technology barriers by creating easy to use, cutting edge products including 4K & HD Monitor-recorders, a pocket size ProRes recorder, signal converters & power management solutions. Each product serves a different need but all share the common benefit of enabling a faster, higher quality and more affordable production schedule for video professionals. 

Website: www.atomos.com

Articles: Digital Photography Review (dpreview.com)

 
Comments Off on Atomos releases new ‘Flame’ versions of Shogun and Ninja recorders

Posted in Uncategorized


8 Steps to Great Long Exposure Landscape Photography

21 Mar

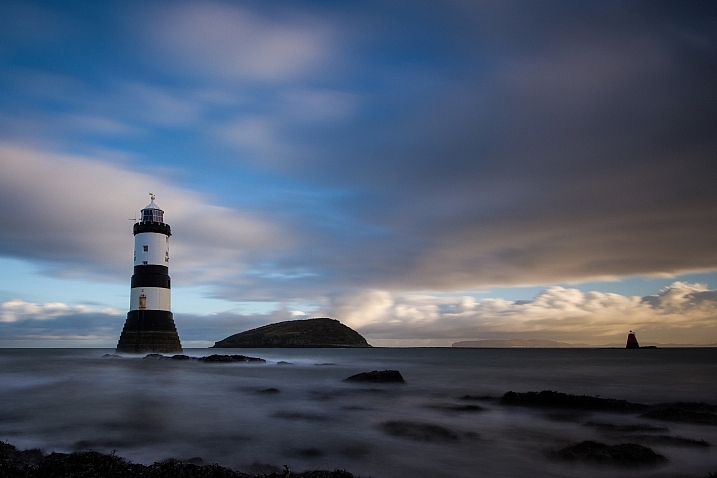
longexposure_landscape2

In this article I will outline eight steps, that will help visualize what you’ll need to capture beautiful, well-planned, and unique images that you’ll be happy with.

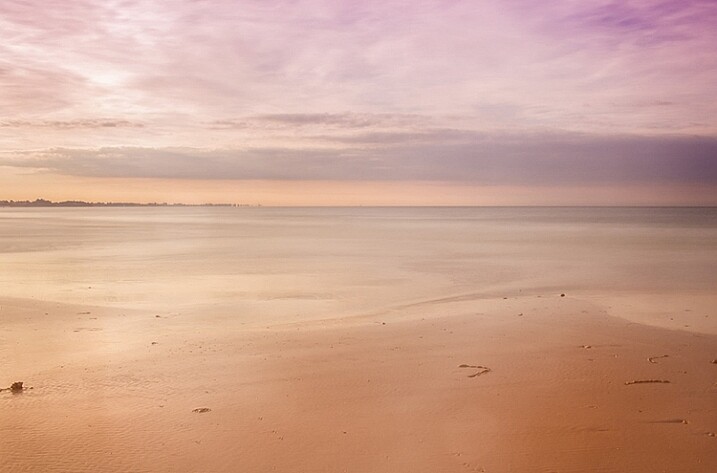
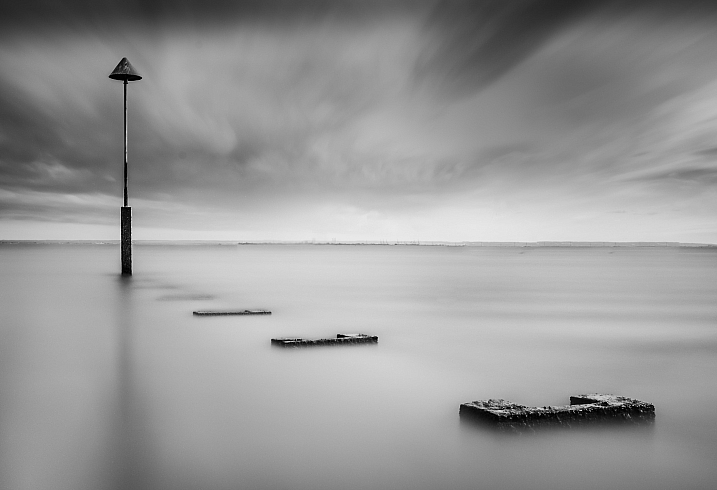
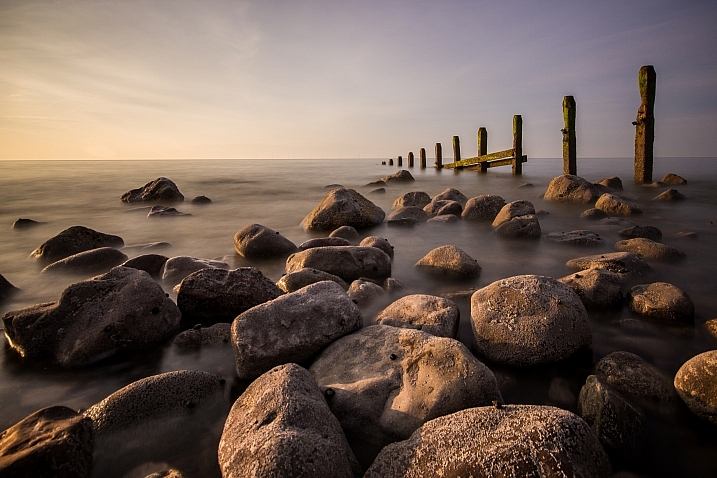
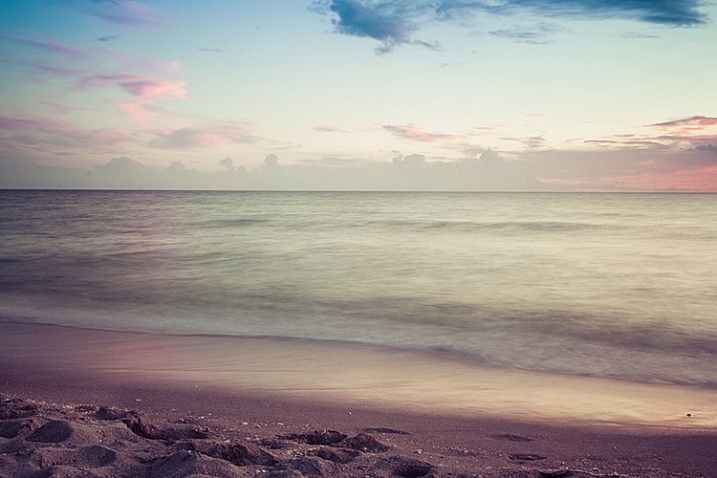
Long exposures are the true artworks of photography; a normally static and bland scene can become a dynamic masterpiece when the shutter is left open, and the capturing of movement occurs. Surf on a beach becomes a swirling, cloud-like mass, and grasses flowing in the wind become a single, beautiful entity. This is a situation where what you see, and what you end up with, are usually two very different things, and the results are often breathtaking.

But capturing that beauty can be challenging. So what do you need to focus on to make a long-exposure landscape shot work? Let’s explore that a bit more.

David McAughtry

By David McAughtry

1. Choose your location wisely

Before you even shoot your landscape, you’ll need to decide what type of shot you’ll tackle, and what environment you’d like to shoot in – whether it be a grassy plain, a seascape, or a busy highway.

Long exposure photography is about capturing, and translating movement within a frame. Spend some time deciding what you’re trying to capture, and what movement you want to accentuate. Rolling waves? Swaying grass? Flowing clouds?

Take a moment to envision what your scene will look like, and what parts of it will be stationary, and which parts will be fluid.

Aaron

By Aaron

2. Be patient and wait for the right time

Long exposures, at their very basic premise, require one of two things to work properly. Either very dim light situations such as the golden hour time periods, very early, or very late in the day – OR modifiers added to the camera to diminish the light that is coming in through the lens.

The reason you need one of these is because leaving the shutter open for longer periods of time, monopolizes one corner of the exposure triangle. When a normal amount of light strikes the camera’s sensor for an extended period of time, you’re guaranteed an overexposure. Therefore, you’ll need to change one of the variables to reduce that amount of light.

longexposure_landscape

The solution? Plan your shoot for very early in the morning, and very late in the evening. The darker it is outside, the longer you’ll be able to leave your shutter open, and therefore the more motion you’ll be able to capture in your image.

If you’re unable to shoot at those times, you’ll need to invest in a neutral density filter, preferably one with the ability to reduce the amount of light coming in to your lens by 10 stops, or more. These filters also add an extra layer of uniqueness to your images, because they allow you to shoot these long exposures at times of the day you normally don’t expect to see them.

3. Select the perfect lens

Of course, there are no hard and fast rules about which lens you’ll need to use, but traditionally, landscapes are captured with wide-angle lenses, to broaden the view and translate a sense of expansiveness.

Can you capture a landscape with a standard 50mm lens? Of course you can! But to maximize the open feel of a scene, consider using something wider. Keep in mind that the more you capture within the frame, the more movement it will contain.

070515_

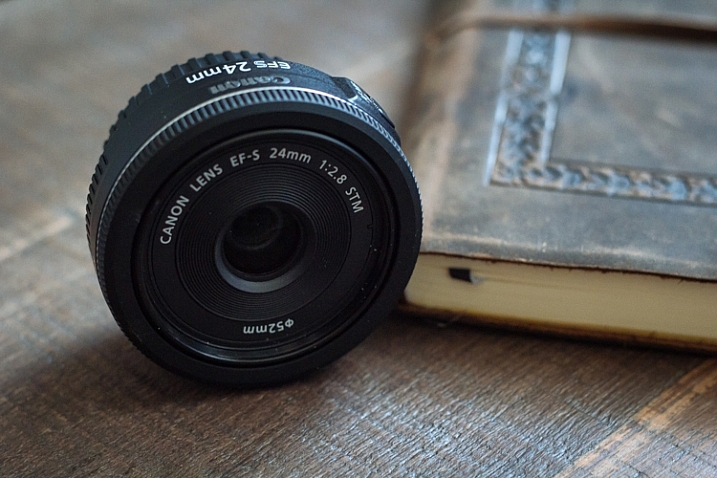
I personally use a 24mm f/2.8 pancake lens for most of my landscape shots. While it’s not as wide as what some people use, I find it gives me a good middle ground, with a wide focal length, and very little of the distortion traditionally associated with super-wide glass.

4. Bring the proper equipment

While we’re speaking about the planning phase of your shoot, it’s a perfect time to consider what gear you’ll need to pull off a long exposure landscape. As it happens, it’s the same equipment you’d need for any other long exposure shot.

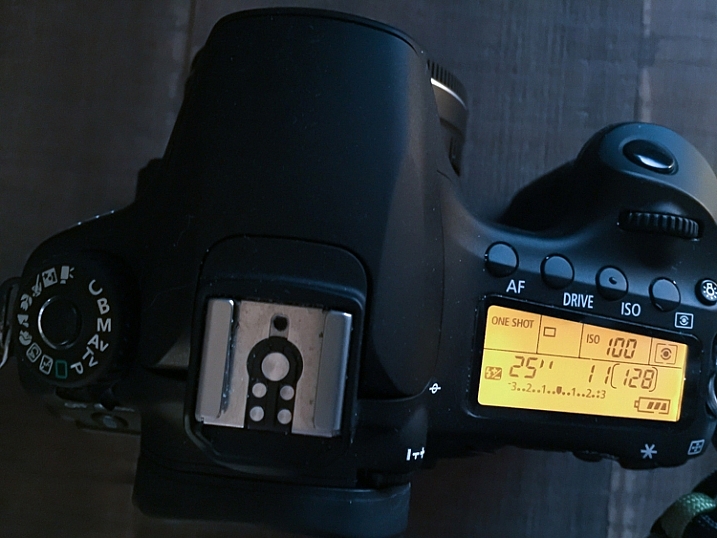
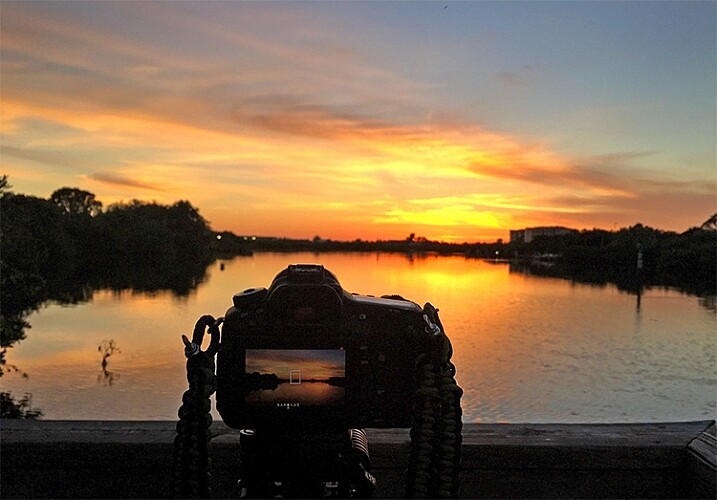
A tripod is a invaluable piece of gear for any landscape photographer, and for a long exposure, it’s an absolute requirement. Exposures of several seconds, which are required to produce movement within the image, need a stable base for the camera. The slightest amount of movement can cause blurriness, and that is amplified with longer and longer shutter times. Invest in a good, sturdy tripod, and ensure nothing will blow or bump into the unit while in operation.

013016_

Another essential accessory for this situation is a remote shutter release. There’s really no excuse for any landscape photographer to not have one, as they can be found for your camera model for $ 10, or so. These releases connect to your camera, and allow you to activate the shutter without ever touching the camera body itself. This keeps the vibration during the shutter click to an absolute minimum.

5. Use the correct camera settings

Since you’re using longer exposure times to pull off this type of shot, you’ll need to make adjustments to other parts of the exposure triangle. Generally, this means you need to stop your aperture down as far as you can, while maintaining sharpness, and reducing your ISO to the lowest setting. These two settings will allow you to bump your exposure time up, to long enough to capture movement in your image.

Fortunately this also gives you some bonus advantages; a lower ISO (such as 100), will keep the noise and artifacts in your shot to a minimum, giving you the best possible image quality. In addition, lenses tend to be sharper in the middle aperture ranges. Using apertures such as f/8, f/11 or f/16 will give you a nice, deep depth of field throughout the picture, while also taking a sharper, clearer photo than what you’d generally get with an extreme aperture of f/22 (due to diffraction).

022916_

As always, shoot in RAW. This will capture as much data as possible, and allow you to make non-destructive edits to the file later. Shooting in RAW format also negates the need to fiddle with white balance while shooting, since that can be adjusted in post-production.

If you do set white balance at the time of the shot, it’s usually a good idea to select the Daylight preset, or a custom white balance setting of your own, that counterbalances the extreme warmth encountered at sunset, and vice-versa for a shot at sunrise, which is a cooler time of the day, color temperature-wise.

6. Focus on your composition

Ekaitz Arbigano

By Ekaitz Arbigano

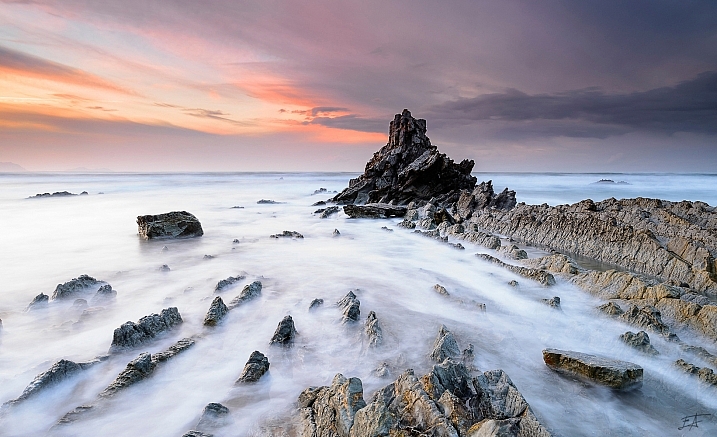
When you have your equipment and settings where they need to be, it’s time to take a moment to compose your shot. What are you capturing? The movement of a body of water like the surf from the ocean? Adjust your composition to allow for more of the water to be in the composition, instead of the sky. Are you trying to focus on the movement of clouds across the sky? Then give that part of the scene more attention within your frame to accentuate it.

7. Envision and anticipate movement

Shooting a moving scene, and attempting to capture that movement involve a bit of foresight, not unlike a marksman leading his target, by visualizing where the target will be when the shot gets there.

longexposure_landscape3

How far will the clouds move in the duration of the exposure? In which direction? Plotting this out before you click the shutter will improve your final image.

For example, capturing the ebb and flow of surf pounding a beach, requires knowing where the surf-line will end, and begin to recede back into the ocean, to properly compose it. Watching the movement of the subject you’re shooting, will help anticipate where it will appear in the final image. It’s always pays to plan ahead!

8. Enhance beauty in post-production

Finally, (and yes, this can be a touchy subject), learn to excel with the post-production process. A long-exposure image will already by eye-catching just by its inherent properties, but it’s important to take time during editing to enhance the beauty you’ve already captured in camera.

This shot initially had a cooler white balance, due to being shot in the morning, as opposed to during sunset.

This shot initially had a cooler white balance, due to being shot in the morning, as opposed to during sunset.

Since you’ll be shooting early or late in the day, tones will most likely already be dramatic, but may require some light boosting of the colors, or dodging and burning in Photoshop to add a bit more.

Since you shot at a low ISO to begin with, you likely won’t have to deal with noise reduction. After your exposure and tones have been taken care of, a little sharpening is all that stands between you and the final image.

Aaron

By Aaron

So that’s it folks, the eight steps to get you started on the path to taking great long exposure landscape shots. What other tricks of the trade do you use to get the perfect capture? Sound off in the comments below, and as usual, let your voice be heard.

This week on dPS we are featuring articles on special effects. Check out the others that have already been published here:

  • How to Photograph the Full Band of the Milky Way
  • Fire Spinning with Steel Wool – A Special Effects Tutorial
  • Special Effect – How to Create Multiple Flash Exposures in a Single Frame
  • Stacking Light Trails for Night Photography Special Effects
  • 26 Unique Special Effects Photos to Spark Your Creativity
  • Weekly Photography Challenge – Special Effects
  • Tips for Shooting Through Objects to Create a Special Effect
  • How to Add Vintage Frame Overlays Using Alien Skin Exposure X

googletag.cmd.push(function() {
tablet_slots.push( googletag.defineSlot( “/1005424/_dPSv4_tab-all-article-bottom_(300×250)”, [300, 250], “pb-ad-78623” ).addService( googletag.pubads() ) ); } );

googletag.cmd.push(function() {
mobile_slots.push( googletag.defineSlot( “/1005424/_dPSv4_mob-all-article-bottom_(300×250)”, [300, 250], “pb-ad-78158” ).addService( googletag.pubads() ) ); } );

The post 8 Steps to Great Long Exposure Landscape Photography by Tim Gilbreath appeared first on Digital Photography School.

Digital Photography School

 
Comments Off on 8 Steps to Great Long Exposure Landscape Photography

Posted in Photography


Roadside Renaissance: Art Of The Painted Desert Project

21 Mar

[ By Steve in Art & Street Art & Graffiti. ]

painted-desert-project-0
Conceived by photographer/activist Chip Thomas, The Painted Desert Project connects urban street artists with communities in the southwest‘s Navajo Nation.

painted-desert-project-1a

painted-desert-project-1b

painted-desert-project-1c

Chip Thomas (above) first set foot in Navajo Nation over 25 years ago when, as a newly-minted doctor, he decided the best way to repay his National Health Service Corps scholarship was by volunteering to serve a community with limited access to healthcare. Decades later, his roots are set deep into the stony desert soil.

painted-desert-project-9a

painted-desert-project-9b

Somewhat of a Renaissance Man, Dr. Thomas displays a very different skill set when he “becomes” Jetsonorama – a street artist whose favored medium is blown-up black-and-white photos applied to a range of outdoor structures.

painted-desert-project-11a

painted-desert-project-11b

painted-desert-project-11c

painted-desert-project-11d

Being as his home base is the Western Agency of the Navajo Nation in Arizona, Thomas’s subjects are the Navajo people and their traditional symbolism. “I’m just trying to reflect the positivity I have been allowed to experience from the people for the past 25 years,” explains Thomas. “It’s like I’m holding a mirror up and saying, ‘Thank you for letting me experience all this.’ And to the youth I’m saying, ‘Learn from this!’” Not corny at all, actually.

Next Page – Click Below to Read More:
Roadside Renaissance Art Of The Painted Desert Project

Share on Facebook


[ By Steve in Art & Street Art & Graffiti. ]

[ WebUrbanist | Archives | Galleries | Privacy | TOS ]


WebUrbanist

 
Comments Off on Roadside Renaissance: Art Of The Painted Desert Project

Posted in Creativity


How to: iFixit disassembles the Fujifilm X100T

21 Mar

Fujifilm X100T iFixit disassembly guide

Curious about what lies beneath the black (and maybe silver) panels of your Fujifilm X100T? Wonder no more, as iFixit has just published a disassembly guide. With nary more than a Phillips #00 screwdriver, tweezers and a heavy-duty spudger you’ll be well on your way to unlocking the mysteries of Fujifilm’s beloved mirrorless model. See some of the highlights here, and be sure to check out the full guide at iFixit.

Fujifilm X100T iFixit disassembly guide

An easy but important first step – removing the camera battery to ensure you make it through the disassembly process unscathed, whether or not your camera does. 


All images courtesy of iFixit

Fujifilm X100T iFixit disassembly guide

A nylon spudger is recommended to nudge the edge of the leather skin up, so that you don’t scratch the surface of the camera. From there, it can be carefully peeled back by hand.


All images courtesy of iFixit

Fujifilm X100T iFixit disassembly guide

Starting on the bottom, you’ll put the screwdriver to work removing the screws securing the cameras side and bottom plates.


All images courtesy of iFixit

Fujifilm X100T iFixit disassembly guide

After removing many tiny screws, the back panel can be pulled back from the camera body, revealing a scene that looks like this. The LCD and back panel can both be removed by gently pulling on the ribbons that connect them to the camera body.


All images courtesy of iFixit

Fujifilm X100T iFixit disassembly guide

With a couple more screws removed, a silver frame covering the guts of the camera can be pulled back. You’ll use a plastic opening tool to pry the orange ribbon connecting this component the main part of the camera.


All images courtesy of iFixit

Fujifilm X100T iFixit disassembly guide

After removing even more screws, the top panel can be lifted from the camera body, and detached using a plastic opening tool.


All images courtesy of iFixit

Fujifilm X100T iFixit disassembly guide

Before long, you’ll find something that looks like this. You’re looking at the back side of the sensor and its associated circuitry, beyond which lies the lens.


All images courtesy of iFixit

Fujifilm X100T iFixit disassembly guide

With the sensor out of the way, the next step is to remove the covering on the back of the lens.


All images courtesy of iFixit

Fujifilm X100T iFixit disassembly guide

With that removed, you’ll remove some more screws to reveal a coiled spring. We were a bit puzzled by this one, but our friend Roger Cicala over at LensRentals had some insight, as usual. The X100T’s focus motor only drives the focusing element in one direction, so the spring works to push the element back the other way. Using this kind of system probably saves a bit of battery life and reduces size. You learn something new every day, right?


All images courtesy of iFixit

Fujifilm X100T iFixit disassembly guide

Here’s the X100T’s motherboard, freed from the body of the camera. iFixit recommends metal tweezers to pull the orange ribbon from the component and detach it.


All images courtesy of iFixit

Fujifilm X100T iFixit disassembly guide

If all goes well, your disassembly will result in something like this. Don’t worry, you can put the whole thing back together again by following the directions in reverse.


All images courtesy of iFixit

Articles: Digital Photography Review (dpreview.com)

 
Comments Off on How to: iFixit disassembles the Fujifilm X100T

Posted in Uncategorized


How to Add Vintage Frame Overlays Using Alien Skin Exposure X

20 Mar

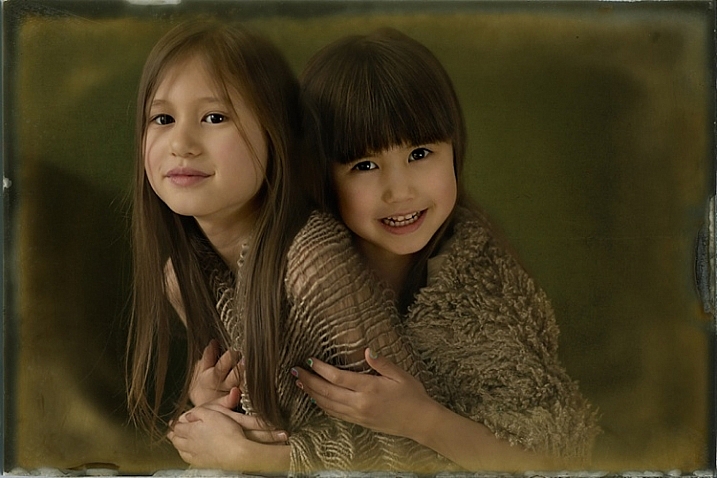
Here is a quick and snazzy tip on adding some cool retro and vintage frame overlays to your photographs, including polaroids and borders, using Alien Skin Exposure X. It’s easy as pie, and takes seconds! Unlike Photoshop, adding frames in Exposure X does not require masking, or the use of layers.

adding-vintage-frames-tutorial-alien-skin-exposure_0007

But first… why add frames?

  1. You may be going for a certain look and want your images to stand out.
  2. You may want to use your images in scrapbooks and blogs that have  a specific theme.
  3. You might just be feeling super creative and want to do something different.

Whatever your reason, it’s a fun experiment, and of course, highly dependent on your taste.

Here’s how to add a frame

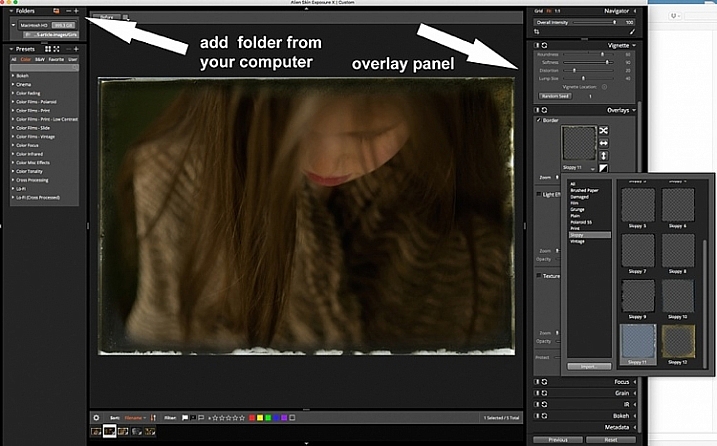
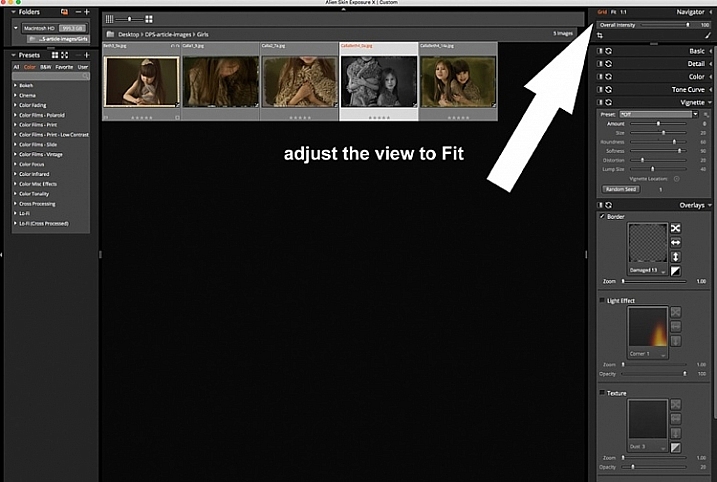
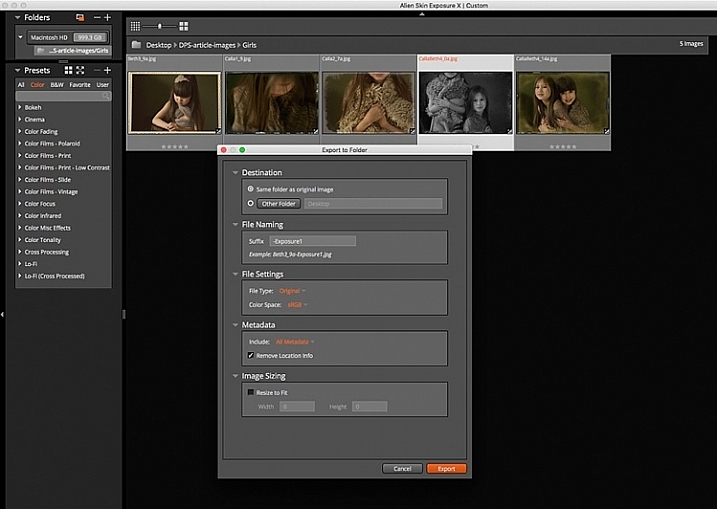
Open Alien Skin Exposure X (the latest version is 10, but previous versions work just the same). Click the + icon on the top left corner of the window to add folders from your computer. Choose the folder you want to add, and double click. You may notice that when you open the folder, your images will be initially displayed as a Grid as shown on the second photo below.

adding-vintage-frames-tutorial-alien-skin-exposure_0000

adding-vintage-frames-tutorial-alien-skin-exposure_0008

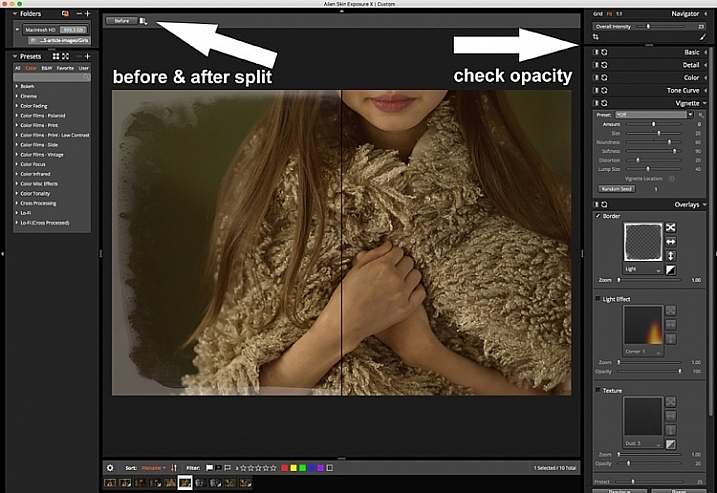
Click Fit on the upper right corner of the window and you will see (as shown on the first photo) that your chosen image is enlarged, but you can still see the rest of the set, in the thumbnails just below. Once you have your image, look on the right panel, and bring up the Overlays option by clicking on the arrow. Tick the border, then click on the box showing the overlay and a pop up window, giving you a variety of overlay options, comes up. You can scroll through these options to find the overlay you want to use.

You can work on each photo individually or select all using Cmd/Ctrl + A, and your chosen settings will be applied to all the images. TypeCmd/Ctrl + D to deselect, and click on one photo to work on it individually. Don’t forget to use the Overall Intensity slider on the top right corner of the window, it works like the opacity slider in Photoshop. You also have a selection of view options that allow you to see the various before and after splits, as shown on the image below. In this case, the left half of the photo has the overlay and the right half shows the original. This is helpful in gauging the intensity of the overlay applied, and its effect on the original image.

adding-vintage-frames-tutorial-alien-skin-exposure_0001

After you have applied your frames on each image, you now need to export them. Select all the images using Cmd/Ctrl + A, then either go to the Exposure bar File menu and select Export, or simply typeCmd/Ctrl + E, and you can export your new images to a folder you designate. I suggest that you keep the suggested file suffix, or change it to something of your choice, so you know these are the new files with the Exposure edits, should you want to keep them in the same folder. You will still have your original images in tact and untouched, in case you want to revisit them later.

adding-vintage-frames-tutorial-alien-skin-exposure_0002

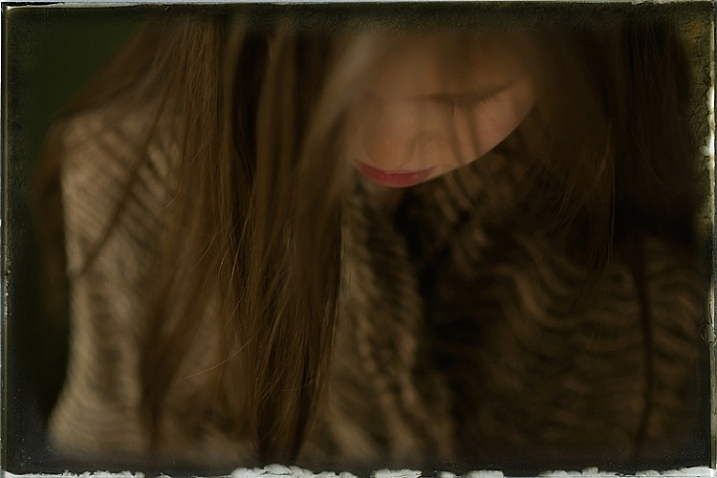
Here are the images that I used in this tutorial, with the added frames using Alien Skin Exposure X.

adding-vintage-frames-tutorial-alien-skin-exposure_0006

adding-vintage-frames-tutorial-alien-skin-exposure_0005

adding-vintage-frames-tutorial-alien-skin-exposure_0002

adding-vintage-frames-tutorial-alien-skin-exposure_0004

I hope you enjoyed this quick tip. Have fun experimenting with frames as well as other special effects. Do share any other quick tips on adding vintage frames in the comments below.

This week on dPS we are featuring articles on special effects. Check out the others that have already been published here:

  • How to Photograph the Full Band of the Milky Way
  • Fire Spinning with Steel Wool – A Special Effects Tutorial
  • Special Effect – How to Create Multiple Flash Exposures in a Single Frame
  • Stacking Light Trails for Night Photography Special Effects
  • 26 Unique Special Effects Photos to Spark Your Creativity
  • Weekly Photography Challenge – Special Effects
  • Tips for Shooting Through Objects to Create a Special Effect

googletag.cmd.push(function() {
tablet_slots.push( googletag.defineSlot( “/1005424/_dPSv4_tab-all-article-bottom_(300×250)”, [300, 250], “pb-ad-78623” ).addService( googletag.pubads() ) ); } );

googletag.cmd.push(function() {
mobile_slots.push( googletag.defineSlot( “/1005424/_dPSv4_mob-all-article-bottom_(300×250)”, [300, 250], “pb-ad-78158” ).addService( googletag.pubads() ) ); } );

The post How to Add Vintage Frame Overlays Using Alien Skin Exposure X by Lily Sawyer appeared first on Digital Photography School.

Digital Photography School

 
Comments Off on How to Add Vintage Frame Overlays Using Alien Skin Exposure X

Posted in Photography


Writer’s Favorite Lens – the Canon 400mm f/2.8

20 Mar

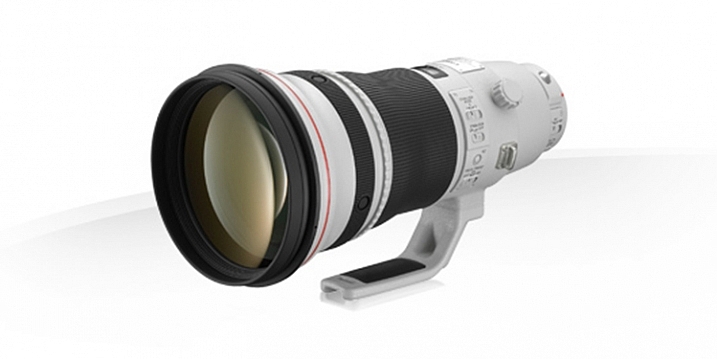
Being a sports photographer, covering things ranging from soccer (football) and rugby, to horse racing, I often have the Canon 400mm f/2.8L IS II USM on one of my camera bodies. It’s this lens’ focal length and fast aperture that is most helpful. I love this lens for its image quality and performance, but also its versatility.

Fig 12

Image courtesy of Canon.

So let’s have a look at the specs of this lens:

  • Focal length: 400mm (560mm APS-C approximate)
  • Maximum aperture: f/2.8
  • Maximum diameter x length: 163mm x 343mm (6.41 x 13.50″)
  • Weight: 3.85 kg (8.48 lbs)
  • Image stabilized? Yes, four stops
  • Minimum focusing distance: 2.7m (8.85′)
  • Weather sealed: Yes

PROS

Ideal Sports Lens

The 400mm focal length of this lens is ideal for many field based sports such as soccer (football) and rugby as it’s not too long, such as a 500mm for example, but at the same time it’s gives more pull than a 300mm. Its fast f/2.8 aperture is very handy when photographing in low-light situations, such as at night matches where the light is often quite low, as it allows me to use a lower ISO and still be able to maintain a shutter speed that is fast enough to freeze the action. This maximum aperture is also ideal to nicely isolate the subject from a busy background and make them pop more. Although I don’t always shoot at f/2.8 (generally hovering around f/3.5-f/4) having the ability to use f/2.8 is quite handy.

As far as focussing speed goes, this lens is blazingly quick and spot-on accurate, especially when coupled to a 1D X, for example. It easily locks on to a subject without any search or lag whatsoever.

In the following images, the 400mm focal length has been fantastic at pulling the subject in closer than what a 70-200 or 300mm for example, would be able to offer. These images have still been cropped, but not as much as would be needed if I had used a shorter focal length.

© Daniel Smith / Getty Images.

© Daniel Smith / Getty Images.

© Daniel Smith / Getty Images.

© Daniel Smith / Getty Images.

Versatility

Being quite heavy and long, with no zoom, you may think that this lens would only be suited to use on the sidelines of a sports field, attached to a monopod. However, this lens is much more versatile than that. Being the series two version of this lens, it is significantly lighter than its predecessor. This reduction in weight means that I am now able to use this lens hand-held (if I’m using it for extended period of time, I do use a monopod; it’s not that light!) which opens up more options. For example, I have photographed live concerts with this lens; a lens that is rarely used because of its long focal length. But it’s this focal length, coupled with an f/2.8 aperture, that I love. Photographing through the crowd is fantastic, as I am able to create abstract shapes through the silhouettes created by the audience, and use them to frame my subject.

The longer focal length can also be great when covering conferences, as I am able to photograph further back. This is especially helpful if the speakers are on a stage, as standing further back will reduce the angle in which you look up, and enable you to reduce the distortion that looking up can cause.

Fig 3

This was taken from further back. The speaker was on a stage. By standing back I was able to photograph the speaker and be closer to his level. The aperture also provided some great bokeh with the lights in the background.

Fig 1

400mm, 1/500sec, f/3.2 ISO 6400. The singer raising her hand is made stronger by the abstract hand being raised by the fans.

Fig 2

400mm, 1/500sec, f/3.5 ISO 6400. Shooting through the fans with their hands in the air adds some great foreground interest to this image.

In addition, its fast f/2.8 aperture lends itself to use with teleconverters if extra reach is needed. When adding one, you multiply the aperture and focal length by the strength of the teleconverter; so if you are using a 2x, it would make this lens an 800mm f/5.6. And because its image quality is so good, the degradation to image quality when using converters isn’t really noticeable with this lens. Its AF also does not really take much of a hit, either. So for the price of a couple of teleconverters, I potentially have three lenses in one:

  • A 400mm f/2.8 as it is
  • A 560 f/4 with a 1.4x teleconverter
  • a 800 f/5.6 with a 2x teleconverter

CONS

Cost

This lens is not the cheapest lens on the market; Amazon has it listed at $ 9,999 USD, so this lens is definitely not something many photographers would consider purchasing.

An alternative to this would be the Canon 400mm f/5.6L USM which sells for a much more affordable $ 1,199 USD. The biggest drawback with that lens, however, is its maximum aperture of f/5.6, which would not be very useful in low-light situations, where a wider aperture is much more beneficial.

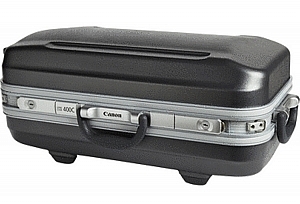
Image courtesy of Canon.

Image courtesy of Canon.

Size

This isn’t the smallest lens either, and you will generally be very noticeable with it. Using this as a street photography lens would not be ideal, and would make you quite a target! You will also need quite a large bag to carry this in, although it does come with its own hard-case as seen here.

Weight

Even though this is the series two, and much lighter that its predecessor, at nearly 4kg (almost 8.5 pounds) this is definitely not a light lens! You will need a monopod with this lens if you intend to use if for long periods of time. Transporting it also requires quite a large bag; a roller bag being ideal as you don’t have to carry it. I transport all of my equipment in the one bag generally – a ThinkTank Photo Airport Security V2.0 roller bag. This makes carrying not only this lens, but all of my equipment much easier, and saves injuring my back.

ALTERNATIVES

This lens is not for everyone, primarily because of its high cost. If you would love to have one of these in your kit but don’t have the finances available, going second hand is an option. A used 400mm f/2.8L IS USM (non-Series II) is still a fantastic lens and can be found relatively (compared to the new version) cheaply at around $ 4,000-$ 5,000 USD.

If that’s still pushing the financial friendship a little consider these:

  • Canon 100-400mm f/4.5-5.6L IS II USM at $ 2,099 USD (or the original for $ 1389)
  • Canon 400mm f/5.6L USM at $ 1,149 USD
  • Or the many offerings from Sigma, Tamron and Tokina which have the 400mm focal length covered

CONCLUSION

While this is the heaviest lens it my kit, the image quality and performance from it is unmatched, and definitely make it worthwhile carting around. With a little practice using a prime super-telephoto, you can create some striking images that you just cannot achieve with shorter focal lengths. The large aperture and the bokeh it produces at 400mm is dreamy, too!

I really enjoy using this lens in areas that it typically would not be used. It doesn’t always work in those situations, but is a lot of fun nonetheless. Do you have a long telephoto lens? What do you shoot with it? Please share your thoughts in the comments below.

amzn_assoc_placement = “adunit0”;
amzn_assoc_enable_interest_ads = “true”;
amzn_assoc_tracking_id = “dpsgeneral-20”;
amzn_assoc_ad_mode = “auto”;
amzn_assoc_ad_type = “smart”;
amzn_assoc_marketplace = “amazon”;
amzn_assoc_region = “US”;
amzn_assoc_linkid = “59b2c6e145b8854217845ac445c9a2b8”;
amzn_assoc_emphasize_categories = “13900861”;
amzn_assoc_fallback_mode = {“type”:”search”,”value”:”Digital Cameras”};
amzn_assoc_default_category = “Photo”;

googletag.cmd.push(function() {
tablet_slots.push( googletag.defineSlot( “/1005424/_dPSv4_tab-all-article-bottom_(300×250)”, [300, 250], “pb-ad-78623” ).addService( googletag.pubads() ) ); } );

googletag.cmd.push(function() {
mobile_slots.push( googletag.defineSlot( “/1005424/_dPSv4_mob-all-article-bottom_(300×250)”, [300, 250], “pb-ad-78158” ).addService( googletag.pubads() ) ); } );

The post Writer’s Favorite Lens – the Canon 400mm f/2.8 by Daniel Smith appeared first on Digital Photography School.

Digital Photography School

 
Comments Off on Writer’s Favorite Lens – the Canon 400mm f/2.8

Posted in Photography


Spherical Tires: Magnetic Levitation for Driverless Vehicles

19 Mar

[ By WebUrbanist in Technology & Vehicles & Mods. ]

magnetic levitation sphere tires

The Eagle 360, a new tire design concept from Goodyear, is a rounded sphere held in place by magnetic fields and designed for a smoother ride in your future driver-free car.

The biggest advantage, of course, is omnidirectional steering capabilities, since the wheels have no orientation, unlike their forward-or-backward circular predecessors.

goodyear tire concept

An organically-patterned, 3D-printed tread is designed to adapt like a sponge to different road conditions, while built-in sensor relay surface measurements to the onboard computer. Faster response times and immediate reaction capabilities in multiple directions all work toward improving passenger safety and comfort.

goodyear tire diagram future


“By steadily reducing the driver interaction and intervention in self-driving vehicles, tires will play an even more important role as the primary link to the road,” said Goodyear’s senior vice president Joseph Zekoski.

goodyear maglev tires

“Goodyear’s concept tires play a dual role in that future both as creative platforms to push the boundaries of conventional thinking and test beds for next-generation technologies.”

Share on Facebook


[ By WebUrbanist in Technology & Vehicles & Mods. ]

[ WebUrbanist | Archives | Galleries | Privacy | TOS ]


WebUrbanist

 
Comments Off on Spherical Tires: Magnetic Levitation for Driverless Vehicles

Posted in Creativity


Tips for Shooting Through Objects to Create a Special Effect

19 Mar

Photography is as much a study of the creative, as it is a study of the technical. Often, knowing all the technical ins and outs of your camera, still does not guarantee a stellar image – an image that evokes emotion, one that makes you stop in your tracks and take a second look. Such images are created by thinking outside the box, by experimenting with new techniques and ideas that may seem crazy, ridiculous, or even somewhat unbelievable! Lucky for us, we photographers are known to be a little bit crazy, so trying new and innovative techniques should not surprise us too much.

One such really cool and innovative technique, to add a little bit of creativity and flare in our imagery, is shooting through objects. This technique is, quite literally, to have a small object between the front of the lens and your subject. This is often used to frame the subject, in order to draw attention to it/them, soften the edges of the image, or add a cool color special effect, to an otherwise ordinary image.

Memorable Jaunts DPS Article Shooting through objects for special effects 01

The whole idea of shooting through objects, is to have an out of focus foreground and be able to shoot through it, but at the same time keep the subject sharp. This effect is best achieved by placing the object close to the lens, either by hand holding it, or by resting it against the lens. Placing the foreground object further away from the actual subject and closer to the front of your lens, makes it easier to blur.

Although any lens will work, the shorter your lens focal length the closer the foreground object will need to be to the front of the lens, making it much easier to hand hold. If the object you are shooting through is large, it is easy to miss the focus on the actual subject. In these situations, it is best to focus on the subject, lock focus by switching to manual focus (MF/AF toggle buttons are located on the lens body in most cases or using back button focus) and then bringing the foreground object close to the lens for the blur effect. Sometimes it is possible to use the out of focus foreground to hide distracting things in the background.

Memorable Jaunts DPS Article Shooting through objects for special effects 06

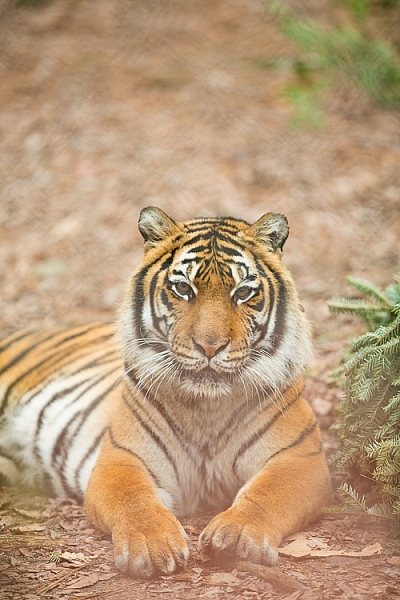
In the above image, this tiger in North Carolina’s Tiger Rescue facility, was holding a perfect pose and staring dead straight at me. Thankfully, I had a fence between me and the tiger (I am sure he was viewing me as a tasty snack!) and I loved the blur shapes seen in the top of the frame. I also handheld a piece of candy wrapper towards the bottom of the lens to give a little pink tint to the bottom of the image. The only post-processing done here, was to bring up the blacks and add a little contrast to the image.

The shoot-through technique works especially well with leaves, flowers, and even small pieces of glass. The possibilities are quite endless when it comes to finding things to shoot through. If you are feeling uninspired, sometimes bringing something as simple as a small strip of fabric, or a piece of clear plastic, can completely change the outcome of your final photograph. Look around your photography location and you are bound to find something to shoot through. Even if you often shoot in the same location, you may find something new each time. Flowers bloom at different times of year, leaves change color, and sometimes even dry twigs add an element of interest.

Memorable Jaunts DPS Article Shooting through objects for special effects-SidebySide01

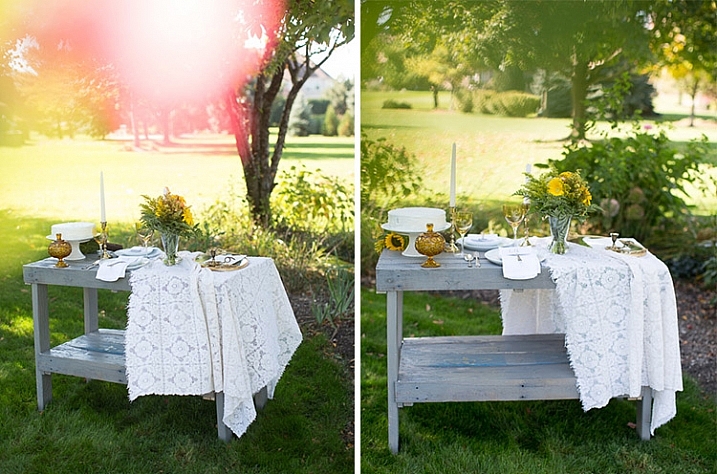
Always use these effects to taste. In the side-by-side above, I initially used a pink flower to see if I could get a cool, light leak effect in the frame. But somehow that did not appeal to me. So in the next frame, I took a leaf and held it up to the top of the lens. I loved this effect, as if I was shooting through the bushes but still retaining the details in the bottom half of the image.

Memorable Jaunts DPS Article Shooting through objects for special effects-SidebySide02

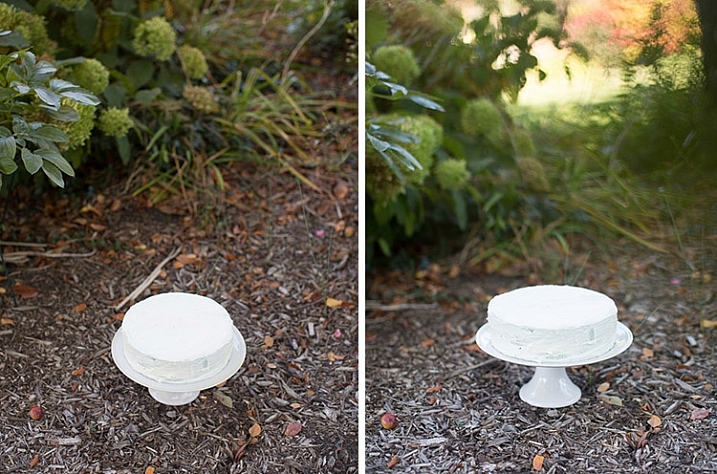
In the images of cakes above, the first is a standard, run-of-the-mill, top shot of the cake. But when I changed my angle and used a leaf to shoot through, I loved the blur effect it produced at the top of the frame.

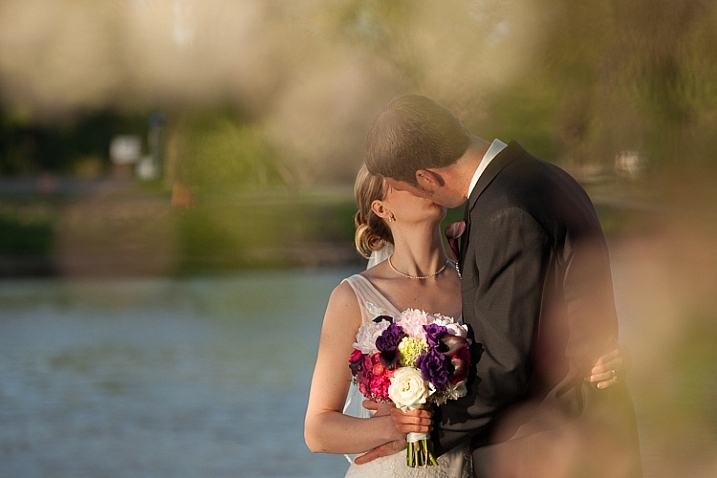
Shooting through objects adds an element of interest to photographs. When you use colored pieces of glass or flowers, you get an effect similar to a light leak (from film days). Some photographs also appear to have been processed with unique filters, except all these effects are straight out of the camera (SOOC), not added during post-processing. When you use clear glass, plastic bags, or even sheer fabric, photographs appear to have additional texture and depth.

Memorable Jaunts DPS Article Shooting through objects for special effects-SidebySide03

The bridal bouquet on the left is a straight shot. The one on the right has a clear piece of plastic (it was used to cover the cake topper) – I held it to the bottom on the lens to add a little texture and interest.

Memorable Jaunts DPS Article Shooting through objects for special effects 05

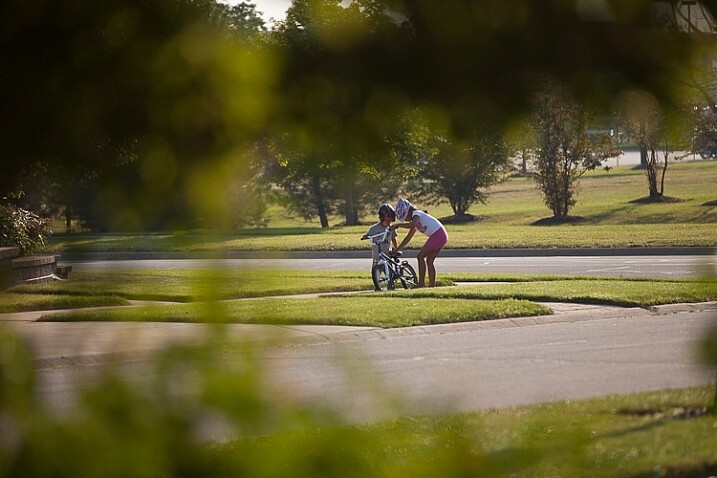
I love this image of my kids – my daughter is teaching my son to ride his bike. By shooting through the bushes, I caught them unawares, as well as used the bushes to frame the subject (in this case my kids!).

Memorable Jaunts DPS Article Shooting through objects for special effects 03

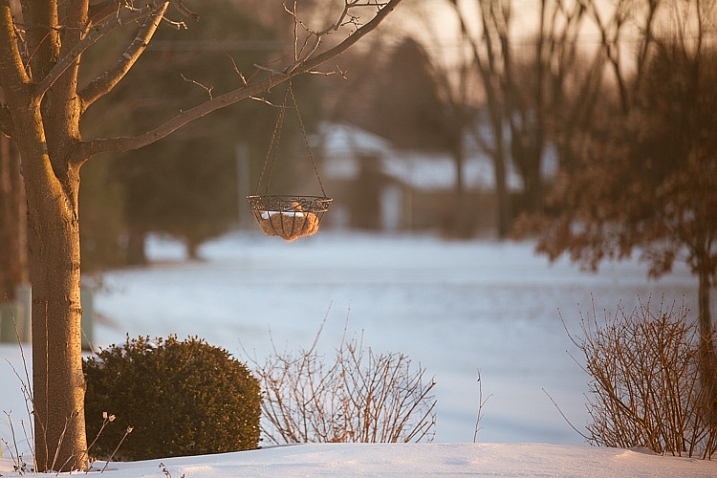
The sun was setting in my backyard, and to exaggerate its warmth, I added an orange piece of plastic (my flash gel cover). No post-processing needed!

While this is not a technique that should be used on every photograph, there are so many options for framing, introducing texture, and adding interest when you add an unexpected element into your photographs. Use this tool when you want to break free from the mundane and the ordinary, you might be pleasantly surprised with the results!

This week on dPS we are featuring articles on special effects. Check out the others that have already been published here:

  • How to Photograph the Full Band of the Milky Way
  • Fire Spinning with Steel Wool – A Special Effects Tutorial
  • Special Effect – How to Create Multiple Flash Exposures in a Single Frame
  • Stacking Light Trails for Night Photography Special Effects
  • 26 Unique Special Effects Photos to Spark Your Creativity
  • Weekly Photography Challenge – Special Effects

googletag.cmd.push(function() {
tablet_slots.push( googletag.defineSlot( “/1005424/_dPSv4_tab-all-article-bottom_(300×250)”, [300, 250], “pb-ad-78623” ).addService( googletag.pubads() ) ); } );

googletag.cmd.push(function() {
mobile_slots.push( googletag.defineSlot( “/1005424/_dPSv4_mob-all-article-bottom_(300×250)”, [300, 250], “pb-ad-78158” ).addService( googletag.pubads() ) ); } );

The post Tips for Shooting Through Objects to Create a Special Effect by Karthika Gupta appeared first on Digital Photography School.

Digital Photography School

 
Comments Off on Tips for Shooting Through Objects to Create a Special Effect

Posted in Photography