RSS
 

Archive for March, 2016

How to Photograph Sun Flares: 14 Tips for Beginners

29 Mar

Sun flares can add beauty and drama to your photos. Cameras and lenses are designed to cut down on flare – so when it comes to sun flares, you are a rule breaker right from the start.

In this article, I share 14 tips to help you get started photographing sun flares:

photographing-sun-flares-tips-for-beginners

Photographing sun flares: 14 tips for beginners

There are no rules with sun flares, they’re all about creativity. You can capture them at any time of day, and with these easy tips you’ll be out experimenting in no time.

1. Try various aperture settings

Have you noticed that in some photos sun flares look soft and diffused, while in others they look bold and defined? That has a lot to do with which aperture setting was used.

If you use a fairly wide open aperture, like f/5.6, you’ll get soft flares. But, if you use a small aperture, like f/22, you’ll get stronger, more defined flares.

sun-flare-tips-wide-narrow-aperture

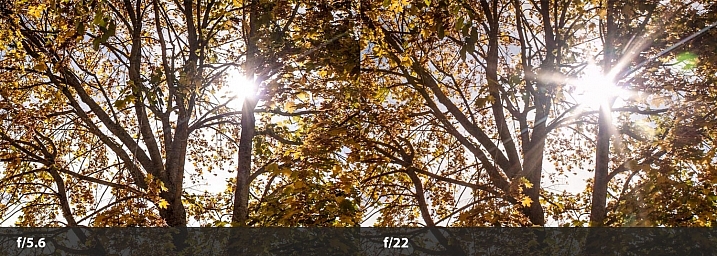
In the split image above, the f/5.6 shot is a softer looking flare, and the f/22 is more defined. The points of the flare are created by the blades of the aperture inside your lens. When they come closer together (as with narrow apertures like f/22) you get more defined points on your flares.

Using different apertures will give you a variety of looks to choose from when you’re editing. You’ll also learn which type of sun flare you prefer, depending on the setting and feel you want in your photo.

2. Use Aperture Priority Mode

The easiest way to use tip #1 is to put your camera in Aperture Priority Mode (AV on a Canon, or A on a Nikon). This way, you’ll be able to easily switch the aperture setting. With your camera set to auto ISO, it will automatically choose the ISO and shutter speed settings for you.

Now you’ll be able to quickly switch apertures and see the difference it makes to your sun flares. Learn more here: Aperture Priority and Shutter Priority: Exposure Lesson #1

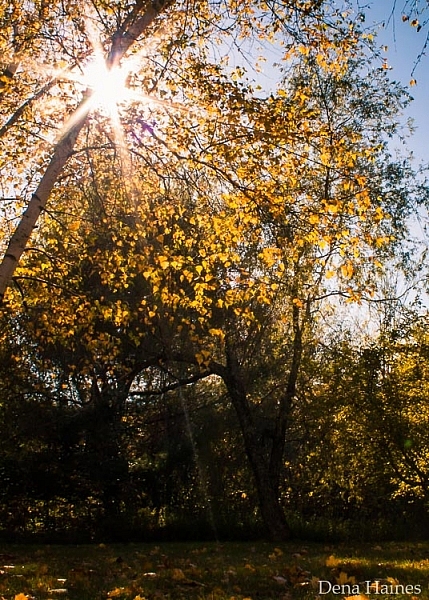
3. Partially hide the sun

Use an object (such as a fence post, building, tree, etc.) to partially hide the sun. This will allow you to capture flare, and add an artistic touch to the object you’re shooting.

sun-flare-tips-for-beginners

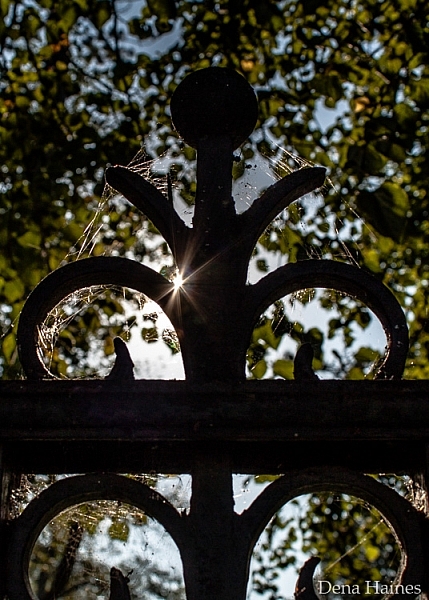
Move around the object, let the sun peek out at different locations as you keep taking photos. I love doing this, and I always come away with something unique.

4. Move around and take lots of pictures

When shooting sun flares it really helps to move around – a lot. If you are partially hiding the sun (as mentioned above in #3) a slight movement to the right or left will cause a big change in the flare. Your photo could be flooded with too much light, or you might miss the flare altogether. Or it could reveal the flare in just the right spot, and create exactly the look you want.

sun-flare-tips-move-around

It’s important to take lots of pictures. You’ll learn how much sun to include, in relation to the amount of flare you want.

sun-flares-creative-photography-tips

Sun flares can be unpredictable, that’s part of what makes them fun to work with.

5. Try using some filters

When photographing sun flares, filters can also be helpful:

  • UV filter: This is a good idea because you will be shooting into the sun. Some photographers feel that a UV filter will protect your camera’s sensor.
  • Polarizing filter: This will help you get different effects as you rotate it. This filter can help increase color saturation and decrease reflections. If you have one, play around with it and see how it affects the flares.
  • Graduated neutral density filter: These filters are darker at the top, and become lighter near the bottom. They can prevent part of the image from looking blown-out, from shooting into the sun.

sun-flare-tip-graduated-neutral-density-filter

In the above image, I used a graduated neutral density filter for the photo on the right. It helped control the light, which kept the colors richer. Learn more about polarizing and graduated neutral density filters.

6. Shoot during different times of day

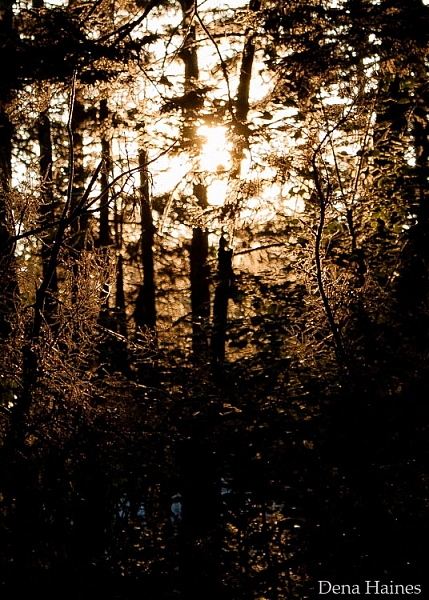
Around sunrise and sunset, the sunlight comes in at a unique angle. This creates a warmer, golden color., whereas during midday, there is a cooler (bluish) or more neutral color.

In the following image, two of the photos were taken around sunset, and the other two were taken a few hours after sunrise. Can you guess when each photo was taken?

sun-flare-tips

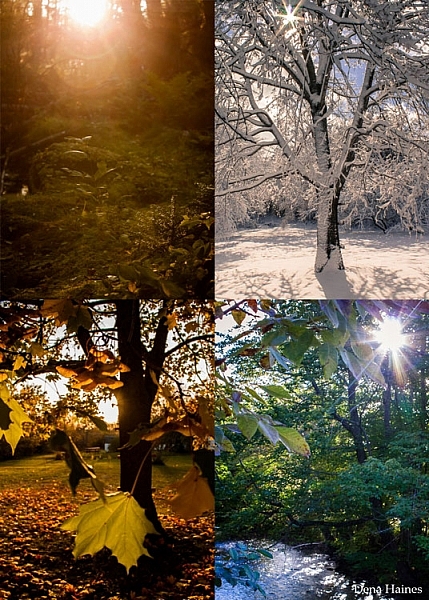
I bet you got it right – the ones on the left were taken near sunset. They have a warmer feel, don’t they?  The ones on the right have a cooler feel. Learn more here: Understanding Natural Light Part 2: Color of Light.

7. Divide the sun with your camera

You can get a softer, more diffused look by composing your photo so that the sun is not fully in your frame. Try cutting the sun in half, or only including its bottom third.

sun-flare-tips-for-beginners-2

Play with it. Create different effects and see which you prefer.

8. Use a tripod and a remote shutter release

As mentioned earlier, a smaller aperture setting (higher number) will give you a sharper, more defined flare. But, using a small aperture also means that your camera will require more time to take the photo. The longer it takes, the more chance there is for camera shake to cause blur in your photo.

If you are hand-holding your camera, this could be a problem. When your camera is on a tripod, there is much less chance of camera shake.

sun-flare-tips-use-a-tripod

Using a tripod will help keep your photos looking sharp and your sun flares crisp. By using a remote shutter release (or your camera’s self-timer) you’ll reduce camera shake even more.

9. Keep the sun at your model’s back

By keeping the sun at your model’s back, you’ll allow the light of the flare to spill out around them in interesting ways.

photographing-sun-flares-tips-2

Depending on the time of day, you might need to lay down, and have your model sit or lay down. The above image was taken around 3:00 p.m. in the afternoon, and I was laying on the ground.

The higher the sun is, the lower you’ll need to be in order to place the flare at your model’s head, or shoulder level. Having your model sit down will make it easier for you. When the sun is lower in the sky, positioning becomes easier for both of you.
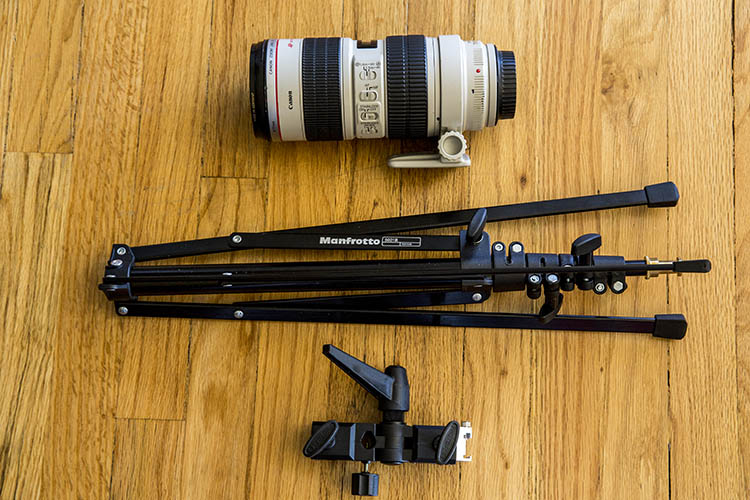
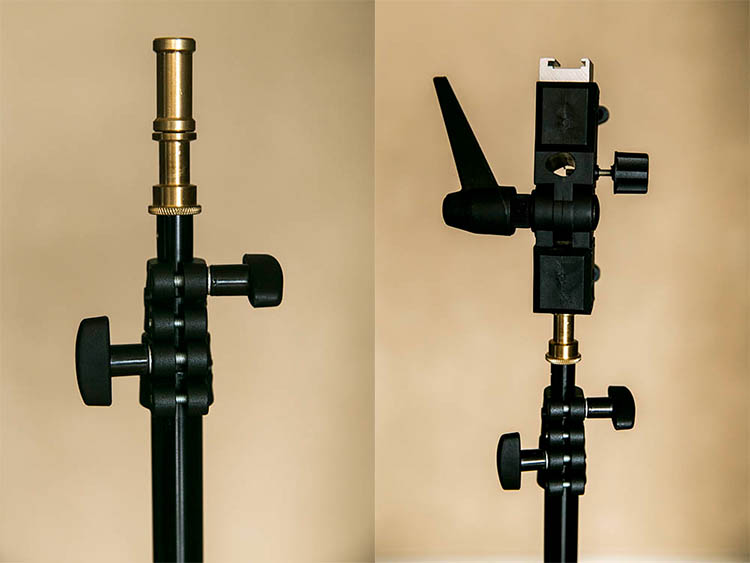
10. Use a reflector

A reflector is used to reflect the light back onto your subject. Reflectors are usually made of fabric (white, silver or gold) and can be hand-held, hung from a freestanding base, or placed on the ground.

Using a reflector could be helpful if your model is in the shade. It would help to brighten their face, making the photo look more pleasing.

11. Cover the sun with your hand to focus

It can be hard to focus when shooting sun flares. There is so much light, that your camera may struggle to lock on where you want. When this happens, hold up your hand to cover the sun, compose your photo, and press your shutter release halfway. Once your camera focuses, take your hand down and press the shutter the rest of the way.

You may have to try this a number of times until you get exactly what you want.

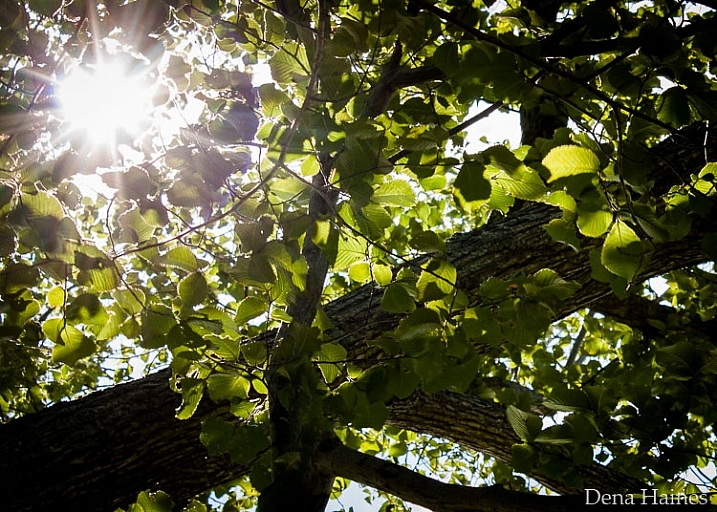
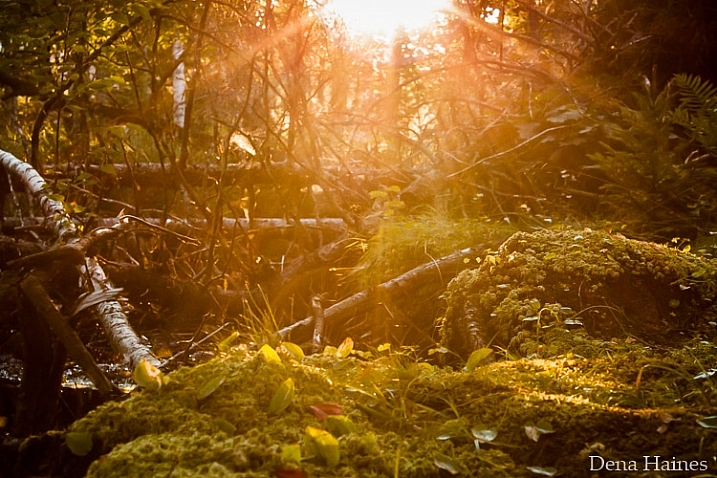
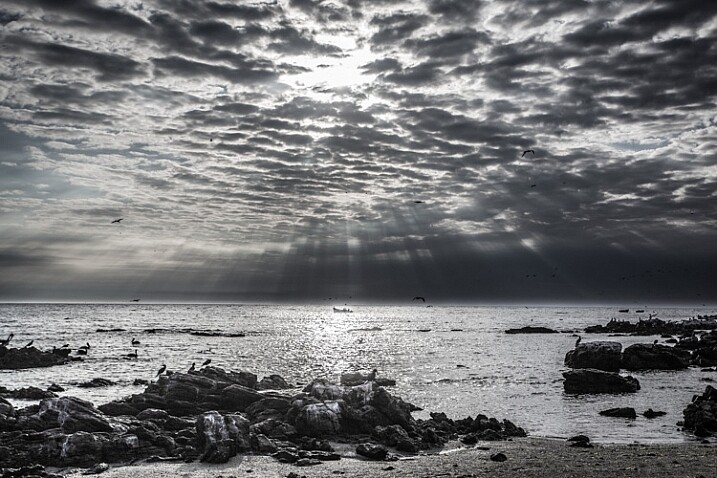
12. Place the sun out of the frame

To get a really soft flare effect, without a bright point, try placing the sun out of your frame.

sun-flare-tips-3

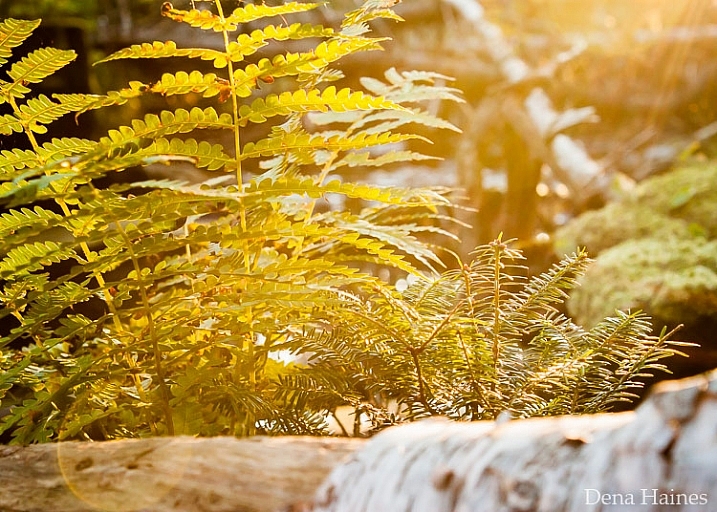
I love how this adds soft light to the above photo, and how the eye is drawn up to the source of light.

13. Use Spot Metering

Spot Metering handles bright light really well, so if you’ve got the choice, go with this metering mode. All but one of the photos in this post were taken using it. If your camera does not have Spot Metering, then Partial Metering would be your next best choice. I use autofocus, with the focus point set to the center.

14. Have fun

This last tip is probably the most important. When photographing sun flares, it’s time to experiment and have fun.

Don’t be afraid to take tons of pictures, try different aperture settings, and move around. Sun flares are wild and unpredictable. Be creative and use different objects to block (or diffuse) the light. You’re bound to get lots of over, and under exposed photos, but you’ll get lots of gorgeous results as well.

Learn more about Using Sun Flares and Starbursts to Create Stunning Images.

Now it’s your turn

I would love to see your sun flare photos and hear your tips! Please share them below.

googletag.cmd.push(function() {
tablet_slots.push( googletag.defineSlot( “/1005424/_dPSv4_tab-all-article-bottom_(300×250)”, [300, 250], “pb-ad-78623” ).addService( googletag.pubads() ) ); } );

googletag.cmd.push(function() {
mobile_slots.push( googletag.defineSlot( “/1005424/_dPSv4_mob-all-article-bottom_(300×250)”, [300, 250], “pb-ad-78158” ).addService( googletag.pubads() ) ); } );

The post How to Photograph Sun Flares: 14 Tips for Beginners by Dena Haines appeared first on Digital Photography School.


Digital Photography School

 
Comments Off on How to Photograph Sun Flares: 14 Tips for Beginners

Posted in Photography


Sony may split off its imaging products business

29 Mar

Sony is considering splitting off its imaging products business, according to a new statement from the company. Sony detailed planned management and organizational structure changes last week, saying its previously announced semiconductor business split will take place next month, placing its image sensors, among other things, under a wholly owned subsidiary.

Sony has been undergoing fairly extensive business restructuring over the past couple of years, having split off its TV business in summer 2014 and its Video & Sound business in October of last year. The semiconductor business split out next month will be its third business group to be separated into an autonomous subsidiary. Whether Sony will proceed to split out its Imaging Products and Solutions Sector is yet to be seen.

Splitting off these segments into subsidiaries will help Sony Corporation focus on strategy across the entire company, placing some operations under the governance of each new Sony Group that until recently were handled by headquarters. The transition of these services to Sony Group companies will start on April 1.


Press release:

Sony Corporation announces changes to organizational and management structure

Tokyo, Japan – Sony Corporation (“Sony” or the Company”) has been engaged in the sequential splitting out of business units across the Sony Group, in order to reinforce the competitiveness of each business, and ensure clearly attributable accountability and responsibility.

In addition to Game & Network Services, Mobile Communications, Pictures, Music and certain other Sony Group businesses that were already operating autonomously as subsidiaries, in July 2014 Sony split out its TV business, followed by its Video & Sound business in October 2015. The Company also plans to split out and establish its semiconductor business as a wholly owned subsidiary in April 2016. Sony is also exploring the split out of its Imaging Products and Solutions Sector.

Concurrently, Sony has also been proceeding to realign the platform functions that support each of its business units in order to enhance the effectiveness and efficiency of these operations.

As previously announced, operations that until now have resided within Sony Corporation, including the Consumer AV Sales Platform, the Manufacturing, Logistics, Procurement, Quality and Environmental Platform for Sony’s electronics business, as well as certain cloud-based platforms and service-related businesses, will each be transferred to the related Sony Group companies. This transition is scheduled to be made sequentially from April 1 2016.

Once the splitting out of these functions has been completed, Sony Corporation will focus on the following Group headquarters functions:

Headquarters: Responsibility for the Sony Group’s overall strategy and governance, and oversight of their execution

  • R&D: Leadership of Sony’s differentiation and creativity through technological innovation
  • New Business: Incubation of new businesses in areas beyond Sony’s current business domains
  • Brand Design: To enhance Sony’s brand value and implement horizontal Group-wide initiatives
  • Professional Services: To support the operations of the Sony Group following the completion of the splitting out process

In conjunction with this structural realignment, certain changes will also be made to Sony’s executive assignments and system effective April 1, 2016, in order to further clarify lines of responsibility and assignments within each business and the headquarters organization. 

The Company will newly appoint four executives, currently in charge of four of the Sony Group’s business segments, as “Corporate Executive Officers” of Sony Corporation. They, together with the six existing Corporate Executive Officers, will assume ultimate responsibility for the Sony Group’s management within the scope assigned to them by the Company’s Board of Directors. Sony will also re-classify its other executives. The executives responsible for executing their assigned business operations under the oversight of the relevant Corporate Executive Officers will be named “Business Executives” of Sony Corporation, while the executives responsible for the headquarters functions assigned to them under the oversight of relevant Corporate Executive Officers will be named “Corporate Executives” of Sony Corporation.

Via: Sony Global

Articles: Digital Photography Review (dpreview.com)

 
Comments Off on Sony may split off its imaging products business

Posted in Uncategorized


Studio report: Nikon D5 has lowest base ISO dynamic range of any current FF Nikon DSLR

29 Mar

When the Nikon D5 arrived in our office on Friday we immediately wanted to answer a few questions: How is the low light performance? How good is the autofocus? How is the Raw dynamic range? After running our Exposure Latitude and ISO Invariance tests we’ve found that while the D5’s sensor is clearly optimised for low-light image making, it represents a rather surprising – and disappointing – step backwards in terms of base ISO dynamic range.

Let’s take a closer look, starting with our Exposure Latitude test scene. There are two pages in this article, so don’t miss page 2, where we’ll look at ISO invariance. 

Exposure Latitude

In this test we look to see how tolerant of pushing exposure the D5’s Raw files are. We’ve done this by exposing our scene with increasingly lower exposures, then pushed them back to the correct brightness using Adobe Camera Raw. Examining what happens in the shadows allows you to assess the exposure latitude (essentially the dynamic range) of the Raw files.

Because the changes in this test noise are primarily caused by shot noise and this is mainly determined by the amount of light the camera has had access to, the results are only directly comparable between cameras of the same sensor size. However, this will also be the case in real-world shooting if you’re limited by what shutter speed you can keep steady, so this test gives you an idea of the amount of processing latitude different formats give.

$ (document).ready(function() { ImageComparisonWidget({“containerId”:”reviewImageComparisonWidget-40640152″,”widgetId”:333,”initialStateId”:2280}) })

Even at a modest 3 stop push, we see the D5 has already contributed a considerable amount of noise to its low ISO images compared to the 24MP D750. After a 5 stop push the gap widens, with the D750’s 5 stop file looking more like the 3 stop file from the D5. In fact, the D5’s performance closely resembles the performance seen from the Canon 6D$ (document).ready(function() { $ (“#imageComparisonLink2279”).click(function() { ImageComparisonWidgetLink(2279); }); }), with just a bit more color noise showing in the 6D’s file.

After very aggressive pushes, an interesting series of bands appears at the top and bottom of the image. We don’t know what’s causing this additional noise (which appears to be confined to specific read-out rows) but it’s interesting to note.

Articles: Digital Photography Review (dpreview.com)

 
Comments Off on Studio report: Nikon D5 has lowest base ISO dynamic range of any current FF Nikon DSLR

Posted in Uncategorized


Future NYC: 12 Design Proposals to Reshape the Big Apple

28 Mar

[ By Steph in Architecture & Cities & Urbanism. ]

future nyc hive

A half century or into the future, will New York City even still exist as it stands today, or will these fanciful and sometimes bizarre proposals get a chance to become reality? These visions for future Manhattan aim to maximize available space by building new infrastructure right on top of transportation hubs as well as the Hudson River, and adapt to changing needs by creating new drone superhighways and building porous street systems that can absorb floodwaters.

Excavated & Walled Central Park
future nyc central park wall 1

future nyc central park wall 2

future nyc central park wall 3

Considering that the entire city is liable to be flooded at the first sign of a serious storm, let alone rising sea levels, sinking any part of Manhattan doesn’t seem like the greatest idea. Yet, the visuals associated with this crazy concept are too stunning to dismiss. The winner of eVolo’s 2016 Skyscraper Competition, ‘New York Horizon’ excavates the entire park to reveal a mountainous landscape, and wraps it in a 1,000-foot-tall mirrored megastructure. Tenants living inside the megastructure would have unparalleled access to the park, but views of it from any other buildings that aren’t skyscrapers would appear to be limited.

Bizarro Futuristic Coney Island
future nyc coney island

future nyc coney island 2

future nyc coney island 3

The New York CityVision Competition by London-based firm Squint/Opera imagines a dazzling new future for Coney Island Park that could save it from the current threats of being turned into a condominium park. Transporting the defunct ‘Southern Star Big Wheel’ ferris wheel all the way from Melbourne, Australia is crazy enough, but those giant clown heads in the sky are asking a little too much.

The Hive: Drone Hub in Midtown Manhattan
future nyc hive

future nyc hive 2

The modules on the outside of ‘The Hive’ skyscraper are designed to fit nine different types of drones, acting as one big dock and charging station for both personal and commercial usage. Incorporating a ‘vertical highway model’ around the tower, the design regulates drone traffic to prevent the sky from becoming one big buzzing traffic jam of flying robots. “To provide a safe landing environment, the tower projected a new method for drones to dock horizontally onto their corresponding platforms with the fitting shape and scale; the platform with docked drones can be flipped vertically to be in parallel with the tower facade. The facade is constantly animated as the platforms flip outwards and backwards to nest back into it.”

Floating Neighborhood
future nyc hudson 1

future nyc hudson 2

An entire neighborhood for 65,000 people will hover right over the congested island of Manhattan in a proposal that seems too crazy to be true, yet is under construction right now. Hudson Yards will rest on 300 concrete-sleeved caissons right on top of the 26-acre West Side Yard, which is a critical part of New York City’s transit system. The plan includes six skyscrapers, 100 shops, 20 restaurants, a school and 14 acres of parks, and will be completed by 2024.

Next Page – Click Below to Read More:
Future Nyc 12 Proposals To Reshape The Big Apple

Share on Facebook


[ By Steph in Architecture & Cities & Urbanism. ]

[ WebUrbanist | Archives | Galleries | Privacy | TOS ]


WebUrbanist

 
Comments Off on Future NYC: 12 Design Proposals to Reshape the Big Apple

Posted in Creativity


CP+ 2016: Nikon interview – ‘the D500 is the D300S replacement that customers wanted’

28 Mar

DPReview was in Yokohma, Japan last month for the annual CP+ photography show. As well as reporting from the show floor, and getting our hands on the latest cameras and lenses, we also made time to sit down with senior executives from several of the major manufacturers, including Nikon. We spoke to Nikon about the company’s new DL-series compact cameras, the D500 and D5 and the future of the 1 System. 


Let’s start with the new DL series. Why did you choose to make three cameras?

We wanted to satisfy most of our customers, all at once. And with this DL concept we wanted DL users – who we believe will be DSLR users – to choose whichever camera in this DL series as if they were choosing an interchangeable lens. And the second aim is reflected in the cameras’ naming. DL. ‘D’ means ‘Digital Camera’ and ‘L’ means ‘Lens’. Again, we want consumers to choose these cameras as if they were choosing from interchangeable lenses, and this is why we named them 18-50, 24-85 and 24-500. 

Nikon intends buyers of its new DL-series compact cameras to shop for the right camera as they might a lens. That’s the logic behind the new cameras’ naming. DL18-50 (shown here), DL24-85 and DL24-500. The numbers correspond to the effective focal lengths covered by the cameras’ lenses. 

With the ability to choose these three different cameras with their three different lenses, how is the DL series differentiated from the 1-series, or from Coolpix?

Our target with the DL series is high-end users who would use Nikon DSLRs. So the series has to be suitable for DSLR users who want a premium compact camera. Coolpix is for the mass consumer, it’s very easy to use in terms of operation. But the DL series in terms of operability and the variety of lenses is much closer to a single lens reflex camera. This makes it different to other compact cameras such as Coolpix.

As for the value that the DL series provides, it is different from DSLR cameras, although the customer may be the same. The value that is provided is different in the sense that the focal length of – say – 24-500mm doesn’t exist in DSLR. A wide range all the way from wideangle to super telephoto. These things are unique to the DL series. 

Can we expect to see much further development of lenses for the 1-series, or is your focus on DL?

We will continue to watch the needs of our customers and market trends to decide what new products will be appropriate – we cannot reveal future plans yet.

How important is pricing in this market segment, and who is your most important competitor?

We acknowledge that the premium compact camera market is very ‘hot’ right now. There are a lot of competitors. But all of these competitors, although they’re all in the same market, their aims are very different. For example some of our competitors want to provide high-performance cameras with the aim of ease of use. Ours is not like that. Our aim for the DL series is for our users to use the cameras as much as they like, and to enjoy shooting with them.

The ‘bridge’ style DL24-500 is the largest camera of the three, and the only one to offer an electronic viewfinder. The larger form factor allows it to pack in by far the most ambitious zoom lens of its sister models.

Are the target audience of the DL series and 1-series different?

Nikon 1 cameras are system cameras so you can customize the cameras as you like depending on the shooting situation. The strength of Nikon 1 is the super telephoto that you can use for example, at 800mm equivalent. And another benefit is interchangeable lenses, so you can switch from long lenses to shot lenses, so system adaptation is one of the strengths of Nikon 1. 

But for DL we can provide all the way from very wide to super telephoto with good portability. 

One of the things that we like about the 1 series it that the performance of the cameras’ hybrid autofocus is very good. Can we expect the same performance from the DL line?

Yes. 

Will we see a professional level mirrorless camera from Nikon?

We are willing to cater to the needs of customers by developing what is required by the market. We’re observing market trends very carefully, and while the DLSR market is in decline, we observe that the mirrorless market is not declining in the same way, so we’ll continue to watch the trends and cater to whatever needs we hear from our customers.

Do you see the DL series co-existing with Coolpix cameras in the future?

Yes. Coolpix will continue to be developed. We recently announced four new Coolpix cameras.

Is the D500 intended to be a replacement model to the D300S?

Yes it is. It’s a DX flagship after 7 years of the D300S in the market. 

The D300S was on the market for seven years, before finally being replaced this year by the D500. But not before Nikon tried to replace it with the D7000-series. It was (we’re told) only the consistent demands from high-end APS-C fans that lead to a true replacement for the still-popular D300S. 

Nikon now has truly modern solutions for professional users in the DX and FX formats, how would you characterize those two types of customers?

D5 is our flagship camera and we believe that professional sports photographers that have enjoyed using the D3 and D4-series series will enjoy the D5. With the D500 the user can enjoy some of the high-end functions used in the D5, such as its AF system. But they can also enjoy the agility of the [smaller] size so we hope that not only professionals but also advanced amateurs will enjoy the D500.

Was the D7000-series ever meant to replace the D300-series?

We were hoping that the D7000 series would cover a portion of the customer base that used the D300S, but the customers continued to say that they wanted a replacement for that model, so that’s why we made the D500.

Now that the D500 has been launched, will we see continued development of professional DX-format lenses?

Yes we have plans for more lenses, if necessary after analyzing the needs of the market. 

The D500 and D5 represent flagship cameras in Nikon’s APS-C and full-frame lineups, respectively. A lot of core functionality is shared between the two cameras, including the same highly advanced autofocus system. 

Why did you select 20MP for both cameras?

We believe that 20MP is the best resolution when it comes to balancing image quality and handling – i.e. speed – which professional sports photographers value most. Also we’ve had 12 and 16MP models, and some users wanted more, so we think that 20MP is the minimum to achieve this balance. 20MP is the best resolution at this point in time. In the future if we can increase speed and increase resolution, we may choose a different resolution. But right now 20MP represents the best balance. 

It’s good to hear that Nikon is continuing to develop the DX lineup. Do you believe that D500 will mostly be using the camera with DX, or FX lenses?

If we were to make a recommendation on the basis of [versatility], we’d recommend a DX lens with the D500, because it’s a DX camera. 

When you develop professional products like these, how does your process differ compared to developing non-pro cameras?

Our question is how do we cater to the users’ needs? One example is memory card slots. If we’re designing a camera for a professional, we’ll include two card slots for identical types of cards. For higher-level amateurs like D500 owners, we’ll include two different card slots, one SD, and one XQD. It’s different user needs.

What was the thinking behind making two versions of the D5, one with CF and one with XQD?

the highest priority for card slots in the D5 is to provide two slots of the same type. CF or XQD. We chose XQD for the D5 because it can support the highest performance that the camera is capable of [in stills and video modes]. We added a model that uses CF cards because users of the D3 and D4 series are familiar with these cards, and have them already. The response has been good to both variants. 

Given how responsive the D5’s AF system is in terms of subject tracking, do you think that DSLRs will always have an advantage in this respect, compared to mirrorless?

Yes. We believe that there is an AF advantage, especially when it comes to tracking moving subjects at high speed. 

Here’s a simulated image of the D5’s AF array, placed over a representation of the ‘scene’ as it would be recognized by any one color channel of the camera’s 180,000-pixel RGB metering sensor. This sensor works in concert with the AF system to recognize and track subjects across the frame and in depth. Our initial impressions are that it works exceptionally well. 

We understand that the color filter array on the D5 sensor has been changed to improve low light performance. Can you comment on this?

It’s very difficult to explain exactly how we achieved this, but the basic concept is that we improved light-gathering ability. And by doing that we reduced noise and increased sensitivity. 

AF precision is becoming increasingly crucial in high-resolution DSLRs. We’ve seen various solutions, from AF fine tuning to manufacturers like Sigma and Tamron making ‘docks’ to program their lenses. How should this problem be solved?

The D810 has 36MP and the D5 has 20MP. Autofocus precision is at the same level. We’ve had an autofocus fine-tuning system for some time, because although autofocus precision has improved, some photographers want to precisely control autofocus for their specific needs. The struggle for users is in using this system, through trial and error.

We introduced automatic adjustment [in the D500 and D5] to make the process easier for them. We expect that now, some of our customers who previously thought that AF adjustment was a hassle in the past and didn’t do it, will start to use automatic adjustment, and will come to us with additional requirements. We will proactively reflect this [feedback] in our future development. 


Editors’ notes

Rishi Sanyal and Barney Britton

The reason we didn’t identify specific interlocutors in this interview is that Nikon sent about 20 people to speak to us in Yokohama (only some of whom are pictured above), plus an interpreter. While we suspect that – as usual – the comments beneath this interview will be packed with people criticizing us for not asking harder questions, and Nikon for not really answering some of the ones that we did ask, Nikon takes us – and you – very seriously. The gentlemen we spoke to didn’t quite say it, but let’s be honest – the D500 is a camera for DPReview readers. All those who complained for years that the D300S didn’t have a proper replacement can take pleasure in the fact that it was your complaints that lead directly to the creation of the D500, a level above the D7000-series that was, we learned, intended to replace the D300S.

And what a replacement the D500 has turned out to be. Our main worry about Nikon’s high-end APS-C DSLR lineup isn’t actually about the cameras at all, but lenses. It was good to hear a kind-of, sort-of acknowledgement that some new high-end DX-format lenses are on the way. Maybe at Photokina this September?

Speaking of lenses, it was interesting to hear Nikon executives speak about the new DL lineup (which is definitively not related to Coolpix, no way, no sir), which has been designed around the concept of ‘camera as lens’, offering (effectively) three different focal lengths built around the same 20MP 1-inch sensor, at fairly accessible price points. If what we’ve been told about AF performance proves true (and it should be) the DL compacts might offer among the best autofocus of any camera currently in this market segment. We’re very excited by the DL18-50 and DL24-85 in particular. Finally, along with Canon’s PowerShot G7 X Mark II and Panasonic’s ZS100, Sony’s Cyber-shot RX-series has some real competition.

Speaking of autofocus, Nikon 1 was arguably one of the first mirrorless series to portend the convergence of on- and off-sensor phase-detect AF performance. There are still differences, though, and we asked Nikon if it thought there would always be an advantage to DSLR when it came to subject tracking during bursts. Subject tracking, or the ability of a camera to follow a subject around the frame, is increasingly becoming so good in some cameras as to warrant relinquishing control over your exact AF point to the camera – which in some cases can be far better than any human at switching AF points to stick to your subject. The D5/D500 in particular are industry leading at this. Although mirrorless cameras have the ability to subject track very well – they constantly assess the scene with their image sensor, after all – we’ve tended to note a drop in performance during bursts. We wondered how much this had to do with the dual-purposing of the image sensor in mirrorless cameras both for AF tracking and image recording. DSLRs are approaching the subject tracking problem by essentially incorporating an additional image (RGB metering) sensor into the light path to the optical finder, and dedicating it to subject analysis and tracking (and face detection).

Nikon’s response was that there is still an advantage to this separate sensor approach, and we largely agree – for now. Given the relatively low resolution of these metering sensors and the fast readouts possible due to the relatively low pixel count, as well as the incredibly short mirror blackouts of cameras like the D5/D500, it may be that a secondary sensor for subject tracking will remain an advantage for high-end DSLRs for years to come.

But we do wonder whether efforts at increasing the readout speeds of main imaging sensors (the ones that produce our photographs) – perhaps to the point where there is no blackout during shooting at all – might allow mirrorless designs to catch up to, or exceed, DSLR performance in this regard.

And if they do, there will be one less thing to worry about: AF calibration and adjustment. We asked Nikon whether we could ever expect its new automatic AF fine-tuning solution to take into account multiple focus points, focal lengths, and subject distances. Every time we mention this sort of a solution to anyone, there’s typically a chuckle in the room – I think a nervous one, acknowledging the complexity of such a solution.

And it is complex. The optimal Fine Tune (or microadjustment) value can vary from AF point to AF point, and with lens focal length and subject distance. Not to mention aperture as well, when there’s substantial focus shift. Camera and lens firmware already contains complicated tables dedicated to such adjustments – it’s just that there’s no guarantee they’re right for your particular lens + body combination. Automating the creation of a matrix to correct for all the variables that lead to inaccurate focus would be welcome, but at what point does it make more sense to ditch the DSLR approach altogether and proceed with a mirrorless platform that is less susceptible to these issues in the first place? 

As usual for the on-record portions of an interview of this kind (i.e., the portion that you just finished reading) the most interesting insights can be found between the lines. The line that interests us most came up as we discussed Nikon’s mirrorless strategy. It is notable that in their response, Nikon’s executives noted on-record the decline in the DSLR industry relative to the more buoyant mirrorless market. It seems pretty much inevitable at this point that Nikon will make a more serious move into mirrorless, and my money would be on that happening relatively soon, possibly even this year. Two things seem pretty certain – whatever product eventually emerges, it won’t be a member of the 1-series, and it certainly won’t be a Coolpix.

Articles: Digital Photography Review (dpreview.com)

 
Comments Off on CP+ 2016: Nikon interview – ‘the D500 is the D300S replacement that customers wanted’

Posted in Uncategorized


Hello, ISO 3,280,000… Nikon D5 studio test scene comparison published

28 Mar

Just moments after the Nikon D5 rolled into our office we whisked it into our studio, putting the flagship FX-format DSLR in front of our test scene. We were curious to see exactly what the 20.8MP CMOS sensor is capable of, and what its impressive ISO range looks like – especially its astronomical ISO sensitivity limit of ISO 3.3 million. And we couldn’t resist sharing some initial thoughts with you.

So what does ISO 3 million look like? See for yourself if any of the ISOs above the D4S’ previous maximum ISO offer anything useful. Nikon’s claims of better ISO performance due to color filter array optimizations appear to have some merit: noise levels in Raw mode are slightly lower in comparison to the D4S, or any other camera, when normalized. Although the performance advantage is more obvious at higher ISOs, like 204,800, the actual benefit does appear to be minimal at best. In fact, compared to the 42MP Sony a7R II, midtone performance at the very high ISOs is fairly similar at a common viewing size, with benefits most apparent in high ISO dynamic range (or shadow performance). And even there, a less than 1/3 EV high ISO dynamic range benefit over the a7R II comes at the cost of a 2 EV deficit in base ISO dynamic range, according to our very own DPReview forum member Bill Claff’s independent measurements.* At this point, we’re simply running up against the best that modern silicon can do: with less than one electron of read noise levels at the highest ISOs in some modern architectures, there’s only so much performance to be gained without drastically increasing light gathering efficiency past the limits already imposed by the Bayer array and current (very good) microlens design. 

When it comes to JPEG, Nikon (and Canon, for that matter) have some work to do with respect to optimally balancing sharpening and noise reduction in JPEG, as detail in the Raw is left on the table at both low and high ISO sensitivities compared to Sony’s more sophisticated engine. Colors, though, are very pleasing, even at high ISOs.

There’s a lot more testing to do. Rest assured we’ll be doing much out-of-studio shooting in the weeks to come – putting to test what we initially feel is the most exciting AF system we’ve ever seen in a DSLR to-date – but for now see how the D5 performs in our standard studio scene test.


* Interestingly, a sinusoidal dynamic range vs. ISO curve is reminiscent of older Canon designs (like the 5D Mark III), distinctly different from the performance of Nikon (and Sony, and even recent Canon) cameras we’ve come to expect (note the D810’s rather linear drop with ISO). In Canon’s older designs, this was due to a dual amplification architecture – which was far from ideal when it came to dynamic range – and we’re surprised to see this result in the D5, as it means that intermediate ISOs on the lower end are less than ideal. We’ll be following up on this result in our dynamic range tests to visualize the noise impact.

Articles: Digital Photography Review (dpreview.com)

 
Comments Off on Hello, ISO 3,280,000… Nikon D5 studio test scene comparison published

Posted in Uncategorized


5 Uncomfortable Truths About Photography

28 Mar

There is a lot of hype about photography, it’s a booming hobby practiced by huge numbers of people around the world. With the prevalence of high quality images from our phones, and widely available, inexpensive dedicated cameras, it’s no wonder the art is so popular. But it isn’t all roses, and there are some uncomfortable things it’s best just to understand from the beginning.

Here are five truths about photography:

AK-NoatakPreserve-KellyRiver-1083-320

1. More gear won’t make you a better photographer

Don’t get me wrong, I love camera gear. New bodies, lenses, and accessories are fun and exciting, but they won’t magically make you better at photography. To be a better photographer you need to learn how to find images. The gear can help you capture them, but the finding part is up to you.

Whenever I’m thinking of buying a new piece of gear, I ask myself, “Is my current gear holding me back?” Sometimes the answer is yes. It could be that the lens I’ve been using for night photography is too slow to get the detail I need, or the limitations of my current body are preventing me from blowing up the final shot to the size and detail required by a client. In such cases, I almost always have a specific image that I want to make, but can’t, due to my equipment.

More often though, the answer to whether my gear is holding me back is no. The actual reason I want a new piece of gear is that it is shiny. I may lust over new camera stuff, but if that gear won’t improve my photography in a very tangible way, I don’t buy it.

Some images require certain equipment. Without a big telephoto, this shot of the full moon over the Andes would have been impossible.

Some images require certain equipment. Without a big telephoto, this shot of the full moon over the Andes would have been impossible.

Remember that good photography comes from your heart and your mind, not your wallet.

2. There is no “knack”

AK-NoatakPreserve-KellyRiver-1083-469

Some people take to photography quickly, others more slowly, but everyone has to learn. Photography is an art, not a gift.

A few times, I’ve been told by people looking at one of my images, “You have such a gift.” I know they are being kind, that they are offering a compliment, but I can’t help feeling insulted. I want to say, “It’s not a gift! I worked my ass off to make that image! That shot is the result of years of effort, of early mornings, and hours of travel, of study and practice, tens of thousands of failed and deleted shots, and thousands of dollars in equipment. Nothing about that image was given to me, I earned it.”

Of course, I don’t say that. Instead, I smile as though they’ve just said the nicest thing, and say thanks.

AK-WragellStEliasPark-NabesnaRoad-July2006-10

Photography can be learned. With practice you can see the way lines and light interact to create a pleasing image. Or how those elements can become jumbled, resulting in a photo that just doesn’t work. With time and effort, you get better at recognizing the difference. It’s a process I work on every day.

So no, photography is not a knack – it’s work.

3. You’ve got to be patient

I spent 20 minutes hand holding a big lens to make this image, as I waited for an albatross to turn in profile over the waves.

I spent 20 minutes hand holding a big lens to make this image, as I waited for an albatross to turn in profile over the waves.

Yeah, lots and lots of patience.

I’ve guided hundreds of photographers into wild locations to make images. Sometimes we’ve arrived at a site, and the light has been perfect, or the wildlife is waiting in the perfect place, as though they’d been staged there. But that is rarely the case. More often, we have to wait, and wait… and wait.

The pages of magazines are filled with spectacular images, timed to perfection. But those didn’t just happen. The images were made because the photographer knew how to be patient.

Few things are so hit and miss as photographing the aurora borealis. (There are lot of misses.)

Few things are so hit and miss as photographing the aurora borealis (there are lot of misses).

The best images all require time and effort.

This is a hard reality for many of my clients (students) to swallow. They just want the photo to be there, though it rarely is. To be honest, I’m not very good at patience. I like to move and explore, but it’s the times where I force myself to wait and sit silently, that I often walk away with something good.

4. There is nothing wrong with being an amateur

AK-BrooksRange-BairdMtns-aerial-31Jul-12

Being an amateur does not mean you are any less talented than a professional photographer. In fact, in many cases, I’d say it is just the opposite. You see, professionals spend much (most even) of their time doing the dirty work: invoicing, marketing, tip-tapping away at the computer, and much less time actually making and working with images. The images we professionals shoot are often those made for clients, not those we make for ourselves. Inherently, photos made for others are not as good as those we are passionate about. Amateurs can shoot whatever they please, and that means they are making photos that matter to them.

Skill and artistic sensibilities are not the sole territory of professionals. Some of the finest photographers I know do not make their living from it.

AK-ANWR-Kongakut-108094-731

And equipment! Here is the biggest irony: pros often can’t afford the latest and best gear. With the exception of the very top people in the industry, we pros aren’t millionaires, or anywhere close. Out of our meagre incomes have to come our mortgage, food, computers, software fees, travel, and yes, camera equipment. When I made the transition to full-time freelancer, that new reality hit me like a falling piano. Science fiction writer John Scalzi once wrote that you shouldn’t consider leaving your day job until you are making TWICE your normal income with your writing (or in this case photography). It’s good advice.

So yeah, there is nothing, NOTHING wrong with being an amateur.

AK-GAAR-AIR-1073-615

5. Postprocessing is a tool, not a crutch

I’m not the first to say it, but I’m going to repeat it, there is no un-suck filter. If your image stinks when it goes into Photoshop or Lightroom, it’s going to stink when it comes out, no matter how much you crop it, add contrast, or saturate.

This image took a lot of work in post-processing, but it was a solid image going in. Nothing in Lightroom will make a bad image good.

This image took a lot of work in post-processing, but it was a solid image going in. Nothing in Lightroom will make a bad image good.

For the love of god, don’t over-process your images. What matters in an image is the way it speaks to the viewer, that the photo means something. Make your image meaningful, and you won’t ever have to rely on post-processing to be successful.

Sunset over the Noatak River, Gates of the Arctic National Park, AK USA.

Conclusion

In the end, what really matters about photography is not the final image, but the process of making it. So forget about the shiny new gear, practice the art, be patient, don’t get caught up in labels, and make your best image in the camera. Everything else is details.

Do you have anything else you’d add to this list? Please share in the comments below.

googletag.cmd.push(function() {
tablet_slots.push( googletag.defineSlot( “/1005424/_dPSv4_tab-all-article-bottom_(300×250)”, [300, 250], “pb-ad-78623” ).addService( googletag.pubads() ) ); } );

googletag.cmd.push(function() {
mobile_slots.push( googletag.defineSlot( “/1005424/_dPSv4_mob-all-article-bottom_(300×250)”, [300, 250], “pb-ad-78158” ).addService( googletag.pubads() ) ); } );

The post 5 Uncomfortable Truths About Photography by David Shaw appeared first on Digital Photography School.


Digital Photography School

 
Comments Off on 5 Uncomfortable Truths About Photography

Posted in Photography


Sunken Central Park: ‘Sidescraper’ Wraps Excavated Landscape

28 Mar

[ By WebUrbanist in Architecture & Cities & Urbanism. ]

excavated central park skyscraper

Conceived of as a hybrid, multi-functional work of landscape architecture, this award-winning design proposes digging down to the bedrock beneath Central Park and erecting a reflective “horizontal skyscraper” around its perimeter, providing 7 square miles of peripheral housing with views out over the park.

excavated park design

Designed by Yitan Sun and Jianshi Wu, the concept received first place in eVolo’s annual skyscraper competition. The proposal includes a continguous 1,000-foot-tall (and 100-foot-deep) structure, creating a looping horizontal-and-vertical skyscraper (or perhaps: sidescraper).

excavated landscape architecture nyc

By carving into the ground, new inhabitable areas are created, while mega-structure winds along the freshly-exposed cliff faces. The designers see this move as an inversion of the typical relationship between landscapes and buildings, with architecture forming a framework around outdoor space (versus a plaza surrounding a traditional skyscraper).

ex 1

ex 2

They also maintain that the project would democratize access to the park by providing more people with greater proximity. On the one hand, it would indeed create more housing units with direct access to and views of the park, decreasing distance for many residents. On the other hand, the resulting residential units would no doubt still remain expensive real estate, and, in most regards, the park is already quite open and accessible.

ex 3

ex 4

ex 5

The displaced dirt and rocks from the excavation would be used to create additional three-dimensional topographies around the city, added to parks and open spaces and creating greater variety within the urban park system of Manhattan.

Share on Facebook


[ By WebUrbanist in Architecture & Cities & Urbanism. ]

[ WebUrbanist | Archives | Galleries | Privacy | TOS ]


WebUrbanist

 
Comments Off on Sunken Central Park: ‘Sidescraper’ Wraps Excavated Landscape

Posted in Creativity


Impactful: 12 Examples Of Crash Test Dummy Art

27 Mar

[ By Steve in Art & Street Art & Graffiti. ]

crash-test-dummy-art-1c
That’s gotta Hertz! These dozen examples of crash test dummy art & graffiti display a curious reverence for our impactful anthropomorphic analogs.

crash-test-dummy-art-1e

crash-test-dummy-art-1a

Crash Test, an art installation by Jamie Willis, is located in Hindmarsh Square, a pleasant urban green space in Adelaide, Australia. The piece consists of five bronze statues displaying black & white vector icons and mounted on posts. The statues’ heads are all tilted to one side as if, say, they were dangling from an invisible hangman’s noose… and that’s no coincidence.

crash-test-dummy-art-1d

crash-test-dummy-art-1b

According to Willis, the statues were inspired by a faded photo of a female Holocaust victim who had been hung from a lamppost. “Crash test dummies stand in for people in horrific situations,” explains Willis. “These figures seem to act out the crashes in human history, the colossal mistakes and the times we smashed into each other. The blandness of these unobtrusive, hovering dummies acts as a foil for the quiet, deafening violence their hanging implies.” Enjoy your picnic lunches, Adelaideans.

Driving School of Hard Knocks

crash-test-dummy-art-6a

Flickr user duluoz cats captured this slightly (ya think?) sketchy vehicle inspection center in Woodstock, NY on February 25th of 2007. “I came upon a child of God, he was walking along the road…” blame it on some billion-year-old carbon clogging up the carburetor.

Samcheongdong Style

crash-test-dummy-art-2a

crash-test-dummy-art-2b

A modern mashup of Michelangelo’s Pietà featuring crash test dummies? Yes please! You’ll find this unlikely artwork on a rooftop in Seoul, Korea’s Samcheongdong neighborhood. As archetypical Pietà sculptures depict a sorrowful Virgin Mary cradling the body of her deceased Son, employing crash test dummies in place of the Madonna and Child isn’t really such a stretch.

Belgian Combo

crash-test-dummy-art-7a

What is “NAWAS”, and why does that name appear on dozens of trains, walls and other outdoor infrastructure throughout the Low Countries? Call it the calling card of one of Belgium’s most noteworthy (or notorious, depending on one’s POV) graffiti crews. The otherwise anonymous artists don’t often depict crash test dummies in their graphics but when they do, it’s on the side of an SNCB train. Kudos to Flickr user New Fast Atomic Daffodil for the above image taken in June of 2014.

Next Page – Click Below to Read More:
Impactful 12 Examples Of Crash Test Dummy Art

Share on Facebook


[ By Steve in Art & Street Art & Graffiti. ]

[ WebUrbanist | Archives | Galleries | Privacy | TOS ]


WebUrbanist

 
Comments Off on Impactful: 12 Examples Of Crash Test Dummy Art

Posted in Creativity


Review: Manfrotto 5001B Nano Light Stand

27 Mar

Rating: 10/10

Among the most essential parts of a photographer’s lighting kit, is a sturdy light stand. While there are a wide variety of options that definitely fall into the sturdy category, many of these light stands are also heavy, bulky, and difficult to travel with. One light stand that is pretty much the complete opposite of every other option out there, is the Manfrotto 5001B Nano. Compact, lightweight, and surprisingly tall for its size, this light stand is my go-to favorite that accompanies me on every one of my photo shoots, however it won’t necessarily meet the needs and expectations of every photographer. Here are some reasons why you might love this light stand, and why you might opt for another option.

Manfrotto 5001B Nano Lighting Stand 1

Manfrotto Nano 5001B shown next to the Canon 70-200mm f/2.8 lens and light stand adapter (neither of these is included and must be purchased separately).

Manfrotto 5001B Nano Specifics

Weighing in at a mere 2.2 pounds (1kg), this aluminum light stand stands at just around 19-inches (0.48m) when it is collapsed, and can extends up to 74.8 inches (1.9m) tall when all of its 5-sections are fully extended. According to the product manual, it has a maximum payload of 3.3 pounds (1.5kg) . Compared to other light stands, most of these stats aren’t particularly impressive, and it should now be apparent why the Manfrotto 5001B Nano won’t be suitable for every photographer. But, here are some situations when this light stand absolutely shines.

Manfrotto 5001B Nano Lighting Stand 1

Lighting stand as seen with a Speedlight adapter attached. Adapter sold separately.

Extremely Compact and Travel-Friendly

The main benefit of this light stand is its compact size, which makes it easy to carry when shooting on location, or in situations when you need a stand or two without carrying an excessive amount of gear. When pairing this light stand with a speedlight, and simple lighting modifiers like an umbrella or any of the Westcott Rapid Box series, you get a simple yet effective lighting setup that won’t take up a ton of room when assembled for use, and when transporting it.

Flexible Light Stand Legs

Unlike most other light stands, the Manfrotto Nano’s legs have little rubber tips to prevent sliding, and the legs themselves are very thin and not rounded, allowing the stand to fold down to 19 inches. The method of folding the stand can take some getting used to, but another unique aspect of the stand is its ability to get extremely low to the ground, thanks to the unusual folding of the legs. This increases the light stand’s overall footprint, offering increased stability, as well as the option of lighting areas close to the ground, without taking up a ton of floor space.

Manfrotto 5001B Nano Lighting Stand 1

Light stand with adapter, speedlight, and umbrella attached. The ideal use for this stand.

Trading Stability for Compact Size

As mentioned earlier, not every photographer will be in love with the Manfrotto 5001B Nano, as it often trades stability for its compact size. Flexible legs are great for packing up small, but also a recipe for disaster if the gear it holds is not balanced or is too heavy. Being very lightweight, without the option of suspending sandbags, this stand is also susceptible to being knocked over by even a slight bump or gust of wind, so outdoor photographers will want to have an assistant to hold it in place.  It’s definitely not as sturdy or as beefy as other light stands, meaning you won’t want to rely on it if you use heavy strobes, or big lighting modifiers.

In Summary

If you’re a location shooter, who doesn’t carry a ton of camera gear and has compact lighting equipment, the Manfrotto 5001B Nano will be your new best friend. Having one or two as travel light stand alternatives, will give you the flexibility to do a quick and easy lighting setup in tight spaces, without carrying extra weight. However, steer clear of these light stands if you prefer uncompromised stability and/or have heavy, valuable lighting gear.

amzn_assoc_placement = “adunit0”;
amzn_assoc_enable_interest_ads = “true”;
amzn_assoc_tracking_id = “dpsgeneral-20”;
amzn_assoc_ad_mode = “auto”;
amzn_assoc_ad_type = “smart”;
amzn_assoc_marketplace = “amazon”;
amzn_assoc_region = “US”;
amzn_assoc_linkid = “6710d26f550e9793f41475ee806fee9e”;
amzn_assoc_emphasize_categories = “13900861”;
amzn_assoc_fallback_mode = {“type”:”search”,”value”:”digital cameras”};
amzn_assoc_default_category = “Photo”;

googletag.cmd.push(function() {
tablet_slots.push( googletag.defineSlot( “/1005424/_dPSv4_tab-all-article-bottom_(300×250)”, [300, 250], “pb-ad-78623” ).addService( googletag.pubads() ) ); } );

googletag.cmd.push(function() {
mobile_slots.push( googletag.defineSlot( “/1005424/_dPSv4_mob-all-article-bottom_(300×250)”, [300, 250], “pb-ad-78158” ).addService( googletag.pubads() ) ); } );

The post Review: Manfrotto 5001B Nano Light Stand by Suzi Pratt appeared first on Digital Photography School.


Digital Photography School

 
Comments Off on Review: Manfrotto 5001B Nano Light Stand

Posted in Photography