[ By Steph in Art & Sculpture & Craft. ]

Defying the typically two-dimensional and impermanent characteristics of paper, these artists cut, sculpt, glue, twist and fold the material into fantastical and unexpected forms. The notoriously thin and fragile material transforms into baroque wigs, complex architectural scenes, cars, animals, religious iconography and even rollercoasters, some retaining a sense of fragility and ephemerality while others seem surprisingly solid and strong.
Baroque Paper Wigs and Costumes by Asya Kozina


The elaborate towering hairstyles of yore are recalled in a new form by Russian artist Asya Kozina, who sculpts the wigs from sheets of paper. She also created a series of paper dresses inspired by Mongolian wedding costumes. “This is art for art’s sake, aesthetics for aesthetics – no practical sense, but they are beautiful. In this case, paper helps to highlight the main form and not be obsessed with unnecessary details.”
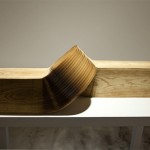
Interior Impressions by Simon Schubert


Looking like rubbings from a more permanent relief sculpture, these paper impressions by Simon Schubert are actually relief sculptures in their own right, mimicking intricate interiors through careful folding. Says the artist, “The works often show interiors from the end of the 19th century reminding the spectator of ‘haunted mansions.’ The pictures of the endless hallways with closed doors, the blind windows, the empty halls and the winding staircases appear to be single views of tremendous, labyrinthine building, which seems to continue ever further into the white.”
Cut Paper Rollercoasters


Known for spectacularly detailed paper cutouts that take on three dimensional form, artist Bovey Lee is back with a new series depicting the culture clash she experienced after a move from Pittsburgh to Los Angeles. “Speaking to the motivation of my relocation, the works also feature imagery associated with romantic relationships, and wedding bouquets, engagement rings, cakes, and eternity symbols populate the pieces. In these works, I draw parallels between one’s romantic relationship and our relationship with nature.”
Abandoned Architecture Paper Collages by Lucy Williams


We’ve seen abandoned architecture incorporated into or transformed into art in a variety of different ways, but never before in the form of cut and layered paper. British artist Lucy Williams creates amazingly realistic-looking reproductions of deserted mid-20th century modernist architecture, from homes to swimming pools.
Religious Iconography by Carlo Fantin


Artist Carlo Fantin combines religious imagery with social media culture in a series of meticulously cut paper illustrations. “I want people to have a physical relationship with my art that tis not just confined to the distance of their arms. I want people to experience how the image changes as they walk away from it. At a very close look the piece seems to be abstract, when you step back the image comes to life.”
Next Page – Click Below to Read More:
Popping Off The Page 15 Sculptural 3d Paper Art Creations
Want More? Click for Great Related Content on WebUrbanist:

Paper Architecture: Intricate 3D Sculptures by Ingrid Siliakus
Amsterdam-based artist Ingrid Siliakus cuts and folds sheets of paper into dazzlingly detailed three-dimensional buildings and cities.
Click Here to Read More »»
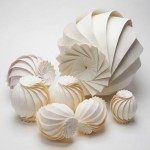
Math + Paper Craft: Computer Scientist Creates 3D Origami
Computer scientist Jun Mitani designs software that generates mathematical designs for complex three-dimensional origami crafted from a single sheet of paper.
Click Here to Read More »»
Flexible Paper Sculptures Bend Reality + Warp Perceptions
Li Hongbo’s sculptures look like fine ceramic at first, but they are far more layered than they appear. This talented artist excels in the unexpected.
Click Here to Read More »»
![]()


[ By Steph in Art & Sculpture & Craft. ]
[ WebUrbanist | Archives | Galleries | Privacy | TOS ]


You must be logged in to post a comment.