RSS
 

Archive for February, 2016

14,000 Refugee Life Jackets Wrap Berlin Konzerthaus Entrance

19 Feb

[ By WebUrbanist in Art & Installation & Sound. ]

life jacket art project

In an effort to raise awareness about the growing refugee crisis, Chinese artist and activist Ai Weiwei has wrapped six giant entry columns to a landmark concert hall in central Berlin with life jackets collected in Greece.

life jacket installation berlin

Weiwei has been living on and working from the Greek Island of Lesvos, a destination currently swamped with income refugees, many coming across Mediterranean Sea from Turkey.

life jacket columns berlin

life jacket installation

He regularly shares images and videos of asylum-seekers from his stay on the island via social media accounts, but the installation takes things a step further, bringing the point home to those living inland on mainland Europe.

life jacket materials

life jacket installed

life boat hangs center

These 14,000 jackets are by no means a complete collection, and that is also part of the point: they are just the tip of the proverbial iceberg, a sampling of the suffering and strife. Hundreds of refugees have also died trying to reach safety away from conflict (images via mompl and Frank Löschner / Konzerthaus Berlin).

Share on Facebook


[ By WebUrbanist in Art & Installation & Sound. ]

[ WebUrbanist | Archives | Galleries | Privacy | TOS ]


WebUrbanist

 
Comments Off on 14,000 Refugee Life Jackets Wrap Berlin Konzerthaus Entrance

Posted in Creativity


World Press Photo of the Year 2015 awarded for moonlight migrant portrait

19 Feb

$ (document).ready(function() { SampleGalleryV2({“containerId”:”embeddedSampleGallery_4257680311″,”galleryId”:”4257680311″,”isEmbeddedWidget”:true,”standalone”:false,”selectedImageIndex”:0,”startInCommentsView”:false,”isMobile”:false}) });

Australian photographer Warren Richardson has won the 2015 World Press Photo of the Year. Richardson’s winning photo, taken on the night of August 28, 2015 at the Hungarian-Serbian border, shows a baby being passed through a barbed wire fence by a refugee.

Speaking about his photo, Richardson explained:

I camped with the refugees for five days on the border. A group of about 200 people arrived, and they moved under the trees along the fence line. They sent women and children, then fathers and elderly men first. I must have been with this crew for about five hours and we played cat and mouse with the police the whole night. I was exhausted by the time I took the picture. It was around three o’clock in the morning and you can’t use a flash while the police are trying to find these people, because I would just give them away. So I had to use the moonlight alone.

According to World Press Photo Foundation, the latest contest received 82,951 images from 5,775 photographers across 128 countries. A total of 41 photographers from 21 countries were awarded prizes across eight categories – see a few above (click for full captions) and a full gallery at World Press Photo’s website.

Via: World Press Photo

Articles: Digital Photography Review (dpreview.com)

 
Comments Off on World Press Photo of the Year 2015 awarded for moonlight migrant portrait

Posted in Uncategorized


Watch This: The Secret(s) to Alexis Cuarezma’s Success

19 Feb

Up for a quick shot of knowledge, with an order of motivation on the side?

Take a few minutes to watch this interview with photographer Alexis Cuarezma, a sports portrait specialist based in San Francisco and LA.

The short version? Be like water finding downhill. But the video is full of good tips, strong work and solid dose of BTS pics to satisfy your jones for lighting.Read more »
Strobist

 
Comments Off on Watch This: The Secret(s) to Alexis Cuarezma’s Success

Posted in Photography


Travel Photography Simplified: 4 Changes that Made me a Better Photographer

19 Feb

Get Viktor’s Lightroom Rapid Editing System for Travel Photography Course 50% off now at SnapnDeals for a limited time only – February 9th-23rd, 2016.

When I look back and analyze how my photography has changed over time, I see that the last couple of years were the most eventful in regards to the evolution of my photography. I see that rapid advances in technology, in combination with my attempts to simplify various aspects of my photography, gradually changed my entire workflow.

Images Travel Photography Simplified 01

If I had to identify the key moments that triggered the rest of the changes, my switch from DSLR to a mirrorless system would be at the very top of the list.

1. Mirrorless Setup

Depending on the type of photography, the switch to a mirrorless system affects photographers differently. As a travel photographer, the effect of the change was huge for me, and even though the learning curve was steep, it was liberating from the very beginning.

The compactness of mirrorless systems was the most obvious factor for the switch. Here is the breakdown of my camera, plus lenses setup:

  • Sony A6000 (344g, 12oz)
  • Sony 10-18mm (220g, 8oz)
  • Sony 16-70mm (308g, 11oz)
  • Total: 874g (31oz)

It’s hard to believe that a high-quality, wide angle zoom lens (10-18mm) can weigh only 220g (8oz). The full set, including the camera and two lenses that cover 90-95% of my needs, weighs less than 900g (32oz). I call it freedom.

Images Travel Photography Simplified 02

From a practical standpoint, it actually means that I can pack the entire setup into a carry-on when traveling by plane. It also means that I do not have to think about what equipment to bring when packing for a demanding hike. Instead, I bring everything with me.

The other two factors of my switch that impacted my photography were the amazing dynamic range of the Sony sensor and its EVF (Electronic Viewfinder). The extended dynamic range of the sensor allows me to reduce the number of brackets I have to take, to cover the entire dynamic range of the scene. Also, it saves me time editing, since I do not have to use HDR, and Image Blending techniques, as often as before.

The Electronic Viewfinder also allows me to more accurately assess the scene before taking the shot and, as a result, reduces the number of unsuccessful shots.

Images Travel Photography Simplified 03

2. Changing Travel Routine

I did not expect that one small change to my travel routine would impact my photography so much. So what was the change? I simply stopped editing photos while traveling. Instead, I began concentrating all my efforts on finding interesting locations and capturing them – nothing else. This new focus makes my trips more enjoyable, reduces stress, and improves my photography in general.

Before, I always loaded all of the new photos at the end of the day to Lightroom using my laptop. While checking the day’s results, I would often start culling and editing.

Now, when I want to check if a shot is successful, I can do it while shooting, simply by wirelessly connecting my camera with my tablet. And, if it is absolutely necessary to post a couple of new photos to social media, I can edit them in seconds using Snapseed on my tablet, then easily post them online.

Images Travel Photography Simplified 04

3. Simplified Backup System

Keeping photos safe while traveling is a big issue for any photographer. Up until recently, there was no reliable enough solution for a photographer, like myself, to go on an extended photography trip without bringing a laptop. For years, a laptop was the center of my backup strategy while traveling, which only added unnecessary bulk to my setup.

Finally, I think this is starting to change. For the last few months I’ve been testing a laptop-less travel approach, and I am confident that a new setup this year will completely replace my outdated backup system.

This new workflow is possible because of a device that was recently released: WD My Passport Wireless. The device has a variety of interesting features, but the most important one, from a photography standpoint, is the SD Memory Card Reader. When you insert a memory card into the reader, it automatically backs up all the contents of the card to the drive. Plus, it supports incremental backups, which means that it backs up only new files rather than those previously transferred.

Images Travel Photography Simplified 05

Photo courtesy Western Digital

This device makes it possible to travel without a computer. Also, it minimizes the risk of losing images due to memory card failure. Now, I incrementally backup my new images multiple times throughout the day, and by the end of the day back at the hotel, I already have all of my new images on two devices.

Another feature of the WD My Drive Wireless that excites me as a photographer, is its ability to connect to the drive with a mobile app and grab any photos (JPEGs only) for editing.

Images Travel Photography Simplified 06

4. Rapid Editing

Lightroom is my primary photography editing tool. At some point, I realized that 80% of my editing steps were identical for every photo. This meant that only 20% of my efforts were spent on what really mattered: making every photo unique. I also recognized that if I could automate the 80%, then I could drastically reduce the time I spend in front of the computer.

The obvious choice for editing automation was Lightroom’s preset functionality. The presets allow users to record their editing steps in Lightroom for later use.

The main obstacle in developing and implementing a new system was Lightroom’s presets limitations. You have probably already noticed that it is rare when you apply one of the presets to a photo that are happy with the final results. You still have to dive deeper into the Lightroom editing tools to compensate for the level of exposure, lighting conditions, shadows, and the dynamic range of the scene.

I solved this problem by introducing a two-level editing system which I call Lightroom Rapid Editing. I separated my Lightroom presets into two categories:

Style Presets: The presets that establish the artistic style and reflect our creative vision. For example, a dreamy, warm look or an aggressive and contrasted style, soft black & white or a vibrant cross processed treatment.

Images Travel Photography Simplified 07

Adjustment Presets: The presets that do affect the style of the photograph but help us to fine-tune the following parameters: exposure, shadow recovery, contrast, clarity, vignetting. I called the collection of the adjustment presets the TOOLKIT.

Images Travel Photography Simplified 08

This is how my workflow looked after I implemented the two level preset system:

First, I applied one of the Style Presets. Then, I used the Adjustment Presets from the TOOLKIT to fine tune the image. Simple, effective, and automated. The Lightroom Rapid Editing System reduced my editing time by more than half and made my photography more consistent.

Here is a quick demonstration:

For the demonstration, I selected a photo of Niagara Falls (American and Bridal Veil Falls). The scene was somewhat challenging as the water of the falls, was much brighter than the rest of the scene. I intentionally set exposure for the brightest areas, making sure I preserved enough details in the water. It resulted in an underexposed capture, making it more challenging to edit.

Images Travel Photography Simplified 09

First, I applied one of my favorite presets from the Landscape Collection – Natural. Second, I used the following TOOLKIT adjustments (Adjustment Presets):

  • 01 Exposure +
  • 08 Open Shadows ++
  • 17 Clarity ++
  • 31 Vignetting +

Here is the result. It took me five clicks, and no more than two minutes to complete the editing. To record my editing steps for future reference and easy sharing, I used Lightroom Rapid Editing Formula: Natural (02, 08, 17, 31).

Images Travel Photography Simplified 10

Read a more detailed explanation of my travel photography workflow here: Photo Editing Workflow for Travel Photography

Conclusion

I believe that simplification is the key factor in mastering any complex process. If you reject unnecessary complexity by drastically simplifying it, you can invest more time and effort into what really matters. The changes I listed above did not happen overnight but they were always driven by the desire to simplify my photography.

How have you simplified your photography? Share with us in the comments below.


If you found this helpful, get Viktor’s Lightroom Rapid Editing System for Travel Photography Course 50% off now at SnapnDeals for a limited time only – February 9th-23rd, 2016.

googletag.cmd.push(function() {
tablet_slots.push( googletag.defineSlot( “/1005424/_dPSv4_tab-all-article-bottom_(300×250)”, [300, 250], “pb-ad-78623” ).addService( googletag.pubads() ) ); } );

googletag.cmd.push(function() {
mobile_slots.push( googletag.defineSlot( “/1005424/_dPSv4_mob-all-article-bottom_(300×250)”, [300, 250], “pb-ad-78158” ).addService( googletag.pubads() ) ); } );

The post Travel Photography Simplified: 4 Changes that Made me a Better Photographer by Viktor Elizarov appeared first on Digital Photography School.


Digital Photography School

 
Comments Off on Travel Photography Simplified: 4 Changes that Made me a Better Photographer

Posted in Photography


Pigment Library: Harvard’s Collection of 2,500 Global Colors

19 Feb

[ By WebUrbanist in Culture & History & Travel. ]

pigment glass cabinetry

Looking as much like a mad science laboratory as a conservator’s dream workshop, this pigment library is populated with color samples from around the world, all helping preservationists maintain and restore historical works of art and design.

historical pigment collection

pigment sample jars

The Straus Center for Conservation and Technical Studies at the Harvard Art Museums puts is jars, bottles and glasses on display for the public to see in glass cabinetry, but also uses them like a witch doctor would employ esoteric medicines. An analogy could also be drawn to seed vaults, which likewise store and preserve precious and sensitive materials for future use.

pigments of the world

From Colossal, “The Forbes pigment collection was started by its namesake—Straus Center founder and former Fogg Art Museum Director Edward Forbes who began the collection at the turn of the 20th century. Forbes would collect his samples from his travels all over the world, bringing back pigments from excavated sites at Pompeii to rare lapis lazuli found in Afghanistan.”

pigment library harvard

Forbes became interested in preservation when a 14th-Century piece he purchased began to visibly fade, sparking him to learn more about the materials and processes around paintings and their preservation.

pigments on display

The origins of the various colors are often stories in themselves, from modern synthetics to obscure organics, like an ‘Indian Yellow’ made from the urine of cows fed only mango leaves. (Images via Peter Vanderwarker, Zak Jensen and Andrea Shea/WBUR)

Share on Facebook


[ By WebUrbanist in Culture & History & Travel. ]

[ WebUrbanist | Archives | Galleries | Privacy | TOS ]


WebUrbanist

 
Comments Off on Pigment Library: Harvard’s Collection of 2,500 Global Colors

Posted in Creativity


Intentional Blur- How to Create it and Why it’s Awesome

18 Feb

An abstract blur of cotton grass, Fairbanks, Alaska, in autumn.

Open up any photography magazine or website, and I promise there will be at least one article, and a half dozen ads, discussing image sharpness and how to get it through technique or gear. Don’t get me wrong, sharpness is great. When I’m shooting a classic landscape or portrait, if the image is a hair out of focus, it goes in the trash. But, at times, blur is exactly what you want, and occasionally, it’s exactly what your sharpness-obsessed brain needs. All you need, is a camera that allows you to manually control shutter speed.

Abstract Panning Blur

Creating abstract blurs is a chance to explore color, and pattern, and forget about the nit-picky details of composition. Frankly, it’s a fun way to screw around with your camera, and the results can be very cool.

An abstract blur of Fireweed, Fairbanks, Alaska, in autumn.

I made the above image in the small wetland below my home in Alaska. In the autumn, the fireweed fades from green, to orange and red, and these plants erupted from the background. Photographically, I didn’t care about the fireweed itself, I wanted to create an image with the feeling of an explosion. After a moment of pondering, I decided a blur might do the trick. I set the camera shutter to 1/10th second, and panned the camera parallel to the direction of the stems (up and down).

The process is simple, but can feel strange. The camera must be in motion for the entire length of the exposure (usually longer than 1/15th of a second). If you pause, start too soon, or end too early, then elements of the image will retain detail, and the clean washes of color will become confused.

Below are a couple of examples using a patch of autumn foliage. In the first (below left), I moved the camera slowly, while the second (below right) is a quicker motion:

AK-FAI-autumn-blur-abstract-11 An abstract blur of Fireweed, Fairbanks, Alaska, in autumn.

Linear patterns, like the fireweed stems I noted above, or trunks of trees, make great subjects for this kind of image. Below are two interpretations of a forest. The first of these images was made during the blue hour of a snowy winter morning, the second is a very fast vertical pan of cottonwoods, on a bright spring day.

AK-FAI-winter-abstract-6
AK-FAI-CreamersField-abstract-104284-25

You can also experiment with jiggling the camera as I did in the image below. The results can be very painting-like, and are quite unlike any other type of image I know how to create.

AK-FAI-CreamersField-abstract-104284-33
Zoom Blurs

A zoom blur, as is obvious from the name, requires a zoom lens to execute. The result is an image that appears to blur outward, from a comparatively sharp center point. Often, it gives the impression of forward motion, or viewing the subject down a long tunnel of color and pattern. Bright subjects, like flowers, often work well. When done properly, this technique yields an image that is a celebration of color.

AK-Girdwood-fireweed-abstract-3

Just as you need the camera in constant motion to create an effective panning blur, you’ll need to make sure the zoom is activated throughout the exposure. Try 1/10th second as a starting point. I’ve experimented with this technique in a variety of situations, even on a colony of King Penguins (below), where I think the technique emphasizes the chaos and noise of the tightly packed birds. It can also be effective for portraying motion, as I did in the image of the mountain biker (second image below). For this image I used a small zooming motion, instead of a dramatic pull back, as the cyclist approached me.

SGeorgia-9Jan10-SalisburyPlains-53
AK-FAI-GoldstreamSports-Sep13-121

Subject Blur

In the techniques I described above, either the camera, the lens, or both must be in motion, but blurs can also be effective when it’s the subject that’s moving. Most landscape photographers will already be familiar with the technique of blurring moving water through the use of a slow shutter speed. This technique requires a tripod to be effective, and composition, unlike in abstract blurs, now plays an important role.

Your shutter speed will dictate how the blur appears in your final image. Slowly moving subjects like rippling waves, may require several seconds to blur, while a fast tumbling creek or waterfall may only need 1/15th second. Experiment, and see what you get. In the two images below, the bear and waterfall required only 1/15 second to blur, while the slower moving creek required nearly a half second.

A Brown Bear fishes for salmon at Brooks Falls in Katmai National Park, AK, USA.

AK-Denpark-Savageriver-01

1/8th second at f16

1/8th second at f16

Water is the obvious subject for this kind of photography, but don’t limit yourself. Several years ago, I was hiking atop a ridge in the Alaska Range. It was mid-summer, a few minutes before midnight, and the sun was just setting behind the mountains. It was windy, and tufts of golden tundra grass were waving rapidly back and forth in the breeze. I knew that when the last light of day departed, those tufts of grass would be lit up, and all the rest of the world would be shadowed. Quickly, I set up: tripod placed low, long shutter speed (1/4 second), and waited. Sure enough, for just a moment, the only thing lit by the sun was the blowing grass stems:

Blowing tundra grass lit by evening sun, Alaska.

Action Blurs

This last technique is frequently used to give the impression of movement and speed, and is often used in sports and wildlife photography. There are two flavors of action blurs. The first is when the camera is panned to track a moving subject. This results in an image with a sharp, or semi-sharp subject, and blurred background like the image below.

AK-FAI-Equinox-marathon-109203-3

The second is when the camera is still, and the subject is in motion. The outcome is a blurred subject, with a sharp background. Both result in an image that clearly tells the story of motion.

AK-FAI-GoldstreamSports-Sep13-128

Results using this technique are hard to predict. The combination of long shutter speeds, and moving cameras and subjects, can result in many failed images. But when it works, the results can be awesome.

CO-Golden-Cyclocross-26Sep2012-87

Rapidly moving subjects may require only 1/60th of second (or faster) to provide blurred motion, but slow subjects may need substantially longer shutter speeds. It’s a game of trial and error. Running and cycling races, or other sporting events, are great places to practice the technique, as you can shoot again and again while experimenting with different shutter speeds. Once you’ve mastered the method, you can break it out on higher stakes subjects like fast moving wildlife, where you may only get one opportunity to get the shot.

AK-FAI-CreamersField-Migration-Aug2009-54

Go out and experiment. Blurs, be they abstract, impressionist, or realistic, can be great fun to play with. For me, it’s a fallback technique when I need to jumpstart my creativity.

Have you tried making blurs? I’d love to see what you get. Feel free to post them in the comments below.

googletag.cmd.push(function() {
tablet_slots.push( googletag.defineSlot( “/1005424/_dPSv4_tab-all-article-bottom_(300×250)”, [300, 250], “pb-ad-78623” ).addService( googletag.pubads() ) ); } );

googletag.cmd.push(function() {
mobile_slots.push( googletag.defineSlot( “/1005424/_dPSv4_mob-all-article-bottom_(300×250)”, [300, 250], “pb-ad-78158” ).addService( googletag.pubads() ) ); } );

The post Intentional Blur- How to Create it and Why it’s Awesome by David Shaw appeared first on Digital Photography School.


Digital Photography School

 
Comments Off on Intentional Blur- How to Create it and Why it’s Awesome

Posted in Photography


Worth the wait? A look inside the Pentax K-1

18 Feb

Announcing the K-1

Here it is – the long awaited full-frame Pentax. The K-1 is a solidly constructed camera that feels good in the hand, and should appeal to many photographers looking to step up from APS-C Pentax DSLRs, as well as those looking to use older K-mount glass on a full-frame format.

The body of the K-1 is constructed of a lightweight magnesium alloy, and has 87 seals around the body. Ricoh claims that the K-1 is dustproof, weather-resistant and cold-resistant.

Big viewfinder

Although most people are likely to buy a full-frame camera because they tend to offer better image quality than smaller sensor models, full frame DSLRs gain an operational benefit as a side effect. The larger mirror needed to cover the larger sensor means that more light is reflected up into the viewfinder, meaning it’s easier for a full-frame DSLR to have a large, bright viewfinder, compared to a smaller-sensor version.

The K-1’s viewfinder offers a ‘near 100%’ field of view at a pretty substantial 0.7x magnification. This isn’t the very largest available but it’s still very large and very bright, and will be a significant step up for any users of APS-C cameras. By way of comparison, the Pentax K-3 II’s 0.95x viewfinder is equivalent to 0.63x once you take crop factor into account.

Tilting cradle LCD

The K-1 features an unusual rear LCD arrangement. The panel itself is attached to a tilting cradle that itself is mounted on four legs that slide along a cross-shaped series of slots. As the legs slide out towards the outer points of this cross, the screen moves outwards from the back of the camera. Because the legs all move independently, the cradle can tilt slightly up/down and left/right, even before the LCD is tilted up or down.

The ribbon cable extending from the back of the camera to the LCD is enclosed in a rubber sleeve, so that the weather sealing extends to the rear screen.

LED lights

On the back of the LCD cradle are four small LED lamps that can be used to shed light on the camera’s rear controls. Ricoh says that compared to backlit buttons, this is a better way of providing illumination while maintaining the weather sealing of the buttons on the back of the camera. You do, of course, have to position the LCD in such a way that it the light from those LEDs reaches the controls.

Another LED sits below the viewfinder hump and lights up the lens mount to make it easier to swap lenses in the dark. Finally, there’s an LED fixed in the camera’s card bay that lights up both the card slots and the socket for remote control connection. The brightness of each of these lamps can be configured independently, so that only the area of illumination you want to operate have any effect when you press the lamp button on the top of the camera.

Multi Function Dial

One of the main areas on which the K-1’s controls differ from the well-liked K-3 series bodies is the addition of the Multi Function Dial. This adds a third command dial to the camera’s rear corner but one whose function can be changed simply by rotating a labelled dial just next to the viewfinder hump.

This means that an already customizable two-dial camera becomes a three dial camera whose behavior can be altered without digging into the camera’s menus. We suspect most people will leave the third dial set to ISO or Exposure Comp, most of the time, but it’s an interesting way of extending the degree of direct control and we’ll be interested to see how it ends up being used.

Autofocus module

The autofocus sensor, which Ricoh is calling SAFOX 12, has been updated. Thirty-three AF sensors, twenty-five of which are cross-type (and centrally located), cover a relatively small portion of the frame. The center point along with those directly above and below can focus down to -3EV, and are also ‘high precision’ (longer baseline), which means that when a F2.8 or faster lens is attached, focusing using these points leads to higher accuracy. This is particularly important when shoot faster primes with this camera: as we’ve seen on other brands’ DSLRs, 36 megapixels have a way of highlighting any slight focus imprecision. We’d expect users to have to do some focus fine-tuning to get the best from the K-1, and Ricoh offers a rudimentary AF microadjustment feature to do just that.

With the current ecosystem of Pentax lenses, we expect autofocus speeds to vary considerably based on lens (with older screw-driven lenses in particular likely to exhibit slower performance), but the good news is that the newest Pentax zoom lenses we’ve tried do appear to have significantly quicker AF motors.

Metering and continuous AF

Ricoh is also claiming a ‘Real-Time Scene Analysis System’ that utilizes the new PRIME IV engine and an 86,000-pixel RGB metering sensor for scene analysis using color, facial information, and movement to aid the camera’s metering and AF systems. Not only does this promise to increase accuracy of metering, it also allows the camera to automatically select the correct AF point to stay on your subject (subject tracking) when using continuous AF.

This isn’t new to Pentax – nor any recent Nikon or Canon DSLR with 3D tracking and iTR, respectively – but we’ve found performance to be lacking in previous bodies like the K-3. A brief play with a pre-production K-1 and the relatively fast-to-focus 15-30mm F2.8 in a non-test environment indicated that the system, while fairly accurate, was slow at tracking subjects across the frame. The AF points do move to stay on a moving subject, but do so sluggishly, which means it’ll be of limited utility with faster moving subjects. The limited AF coverage also means it’s unlikely fast-paced shooters will experience much success shooting this way, possibly falling back to relying on single point AF.

Pixel-shift to sample all colors

The K-1 includes an updated version of the Pixel-Shift Resolution mode introduced on the K-3 II. Like that camera, the K-1 takes four shots, shifting its sensor by one pixel between each shot. This means it captures red, green and blue information at every capture location, resulting in an image with full color information for every output pixel.

The latest implementation tries to cancel-out the effects of subject movement as its shooting the four images. Ricoh tells us not to expect it to cope with major changes, such as a car driving across the frame but that it should cope with leaves moving in the breeze.

As well as the more accurate color capture, the benefit of capturing four frames is that the noise performance is improved (because noise can be averaged-out between the frames). It should also mean higher dynamic range, which theoretically could improve up to 2 EV from sampling four images, possibly putting it in competition with the 645Z’s industry-leading Raw dynamic range.

AA-filter simulation

The K-1 also offers the anti-aliasing filter simulator feature that first appeared on the K-3. This vibrates the sensor during exposure just enough to blur the light across more than one pixel. This removes the risk of high frequency patterns clashing with the camera’s color filter, which otherwise results in false color and spurious patterns (aliases) appearing in images.

The camera offers two intensities of filter simulation and, because the sensor itself doesn’t have a physical AA filter, it can also offer an ‘Off’ mode. As on the K-3 II there’s also a filter bracketing option that lets you shoot consecutive images with different degrees of AA filter effect applied, so that you can use a filtered version of the shot if the unfiltered version exhibits moiré.

Astrotracer

The K-1 includes built-in GPS and an electromagnetic compass, giving it the kind of location awareness that you’d usually only expect from a smartphone. The camera uses this, in conjunction with its image stabilization system, to offer the Astrotracer feature that Pentax developed back in 2011. This uses the GPS to work out where the camera is and hence how much the Earth’s rotation will affect the apparent position of the stars overhead.

The camera can then shift and rotate its sensor during a long exposure to track the relative movement of the stars so that they appear as points, rather than trails, in the resulting image. Since this inevitably blurs static objects in the scene, it is most useful for creating low noise starscapes. Night time landscape photographers will also find this tool useful if they combine images with the Astrotracer on and off, using appropriate masking techniques. (Image courtesy of Pentax)

Lens-lineup: FA lenses

At the time of launch, Ricoh offers approximately 12 FA and DFA full-frame lenses. This list includes five FA primes, including the 31, 43 and 77mm ‘Limited’ series. On top of these there are five D FA zooms: a 15-30mm F2.8, 24-70mm F2.8 and 70-200mm F2.8, along with the newly-announced 28-150mm F3.5-5.6 and the 150-450mm F4.5-5.6. Finally, there are two D FA macro lenses: a 50mm and a 100mm.

In addition to these, the camera includes lens correction data for 14 out-of-production lenses – making clear how important backwards compatibility is to this camera.

Using crop lenses on K-1

The K-1 can, of course, still use the Pentax DA lenses designed for the company’s APS-C cameras. By default the camera will use a 15MP APS-C-sized crop of the sensor if a DA lens is mounted but can be made to use its full sensor region, if you’d prefer. Ricoh has published a list of those lenses (all of which are primes) that will produce relatively useable results in full frame mode, if the aperture is stopped down.

DA Prime Lens / Utility on K-1
DA 14mm Crop Mode Only DA 50mm F1.8 Stopped-down
DA 21mm Limited Crop Mode Only DA* 55mm F1.4 Stopped-down
DA 15 F4 Limited Crop Mode Only DA 70mm Limited Stopped-down
DA 35mm F2.4 Stopped-down DA* 200mm F2.8 SDM Fully Functional
DA 35mm F2.8 Macro Stopped-down DA* 300mm F4 SDM Fully Functional
DA 40mm Limited Stopped-down DA 560mm F5.6 Fully Functional
DA 40mm XS Stopped-down RC1.4X Crop Mode Only

Summary

It should be apparent to anyone that the K-1 is a very impressive-looking camera. While we doubt it’s going to be cutting-edge in every respect when it comes to performance, it offers a very solid looking set of specifications with some very clever and genuinely useful flourishes in a very solid looking body.

That in itself is likely to be enough to satisfy the patient Pentax lens owners who’ve been wanting a camera like this for so long. For those people not already committed to the system, there’s the appeal of the price. $ 1799 is an aggressive price for a camera of this caliber and should help extend its appeal beyond the system’s existing users.

Articles: Digital Photography Review (dpreview.com)

 
Comments Off on Worth the wait? A look inside the Pentax K-1

Posted in Uncategorized


Designing the Perfect Camera – What Features are on Your Wish List?

18 Feb

The perfect camera doesn’t exist, but if I were a camera designer, I know exactly what sort of camera I would make for myself, and how I’d improve on the one that I’ve already got. I’m not asking for the impossible either – all these ideas could be implemented using current technology. Really, what I would do is take the camera I already own – the Fujifilm X-T1 – and add the best bits from other cameras, to make a kind of super-camera, or at least one that is better tailored to my own needs.

1 – Sensor size

Let’s start with the sensor. The X-T1’s sensor uses the same 3:2 aspect ratio as other APS-C and medium format cameras. This often works well when taking photos in the landscape orientation. But it doesn’t work nearly so well when taking photos in the portrait orientation (with the camera turned on its side).

Aspect ratio

The portrait on the left has an aspect ratio of 2:3 (width always comes first), the same as the sensor on the X-T1. The portrait on the right shows how it would look if the sensor had a 4:5 aspect ratio. The area is the same, but the width and height are different.

It’s surprisingly hard to create a good composition that utilizes all the space in the frame well, especially for landscapes and portraits. It’s much easier with a shorter rectangle, such as those found in large format cameras (aspect ratio 5:4), some medium format film cameras (7:6) and Micro four-thirds cameras (4:3).

For example, check out the landscapes of Joe Cornish. He uses a large format camera for a lot of his work, and he uses the portrait orientation a lot. It works really well with the short rectangle.
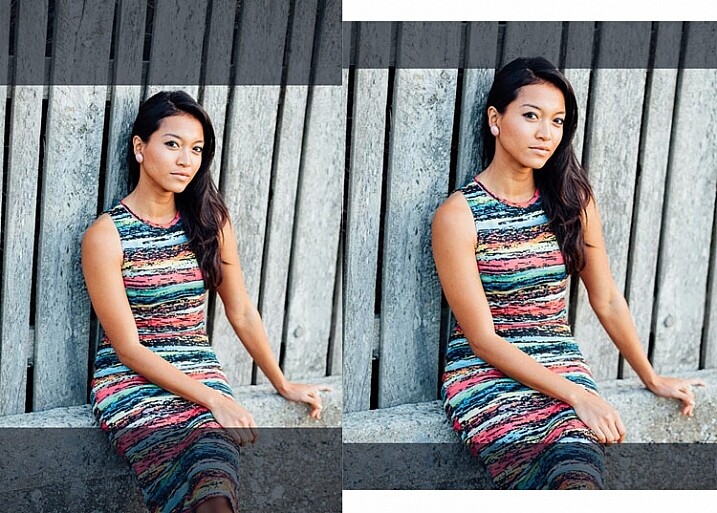
 

My proposal is this. Ditch the 3:2 aspect ratio sensor and place it with one that uses the 5:4 aspect ratio. But keep the area of the sensor – don’t make it bigger or smaller. This would give you several benefits:

  • It’s easy to compose images within the 5:4 aspect ratio.
  • If you crop to a square (as I often do because I love the square format) you use more of the sensor than when you crop the current APS-C sensor.
  • You get a slight improvement in image quality, especially at wide apertures, because you are using the centre part of the lens to create the image.
Aspect ratio

The above two photos, cropped to a square. The dark grey area shows the unused part of the sensor. You lose less information captured from the 5:4 sensor than you do from the 3:2 one.

What I don’t want to see, is a full-frame camera introduced into the Fujifilm range. The problem with having two sensor sizes in the same range, is that it greatly complicates the process of making, and buying lenses. It’s far better, as Fujifilm has done so far, to use a single sensor size throughout the range (in my opinion).

2 – In-Camera Image Stabilization

I think this is a fantastic idea, and I’d like to see it in Fujifilm cameras. The advantage of having Image Stabilization in the camera is that you can use it with any lens. That includes wide-angles, which you can then potentially hand-hold at shutter speeds like 1/4 or 1/8 second, giving all sorts of interesting creative possibilities when it comes to recording movement. Sony and Olympus have got this one right.

Fast shutter speed

I took this photo with a 35mm lens at 1/180 second to freeze movement. This lens doesn’t have Image Stabilization, but if it were built into my camera, I could try taking the photo at a shutter speed as slow as 1/15 or 1/8 second. The man would be a blur, creating a different image entirely. Image Stabilization lets you try this with a hand-held camera, so you don’t have to use a tripod.

3 – Quick control dial

Mid-range and high-end Canon cameras have a quick control dial – a thumbwheel on the back of the camera, that you can move while looking through the viewfinder. The big advantage of the quick control dial is that you can adjust exposure compensation without removing your eye from the viewfinder.

Quick control dial

The quick control dial on the EOS 5D Mark II. Its position means that it’s easy to move with your thumb, while looking through the viewfinder.

The X-T1 can already display a histogram in the viewfinder. With a quick control dial you can adjust exposure compensation (when in an automatic mode like aperture priority, shutter priority or program) as you go, to get the histogram where you want it. All guesswork regarding exposure is gone. The current exposure compensation dial is too hard to move while looking through the viewfinder, and reduces the usability of the camera.

The joystick added to the X-Pro 2 for quick movement through the autofocus points would also be a welcome addition.

4 – Dual card slots

Probably coming in the XT-2, but essential for backing up photos. Good quality memory cards are virtually indestructible. If your camera saves a copy of each photo on two different cards this makes backing up photos much easier, especially while travelling.

So Fujifilm, if you’re listening, I know I’m only one user among many, but I’d love it if you could give some consideration to these ideas. Especially the one about sensor size, which I think could revolutionize the way we use cameras.

Your turn

If I could add just one feature to my X-T1 it would be the 5:4 aspect ratio sensor. So here’s a question for you – if you could add just one feature to your camera, which would it be and why? I’m looking forward to reading your answers, this should be interesting.


Mastering Lenses photography ebookMastering Lenses

My new ebook Mastering Lenses: A Photographer’s Guide to Creating Beautiful Photos With Any Lens shows you how to get the best from the lenses you own already. A comprehensive guide to exploring the creative potential potential of wide-angle, normal and telephoto lenses, it’s also the ultimate buying guide for readers thinking about purchasing a new lens for their camera. Please click the link to learn more or buy.


googletag.cmd.push(function() {
tablet_slots.push( googletag.defineSlot( “/1005424/_dPSv4_tab-all-article-bottom_(300×250)”, [300, 250], “pb-ad-78623” ).addService( googletag.pubads() ) ); } );

googletag.cmd.push(function() {
mobile_slots.push( googletag.defineSlot( “/1005424/_dPSv4_mob-all-article-bottom_(300×250)”, [300, 250], “pb-ad-78158” ).addService( googletag.pubads() ) ); } );

The post Designing the Perfect Camera – What Features are on Your Wish List? by Andrew S. Gibson appeared first on Digital Photography School.


Digital Photography School

 
Comments Off on Designing the Perfect Camera – What Features are on Your Wish List?

Posted in Photography


Newly enthused: hands on with the Canon EOS 80D

18 Feb

Announcing the Canon EOS 80D

Canon has announced the EOS 80D, the successor to very capable EOS 70D that, notably, introduced Dual Pixel autofocus. The 80D brings some marked improvements to Canon’s mid-market, enthusiast line, including a new 45-point AF module and updated Dual Pixel AF.

Body-wise, the 80D remains very similar to the 70D, which means a polycarbonate exterior with water and dust resistance. A few things have changed: the Q and Playback buttons on the back have shrunk, a headphone socket has been added, the remote port has been moved downward, and the stereo microphones have been relocated from the top of the camera (near the hot shoe) to the front, with wider separation (note the four small holes just left of the EOS 80D logo). Furthermore, the 80D now has a mirror vibration control system similar to the 5DS and 7D Mark II.

Dual Pixel AF

Possibly the most noteworthy improvement is that it’s the first time Canon has delivered continuous autofocus (AI Servo) in still live view shooting from a Dual Pixel AF camera, and only the second time Canon offers continuous AF in live view for stills at all. Last time we saw it was in the the Rebel T6s (EOS 760D), which offers continuous AF in both stills and movie mode from its ‘Hybrid CMOS III’ sensor. However, its implementation is far from ideal, with significant hunting from Hybrid AF’s reliance on contrast-detect AF in addition to phase-detect AF. (Only some of the imaging pixels on the T6s are masked for phase detection, rather than having split PDAF-capable pixels across the entire sensor.)

Our brief time with the 80D, on the other hand, left us very impressed. You can select your subject by tapping on it, and then as long as you keep the shutter half-depressed, the camera will quickly track your subject in all three dimensions to keep it in focus – no matter where it moves to within the frame. This means your subject tends to already be in focus when you’re ready to take your shot and depress the shutter button. The camera even continues to focus in continuous drive at 5 fps.

Oddly, the much higher-end Canon EOS-1D X Mark II, skimps on this feature, only offering single AF in Live View. Previous iterations of Dual Pixel AF in the 70D and 7D Mark II also did not offer continuous AF.

Metering sensor

The 80D gains the same 7560 pixel RGB+IR metering sensor that we first saw in the Rebel T6s and T6i (EOS 760D and 750D). It’s essentially a low resolution image sensor: a marked improvement over the 63-zone dual layer sensor in the 70D, promising more accurate metering through scene analysis.

In addition to metering, this sensor is also used to give the camera a degree of human subject awareness. Skin tones can be detected – and then tracked (in continuous AF mode) – to aid the AF system in finding and focusing on a human subject. Our initial, informal testing leads us to believe this isn’t nearly as reliable as ‘proper’ face detection – which the 1DX II, and the 80D itself in Live View, offer.

The camera doesn’t offer Canon’s ‘Intelligent Tracking and Recognition’ (iTR) system, that uses the metering sensor as well as distance information to track subjects around the frame. For reliable continuous AF, you’ll want to stick to a single point and try to manually follow your subject.

The metering sensor brings another important benefit: it monitors the characteristics of the scene illumination, not only trying to interpret an appropriate white balance for the scene but also checking for flickering in the light source. If flicker is detected, the camera can delay its shooting during continuous drive such that it always shoots at the brightest point during the light’s flicker cycle; helping to give more consistent results.

New 45-point AF module

The 80D has received a new autofocus module. It’s a big step up from the EOS 70D, now offering 45 AF points – a considerable upgrade from the 19 AF points on the older model. All of these are cross-type, sensitive to both horizontal and vertical detail, giving all points the ability to focus in challenging, low light and low contrast (including backlit) situations. 27 points remain cross-type even when using a lens/teleconverter combination that has a F8 maximum aperture (ideal for birding and wildlife). Impressive.

The central AF point is rated as working down as far as -3EV in Single AF (One-Shot), which should mean the camera remains usable in extremely dark situations. It’s also a dual cross-type, high precision sensor with F2.8 and faster lenses, which brings enhanced accuracy to focus – particularly important when dealing with the shallow depth-of-field associated with fast primes.

Wi-Fi/NFC/GPS

The EOS 70D already included Wi-Fi but the 80D extends the capability by adding NFC (near-field communication). This simplifies the pairing process for Android devices and also provides compatibility with Canon’s Connect Station storage/viewing unit.

The 80D also gains built-in GPS, which adds the ability to capture location data at the point of capture. This can be hugely useful when it comes to managing your files afterwards, as you have an additional, meaningful data point associated with your images, without the need to manually tag or keyword the files.

Video improvements

The EOS 80D gains some significant upgrades when it comes to movie shooting. The most obvious change is the addition of 1080/60p video (and 50p for PAL shooters). In addition, the camera gains a headphone socket for audio monitoring while recording. Importantly, the mic and headphone sockets are angled for good reason: you can swing the articulating LCD and angle it upward or downward without it running into connected audio components. This allows videographers to make full use of the articulating screen while filming.

Add to this little changes like the movement of the built-in mics to the front of the body, rather than the haunches of the hot shoe, and the 80D shows signs that a lot of thought has been put into video.

Sadly there’s no C-Log gamma option (a very flat tone curve useful for color grading), no focus peaking or zebra warnings and no ‘clean’ HDMI output for external recording, making clear this isn’t intended for video professionals. However, the maximum ISO setting has received a boost and, much like the 1D X II, the combination of touchscreen and Dual Pixel AF should make it easier for non-pros to get good results.

New kit zoom with Nano USM

Alongside the EOS 80D, Canon has announced a new version of its 18-135mm F3.5-5.6 lens. The EF-S 18-135mm F3.5-5.6 IS USM makes use of a new type of focus motor that Canon is branding ‘Nano USM.’ The company declined to give any further detail about the technology behind the actuator but said that it’s able to offer the speed of a ring-type USM motor but is as quiet and smooth as the existing STM (stepper motor) designs.

Canon says the latest version will be 2.5x faster to focus than the existing STM version at the wide-angle end of the range and 4.3x faster at the long end of the zoom. We were very impressed in our own informal tests: the lens is able to ‘snap’ into focus almost instantaneously, even from extreme defocus. The Nano USM design is likely to be used on other lenses in future but can only be applied on lenses with single, light focus elements.

The lens’ stabilization is rated a 4 stops by CIPA standards.

PZ-E1 Power Zoom Adapter

Furthering the video capabilities of the 80D+18-135mm USM combination is the PZ-E1 zoom motor. It’s a clip-on unit that allows the 18-135mm to be zoomed in a controlled manner for video shooting. The PZ-E1 offers two zoom speed modes (high and low), both of which then offer variable zoom speed.

In fast mode the drive can take between 2.4 and 14 seconds to zoom from one extreme of the lens to the other, or 9.5-14 seconds in slow mode. This zoom can be controlled via Wi-Fi app or the desktop-based Smart Utility, as well as the on-body controls.

We really like Canon’s approach in offering the PZ-E1 as a separate unit. It means that stills-only shooters don’t end up having to buy a heavier, more expensive lens for a feature they don’t want but, at a list price of $ 150, videographers don’t have to spend too much to gain smooth zooming.

Canon says other lenses will be made compatible with the drive unit in future.

DM-E1 shotgun mic

Canon has also announced a hot-shoe-mounted shotgun microphone. It’s compatible with pretty much any camera that has a 3.5mm (1/8″) socket. There’s nothing camera or brand-specific about it, but it’s interesting that Canon has decided to start offering video-specific accessories. The DM-E1 will set you back around $ 250.

Summary

Canon’s ‘##D’ series cameras have generally been fairly subtle and progressive evolutions, compared to the previous models (with the exception of the lower-priced 60D, but that appears to have been a temporary blip), and the 80D follows this pattern. Almost every aspect of the latest camera has been upgraded, most of which try to make image-taking faster and more consistent. The AF module has significantly advanced from the 70D, particularly for wildlife photographers that will appreciate expansive F8 focusing. Dual Pixel AF has been upgraded to allow continuous live view AF in still shooting that is competitive with some of the best mirrorless cameras. In fact, face detection and subject tracking are so good in live view that those looking for an easy way to shoot human subjects might even opt to shoot in live view rather than through the viewfinder.

We suspect, though, that the biggest impact might be felt by those users who want to shoot video. The bump-up to offering 1080/60p is useful, either for capturing fast motion or giving a bit of a slow-mo option, but it’s the addition of a headphone socket and the optional power zoom adapter that should make it easier-than-ever to shoot in-camera footage (at the expense of some tools more experienced videographers might expect). And Dual Pixel AF remains one of the most compelling video AF solutions to date.

Combine all this with the advantages of an optical viewfinder and thoughtful ergonomics, and you have a solid addition to the ‘##D’ line.

Articles: Digital Photography Review (dpreview.com)

 
Comments Off on Newly enthused: hands on with the Canon EOS 80D

Posted in Uncategorized


Top Secret City: Oak Ridge, Birthplace of the Atomic Bomb

18 Feb

[ By Steph in Culture & History & Travel. ]

atomic oak ridge 1

Thousands of people who lived and worked in Oak Ridge, Tennessee during the 1940s had no idea what they were actually doing every day, performing their tasks as directed without asking questions, surrounded by constant reminders that they needed to keep their traps shut or else. It wasn’t until the United States bombed Hiroshima in 1945 that they learned they were processing uranium as part of The Manhattan Project, many of them exposed to radiation for years.

atomic oak ridge 3

atomic oak ridge 2

Nicknamed the Secret City, the Atomic City and the City Behind the Fence, Oak Ridge was developed by the government on 56,000 acres of former farmland and remains a center of nuclear research and development today. In photos from the World War II era, published by the U.S. Department of Energy and taken by Oak Ridge’s only authorized photographer Ed Westcott, we see the many signs reminding residents that their discretion was paramount, even if they didn’t exactly know what they were keeping secret.

atomic oak ridge 4

atomic oak ridge 5

atomic oak ridge 6

atomic oak ridge 7

While part of the city was open to the public, all visitors were required to go through military checkpoints on their way in and out. Other areas were strictly restricted. If anyone asked too many questions, they were out of a job and a home.

atomic oak ridge 8

atomic oak ridge 10

atomic oak ridge 11

atomic oak ridge 12

In the decades that have passed since then, some workers have spoken publicly about their experience, talking about the strange clicking instruments they had to wave over all sorts of objects, including uniforms. That instrument, of course, was checking for radiation.

atomic oak ridge 13

atomic oak ridge 14

atomic oak ridge 15

In addition to its many official facilities, Oak Ridge became home to ten schools, seven theaters, 17 restaurants and cafeterias, 13 supermarkets, 17 churches, a symphony orchestra and enough prefabricated modular homes for its 75,000 residents.

atomic oak ridge 17

atomic oak ridge 18

atomic oak ridge 16

Two years after World War II ended, Oak Ridge transitioned to civilian control, but retains the Oak Ridge National Laboratory, where the supercomputer Titan was developed in 2012. Tours of the original facility are offered, but there’s so much interest, you have to add your name to a waiting list if you want to get in.

Share on Facebook


[ By Steph in Culture & History & Travel. ]

[ WebUrbanist | Archives | Galleries | Privacy | TOS ]


WebUrbanist

 
Comments Off on Top Secret City: Oak Ridge, Birthplace of the Atomic Bomb

Posted in Creativity