RSS
 

Archive for January, 2016

Last Stop: Japan Keeps Old Train Station Open for Lone Passenger

27 Jan

[ By WebUrbanist in Culture & History & Travel. ]

japan railways deserted abandoned

In a remote area of Hokkaido, the northernmost island of Japan, a train stops just twice a day, as it has for years: once to pick up a girl on her way to school, and once to drop her back off afterward.

rural station interior

The otherwise-abandoned Kyu-Shirataki station remains open, thanks to Japan Railways, which honored the request of two parents to continue transporting their daughter back and forth until she graduates.

rural station last stop

The physical space is remarkably well-kept despite its relative disuse, still containing route maps and schedules as any other station would, despite serving as essentially a single-person shelter for the place’s only daily passenger.

rural station in japan

As the country’s population continues to shrink as well as urbanize, rural routes like this one have been forced to close – only high-speed railway lines remain on the rise. Fans of Japan Railways’ actions in this case see it as a victory for common courtesy as well as education. The line will ultimately close completely after the girl graduates and moves on (via CityLab).

Share on Facebook


[ By WebUrbanist in Culture & History & Travel. ]

[ WebUrbanist | Archives | Galleries | Privacy | TOS ]


WebUrbanist

 
Comments Off on Last Stop: Japan Keeps Old Train Station Open for Lone Passenger

Posted in Creativity


History Repeating: Olympus PEN-F First Impressions Review

27 Jan

The original Olympus PEN-F first hit the streets in 1963. Built around the half-frame film format, it quickly gained a following thanks to its beautiful, yet simple design and small size. Getting 70 images to a roll of film probably didn’t hurt, either. Now, 53 years later the PEN-F is back.

The digital reincarnation of the 35mm film Olympus PEN-F does not replace the current digital PEN flagship E-P5, rather it slides in next to it as the ‘premium’ option in the PEN family. The reason being that unlike digital PENs before it, the F has something much more OM-D-like: a built-in 2.36 million dot OLED electronic viewfinder. The F also boasts the highest output resolution of any Olympus body to date, boasting a 20MP Four Thirds sensor (probably the same one we’ve seen in the Panasonic Lumix DMC-GX8).

Released specifically to appeal to street shooters and the design conscious looking for a capable camera with retro-styling and rangefinder-like controls, the PEN-F has a lot going for it.

Olympus PEN-F features:

  • 20MP Live MOS Four Thirds format sensor
  • 5-axis image stabilization with automatic panning detection
  • 2.36 million dot OLED electronic viewfinder
  • Up to 10 fps continuous shooting (20 fps with electronic shutter)
  • Highly customizable interface, twin controls
  • Fully articulating 1.04 million dot, 3″ LCD touchscreen
  • 50MP High-res Shot mode
  • 1/8000 sec top mechanical shutter speed (1/16,000 with e-shutter)
  • 1080/60p video recording

All of the above come packaged in a machined aluminum and magnesium body, with no visible screws anywhere. A faux-leather wrap encircles the PEN-F and the body itself is both well-weighted and has a very solid feel to it. 

With many of the same guts as the OM-D EM-5 II and sleek rangefinder-style looks (reminiscent of Fujifilm’s X100 series cameras), the most direct competitors for the PEN-F are probably Sony’s a6000 and Fujifilm’s just-announced X-E2S – both of which are APS-C format cameras. Of course, the PEN-F also has to compete against alternatives within the OM-D series as well.

To help us to better understand how the PEN-F fits into the market place as a whole, we chatted with Eric Gensel, a technical specialist with Olympus. He breaks down exactly how the PEN-F fits in Olympus’ lineup, who the target-audience of the camera is and what went into the design process:

Compared to its siblings

Many of the highlight features of the PEN-F aren’t new. In fact a lot of the key spec is shared with other recent Olympus releases. However, some functions have been improved upon. For instance, thanks to its 20MP sensor, the Pen F is capable of higher resolution in multi-shot mode compared to the OM-D E-M5 II, up to 80MP in Raw mode (50MP in JPEG). It also features a dedicated creative control knob on the front, as well as four customizable shooting modes, accessed via the locking exposure mode dial.

It’s hard to see the PEN-F as a large step forward given how many of its core features are inherited from other models, but it offers a handling experience that is unique in Olympus’s lineup. Is the PEN-F more than just a pretty face? Let’s dig in.

 
Olympus PEN-F
Olympus OM-D
E-M5 II
Olympus PEN E-P5
Pixel count 20MP 16MP 16MP
Image stabilization 5-axis 5-axis 5-axis
Stabilization (CIPA) 5 stops 5 stops 4 stops
Max shutter speed

1/8000
(1/16000 electronic)

1/8000
(1/16000 electronic)
1/8000
On-sensor PDAF No No No
Continuous shooting
(without /with AF)
10 fps / 5 fps 10 fps / 5 fps 9 fps / 5 fps
Flash Clip-on
Tilt/bounce/rotate
Clip-on
Tilt/bounce/rotate
Pop-up flash
Viewfinder Built-in 2.36M-dot LCD
1.23x mag
Built-in 2.36M-dot LCD
1.48x mag
Optional VF-4 accessory EVF w/ 2.36M-dot LCD and 1.48x mag
Max video res/rate 1080/60p 1080/60p 1080/30p
Max bitrate 77Mbps 77Mbps 20Mbps
Mic socket No Yes No
Rear screen

Fully articulating 3″ touchscreen
1.04M-dots

Fully-articulated
3.0″ touchscreen
1.04M-dots
Flip up/down
3.0″ touchscreen
1.04M-dots
Wi-Fi Yes Yes Yes
Environmental sealing? No Yes No
Battery life (CIPA) 330 310 330
Weight 427 g 469 g 420 g
Dimensions 125 x 72 x 37mm 124 x 85 x 45mm 130 x 94 x 63mm

Pricing and availability

The Olympus PEN-F will be available at end of February – early March 2016, and will hit the streets at a body-only price of $ 1199. It ships with the FL-LM3 flashgun seen in the image at the top.

If you're new to digital photography you may wish to read the Digital Photography Glossary before diving into this article (it may help you understand some of the terms used).

Conclusion / Recommendation / Ratings are based on the opinion of the reviewer, you should read the ENTIRE review before coming to your own conclusions.

We recommend to make the most of this review you should be able to see the difference (at least) between X, Y, and Z and ideally A, B, and C.

This article is Copyright 1998 – 2016 and may NOT in part or in whole be reproduced in any electronic or printed medium without prior permission from the author.

Articles: Digital Photography Review (dpreview.com)

 
Comments Off on History Repeating: Olympus PEN-F First Impressions Review

Posted in Uncategorized


Roger Cicala finds innovation sealed inside the Sony 35mm F1.4 ZA

27 Jan

Sony FE 35mm F1.4 ZA teardown

We’ve already looked at Roger Cicala’s teardown of the Canon EF 35mm F1.4L II, where he showed it to be a heavy duty design with extensive adjustability to bring it back to spec after a period of abuse. LensRental’s look inside the Sony FE 35mm F1.4 turned up a lens designed with a radically different approach. It’s easy to over-interpret the differences and start trying to picture the different use-cases they’ve been designed for, but even if you don’t want to extrapolate so far, it’s fascinating to see how unconventional Sony’s approach is.

Taking a more linear route

The most fundamental difference Cicala highlights between the two designs is how the focus elements are moved. The Canon uses a traditional helicoid design – rotating the focus element along a helical track, in much the same way as manual focus lenses would. The Sony design instead uses a piezoelectric drive to push and pull the lens element along a rail, meaning that there’s no rotational movement occurring at all. Instead it can be shuffled back and forth in very fine increments.

Sony calls this design ‘Direct Drive SSM’ (with SSM standing for Supersonic motor), and it’s based on technology used for in-body image stabilization in Sony A-mount cameras, hinting at the speed and precision that such systems can provide. It’s distinctly different from the linear motor technology used in the FE 55mm F1.8, which you can see in operation here.

Direct drive SSM

The Piezoelectric drive mechanism is fascinating, and we saw it embedded in a cut-in-half FE 35mm at CP+ last year. It involves a drive element that can be expanded or contracted by applying an electric current. Expanding it slowly moves the lens out along its mounting rail, but the connection to the rail is designed to slide in response to rapid movement, so rapidly contracting the drive element leaves the lens in the more distant position but with the drive element retracted. Repeating this pattern of slow extension and rapid contraction progressively nudges the lens away from the drive element. Pulling the lens back again involves reversing the process: rapidly expanding the drive element so that it slips through the clamp, then slowing drawing the lens back in, one step at a time.

Why do it this way? Well, it’d certainly be quiet and it allows very fast movement, giving the lens possibly the fastest focusing we’ve ever seen in this class: when paired with the a7R II’s phase-detect AF system, autofocus is quick and precise. A single element able to move quickly back and forth in tiny steps lends itself well both to contrast detection focus in video as well as being able to reverse directions when subjects erratically switch between approaching and receding.

Adding a snap to aperture-by-wire

Another interesting design detail is the switch for engaging and disengaging the stepped, clicking aperture. A weather-sealed switch pushes a small, sprung ball bearing against a series of tiny teeth, to give tactile feedback as you rotate the aperture ring. However, no other mechanical connection is engaged: the aperture is entirely controlled by-wire, with a sensor detecting movement of the aperture ring and relaying it to the aperture motor.

Locked on place

The other major difference between the Canon and the Sony is the philosophy behind lens alignment. Where the Canon had a series of shims and adjustment screws to allow the different elements to be re-aligned, and re-centered, the Sony has most of its elements glued together in one giant module. This whole module then has three shims offering only a small degree of adjustment. LensRentals’ testing of its copies suggests this adjustment isn’t sufficient to give the consistency you might hope for.

Individual replacement parts are not available for after-market repair: the only option is to slot a whole new module in, with limited adjustment to ensure its alignment within the lens barrel. This approach means Sony has a good level of control over the alignment within each module but means the lens is harder and more expensive to service if it goes out of alignment or if the front element gets scratched.

In summary

The construction and adjustment isn’t quite as extensive as in the Canon but, as Cicala highlights: nor is it in most lenses. Instead it appears Sony has designed its lens so that it’s durable and everything is fixed in place, whereas Canon has built its lens to be tough but accepted that as a photojournalist’s workhorse, it’ll need to be beaten back into shape every now and again.

it’s clear, though, that Sony has built this lens to be tough: not only is each element individually positioned, rather than being spaced apart, relative to another, but Sony has included extensive amounts of weather sealing at every step of the design (just look at the size of the rubber gaskets, in the picture above). Cicala concludes: ‘This lens has the most rubber gaskets I’ve ever seen. The weather and dust resistance in the lens itself should be superb.’

Articles: Digital Photography Review (dpreview.com)

 
Comments Off on Roger Cicala finds innovation sealed inside the Sony 35mm F1.4 ZA

Posted in Uncategorized


Yongnuo announces YN360 LED light wand

27 Jan

Chinese lighting manufacturer ShenZhen Yongnuo Photographic Equipment Co has announced a variable temperature LED wand for still and video photographers. The Yongnuo YN360 features a 39.5cm/15.5in light board that is equipped with 160 LEDs designed to match daylight, 160 LEDs to match tungsten lighting and 40 further LEDs that are RGB SMD lamps. The wand can be used to produce light that blends in with ambient lighting in a wide range of conditions by varying the mix of 3200K and 5500K LEDs, and also be used to create a spectrum of colors by mixing the red, green and blue LED sources. 

The company says that the color of the wand and the brightness of its illumination will be controllable via a smartphone app and physical dials on the wand’s handle, and claims that its technology and encoders allow the light to be dimmed without altering its color. 

The YN360 will be powered by Sony NP-F type lithium-ion cells, and we should expect two hours at its 2560-lumen brightest output in the color temperature mode, and four hours in RGB mode, from a single charge of the recommended NP-F770 battery. A mains adapter will also be available. 

The Yongnuo YN360 should go on sale by the middle of February, though the company has yet to release information regarding its price. For more information see the Yongnuo store blog. 

Articles: Digital Photography Review (dpreview.com)

 
Comments Off on Yongnuo announces YN360 LED light wand

Posted in Uncategorized


GoPro and Periscope partnership enables live broadcasting from Hero4 action cams

27 Jan

Live-streamed content is about to get a little more extreme as action cam maker GoPro and live-broadcasting video app Periscope have announced a partnership. Starting today, Periscope users can broadcast live from GoPro’s Hero4 Black and Silver models. With Periscope’s iOS app, users can switch between the camera on their mobile device and a GoPro, enabling a two-camera setup. An iPhone 5s, 6 or 6+ running iOS 8.2 is required. If you’ve got all the necessary equipment, download the latest version of the iOS app to start broadcasting from your GoPro.


Press release:

GOPRO GOES LIVE WITH PERISCOPE

Live story-telling just got more immersive! Beginning today, Periscope users can now broadcast live directly from their GoPro HERO4 Black or Silver camera. This innovative integration allows the 10+ million Periscope users to toggle between broadcasting from their iPhone’s camera to their GoPro directly from the phone screen with the simple touch of a button. 

Much like a production switchboard, you can use your Periscope interface to flip between the two different camera angles, so even if your broadcast is lacking that heart-pounding action only GoPro can capture, you can still set up a two-camera shot for more dynamic story telling in real time. And yes, your GoPro will still record locally on the micro SD card even while broadcasting through Periscope.

Periscope lets you see what’s happening in the world right now, unedited and unfiltered. Integrating GoPro offers Periscope broadcasters a new tool to help tell their stories more creatively, while GoPro content creators now have a new platform and audience with Periscope and Twitter to share their experiences, live!

Live broadcasts from GoPro can now be shared directly to Twitter’s home timeline, enabling GoPro users and Periscope broadcasters to expand their reach to their Twitter fan base. This helps broadcasters cultivate new fans and interact with their audience right from their broadcasts in their home timeline, even after the live broadcast is done.

Pablo Jablonski, Periscope iOS Engineer said, “As a skier myself, I’ve always loved extreme sports, and I love how GoPro can show us all of the crazy things these athletes can do. As an iOS engineer on Periscope, bringing these two technologies together has been a the fulfillment of a longtime personal wish. Starting with X Games and moving forward, Periscope and GoPro together will bring these LIVE moments to all the fans.”

*Broadcast functionality is currently only available on iOS, but users will be able to view GoPro broadcasts from any platform.

*Compatible with iPhone 5s, 6 and 6+ with iOS 8.2

*Integration for use with GoPro HERO4 Black and Silver models

Articles: Digital Photography Review (dpreview.com)

 
Comments Off on GoPro and Periscope partnership enables live broadcasting from Hero4 action cams

Posted in Uncategorized


6 Advanced Composition Techniques to Improve Your Photos

27 Jan

When you think of composition in photography, what is the first idea that pops into your head? Let me guess – the rule of thirds?

Likely that was true for many of you who reading this, why do you think that is? The rule of thirds is probably the most widely known, and well used compositional tool in photography. Most often, it is the first composition tool we are taught (it was for me anyway). Once we know it, and use it, we don’t really think about it, or about any other compositional techniques.

There are other methods though, using visual design techniques that talk about texture and colour, amongst others. Many photographers simply default to the rule of thirds and take the shot, without trying other compositions. These other techniques can make a difference in your images. This article is about six techniques you can use to improve your compositions, and your photos Some of these would be known as advanced techniques, but once you understand them, they are pretty self explanatory.

1. The Golden Ratio or Fibonacci Spiral

Use the Golden Ratio to enhance your composition

Use the Golden Ratio to enhance your composition

This is a tool that has been used for centuries, as a design principle. Many famous works of art use the Golden Ratio in their composition and it is often seen in nature’s own designs. Think of the spiral of a snail shell, how it curls in on itself. That shape conforms to the Golden Ratio. It is a ratio of 1:1.618 which seems to work really well in design and photography. To read much more detail about this technique check out: Divine Composition With Fibonacci’s Ratio (The Rule of Thirds on Steroids).

2. Unity

Unity is about order. Repetition can be very powerful in this regard. You can repeat shapes, lines, or colours in your image. By doing so you create a unified view of the scene, and this in turn gives a very powerful compositional effect. Unity can bring a calming feel to the image, try and find a subject that portrays this.

The lines and the rivets in the image make it feel uniform, as does the lack of colour

The lines and the rivets in the image make it feel uniform, as does the lack of colour

3. Coherence

Different from unity, coherence is more about similar types of elements or shapes in your scene. Think of a rocky river bed with similar sized rocks and pebbles. This scene would be coherent if the rocks and pebbles are a similar size, shape, and colour. Coherence appeals to the viewer’s sense of order, and can make for very interesting images.

Similar shapes and colours make this image feel more coherent

Similar shapes and colours make this image feel more coherent

4. Balance and Rhythm

Balance is pretty much as it says, the idea here is to try and arrange the elements in your scene so that the image is symmetrical. This can be done using lines and shapes. The ideas is to create a sense of equality in the scene. Rhythm is similar in a sense, but is about a repeating pattern in the scene. These are a little more difficult to find, but often a close up or abstract image can showcase this technique well.

The centred composition of this image of a theatre shows the balance in the scene

The centred composition of this image of a theatre shows the balance in the scene

The curved shapes of the glass buildings gives a great sense of rhythm

The repeated curved shapes of the glass buildings gives a great sense of rhythm

5. Space

Open, or negative space, in your image is sometimes as important as the subject. Negative space gives your subject context, and shows the viewer where or how your subject relates to its surroundings. Quite often, negative space is the sky. It can be tempting to ignore this one, but if it’s used correctly, this can be a very powerful compositional tool.

The texture in the clouds in give this image some gravity. If the sky were simply blue, it would not be as impactful

The texture in the clouds in give this image some gravity. If the sky were simply blue, it would not be as impactful

6. Breaking the Rules

Now that you have some new ideas about how to make better compositions. Knowing these techniques will certainly improve some of your images, but also, knowing how to break them is just as important. In some cases, it will be obvious which technique to use, in others, you may find that putting your subject in the middle of your frame works best. You need to decide what will work for your image. Try techniques like this and see if one works. If not, break the rules and do what you think looks good.

By cropping the building quite aggressively, the image seems unfinished, but the colours and the sky make it work

By cropping the building quite aggressively, the image seems unfinished, but the colours and the sky make it work

googletag.cmd.push(function() {
tablet_slots.push( googletag.defineSlot( “/1005424/_dPSv4_tab-all-article-bottom_(300×250)”, [300, 250], “pb-ad-78623” ).addService( googletag.pubads() ) ); } );

googletag.cmd.push(function() {
mobile_slots.push( googletag.defineSlot( “/1005424/_dPSv4_mob-all-article-bottom_(300×250)”, [300, 250], “pb-ad-78158” ).addService( googletag.pubads() ) ); } );

The post 6 Advanced Composition Techniques to Improve Your Photos by Barry J Brady appeared first on Digital Photography School.


Digital Photography School

 
Comments Off on 6 Advanced Composition Techniques to Improve Your Photos

Posted in Photography


Adobe Portfolio brings customizable personal websites to Creative Cloud

27 Jan

Adobe has introduced Adobe Portfolio, a website creation platform similar to Squarespace. Part of Creative Cloud, Adobe Portfolio is offered under three subscription tiers and aims to provide creatives and professionals with a simple way to showcase their work online.

The Adobe Portfolio service offers pre-made layouts, as well as customization options for website elements like the header, logo, navigation, background and footer. The designs are responsive, able to scale for various screen sizes and there’s an option for a personalized website URL. Features include galleries for showcasing content, password-protected pages and website analytics. Subscribers can also integrate a Behance account with Portfolio for seamless content syncing.

Adobe Portfolio is available to individuals under three Creative Cloud pricing tiers: $ 9.99 USD/month with included access to Photoshop CC and Lightroom CC, $ 19.99 USD/month with access to 20GB of cloud storage and one desktop app and $ 49.99 USD/month with access to all Adobe creative apps.

Via: Adobe Blog

Articles: Digital Photography Review (dpreview.com)

 
Comments Off on Adobe Portfolio brings customizable personal websites to Creative Cloud

Posted in Uncategorized


Let’s Get Up Close with Extension Tubes

26 Jan

If you want to get up close to your subject, closer than you can by setting your lens to its minimum focusing distance, then extension tubes are an excellent way of doing so.

Extension tubes and close-up photography

When you turn the focusing ring of your lens away from infinity, the front element moves out from the lens body. The distance between the front element and the sensor (or film) plane is called extension. When your lens is set to its minimum focusing distance, the front element can move no further forward. You have reached the limit of the lens’s design.

An extension tube is a hollow tube that fits between your lens and camera body. It moves the lens further away, increasing the extension of the front element. In turn, this lets you move the lens closer to the subject, increasing magnification, and in some cases even matching the 1:1 magnification of a true macro lens.

This is the Fujifilm MC-EX 16 extension tube that I use. The electrical contacts, that allow the lens and camera body to communicate, are visible at the back (more on the importance of this later).

Extension tubes and close-up photography

This is the Fujinon 35mm f/1.4 lens mounted to an X-Pro 1 camera. The distance between the front lens element and the sensor plane is the extension. This figure helps determine the closest point the lens can focus on (in this case 28cm), and subsequently the magnification.

Extension tubes and close-up photography

Below is the same lens with the MC-EX 16 extension tube added. You can see that the front element of the lens is now 16mm further away from the sensor plane. Now the lens can focus on a much closer point.

Extension tubes and close-up photography

Extension tubes versus macro lenses

Extension tubes are a great tool, but for the best possible optical quality and the most versatility you should choose a macro lens if you can. The reason for this is that increasing the extension of a non-macro lens means that you are using it outside the limits it is designed to work within. Macro lenses, on the other hand, are designed to give their peak optical performance at close focusing distances. They can also focus at infinity – whereas a lens fitted with an extension tube cannot.

The main benefit of extension tubes is that they are small and light. You can carry them around in case you need them, and leave your macro lens (if you have one) at home. They are ideal for anybody who travels a lot, or who wants to keep the weight of their camera bag down.

Cheap extension tubes versus good quality ones

You can buy inexpensive extension tubes from Amazon or eBay. These may look like a great deal but they break the electrical connection between your camera and the lens. If your lens has an electronically controlled aperture that means, you can’t stop the lens down. The camera also can’t record the aperture setting in the EXIF data.

Your camera will still work, and meter the subject to give you the correct exposure. But, given that depth of field at the widest aperture is incredibly narrow, and that you need to stop down to improve image quality, these cheap extension tubes are not of much practical use. They are only useful if you have a lens with a manual aperture ring.

The best ones to buy are those made by your camera manufacturer, or by a third party like Kenko or Vivitar, who make extension tubes that maintain the electronic connection between lens and camera. There is usually a choice of two sizes. The widest will get you closer, and the narrowest will come in useful when you don’t need to be quite so close. You may want to start off buying one or the other, but will probably end up buying both to cope with different situations.

Extension tubes and magnification

Extension tubes are most effective when used with lenses of focal lengths between 24-100mm. They are not so effective when used with telephoto lenses (for these, use a close-up lens). You can’t use an extension tube with some wide-angle lenses as it becomes impossible to focus with it fitted.

To see how much magnification an extension tube will give you with a specific lens, check the specifications on B&H Photo Video (United States) or Wex Photographic (UK). You may also be able to find the information on the manufacturer’s website. The instruction sheet that comes with the extension tubes also has this information, and you may be able to find a copy online.

There’s an easy formula for calculating how much extra magnification an extension tube will give you:

Increase in magnification = extension distance/lens focal length

For example, my Fujinon 35mm f1.4 lens has a magnification of 0.17x at its closest focusing distance of 28cm (I found this information in the spec sheet). Adding a 16mm extension tube means the increase in magnification is 0.45 (16/35), giving a total of 0.62x (0.45 + 0.17). This figure is a little academic, but it’s useful for evaluating whether you can add an extension tube to your lens and reach the 1:1 (1x) magnification, offered by most macro lenses.

Extension tubes in action

These photos show you how much difference an extension tube can make.

Extension tubes and close-up photography

This first image was taken with my 35mm lens. This is the closest I could get to the flowers.

Extension tubes and close-up photography

This was taken with the 35mm lens plus 16mm extension tube. Look at the difference.

Extension tubes and close-up photography

This photo was taken with a Canon 85mm lens fitted with a 12mm extension tube.

Extension tubes and close-up photography

This was taken with the same lens fitted with a 25mm extension tube. It shows the huge difference a different sized tube makes to the magnification.

Your turn

Do you own an extension tube? Which ones do you have and how useful are they? Let us know in the comments, it will be useful for other readers who are thinking about buying some.


Mastering PhotographyMastering Photography ebook by Andrew S. Gibson

My ebook Mastering Photography: A Beginner’s Guide to Using Digital Cameras teaches you how to take your camera off automatic so you can take control and start creating the photos you see in your mind’s eye. Click the link to learn more or buy.

googletag.cmd.push(function() {
tablet_slots.push( googletag.defineSlot( “/1005424/_dPSv4_tab-all-article-bottom_(300×250)”, [300, 250], “pb-ad-78623” ).addService( googletag.pubads() ) ); } );

googletag.cmd.push(function() {
mobile_slots.push( googletag.defineSlot( “/1005424/_dPSv4_mob-all-article-bottom_(300×250)”, [300, 250], “pb-ad-78158” ).addService( googletag.pubads() ) ); } );

The post Let’s Get Up Close with Extension Tubes by Andrew S. Gibson appeared first on Digital Photography School.


Digital Photography School

 
Comments Off on Let’s Get Up Close with Extension Tubes

Posted in Photography


The Long Night: Tim Matsui on creating social change through stories

26 Jan

Award-winning and Emmy-nominated visual journalist and filmmaker Tim Matsui used to view stories as a means of having experiences. Now, he sees them as a means of creating change, engaging audiences and helping them see that they can make a difference. In this PIX 2015 video, Matsui speaks on The Long Night, his documentary on human trafficking, and how he leveraged grassroots distribution to effect social change.

Matsui’s insistence on grassroots distribution stems from the difficulty he found in getting sponsorships to fund creation of the project and get the final film in front of audiences. ‘This is a difficult subject,’ Matsui says. ‘Brands don’t want to touch it. It’s a little too dark. This pisses me off.’

After exhausting his grant money, leveraging his own savings and going into debt just to get the filming done, Matsui explored every avenue he could find to take his film to his audience. He explored social media, Kickstarter, mainstream media like TIME Lightbox and the Huffington Post, and GATHR, a crowdsourcing platform for bringing small productions into mainstream movie theaters.

To be successful in creating change, ‘don’t make them come to you,’ he says about his audiences. ‘Go to them.’

Articles: Digital Photography Review (dpreview.com)

 
Comments Off on The Long Night: Tim Matsui on creating social change through stories

Posted in Uncategorized


How to Create Bokeh In-camera and Using Photoshop

26 Jan
Title-Emmet-with-Bokeh

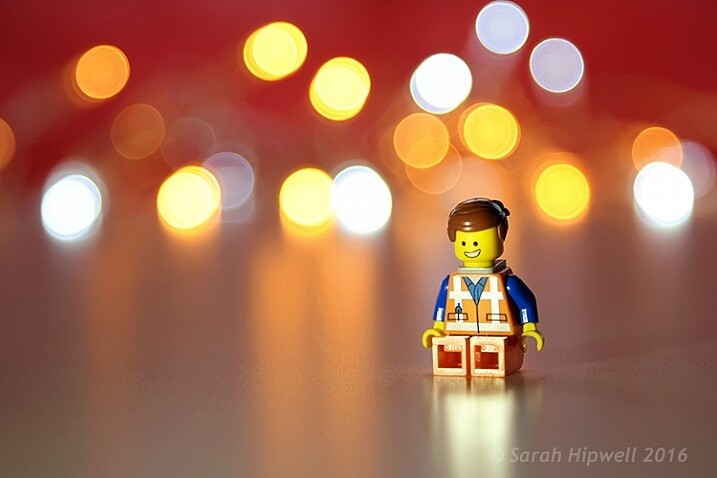
Emmet with background bokeh from small LED lights.

As the holidays are over, I couldn’t resist taking a classic bokeh shot before putting away the lights and decorations for another year.

In this article I’ll show you how you can create this effect in-camera in your own living room. Plus I’ll show you how easy it is to create a bokeh effect using Photoshop as well.

What is Bokeh?

Bokeh comes from the Japanese word boke, which means blur or haze, or the phrase boke-aji which is the blur quality. It isn’t just that any blur will do. It’s more to do with an aesthetic quality of the blur.

What does Bokeh look like?

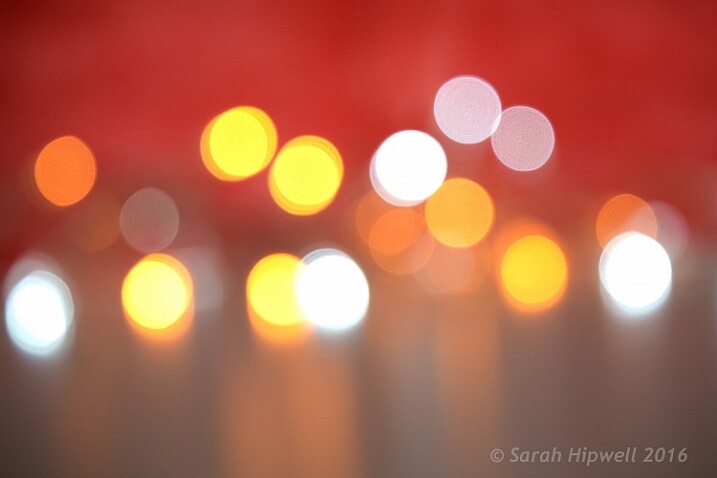
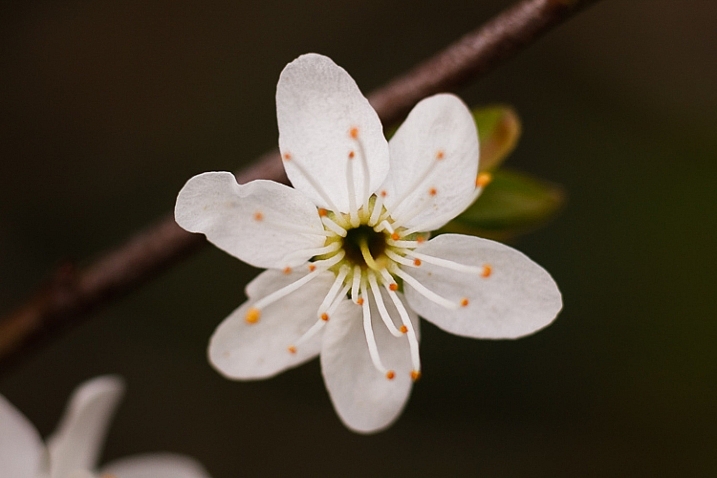
The easiest way to see the shape of the bokeh is by taking a photo with small lights in the background, thrown way out of focus (see second image below).

Small-LED-lights-with-window-in-background

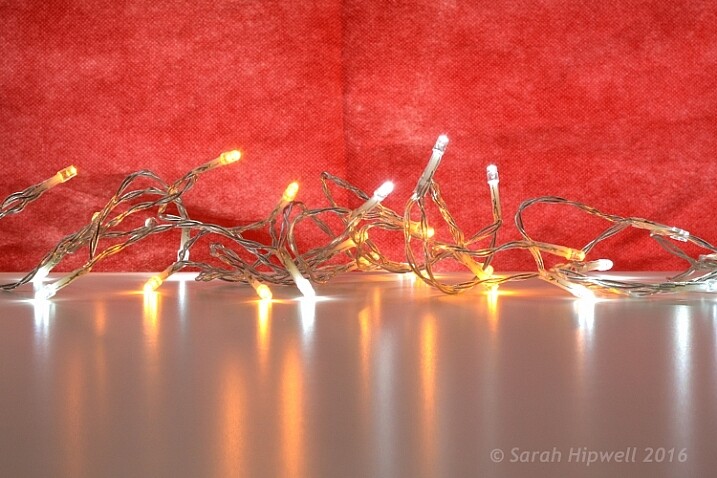
Small LED Lights placed in front of a big window with red see through fabric.

Bokeh-effect-using-aperture-f4

Bokeh effect created in-camera using an aperture of f/4, with a 120mm focal length lens.

Is shallow Depth of Field (DOF) the same as bokeh?

No, but it is important to understand DOF and how it can play an important aspect in creating a bokeh effect. Depth of field (DOF) is the area of your image that is in focus.

Shallow depth of field refers to the object or subject being in focus, but the areas in front, and especially in the background, are blurred. Whereas bokeh is the term that refers to the aspect of light sources that are blurred in the background or foreground.

When discussing DOF, we need to take into consideration three other factors:

  • Aperture size
  • Distance from the lens
  • Focal length of the lens

In practice, photographers who shoot portraits, will in general, use long focal lengths and a wide aperture setting (f/2.8-f/5.6). For example, when you are shooting outdoors with your model, and you don’t want the background in focus. Street lights, or interior building lights, can be used effectively for creating bokeh in the background of your subject.

Aperture

Bokeh is affected by the shape of the diaphragm blades (the aperture) of the lens. A lens with more circular shaped blades will have rounder, softer circles, of out-of-focus highlights. Whereas a lens with an aperture that is more hexagonal in shape, will reflect that shape in the highlights. Generally speaking, the faster the lens, the better the bokeh.

In the following animated gif, you can see that the wider the aperture (the lower the f-number), the shallower your depth of field. The lowest aperture setting on my lens is f/4 but I zoomed out to its maximum focal length of 120mm.

Aperture-animation

Animated gif illustrating the different apertures and how they deal with the lights in the background being thrown out-of-focus.

Create your own bokeh

This setup is really easy to try at home. Use whatever lens you have. Set your DSLR camera to Aperture priority or Manual mode ,and use a tripod. I used small LED christmas lights that were battery operated.

Small-LED-lights

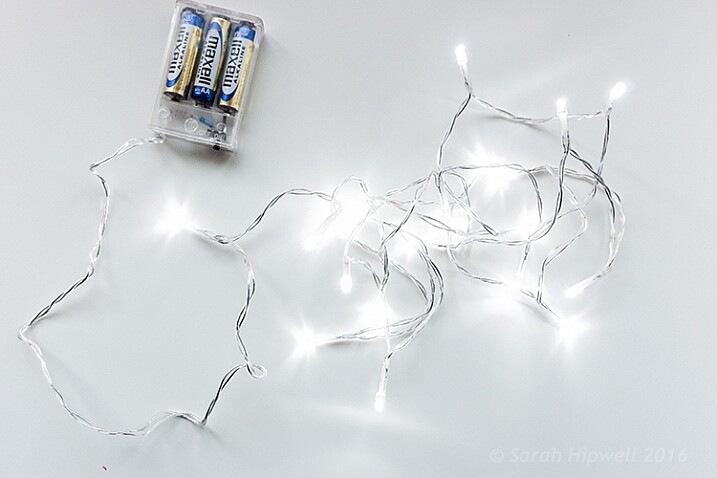
Small battery operated LED lights.

Place your object a good distance away from the camera, and in front of the lights. The distance will vary depending on the lens (focal length) that you are using, so it will be trial and error exercise. Your object must be as near as possible to the camera lens.

Begin with the widest aperture on your lens. The objective is to get the circles of light as round, and as smooth as you can. You may need to experiment by moving the object further away from the lights.
The lighting I used for this setup was a big window light and a small small LED light on Emmet.

Lighting-setup-to-create-Bokeh-in-your-own-home

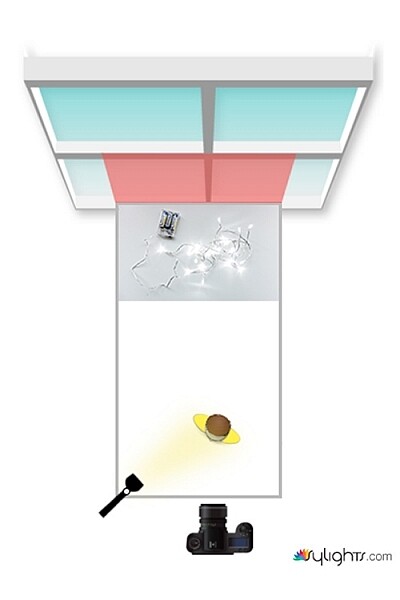
Lighting diagram to show the setup for doing bokeh shots in your own home.

Creating bokeh in Photoshop

Once I got my shot in-camera, I then decided to see if I could create a great bokeh effect in Photoshop.

In the Filter Gallery, under Blur is a fantastic option called Field Blur, which has a dedicated Bokeh feature. I took a few random close-up shots of my christmas tree. I focused only on the lights.

Christmas-tree-with-lights

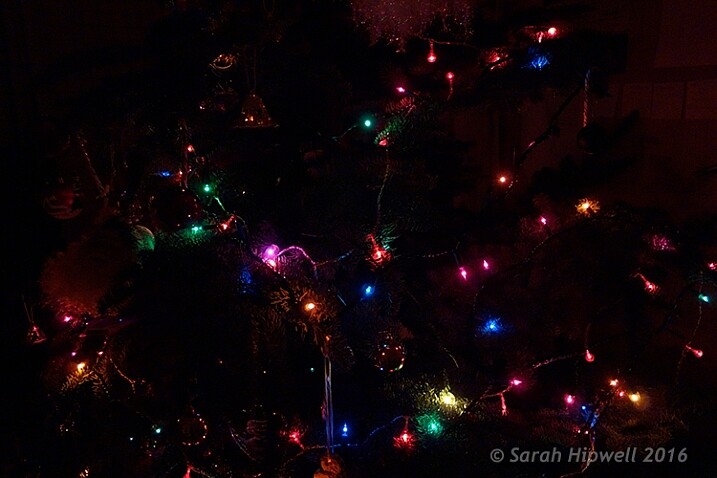
Random shot of a christmas tree with lights.

Next, I brought it into Photoshop (CS6). I used the image straight out of camera (SOOC), I didn’t do any other post-processing. Go to Filter > Blur > Field Blur.

Filter-Blur-Field-Blur

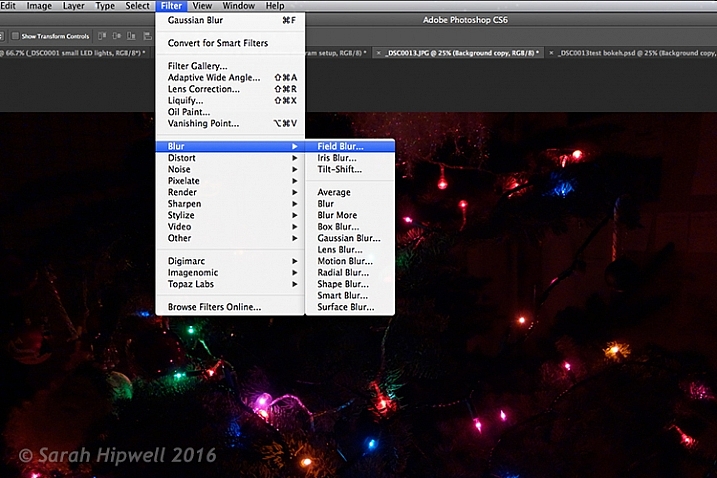
The Field Blur in the Filter Gallery in Photoshop has its own bokeh feature.

Two panels appear on the right: Blur Tools and Blur Effects. Under Blur Tools, enter 200 px in the Field Blur option. Under Blur Effects, move the Light Bokeh slider to 57%, and the Bokeh Color slider to 78%. Then press the OK button. It takes a few seconds for the blur to take place. Et voilà!

Field-Blur-dialog-options

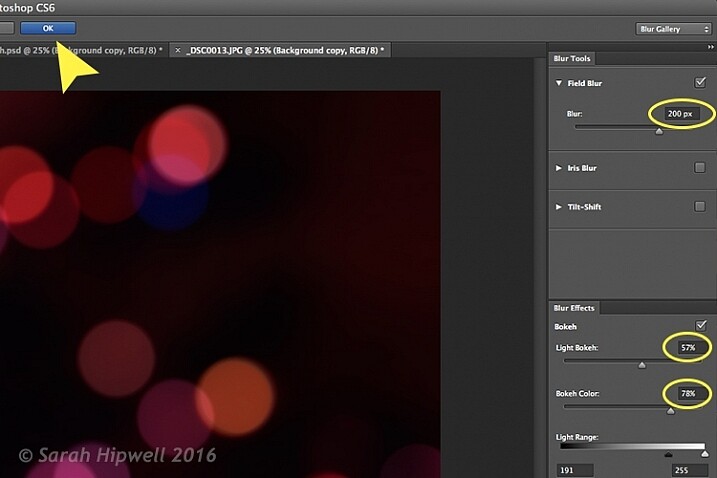
You can experiment with the input figures for the Blur and Blur Effects to get the desired bokeh. I chose these.

Bokeh-from-christmas-tree-lights

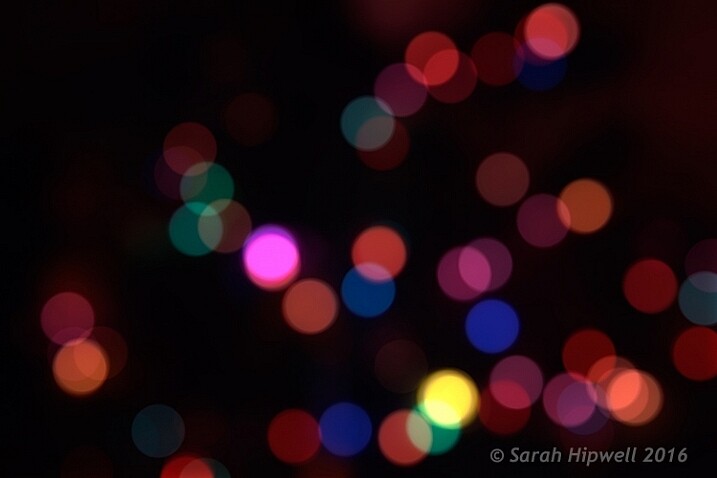
Bokeh effect created in Photoshop using the Field Blur.

Okay, so now what do you do with the image? Use it as a background. I shot a series of playing cards images against a black background.

Playing-cards

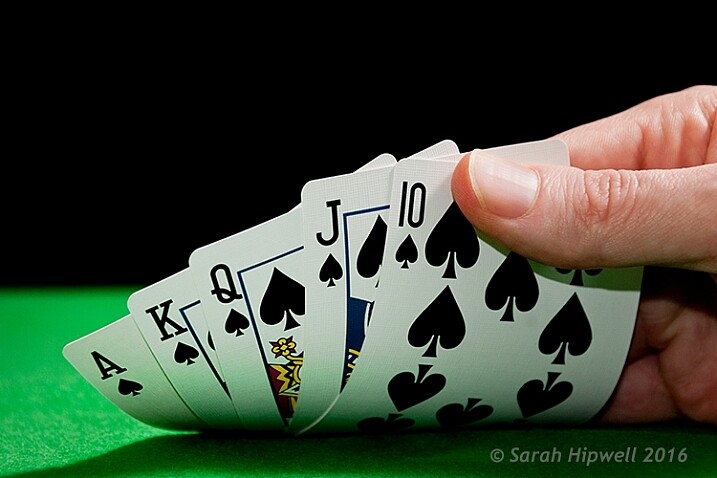
One of a series of images I shot against a plain black background.

This is where the power of Blending Modes and Layer Masks comes into their own.

By placing the bokeh image on its own layer. I duplicated it to make another copy. Then I reduced the size of the original and moved this over to the left side of the image. I changed the Blend Mode to Screen and reduced the Opacity. I wanted the lights to appear further away from the playing cards, to give it a better depth of field. The screen blend option eliminates the dark areas and makes the light areas show through, making the bokeh appear.

For the copy layer, I left the size as it was and moved it over to the right. I increased the brightness by using a Levels Adjustment layer to match the light source. I also changed the Blend Mode of this layer to Screen. Lastly, I masked out any hard lines using Layer Masks.

Playing-cards-with-bokeh-background

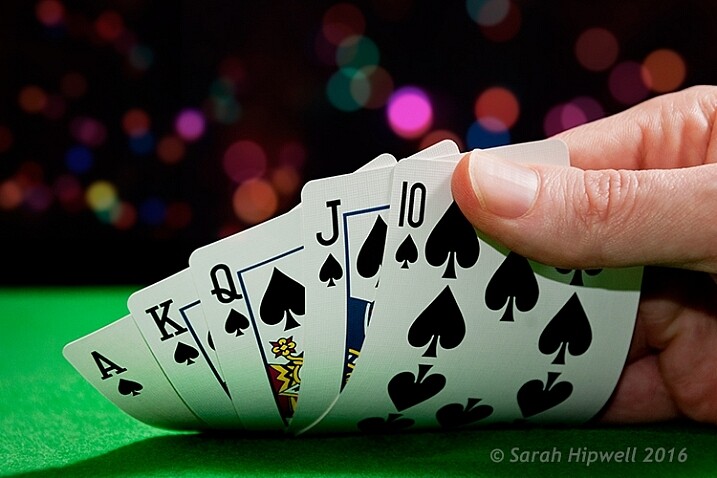
Bokeh effect created in Photoshop and then applied to a background in this image.

I was well pleased with the result.

Now it’s your turn. Let’s see your images with “Bokeh-licious” images posted below.

googletag.cmd.push(function() {
tablet_slots.push( googletag.defineSlot( “/1005424/_dPSv4_tab-all-article-bottom_(300×250)”, [300, 250], “pb-ad-78623” ).addService( googletag.pubads() ) ); } );

googletag.cmd.push(function() {
mobile_slots.push( googletag.defineSlot( “/1005424/_dPSv4_mob-all-article-bottom_(300×250)”, [300, 250], “pb-ad-78158” ).addService( googletag.pubads() ) ); } );

The post How to Create Bokeh In-camera and Using Photoshop by Sarah Hipwell appeared first on Digital Photography School.


Digital Photography School

 
Comments Off on How to Create Bokeh In-camera and Using Photoshop

Posted in Photography