RSS
 

Archive for January, 2016

Hands-on with the Nikon D5

13 Jan

Hands-on with the Nikon D5

Back in November Nikon teased us by announcing that a new D5 DSLR flagship camera was in development. Fortunately, we didn’t have to wait long for ‘development’ to turn into ‘product.’ At CES 2016 we got the chance to meet the D5, up close and personal.

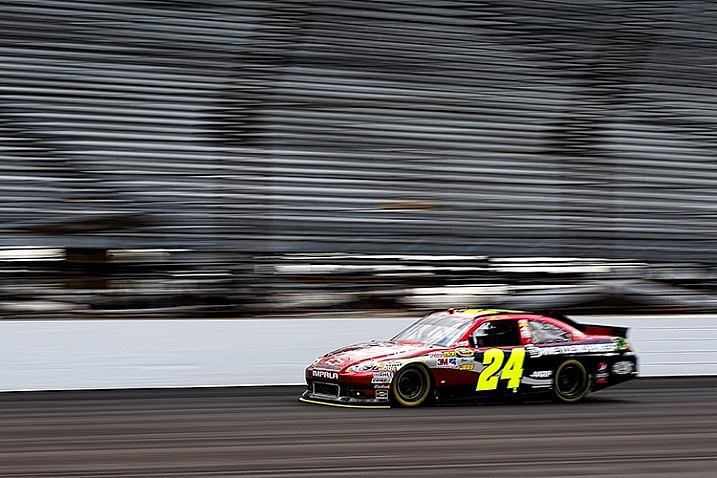
At its core is a brand new 20.8MP FX-Format CMOS Sensor and Nikon’s EXPEED 5 image processor. It uses a new autofocus system with 153 AF points, 99 of which are cross-sensor. Compared to the D4s, those AF points are spread out to cover a greater portion of the frame. The D5 also features updated AF algorithms. In terms of speed, it is capable of 12 fps bursts with AF and 14 fps with the mirror locked-up.

The new AF system, coupled with the camera’s 180k-pixel RGB metering sensor, should also result in improved subject tracking capabilities. The metering sensor has doubled in resolution compared to the 91k-pixel sensor in the D4s. The D5 is also capable of 4K UHD video capture (albeit with a 3 minute limit and a nearly 1.5x crop factor).

As you would expect, the D5 feels like a brick in your hand. Maybe two bricks, actually. That’s not a complaint. It’s what we’ve come to expect from Nikon’s flagship cameras.

Hands-on with the Nikon D5

The D5 looks very similar to its predecessor, the D4s. In fact, in terms of their dimensions, the two cameras are exactly the same. Don’t be fooled by the familiar looks, though, the D5 is an entirely different camera beneath its magnesium alloy body.

For one, it is now capable of native ISOs ranging from 100-102,400 and expandable from ISO 50-3,280,000, (the upper ISO is Hi-5). We shot a couple images at ISO 102,400 using the D5 on display in Nikon’s booth at CES. And though we were unable to take the images with us to download and inspect closer, our initial impressions of the highest native ISO offered on the D5 are positive.

Hands-on with the Nikon D5

In-hand, the D5 feels exactly like a professional camera should; it is well-weighted and offers plenty of grip to wrap your hands around, with ample control points. Three of those points are custom function buttons that can be set to one of numerous functions by the user (a few other buttons remain re-assignable as well). And like Nikon’s flagship cameras before it, the D5 has a built-in vertical grip with a dedicated shutter and dual control dials.

Because this camera is designed for use by the world’s top photojournalist and sports photographers, in what could often be less-than-deal conditions, it is built extremely tough. The entire body is constructed from magnesium alloy and it is fully weather-sealed. The shutter is also rated to 400,000 actuations.

Hands-on with the Nikon D5

The 3.2-inch 2.36 million-dot LCD is a serious upgrade over previous models and other cameras typically sporting a 1.2 million-dot LCD. Images on it look really crisp. The LCD is also touch-sensitive, though according to Nikon PR, it can not be used to select AF points when shooting stills using the optical viewfinder (a feature available on both the D5500 and now the D500). We were told that the D5’s touch capabilities are largely gear toward video shooting.

A new, programmable Fn-3 button has been added to the back of the camera, where the info button previously was on the D4s. Aside from that change, the back of the D5 is largely the same as the D4s, which is a good thing. The AF sub-selector joystick remains in the same exact spot (right below the AF-On button). In use we’ve found the sub-selector to be the most efficient way to select an AF point, compared to using the somewhat slower-to-use D-pad. And we are happy to see the sub-selector also make its way to the Nikon D500.

One design tweak that may go unnoticed can be found in the area around the viewfinder: it is now removable. Simply slide it up. Nikon engineered the camera this way to make it easier to attach a rain hood. According to Nikon PR, the company is currently developing a hood specifically for the D5, which will likely be announced in the coming months. 

Hands-on with the Nikon D5

It’s nice to see the ISO button move to a more logical spot, right by the shutter, on top of the camera. Previously, many photographers would remap the movie record button to ISO, but the presence of a dedicated ISO button will be a boon for one-handed operation.

The mode button has also moved (to make way for the ISO button) to the top left. The video record button has also migrated a bit further out on the grip, making it easier to hit with your shutter finger while your eye is to the finder. 

Hands-on with the Nikon D5

The D5 comes in two flavors, either with dual CF or dual XQD slots. For those seeking to make the most of the D5’s speed capabilities, the XQD version is going to be the better option – we’ve heard reports that with fast XQD cards, the camera will really take 200 Raw shots before slowing down its shooting speed. Still, many shooters, especially pros, have invested heavily in CF, and it is nice to see Nikon continuing to support CF in its higher-end offerings.

Users also have three different size options for saving raw files. Raw sizes medium and small result in 12-bit lossless compress NEF files, while full size Raw images can be shot in up to 14-bit lossless uncompressed NEF files. We’ll be curious to check if bit-rate drops at the highest shooting speeds: for example, we found 6fps on the D7200 to cause a small loss in dynamic range due to 12-bit readout.

As with all dual slot Nikon DSLRs, users can elect to shoot Raw+JPEG and have their Raw files save to a separate card from their JPEG files (or not).

Hands-on with the Nikon D5

The D5 gains an additional Function button on the front of the body (to the left of the lens mount) compared to its predecessor, the D4s. In hand, we found the new Fn-2 button to be very easy access whether you are gripping the camera vertically or horizontally. This addition of this button makes more customizable one of the most customizable DSLRs in the industry.

Speaking of the gripping the camera, the D5 is extremely comfortable to hold: the the grip is quite large, and very deep. With a camera this size, a solid grip is paramount to the overall ergonomics of the camera. 

Hands-on with the Nikon D5

There are plenty of ports on the D5, including a Nikon 10-pin, USB 3.0, 1/8″ headphone, 1/8″ microphone, HDMI C and LAN ports. 4K video can be outputted over HDMI, which is one way around the 3 minute time limit for internal 4K capture. That said, at this time, we do not know how good the signal being sent is – particularly whether or not the video is truly sampled at 8 or 10 bits per color channel.

Hands-on with the Nikon D5

Here you can see all of the ports, once the rubber seals have been pulled back. USB 3.0 is a bump up from the USB 2.0 port on the D4s. Wi-Fi functionality can be added to the D5 via WT-5A and WT-4A Wireless Transmitters.

Hands-on with the Nikon D5

Compared to a (relatively) normal-sized head, the D5 is enormous. Then again, when it comes to this class of camera, the large size is expected. Here you can see just how easy it is to access that new Fn-2 button with the camera held vertically.

Hands-on with the Nikon D5

The D5 uses the same EN-EL18a battery as its predecessor. It is CIPA rated to last 3780 shots per charge, meaning you likely won’t be reaching into your bag often for an extra battery. From our experience, that should be more than enough shots to get most users through a full day of shooting, and then some.

Articles: Digital Photography Review (dpreview.com)

 
Comments Off on Hands-on with the Nikon D5

Posted in Uncategorized


ZY Optics unveils new Lens Turbo adapters for Micro Four Thirds cameras

13 Jan

Chinese lens maker Zhongyi Optics has added M42, Canon FD and Minolta MD lens adapters to its second-generation Lens Turbo lineup for Micro Four Thirds cameras. Like Metabones’ Speedboosters, the adapters shorten the effective focal length, increasing the F-number by one stop and partially negating the crop factor. The 0.726x focal length reduction combines to give a net 1.45x focal length crop, rather than the 2x crop that you’d usually experience on a Micro Four Thirds camera.

These three adapters join ZY Optics’ existing Lens Turbo Version II adapters for Canon EF and Nikon G lenses. Among the adapters’ four optical elements is an extra-low dispersion element, and all three offer stainless steel mounts and metal bodies.

All three adapters are available directly from ZY Optics for $ 149 USD.

Articles: Digital Photography Review (dpreview.com)

 
Comments Off on ZY Optics unveils new Lens Turbo adapters for Micro Four Thirds cameras

Posted in Uncategorized


DxOMark Mobile report: BlackBerry Priv

13 Jan

The Blackberry Priv combines Google’s Android operating system with BlackBerry’s security features and a slider form factor with hardware qwerty-keyboard. In the camera module an 18MP sensor works together with a Schneider Kreuznach designed lens and optical image stabilization. The camera is capable of recording 4K video and there is also a dual-tone LED flash. DxOMark recently published its test results, placing the BlackBerry Priv into a joint eleventh place in its smartphone rankings, on the same level as Apple’s iPhone 6s.

Articles: Digital Photography Review (dpreview.com)

 
Comments Off on DxOMark Mobile report: BlackBerry Priv

Posted in Uncategorized


Do This Before You Upgrade a Lens for Your New Camera

13 Jan

new-camera-tips-5

So, you just got a new camera! Congratulations! You’re in the right place, DPS is absolutely full of amazing tutorials that will help get you started, and point you in the right direction. As for me, if there’s one thing that I could say to someone who has just purchased, or received a new camera, this is it:

If this is your first DSRL or mirrorless camera with interchangeable lenses, don’t buy any new lenses or gear for at least a month.

I know, I know. You’ve probably heard that the kit lens is terrible. You’ve probably already been given a list of things that are “must-buys” in order to take amazing photos. You may have even tested out your brand new camera, and been disappointed that your images don’t quite look like you’d hoped they would after you upgraded.

I understand, because I’ve been there. However, waiting to upgrade for at least a few months (get that you need like batteries and memory cards, but hold off on any major purchases like lenses) may actually benefit your photography in the long run. To explain why, let me tell you a little about me and my story.

New-Camera-Tips-1

I received my first DSLR, a Canon Rebel XS, in 2009. I’d done black and white film photography for years, so photography itself wasn’t new to me, but my old fully manual Pentax camera didn’t have things like white balance, or the ability to choose metering modes, and neither did my point-and-shoot digital camera at the time (at least not that I knew of), so there was definitely a big learning curve for me as I transitioned to a digital SLR.

The image above was one of the first that I took with my new camera, and I remember being so frustrated. I hated how yellow it was. I hated the fact that it didn’t really look any better than the images I took with my point-and-shoot camera, and it might have even looked worse! It didn’t take much complaining on my end before well-meaning friends and family members started suggesting different lenses, flashes, and other gear that would help me achieve the look that I was hoping to achieve.

Although I was confident that I’d need to upgrade lenses if I wanted to take my photography to a new level, my husband and I were still pretty newly married and money was tight, so I just kept on with my Rebel XS and Kit lens. I was really frustrated about not being able to upgrade at the time, but the truth was that I didn’t need a lot of new gear, I really just needed to learn how to utilize the gear that I already had.

new-Camera-Tips3

I was pretty sure that I was more interested in photographing landscapes and abstract items than I was photographing people. So, I’d take my camera to work with me and go on photo walks during lunch breaks, taking photos of whatever was around. I discovered how white balance worked, and started to chip away at learning a little more about how my camera functioned. The images still weren’t perfect, as you can see by the examples above and below, but I felt like I was making progress in terms of the overall aesthetic of the photos, and I was really starting to have fun. I was still itching to upgrade, but am forever grateful that we just couldn’t afford it at the time, because it turned out that the type of photography that I thought I was interested in, wasn’t actually my passion after all.

New-Camera-Tips-2

Over the course of the next year, I started taking photos of my nieces and nephew just for fun, and much to my surprise, discovered that I loved taking candid photos of kids. I had experience with portrait photography in high school and college, but thought I didn’t like it. As it turns out, most of my portrait experience had been in a studio setting with a professor who was very, very passionate about Rembrandt Lighting. I didn’t enjoy that kind of photography, but I discovered that I loved sitting in the grass in the backyard, and taking photos as my nieces and nephew played. I loved taking pictures while singing funny songs, and telling little jokes to see if I could make them laugh. Around the same time, I took a few senior portraits for some family friends, and discovered that it wasn’t just kids I enjoyed photographing. I loved taking pictures of people, and I especially loved taking portraits of people.

I also really loved portraits that had a nice blurry background, which was hard (but not impossible) to achieve with my kit lens. I began to look into how I could achieve that effect more easily, and quickly came across Canon’s Nifty Fifty Lens (50mm f/1.8). I purchased that lens shortly before my first daughter was born. It stayed pretty permanently attached to my camera body for the next several years.

New-Camera-Tips-4

My love for portraits has only intensified, and though I have made a number of upgrades to my gear since 2010, I’m glad that it took me about a year to make my first purchase. Being forced to wait allowed me time to discover which type of photography I was really interested in. Had I upgraded right away, I probably would have purchased a lens that would be collecting dust in the back of my closet, because I would have gotten something targeted towards landscapes or macro, rather than something more appropriate for portraits. It’s not the end of the world to own a lens that you don’t use all that often, but it’s also something that can be avoided with just a little patience!

new-camera-tips-6

Waiting to upgrade also forced me to really learn to use the camera that I had, which was actually a great camera, kit lens and all! Still need a little extra convincing that the kit lens isn’t terrible? Check out this Flickr Group called Kit Lens Losers. There are some incredible images in there, all taken with the standard kit lens. You CAN take great images, right out of the box. I promise.

When it did finally come time to upgrade to a new lens, I did so knowing that the upgrade was necessary in order to achieve something (better bokeh and the ability to shoot wide open), that my previous setup limited. The lens was important in helping me achieve the aesthetic that I like in photography, but it was only one piece of the puzzle. Learning about white balance, metering modes, shooting in RAW, and a whole slew of other camera settings were just as important as a new lens in terms of the overall affect on my photography.

I’m not saying that you need to have a perfect understanding of your camera before you upgrade, but I firmly believe that we’re never done learning when it comes to photography. What I am suggesting is that if you spend some time really getting to know your camera and what it is capable of before you upgrade, you’ll be able to ensure that you’re spending your money intentionally, in ways that will allow you to continue to grow in your photography – and that’s always a good thing.

new-camera-tips-7

Have you upgraded you gear? If so, what was your first purchase? If you haven’t, please share what has made you decide to wait.

googletag.cmd.push(function() {
tablet_slots.push( googletag.defineSlot( “/1005424/_dPSv4_tab-all-article-bottom_(300×250)”, [300, 250], “pb-ad-78623” ).addService( googletag.pubads() ) ); } );

googletag.cmd.push(function() {
mobile_slots.push( googletag.defineSlot( “/1005424/_dPSv4_mob-all-article-bottom_(300×250)”, [300, 250], “pb-ad-78158” ).addService( googletag.pubads() ) ); } );

The post Do This Before You Upgrade a Lens for Your New Camera by Meredith Clark appeared first on Digital Photography School.


Digital Photography School

 
Comments Off on Do This Before You Upgrade a Lens for Your New Camera

Posted in Photography


Under Cover: Secret Swiss Military Bunkers Hide in Plain Sight

13 Jan

[ By WebUrbanist in Travel & Urban Exploration. ]

swiss bunker under cover

Throughout the rolling hills of rural Switzerland, tucked inside idyllic works of regional vernacular architecture, lie disguised fortifications of a country always ready for war. Some of these bunkers conceal gun caches, communications infrastructure and even anti-aircraft artillery.

swiss bunker camouflage

The camouflage is incredibly convincing: a worn wood-sided barn, countryside home with cracking paint or a cute small-town cottage could all house militarized surprises.

fake chalet window painted

The public is not privy to precise numbers, but estimates suggest the country contains 250 or more such structures variously disguised as buildings or parts of the natural landscape.

villa rose bunker

painted window

The Swiss are world-famous for their perpetual state of military preparedness, but few outsiders (as well as many citizens of Switzerland) are unaware just how much they are surrounded with infrastructure of war.

swiss bunker cannon

Christian Schwager’s relatively recent book on Fake Chalets helped make these buildings an open secret, in turn aiding preservation efforts for many of these facilities that no longer serve an official purpose.

fake chalets

Reporter Anneke Bokern has also delved into the history of these buildings, many of which date back to the 1930s and 40s: “Theatre painters were in charge of the paint jobs, supplying each bunker with a customised skin inspired by the local chalet style.”

fake chalet hillside military

fake chalet interior

“As the results prove, they went about their job with Swiss precision – although the bunkers only had to deceive at a minimum distance of 20 metres. They painted realistic window shutters, created perfect imitations of wood grain, and even took the position of the sun into consideration.”

Share on Facebook


[ By WebUrbanist in Travel & Urban Exploration. ]

[ WebUrbanist | Archives | Galleries | Privacy | TOS ]


WebUrbanist

 
Comments Off on Under Cover: Secret Swiss Military Bunkers Hide in Plain Sight

Posted in Creativity


A Beginner’s Guide to Choosing the Right Post-Production Software

12 Jan

When it comes to choosing your first piece of post-production software you may find yourself spinning in circles. There’s so much to choose from, and the whole idea of learning to do something new can be intimidating. This article will cover a number of the most well known software options available, and hopefully lead you towards the right decision for you.

Adobe Photoshop CC

Over the years no one has truly been able to displace Adobe’s dominance of the photography software market. Both Lightroom and Photoshop are hugely popular pieces of software and regarded as the go to platforms for professionals. Let’s break down both Lightroom and Photoshop individually to see what makes them so popular.

Adobe Lightroom

LR

Lightroom is the most popular tool available for post-processing your images. It can be used as an all-in-one solution for post-processing, image storage, and printing. Due to this all-in-one nature, Lightroom becomes a convenient and powerful option for both new photographers and pros alike.

One of the biggest differentiating factors of Lightroom verses other post-production tools is that it is widely supported by third party developers. What this means is that you can find a number of plugins for Lightroom that will allow you to extend your workflow beyond the core program. You’ll also be able to find a number of Lightroom presets, which can help you speed up your workflow by saving time for tedious edits. On top of that, sites like Smugmug and Zenfolio allow you to hook right into Lightroom, enabling you to share your photographs directly from your Lightroom catalog to your website.

Finally, due to the popularity of Lightroom, there is no shortage of support for you on the web. If you have a question about something related to processing an image with Lightroom look no further than YouTube or the many eBooks written on a number of different aspects of Lightroom’s features (including Loving Landscapes, a dPS ebook about processing your landscape images in Lightroom).

This whole package of features, extendibility, and resources, is why I’d suggest Lightroom as the first program for any new photographer looking to get into post-production. Not only are you getting a very capable program for editing and organizing your images, but you have the ability to extend the core features as your skills develop. You also have an endless supply of help from the many tutorials written on the platform over the years.

Adobe Photoshop

PS

Lightroom may be the best place to start as a new photographer, but Photoshop is a close second. The only reason I place Photoshop second on this list is due to its complexity. You still get the same great community of professional photographers, which enables you to learn more quickly, and you’ll still find a wealth of Photoshop Actions to help you speed up your workflow, but the learning curve for Photoshop is quite a bit more challenging than that of Lightroom, making it harder to recommend to a total beginner.

Adobe’s Creative Cloud platform is a subscription based model, which gives you access to both Photoshop and Lightroom for $ 10/month. The reason to pay the premium for Adobe’s products, over the ones I’ll list below, is not because they will perform better edits, but rather because of the way they integrate with other pieces of software, and the availability of tutorials on the web.

Open Source Options

If you’re not ready to invest money into your post-production workflow just yet, then these open source platforms are where I’d direct your attention.

GIMP

wilber_painterGIMP is the most well known Photoshop alternative out there. It has been around for years, works on both PC and Mac, and will provide you with many of the same tools that Photoshop offers. Being open source it doesn’t have the polish that Photoshop does, and won’t offer nearly as many third party options or tutorials. However, as a budget friendly way of processing your images, this is by far the best way to go.

Darktable

darktableDarktable is what I’d recommend if you’re looking for a RAW developer to substitute for Lightroom. Like GIMP, this is an open source option, which offers a number of features that will give you complete control of your images, and truly does compete with Lightroom in that area. Again where it’ll fall flat is that you’ll have less extendibility, and not as many resources to help you along the way. Note: Darktable does not work on Windows.

Other Tools

When it comes to post-production there are a number of what I’d call, supplemental tools available. These tools are designed to work in conjunction with Photoshop and/or Lightroom, and help you further refine your style as a photographer.

TopazLabs

logo_smallThe TopazLabs line of products includes 17 different pieces of software, each one specifically designed for its own unique purpose. These tools are designed to help you enhance and speed up your post-production workflow, but not necessarily replace Photoshop or Lightroom, although some of Topaz’s programs, like Impression and Texture Effects, do offer some standalone functionality that will let you create very different types of images.

Nik Softwarenik-logo

Like TopazLabs, Google’s Nik collection is a set of tools that will help you enhance and speed up your workflow. There aren’t as many different tools, and Google has a recent track record of killing off products that weren’t working for them without warning. But, the Nik collection is powerful, and will give you some great functionality beyond just Lightroom’s basic toolset.

Photomatix

photomatix
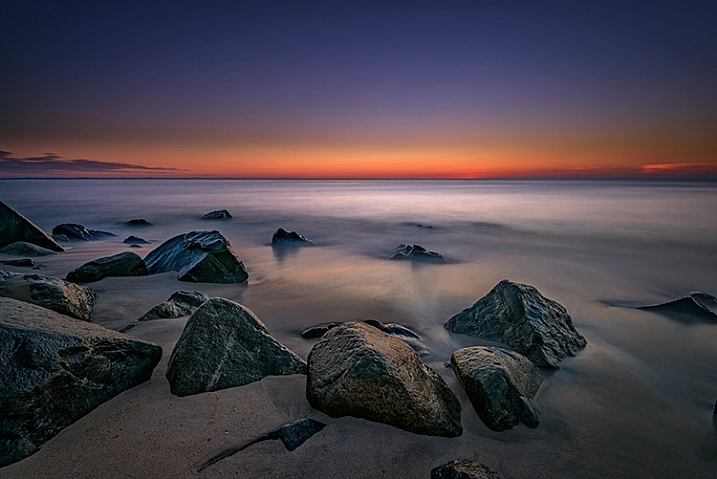
Photomatix has been the leader of the HDR post-production world for quite some time. Their product continues to produce some of the best controlled tone mapped images, and would be a great addition to your set of tools if you wanted to get deep into HDR photography.

Aurora HDR

aurorahdrAs an alternative to Photomatix, Aurora HDR is a newly released product from Macphun, in partnership with Trey Ratcliff. At the moment Aurora HDR is only for Mac and is an early stage product, so there’s bound to be some growing pains. That said, with backing from Trey Ratcliff, who’s made his name on HDR photography, this product could eventually get to where it wants to be – which is an all-in-one HDR tool, that doesn’t require Lightroom or Photoshop to produce images.

Not a beginner? What else would you recommend?

If your favorite piece of software didn’t make this list let us know why you like it, and why you’d recommend it over the others in the comments below.

googletag.cmd.push(function() {
tablet_slots.push( googletag.defineSlot( “/1005424/_dPSv4_tab-all-article-bottom_(300×250)”, [300, 250], “pb-ad-78623” ).addService( googletag.pubads() ) ); } );

googletag.cmd.push(function() {
mobile_slots.push( googletag.defineSlot( “/1005424/_dPSv4_mob-all-article-bottom_(300×250)”, [300, 250], “pb-ad-78158” ).addService( googletag.pubads() ) ); } );

The post A Beginner’s Guide to Choosing the Right Post-Production Software by John Davenport appeared first on Digital Photography School.


Digital Photography School

 
Comments Off on A Beginner’s Guide to Choosing the Right Post-Production Software

Posted in Photography


Crazy Combo Compositions: Photo Series Contrasts the Unexpected

12 Jan

[ By Steph in Art & Photography & Video. ]

Skiers land jumps on ice cream cones, construction equipment struggles to transport oversized hot dogs and jet-powered seagulls zoom through the sky in a series of surreal photographic collages by Stephen McMennamy. Creative director of the advertising agency BBDO, McMennamy takes original photos of everything from meatballs to hand grenades and puts them together in unexpected ways, calling the results ‘combophotos.’

combo photo 2

combo photo 3

combo photo 4

Inspired by the plethora of talent and creativity that can be found on Instagram, the photographer set out to pair things you’d never imagine together. Rather than seamlessly blending the photos in Photoshop so they appear to be a single composition, McMennamy simply matches up the contours of each subject, leaving behind the demarcation lines.

combo photo 5

combo photo 6

combo photo 7

This technique results in images that tell an entirely different story than each of the originals, turning what would be highly ordinary, stock-photo-type images into something else altogether. McMennamy’s curiosity was initially piqued by photo apps that let you layer photos into collage compositions, and then he tried connecting images for a more fluid effect.

Processed with VSCOcam with se3 preset

Processed with VSCOcam with se3 preset

combo photo 12

combo photo 13

“The whole thing is one big scavenger hunt,” says the artist. “Sometimes it’s as simple as playing with scale and other times there’s a more meaningful message being told, like the cigarettes and French fries image but for the most part it’s just visual fun, like a truck with skateboard wheels.”

Share on Facebook


[ By Steph in Art & Photography & Video. ]

[ WebUrbanist | Archives | Galleries | Privacy | TOS ]


WebUrbanist

 
Comments Off on Crazy Combo Compositions: Photo Series Contrasts the Unexpected

Posted in Creativity


Metz announces UK availability of new mecablitz 44 AF-2 flash/video light

12 Jan

German flash manufacturer Metz has said that the mecablitz 44 AF-2 flash unit that it announced at the end of last year will be available immediately in the UK at a price of £179.99. The gun is an update of the 44 AF-1, and brings with it compatibility with Fuji’s X-system and a built-in LED for videographers. 

Originally announced in November last year, the 44 AF-2 is designed for full frame and APS-C DSLRs, as well as a collection of mirrorless cameras. It has a maximum guide number of 44m / 144 ft at ISO 100 when used with a 105mm lens, and offers an automatic zoom head that covers angles for lenses from 24-105mm. A wide diffuser extends that coverage to 12mm. 

Metz has included a video light in the form of an LED that has an output of 100 Lux at one meter, and which can be controlled via four brightness levels. The LED can also be used as a modeling light to accompany the flash head. 

The flash can be integrated into the wireless flash control systems of Canon, Nikon, Panasonic, Olympus, Pentax, Sony and Samsung cameras, and is additionally compatible with Fuji and Leica cameras when mounted in the hotshoe. Depending on the model in use, the 44 AF-2 can be used as a commander in a wireless set-up, or only as a slave. 

In manual mode the gun has four output levels, and in all modes it can be triggered at the beginning or the end of the exposure. High speed modes allow synchronization with shutter speeds beyond the usual maximum sync speeds of the host camera. 

The gun is designed to be easy to use and sits slightly above the middle of the company’s AF range of hotshoe mounted flash units. 

This will be the first Metz flash unit launched since the Metz-Werke GmbH & Co. company became insolvent and the flash business was saved by Germany’s Daum Group, which is better known for making fitness equipment. The flash side of the business is now called Metz mecatech GmbH. 

In Europe the flash unit will cost 190 Euro, but it doesn’t appear to have been launched in the USA yet. For more information on the Metz mecablitz 44 AF-2 see the Metz website.

Articles: Digital Photography Review (dpreview.com)

 
Comments Off on Metz announces UK availability of new mecablitz 44 AF-2 flash/video light

Posted in Uncategorized


Camera Modes Explained for Newbies

12 Jan

Okay, so for one reason or another you’ve decided to step up to a new, more capable camera. Maybe you’ve moved up from a point and shoot, or maybe your phone just doesn’t cut it for you anymore. But now what? There are all these buttons and dials to make sense of – where do you even start? Not to worry, read on!

Your Mode Dial Explained

Manual Mode is used to capture long exposure images such as this.

The Camera Mode Dial

Well, the first place to start, is by learning about camera modes. This is where you’ll tell the camera how you want to capture an image. Very likely, you’re looking at this dial, or it may be a display on the screen, and you’re wondering what all those different camera modes are.  I’ll explain all of that in a moment, but first I’ll need to go over a few definitions:

Aperture

This is the opening in the lens, that determines how much light enters the camera. The aperture also affects depth of field, which is the range of objects that are in focus – from those that are closest to you, to those farthest away. A smaller aperture setting will give you greater depth of field, while a larger aperture setting gives you shallower depth of field. Aperture settings work a bit backwards, in that the higher the number, the smaller the opening. For instance, f/4 is a larger aperture than f/11. Of those two, a setting of f/11 will give you greater depth of field. For more on how the aperture works, see How to Take Control of Aperture and Create Stronger Photos.

Shallow-DOF

Use of a large aperture creates a shallow depth of field as in this image, where only a small portion is in sharp focus.

Shutter Speed

The shutter speed determines the amount of time that light is allowed to enter the camera. It also determines how movement is recorded in an image. A faster shutter speed will freeze motion, while a slower one will blur motion. Faster shutter speeds are often referred to in fractions of a second, such as: 1/125th, 1/60th, 1/500th and so on – while longer shutter speeds can be one second, 5 seconds, or even 30 seconds long. For more on shutter speed, check out Demystifying Shutter Speed.

ISO

Your camera’s ISO determines how sensitive it is to light. Lower numbers, such as ISO 100 or 200, mean your camera is less sensitive, and are used in bright situations, such as outdoors on a sunny day. Higher numbers, such as ISO 800 or 1600, make your camera more sensitive to light, and are used when there is less available light, such as outdoors on a cloudy day, or indoors when you can’t use flash. Read 6 Tips for Using ISO Effectively With Your Camera for more on setting your camera’s ISO.

Every camera’s mode dial is a bit different. The major manufacturers all tend to have the same, or similar basic modes, but each may have their own spin on things, or even throw in a few of their own special modes. In this article I’ll deal with the basic modes that are common to pretty much everyone.

The Basic Modes

Mode Dial

The Mode Dial (a Nikon dial is shown here)

Your camera will have a few basic modes, where the camera takes control of everything, and all you have to do is push the shutter button to take the picture. These modes can be a good place to start if you’re unsure of how to get a specific type of picture.  Keep in mind that when using these modes, the camera is controlling everything, including: color, contrast, white balance, shutter speed, aperture, and ISO. The most common of the basic modes are:

Auto Mode

Depending on your camera’s brand, this will be indicated in one of several different ways. Sony uses a green camera icon, Canon uses a green box, and Nikon uses a camera with the word Auto above it. What you need to know about this mode, is that the camera is making all exposure decisions for you. If the camera is a recent release, it may also be using a type of Intelligent Auto mode, where it analyzes the scene you are taking a picture of to determine the best settings. The flash may pop up if needed. The camera will set an appropriate aperture, ISO, and shutter speed to allow you to hold the camera and get a good exposure.

Portrait Mode

Portrait Mode is usually indicated by a head icon of some kind. When this mode is selected, the camera optimizes your settings for taking pictures of people. It will select color settings, choose a fairly shallow depth of field, and a fairly fast shutter speed, to ensure that your subject is not blurry. The camera may decide that flash is necessary, and fire if it is needed for exposure. Want to learn more about shooting portraits? See 10 Crucial Things You Need To Think About for Portrait Photography.

Portrait Mode

Portrait mode is great for capturing images of people. Be aware your camera’s flash might fire if there’s not enough light!

Landscape Mode

This mode is generally indicated by an icon containing mountains. When you select Landscape Mode, you are telling the camera you’re shooting scenery. The camera will record vivid colors, and set a small aperture for maximum depth of field. You may also need a tripod, as the shutter speed may be too slow to handhold the camera without blurring the image. The flash will not pop up in this mode. For more on photographing landscapes, take a look at 7 Landscape Photography Mistakes That Could be Ruining Your Photos.

Landscape mode is used for scenes like this where you want a lot of depth of field.

Landscape mode is used for scenes like this where you want a lot of depth of field.

Sports Mode

An icon of a running man indicates Sports Mode. This setting is best for capturing subjects that are moving, such as children playing, or a sporting event. The camera uses a faster shutter speed to freeze the motion of the subjects, and will use a wider aperture for shallower depth of field. The ISO may be raised to accommodate the faster shutter speed, and the flash will not fire. If catching action is your thing, Catching the Action: Photographing Youth Sports has some tips for getting started.

Sports Mode

Sports mode will set a shallow depth of field and a fast shutter speed to stop action.

Night Portrait Mode

That picture of the person with a star or moon behind them? That’s night portrait mode. This mode is used to capture pictures of people at night, usually firing the camera’s flash to illuminate them. However, the camera will also use a slightly slower shutter speed, and a higher ISO, to allow any ambient light to record in the image as well. Think of it this way – if you want to take a picture of someone at night in front of a neon sign, and you want the glow of the neon to show up in the image, this is the mode to use.

Close-up Mode

Almost invariably, an icon featuring a flower indicates Close-up Mode. Many people incorrectly call this Macro Mode. I say incorrectly, because macro generally means you are recording the objects you are photographing at life size, or larger. Close-up mode is used when you are photographing an object very close to the camera. Each manufacturer uses this mode a bit differently. While Nikon states that the camera will use a small aperture to maximize depth of field, Canon states that it will use a wide aperture to blur the background. The camera will also attempt to focus on the nearest subject to the camera. In each case a tripod may be necessary to work with a slower shutter speed.

Close-up Mode

Advanced Modes

The advanced modes on your camera’s mode dial grant you more control over exposure choices to some degree, depending on which mode you select. In addition, you’ll have the flexibility to choose picture styles, white balance, and other settings as well. Let’s start with the more basic of the advanced modes, and move on from there.

Program Mode

Contrary to popular belief, the “P” on the mode dial does not stand for “Perfect”. It stands for Program, and is Auto Mode’s big brother. Program mode is a good general use option. The camera will select the ISO, aperture, and shutter speed for you. Sounds like Auto Mode, right? It’s similar, but in Program mode, you have the ability to choose the white balance you want, the picture style you want, and you have the ability to shift the exposure, so if the camera selects a shutter speed or aperture you don’t want, you can shift that setting, and the camera will adjust the others accordingly. Your Guide to Understanding Program Mode on Your Camera can provide further insight into this setting.

Aperture Priority Mode

Aperture-Priority

Once you know how the advanced modes work, an image like this can be done a number of ways. Either Aperture Priority with a small aperture, or Manual mode with full control, could be used.

On Canon or Pentax cameras, this mode is indicated by an Av on the dial, while other manufacturers simply use an A. This mode is exactly what it says – you choose the aperture setting you want, usually deciding on such a setting to achieve a specific depth of field, the camera will then set the appropriate shutter speed to achieve proper exposure. You will also be responsible for choosing an ISO setting. Many cameras now feature an AUTO ISO setting, which lets the camera choose the ISO, if you’d rather not be bothered with selecting it yourself.

Aperture priority is best used when you know you want a specific depth of field for your image. For instance, if you’re shooting a landscape or grand vista, you’ll likely want the entire scene in focus, so you’ll want to choose a smaller aperture, such as f/16, to achieve that. The camera will then set the appropriate shutter speed for proper exposure. You’ll need to be aware of the shutter speed the camera selects, as you may need a tripod to keep the camera still if a slower shutter speed is necessary.

Shutter Priority Mode

The S on your mode dial (Tv if you have Canon or Pentax) stands for Shutter Priority mode. The Tv stands for Time Value, or the length of time the shutter remains open for exposure. This mode is the opposite of Aperture Priority. You’ll choose the shutter speed, and the camera will set the appropriate aperture, to give you the proper exposure. Remember, you’ll also need to set the ISO to ensure your exposure is correct, or set AUTO ISO so the camera can do it for you.

Shutter-Priority-Panning

Use of shutter priority allows you to select the shutter speed for panning shots like this one.

Shutter priority is useful when you know you want to use a certain shutter speed to capture motion in a specific way. For instance, if you are photographing sports, you know you want a faster shutter speed to freeze the action. You’ll likely set a shutter speed of 1/500th (or faster) to ensure you’re doing that, and let the camera set the aperture for the appropriate exposure. For more information on both Aperture Priority and Shutter Priority modes, see Getting off Auto – Manual, Aperture and Shutter Priority modes explained.

Manual Mode

Universally indicated by an M on your mode dial, in Manual Mode you are truly flying solo. You are responsible for setting your aperture, shutter speed, and the ISO, to achieve the proper exposure. This gives you the ultimate freedom in creating images, as all camera settings are available for you to set, and change as you see fit. You’ll want to keep an eye on your camera’s meter to be sure you aren’t over or underexposing the image. How to Learn Your Camera’s Light Meter and Master Manual Mode is a great primer if you’re ready to take the plunge and learn to shoot manually.

If you’re still not sure where to start, have a look at A Beginner’s Guide to Choosing Shooting Mode for further clarification.

googletag.cmd.push(function() {
tablet_slots.push( googletag.defineSlot( “/1005424/_dPSv4_tab-all-article-bottom_(300×250)”, [300, 250], “pb-ad-78623” ).addService( googletag.pubads() ) ); } );

googletag.cmd.push(function() {
mobile_slots.push( googletag.defineSlot( “/1005424/_dPSv4_mob-all-article-bottom_(300×250)”, [300, 250], “pb-ad-78158” ).addService( googletag.pubads() ) ); } );

The post Camera Modes Explained for Newbies by Rick Berk appeared first on Digital Photography School.


Digital Photography School

 
Comments Off on Camera Modes Explained for Newbies

Posted in Photography


Apple patent describes dual-camera design

12 Jan

Looking at a new Apple patent that has recently surfaced, it appears we might see a dual-camera setup in future iPhone generations. The design uses two camera modules, one with a wide-angle lens and another with a longer focal length. Throw some Apple software wizardry into the mix and you get yourself a smartphone zoom lens that should get close in quality to fully optical zooms and much better than existing digital zooms. Read more

Articles: Digital Photography Review (dpreview.com)

 
Comments Off on Apple patent describes dual-camera design

Posted in Uncategorized