RSS
 

Archive for December, 2015

6 Tips for Capturing Dramatic Skies in your Landscape Photography

17 Dec

Don’t let the land in landscape photography fool you–a great landscape photo relies just as much on the sky. Boring gray skies make for boring landscape photos. But capturing a dramatic sky in camera is trickier than it seems. With the sky lighter than the land, the camera will typically overexpose the sky, turning a brilliant blue into a vague and unexciting gray.

But, with a little fine tuning, it is possible to capture a sky that is the cherry-on-top of a great scene on land. Here are six tips for capturing more dramatic skies in your landscape photography.

Desolation Wildernes Sunset Jkatzphoto

Photo Courtesy Justin Katz Photography.

1 – Time it right

Landscape photography may not require the split second timing that’s necessary for capturing a toddler’s smile, or a wide receiver’s catch, but timing is still a big part of the picture. The sky that’s gray one day, could be bright blue the next. When planning out a landscape photo, consider how the timing will impact the sky.

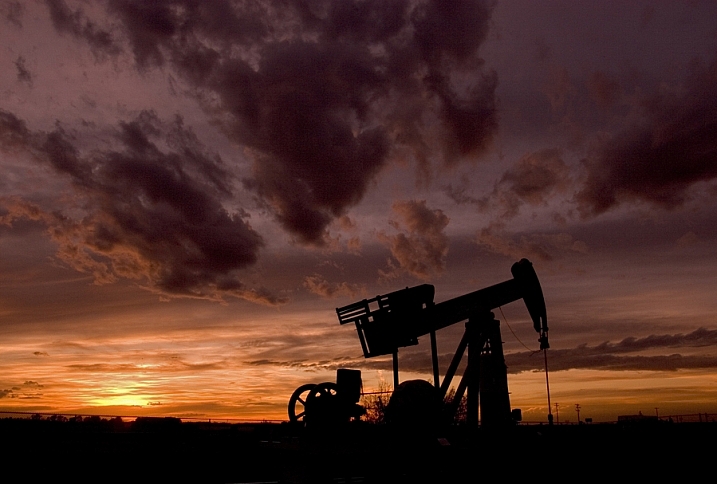
Watch for weather patterns that add could add interest to a shot, like a storm brewing just on the horizon. Weather plays a big role in the overall mood of the image–if you’re hoping to capture a dark and gloomy shot, head out when the sky is stormy. On the opposite end, if you’re hoping to capture a more relaxed or happy feeling, look for blue skies dotted with clouds.

Yosemite Tunnel View Jkatzphoto

Photo Courtesy Justin Katz Photography.

The time of day matters too. While the middle of the day will produce the most shadows on the land, the sky tends to be the bluest then. Just after sunset and just before sunrise is often a good time to capture wispy clouds and a warmer tint of light. Of course, sunrise and sunset makes for a dramatic sky as well.

2 – Try the wrong white balance

Photography rules are sometimes meant to be broken–sometimes, using the wrong white balance setting creates a more dramatic sky. This is especially true when shooting towards the beginning or end of the day–using a different preset will adjust the color in the sky. Auto, cloudy and shade presets will get you an orange-ish sunset with a light blue sky, with a slight variation between the settings. A florescent setting, on the other hand, will typically turn an orange sunset purple, with a brilliant blue sky. Tungsten offers a similar effect, but with even deeper colors.

Whitebalancepresets

Using Kelvin temperatures to adjust your white balance results in an even greater control over the colors in the sky. Around 5500K will usually capture a sunny sky with an accurate white balance–that is, where things that are white are still white in the picture, or neutral tones. A higher temperature, for example 6500K, will give the land an orange glow but also enhance the colors in a sunset. A cooler temperature, on the other hand (say 3000), will play up the blues and purples. By using the Kelvin scale, you have more options for picking a white balance setting that best captures those colors.

White Balance 16,000 K

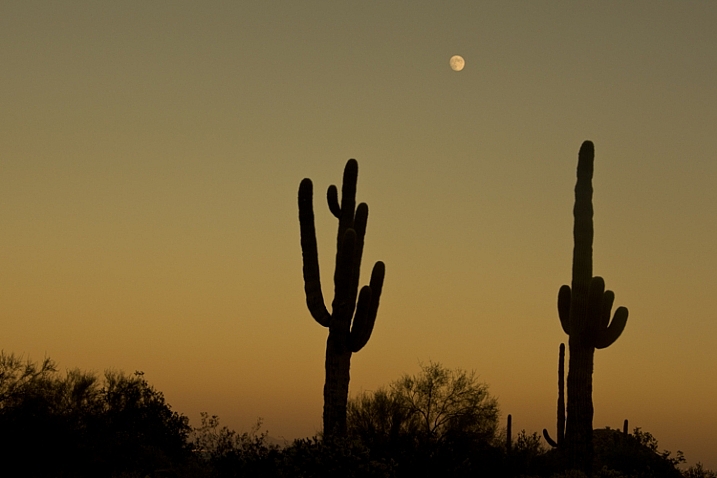
Photo © Hillary Grigonis – White Balance edited to 160,000 K in post-processing to add orange

While it’s always best to get the shot right in camera, shooting in RAW allows you even more flexibility when it comes to adjusting the colors in the sky (and the rest of the image, for that matter). If you perhaps overdid it by making the shot too warm or too cool, you can easily adjust it to find the color temperature that fits the image the best. If you have a landscape photo that you already shot in RAW, open it and try different white balance presets, or the temperature slider, to see first hand how shooting with a different white balance would have impacted the shot.

3 – Compose for the sky

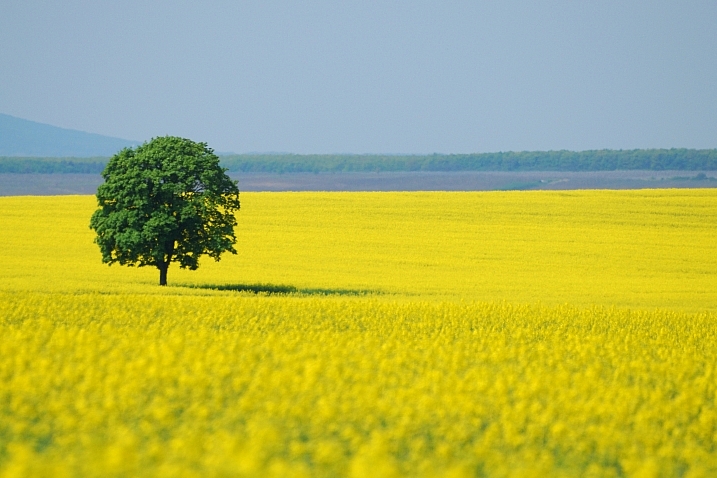
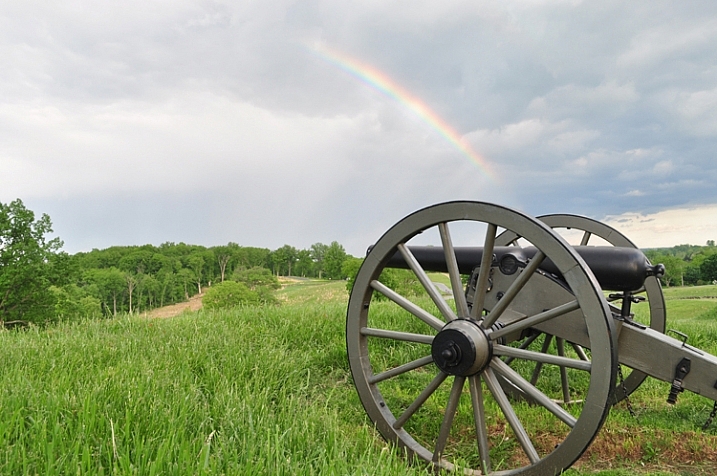
When the sky is more dramatic than the land, why not use that when determining your composition? Pay attention to where you place the horizon when you are composing your shot. Using the rule of thirds to imagine the image is dived into threes, place the horizon on one of those horizontal lines. If you are shooting a photo with an average looking sky, try placing the horizon on the upper third of the image, so more of the land is included in the photo. But if the sky is really dramatic, take advantage of that and include more of it in the frame by placing the horizon on the lower third.

Darlene Hildebrandt

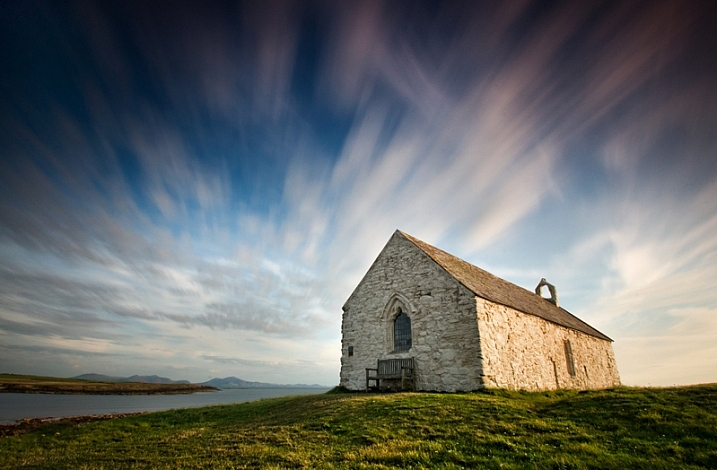
By Darlene Hildebrandt – The sky is dramatic so the image was composed to show less ground and more sky by placing the horizon toward the bottom.

Ádám Tomkó

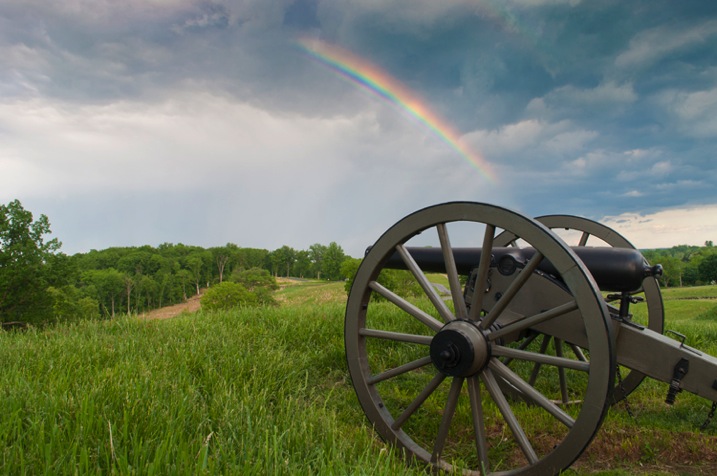
By Ádám Tomkó – as the sky is less dramatic, the horizon placed higher helps minimize the sky.


4 – Use a filter

There are two filters every landscape photographer should have in their camera bag in order to capture more dramatic skies. The first is a graduated neutral density filter. A regular neutral density filter is like putting sunglasses over your lens–it limits the light coming in for bright scenes or long exposures. But a graduated neutral density filter places that darkening effect only on a portion of the image. By placing the dark portion of the filter over the sky, you can properly expose the entire scene. Without the filter, the sky will either be overexposed and bland, or the land will be underexposed and dark. With the filter, you can achieve an exposure that works for both in one shot. The only downside is that graduated neutral density filters don’t work as well with an uneven horizon, like shooting a cityscape. Graduated neutral density filters come in both circular and square formats, but the square is often preferred because you can then place the horizon anywhere in the frame.

A graduated neutral density filter doesn’t work in every scenario–like a very uneven horizon, for example. A polarizing filter doesn’t have as much of an effect on the sky, but it can still be used with uneven horizons. Polarizing filters work by adjusting the reflected light rays coming through your camera lens. Since the sky is blue because of these reflecting rays, turning the front of the polarizing filter will adjust the intensity of the blues in the sky. Since it just affects reflected light rays, it can still be used when mountains or buildings make the horizon uneven. Polarizing filters are also great for enhancing reflections off water or other shiny surfaces too.

Lake Tahoe Sunset Nevada Jkatzphoto

Photo Courtesy Justin Katz Photography.

Experiment with motion blur and long exposures

Long exposures aren’t just for photographing waterfalls. If you use a long enough shutter speed, the clouds will blur too, creating a sky of wispy clouds and a slight feeling of motion. To capture motion blur in the clouds, you’ll need to use a long shutter speed. The best settings will depend a bit on the weather and how much motion blur you’d like, but you can try starting with a two minute exposure and adjust up or down from there.

Kris Williams

By Kris Williams (Exposure info: ISO 200, f/22 for 75 seconds)

If you are shooting during the day, you may not be able to balance out a two minute exposure with a narrow enough aperture or low enough ISO, ending up with a photo that’s way too bright. So how do photographers capture motion blur in the clouds when the photo obviously wasn’t taken at dusk or dawn? A neutral density filter helps block out some of that light so you can use a long exposure during the day (that’s the same thing as the graduated neutral density filter from the last tip, only the entire filter is dark instead of just half).

Image used with permission of Matt Kloskowski

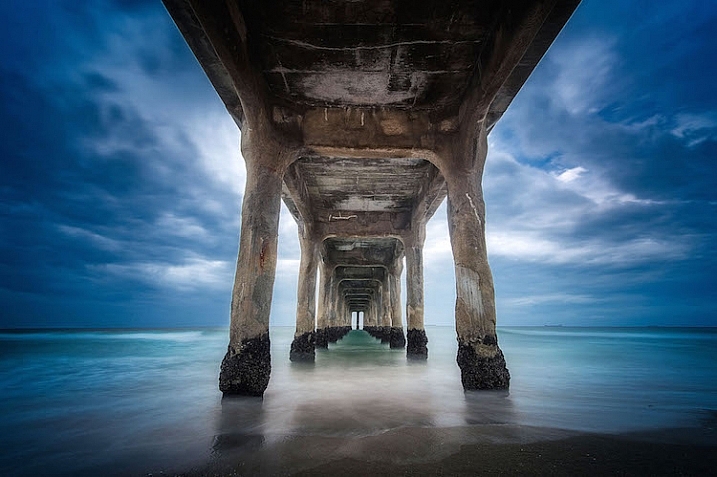
Image used with permission of Matt Kloskowski (10 second exposure)


Use the Camera RAW graduated filter tool

While it’s always best to get the shot right in-camera, there are a few editing tools that can improve the sky in your landscape photos. One of those tools is the graduated filter inside Adobe Camera RAW (works the same in Photoshop and Lightroom). Using the tool, you can click over the sky on the image. Like an actual graduated filter, the effect will only cover that portion of the image and gradually fade away, making it possible to create natural looking edits.

The graduated filter tool can be used to adjust the exposure, creating an effect much like using the actual filter. But, the Camera RAW tool can also adjust brightness, contrast, saturation, clarity, sharpness and color. That opens up a lot of possibilities for applying edits just to the sky for more drama that sometimes can’t be done in-camera.

Original imag

Original image

Graduated filter added in post-processing stage

Graduated filter added in post-processing stage

The sky can make or break a landscape photo. From timing and composition to filters, when you consider the sky as you shoot, you’ll end up with more dramatic, frame-worthy shots.

Do you have any other tips for creating dramatic skies in landscape photography?

googletag.cmd.push(function() {
tablet_slots.push( googletag.defineSlot( “/1005424/_dPSv4_tab-all-article-bottom_(300×250)”, [300, 250], “pb-ad-78623” ).addService( googletag.pubads() ) ); } );

googletag.cmd.push(function() {
mobile_slots.push( googletag.defineSlot( “/1005424/_dPSv4_mob-all-article-bottom_(300×250)”, [300, 250], “pb-ad-78158” ).addService( googletag.pubads() ) ); } );

The post 6 Tips for Capturing Dramatic Skies in your Landscape Photography by Hillary Grigonis appeared first on Digital Photography School.


Digital Photography School

 
Comments Off on 6 Tips for Capturing Dramatic Skies in your Landscape Photography

Posted in Photography


DPReview recommends: Best Cameras for Kids 2015

16 Dec

If they’re young enough, your kids have always known a world in which smartphones are the most popular devices for taking photos. That’s too bad. To ensure that the next wave of young photographers understand the performance and ergonomic advantages of using a real camera, you’ll need to get one into their hands as soon as possible.

But wait! Before you sneak a Nikon D810 into your baby’s basket of toys, you’ll need to consider choking hazards and the fact that some children are a lot more careful than others when it comes to handling expensive electronics. If you want to buy a camera specifically for your child – or a camera that your entire family can share without worrying too much – durability and ease of use are just as important, if not more, as image quality and features.

And, of course, much of that depends on the age and maturity level of your child. We wouldn’t trust any toddler or the vast majority of 10-year-old boys with an advanced point-and-shoot, but for a teenager or pre-teen that’s wise beyond their years and genuinely interested in photography, a compact with a lot of zoom and manual controls to grow into might be a great fit.

So here’s a selection of some of what we think are the best camera options for your kids. Most of these models aren’t specifically for kids, and all of the obvious caveats apply. Batteries aren’t edible, memory cards are choke hazards, cameras can hurt when they’re thrown at people, etc. All prices are approximate street prices, correct at time of publication, and if you think we’ve missed a model that deserves consideration, let us know in the comments!

Younger Kids

If you’re shopping for kids 6 and under, you probably don’t want to spend a lot of money, and durability is likely to be important. You want something lightweight that won’t break the first time it gets dropped, and the simpler the operation the better.

Vtech Kidizoom Connect ($ 48)

1.3MP sensor | 4X digital zoom | 1.8″ LCD | 320 x 240 video | 128MB built-in memory | uses AA batteries

Baby’s first piece of kit should be tough and inexpensive, and the VTech KidiZoom fits the bill. This durable 1.3-megapixel camera/toy comes has a fixed lens with 4X digital zoom, 128MB of internal memory (with an option for MicroSD memory card expansion), a 1.8″ LCD and 320 x 240 video. There are even three photo-related games to keep your kids entertained.


Nikon Coolpix S33 ($ 99)

13.2MP CMOS sensor | 30-90mm equiv. lens | Waterproof to 32ft | Shockproof from 5ft | Full HD video

Cameras do get bumped and dropped (or worse), making Nikon’s inexpensive waterproof, shockproof and freezeproof Coolpix S33 worth a look. It features an easy-to-use interface and dedicated one-touch buttons for simple shooting. Although it’s 13.2 megapixel CMOS sensor is roughly the size of what’s in your smartphone, it can capture decent quality images. Its lens has a focal range of of 30-90mm – adequate for most purposes. A dedicated movie record button allows users to quickly shoot Full HD video clips. The S33 offers sixteen creative styles and effects options (including Underwater Face Detection) and an option to shoot videos with a miniature effect.


Fujifilm instax mini 8 ($ 80)

Makes card-sized instant prints | 60mm equiv. fixed lens | Uses AA batteries | Comes in several colors

Now your kids can relive the days of instant prints with the Fujifilm instax mini 8, one of several models available from the company. It’s definitely not rugged, but the thrill of getting a 2.4 x 1.8 inch print in about 2-3 minutes will excite both kids and adults alike. The mini 8 is a very basic camera, with a small optical viewfinder (and no LCD), dial-in exposure, and a flash that always fires. One important thing to know is that instax cameras are a bit of a money pit, with a ten pack of film priced at around $ 8.50, so your little photographers will need to be pretty selective before pressing that shutter release button.  


Viddy Pinhole Camera kit ($ 57)

DIY pinhole camera | Accepts 35mm or medium-format film | Available in four colors

For the creative kid with a do-it-yourself attitude, the VIDDY is a pinhole camera kit made from tough, durable recycled cardboard in four colors: green, black, blue or red. It accepts both medium format and 35mm film. Bonus: it’s a perfect project between parent and child. Pop out VIDDY’s screen printed parts and assemble in 30 minutes.


Polaroid Cube ($ 99)

6MP sensor | 35mm lens w/124° angle-of-view | Weatherproof | Full HD video | Numerous mounts available

The latest HD action camera from Polaroid combines a 6MP sensor with a lens with an impressive 124° field-of-view and puts it into a weatherproof body measuring just 35mm on each side. The camera has can record Full HD video onto an optional microSD card, and a 90 minute battery allows extended recording for every bike ride and beach adventure. Just like more expensive GoPros, there are numerous mounts available for the Cube, plus an underwater housing. And a magnet in the camera’s base opens up even more potentially interesting vantage points.

For those seeking Wi-Fi capabilities, the Cube+ offers that for $ 149.

Older Kids

Durability may be less important in a camera for this age group, but it really depends on the child. In our selection we’re assuming that you’re buying for a kid who’s learned not to throw precious things around, and most of the models we’ve chosen offer a little room for your child to grow away from the strictly auto-everything snap-shooting if they get more confident.

Olympus Tough TG-4 ($ 349)

16MP BSI CMOS sensor | 25-100mm equiv. lens | Waterproof to 50ft | Full HD video | Wi-Fi + GPS

For kids that are on the go – or have the tendency to drop expensive pieces of electronics, the Olympus TG-4 is a good choice. It’s well built, responsive, full-featured and produces excellent quality images for a small-sensor camera. It offers automatic shooting modes but opens up the world of manual exposure for older children ready to get their feet wet (no pun intended) in more serious photography. Other features include numerous ‘art filters’, Full HD video recording, and support for fisheye and telephoto conversion lenses. It has very good battery life as well, so it can make it through the day with ease.

The TG-4 is waterproof to 50ft, shockproof from 7ft, crushproof to 220lbf and freeze proof to +14F, so it can take a beating. Wi-Fi is built-in for easy photo sharing, and the GPS receiver will let young photographers check a map to see where a photo was taken.

Panasonic Lumix DMC-ZS50 ($ 250)

12MP BSI CMOS sensor | 24-720mm equiv. lens | Electronic viewfinder | Full HD video | Wi-Fi


For the child you trust with more fragile cameras, might we suggest the Panasonic Lumix DMC-ZS50. It’s a great camera to take on vacation, thanks to its long 24-720mm (30X) zoom lens and ultra-compact body. It offers speedy focusing and continuous shooting, and photos can be composed on either a 3″ LCD or a small (but still useful) electronic viewfinder. The camera can record Full HD video with ‘hybrid’ image stabilization to reduce severe camera shake. 

The ZS50 offers more advanced manual controls than the TG-4 above, so if you want to teach your budding photographer about aperture and shutter speed or how to manual focus, the ZS50 is a camera which can do it.


Apple iPod Touch ($ 199 and up)

Full-featured smart device | 8MP BSI CMOS sensor | F2.4, 29mm equiv. lens | 4″ Retina display | Full HD video

While it may be too early in their lives to buy your kids an iPhone, you might as well prepare for the inevitable by picking up an iPod Touch (2015). It’s essentially an iPhone without the phone, meaning that you get access to hundreds of thousands of apps, many photo-related, easy photo sharing over Wi-Fi, and all of the other things that have made iPhones a smash hit.

On the photo side, the iPod Touch sports a 8MP BSI CMOS sensor and an F2.4, 29mm equivalent lens, plus a lower resolution front-facing camera for selfies. It has the usual features you’d expect to see on a ‘regular’ camera, plus impressive Auto HDR and panorama features. The iPod Touch can also record Full HD video, with slo-mo and time-lapse options. You couldn’t ask for a better screen on which to compose photos, either, as the 4″ Retina display truly shines. You can even add extra lenses from companies like Olloclip for more flexibility.

Articles: Digital Photography Review (dpreview.com)

 
Comments Off on DPReview recommends: Best Cameras for Kids 2015

Posted in Uncategorized


Das 96-Tage-Experiment

16 Dec

96 Tage Projekt © Markus Thoma

Ein Beitrag von: Markus Thoma

„Wer sehen kann, kann auch fotografieren. Sehen lernen kann allerdings lange dauern.“ Mit diesem Sinnspruch hat die Leica AG bereits geworben. Manche meinen, ein fotografischer Blick muss angeboren sein. Das ist wie ein Talent. Ich finde aber, man kann mit gezielten Übungen auch aktiv daran arbeiten, seine Sicht in der Fotografie auszuprägen.
kwerfeldein – Fotografie Magazin | Fotocommunity

 
Comments Off on Das 96-Tage-Experiment

Posted in Equipment


Today Only: 70% Off Our 101 Lightroom Presets Pack

16 Dec

Presets coverToday is Day 3 in our 12 Deals of Christmas and we’re slightly worried about server capacity on this one because it’s 70% off our most popular dPS product of 2015 – our very own Lightroom preset collection!
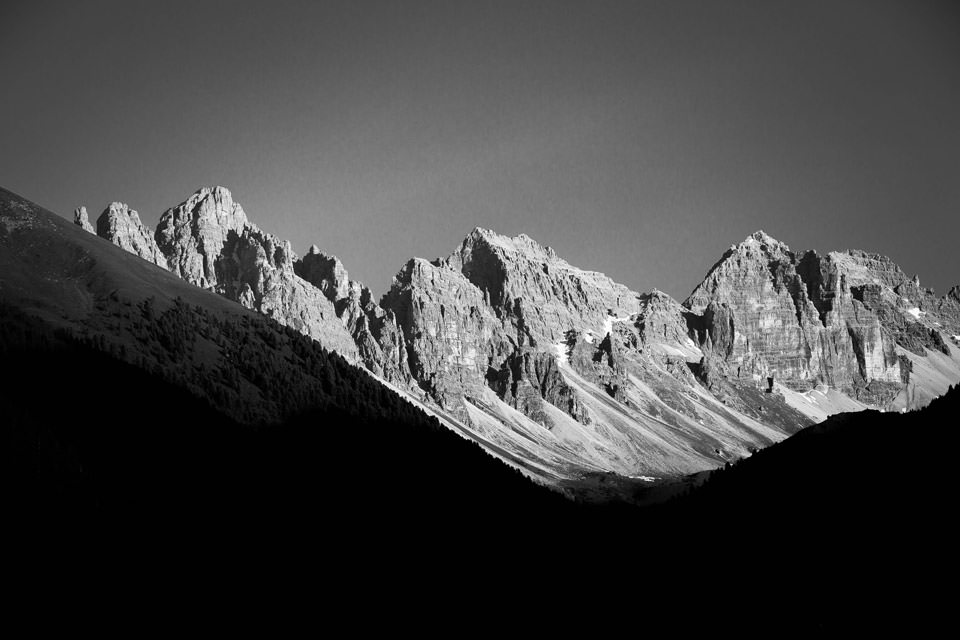
Grab them before the deal ends here.

For just $ 10 USD this deal gets you 101 useful Lightroom* presets. That’s less than 10 cents per preset!

These presets are simple to use, are exceptional quality and will enable you to transform your images in a click. Full instructions are included, so you’ll be walked step-by-step how to install and use them in Lightroom.

Preset bundles like this might set you back upwards of $ 100 on other sites but for today only this pack can be yours today only for just USD $ 10!

Grab yours before time is up.

Note: Even though these presets are just $ 10 each, they are still fully backed by our 60-day money-back guarantee. If you don’t find them useful simply contact our support team within 60 days and we’ll return your $ 10.

*All 101 presets in this pack work flawlessly with Lightroom versions 4, 5 & 6, or Lightroom CC. Lightroom is required to use these presets.

googletag.cmd.push(function() {
tablet_slots.push( googletag.defineSlot( “/1005424/_dPSv4_tab-all-article-bottom_(300×250)”, [300, 250], “pb-ad-78623” ).addService( googletag.pubads() ) ); } );

googletag.cmd.push(function() {
mobile_slots.push( googletag.defineSlot( “/1005424/_dPSv4_mob-all-article-bottom_(300×250)”, [300, 250], “pb-ad-78158” ).addService( googletag.pubads() ) ); } );

The post Today Only: 70% Off Our 101 Lightroom Presets Pack by Darren Rowse appeared first on Digital Photography School.


Digital Photography School

 
Comments Off on Today Only: 70% Off Our 101 Lightroom Presets Pack

Posted in Photography


15. Dezember 2015

16 Dec

Das Bild des Tages von: Dieter Irschitz

19164846288 © Dieter Irschitz

Im Ausblick: Paris 1914, Polarfüchse und Unterwasserkunst
kwerfeldein – Fotografie Magazin | Fotocommunity

 
Comments Off on 15. Dezember 2015

Posted in Equipment


Sigma Announces Protective Lens Made of Clear Glass Ceramic

16 Dec

Sigma has created an all-new protective filter, the Sigma Water Repellent (WR) Ceramic Protector, using Clear Glass Ceramic with water and oil repellent coating. This is the first filter to use such a material in its construction. It promises both lighter weight and higher strength than normal protective filters with minimal effects on transmittance and sharpness.

It will be available in common filter thread sizes between 67mm and 105mm. See the press release below for more info, or take a look at it on their website at: http://www.sigmaphoto.com/wr-ceramic/


Press Release:

SIGMA CORPORATION ANNOUNCES WORLD’S FIRST PROTECTIVE LENS MADE OF CLEAR GLASS CERAMIC

RONKONKOMA, NY — December 16, 2015 – Sigma Corporation of America, a leading DSLR lens and camera manufacturer, today announced the new Sigma Water Repellent (WR) Ceramic Protector, a lens filter that features new Clear Glass Ceramic material and provides enhanced protective qualities. Pricing and availability is not yet available.

This shock- and scratch-resistant Clear Glass Ceramic was developed specifically for Sigma in partnership with a glass manufacturer. Made with a special heat treatment that evenly precipitates microcrystalline spinel throughout the materials, the Clear Glass Ceramic is 10 times stronger than a conventional protective filter and three times the strength of a chemically strengthened filter. The lens protector also contains WR coating, which repels water, dust and oil, and allows fingerprints to be easily removed. This enhanced protection helps to preserve the lens and ensure long-term, top-notch image quality.

“The Sigma WR Ceramic Protector is the latest example of Sigma’s dedication to innovative and first-to-market photography equipment,” said Mark Amir-Hamzeh, president of Sigma Corporation of America. “The new Clear Glass Ceramic protector is the first of its kind and the strongest material used in the industry. It will enable photographers to safeguard their lenses, while maintaining the impressive sharpness offered by high-quality glass, like our Global Vision line of lenses.”  
Key features of the Ceramic Protector include:

  • Scratch-resistant – Sigma’s Clear Glass Ceramic offers a Vickers hardness number of 700HV. The strength of the Clear Glass Ceramic is much stronger than chemically strengthen glass and is; 10 times stronger than conventional filters
  • Thinner and lighter – This new protector is up to 50 percent thinner and is up to 30% lighter than previous Sigma filters
  • High transmittance – Sigma’s Clear Glass Ceramic offers very high transmittance, making it ideal for use as optical glass
  • Water- and oil-repellent coating – The water repellent coating reflects only 0.24 percent of visible light, thereby minimizing flare and ghosting. Its ability to repel both water and oil is also excellent, with water drops bouncing right off, and fingerprints easily to remove

This filter is offered in the most popular filter thread sizes, and is compatible with all Sigma lenses and other lenses that accept front filter threads that are 67mm-105mm diameters. Compatible lenses in Sigma’s Art line include: 35mm F1.4 DG HSM, 30mm F1.4 DC HSM, 18-35mm F1.8 DC HSM, 24-35mm F2 DG HSM, 24-105mm F4 DG OS HSM, 50mm F1.4 DG HSM, 24mm F1.4 DG HSM, 19mm F2.8 DN, 30mm F2.8 DN and 60mm F2.8 DN. Compatible lenses in the Sports line include the 120-300mm F2.8 DG OS HSM and 150-600mm F5-6.3 DG OS HSM. Compatible lenses in the Contemporary line include the 17-70mm F2.8-4.0 DC OS HSM, 18-200mm F3.5-6.3 DC OS HSM, 18-300mm F3.5-6.3 DC OS HSM and the 150-600mm F5-6.3 DG OS HSM. As with all of Sigma’s lenses, the filter is checked with Sigma’s own Modulation Transfer Function (MTF) measuring system, “A1,” in the company’s factory in Japan. 

For information about Sigma, go to www.sigmaphoto.com or follow the company on Twitter, Instagram and Facebook.

Articles: Digital Photography Review (dpreview.com)

 
Comments Off on Sigma Announces Protective Lens Made of Clear Glass Ceramic

Posted in Uncategorized


World’s Brightest Flashlight: Brilliant 1000-Watt DIY Lantern

16 Dec

[ By WebUrbanist in Gadgets & Geekery & Technology. ]

highyieldledlight

Lighting up the night sky like artificial lightning, this incredible homemade lamp boasts a 90,000-lumen output (over 100 times that of a typical Maglite) that would put the flashiest high-beams on dark roads to shame, making nighttime scenes look uncannily daylit.

Constructed by RCTestFlight and published on YouTube, the project consists of ten 100-watt LEDs mounted on a heatsink and powered by twin 8 amp-hour, lithium-polymer batteries (about the equivalent energy of 10 mobile phones).

night bright light

In the embedded video, you can see comparisons between car lights, streetlights, other handheld lamps and this flashlight, as well as demonstrations of lighting up clouds and mountains at a distance. Even the short-exposure shots reveal an incredible degree of brightness.

night handheld led flashlight

The rig uses ten 100-watt LED chips in a row, each connected to a large heatsink with bolts and thermal grease to help the heat transfer, each component tied to its own driver. Each LED has its own lens focusing light projection at around 60 degrees.

night flashlight worlds brightest

Made to burn fast and bright, the projection lifespan is accordingly limited: it can only run for about ten minutes and gets hot even faster than that. Cooling fans would be useful if longer blasts were needed, but for short bursts the system holds up just fine.

blindinglight

It shines bright in part due to LEDs trumping halogens, but also the various engineering details that help optimize for power and heat. The device can turn well-lit rooms into sun-bright spaces and even outdoors, at closer than 100 feet, it is basically blinding.

Share on Facebook


[ By WebUrbanist in Gadgets & Geekery & Technology. ]

[ WebUrbanist | Archives | Galleries | Privacy | TOS ]


WebUrbanist

 
Comments Off on World’s Brightest Flashlight: Brilliant 1000-Watt DIY Lantern

Posted in Creativity


Make-up bracketing and selfie boutiques help shoot Casio to record levels of profit

16 Dec

Casio’s TR series of Exilim compacts has propelled the Japanese company to record profitability this year after the cameras caught a firm grasp of the massive Chinese selfie market. According to a report from Nikkei Asian Review, Casio is on-track to make a $ 403 million profit this year, and a good part of that has come from the sale of its unusually shaped EX-TR compact cameras that the company has designed to appeal to female selfie shooters.

Just after the launch of the first TR – the Exilim TRYX EX-TR100 – in 2011, Casio’s photography business was in such trouble that it pulled distribution in the majority of territories it operated in. At the time Casio concentrated on the ‘cool’ looks of the camera and its ART modes that created HDR and painting-effect images, but since 2013 the TR cameras have proved such a hit with the Chinese that its imaging division expects to make a ¥4.2bn (about $ 34.5 million) operating profit. That comes after four years of losses, up to 2012. 

The secret of the camera’s success has been a combination of a growing fashion-conscious design and the product’s suitability for shooting selfies. With a hinged frame the TR models can support themselves standing upright so are ideal for placing on a table facing the subject. They also have a number of ways to trip the shutter including squeezing the frame, using a ‘selfie pad’ on the side of the body, using a count-down-display self-timer, by the camera detecting the subject putting his/her hand in a certain part of the frame and by touching the 3″ LCD. The 921,600-dot LCD also acts as a digital mirror so the subject can check hair and make-up before the picture is taken – as the camera lens and the LCD face in the same direction. 

It has become common to feature digital retouch shooting modes in compact cameras, but Casio’s Exilim TR models go a step further with make-up modes that offer up to 12 levels of skin smoothness as well as skin tone adjustments to suit the way you want to look. A step beyond that even is make-up mode bracketing that provides three images with smoothness levels either side of the setting you chose yourself. In the latest model, the EX-TR70, make-up mode is now available when shooting movies too. 

For those not sure of their best side, pose bracketing gives you five chances to look good as the camera’s voice guidance counts down three-two-one between pictures so you have the opportunity to ruffle your hair, bend a knee or pout a little bit more. 

All of the EX-TR models use a lens with an angle of view equivalent to a 21mm on a 35mm system. Such a focal length would seem excessively wide for general purpose photography, but when holding a camera at a short-arm’s length it has proved perfect for getting you and your friend in the frame. Instead of a flash the cameras are equipped with an LED light that’s positioned very close to the lens axis to create soft and shadowless lighting – and the LED is round to form an attractive circular catch-light in the eyes. Genius. 

The cameras have proved so popular in China that Casio has opened three stores that sell only TR series models. The stores are designed like make-up boutiques, to set the products apart from other cameras in the market. At up to ¥100,000 (about $ 800) a pop these are not low-cost novelties priced for the mass market, so clearly Casio has been doing something very right indeed. 

For more information on the Casio Exilim TR series see the Casio digital camera website.

Articles: Digital Photography Review (dpreview.com)

 
Comments Off on Make-up bracketing and selfie boutiques help shoot Casio to record levels of profit

Posted in Uncategorized


5 Essential Things You Need to Know About the Lightroom Library Module

16 Dec

Essential things Lightroom

For those of you who have been following my Lightroom articles I thought it would be fun to test your knowledge. We’ll start with the Lightroom Library module because the work you do here, lays the foundation for everything you do inside Lightroom. Master the Library module and you’ll be well on your way to becoming an expert on the entire program.

Ready? Let’s start with what is probably the most important thing of all – backing up your Catalog.

1. How to back up your Catalog

This is really important. Your Lightroom Catalog is absolutely essential because it’s where Lightroom stores every piece of information it has about your photos. Not only does this include the location of your photos (i.e., where they are saved on your hard drive) but any metadata associated with them (from camera settings to keywords), Lightroom specific information (such as which Collections a photo belongs to) and any edits you have made in the Develop module. Yes, these are all stored in the Catalog.

How much of a disaster would it be if you lost all this data? I’m sure it would be a major loss. That’s why it’s so important that you back up your Catalog regularly. You should also back it up to an external hard drive, not to an internal one, in case your computer is lost or stolen.

You can check your back up settings by going to Lightroom > Catalog Settings. Click the General tab – Back up catalog should be set to Every Time Lightroom Exits as shown below.

Essential things to know about Lightroom

Connect the external hard drive on which you back up your Catalog, then exit Lightroom. Before Lightroom closes down, it displays the Back Up Catalog window. The Backup Folder setting should point to a folder on your external hard drive. If it doesn’t, click Choose and change it now.

Essential things to know about Lightroom

When you exit Lightroom is the only time you will see this popup box, and the only place you can change where it saves the backup of your catalog.

Make sure the Test integrity before backing up and Optimize catalog after backing up boxes are ticked. When you’re done click the Back up button. Lightroom will save a backup of your Catalog to your external hard drive before closing. This may take some time, especially for a large Catalog, so be patient.

Some important things to note about Catalog backups:

  • You only need to keep the last two or three backups. You can delete older ones to free up hard drive space.
  • If you have Lightroom 6 or Lightroom CC the backed up Catalogs are compressed, saving hard drive space.
  • You should always back up your Lightroom Catalog to a different hard drive than the one the main Catalog is stored on. That way, if your main hard drive fails, the backed up Catalog is safe.
  • Once a month (or more often if you like) copy the latest backup to Dropbox, Google Drive or another cloud storage solution. This is to protect you in case you lose both your computer and your external hard drive to theft or fire. The location and name of your Lightroom Catalog are recorded in Catalog Settings.

Essential things to know about Lightroom

2. How to back up your photos

This is important to mention because I want to make sure you understand that your photos are not stored inside Lightroom, or in the Catalog. Your photos are saved on your hard drive (or drives) and you need to back them up yourself. It is your responsibility – Lightroom doesn’t do it for you.

There are many ways of backing up photos, you need to find the method that works best for you. However I’m sure it will help if I share my method. Feel free to use, adapt or ignore it.

  • Create a folder called Raw. All your Raw files are stored in there (I shoot everything in Raw – you could simply call your folder something like Photos if you shoot a mixture of Raw and JPEG).
  • In that folder create a new folder for every year you take photos.

essential things about Lightroom

  • In each of those folders, create 12 folders, one for every month of the year.

essential things about Lightroom

  • Whenever you import photos into Lightroom, select the correct destination folder depending on the month and year the photos were taken.
  • Place each shoot into a folder of its own. You can either give it a name or organize the folders by date.

essential things about Lightroom

This system works because it’s easy to see whether your Raw files are backed up. Want to back up all your Raw files to another hard drive? Just copy the Raw folder. Want to see whether you’ve backed up all the photos you’ve taken this month? It’s easy to do so with this system.

By the way, I keep my Raw files backed up to four different external hard drives, one of which is stored off-site. That way, if one of the hard drives fails, I have three other copies.

3. How to set up File Handling in Catalog Settings

The File Handling settings are important because they help you strike a balance between optimizing Lightroom’s performance speed, and using hard drive space.

The first thing you need to look at is the total size of the cache. This tells you how much hard drive space your previews take up. For example, looking at mine (see below) I can see my Lightroom previews are currently taking up 28GB.

Essential things to know about Lightroom

It’s important to keep some of your hard drive free (at least 10%, but preferably more) otherwise Lightroom will slow down (as will everything else your computer does). If you are running out of hard drive space, come and have a look here to see if your preview files are too large.

There are two steps to keeping your previews file under control.

1. Make sure Lightroom is generating the optimum size Standard Previews. These are used to display your photos in Loupe View and don’t need to be any larger than your monitor’s resolution.

If you have Lightroom 6 or Lightroom CC you can set the size to Auto. Lightroom will calculate the optimum size for you. In Lightroom 5 or earlier pick the size that best matches your monitor’s resolution.

Set Preview Quality to Medium – it gives you the best balance between quality and size.

Essential things to know about Lightroom

2. Set Automatically Discard 1:1 Previews to After 30 Days. You need 1:1 previews for zooming in to photos, and working on them in the Develop module. However, they are very large. If you generated 1:1 previews for every photo in your Catalog, and never deleted them, you would eventually run out of hard drive space. To be honest, it doesn’t really matter which setting you choose here as long as it’s not set to Never. You can always regenerate discarded 1:1 previews if you need them again later.

4. How to search for images

One of the benefits of building the Lightroom architecture on a database is that it is easy to search your photos. You do this in the Filter Bar, which is displayed above the Content Window in Grid View (press ‘\’ on the keyboard if you don’t see it).

There are three types of searches:

  1. Text: Search keywords, filenames, titles, captions, etc., for text sequences.
  2. Attribute: Filter by flag, star rating, colour label or file kind (master photo, virtual copy, or video).
  3. Metadata: Search by date, camera, lens, camera setting (ISO, shutter speed, aperture, etc.), aspect ratio or any of the dozen or so search options listed there.

Have a play with these options to see how it works. Just bear in mind that Lightroom is searching the selected folders or Collections, not your entire Catalog when you do so (select All Photographs to search your entire library).

Essential things to know about Lightroom

5. How to use Collections

Collections are virtual Folders, which you use to organize your images. Folders are limited because a single photo can only be stored in one Folder at a time. The same photo can be stored in as many Collections as you like, making Collections the easiest, and most flexible, way to organize your photos.

An example of this is a photo taken of a person called Jenny in Rome in November 2015. The photo can only be stored in one Folder, but it can be added to a Collection called Jenny, another one called Rome, another called 2015 – in fact as many as you need.

Your folders should be set up to make backing up easy (see earlier point). Your Collections should be used to organize your photos. My article Use Lightroom Collection to Improve your Workflow will help you with this.

Your turn

Of course, this list is not exhaustive, but I’d like to hear your thoughts as well. What do you think is essential to know about the Library module? Do you have any questions about the points raised in this article? Please let me know in the comments below.


The Mastering Lightroom CollectionMastering Lightroom ebook bundle

My Mastering Lightroom ebooks are a complete guide to using Lightroom’s Library and Develop modules. Written for Lightroom 4, 5, 6 and CC  they  show you how to import and organise your images, use Collections, creatively edit your photos and how to work in black and white.

googletag.cmd.push(function() {
tablet_slots.push( googletag.defineSlot( “/1005424/_dPSv4_tab-all-article-bottom_(300×250)”, [300, 250], “pb-ad-78623” ).addService( googletag.pubads() ) ); } );

googletag.cmd.push(function() {
mobile_slots.push( googletag.defineSlot( “/1005424/_dPSv4_mob-all-article-bottom_(300×250)”, [300, 250], “pb-ad-78158” ).addService( googletag.pubads() ) ); } );

The post 5 Essential Things You Need to Know About the Lightroom Library Module by Andrew S. Gibson appeared first on Digital Photography School.


Digital Photography School

 
Comments Off on 5 Essential Things You Need to Know About the Lightroom Library Module

Posted in Photography


Scarchitecture: Aerial Photos Reveal Vanished ‘Ghost Streets’

16 Dec

[ By WebUrbanist in Architecture & Cities & Urbanism. ]

architectural scars

When thoroughfares are subtracted from city grids, subsequent urban infill is shaped by the voids of these former roadways, streetcar or rail paths, standing out like architectural scar tissue when viewed from above. The effect is all the more pronounced when the disappeared passageways cut at odd angles through city blocks, forcing particularly odd-shaped ‘scarchitecture’ to follow.

scar detail view

When architectural writer Geoff Manaugh came across this phenomena in the streets of Los Angeles, readers rapidly began sending in examples from other cities. Some are surprisingly complex and counterintuitive, like the half-circle seen below (if you look closely) that seems to arbitrarily slice across multiple city blocks.

scar pathway winding

Manaugh’s fascination is infectious: “The notion that every city has these deeper wounds and removals that nonetheless never disappear is just incredible to me. You cut something out—and it becomes a building a generation later. You remove an entire street—and it becomes someone’s living room.”

scar horizontal slice

Perhaps most remarkable of all: many of these scarchitectural expressions frequently go largely unnoticed on the ground level. Most, however, emerge immediately as visual patterns when seen from aerial vantage points, their persistently unconventional orientations going against the grain of gridded streets surrounding them.

scar residual architecture

Small buildings can completely conform to the unusual geometries these ‘ghost streets’ trace; some sides of other structures, reconfigured paths and even parking space orientations may also follow these uncanny trajectories, in part or in whole, as if aligning to secular ‘ley lines’ of invisible force. Next time you are using Google Maps, pan around your own neighborhood and you could find evidence of scarchitecture, perhaps cutting right through your own backyard.

Share on Facebook


[ By WebUrbanist in Architecture & Cities & Urbanism. ]

[ WebUrbanist | Archives | Galleries | Privacy | TOS ]


WebUrbanist

 
Comments Off on Scarchitecture: Aerial Photos Reveal Vanished ‘Ghost Streets’

Posted in Creativity