RSS
 

Archive for October, 2015

Out of sight: Astronomers create 46-gigapixel image of the Milky Way

27 Oct

Researches from German university Ruhr-Universitat Bochum spent half a decade creating the largest astronomical image created to date, a 46-gigapixel image of the Milky Way, which is now available via an interactive online viewer. The image is made up of 46 billion pixels, and the file weighs in at a hefty 194GB. Read more

Articles: Digital Photography Review (dpreview.com)

 
Comments Off on Out of sight: Astronomers create 46-gigapixel image of the Milky Way

Posted in Uncategorized


Get Spooky With a DIY Halloween Photo Booth!

27 Oct
Halloween DIY

Photo booths are a must for Halloween parties and we’ve got all the tricks and treats you need to make a screamin’ good one using either your phone or DSLR.

(…)
Read the rest of Get Spooky With a DIY Halloween Photo Booth! (0 words)


© Erin for Photojojo, 2015. |
Permalink |
No comment |
Add to
del.icio.us

Post tags:


Photojojo

 
Comments Off on Get Spooky With a DIY Halloween Photo Booth!

Posted in Equipment


Concrete Wonders: 13 Brutalist Buildings in the USA & Britain

26 Oct

[ By Steph in Architecture & Public & Institutional. ]

brutalism US brunel 2

While the most theatrical Brutalist buildings remain in the former USSR, there are plenty more of these controversial concrete complexes around the world, and they draw both admiration and ire in Britain and the United States. While Prince Charles of Wales likes to call them ‘monstrous carbuncles,’ and sloppy Brutalist blunders certainly exist, many modernist concrete structures built between the 1950s and ‘80s are striking in their minimalism and solidity.

Geisel Library, San Diego, California

brutalist US geisel

brutalist US geisel 2

The Geisel Library at the University of California, San Diego (named for the author best known as Dr. Seuss) was made of reinforced concrete to save money, which enabled a more sculptural design. The 8-story structure by William Pereira has two subterranean levels and was “deliberately designed to be subordinated to the strong, geometrical form of the existing library” on the campus.

Tricorn Center, Portsmouth, England
brutalist US tricorn

brutalist US tricorn 2

brutalism US tricorn 3

This weird building called the Tricorn Center was a retail, nightclub and parking garage complex completed in the mid-1960s and so named because it resembles a tricorn hat from above. It was voted the third ugliest building in the UK in the ‘80s, and demolished in 2004. Charles, Prince of Wales famously called it “a mildewed lump of elephant droppings.”

Barbican Estate, London, England

brutalist US barbican

brutalism US barbican 2

brutalism US barbican 3

This residential complex built in the ‘60s and ’70s stands right in the financial district of London, one of the few examples of British brutalist architecture that’s still mostly intact. There are three tower blocks and 13 terrace blocks positioned around a lake and green squares; the towers are each 404 feet tall.

Brunel University, London, England

brutalism US brunel

brutalism US brunel 2

Built in the ‘60s and designed by Richard Sheppard, Robson & Partners, the Brunel University Lecture Center was one of two ‘high Brutalist’ structures prominently featured in Stanley Kubrick’s film A Clockwork Orange.

Brownfield Estate, East London
brutalist US balfron 1

Balfron Tower at the Brownfield Estate, an area of social housing in East London, is often considered the sister building of Trellick Tower. Designed by Erno Goldfinger in 1963, it contains 146 residences and features a separate elevator shaft with skybridge connections on every third floor.

Next Page – Click Below to Read More:
Concrete Wonders 13 Brutalist Buildings In The Usa Britain

Share on Facebook


[ By Steph in Architecture & Public & Institutional. ]

[ WebUrbanist | Archives | Galleries | Privacy | TOS ]


WebUrbanist

 
Comments Off on Concrete Wonders: 13 Brutalist Buildings in the USA & Britain

Posted in Creativity


26. Oktober 2015

26 Oct

Das Bild des Tages von: Mugelone

Mugelone

Im Ausblick: Was aus Kim Puc wurde, der Titanic-Eisberg und schmelzende Gletscher.
kwerfeldein – Fotografie Magazin | Fotocommunity

 
Comments Off on 26. Oktober 2015

Posted in Equipment


Video: What’s in the future for Sony’s Alpha system?

26 Oct

At PIX 2015 we took the opportunity to sit down and talk with industry leaders while they were in our neighborhood. Sony’s Alpha system has made some interesting moves over the last year, and we asked product manager Kenta Honjo all of our burning questions, including what’s in store for the future of the system. Read more

Articles: Digital Photography Review (dpreview.com)

 
Comments Off on Video: What’s in the future for Sony’s Alpha system?

Posted in Uncategorized


Testbericht: Samyang 135 mm f/2 ED UMC

26 Oct

Eine junge Frau sitzt mit einer Laterne im Wald

Ein Beitrag von: Paul Weber

Die manuell zu fokussierenden Objektive aus dem Hause Samyang sind ja durchaus dafür bekannt, gute optische Ergebnisse zu liefern, ohne dabei ihrem zukünftigen Besitzer ein nie mehr zu stopfendes Loch in seinen Geldbeutel zu reißen. Ob das Samyang 135 mm f/2 ED UMC da keine Ausnahme macht, versuchte ich in drei, am Ende dann doch sehr kurzweiligen, Wochen herauszufinden.
kwerfeldein – Fotografie Magazin | Fotocommunity

 
Comments Off on Testbericht: Samyang 135 mm f/2 ED UMC

Posted in Equipment


How to do a Head Swap using Photoshop

26 Oct

When looking through your pictures, have you ever had that sinking feeling of seeing everyone in a single image perfectly happy and smiling except for one person who was sneezing, sniffling, or looking at a squirrel? I can recall several times when I have returned from photo shoots being all optimistic about the experience, but realized as I combed through my images, that while I had several good shots where most people were perfectly posed, I didn’t have any shots where everyone looked just right.

It can be intensely frustrating, especially if you know you did everything in your power to get just the right shot. Fortunately Photoshop can help. With a few simple steps, you can learn how to load up a couple of images and perform a face or head-swapping maneuver with surgical precision, that would make Nicolas Cage blush (as in from the movie: Face Off). If it’s done correctly, no one will ever be able to tell that the final image has been altered.

Face-swapping can be incredibly useful when dealing with squirmy kids. This impromptu photo at a birthday party is actually a composite of three separate pictures.

Heade-swapping can be incredibly useful when dealing with squirmy kids. This impromptu photo at a birthday party is actually a composite of three separate pictures.

When going through my pictures, I always start with Lightroom to cull the images down to the best ones, and do initial edits, such as exposure and color adjustments. If I come across a situation where I need to take a face from one photo, and put it in another, I open both pictures in Photoshop (which is a simple matter of right-clicking and choosing: Open as Layers in Photoshop). For example, the following picture turned out fine except for the boy who was distracted by something off to the side.

This family picture I took on July 4 is fine, but the boy's expression is not the greatest.

This family picture I took on July 4th is fine, but the boy’s expression is not the greatest.

Fortunately I had another picture that looked great, but in this one the mother was blinking. No worries though – Photoshop was there to save the day!

He has a much better expression in this photo, but his mother was blinking.

The little guy has a much better expression in this photo, but his mother was blinking. Photoshop to the rescue!

When working with edits like this it’s a good idea to use as high-resolution of pictures as possible, so you have the maximum amount of data to work with. Do not export your images from Lightroom as low-res JPG files, and then import them into Photoshop. Instead use full-size originals, though I do like to make sure the exposures are as closely matched in each picture first. Edit your white balance, color adjustments, and other parameters such that both images are as close as possible before going into Photoshop, or your composite will look painfully obvious. (Some photographers take the exact opposite approach and do all the Photoshop work first, and then do color adjustments and cropping in Lightroom. Either way works, but I prefer the former method.)

If you’re unfamiliar with Photoshop, and it seems a bit overwhelming at first, don’t think about all the buttons, menus and options available to you just yet. This face compositing really only requires two sections: the Layers panel in the bottom right corner, and the Brush tool on the left side.

photoshop-face-swap-workspace

Open both images as layers in Photoshop

Select both images in Lightroom and right click, then choose: Open as Layers in Photoshop. Once your images are open in Photoshop, rename one or both so you can tell which is the one to use most people, and which is to copy the new head from.

photoshop-face-swap-edit-as-layers


You now have two layers in one image: the background (in this case, the one where everyone but the mother is smiling) and the layer you just copied over (in this case, the one where only the mother is smiling).

photoshop-face-swap-multiple-layers

Make a layer with just the new head to be added

From here there’s a couple different ways to go about combining them, but when doing a simple head swap the method I prefer is to get rid of everything in the second layer except the face I want to put into the first image. To do this, use the Lasso tool to draw an active selection around the face, and create a new layer which consists of just the face itself. I like to use New Layer via Copy just in case I want to go back to the original for something, but it’s up to you. Make sure to leave plenty of padding around the face so you have enough room to blend it in as you make your adjustments.

photoshop-face-swap-new-layer-via-copy

You now have three layers in the side panel: the original background, the new one you copied over, and the face itself. Since you only need the face, you can click the eye icon just to the left of the layer you copied over, which leaves it intact but invisible (hidden layer).

photoshop-face-swap-three-layers-hide-one

Compositing or blending them together

Now comes the fun part – compositing the face! I like this step because I get to be a little creative, and play around with exactly how I want the final image to look. The first thing you’ll notice is the face you are working with is probably going to be out of place, unless your camera was on a tripod, and everyone was perfectly still.

photoshop-face-swap-initial-composite

To get the face into the proper position, select it in the Layers panel and change its opacity to about 50%. That way you can see both faces at the same time, which will help you as you start lining them up. (Note: alternatively you can change the face layer’s blend mode to Difference. That will show it sort of inverted (negative) and it makes it easy to position them or align the layers. Then just change it back to normal when done.)

photoshop-face-swap-opacity

With the face layer still selected, choose “Transform” from the “Edit” menu, or press command-T on a Mac (control-T on Windows). Use your mouse to drag the face into the proper position, and press the arrow keys on your computer to fine-tune your movements on a per-pixel basis. You can also use the Transform command to rotate the face in case the person has turned his or head slightly. To do this, put your mouse cursor just outside the border near one of the corners, where it will change to a rounded arrow which means you can now click and drag to rotate.

photoshop-face-swap-line-up-facial-features

Once you that have the second face lined up properly over the first one, press the [Enter] key to lock it in place, then bring the layer opacity of the face back up to 100%. Don’t worry if you didn’t get things just right: you can always made additional Transformations later by selecting the layer and choosing “Transform” just like before.

At this point things are looking pretty good, but right away you will notice a harsh border around the face where your selection box was. This needs to be eliminated so you only have the facial features you want, and not the person’s hair or any background elements that might have changed between the shots.

photoshop-face-swap-harsh-border

At this point you might be thinking “No problem! I’ll just use the eraser tool to get rid of the parts I don’t need,” but that’s a rookie mistake you will soon regret. The eraser tool is permanent, so instead we’ll use what’s called a layer mask to get rid of any parts we don’t want. It works similar to the eraser tool, but is fully adjustable and even altogether reversible (it’s called non-destructive editing) so that any edits you make can easily be undone at any point. With the face layer selected, click the “Add Layer Mask” button at the bottom of the Layers panel.

photoshop-face-swap-new-layer-mask

Now you can use the brush tool to paint out (using black) any areas of the face layer you do not want, or paint them back (paint with white) in if you do decide to keep them. This layer mask method is far more flexible than using the eraser tool, and it allows you to use varying levels of opacity as well. You can partially erase something, while retaining just enough to allow for a smooth transition, instead of a harsh line. Select the brush tool and choose a brush with soft edges. Play around with your flow rate and opacity settings too. I don’t like to go all the way to 100% opacity right away, so I usually start with 50%-70% to leave some wiggle room. Remember, you can always change your adjustments later.

photoshop-face-swap-brush-selection

Now you can start blurring the line between the background photo and the face you are compositing onto it. Use the brush tool to gradually erase around the edges of the face, and if you find yourself wanting to brush anything back in just press the X key to reverse the process (X switches your foreground and background colors, in this case black and white) as you apply the brush. Notice that you’re not actually painting on the image of the face, but on a mask that has been applied to the layer. You are basically telling Photoshop which parts of the face layer you want to see, and which parts you want to erase (hide) or mask out. In the Layers panel you will see this mask show up to the right of the original layer as a mostly white box with some dark spots that indicate where you have painted with the brush.

photoshop-face-swap-edit-layer-mask

Using brushes on the layer mask is the most part of this whole process as I get to see my edits in realtime, and get as detailed as I want with brushing in the smiling face.

photoshop-face-swap-final-image

The final image

You can use this technique to composite as much as you want, including background elements, multiple faces, or even individual features such as eyes or teeth. Learning this simple head swapping technique is not only handy for creating the perfect group portrait, but can also be your gateway into a much broader world of Photoshop editing in general.

What are your favorite tips for doing simple edits in Photoshop? Do you have any other techniques that have worked for you over the years? Leave your thoughts in the comments below.

googletag.cmd.push(function() {
tablet_slots.push( googletag.defineSlot( “/1005424/_dPSv4_tab-all-article-bottom_(300×250)”, [300, 250], “pb-ad-78623” ).addService( googletag.pubads() ) ); } );

googletag.cmd.push(function() {
mobile_slots.push( googletag.defineSlot( “/1005424/_dPSv4_mob-all-article-bottom_(300×250)”, [300, 250], “pb-ad-78158” ).addService( googletag.pubads() ) ); } );

The post How to do a Head Swap using Photoshop by Simon Ringsmuth appeared first on Digital Photography School.


Digital Photography School

 
Comments Off on How to do a Head Swap using Photoshop

Posted in Photography


Tips for Pre-Planning City Photography When Travelling

26 Oct

You have finally arrived. After all the planning and decisions you are in one of the most beautiful places in the world. You have rested, and now you’re ready to go out to see what you can photograph.

You look around and realize you’re overwhelmed, and you’re experiencing sensory overload. You can’t figure out what to photograph, as there are too many options, and you don’t know what will make a good image.

leannecole-city-manhattan-skyline

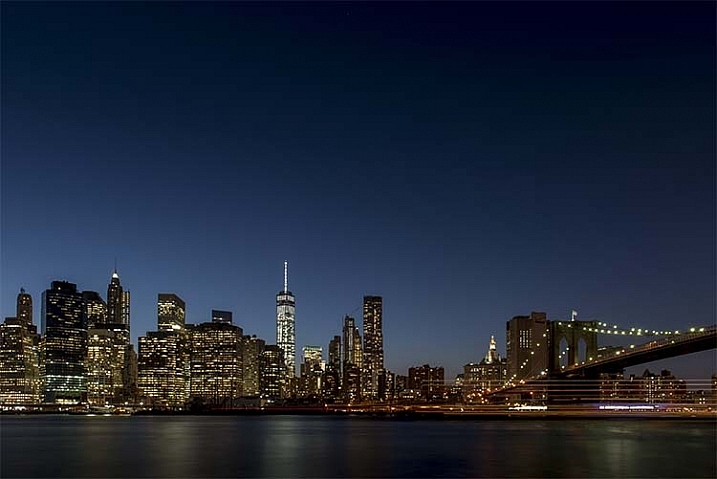
Manhattan at dusk from Brooklyn Park

This is a common problem when you find yourself somewhere that has so many amazing places to look at, and to photograph. It happened recently in New York to someone I was travelling with. She couldn’t work out what to do and how to approach where she was. She felt lost in a world of so many beautiful things to take photos of.

If you find yourself in a similar situation, here are some tips to help you get past that.

Figure out what you want to see

Think about why you have travelled to this destination. There have to be reasons why you wanted to go there. It might be a good idea to do some research and get an idea of what you would like to see ahead of time.

Make a list

Once you have that, the next thing to do is to make a list of the places you want to visit. For example let’s say you are in New York City. Some examples of places to visit and things to do include:

  • Empire State Building
  • The Flatiron Building
  • Walk over the Brooklyn Bridge
  • Times Square
  • Take a ride on the subway
  • Explore Central Park
  • Pay your respects at the 9/11 Memorial

Of course a city like New York is full of amazing places to go and photograph, these are just a few.

Work out on a map, or, if you have internet access, Google Maps, where they all are and how many of them are near one another. You don’t want to see them all on the same day, so divide them up over a few days.

What is the best time of day to shoot your chosen locations?

leannecole-newyork-flatiron-whole

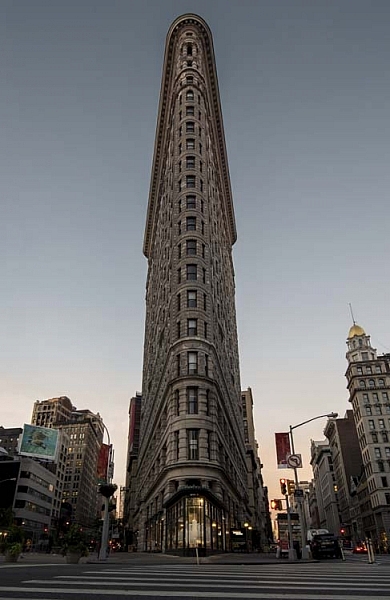
The Flatiron Building in New York just after sunrise.

It’s good to see where they are on the map as well for orientation. Can you see where they will be according the position of the sun each day? Take the Flatiron Building for example, would it be better to photograph it in the early morning, or in the late afternoon. Early morning during the sunrise could give you a lovely colour in the sky, but it will also mean that there will be less people around. If you are anything like me and don’t like people in your photos, then early morning can be the best time to see and photograph places.

Then again, if you want to photograph Manhattan after walking over the Brooklyn Bridge then late afternoon is going to be a better time. You get the sunset and then the lights coming on in the city.

The number of people at these places is also something to consider. New York is full of tourists, though many popular cities around the world are the same, so you need to think about whether or not you want them in your images. You can get photos without them, but that can take patience.

How are you going to photograph your chosen spots?

This is the part that can baffle a lot of people. Once you have narrowed down what you want to take photos, next you have to decide how to do it. There are several options, these might help you decide.

It is very easy to walk up to a building, hold the camera up to your face, click, and then you’re done. That is often what you see tourists doing, the “I’ve been here and done that” type of image, but as photographers we usually want more than that. You can get a lot more from a location- here are some tips to help you get better images:

1 – Photograph everything

leannecole-city-grand-central-station

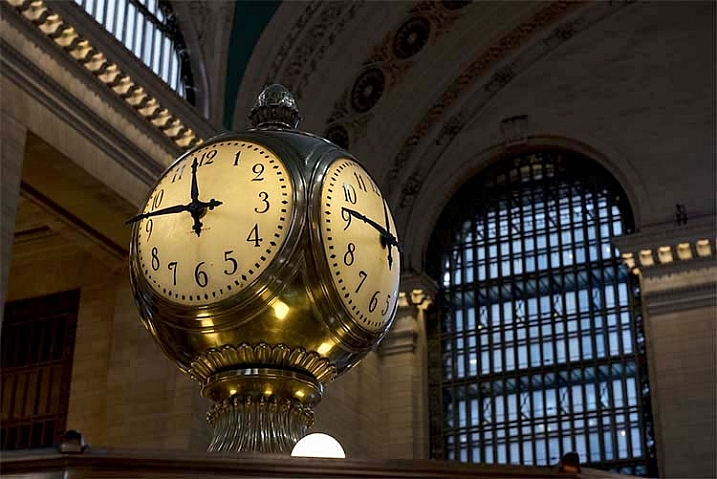
A close-up of the clock at Grand Central Station or Terminal

With the age of digital, not having to worry about how much film is going to cost to buy or process, you really can photograph everything. If something catches your eye, then take a photo of it.

Don’t analyze why, just do it. You can think about things too much, but keep in mind that you are there to take photos and it doesn’t matter, just snap away.

2 – Focus on the details

leannecole-newyork-flatiron-detail

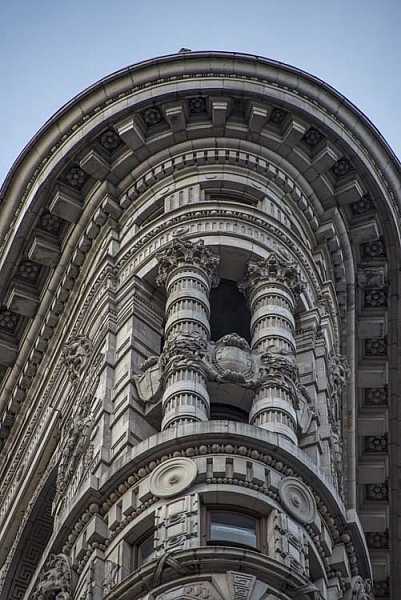
Detail of the Flatiron Building in New York.

Sometimes if you just look for the little things, the shape of a door, or some ornate decoration above a window, it can make a big difference.

Old buildings are great for giving you lots of details. They were often built using heaps of ornamental decorations around doors or windows. Besides taking photos of the whole building or location, think about smaller things, and how a close-up of a certain aspect can help give more of an idea of what it looks like.

If you look at the Flatiron Building, first you see the oddity of its shape, how it is placed within its environment, and then you start to see the stonemason’s work on the sides. It is covered in lacework and small sculptures.

New buildings don’t have the type of stonework as the older ones, but you can still get some interesting images. Often instead of small things, the buildings themselves are one large shape. It can be good to find that shape and the best way to take an image of it.

Take the new World Trade Centre, or, as it is commonly called, the Freedom Tower. It is an incredible shape which stands out all over the city. There is no denying it when you see it. Look at its form, and see if there is anything unique about it.

3 – Consider its position in the environment

leannecole-manhattan-bridge-empire-state

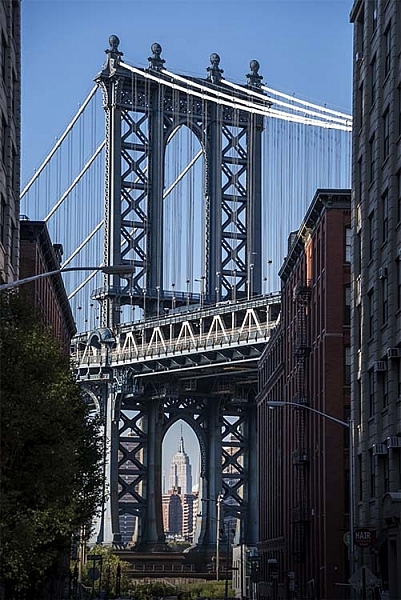
Looking through Manhattan Bridge to the Empire State Building.

The situation of the object you are photographing can help tell the story of it. Look around and see what else is there. Is it a busy street? Do people use it a lot? Is there a strange juxtaposition of what it is and where it is located?

Central Park is so big, yet it seems almost a contradiction to see it inside a city of steel and glass. It can be seen as an escape, yet in certain places you can see the city above the line of trees.

4- Look inside

leannecole-city-newyork-public-library

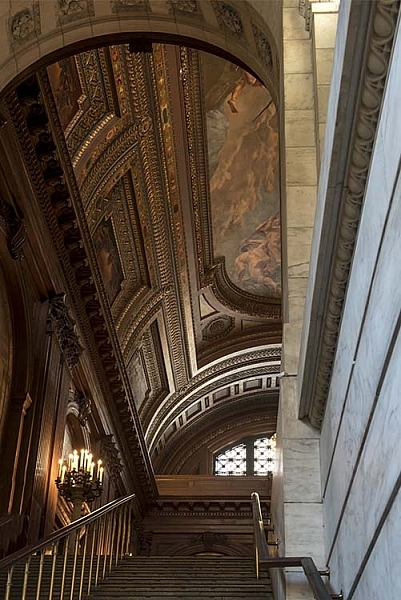
The staircase and ceiling in the New York Public Library.

There are many buildings that you can also photograph inside. Just make sure you have permission to do so first.

Once inside don’t use the flash on your camera, it will give your a strange look and, if it is a big room, will have little affect. Most public buildings frown on the use of flash as well.

Once you go into a building you will need to make your ISO higher, so don’t forget to raise it when you go inside.

Staircases are wonderful to photograph in both directions. Old buildings often have wonderful light fittings and very ornate ceilings, try to capture those.

leannecole-city-central-park

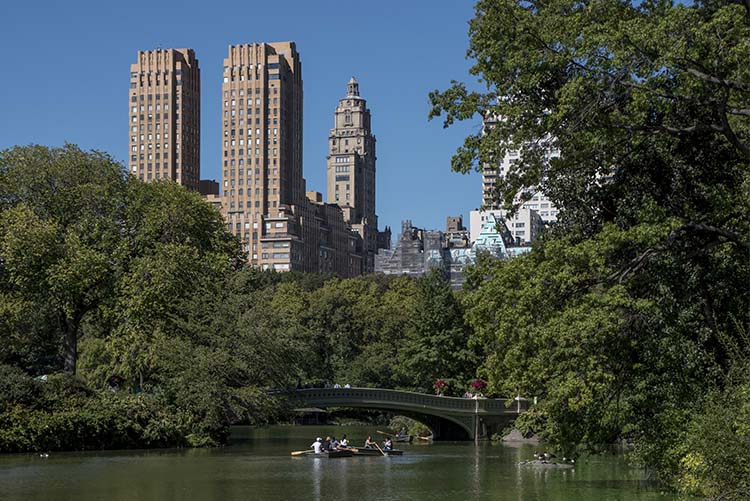
New York appearing above the trees in Central Park and the Bow Bridge.

Before you head out the door

Remember what you want to do when you are out taking photos. If you make a list of what you want to photograph, or a summary of this list, then you will get what you want.

If you are going to the Flatiron Building your list might look like this:

  • From across the street and straight on
  • From the left looking down the side street
  • Do the same on the right
  • Stand at the bottom and look straight up
  • Zoom-in on some of the different details on the building
  • Move to one side and have the building on the left or right and then show the street it is on

This can be a good way to get the shots you want. You don’t want to get back home and wish you had done something else.

If you think about all of these aspects of travel photography then it should help you to get over your feelings of being overwhelmed. It will help you focus on what you want to photograph, and how you want to see the city through your camera.

googletag.cmd.push(function() {
tablet_slots.push( googletag.defineSlot( “/1005424/_dPSv4_tab-all-article-bottom_(300×250)”, [300, 250], “pb-ad-78623” ).addService( googletag.pubads() ) ); } );

googletag.cmd.push(function() {
mobile_slots.push( googletag.defineSlot( “/1005424/_dPSv4_mob-all-article-bottom_(300×250)”, [300, 250], “pb-ad-78158” ).addService( googletag.pubads() ) ); } );

The post Tips for Pre-Planning City Photography When Travelling by Leanne Cole appeared first on Digital Photography School.


Digital Photography School

 
Comments Off on Tips for Pre-Planning City Photography When Travelling

Posted in Photography


Audiovisual Trikes: Portable Projections Animate City Streets

26 Oct

[ By WebUrbanist in Art & Installation & Sound. ]

audiovisual tricycle performance art

Lighting up streets and sidewalks of Rio de Janeiro, these mobile animation units utilize the movement of tricycles and available city surfaces to create amazing and interactive works of art.

interactive wall installation projection

The so-called Suaveciclos were designed by artists Ygor Marotta and Ceci Soloaga of VJ Suave from São Paulo, combining batteries, laptops, projectors and speakers to create a multimedia experience.

portable programmable light art

portable projection wall art

While some of the works are projected up high, those aimed at human-accessible surfaces (roads, sidewalks or low walls) are remarkably engaging, sparking children to start playing with the live projections.

portable light art demo

portable swimming mermaid wall

The versatility of these stop-and-go projection systems (tweakable to context) make it easy for the artists to react to crowds, stopping where popular or pressing on when their work at one site has run its course. They have pedaled their act in cities in Russia, Luxembourg, Slovakia Germany and Switzerland as well.

portable vj sound and light

portable speakers projectors

portable public art

From the artists: “small narratives with characters and poetry can travel open spaces, lighting walls on a large scale. The projections illuminate walls, trees, lakes, sidewalks and propose a playful interactivity with the public. With the video manipulated in real time, Suaveciclos bring art to all audiences and create unique moments between the city and the viewer.
In their playful universe, vjsuave deals with current themes with ambient sound accompanying the performance” (h/t Colossal and  Prosthetic Knowledge).


Share on Facebook


[ By WebUrbanist in Art & Installation & Sound. ]

[ WebUrbanist | Archives | Galleries | Privacy | TOS ]


WebUrbanist

 
Comments Off on Audiovisual Trikes: Portable Projections Animate City Streets

Posted in Creativity


Erez Marom: On the importance of naming images

26 Oct

Landscape and nature photographer Erez Marom has a lot of experience getting images in tough locations all over the world. Getting great shots takes a lot of work, but how many of us spend any time considering how to name our images? In this article, Erez takes us through his thought-process when titling his images, and explains why he thinks it’s so important. Click through to read the full article

Articles: Digital Photography Review (dpreview.com)

 
Comments Off on Erez Marom: On the importance of naming images

Posted in Uncategorized