Das Bild des Tages von: Felix Pacholleck
Im Ausblick: Die Frage nach der Schönheit, Leidenschaft finden und verlassene Villen.
kwerfeldein – Fotografie Magazin | Fotocommunity
Das Bild des Tages von: Felix Pacholleck
Im Ausblick: Die Frage nach der Schönheit, Leidenschaft finden und verlassene Villen.
kwerfeldein – Fotografie Magazin | Fotocommunity
Whenever you take a photo, no matter what the subject, it would be extremely unusual if it couldn’t be improved in some way by making local adjustments in Lightroom.
Local adjustments affect part of the image. Whenever you carry out any processing action in Lightroom you are either making a local adjustment (only affects part of the image) or a global adjustment (affects the entire image).
If you have been following this series and trying out some of the techniques I wrote about in my earlier Lightroom articles that you have been mainly making global adjustments. There is an exception. Adding a vignette in the Effects panel is a local adjustment because it affects the edges of the image but not the centre.
Lightroom gives you three powerful tools for making local adjustments. They are the Adjustment Brush, the Graduated filter, and Radial filter.
The Adjustment Brush is for creating an odd shaped mask – one that can’t be made easily with the Graduated or Radial filters.
 Note that masks work differently in Lightroom than in Photoshop. In Photoshop, the adjustment is applied to the area that isn’t covered by the mask. In Lightroom, the adjustment is applied to the area covered by the mask.
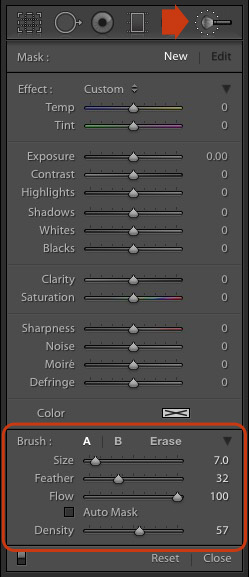
Creating a mask in Lightroom is the same as making a selection in Photoshop. Go to the Develop module and click the Adjustment Brush icon (marked on the right) or use the keyboard shortcut K.
The Adjustment Brush panel opens up underneath the icon. The first 14 sliders show the adjustments you can make with this tool. The Effect menu contains a number of presets that you can use (click the word “Custom” to see the pull-down menu).
At the bottom (circled) are sliders for setting the size, softness and strength of the Adjustment Brush.
To start, select Brush A (if not already selected) and use the [ and ] keys to make the brush smaller or larger respectively, until it is the right size to create the mask you need. You can also use the Size slider, but the keyboard shortcuts are easiest.
Hold down the Shift key and use the [ or ] to adjust the amount of feathering. Again, you can use the Feather slider but the keyboard shortcuts are faster once you get to know them.
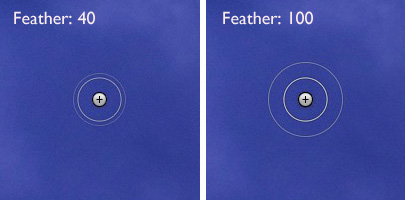
The size of the Adjustment Brush is shown by two concentric circles on the screen. The inner circle shows the area fully covered by the brush. The outer circle shows more or less where the effect of feathering ends. The distance between the circles increases when you increase the feathering amount. This diagram shows how it looks on screen.
You can create another Adjustment Brush by clicking on B and changing the parameters. You can switch between the A and B brushes whenever you like, useful for complex retouching.
Select Erase to delete part of the mask that you have created. You can adjust the size and feathering of the Erase brush as well.
Flow controls the opacity of the mask. 100 is full strength. Set it here unless you have a reason to do otherwise.
Density sets the maximum strength of the effect.
The difference between Density and Flow is this. If you set Flow to 25% and repeatedly brush over part of the image, each brush mark builds on the one below it, increasing the strength of the effect until you reach 100%. If you set Density to 50%, and flow to 25%, then repeatedly brush, the maximum strength you can reach is 50%.
This diagram shows the difference. On the left I set the Exposure slider to +4.00, Flow to 25%, Density to 50% and brushed repeatedly. On the right I did the same with Density set to 100%.
Tick the Auto Mask box to limit the edges of the mask to any edges in the photo. Sometimes this tool works well, but other times it reacts to textures and creates a patchy mask that doesn’t cover the area you want. I leave this unticked most of the time.
You can add as many Adjustment Brushes to an image as you like. Each one is represented by a grey dot that is revealed when you select the Adjustment brush tool and move the mouse over the photo. The current Adjustment Brush is marked by a black circle within the grey pin. Click on a grey dot to activate that adjustment and make changes to it, or delete it (press the Backspace key).
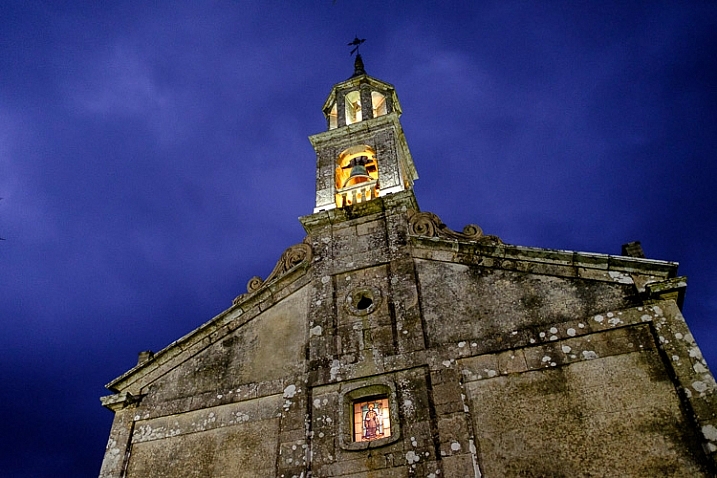
Now, let’s put that into practice. I’d like to do two things to the photo below. One is reduce the intensity of the highlights created by the lights inside the church; the second is emphasize the texture of the stone. We can do both with the Adjustment Brush.
First, I brushed in the areas affected by the bright highlights (shown in green below).
You can see the area covered by the Adjustment Brush at any time by pressing the O key.
This is called the Mask Overlay and is coloured green in my screen shots. The default colour is red. Press the Shift and O keys together to change it. Press O again to hide the Mask Overlay.
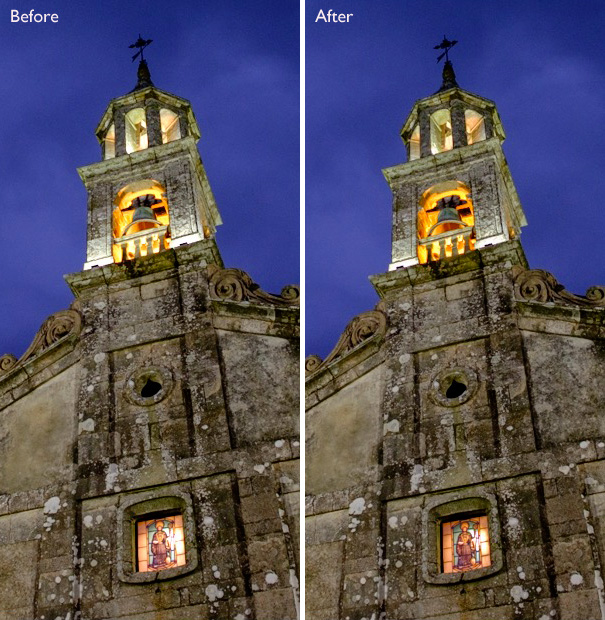
Then I moved the Highlights slider left (to -67) to reduce the intensity of the highlights. These screen shots show the difference.
Next, I created a new mask covering the stonework.

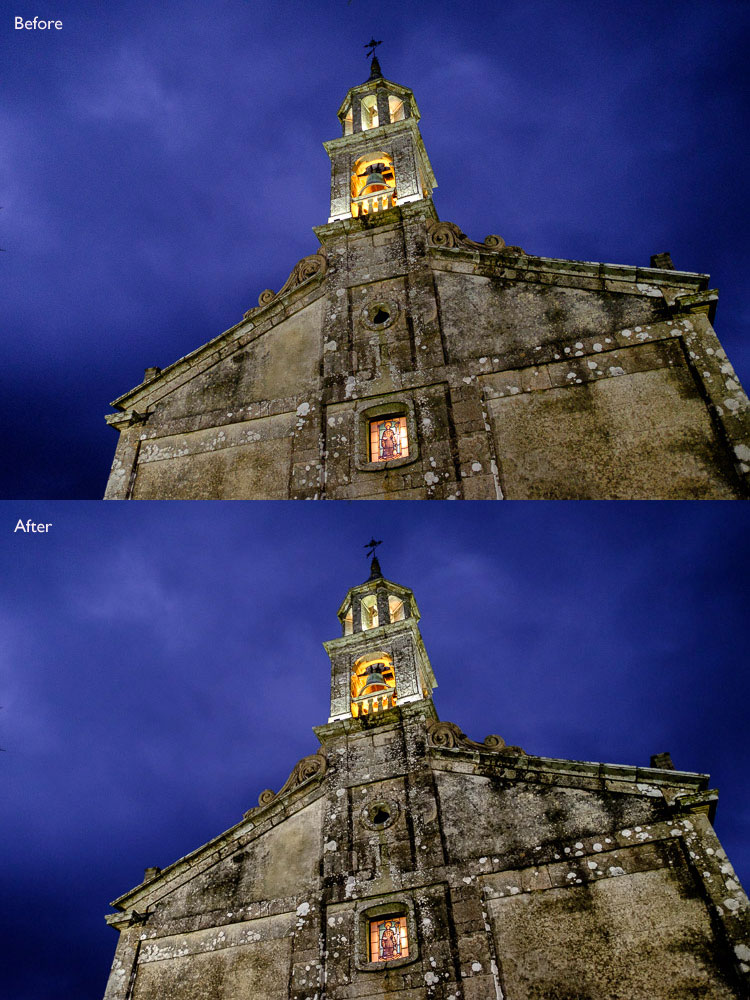
Then I increased Clarity to +58 to bring out the texture of the stone wall.
Here’s the final result, compared to the original.
Here are some more uses for the Adjustment Brush:
My article, Four Ways to Improve your Photos with the Clarity Slider in Lightroom, shows you how to do it.
Lightroom’s Graduated filter is named after the type of filter used by landscape photographers to make skies darker.
This is also the most obvious use for Lightroom’s Graduated filter. However, it only works if detail was recorded in the sky. it doesn’t replace a physical graduated neutral density filter.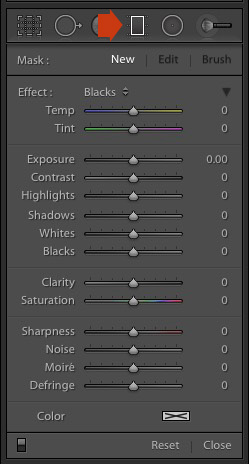
Go to the Develop module and click the Graduated filter icon (marked right), or click the keyboard shortcut – M. The Graduated filter panel opens, revealing the same sliders as the Adjustment Brush.
Click and hold the left mouse button down, and pull the mouse down over the image. Lightroom adds a Graduated filter to the photo.
The Graduated filter is marked by three lines that move further apart as you move the mouse across the photo. The lines represent the softness of the filter – the further they are apart, the more graduation you get.
Let go of the mouse button to place the filter. If you do so close to the edge of the photo, you will create a filter with three lines close together. This is a hard filter, with a rapid graduation between full effect and no effect.
If you hold the mouse button down for longer, you get a filter with three lines spaced far apart. This is a soft filter, with a gentle graduation between full effect and no effect.
The two types of filter are shown below. I pressed the O key to show the Mask Overlay (you can only do this in Lightroom 6 and Lightroom CC).

After creating the filter, you can move it by clicking and dragging the central pin.
If you hold the Shift key down while creating the filter, it is placed parallel to the edge that you started from.
To rotate the filter, hold the mouse over the central line (the one with the pin) until the cursor changes from a plus sign to a curly double arrow. Hold the left mouse button down and move the mouse to rotate the filter.
To change the softness of the filter, hold the mouse over the outer line until the cursor changes to a hand. Click and drag to move the line closer to, or further from, the central line. If you hold the Alt key down while you do so, the central line stays in position.
The best way to come to grips with this is to try it out. It may sound complex, but it’s quite simple, and you’ll quickly get the hang of it.
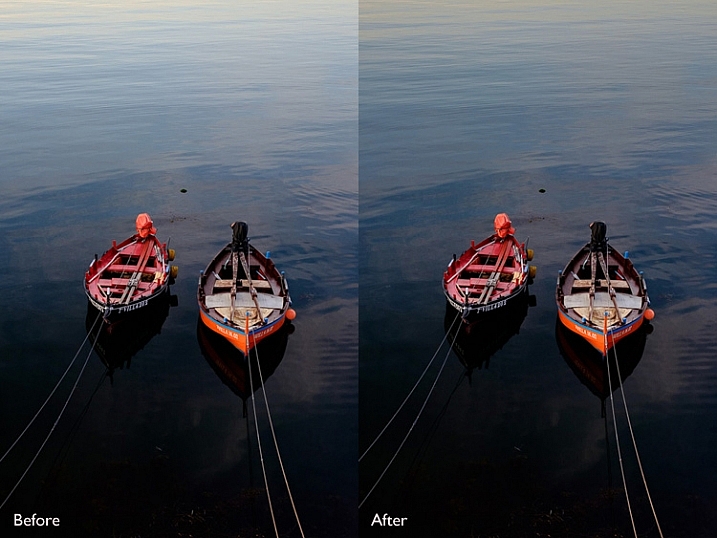
Here’s an example of how you can use the Graduated filter to improve an image. The water behind these boats is very bright, and I wanted to make it darker to fit in with the foreground. The Graduated filter is the perfect tool for this. Before and After photos shown below.
In Lightroom 6 and Lightroom CC you can combine the Graduated filter with the Adjustment Brush. The Adjustment Brush is used to alter the shape of the mask created by the Graduated filter.
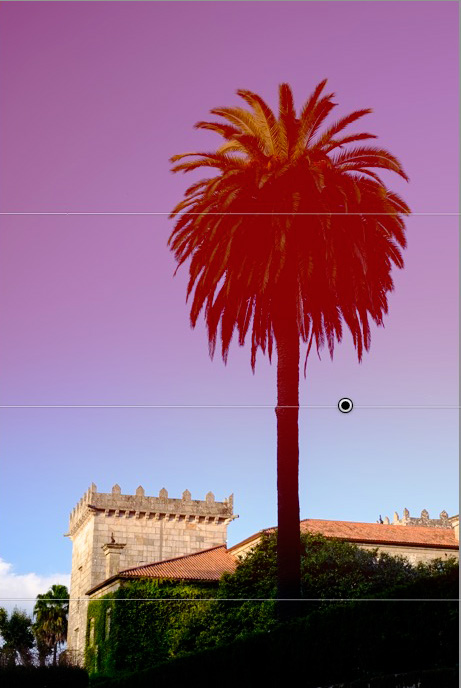
In this example, I used the Graduated filter to darken the sky. The only problem is that the Graduated Filter also makes the palm tree darker, which I don’t want. Here’s the Mask Overlay (shown in red).
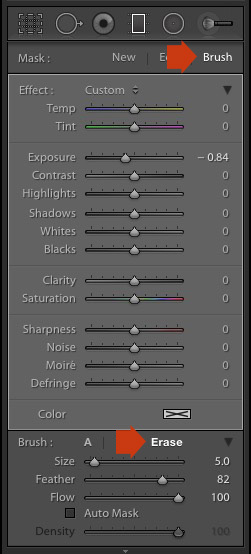
Press O to show the Mask Overlay, then click on the word Brush in the Graduated filter panel (marked below). The Brush options open up below the panel. Click Erase (also marked below) and adjust the size (and other settings) to suit.
Here’s what the Mask Overlay looks like with the part that covers the palm tree erased.

Here are the before and after versions.
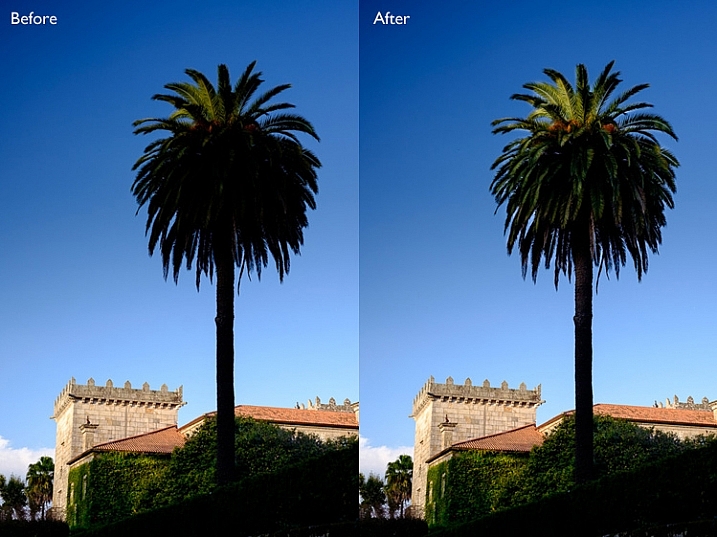
Before (left) showing the graduated filter to darken the sky. After (right) showing the tree portion having been erased or masked out from being darkened by the graduated filter.
My article Improve Your Images with the Lightroom Graduated Filter Tool shows you six ways you can use the Graduated filter to improve your photos.
The Radial filter (new in Lightroom 5) is for creating circle or oval shaped masks. If you have Lightroom 6 or Lightroom CC you can press O to show the Mask Overlay. You can also combine the Radial filter with the Adjustment Brush.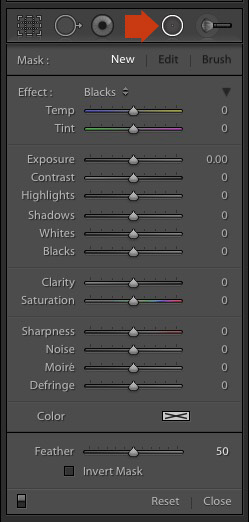
Go to the Develop module and click the Radial filter icon (marked right). The Radial filter panel opens. The sliders are the same as those used by the Graduated filter and the Adjustment Brush.
Hold the left mouse button down and drag the mouse across the photo. Let the mouse button go when you are done.
Change the size and shape of the Radial filter by clicking and dragging the four white squares at the compass points of the filter.
Rotate the Radial filter by moving the cursor to the edge of the filter until it changes from a hand or plus icon to a double curly arrow. Click and drag to rotate.
Use the Feather slider to set the softness of the gradient at the edges of the Radial filter. The default setting of 50 seems to work well for most masks, but you can change it if you need to.
By default Lightroom applies the adjustments to the area outside the Radial filter. Tick the Invert Mask box to apply the adjustments to the area inside it instead.
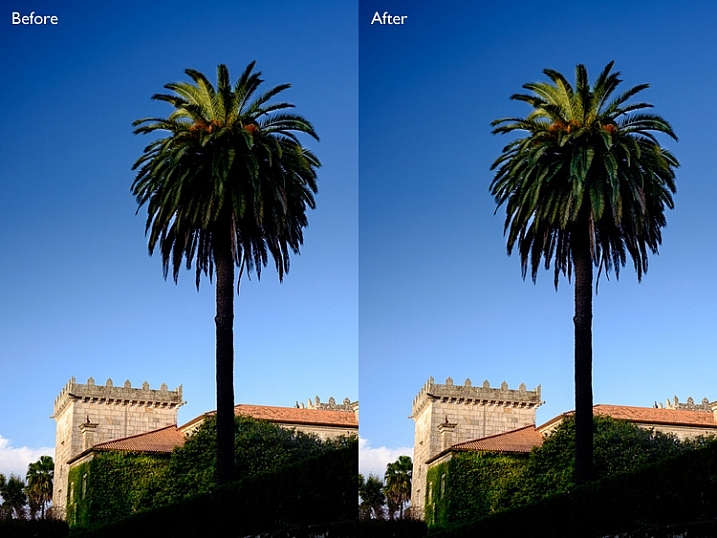
The screenshot below shows a Radial filter that I placed on photo used in the previous demonstration. I ticked the Invert Mask box to apply the adjustment to the area inside the Radial filter. The Mask Overlay is on to show you the affected area (in red).
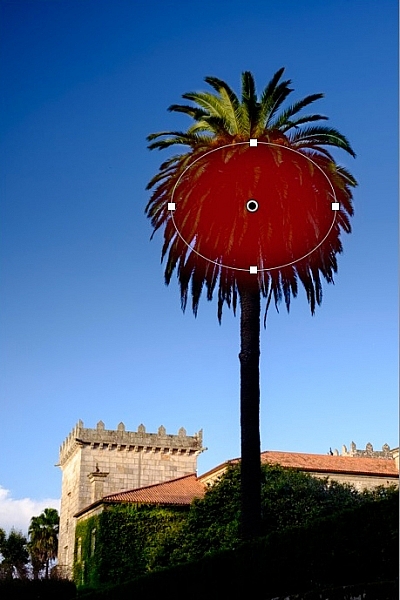
Then I increased Exposure to bring out some detail in the palm tree. Before and after versions below.
Here are some uses for the Radial filter:
In my next article I’ll show you how to harness the power of Lightroom using Virtual Copies. Until then, if you have any questions about the techniques in this article, or you would like to share how you use local adjustments in Lightroom, please let us know in the comments.
The Mastering Lightroom Collection
My Mastering Lightroom ebooks will help you get the most out of Lightroom. They cover every aspect of the software from the Library module through to creating beautiful images in the Develop module. Click the link to learn more or buy.
googletag.cmd.push(function() {
tablet_slots.push( googletag.defineSlot( “/1005424/_dPSv4_tab-all-article-bottom_(300×250)”, [300, 250], “pb-ad-78623” ).addService( googletag.pubads() ) ); } );
googletag.cmd.push(function() {
mobile_slots.push( googletag.defineSlot( “/1005424/_dPSv4_mob-all-article-bottom_(300×250)”, [300, 250], “pb-ad-78158” ).addService( googletag.pubads() ) ); } );
The post How to Use the Local Adjustments Tools Inside Lightroom by Andrew S. Gibson appeared first on Digital Photography School.
The Droid Turbo 2 is Motorola’s latest high-end device, bearing a 21MP sensor and an F2.0 aperture. Camera specs are mostly shared with the Moto X Style, but the new provides a more powerful Qualcomm Snapdragon 810 chipset, shatter-proof display and a battery good for 48 hours on a single charge. With a DxOMark Mobile score of 84 the Droid Turbo 2 cracks DxOMark’s top mobile rankings. Read more
Articles: Digital Photography Review (dpreview.com)
The LED monitor on the back of a camera is most often used to review captured images. But here’s a tip: Live View can also be a useful tool, helping you to focus your camera before taking the shot. In fact, Live View may be the most accurate means of focusing a camera. Let’s take a look at six ways you might use Live View to focus.
Use Live View to focus at different distances for focus stacking.
Focus Stacking is similar in principle to HDR. However, when doing Focus Stacking, images are captured with different parts of the image in focus, then combined in Photoshop to create an image with more depth of field than would be possible with a single exposure. This method is a useful tool when doing macro photography. Calm winds are a must to capture focus stacking images. Use Live View to accurately focus each image. Here is the step-by-step outline of the process:
Use Live View to manually trap focus a macro photography subject.
Manual Trap Focus can also be useful in macro photography. Set your camera to manual focus, and using Live View move the camera until the subject is in focus. Used in conjunction with a focusing rail on a tripod, or hand held, move the camera to focus the image. Another benefit of this method is that it also gives you a Live View of the depth of field for the image you plan to capture. See steps below to give this method a try:
To fine-tune the focus, use the zoom feature in Live View to get the most accurate focus point possible.
Live View is not restricted to the usual focusing points in your camera’s main focusing system. Most newer camera models will have 51 or more focusing points. However, these points are clustered around the center of the image. In Live View, you can move your focusing point all the way out to the edge of the image.
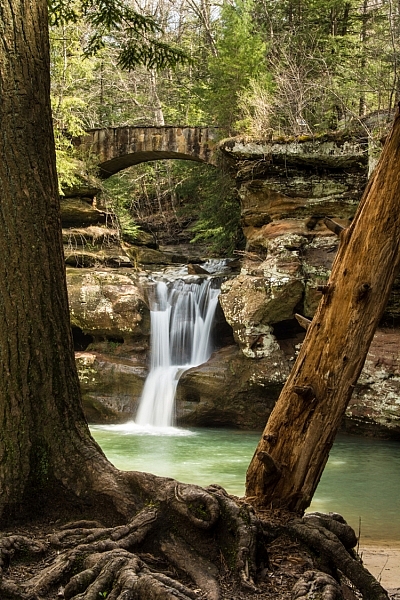
Use Live View focus to zoom-in for a more accurate focus on waterfalls.
Live View also provides a more accurate focus than a camera’s main auto focusing system. The Live View system is based on the contrast of the image actually captured by the camera’s sensor. It is slower-focusing than your camera’s regular phase detection autofocus system, but it is more accurate. This works great for focusing in on subjects within landscape, and portraiture where a slower-focusing method doesn’t affect the ability to capture the shot.
When photographing in low light situations, such as astrophotography, auto focusing often fails to provide a desirable result. Using Live View, in conjunction with manual focusing, can help obtain a sharp image. While in Live View, use the zoom to enlarge the subject’s image and then use manual focus to tweak the photo’s sharpness.
Use live view to focus when capturing low light images.
For the most compelling portraiture and wildlife photography, the most important focus is on the eye(s) of the subject. Using Live View, it is possible to isolate the eye for either auto focus or a manual focus. This method is limited to images that are posed, or with little movement.
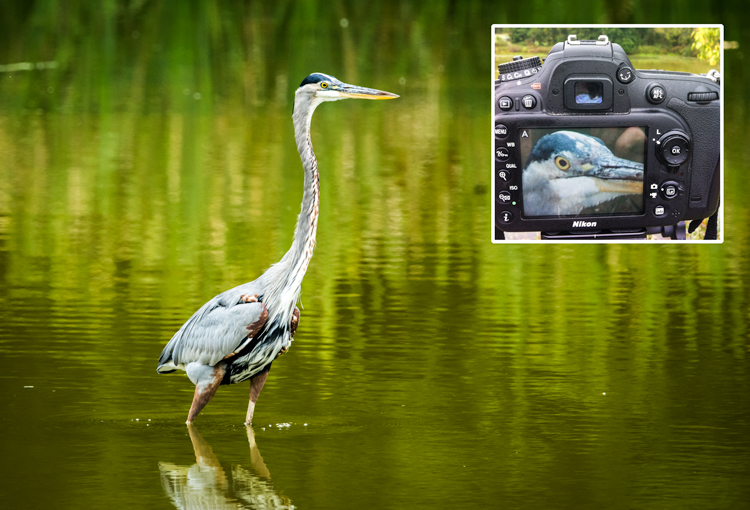
Use Live View to focus on the eye to fine-tune the focus in select wildlife images.
These are just a few ways that you can use Live View mode to focus your camera. Remember that using these methods will be much harder on your battery life. Always keep a spare, fully charged, battery with you when you are shooting. If you have any other ideas for using Live View for focusing, please leave them in the comments below.
googletag.cmd.push(function() {
tablet_slots.push( googletag.defineSlot( “/1005424/_dPSv4_tab-all-article-bottom_(300×250)”, [300, 250], “pb-ad-78623” ).addService( googletag.pubads() ) ); } );
googletag.cmd.push(function() {
mobile_slots.push( googletag.defineSlot( “/1005424/_dPSv4_mob-all-article-bottom_(300×250)”, [300, 250], “pb-ad-78158” ).addService( googletag.pubads() ) ); } );
The post 6 Ways to Use Live View to Get Sharper Images by Bruce Wunderlich appeared first on Digital Photography School.
How compositional rules can help or hinder your composition
Creating good photographs, and becoming a good photographer, is in general, not just about learning about your camera and all the rules of composition. These help, but while you should know your camera and have a good knowledge of technique, the biggest challenge you need to give yourself is learning to expand your perception, of the world and learn to see the world as it really is. Our minds are basically full of distractions – endless thoughts about our needs, wants, and to do lists. It’s a bit like living in a bubble which you need to break out of, so that you are fully able to see what’s happening around you, and not be distracted by your mind.

“It takes a lot of imagination to be a good photographer. You need less imagination to be a painter because you can invent things. But in photography everything is so ordinary; it takes a lot of looking before you learn to see the extraordinary.” – David Bailey
I think the rules of composition, and in particular the Rule of Thirds, are a great way to develop your perception. It’s not a rule you should learn and then overlay on all of your images, or your view of the world.
For me rules are a way to train your eye, so that eventually you can unleash its wild creativity. The creativity that is totally unique to you and exists in no other person.
My philosophy with rules is always, “Learn the rules like a pro, so you can break them like an artist.” (Picasso said that by the way, not me).
I like to think of the rules of composition as a little tool box that you can draw from in different ways, and in different variations. They aren’t always necessary, but they are super useful for helping your mind be both disciplined and focused, as well as creative, free, and wild.
I love the rule of thirds because it’s a very simple, and easy concept to understand. It’s one of the key compositional rules (others include: leading lines and natural framing) that many photographers use to enhance their compositions. Although it can be tricky initially to bring it into your photos, once you start composing using the Rule of Thirds, it will immediately give your photographs a feeling of flow and depth; as well as helping them look balanced, creating an easy path for the eye of the viewer.
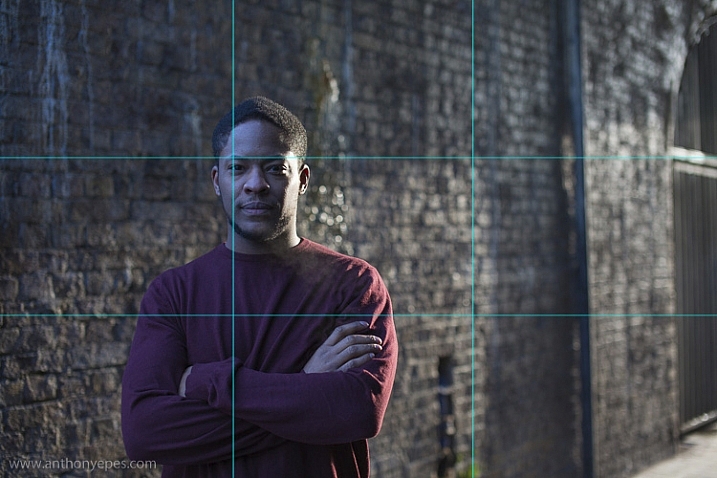
The rule of thirds breaks the image up into nine equal squares. Where the lines intersect we call these Points of Interest. The rule works by placing your subject, and other elements, along the lines and at the points of interest. Most cameras will have the option to overlay this grid on the viewing screen, so turn it on if that helps.

The human eye is naturally drawn to the these points of interest. It won’t generally look in the centre of an image first, unless there is a particularly arresting subject drawing the eye there.
Generally placing your subject off-balance, then using one, two or several other elements within the frame, placed at the points of interest, creates a much more visually appealing photo than having your subject dead centre. It:
What’s very important also, is that you have one or two other elements within the frame that balance or create energy, tension or harmony with your subject. It’s not enough to just have your subject off-centre. Let’s look at some examples.
Let’s start simply. Rule of thirds can be applied to your horizon line. Don’t put it in the middle, use it to run along the top or bottom third of the image:
This is more unusual to do than you imagine. Of the thousands of photos I have with a horizon line only a handful are not running along the centre of the image.
With every technique you use, there has got to be a reason for doing it. Otherwise you just see technique. I used it in the photo above (at the top of the article) because the clouds and sky were so much more interesting than the foreground, and below, because the light on the water was beautiful.

You can also apply the idea of having lines run along the upper or lower third of your image to things other than the horizon. Here I’ve applied it to some well organized rubbish bags. Notice that the line of bags follows the bottom horizontal line, but that it’s also emphasized by the line of the pavement and double yellow line at the bottom? These elements create energy – giving it perhaps a sense of movement and flow. Then you have the vertical lines and brickwork patterns as a contrast. All of this order of lines and patterns are very pleasing to the eye. The mind is always looking for order within the chaos of the world!

It’s important to say that I am not walking around looking for pictures that fit into the rule of thirds, or any of the other composition rules. But when I find a subject I’m interested in (I believe passion for your subject is the most important thing in your photography) and I am composing, looking for elements etc., then that’s when the rules are really helpful. Once you really get familiar with the rules, then you can start to adapt them to your own creative vision.
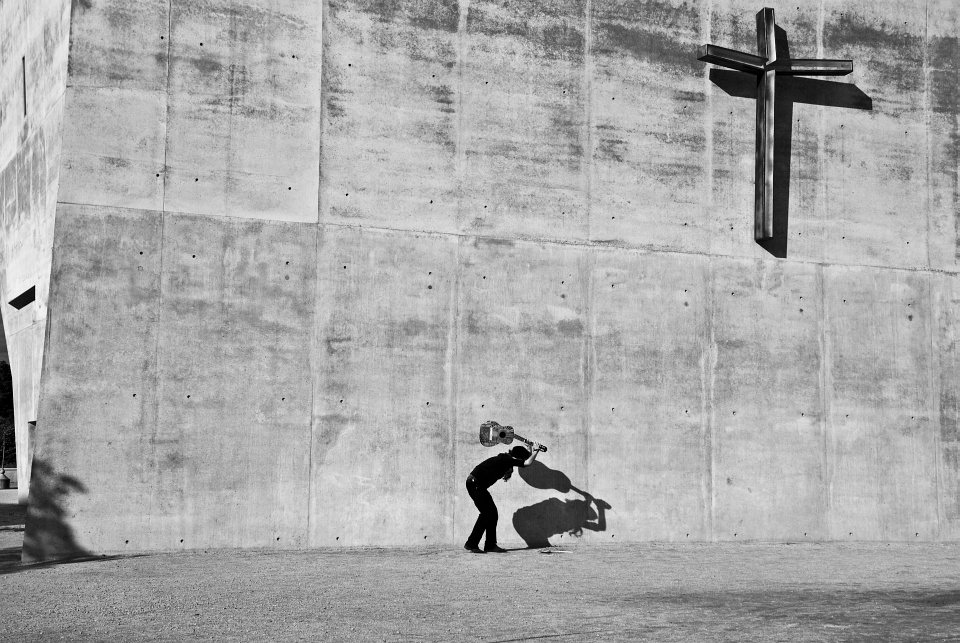
I have a passion for urban decay, you might call it. In the image below, instead of placing the ball and the column dead centre, I placed it in the left third of the frame. The other elements that are balancing it out are the ring on the floor, the lines going horizontally along the image, connecting with the points of interest lines, and then in the top third of the photo we have the notice on the wall. Take away the notice and the ring, and you’d have a much plainer, less interesting image.

Below is one of my favourite photos of London. Here you have the old street lamp hitting the two left hand points of interest, and the wheel of the London Eye in the bottom right corner. You could say that there are only two elements in this photo – a primary and a supporting secondary in juxtaposition. The street lamp being the primary element is placed on the first third and is without a doubt the main subject. But by adding the London Eye as the secondary element we now have a sense of place, and the relationship is complete. It says, “This is London!”

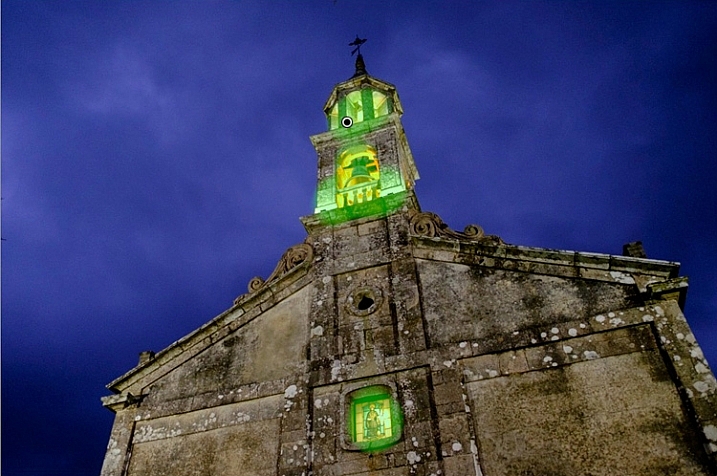
I like that the third element in the image below is the blue background, which helps the image feel clean. But because of the balancing elements of the woman and the sign, it’s not overly simple.

In the photo below is a rough adherence to the Rule of Thirds. Can you see where I placed the elements and why? Do you think this was the best way to compose the image? What’s important for me is that it’s not just a photo of a skeleton – it’s a photo of a skeleton in a very beautiful place. I find that lots of photographers will get absolutely mesmerized by their subject and start taking photos before absorbing the whole scene (you know that time when you get your images up on the computer and wonder why they don’t look as great as you thought they were going to, this is often due to not taking in the whole scene).

A very interesting skeleton it is, and unusual to come across. But there is also the element of perspective and the upper third being an almost ethereal sky. If you take away the sky the photo wouldn’t pop, would it? By placing the subject nearer the lower third I’ve created space for it to rest in.
Most people are able to appreciate, and see, the beauty and harmony of nature on a large scale – that epic view of a sunset over a beach, the vast meadow of beautiful flowers. But when you put a camera up to your eye, and reduce an image to a much smaller scale, I think most people lose that ability to see the harmony of the world, and thereby its beauty. The rule of thirds will help you see how to create harmony and balance within your photo, by helping you when you are placing your elements within your frame.
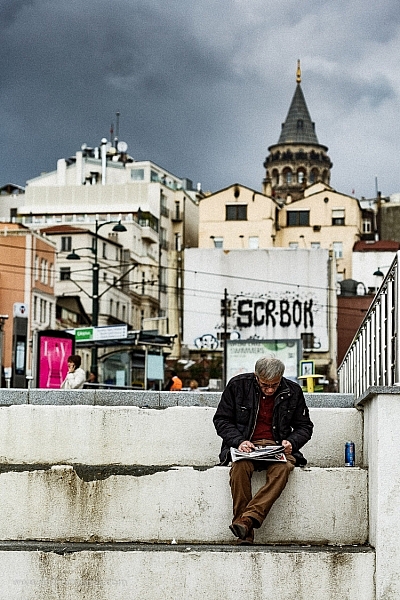
And now to Venice. This photo below is a bit more complicated, but let’s look at what elements are the most important. The man, definitely. He is bang on one of the points of interest. Now notice how the change of colour and texture of the building runs along one of the lines.
There is some of the structure of the rule of thirds but that’s not the whole story here. So you can use elements of the rule of thirds and then add in your own ideas and elements. It’s all flexible. Play with it.

You can sometimes use the rule of thirds to almost repair your image, by cropping. All processing programs will have the grid available, and I know that some photographers will overlay the grid and crop their image to fit these rules. I am not a fan of any kind of regular cropping. Why? Because I think in general it makes you a lazy photographer. Don’t rely on anything after the fact to make your photo better, when you can capture something in-frame now. By all means use things to enhance an already good photo, but no bad photo can be saved in post-production.
But – if you love post production, and you want that to be what defines your images, that’s fine. But become awesome at that, be excellent. What unifies all photographers who are taking consistently excellent photos is they are committed to excellence in their own way. That I can get behind.

We all come to rules differently. I’ve noticed in my workshops that not everyone has an affinity for absorbing rules, and putting them into practise. Maybe the idea of a more technical basis for your photography makes you squirm. But I would really encourage you to stick with it. Even if it takes a while for you to absorb this, the technical aspects of photography really give you a good grounding, so that you have the ability to take the photographs that you see in your mind’s eye.
If you are more of a technical rules-based person, my advice is to try and propel yourself away from the rules. I’ve noticed that people who get too involved in rules of composition, and their camera buttons, often find it difficult to really see what’s going on around them. So learn the rules, but then really push yourself to see beyond them.
So go explore and take the rules with you. Learn them, play with them and have fun.
googletag.cmd.push(function() {
tablet_slots.push( googletag.defineSlot( “/1005424/_dPSv4_tab-all-article-bottom_(300×250)”, [300, 250], “pb-ad-78623” ).addService( googletag.pubads() ) ); } );
googletag.cmd.push(function() {
mobile_slots.push( googletag.defineSlot( “/1005424/_dPSv4_mob-all-article-bottom_(300×250)”, [300, 250], “pb-ad-78158” ).addService( googletag.pubads() ) ); } );
The post The Rule of Thirds – How it Can Help or Hinder Your Composition by Anthony Epes appeared first on Digital Photography School.
[ By Steph in Abandoned Places & Architecture. ]
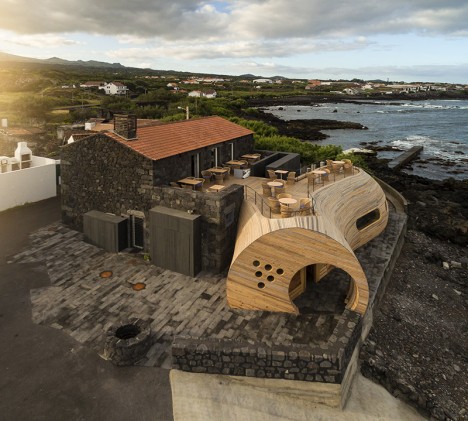
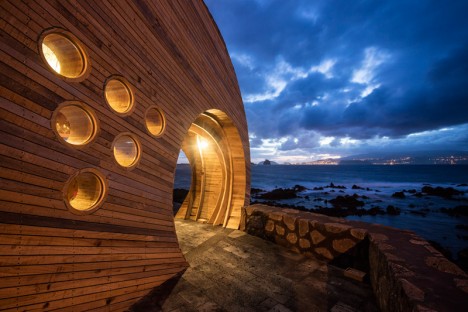
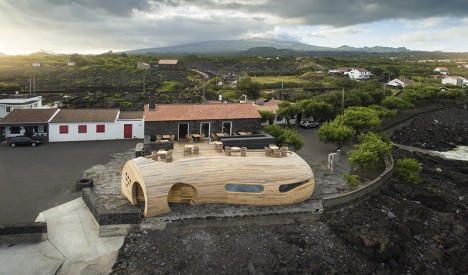
An abandoned traditional building on the coast of Madalena, Portugal has come back to life with a sculptural wooden extension that emerges from the back like a living organism. Cella Bar by FCC Arquitectura and Paulo Lobo leaves the original structure intact, merging the vernacular architecture with a wholly modern aesthetic in pale curving timber.
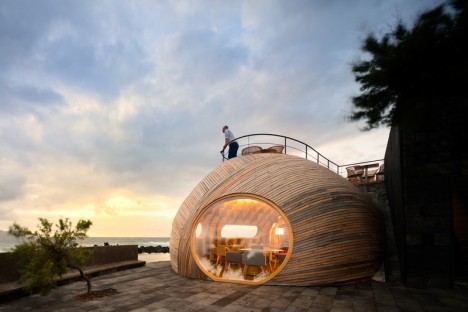
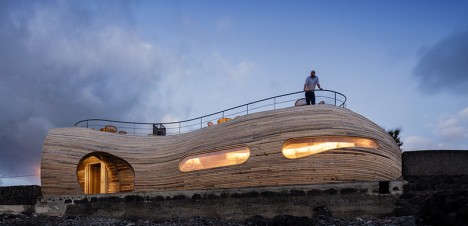

Missing elements of the abandoned building, like the doors and windows, were restored to make it look just as it did when it was first built, minus the charming weathering on the stones. The interiors were transformed to suit the building’s new purpose as a restaurant, the wooden floors flowing out the rear doors, onto the original terrace and continuing onto the roof of the addition.

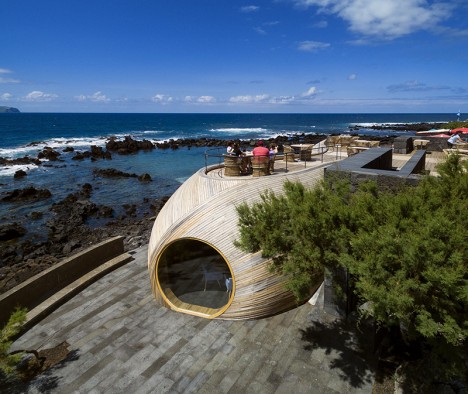
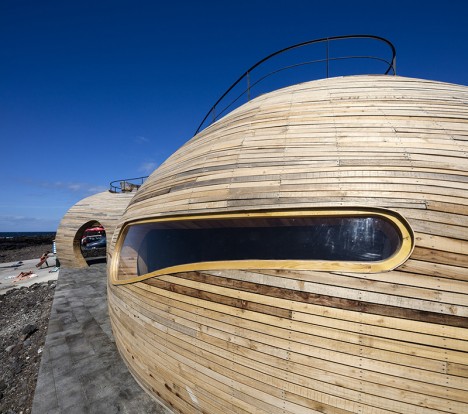
“The new extension is a contemporary creation, exposed to a completely different language,” say the architects. “It is an organic, dynamic construction that contrasts with the orthogonal, classic language of the building where it is embedded. The design is defined by great plasticity, both in terms of forms and materials, and is markedly inspired by the natural environment around the site. Several features of that environment are present in the architecture of the building, including the outline of the island, rocks, whales and wine casks. The new volume acts like a giant sculpture, tailored for its location.”

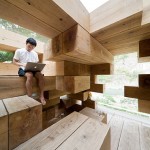
An abandoned building in Taipei serves as an urban laboratory for architecture and design students to incorporate nature and transient structures into cities.
Click Here to Read More »»
Wood may be most closely associated with cabins, stick-frame housing and other conventional forms of architecture, but a new wave of architects is adapting its …
Click Here to Read More »»

A faceted glass structure clings to the ruins of a stone church in Santpedor, Spain, filling in a gaping hole that was created with the demolition of an …
Click Here to Read More »»
![]()


[ By Steph in Abandoned Places & Architecture. ]
[ WebUrbanist | Archives | Galleries | Privacy | TOS ]
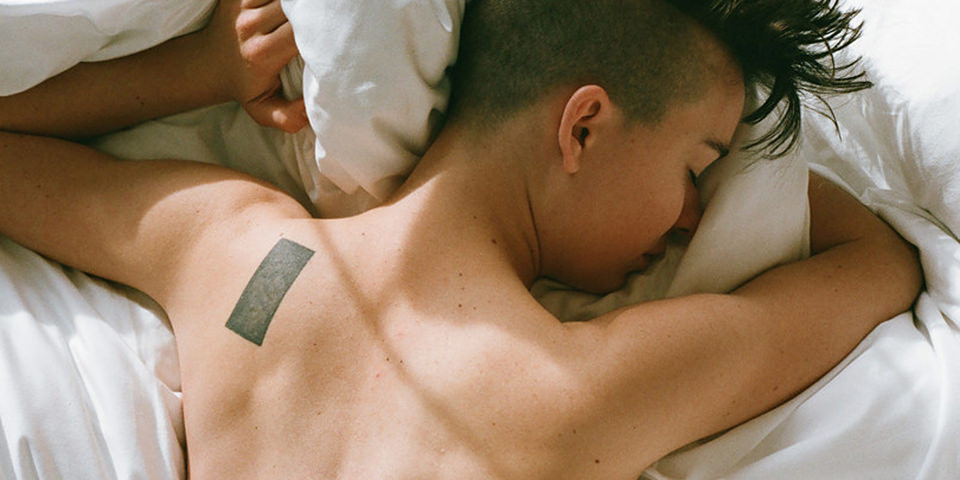
Ein Beitrag von: Brooke Nolan
Die Fotografin und Regisseurin Goodyn Green kommt zu unserem Treffen mit einem alten blauen Fahrrad, alten Jeans, Lederjacke und kurzen scharlachroten Haaren. Zwei Tattoos auf ihren Armen zeigen die Sprüche „How feminine is this?“ und „pretty damn fucking feminine“. Ich berichte über die Arbeit von Goodyn Green, die Rollenklischees hinterfragt.
kwerfeldein – Fotografie Magazin | Fotocommunity
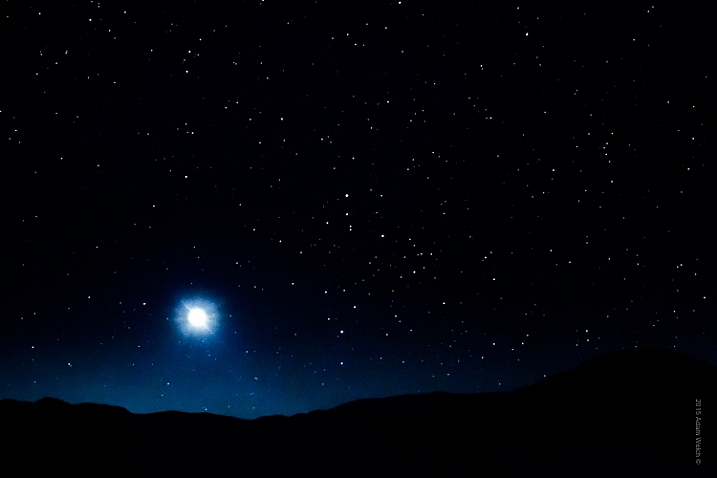
There may not be a more challenging subject matter for photographers than astrophotography. When I first began making photographs, I had an elusive and challenging goal which was to make a photograph of the moon.

13 years later (has it really been that long?) I think back and smile at how impossible capturing that photograph of the night sky seemed to me at the time. Back then, the idea of making an image that captured the moon or the stars, and even a galaxy, seemed impossible. I assumed the images would require an expensive camera or some kind of magical photo gear. I couldn’t have been more wrong. In reality, you probably have everything you need to get started in astrophotography right now!
Astrophotography is simply a name for the realm of photography which images astronomical objects and the night sky itself. The moon, stars, constellations, galaxies, and even the sun, are all considered astronomical objects. In this article, you’ll learn just how easy it is to make great single exposure photographs of the wonders to be found in the expanses of the night sky.
You will only need some basic photographic gear and a small dose of patience. Complicated image stacking software and astronomically priced lenses and professional cameras not required. Now let’s get started!
Let’s talk about some of the bare bones gear that you will need in order to make your astro photos.
You need to be able to control as many variables as possible, so shooting in Manual Mode is essential. Bulb capability is a plus, but not required. Bulb mode means that the exposure begins when you open the shutter and continues until you choose to end it by closing the shutter. Bulb mode is a setting which is now available on even the most budget friendly dSLR’s and mirrorless cameras (even some point and shoots have it).

Wide angle lenses are sometimes viewed as the only focal length to use for astrophotography, but that is most definitely not true. The key to solid astrophotography is to use a lens which can let in the most light. These lenses will be rated with a small f-number and are often prime (fixed focal length). While wide angle lenses will give you a sweeping vista of the sky, don’t count out your medium-telephoto lenses.

You simply cannot escape the fact that a reliably sturdy tripod is the foundation on which all strong astrophotographs are built. Unwanted motion is your enemy. You will need a tripod that can support the weight of your camera and keep it completely motionless. Also, the mount on which the camera physically attaches will play a key role in the outcome of your images. Low quality ball-head mounts can sometimes drift under the weight of your camera during long exposures, so keep that in mind as well when choosing your tripod head.

You will have your lens tilted upward for many of your shots, so settling dew can become a problem, especially in the summer months. Be sure to pack at least one clean micro-fibre lens cloth to wipe off any moisture which can accumulate on your lens’ front element during long exposures. This is a small piece of gear that can make or break your photo outing.
Unless you are shooting in Bulb mode, a remote shutter release in not necessary. However, it makes your shooting a little easier, and helps to ensure less camera shake. When not using a remote, set your shutter release on the 2-second timer so that you will not shake the camera by pressing the shutter button.
Now that you know what gear you will need, let’s look at how to go about making your astrophotographs.
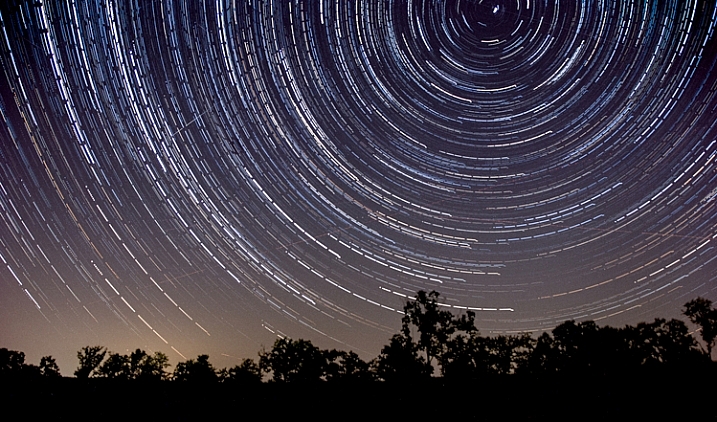
Without a doubt, the biggest question about astrophotography is, “How long should I expose my image?” The answer depends on what kind of photograph are you planning to make. The night sky is dynamic. Everything we see is moving, although it may not appear that way to our eyes. I often relate making photos of the night sky to making photos of water. If you want motion blur (star trails) you will need a longer exposure time. If you want to freeze motion (constellations and galaxies) you will need a shorter exposure time.
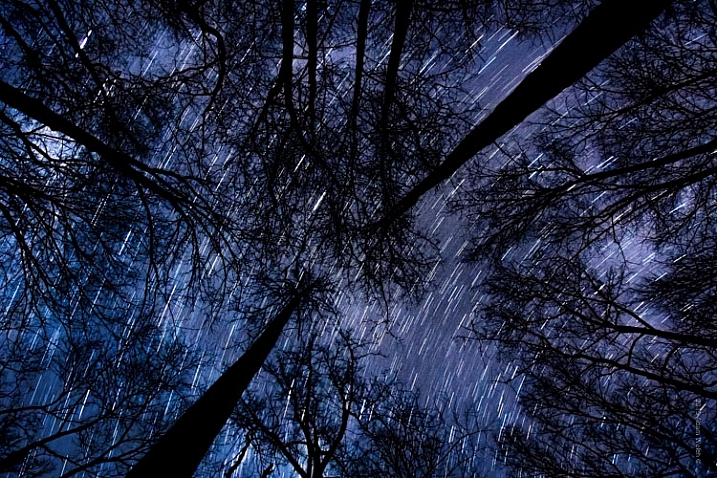
In my experience, the sweet spot for obtaining workable images of stars and the Milky Way without star trails, is around 15-20 seconds depending on the ISO and aperture (more on that shortly) settings. While there are of course no absolute formulas, a good guideline is called the 600 Rule. It is very similar to the reciprocity rule used for avoiding camera shake during hand-held shooting.
The 600 Rule states that to reduce celestial motion blur, the exposure time should be no longer than the equivalent of 600 divided by a given focal length. Meaning that the maximum shutter time in order to reduce star streaking for a 50mm lens would be 12 seconds (600 / 50 = 12), for a 14mm focal length it would be 42 seconds (600 / 14 = 42), and for a 24mm focal length it would be 25 seconds (600/24). This rule is based on full-frame digital image sensors and will keep star trailing less than 8 pixels wide. If you’re shooting an APS-C(cropped sensor) camera, try using 400 instead of 600 in order to obtain similar results.
The important thing to understand about shutter speed as it relates to astrophotography is that, just as in any other type of photography, longer shutter speeds will result with increased motion blur.

Aperture controls how much light is allowed to enter your camera, and in astrophotography the more light you have to work with, the better your images will be. Shoot your scene at the widest aperture possible. Keep in mind though, that all lenses have ideal apertures, and opening a lens all the way up (largest aperture) often affects overall sharpness. That being said, using a large aperture is almost always desirable, because it allows in the maximum amount of light, which will make your stars brighter and small celestial details more visible.
I shoot the majority of my astrophotography from f/1.8 down to f/3.5 and even f/4. Remember too, that with a wider aperture, precise focusing becomes very important due to the decreased depth of field. Manual focusing is very useful. If your camera has a focus magnification option, use it to zoom in on pinpoint stars or the moon, so that you can obtain the sharpest focus possible. Don’t rely on the infinity focus markings on your lens (they are often not accurate).
Selecting the ISO for your astrophotography is an exercise in compromise. High ISOs are better for shooting in low light conditions, but will also result in more grain and noise in your final photograph. Finding a comfortable medium can be difficult. Shoot with the highest ISO that you feel gives you the least amount of noise, but still allows you to use your desired shutter and aperture settings.
Most cameras now have high ISO noise reduction built into the their on-board software. I find it is almost always helpful to turn this function off – stay with me here. The reason being, is that image post-processing software today almost always does a better job of reducing noise than does in-camera high ISO noise reduction, which can sometimes reduce contrast and image sharpness. I highly recommend that you experiment with your particular camera and find out what you prefer for your own needs.
You may have heard the benefits of shooting in RAW format. In astrophotography, shooting your images in RAW format becomes extremely helpful. The extra information gathered from these larger files will add a huge amount of dynamic range, which will allow you to process the images to a greater degree. Noise reduction will also work more effectively when coupled with the RAW image format.

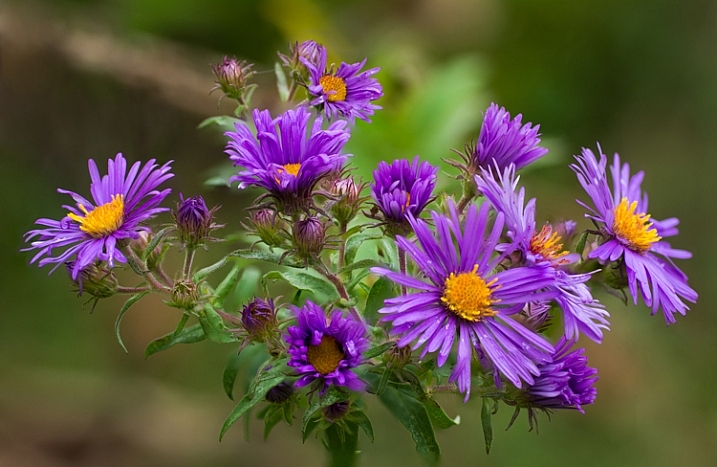
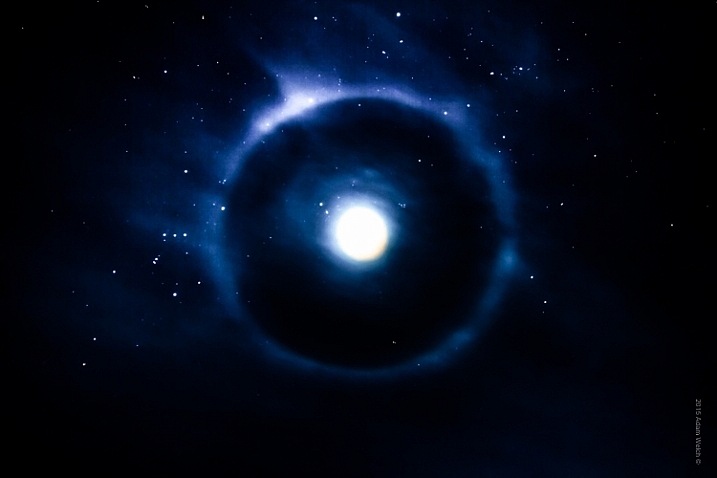
While the objects found in the night sky are incredibly beautiful on their own, adding additional points of interest will often make your astrophotography even stronger. Add reference points such as trees or buildings. Look for a elements that bring harmony within the composition, and flow well with your astrological subject.

While dark skies are certainly ideal for astrophotography, don’t feel that that all external light sources are a bad thing. Sometimes having city lights, or other luminance, interact with your scene can heighten the impact of your composition and add contrast within the image.

Astrophotography loves color. Don’t be afraid to increase, and manipulate saturation and hues in your post-processing workflow. Experimenting with colors will make your photograph a piece of personal art, rather than just a representation. Still, it is advisable not to over process your images so much that you lose detail, and/or make the entire image gaudy and unrealistic (which of course is very subjective). As always, less can sometimes be more.
Astrophotography is challenging, fun, rewarding, and educational. Making images of the heavens is a great way to develop your skills as a photographer, while at the same time producing beautiful images of things that most people may not have noticed before. Today, cameras and imaging software make it easy for us to make great photographs of the night sky. The information you have read here will put you well on the way to producing exciting astrophotos. Shoot for the moon!
googletag.cmd.push(function() {
tablet_slots.push( googletag.defineSlot( “/1005424/_dPSv4_tab-all-article-bottom_(300×250)”, [300, 250], “pb-ad-78623” ).addService( googletag.pubads() ) ); } );
googletag.cmd.push(function() {
mobile_slots.push( googletag.defineSlot( “/1005424/_dPSv4_mob-all-article-bottom_(300×250)”, [300, 250], “pb-ad-78158” ).addService( googletag.pubads() ) ); } );
The post Astrophotography Made Simple by Adam Welch appeared first on Digital Photography School.
For a few years now, InVisage has been working on a new kind of smartphone image sensor that claims to offer higher dynamic range and zero rolling shutter than the chips currently found in mobile devices. It appears the technology is now at a stage where its benefits can be demonstrated, and for this purpose InVisage has commissioned a short movie called Prix shot entirely on a prototype device using InVisage’s QuantumFilm technology. Read more
Articles: Digital Photography Review (dpreview.com)
PocketWizard has introduced a new version of its Plus series transceiver that features a top-mounted hotshoe. The new hotshoe allows a flash unit to be fitted while the PocketWizard Plus IV is attached to the camera, as well as when the flash is positioned remotely and being controlled wirelessly. Read more
Articles: Digital Photography Review (dpreview.com)
You must be logged in to post a comment.