RSS
 

Archive for September, 2015

6 Tips for Creating More Captivating Landscape Photographs

07 Sep

2-for-1 special

As part of Landscape Photography Week here on dPS, we’re offering TWO for the price of ONE on our best-selling Living & Loving Landscape Photography ebooks!

Click here to take advantage of this offer.


If landscape photography is your passion, you probably love to visit new places, and photograph beautiful natural scenes. But have you ever been unable to capture the beauty you saw in front of you in your camera? Do your images come out flat and boring? With these six tips, you’ll take your photography to the next level by creating more captivating landscape photographs that really stand out.

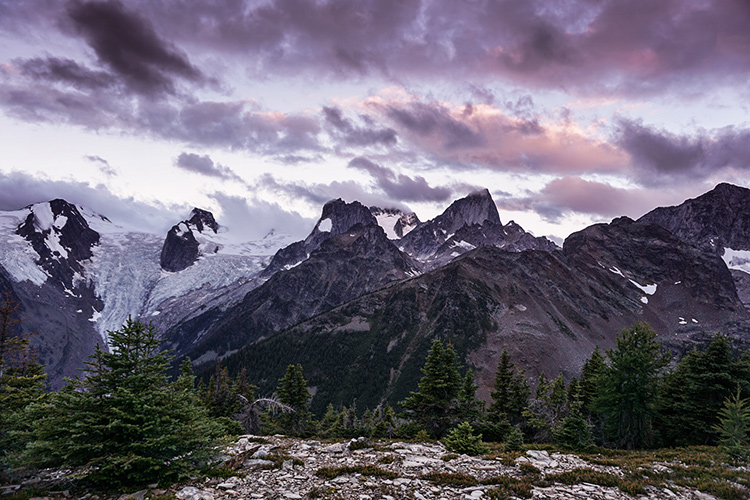
1. Time your shoot for the perfect light

Making interesting photographs is all about the light. Boring light creates boring photographs. Dramatic light creates dramatic photographs. Once you find a scene to work with, be patient and wait for the dramatic light that will enhance your image. You may even have to return on a different day to make the most of the scene.

Devils Tower, Wyoming by Anne McKinnell

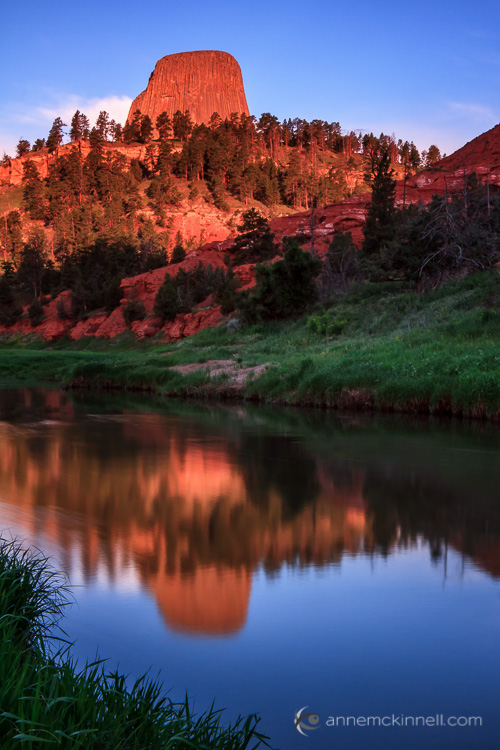
The quality of the light that illuminates your scene is going to change depending on the weather and the time of day.
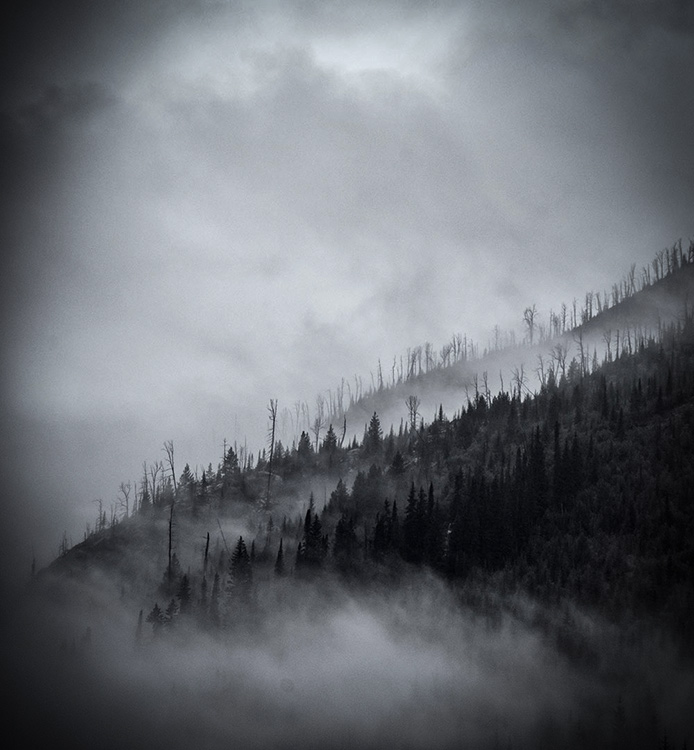
Weather

The effect that weather has on your photo is usually obvious – a clear, blue sky gives a distinctly different feeling than dark storm clouds. Direct sunlight causes high contrast and dark, clear shadows – but the light becomes soft and even on an overcast day.

Time of Day

We know that the sun rises in the east and sets in the west, but the direction of the sun with respect to your landscape also makes a big difference. It could mean the difference between the sun being in, or out of the frame. It determines which side of a mountain is lit, and can change the way the shadows fall in a grove of trees.

When you’re scouting your location, try to figure out where the sun will be at different times of day, what effect that will have on your landscape, and when you think the light will be at its best. This can be as simple as deciding whether you are at a sunset or sunrise location, so you know the best time to return to the scene.

Joshua Tree National Park by Anne McKinnell

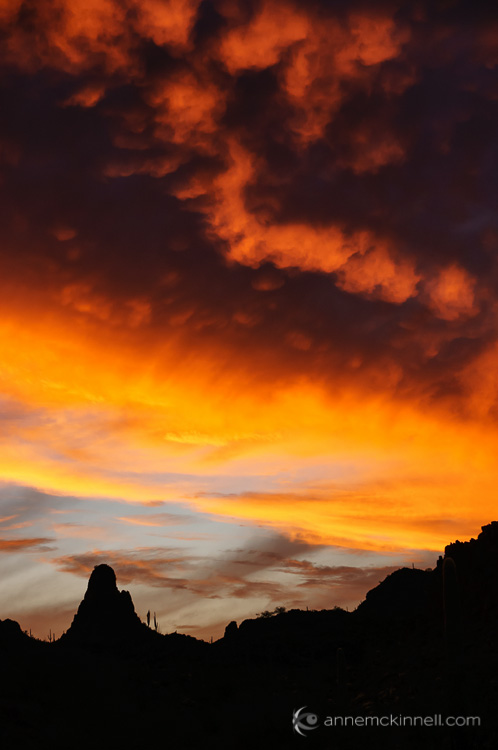
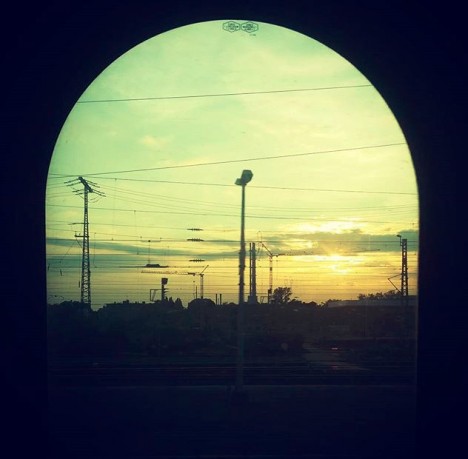
Keep in mind, as well, that the colour of the light changes throughout the day. When the sun is low in the sky (towards sunrise or sunset) the light takes on a warm golden hue, but in the middle of the day the light turns a brighter white. Just after the sun sets, and again before it rises, the blue hours give a scene a soft, cool tone.

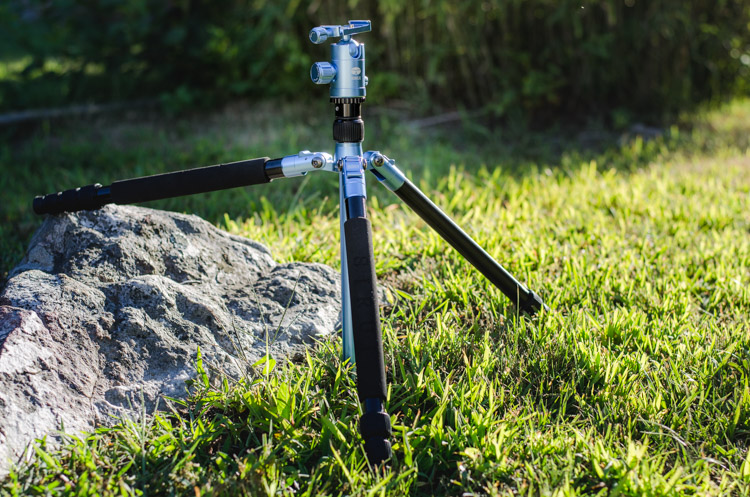
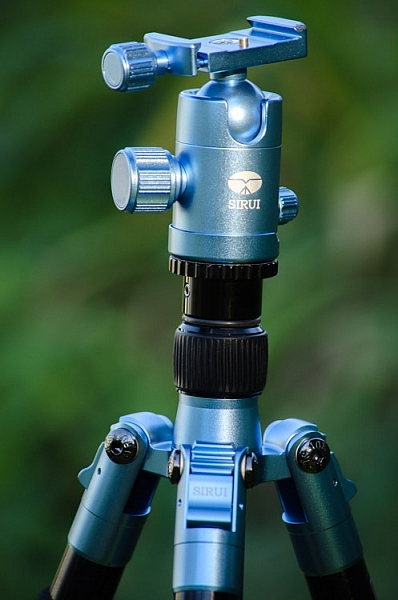
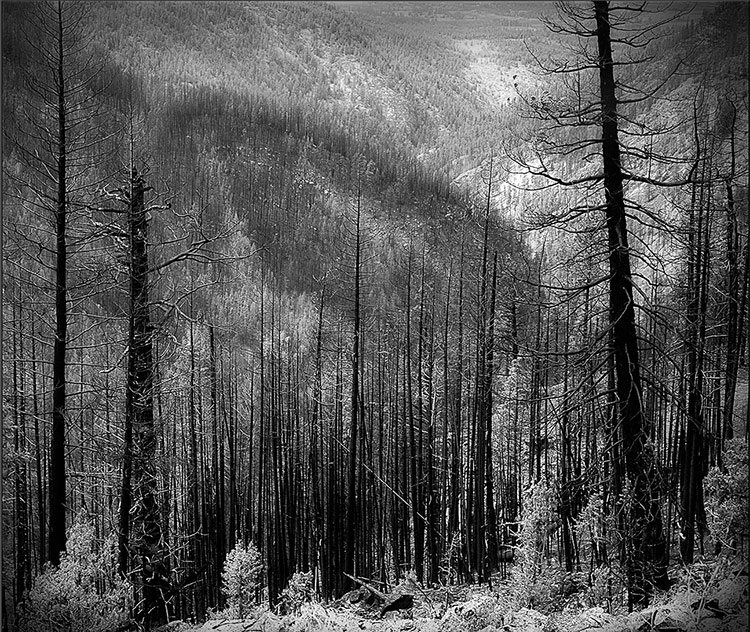
2. Use the right equipment

Use a tripod to keep your camera steady and allow for longer exposures. A tripod will also help you be more purposeful in the way you compose the frame.

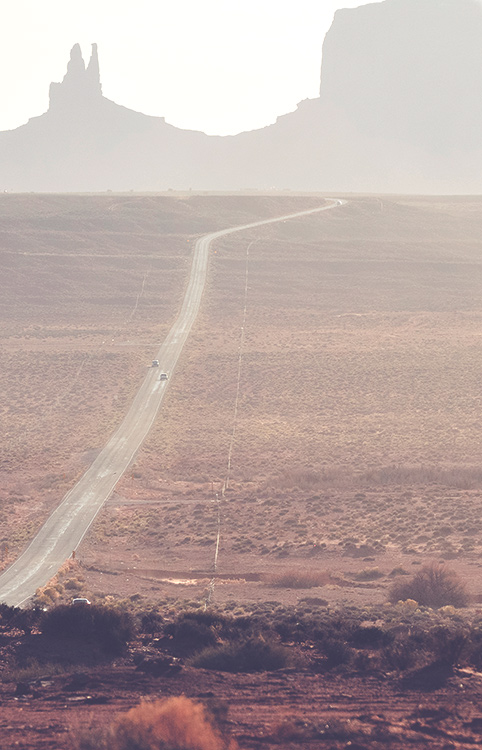
Choose your lens based on the type of photograph you want to make. A grand vista type of landscape photograph is usually made with a wide-angle lens, with a focal length below 35mm. The shorter your focal length, the larger your angle of view, and the more of the scene you can fit in the photo. However, by doing this you shrink everything within the frame.

Ajo Sunset by Anne McKinnell

If there is something in your frame that you want to appear large in the scene, using a longer focal length will emphasize it. Longer focal lengths are also excellent for more intimate landscapes that do not include a massive expanse of space.

3. Use the right camera settings

Understanding the exposure triangle is critical when it comes to choosing the best camera settings. Generally, for landscape photographs where nothing is moving in the scene, you don’t need to worry about shutter speed, especially if you are using a tripod (see tip #2 above).

In landscape photography, one very important setting is aperture, since that controls the depth of field in your image. When making a grand vista type landscape, you usually want everything from foreground to background to be in sharp focus.

To get your photo sharp all the way through, use a small aperture, like f/11, to maximize your depth of field. However, smaller doesn’t always mean sharper – because of an optical phenomenon called diffraction, images tend to get softer when the aperture is too small. Therefore, the clearest images are typically made closer to the middle of a lens’ aperture range. I recommend shooting landscapes at f/11 instead of f/22 for the sharpest possible photo.

Organ Pipe Cactus National Monument Arizona by Anne McKinnell

That leaves ISO as the last factor in the exposure triangle. For the best image quality, your ISO should be set to a low value, like ISO 100.

If nothing is moving in your landscape, use aperture priority mode, set the aperture to f/11, set the ISO to 100, and then let the camera calculate the appropriate shutter speed to get a good exposure.

However, if there is something moving in the scene, you can set a higher ISO, to allow for a faster shutter speed.

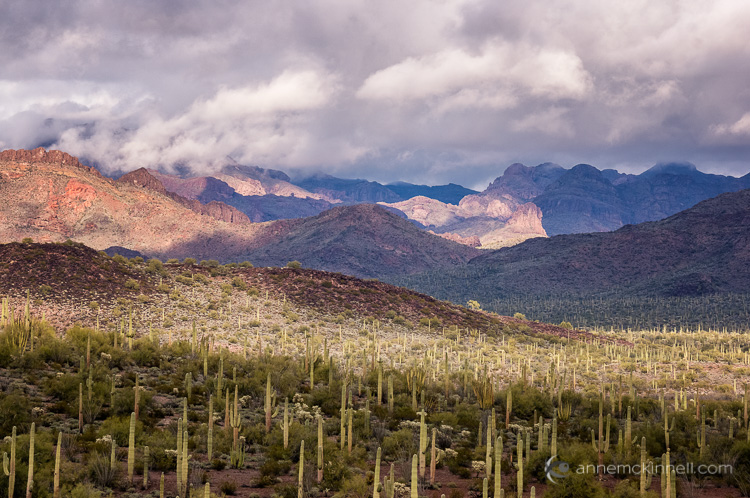
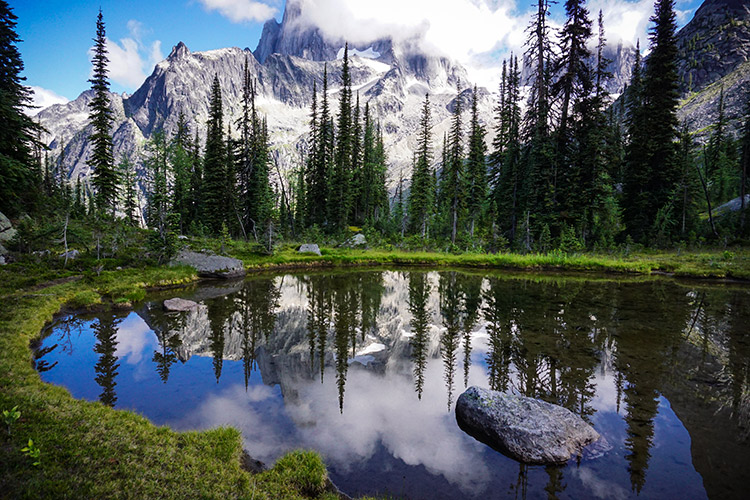
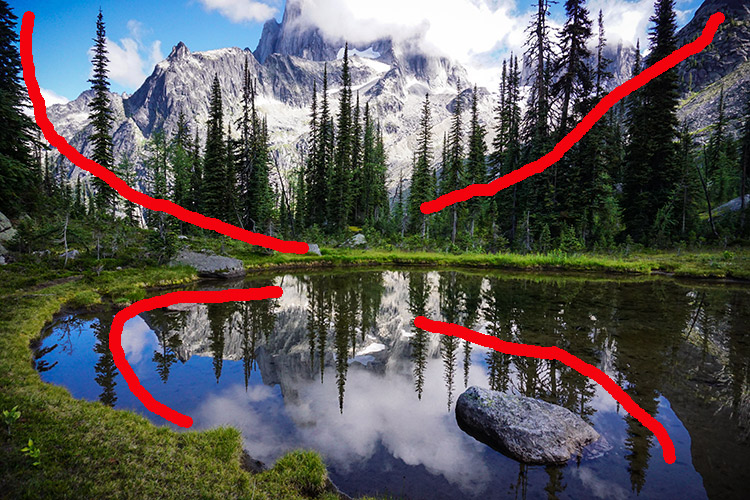
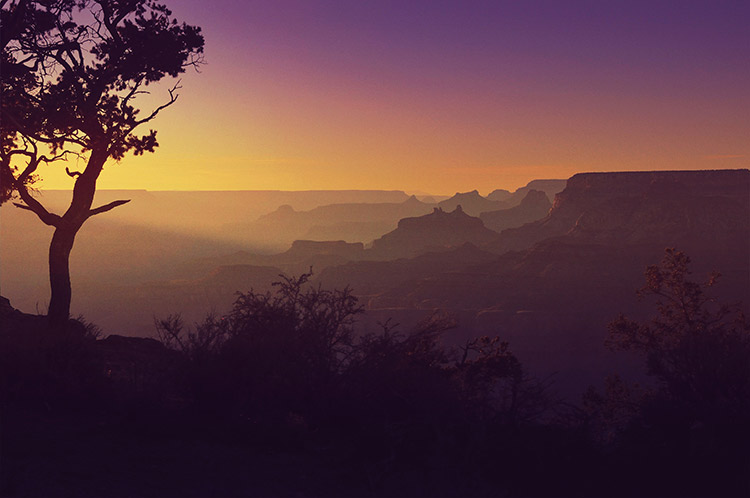
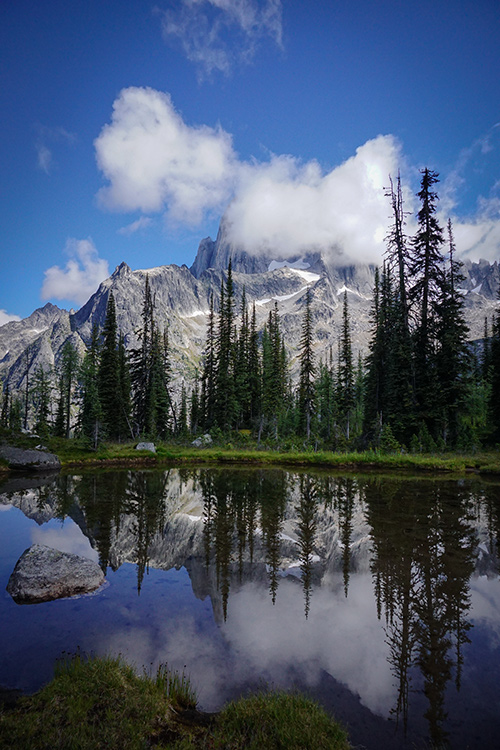
4. Separate your foreground, middle ground, and background

When composing your landscape photo, try to arrange it with elements in the foreground, middle ground, and background. Make sure they are framed to be distinct, and separate from each other, in order to create a sense of depth that draws the viewer into the picture.

Big Bend National Park , Texas, by Anne McKinnell

Background features are common things like mountains, the horizon, and sky – while foregrounds can be nearby objects such as trees, grasses, man-made objects, and even rocks on the ground in front of the camera. The middle ground, of course, is everything in between that occupies the main part of the scene.

Not all photographs have these three distinct areas, but if you can compose your image so it does, you’ll have a photo with great depth and more impact.

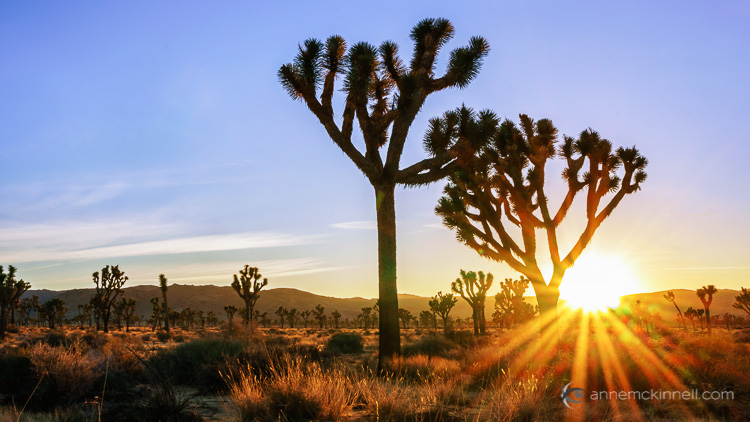
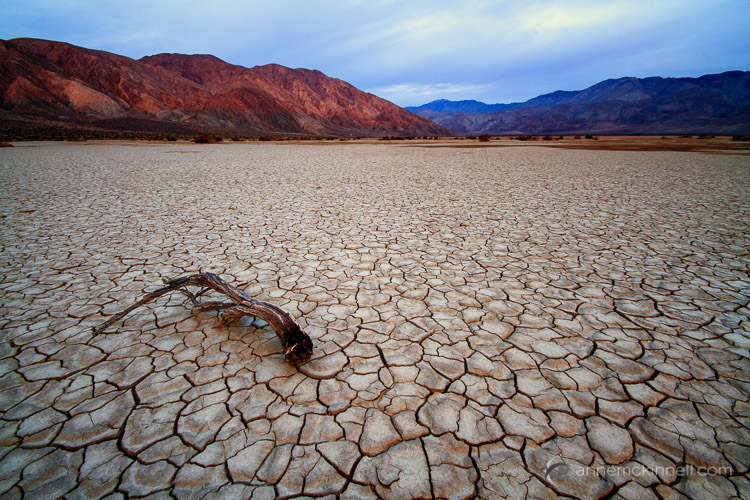
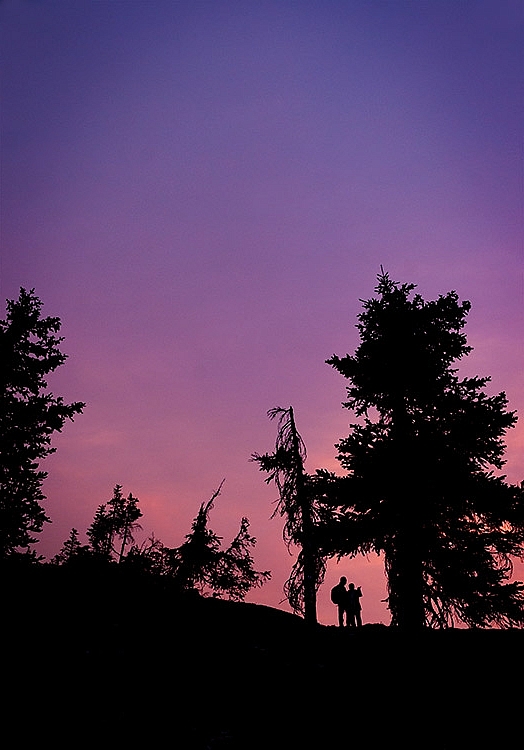
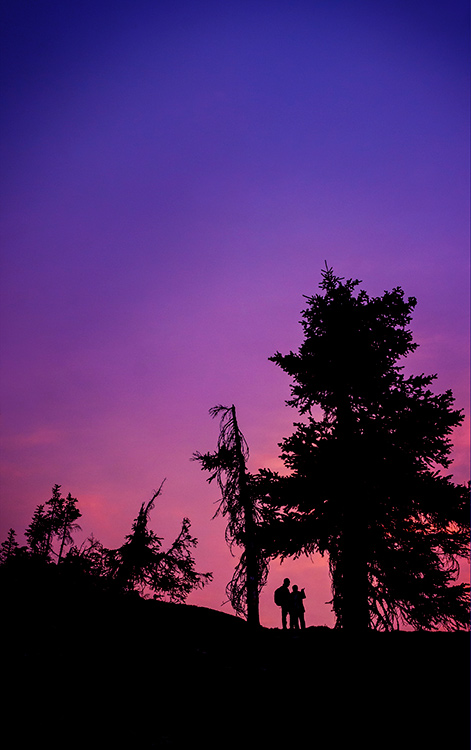
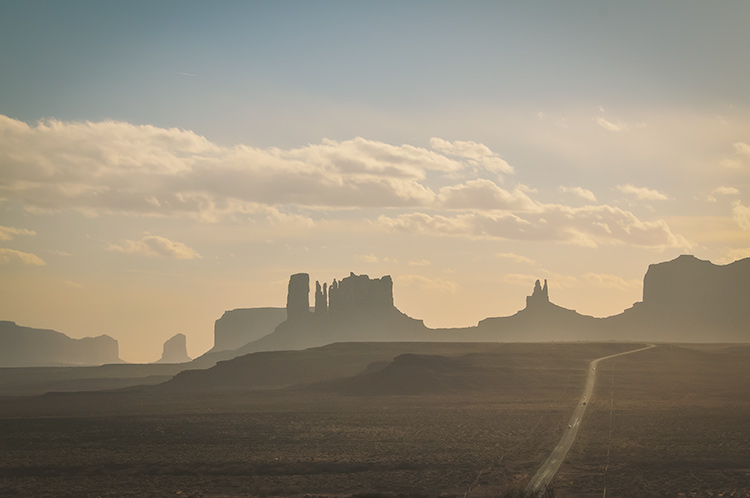
5. Include a point of focus

Sunsets and forests and seashores are beautiful, but they need something small to give them a sense of scale. Almost anything can serve this purpose – a person walking through the scene, a single silhouetted tree, a boat floating in a lake, a dock, or an animal – anything to give scale to the immensity of the landscape and create something for the eye to be drawn to.

Clark Dry Lake by Anne McKinnell

6. Bracket your shots

Landscape scenes can be very high in contrast, so it’s a good idea to shoot a few different exposures to make sure you get details in both the highlights and shadows. Some cameras will have an automatic bracketing feature built-in, but if not, you can do this manually. Simply take one picture at the recommended settings, then turn your exposure compensation button (+/-) to +1 and take another. Repeat this at -1 and you’ll end up with three pictures of different brightnesses. Later, when editing them on your computer, you can decide which exposure looks best and even combine multiple images in Photoshop or Lightroom (using the new Merge to HDR feature in LR CC or LR 6) to get the most detail possible.

Good light, the right equipment, the right settings, a strong composition, and a good exposure all work hand-in-hand to ensure you’ll make captivating landscape photographs.


Here on dPS this is landscape week – here is list of what we’ve covered so far. Watch for a new article (or two) on landscape photography daily for the next couple days.

  • 6 Tips for Better Low-Light Landscape Photography
  • Landscape Photography and the Human Element
  • 5 Ways a Telephoto Lens Can Improve Your Landscape Photography
  • Landscape Photography from the Side of the Road
  • 32 Majestic Landscape Photos to Inspire Your Wanderlust
  • Weekly Photography Challenge – Landscape
  • Landscape Photography – Shooting the Same Location Through the Seasons
  • How to Solve 5 Composition Conundrums Faced by Landscape Photographers

googletag.cmd.push(function() {
tablet_slots.push( googletag.defineSlot( “/1005424/_dPSv4_tab-all-article-bottom_(300×250)”, [300, 250], “pb-ad-78623” ).addService( googletag.pubads() ) ); } );

googletag.cmd.push(function() {
mobile_slots.push( googletag.defineSlot( “/1005424/_dPSv4_mob-all-article-bottom_(300×250)”, [300, 250], “pb-ad-78158” ).addService( googletag.pubads() ) ); } );

The post 6 Tips for Creating More Captivating Landscape Photographs by Anne McKinnell appeared first on Digital Photography School.


Digital Photography School

 
Comments Off on 6 Tips for Creating More Captivating Landscape Photographs

Posted in Photography


Eerily Altered Faces & Spaces: 14 Projection-Mapping Projects

07 Sep

[ By Steph in Art & Drawing & Digital. ]

projection mapping gas tank 1

The lines between three-dimensional objects and digital creations blur as projections alter architecture, sound stages and even human figures in real time. These projection mapping projects create an interplay between real and virtual space, often combining cutting-edge technology with dance and performance art

Hakanai: Dancer in a Projected Geometric Space

projection mapping dancer 1

projection mapping dancer 2

projection mapping dancer 3

projection mapping dancer 4

A solo dancer performs within a surreal cube with projection-mapped walls for ‘Hakanai,’ a performance at BAM’s Fishman Theater. CGI and sensors create a dynamic environment based on the dancer’s movement and location within the cube. Says creator Claire Bardainne of the show, “At the beginning it’s a word. Hakanai. It’s a Japanese old word, which denotes ephemeral, transitory, fragile, and everything you cannot catch. It’s the union of a human being and her dreams. It’s a show made of haikus that try to explain that word.”

Pixel: Surreal Reactive Environments

projection mapping pixel performers 1

projection mapping pixel performers 2

projection mapping pixel performers 3

Pixel is a dance show with eleven dancers interacting in a virtual and ‘living visual’ environment aiming to combine “energy and poetry, fiction and technical achievement, hip hop and circus.” Created by the same people responsible for ‘Hakanai,’ it also invokes a bizarrely responsive environment with surfaces that undulate beneath the dancers’ bodies.

320° Licht: Light in a Reclaimed Gas Tank

projection mapping gas tank 4

projection mapping gas tank 3

projection mapping gas tank 2

Using the cathedral-like space within the disused Gasometer Oberhausen to its fullest advantage, this interactive installation creates new worlds within the 20,000 square meters available. “This experience is based on the vastness of the Gasometer. We tried to work with that expression to make the space bigger and smaller, to deform it and to change its surface over and over while not exaggerating and overwriting the original effect of the room.”

OMOTE: Real Time Face Hacking

projection mapping omote 1

projection mapping omote 2

projection mapping omote 3

projection mapping omote 4

A designer, a makeup artist and a digital image engineer came together to create ‘OMOTE,’ an eerie project projecting hundreds of different images onto the faces of live actors in real-time, continuously re-writing their appearances.

Projection-Mapped Music Video for ‘Save Me’ by Irma

projection mapping irma

projection mapping irma 2

Seven digital projectors change the environment around singer Irma on a single soundstage in the video for her song ‘Save Me.’ The process required Irma and her 20 young dancers to perform choreography perfectly in sync with the videotaping content.

Next Page – Click Below to Read More:
Eerily Altered Faces Spaces 14 Projection Mapping Projects

Share on Facebook


[ By Steph in Art & Drawing & Digital. ]

[ WebUrbanist | Archives | Galleries | Privacy | TOS ]


WebUrbanist

 
Comments Off on Eerily Altered Faces & Spaces: 14 Projection-Mapping Projects

Posted in Creativity


5 Goal Setting Strategies for Photographers

07 Sep

We all have goals to achieve. But why are some people successful at achieving their goals while others only add new items to their to-do list day by day and year by year? In this post I collected some goal setting strategies to help you get your photography career and business on a fast track. A goal is not always Continue Reading

The post 5 Goal Setting Strategies for Photographers appeared first on Photodoto.


Photodoto

 
Comments Off on 5 Goal Setting Strategies for Photographers

Posted in Photography


Sirui T-004X Aluminum Tripod Review

07 Sep

Tripods may not be the most exciting of gadgets in the photographer’s arsenal, but they are one of the more important. While the new Sirui T-004x tripod doesn’t exactly revolutionize the industry, if you are a travel or hiking enthusiast, you might want to give it a look.

SiruiTripodReview

Introduction – The Basics

The Sirui T-004x is one of the best light-weight aluminum tripods I’ve had the opportunity to test. When I first opened the package I questioned whether this little tripod would hold a point a shoot steady, let alone my Nikon D7000. But, after a couple solid days of testing, I can safely say that Sirui has a great combination of strength and portability in their T-004x offering.

In my testing the Sirui was able to hold the D7000, paired with either the Nikon 55-300mm f/4.5-5.6 or the Tokina 11-16 f/2.8 wide angle lens without a problem. Unfortunately, I didn’t have anything larger to try, but T-004x is rated at 13.2 lbs (5.9 kg) which should be enough for most midsize DSLRs and smaller.

The Good

The standout feature of the Sirui T-004x has got to be its weight and folded size – this thing is tiny! When fully folded it becomes super portable at 15.7 inches (39.9 cm) long and weighs in at just 2.0 lbs. (0.9 kg).

SiruiTripodReview2

It comes with all the basics that you’d expect of today’s tripods. The four section legs can adjust to three different angles, independently of one another for photographing on tough terrain. The twist locks on each section are quick and easy to use – they also held tight throughout my testing. There’s a reversible center column so that you can set up for close macro photographs. Sirui also includes a shorter center column, which allows you to get even closer to the ground, should you want to take a super low camera angle perspective.

The Basic Specs

  • Load Capacity: 13.2 lbs (5.99 kg)
  • Max Height: 58″ (147.32 cm)
  • Min Height: 4.9″ (12.45 cm)
  • Folded Length: 15.7″ (39.88 cm)
  • Weight: 3.7 lbs (1.68 kg)
  • Leg Sections: 4

The Not so Good

When reviewing this tripod within the mindset of what it is supposed to be (a light weight travel tripod) it’s hard to find a lot of bad.

I will say that I am not a huge fan of the ball head that came with the Sirui as the twist knobs are a bit slow compared to the flip lever action I’m used to on my Manfrotto. This was especially noticeable with the quick release plate where it requires a few good twists of the release knob to remove the camera from the tripod. Of course, these are minor inconveniences, and if it bothers you enough you could replace the head with something more suited to your liking.

SiruiTripodReview1

Due to the compromises that had to be made in order to make this as light and as portable as possible, the overall ruggedness of the tripod is questionable. Now, I didn’t put it through anything too serious in my testing, but I’d imagine that a tumble down a rocky hill, or dropping it a off a ledge might result in some damage. Being as light as it is I’d also expect it to be quite susceptible to wind – though there is a bag hook on the center column that you could use for added weight if needed.

So Who’s the Sirui T-004x for?

The ideal photographer for the Sirui T-004x would be someone who needs a lightweight travel tripod. Whether you’re a frequent flyer, or a frequent hiker, the Sirui would be a good option for you. If you’re looking for something to take a bit of abuse, or will be using it during weddings, portrait sessions, or other situations where a bit more stability and heft are required this probably isn’t want you’re looking for.

What tripod do you currently use? Leave a comment below!

googletag.cmd.push(function() {
tablet_slots.push( googletag.defineSlot( “/1005424/_dPSv4_tab-all-article-bottom_(300×250)”, [300, 250], “pb-ad-78623” ).addService( googletag.pubads() ) ); } );

googletag.cmd.push(function() {
mobile_slots.push( googletag.defineSlot( “/1005424/_dPSv4_mob-all-article-bottom_(300×250)”, [300, 250], “pb-ad-78158” ).addService( googletag.pubads() ) ); } );

The post Sirui T-004X Aluminum Tripod Review by John Davenport appeared first on Digital Photography School.


Digital Photography School

 
Comments Off on Sirui T-004X Aluminum Tripod Review

Posted in Photography


Sony Cyber-shot DSC-RX10 II added to studio test scene comparison

07 Sep

The Sony RX10 II is built just like its predecessor, but under the hood are a lot of interesting improvements. We’ve done a lot of real-world shooting with the camera, but now we’ve put its 20MP 1″-type stacked CMOS sensor to the test in our studio. Take a look at how it stacks up against its peers. Read more

Articles: Digital Photography Review (dpreview.com)

 
Comments Off on Sony Cyber-shot DSC-RX10 II added to studio test scene comparison

Posted in Uncategorized


How to Process a Landscape Photo in 5 Minutes Using Photoshop

07 Sep

2-for-1 special

As part of Landscape Photography Week here on dPS, we’re offering TWO for the price of ONE on our best-selling Living & Loving Landscape Photography ebooks!

Click here to take advantage of this offer.


In this ultra fast video tutorial photographer Joshua Cripps walks your through how to process a landscape photo using Photoshop in under five minutes. He talks really fast and works quickly so if you miss anything just watch the video again (he even says that at the end) or pause it so you can follow along.

How did you make out with your own landscape image, could you do it in five minutes? If it takes you a little longer that’s just fine, especially if you’re just learning Photoshop.

Note: everything he does in the video can also be done in Lightroom using the basic sliders, adjustment brush, and graduated filter.


Here on dPS this is landscape week – here is list of what we’ve covered so far. Watch for a new article (or two) on landscape photography daily for the next couple days.

  • 6 Tips for Better Low-Light Landscape Photography
  • Landscape Photography and the Human Element
  • 5 Ways a Telephoto Lens Can Improve Your Landscape Photography
  • Landscape Photography from the Side of the Road
  • 32 Majestic Landscape Photos to Inspire Your Wanderlust
  • Weekly Photography Challenge – Landscape
  • Landscape Photography – Shooting the Same Location Through the Seasons

googletag.cmd.push(function() {
tablet_slots.push( googletag.defineSlot( “/1005424/_dPSv4_tab-all-article-bottom_(300×250)”, [300, 250], “pb-ad-78623” ).addService( googletag.pubads() ) ); } );

googletag.cmd.push(function() {
mobile_slots.push( googletag.defineSlot( “/1005424/_dPSv4_mob-all-article-bottom_(300×250)”, [300, 250], “pb-ad-78158” ).addService( googletag.pubads() ) ); } );

The post How to Process a Landscape Photo in 5 Minutes Using Photoshop by Darlene Hildebrandt appeared first on Digital Photography School.


Digital Photography School

 
Comments Off on How to Process a Landscape Photo in 5 Minutes Using Photoshop

Posted in Photography


Haitis Generation der Amputierten

07 Sep

Ein Kind, das einen Arm verloren hat, liegt auf einem Bett,

Ein Beitrag von: Albertina d’Urso

Im Jahr vor dem großen Erdbeben ging ich zum ersten Mal im Auftrag der NPH (Hilfe für Waisenkinder) nach Haiti. Die NPH hat dort eine Kinderklinik, ein Rehabilitations-Zentrum für Kinder mit Behinderung, ein Waisenhaus und 18 Straßenschulen, um Kindern in akuter Not zu helfen.
kwerfeldein – Fotografie Magazin | Fotocommunity

 
Comments Off on Haitis Generation der Amputierten

Posted in Equipment


Home-Free Living: German Woman Trades in Rent for Train Ticket

07 Sep

[ By WebUrbanist in Boutique & Art Hotels & Travel. ]

train traveler

Reasoning that a full-time train pass costs less than an apartment, a 23-year-old German writer and student has exchanged her life in a fixed location for one in perpetual motion. At the equivalent of $ 380 a month, she can catch a ride anytime day or night, and much more comfortably than other contemporary high-tech hobos.

life on train

Everything Leonie Müller needs travels with her in a single backpack, making it easy to switch rides or catch the overnight rail, washing up in the onboard restrooms. In a strange reversal of convention, it is cheaper for her to use her pass and sleep aboard than to stay in one place.

train travel exclusively

Europe’s extensive train network, most impressive (and consistently on time) in Germany, provides various speeds of travel and connections to just about any town or city, enabling Leonie to visit friends or crash with family without much effort or planning.

train station

train car living

The move (or: moving) be permanent, but for now the costs and lifestyle make sense to her and provides material for her thesis project on nomadic living. She writes papers for school and posts for her blog while riding, and recommends noise-cancelling headphones for those who would follow her footsteps (or rail tracks, as it were).

Share on Facebook


[ By WebUrbanist in Boutique & Art Hotels & Travel. ]

[ WebUrbanist | Archives | Galleries | Privacy | TOS ]


WebUrbanist

 
Comments Off on Home-Free Living: German Woman Trades in Rent for Train Ticket

Posted in Creativity


How to Solve 5 Composition Conundrums Faced by Landscape Photographers

07 Sep

2-for-1 special

As part of Landscape Photography Week here on dPS, we’re offering TWO for the price of ONE on our best-selling Living & Loving Landscape Photography ebooks!

Click here to take advantage of this offer.


Do you ever get frustrated when reviewing your landscape shots? In the field you thought you’d nailed the scene, but back at your computer you now see that things don’t look so great. I know sometimes my frustration seems endless after a landscape shoot. There are just so many questions about how to shoot and compose breathtaking landscapes.

DSC01032edit

Landscapes are both one of the easiest things to photograph, and the most difficult. Easy – because landscapes are everywhere, and they don’t really move, so no expensive technical equipment is needed. Often novice photographers mistake this ease of access with easy photography. Landscapes are difficult to photograph well because, like most other subject matter, the devil is in the details, and there are a myriad of details to pay attention to in landscape photography.

It is these details that create conundrums for photographers, especially when it comes to composing a great landscape shot.

When I’m out with a photography class, students seem to have several common dilemmas they want solved. So in this article we’ll explore these compositional conundrums and try to get you some solutions.

1) How do I choose my point of interest?

Most photography guides say that a great image must have a strong point of interest. In an expansive vista it’s often difficult to decide on just one central point. In fact, you may often feel like the entire scene is THE point of interest. But try thinking about the scene this way – why are you attracted to this scene? What is it that make it so stunning?

It might be the light at sunrise or sunset, or a confluence of streams, or maybe the patterns of wildflowers.  Take a moment to think about why you want to photograph this landscape. In a few moments a story will start to evolve in your mind.

If your story is about the light, where in the scene is the light most spectacular? In the clouds? Reflecting off water? Lighting up a mountain peak? You’ll soon find your answer, and will have solved conundrum #1. You now have a solid point of interest.

DSC01032editsymmetry

All roads lead to Rome – or in photography, to your center of interest. The symmetry of the scene is mirrored in both the reflection and the composition.

2) What should I include and exclude in the frame?

This is a big compositional conundrum for most photographers. Sometimes you may want to create a frame for your scene with something from the surrounding environment – tree branches are a common framing device. But will they be distracting? Will they prevent your viewer’s eye from traveling INTO your image, to land softly on the great point of interest you carefully identified above? Sometimes the scene itself will have framing elements in it. Should you use these?

If you decide to use this type of compositional device to frame your subject, should it be on the right? On the left? On the top, or all three sides?

_2DS2439before

BEFORE: The half tree on the left does nothing to move the viewer to the center of interest. Let’s remove it.

_-2DS2439after

AFTER: Using the framing technique AFTER removing distracting elements.

There are really only two considerations with objects at the edges of your viewfinder frame.

The first is to make sure that your leading lines are not broken by the object. So, if there is a nice big tree on the left of your composition, make sure to position yourself in such a way that the tree helps guide the viewer towards your centre of interest. If it is just a big dark shape on the left of your scene it may not add to the composition, and in fact may be detrimental. Large vertical objects on the left, or in the centre of the frame, tend to arrest the viewer’s gaze, and make for a weak composition.

Second, if you are going to use objects around the edges as a framing technique, be bold, and do it with purpose. Make sure your viewer doesn’t think it was a mistake, or something you didn’t notice. Bits of branches or clouds that seem to poke into the frame are more like intruders than active participants in your image. Move around a bit more to make sure there are no interlopers jutting in, or remove them in post-production.

2015-03-25-23.35

Be bold – add it like you mean it – include elements with purpose. This tree is here on purpose and its branch leads to the sun ray that takes you right into the center of interest, the glowing layers of the landscape, framed by the dark shrubs in the foreground.

If you’re using a wide angle lens, you know to include lots of the foreground to guide the viewer into the frame. But often students ask me what makes a good foreground? They walk around a bit, point to various items, and ask, “Would this be good? How about this? Or this?”

Because of the way the wide angle lens exaggerates perspective, you should take advantage of that by choosing a foreground subject that can create leading lines into your image. If there’s a big boulder in your scene, how does it look close-up through the wide angle lens? Does it create a pointer, or a set of lines that lead to your main point of interest? That will make a good foreground.

If the objects closest to the camera consist of mainly horizontal lines, running left to right in the frame, they may not be a great foreground to include, unless you can shoot at an angle so they become leading lines into your image. You may need to walk around the scene a bit more to see if this will work with the overall view. If not, choose another foreground, or if there is nothing that works, you can always select another lens – a 50mm is often a great choice for landscape photography.

Which brings us to the next conundrum – focal length, your lens.

3) What focal length is best for landscapes?

I think this is always the first question I get asked when shooting landscapes with a group, “What lens are you using?”

But the real question is what is your artistic intention for your image? If you want to get that awe inspired feeling you have as you view the scene into your image, why not try 50mm. This lens on a full frame sensor approximates what your eye sees in terms of angle of view. So it could be the best choice if what you want to convey is that awesomeness of the view that you are seeing with your eyes. Lately I have been using a 50mm (full frame) lens for landscapes almost exclusively.

4-whither-the-phoenix

The big picture, wide angle lens, and 50mm works well too.

Remember too, that the longer the focal length, the more compressed the image gets, and the closer the background becomes. It’s not just a matter of getting nearer or getting more in the frame, the entire look of your image will be very different depending on the lens. This is a definite conundrum for landscape photographers, because the choice is usually very subjective. If, as I mentioned above, you have nothing suitable for a creative foreground, try your 50 mm to get the big picture but without the perceptive grabbing view of the wide angles. If your intention is to get a more intimate view of the place, then a longer lens would be a better choice.

2_DSC6358W

A more intimate look at patterns, textures, and shapes with a 200 mm lens.

So your choice of lens has a few considerations, but a quick check of your intention, and the surrounding space you are standing on, will help you solve this one.

4) Should I Shoot Vertical or Horizontal?

This is another common landscape photographer conundrum, and one that I often have myself. Fortunately this one is very easy to solve. My way of dealing with this is to shoot the scene both ways, then do an honest critique once I am back at a computer to view the full images. But given the traditional style of landscape photography, most often the horizontal or (curiously!) named “landscape” orientation will serve you best.

However, some things may be more suitable for the vertical (portrait) camera orientation: scenes with reflections in lakes, scenes with dramatic skies where the sky has a dominant role in your story, scenes that include the moon, or a dramatic afternoon sun with some lens flare shining through trees or objects, and scenes that include people beside tall objects or monuments so you can capture the sense of scale.

When in doubt, shoot both ways. It’s easier than having to go shoot the place again, if that is even possible. So conundrum #4: solved!

DSC01030W

_DSC1467

Horizontal or landscape orientation – the scene has a certain mood and story.

This image tells a very different story and has a different mood.

_DSC1451W-

Vertical shot, with a telephoto lens. Depth is compressed and the background is much closer in the frame.

5) Is this scene photo-worthy?

As unfortunate as it is, not every grand landscape is suitable for making a great photo. It may be that the light is not right, that there is just no place for the eye to rest, or that your point of view is not providing  a clear enough vantage point. There may be too many distracting items poking into your frame that would be too hard to remove in post-processing. There are numerous reasons that a landscape might not make a good photo. But consider this a challenge – capture it anyway, see if you can make something of it. Try different lenses, camera orientations, walk around a bit more. Get down like a worm and see if there is any vantage point that will give you a creative point of view.

Practice every chance you get, and know that the conundrums will present themselves in every landscape, but hopefully now you have them solved!

DSC00826W

A pretty scene, but not such a great photo. Not every landscape will make a killer photograph. Do you know how to tell if it will or not?

Have you ever struggled with any of these conundrums? What are some of your landscape photography struggles?

Have you solved them? How did you decide what to do?


Here on dPS this is landscape week – here is list of what we’ve covered so far. Watch for a new article (or two) on landscape photography daily for the next couple days.

  • 6 Tips for Better Low-Light Landscape Photography
  • Landscape Photography and the Human Element
  • 5 Ways a Telephoto Lens Can Improve Your Landscape Photography
  • Landscape Photography from the Side of the Road
  • 32 Majestic Landscape Photos to Inspire Your Wanderlust
  • Weekly Photography Challenge – Landscape
  • Landscape Photography – Shooting the Same Location Through the Seasons

googletag.cmd.push(function() {
tablet_slots.push( googletag.defineSlot( “/1005424/_dPSv4_tab-all-article-bottom_(300×250)”, [300, 250], “pb-ad-78623” ).addService( googletag.pubads() ) ); } );

googletag.cmd.push(function() {
mobile_slots.push( googletag.defineSlot( “/1005424/_dPSv4_mob-all-article-bottom_(300×250)”, [300, 250], “pb-ad-78158” ).addService( googletag.pubads() ) ); } );

The post How to Solve 5 Composition Conundrums Faced by Landscape Photographers by Alex Morrison appeared first on Digital Photography School.


Digital Photography School

 
Comments Off on How to Solve 5 Composition Conundrums Faced by Landscape Photographers

Posted in Photography


Fender Bender Menders: 15 Abandoned Auto Body Shops

06 Sep

[ By Steve in Abandoned Places & Architecture. ]

abandoned-auto-body-1
Auto body repair requires extensive training and expensive tooling these days, setting classic independent auto body shops squarely on the road to ruins.

abandoned-auto-body-1b

Automotive innovations such as aluminum body panels and self-cleaning paint are cutting-edge today but they’ll be commonplace tomorrow, so if you’re thinking of taking the family ride down to (insert folksy name here) Auto Body next time you dent a door, fuggeddaboutit! End result: hundreds of abandoned auto body shops across the nation, from big cities to tiny towns like Keeler, California (population 66).

Post No Bills

abandoned-auto-body-labelscar-2a

abandoned-auto-body-labelscar-2b
Indeed, neighborhood auto body shops are fading away… and so are their signs. Flickr user suism1 captured the rough and weathered “labelscar” above on January 13th of 2010.

Unclean Sweep

abandoned-auto-body-broomworks-3

“I doubt the Liberty Broom Works or the Kustom Paint & Body Shop have been at this location for quite a while,” comments Barbara Hullett of Hullett Photography about the gritty abandoned edifice above. Located in Liberty, North Carolina, the curious conjunction of defunct businesses begs the question: which one was abandoned first, the broom works or the body shop?

Them’s The Brakes

abandoned-auto-body-4a

abandoned-auto-body-4b

Small auto body and car repair shops of a certain age typically share a similar style and structure – cheap, practical, and plenty of garage doors. Though modern quick-lube and oil change shops are often built on this type of plan, it’s rare that one of the chain stores takes over a closed or abandoned body shop. Flickr user Justin Wolfe managed to find two similar-looking abandoned auto body shops within a stone’s throw of each other in Newport News, Virginia, on September 20th of 2013.

Import Expired

abandoned-auto-body-cutler-5

Owners of Ferrari, Porsche, Aston Martin and other exotic foreign makes must be scratching their heads, wiping their monocles and driving veddy cawefuwy since the Cutler Import Body Shop threw in the grimy, oil-stained towel. The Grandview Heights, Ohio establishment was captured in all its letter-shedding glory on February 7th, 2009 by Flickr user brew127.

Next Page – Click Below to Read More:
Fender Bender Menders 15 Abandoned Auto Body Shops

Share on Facebook


[ By Steve in Abandoned Places & Architecture. ]

[ WebUrbanist | Archives | Galleries | Privacy | TOS ]


WebUrbanist

 
Comments Off on Fender Bender Menders: 15 Abandoned Auto Body Shops

Posted in Creativity