RSS
 

Archive for September, 2015

Animal Overpass: LA Wildlife Crossing to Be Largest in US

09 Sep

[ By WebUrbanist in Architecture & Cities & Urbanism. ]

la crossing proposal

Set in urban Los Angeles over a calculated spot along the 101 Freeway, an audacious freeway overpass has been designed to reduce deaths among mountain lions, pumas and other wild species populating the area. While such wildlife crossing exist in various forms around the world, this would be the biggest of its kind in North America at 165 by 200 feet, and perhaps the largest urban example on the planet.

wildlife crossing example

ecoduct bridge wildlife crossing

The crossing is set to connect two areas of protected public land, in the Santa Monica Mountains to the south and the Santa Susana Mountains to the north, stitching a fragmented habitat back together. Covered in native greenery, it would provide a safe passage for animals across the busy freeway below and could double as a crossing for hikers and mountain bikers as well.

wildlife crossing in bamf

Backed by local politicians and wildlife protection organizations, the project was vetted for feasibility by the Mountains Recreation and Conservation Authority and is set to be funded with public money. It is intended primarily to protect animals, but also benefits motorists who can also be harmed in wildlife-related accidents.

animal crossing design

There are smaller-scale precedents around the US and the globe, variously set above or below roads help animals both large and small. Some are larger, including tunnels or bridges for bears, cougars, deer, elk but others are smaller and species-specific, like the above aerial trellis for mice and squirrels in Australia. In some cases, as with a certain species of crab (below, also: Down Under), the crossings are essential to maintaining balanced ecosystems and supporting local economies.

crab crossing

Many of these kinds of structures can be found in more rural states around the country, while very few bridge metropolitan highways. “I don’t know anywhere where people have tried to put such a large wildlife crossing over such a busy highway in such an urban landscape,” said Seth Riley, a wildlife ecologist with the Santa Monica Mountains National Recreation Area, a unit of the National Park Service (additional images via Wikipedia).

Share on Facebook


[ By WebUrbanist in Architecture & Cities & Urbanism. ]

[ WebUrbanist | Archives | Galleries | Privacy | TOS ]


WebUrbanist

 
Comments Off on Animal Overpass: LA Wildlife Crossing to Be Largest in US

Posted in Creativity


8. September 2015

08 Sep

Das Bild des Tages von: thethomsn

20691717068 © thethomsn

Im Ausblick: Ende der Analogfotografie, Zukunft des Kameraabsatzes und tschüss DSLR.
kwerfeldein – Fotografie Magazin | Fotocommunity

 
Comments Off on 8. September 2015

Posted in Equipment


3 Simple Steps to Make Your Skies Pop in Lightroom

08 Sep

2-for-1 special

As part of Landscape Photography Week here on dPS, we’re offering TWO for the price of ONE on our best-selling Living & Loving Landscape Photography ebooks!

Click here to take advantage of this offer.


Photo of Monument Valley: Example of sky enhancement with Lightroom.

You take a photograph of a scene that includes a beautiful blue sky with puffy white clouds. You look at your LCD after taking the photo only to see that the sky your camera captured is not what you see in front of you. Instead, your camera captured a washed-out-looking sky with little or no detail. It looks overexposed. What to do?

You could take another picture, reducing the exposure so that the sky looks better. But if you do that, the foreground will be underexposed and maybe even black. So what now?

There is good news here, and it is that Lightroom can fix this problem easily and incredibly quickly. In fact, there are three quick steps you can take in Lightroom that will each dramatically improve the daytime sky in your pictures. They are all dead simple. You can do any one of the steps, or do all three together. Even if your sky already looks pretty good, and you just want a minor enhancement, these steps will help.

Photo of Big Sur: Example of sky enhancement using Lightroom

1. Darken the Blues

The first move you should make is to darken the blue tones in your image. This is simple to do in the HSL/Color/B&W panel in Lightroom’s Develop module. There you will see a number of sliders that control individual colors. You can adjust the hue, the amount of saturation, or the luminance of these colors. Use the sliders – specifically the  blue slider – to affect only the blue tones in the image and reduce the brightness of those tones. Just find the slider marked Blue, make sure that the panel is set to change Luminosity, and pull the slider to the left. There is no set amount or range of values for this change, it will just depend on each picture.

HSL/Color/B&W panel in Lightroom's Develop Module

If you need more punch to the blues, change the setting above to saturation, and push the Blue slider to the right. This will increase the saturation of the blues in your image. For our purposes here, what is important to know, is that increasing the saturation of the blues will make the luminosity adjustment you just made have even more bite.

You should see a dramatic improvement in your sky, just with this one move. Sometimes it is all you need to do. But for additional improvements, read on.

Note: be careful not to go too far. Pulling one color to extremes can cause banding (separation of the colors into stripes, not a smooth transition) or image degrading. 

Photo taken from Seven Mile Bridge in the Florida Keys: Example of sky enhancement using Lightroom

2. Control the Highlights

It might have surprised you that our first move was not to tone down the highlights of the image. After all, that is where the problem lies. The sky is so bright that there is little detail in it, and a reduction in the highlights will target those tones and add detail.

Highlights control in Basic panel of Lightroom's develop module

But recall that part of what makes a sky look great is deep rich blue tones combined with bright white clouds. If you crank down the highlights, yes, you will add detail to the clouds, but you will push the tones of the blues and whites together so that there will not be the strong contrast you want. That’s why we started with darkening the blue tones.

If there is already sufficient detail in your clouds, you do not need to do anything further. In fact, sometimes you may want to increase the Whites or the Highlights to create more contrast between the blue sky and white clouds.

Other times, however, your sky will still be too bright and the clouds will lack detail. In that case, it is time to tone down the brightest portions of the image to add some detail. Do that by pulling down the highlights of your image. You want to do just enough that you add detail in the sky, but not so much that your clouds turn grey. Let the histogram be your guide. Pull the Highlights slider to the left until any spike on the right side of your histogram moves to the left (use the Alt/Option button to see where the highlights are clipped). At the same time, you should be adding detail to your sky.

Photo of Lighthouse on Sanibel Island, Florida: Example of sky enhancement using Lightroom

3. Add a Blue Tint to the Sky

At this point, your sky should be looking very good. In fact, in most cases, the two moves above should be all you need. If you have a particularly flat and lifeless sky, however, you may need to break out the big guns. That means adding a tint to your sky.

To do this, you will need to employ the Adjustment Brush (actually, you can use the Adjustment Brush for either of the two steps above, but you usually won’t need to). Click on the Adjustment Brush, then when the sliders for the brush appear, go to the White Balance ones at the top. Move the Temp slider to the left, which will increase the amount of blue in the image.

Adjustment brush and tint controls in Basic panel of Lightroom's develop module

Before you apply the brush to the sky, there is one important thing you need to check. Make sure the “Auto Mask” box at the bottom of the Adjustment Brush panel is checked. Doing so will limit the brush to the sky only. Once that is checked, go ahead and brush in the effect where you want it.

When you are done, you can adjust the effect by moving the blue slider (or any other sliders you might want to change). When you close the Adjustment Brush, the sky should be blue and look much better.

Photo of the Portland Head Light: Example of sky enhancement using Lightroom

Application

The old adage about “getting it right in-camera” still applies. Try to get your skies looking as good as possible in the field with proper exposure techniques. Further, if you have a polarizing filter, that will make midday skies look much better. You might also employ a graduated neutral density filter to tone down the sky and make it even with the foreground.

When these techniques won’t work, however, Lightroom can make your skies look dramatically better. Of course, you could also use blending or HDR techniques, but these can appear surreal and involve much more work. The same goes for a wholesale sky replacement.

So next time, use Lightroom to achieve the desired effect simply. You can use these steps along with your normal workflow to make your photos look even better.


Here on dPS this is landscape week – here is list of what we’ve covered so far. Watch for a new article (or two) on landscape photography daily for the next day or so.

  • 6 Tips for Better Low-Light Landscape Photography
  • Landscape Photography and the Human Element
  • 5 Ways a Telephoto Lens Can Improve Your Landscape Photography
  • Landscape Photography from the Side of the Road
  • 32 Majestic Landscape Photos to Inspire Your Wanderlust
  • Weekly Photography Challenge – Landscape
  • Landscape Photography – Shooting the Same Location Through the Seasons
  • How to Solve 5 Composition Conundrums Faced by Landscape Photographers
  • 6 Tips for Creating More Captivating Landscape Photographs
  • Tips for Getting Started with Urban Landscape Photography

googletag.cmd.push(function() {
tablet_slots.push( googletag.defineSlot( “/1005424/_dPSv4_tab-all-article-bottom_(300×250)”, [300, 250], “pb-ad-78623” ).addService( googletag.pubads() ) ); } );

googletag.cmd.push(function() {
mobile_slots.push( googletag.defineSlot( “/1005424/_dPSv4_mob-all-article-bottom_(300×250)”, [300, 250], “pb-ad-78158” ).addService( googletag.pubads() ) ); } );

The post 3 Simple Steps to Make Your Skies Pop in Lightroom by Jim Hamel appeared first on Digital Photography School.


Digital Photography School

 
Comments Off on 3 Simple Steps to Make Your Skies Pop in Lightroom

Posted in Photography


Rooftop View: World’s Largest Mural Takes Up Entire Building

08 Sep

[ By Steph in Art & Street Art & Graffiti. ]

world's largest mural 6

Spanning the massive multi-building rooftop of a construction company, this black-and-white mural of a lounging girl might just be the largest ever painted. Commissioned by French duo Ella & Pitr for Norway’s Nuart Street Festival, the painting takes up an incredible 21,000 square meters, and in overhead photos, nearby cars look like toys.

world's largest mural 1

world's largest mural 4

world's largest mural 5

Entitled ‘Lilith and Olaf,’ the mural depicts a girl lying on her side with the figure of a crowned man by her side, representing King Olaf I of Norway, who ruled the nation from 995-1000 and was born just a few meters away from the site. Her red toenails and the king figurine are the only spots of color in the scene, unless you count the three living people that can be seen near her mouth in the photos.

world's larest mural 3

world's largest mural 2

world's largest mural 7

Though it was created for the festival, most attendees will never see it, as it can only be viewed from above. This might seem limiting, but thanks to the building’ location adjacent to the Sola airport, thousands of people traveling to and from the area can glimpse it from their airplane windows.

Share on Facebook


[ By Steph in Art & Street Art & Graffiti. ]

[ WebUrbanist | Archives | Galleries | Privacy | TOS ]


WebUrbanist

 
Comments Off on Rooftop View: World’s Largest Mural Takes Up Entire Building

Posted in Creativity


Im Gespräch mit Sina Domke

08 Sep

© Sina Domke

Ein Beitrag von: Victor Hamke

Hallo Sina! Schön, dass Du Dir die Zeit für dieses Interview nimmst. Fangen wir mal mit dem Grundlegenden an: Wer bist Du und was machst Du neben Deiner wunderbaren Fotografie?
kwerfeldein – Fotografie Magazin | Fotocommunity

 
Comments Off on Im Gespräch mit Sina Domke

Posted in Equipment


Tips for Getting Started with Urban Landscape Photography

08 Sep

2-for-1 special

As part of Landscape Photography Week here on dPS, we’re offering TWO for the price of ONE on our best-selling Living & Loving Landscape Photography ebooks!

Click here to take advantage of this offer.


Memorable Jaunts Urban Photography Article for Digital Photography School Downtown Chicago Skyline as seen from Museum campus

My friends always joke that if I had my way I would pack my belongings, load up the family car, and head to the mountains to live out the rest of my days away from all the chaos of city life. What a happy dream, and one that someday I hope to make a reality, but for now I live in a urban city as far away from mountains as you can get. Urban living does have some benefits, in that it presents some wonderful photographic opportunities, if you know where to look and how to go about it.

There is some confusion among photographers between the terms: urban photography and street photography. Technically they are quite similar, and it is very easy to overlap the two, but here’s how I look at them. To me, urban photography portrays the urban landscape (e.g. buildings, bridges, structures, monuments, etc.) and does not necessarily include people where as street photography often features people or other human elements living in an urban setting. Now keep in mind, urban in itself has different meanings for different people. Wikipedia says, urban is anything related to a city. I like to think of urban as anything that is not rural (e.g. no corn fields, agricultural lands or remote mountain areas). This opens up a whole gamut of photographic opportunities for every pallet.

In general, here are some of the rules or tips I like to follow while on an urban photo expedition.

Preparation

Memorable Jaunts Urban Photography Article for Digital Photography School Dharamsala Monastery Photo

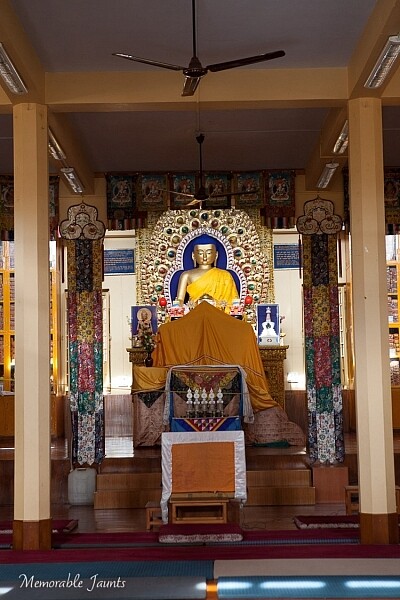
A little prep work paid off as I was able to photograph inside one of the monastery temples in Dharmsala, India

Before going on an urban photography excursion it is very important to be prepared. That not only means packing your gear the night before, and making sure all the cards are formatted and all batteries are charged (although you should do that too), but it is also beneficial to understand where you are going, and how are you going to get there.

What are the traffic patterns? Are there any parking restrictions? Do you need any special permits to photography there? Is photography even allowed? The Art Institute of Chicago is a perfect example. While photography is permitted, they don’t allow large camera bags or roller bags. So a small purse/backpack with a single camera and lens setup is your best bet. Do some research, and ask around if other photographers have experienced any issues in the location you want to explore.

Gear choice

I touched on this briefly already, but most urban photography expeditions are best done on foot where you are free to explore alleyways, buildings and street corners. I don’t know about you, but walking with about 30lbs of gear on my back is not my idea of fun, unless I am backpacking in the mountains! Pack light and carry at most two lenses.

My camera of choice is the Canon 5D MKIII and my go to lenses are Canon EF 24-70mmL zoom and Canon 100mm macro. Sometimes if I am brave, and in the mood for a good upper body workout, I will ditch the 100mm macro and carry my Canon EF 70-200mm. I carry an extra battery for my camera and one extra 32GB memory card. All of these fit comfortably in my backpack.

Shoot smart

Memorable Jaunts Urban Photography Article for Digital Photography School Willis Tower Image Downtown Chicago

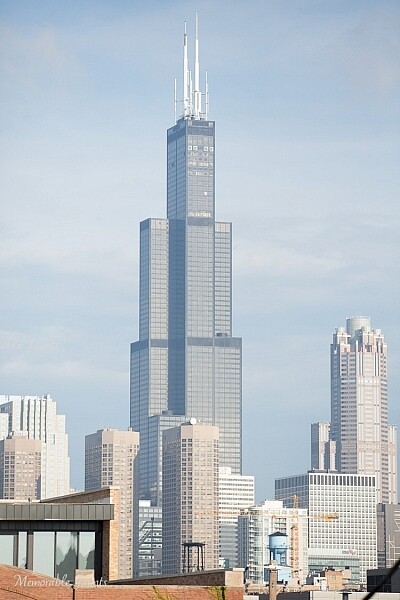
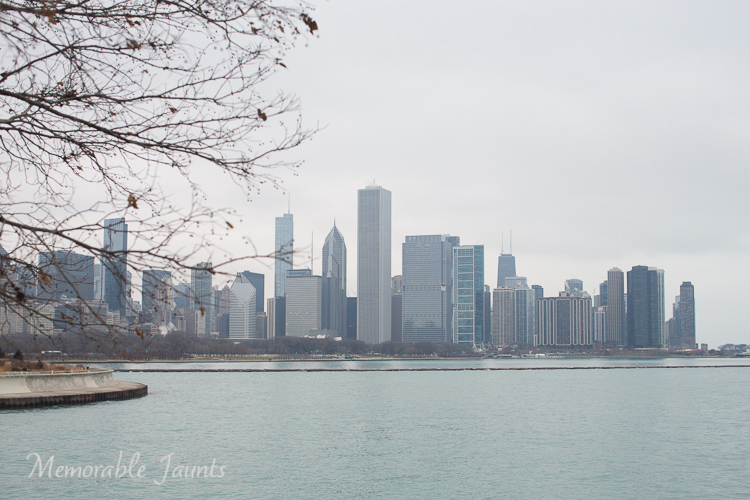
A really wide shot of Willis tower with other buildings around it, provides a sense of scale and grandeur of one of the tallest buildings in the world.

Often we tend to photograph first and think later. The mindset of, “I have a limited amount of time so I will take pictures of everything and anything and cull my images later” is one that is very easy to adapt. I am guilty of this as well, and have to consciously remind myself to think first, and photograph later. But challenge yourself to stop being a lazy photographer (I fall into this trap too) and start photographing smart. Especially with urban photography, there is only so much you can portray about a building or a monument. Limit yourself to

  • One horizontal photo of said object/building/monument
  • One vertical photo
  • One zoomed in detail if there is anything particularly appealing
  • One wide angle shot to give a sense of place and space


Memorable Jaunts Urban Photography Article for Digital Photography School Mumbai Sea Link Photo

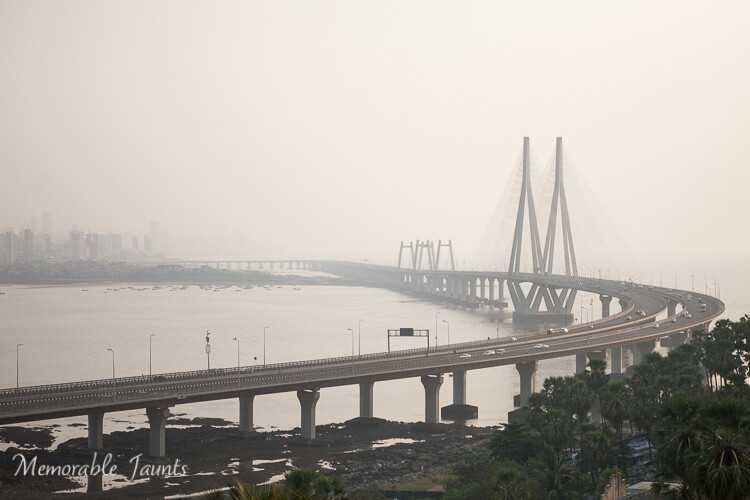
However a zoomed out, wider view of the entire bridge in the early morning hours with the sea, gives the viewer a true sense of its beauty

Memorable Jaunts Urban Photography Article for Digital Photography School Mumbai Sea Link Photo

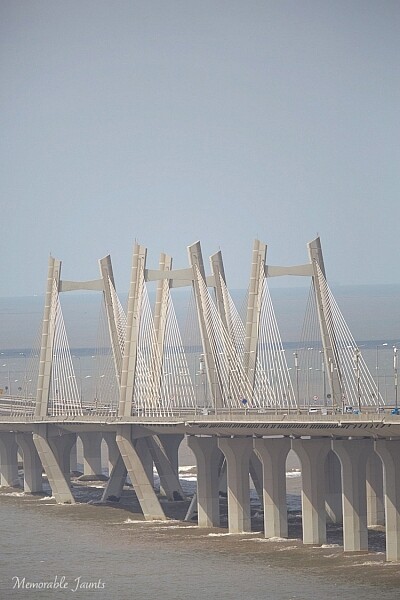
A zoomed in view of Mumbai’s famous Sea Link does NO justice what so ever to this engineering marvel.

Angles and Framing

Memorable Jaunts Urban Photography Article for Digital Photography School Pfister Hotel Downtown Milwaukee

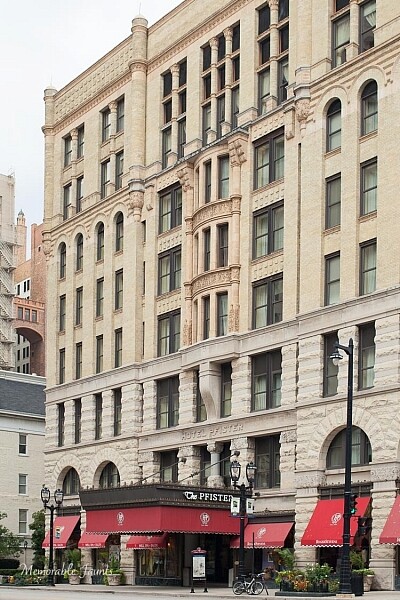
Adding the name of this historic hotel in downtown Milwaukee in the frame makes it easy to find, and completes this story.

This tip goes hand in hand with the shoot smart strategy above. Try and get everything correct in-camera so you spend less time in front of the computer, and more time out exploring. I find that when I am out photographing urban scenes, I am shooting in conditions where I don’t have much control – think harsh midday sun, far away subjects, etc. Hence, I pay particular attention to the technical aspects I can control.

When I am framing my subject and composing the image, I try to convey a story. There is no right or wrong way to do it, remember it’s your story, so as long as you can convey your message, go for it. When photographing a really tall building, go wide. If you cannot go wide, then try to either get the top half or the bottom half. Is it a historic site? Are there some special markers or markings? Something that will help explain why you have taken that particular shot?

Experiment with various angles as well – get down low or shoot from high above. I am not a big fan of tilted angles, particularly on urban landscapes. They make me dizzy and I always wonder which way am I supposed to tilt my head to see the image. Unless the building has a natural slant like the Leaning Tower of Pisa, I don’t get the image! Of course, this is just my personal preference. If tilting is your thing, your forte – then go for it. Experiment and see what works for you.

Memorable Jaunts Urban Photography Article for Digital Photography School Chennai Train Station

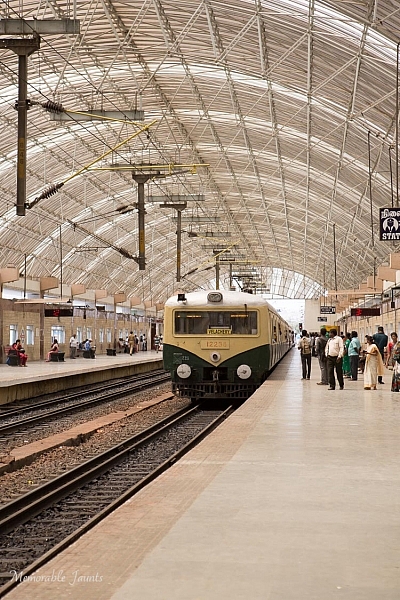
The name of the train line at the front of the train gives this image a sense of place (and yes, I included people in this urban photo).

Memorable Jaunts Urban Photography Article for Digital Photography School Downtown Milwaukee Photo

An apartment community with boat parking docks is aptly called Harbor Front in Downtown Milwaukee, Wisconsin

End goal

Always have an end goal for any photographic exercise. Goals can vary. Maybe you want to try out new gear, explore modern architecture, or maybe you just want to explore a new city or an old favorite neighborhood though your view finder. No matter what the goal, be clear and set your own expectations.

Memorable Jaunts Urban Photography Article for Digital Photography School Taj Hotel Mumbai Photo

The majestic Taj hotel in Mumbai taken from a roof top building several miles away.

Memorable Jaunts Urban Photography Article for Digital Photography School Downtown Chicago Fountain Photo

A fountain in Downtown Chicago comes alive as the sunlight hits the water flowing out of it (my personal perspective, my story).

Memorable Jaunts Urban Photography Article for Digital Photography School Downtown Milwaukee Photo

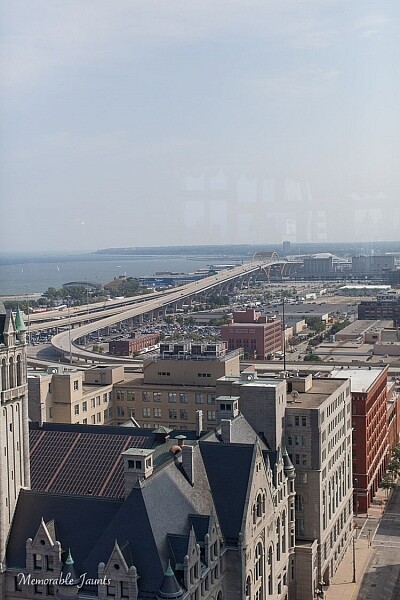
I wanted to show the beautiful bridge that acts as an entryway to downtown Milwaukee, and decided to live with the glass refection very obvious against the blue sky (this was taken from the sky deck of the Pfister Hotel).

At the end, when all is said and done, if there is one tip I can give you, this is it – remember to have a good time exploring, and don’t get too caught up in getting the perfect shot. It is okay to put down the camera at times, engage in conversation with others, and also experience the space and place you are in with your mind’s eye! So get out there and explore.


Here on dPS this is landscape week – here is list of what we’ve covered so far. Watch for a new article (or two) on landscape photography daily for the next day or so.

  • 6 Tips for Better Low-Light Landscape Photography
  • Landscape Photography and the Human Element
  • 5 Ways a Telephoto Lens Can Improve Your Landscape Photography
  • Landscape Photography from the Side of the Road
  • 32 Majestic Landscape Photos to Inspire Your Wanderlust
  • Weekly Photography Challenge – Landscape
  • Landscape Photography – Shooting the Same Location Through the Seasons
  • How to Solve 5 Composition Conundrums Faced by Landscape Photographers
  • 6 Tips for Creating More Captivating Landscape Photographs

googletag.cmd.push(function() {
tablet_slots.push( googletag.defineSlot( “/1005424/_dPSv4_tab-all-article-bottom_(300×250)”, [300, 250], “pb-ad-78623” ).addService( googletag.pubads() ) ); } );

googletag.cmd.push(function() {
mobile_slots.push( googletag.defineSlot( “/1005424/_dPSv4_mob-all-article-bottom_(300×250)”, [300, 250], “pb-ad-78158” ).addService( googletag.pubads() ) ); } );

The post Tips for Getting Started with Urban Landscape Photography by Karthika Gupta appeared first on Digital Photography School.


Digital Photography School

 
Comments Off on Tips for Getting Started with Urban Landscape Photography

Posted in Photography


Canon turbo boosts the pixel race with 250-million-pixel APS-H sensor

08 Sep

If you thought the pixel race was something that ended a few years ago think again. Canon has announced that its R&D team has developed a CMOS sensor of a similar size to that used in the EOS 1D Mark IV which houses 250 megapixels. Read more

Articles: Digital Photography Review (dpreview.com)

 
Comments Off on Canon turbo boosts the pixel race with 250-million-pixel APS-H sensor

Posted in Uncategorized


Red Dot Camera wants to bring the Leica experience to your iPhone

08 Sep

Red Dot Camera is a new camera app for iOS by Lifelike Apps. Its makers, who call themselves avid Leica M shooters, have tried to convert the look and feel of the legendary camera series to an iPhone app complete with rangefinder-style manual focusing. Read more

Articles: Digital Photography Review (dpreview.com)

 
Comments Off on Red Dot Camera wants to bring the Leica experience to your iPhone

Posted in Uncategorized


Top 6 Interview Tips For Making It In The Photography Industry

08 Sep

Photography Industry Leaders Share Their 6 Top Interview Tips For Getting Ahead

Top 6 Interview Tips To Advance In The Photography Industry

Hey there FashionPhotographyBlog.com readers. Our friends from the Dots are back once again to share great tips from photography industry leaders who attended their portfolio masterclass in London, UK. The Dots is a community of creative professionals, designed to connect creatives with collaborators, companies and commercial opportunities. They believe in collectively building a stronger, more profitable and diverse creative sector, similar to us here at FPBlog. We are super excited to have them here with us again on our website.


Just in case you may not be aware, The Dots hosted a Photography Portfolio Masterclass at Spring Studios to give talented emerging photographers the chance to have their work reviewed by some of the UK’s most prominent picture editors and photographic agents. It was also an opportunity for these budding photographers to ask questions and engage in dialogue with these photography representatives, who would be otherwise out of reach. 


With such a wealth of collective experience in the room, they all must have heard all sorts of answers photographers give in interviews when they come to meet them. This is why the team at The Dots took each of them aside to ask them for their best interview tips they could give to photographers to get ahead in the hugely competitive photography industry. Here’s what the photography industry representatives revealed:


6 Interviews Tips For Photographers Who Want To Move Up In The Industry


  1. Research


It may seem obvious to some, but our industry leaders’ main interview tip was to make sure you do your research.


Jamie Klingler (Publishing Manager, Shortlist/Stylist Magazine) made it very clear that “if you walk in and you don’t know what my job is, you don’t know where I’ve worked before, you haven’t seen any of the shoots I’ve produced before – you’re not gonna have an ‘in’ with me, you’re not gonna be showing me your professionalism.”


David Birkitt (Owner & Managing Director, DMB Represents) noted that you should “have a really good reason as to why you’re coming to see me, be aware of what I do. Be aware of something you can add to what I’ve got, not replicate what I’ve got. Have a goal, have a reason for why you want to come, and have at least one thing that you wanna learn.”


Our golden rule for interviews: Do your homework!


  1. Have a point of view


(Robin Derrick, Executive Creative Director, Spring Studios) illuminates why perfectly – “when people ask me how to become a fashion photographer – which is mostly what I commission. What they should remember is the word ‘Fashion’ is as big as the word ‘Photographer’ in that phrase, and it’s very important for a fashion photographer to have a point of view on fashion […] most people can take a picture; I think really learning about fashion and having a point of view on that is normally what improves the work.”


Holly Hay (Photographic Editor, AnOther Magazine & Another Man) reinforced this notion, stating that she also looks for “someone who has something to say, someone who has an opinion on the world and on fashion and on style.”


  1. Make sure your style fits.


If your work is more ‘classic’ than ‘edgy’ then there’s no point in applying for a job at places such as Dazed or Vice as that’s not the kind of work they’re looking for, it’s “a waste of time for everybody, a waste of time for the photographer and for ourselves” Dalia Nassimi (Deputy Picture Editor, WIRED).


Your time is precious; make sure you’re not wasting it!


  1. Be passionate.


Jamie Klingler needs to see passion from a photographer in an interview – “it’s not an easy job, we’re not in this because we want to work 9-5, we’re in this because we want more. So you have to show me that you want to give more and you want to collaborate more.”


Dalia Nassimi points out that, “in magazines – you’re not in it for money you’re in it for the experience, for the exposure. You’re going to get access to a really interesting person or access to a really interesting company. That’s what we’re giving you – go run with it, because in ad world you don’t get that.”


So, in your interview, be passionate about the project and let them know how much you want the opportunity to work with them.


  1. Be on time


Again it may seem obvious, but punctuality is crucial in an interview. It’s the very first impression you give to the interviewer and you don’t want it to be a bad one, as Jamie Klingler stresses, “if I think you’re late for an interview you’re gonna be late for my shoot and I just don’t deal with lateness […] I’ve never hired anyone that was late for an interview.”


And Finally…


  1. Be persistent


After so many emails sent with no response, it can feel like you may never get your big break.


But Holly Hay’s advice for breaking into the industry is to “have persistence – don’t feel like you’re chasing people. Everyone is so busy they won’t feel hounded […] it’s all about timing – hitting someone’s inbox at the right time. So persistence and be brave, and stay true to why you originally started taking pictures.”


What did you think about these photographer’s interview tips? Hopefully, next time you are sitting at the desk of a photography magazine editor or creative director to pitch an idea or show them your portfolio, you will now be better prepared. If you have any interview tips for getting ahead in the industry that you want to share, that hasn’t been mentioned in this post, or you want to leave a comment about the ones listed above please feel free to write them in the comment section below. 


To find out  more about The Dots’ next Photography Portfolio Masterclasses here: https://the-dots.co.uk/about/portfolio-masterclasses


You can also check out The Dots’ Vimeo channel for video interviews, tips & highlights from the Photography Portfolio Masterclass here:  https://vimeo.com/album/3444505


IMAGE SOURCE: 

Feature image & images 1: courtesy of Jack Woodhouse


Fashion Photography Blog

 
Comments Off on Top 6 Interview Tips For Making It In The Photography Industry

Posted in Uncategorized


7. September 2015

08 Sep

Das Bild des Tages von: Moni Bergauf

moni-bergauf

Im Ausblick: Barbie gesellschaftskritisch, tote Kinder und Springers Bildmanipulationen.
kwerfeldein – Fotografie Magazin | Fotocommunity

 
Comments Off on 7. September 2015

Posted in Equipment