Das Bild des Tages von: Tim Cavadini

Unser heutiger Ausblick ist einem Horrorfilm entsprungen.
kwerfeldein – Fotografie Magazin | Fotocommunity
Das Bild des Tages von: Tim Cavadini
Unser heutiger Ausblick ist einem Horrorfilm entsprungen.
kwerfeldein – Fotografie Magazin | Fotocommunity
[ By Steve in Destinations & Sights & Travel. ]
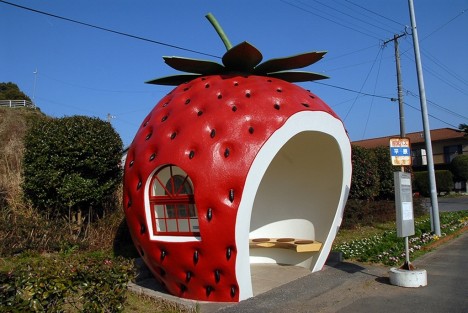
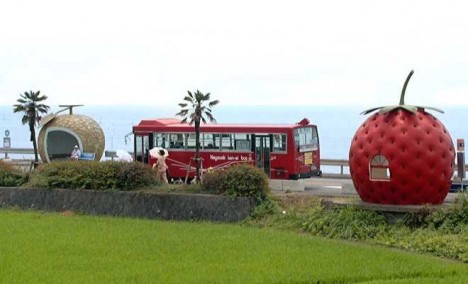
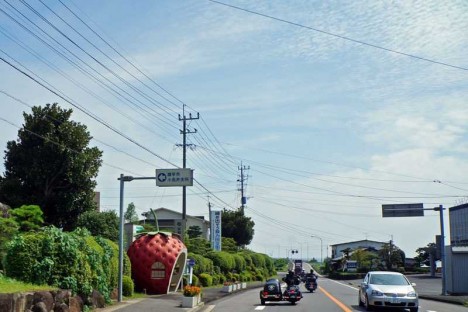
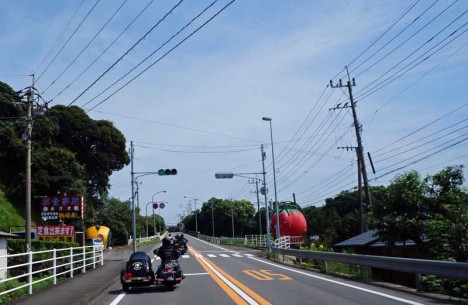
Originally built for a 1990 travel expo, these fruit-shaped bus stops from southern Japan still look as tasteful (and tasty!) as they did 25 years ago.
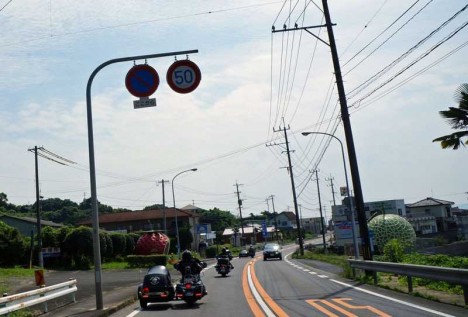
EXPO ’90 (or the International Garden and Greenery Exposition; its formal title) was hosted by the city of Osaka from April through September of 1990. The fair attracted over 23,000,000 visitors over a six-month run, and a host of smaller fairs expressing related themes were held across Japan as well.
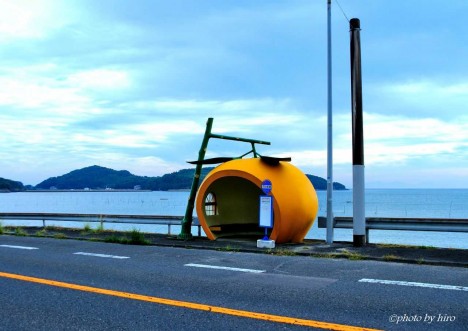
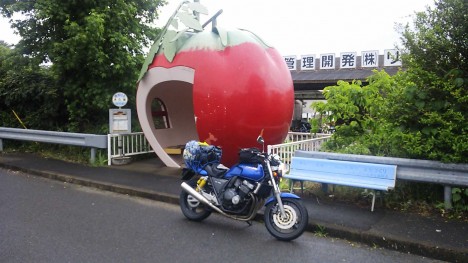
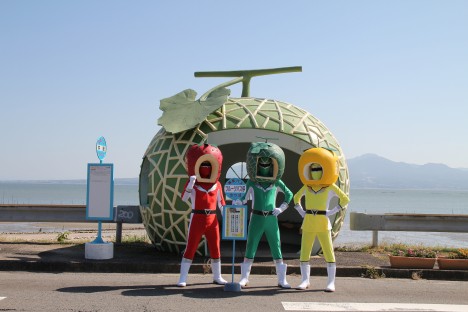

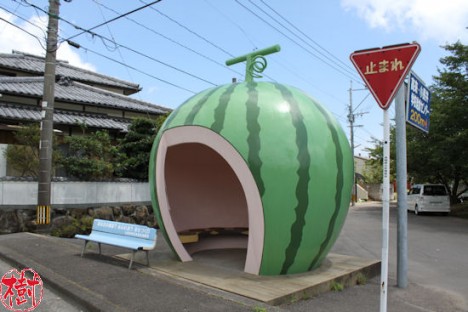
Konagai, a small town situated just east of Nagasaki, decided to jump aboard the bandwagon by hosting the little-known Nagasaki Journey exhibition. The only remaining relics of the fair are fourteen bus stops (some sources state the number to be 16) constructed in the form of hollowed-out oversized fruits!
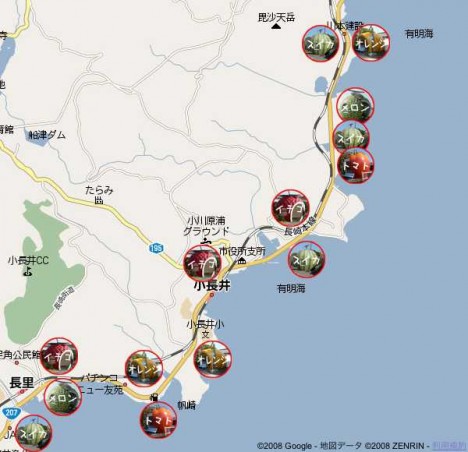
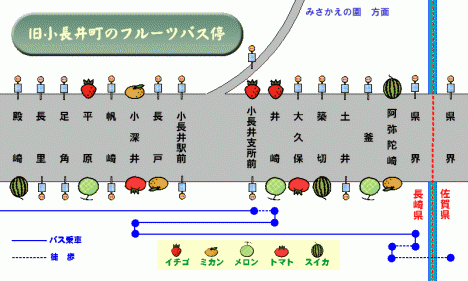
The stops have held up remarkably well over the ensuing quarter-century… still functional and in splendid shape structurally, the bus stops erected along the 207 National Highway have become a tourist attraction in their own right.

Trading a free vacation for their design input, a series of world-renowned designers each contributed their vision of a bus shelter to a tiny town of just …
Click Here to Read More »»

Seven years into his experiments, the living artworks of Sam Van Aken are bearing far more than just fruit, each new variant of the Tree of 40 Fruit building …
Click Here to Read More »»

Most bus stops are… less than stellar. Unfortunately, the only way most bus stops generate excitement is through advertiser-driven guerilla marketing.
Click Here to Read More »»
![]()


[ By Steve in Destinations & Sights & Travel. ]
[ WebUrbanist | Archives | Galleries | Privacy | TOS ]
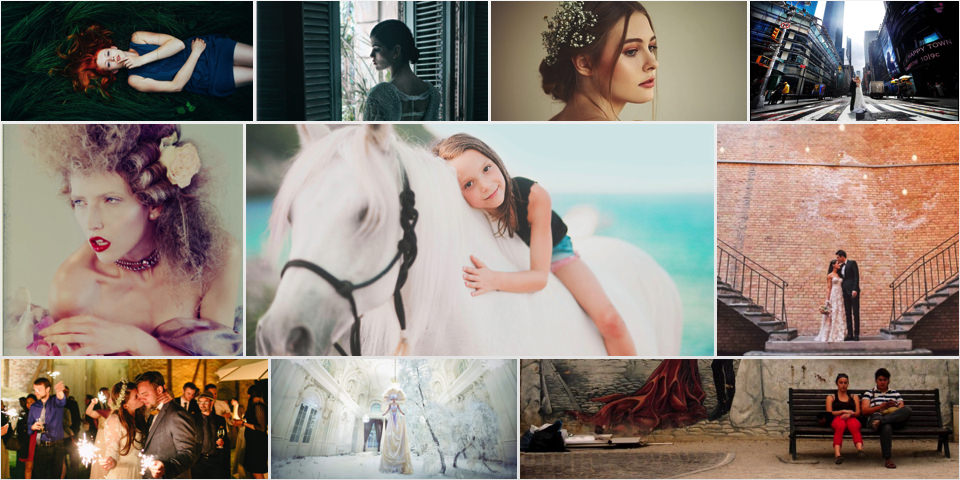
Place your subject to the right or left of centre. For portraits, the eyes should be above the centre line for a pleasant good composition.
Composition is all about the balance of the elements in your photograph. This also includes colors tones and textures. This is what separates a snapshot from a great shot. If you want to achieve a good composition, you need to plan it out and see where each element is going to be placed before you take the shot.
You may have heard photographers talk about seeing the shot in their head before they have actually taken the shot. It’s this ‘seeing’ that I’m going to describe in more detail. I’ll also demonstrate a few useful tips to train your eye in seeing or framing a scene with or without a camera, and in post-editing.
A good composition in a photo will most likely have followed a compositional rule. These are very useful to know. I’ve chosen five of these principles to describe how they work. I prefer to call them principles or guides rather than rules. There are many more, but these five are a good place to start.
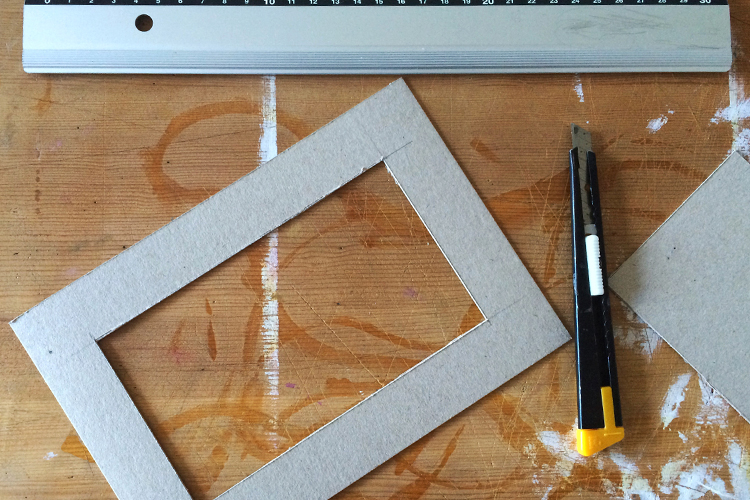
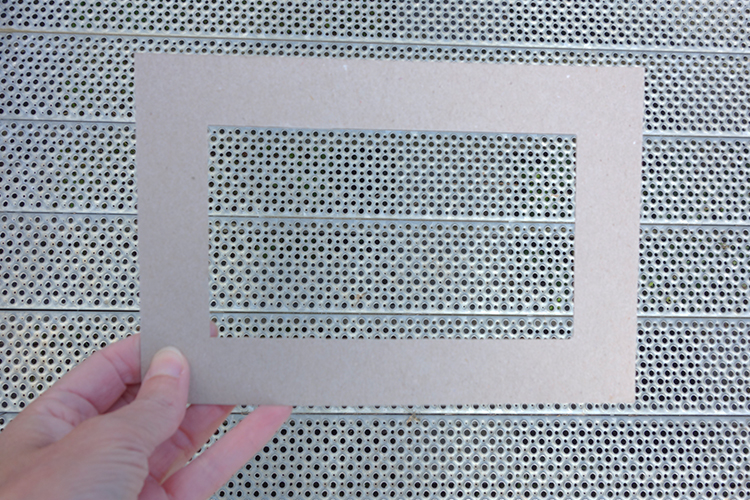
Cut-out cardboard frame for training your eye to see.
Let’s get back to seeing your shot or framing the scene. For this exercise, you won’t need a camera. You might get funny looks but bear with me. Choose any place, location that you want.
Cut out a frame from cardboard or any material you want as long as it’s a rectangle. See above.
You could equally use your hands, but I preferred using the cardboard frame.
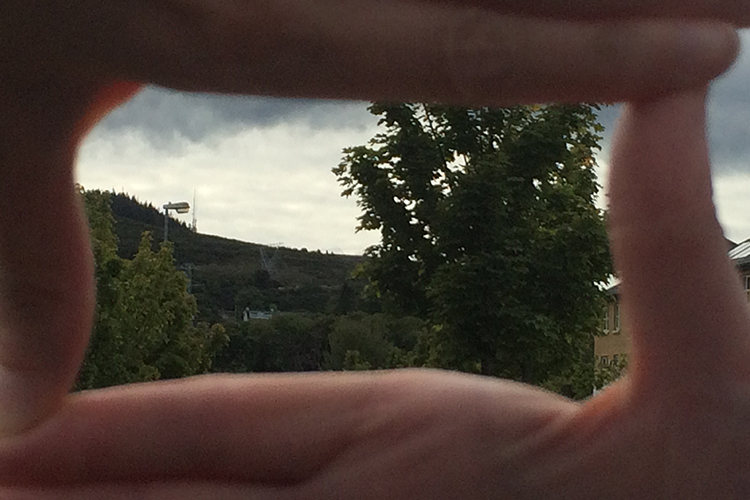
Framing your shot using hands.
As you will see, the frame narrows your field of vision and helps to block out distractions and look for the main focal point, which is what the viewer’s eye is drawn to. I can’t emphasize enough that this simple exercise will help you train your eye to see better in terms of composition. Don’t forget to get down low and look up too.
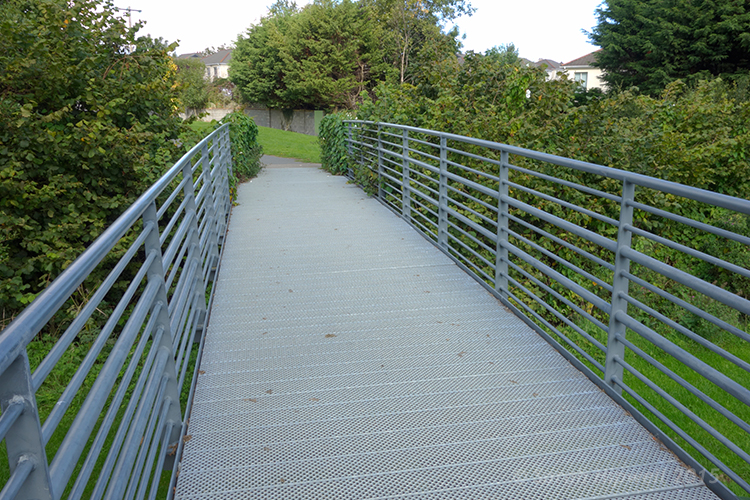
Take this metal bridge, for example. Not a very interesting photo.
By using the cardboard frame to ‘see’ the potential for an interesting shot.
Bring it into your post-editing software and create an interesting texture shot.
Another useful tip that I would highly recommend is a trip to your local art gallery to see great works of art. Not only is it visually pleasing, but you get the chance to study how these great artists used composition to great effect. So the next time that you happen to be in such a museum, observe and take note. Ask why you liked a particular painting? How were the elements in the painting arranged or placed? Where was the horizon line – a third up from the bottom? What about color and texture?
Okay, what if you don’t live near an art gallery? Then maybe a visit to your local library could be an option? Libraries are such a wonderful resource. In the art section alone, you have great masters, such as Leonardo da Vinci, Rembrandt and so forth. And of course, the masters in the photography world such as Henri Cartier-Bresson and Ansel Adams, to name just a couple.
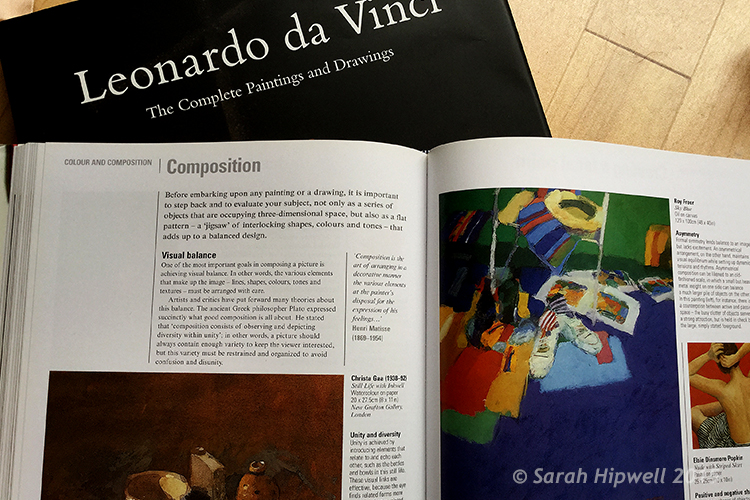
Go to your local library for inspiration from the masters in the art world to see how they used composition in their works.
Before you go and get your camera, let me explain the following five compositional principles I believe are a great starting point for beginners.
You may have already heard of this one. This is an actual formula based on mathematical principles of harmony and proportion. It has been used by artists for centuries. So think of your photo with imaginary lines that are drawn dividing the image into thirds both horizontally and vertically. You place important elements of your composition where these lines intersect. Similar to a tic-tac-toe game.
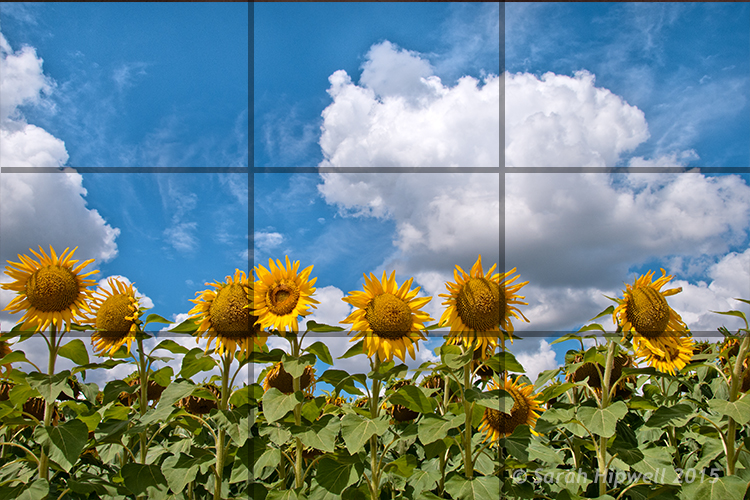
How the rule of thirds looks like. Where the lines intersect are the points in which to place your elements.
This may sound a bit odd (sorry, excuse the pun), but our brain looks for evenness and symmetry. So this principle asserts that having an odd number of objects in an image will be more interesting and, therefore, more pleasing. By having one or three elements is better than two.

Odd numbers of elements are more pleasing and interesting than even ones.
Keep the horizontal lines level and the vertical lines straight. This is particularly important if you shoot landscapes, seascapes and cityscapes. Leading lines are also very effective for drawing the viewer to where the focal point is.
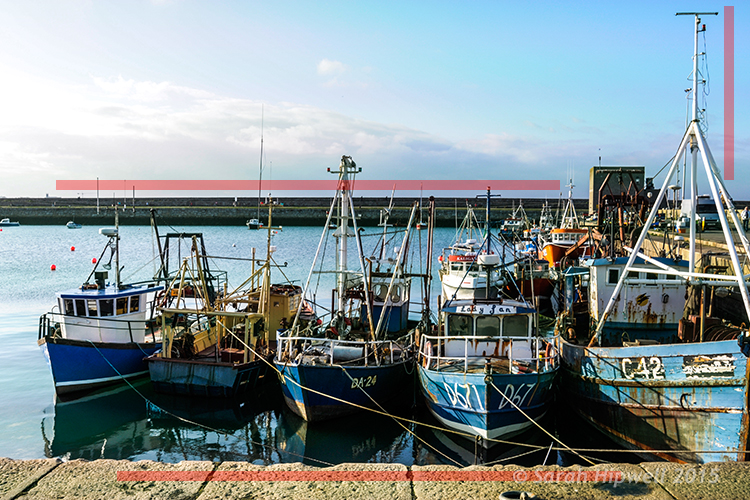
The red lines are to show the horizontal lines are even and the vertical lines are straight.
Color and textures are a great way to demonstrate good composition.

Here is an example of color and rule of thirds for this composition. Notice the curve elements.
This is an abstract concept which describes the space around your subject, otherwise known as ‘white space’ that draws your eye to it. Basically like ‘sky’ or a blurred background that provides the main emphasis on the subject.
Think of it in terms of letting your main subject or object breathe by giving it room.
As photography is about creativity, rules are not meant to be strictly adhered to. In the bikini photo, although I used two of them and they are symmetrical, I used color to contrast the elements and by not placing them in the centre gives the photo a more pleasing compositional effect.
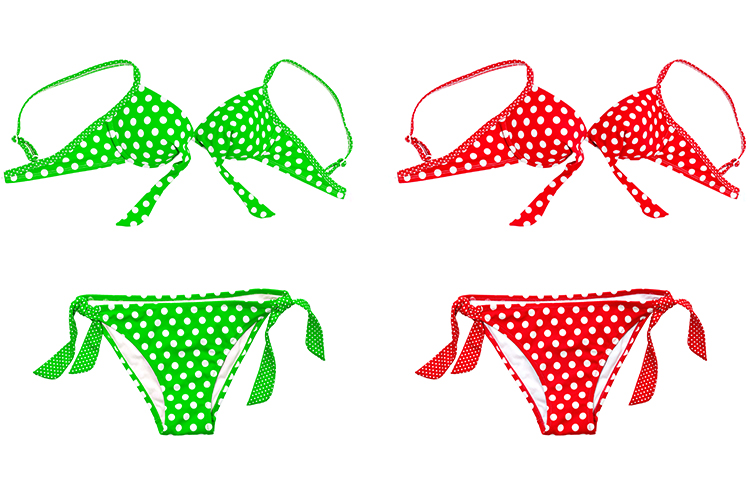
Although I used two pairs of elements and I know that these are even, the color contrast and using the rule of thirds still makes this image a good composition.
Right, let’s get the camera out. Most DSLR cameras have built-in grid lines and some have a virtual horizon or a spirit level. If your camera has none of these options, you can always add a leveling aid, such as a hot shoe-mounted spirit level or use the focusing points within the viewfinder.
Use your tripod to help you frame your shot so that you get a good composition. Look through the viewfinder, see what elements are in the frame. Then take a look at the scene in front of you with both eyes, then go back to your viewfinder, recompose, then shoot.
Practice will improve your understanding and shooting better compositions. Don’t expect to get it in one go. Give yourself time.
Last, but not least, cropping your images in post-editing. Whether you use Camera Raw, Photoshop or Lightroom, cropping your photos will give you a better understanding of how the principles of composition apply.
You can easily straighten crooked horizon lines by using the Crop Tool or get rid of barrel distortion in buildings using the Lens Correction filter in Photoshop. Or simply change the image dramatically from the one you shot originally. All of these edits can be done non-destructively, so you can crop to your hearts content!
This is how the photo at top of this article was shot, yet when I cropped in tight on the model to the right, it gave me a different shot.
To summarize, like any complex subject that goes beyond just one article, I hope I have illustrated some useful tips to show the importance of composition in your photography. Please share your comments below.
googletag.cmd.push(function() {
tablet_slots.push( googletag.defineSlot( “/1005424/_dPSv4_tab-all-article-bottom_(300×250)”, [300, 250], “pb-ad-78623” ).addService( googletag.pubads() ) ); } );
googletag.cmd.push(function() {
mobile_slots.push( googletag.defineSlot( “/1005424/_dPSv4_mob-all-article-bottom_(300×250)”, [300, 250], “pb-ad-78158” ).addService( googletag.pubads() ) ); } );
The post Easy Tips to Help Beginners Understand Composition by Sarah Hipwell appeared first on Digital Photography School.
You might already know the work of photographer and urban explorer Ralph Mirebs – his series of photos of abandoned Soviet spacecraft went viral earlier this year. His fascination with science and technology have fueled his photography, and he’s passionate about documenting abandoned industrial spaces striving to always answer the question ‘What was this used for?’ See his work and find out more in our Q&A. Read more
Articles: Digital Photography Review (dpreview.com)
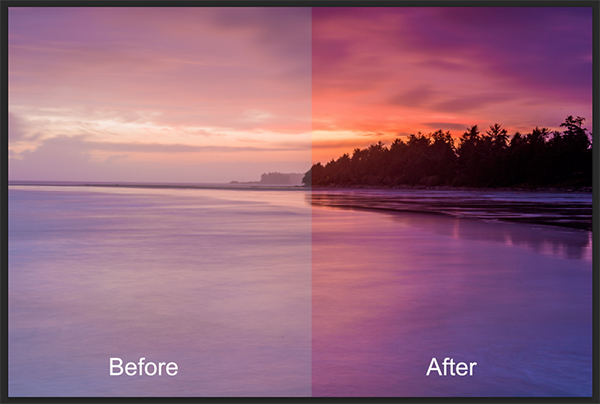
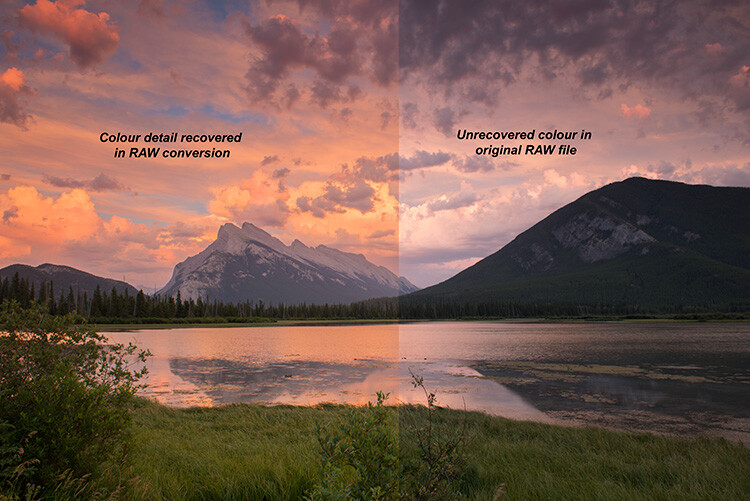
Detail recovered from a RAW file, before and after.
There is often a debate among photographers about shooting in RAW. Try it out – next time you are with a group of photographers, ask them who shoots in RAW. Better still, ask them why they don’t shoot in RAW. The conversation will become pretty interesting. When I first started photography, I was told that shooting in RAW was a waste of time and that I won’t need all that “information”. I was told it was better to shoot on JPEG as it saves space. Yes, RAW files are bigger, especially on a high-resolution camera, but is it true that we don’t need all that “information”? Over the past few years, I have done a fair amount of research into the RAW vs JPEG debate and I now shoot completely in RAW. Yes, my image files are MUCH bigger; yes, I need more space to store my images; yes, it does impact my image editing workflow. Is it worth it? A categorical yes. Here are five reasons why you should shoot your landscape images in RAW.
RAW files are big because they don’t discard any image information that is captured in the scene. When you shoot on JPEG, the algorithm for JPEG determines which information is discarded and which is kept without changing the way the image looks. That is great for saving space on your memory card, but not so good if you intend to edit your images in Photoshop.
The reality is that your camera can capture a significant amount of data if you shoot in RAW, which in turn gives you much more flexibility in Photoshop later. On average, a normal JPEG file will be between four and six megs per image. The same image shot on the same camera in 14-bit lossless RAW format will be 25 – 30mb, five times bigger. The reason is that there is much more information in a RAW file. That information is critical in post-production. You can get so much detail out of a RAW image, such as pulling back blown-out highlights and bringing back detail in the shadows that would be impossible to recover in JPEG format. This doesn’t mean you should be sloppy and not pay attention to your exposure. What it does mean is that in tricky lighting conditions, you will be able to get a shot that’s usable.
Recovered details in a street scene, overall much more detail can be seen.
We all shoot on color nowadays. If you don’t, you should, even if you are going to convert to black and white – but that’s for another post. Shooting in RAW means that you are saving as much color information as possible from the scene. This is really important in landscape photography, portrait photography, food photography and even street photography. The color in your scene can make the difference between a good image and a great image. By shooting in RAW, you will have all the color information possible. The important part of that is the subtle color. For example, the gradation in the sky will look better than it would on JPEG, even if you think that JPEG will be fine from a color perspective. If you are shooting a landscape scene, you want to get as much color information as you can. RAW would be the format to do this. In Photoshop, the vibrance function will saturate the colors in your scene which are undersaturated and this can give your RAW file that subtle boost to make the image pop.
Much more color can be rendered from a RAW file.
The exposure in your scene should always be as good as you can get it in camera. In the past, most photographers would underexpose a little to make sure they didn’t blow out the highlights. In recent years, most photographers shooting in RAW have been exposing to the right (ETTR). The new generation of cameras have a really good dynamic range and are able to render details in the shadows and the highlights in one shot. This was not possible a few years ago. ETTR means that when you look at your photograph’s histogram, try and push it over to the right a little – in other words, overexpose it a little. The reason is because RAW can handle highlights in a scene really well and if your shadows are a little brighter there won’t be as much noise in the shadows. This is really a good technique to use in landscape photography and architectural photography. Your images will be cleaner and have very little noise in them. Once you adjust the image in Photoshop, you will have a well-exposed image across the dynamic range.
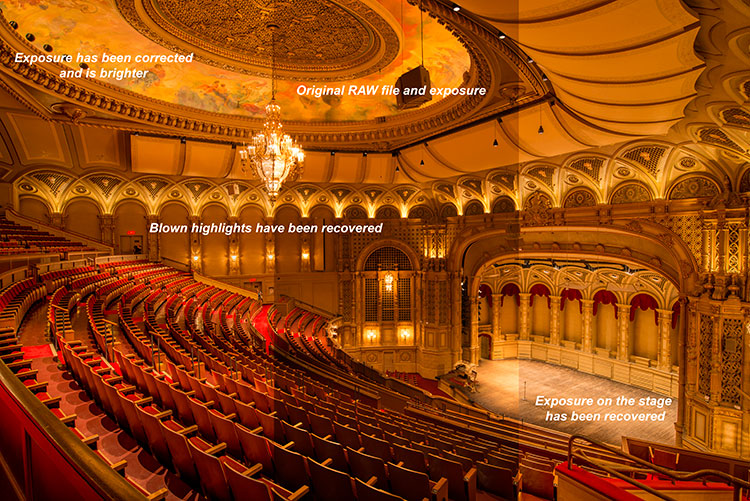
Blown out highlights in this scene were brought down, but the overall exposure was brightened.
The best part about RAW files are that they give you flexibility. If you shoot landscape images or street photography, you have a lot of information to work with and you can use that information to create the best possible image. Also, Photoshop is always improving their tools and functions. I have gone back and reworked older images: the RAW file had all the information and the new functions brought out the best of that scene. This has happened quite a few times, so don’t delete “throwaway” images so quickly. For this reason, I am also not a fan of chimping too much. Wait until you download the images to see what is worth keeping. Use RAW to give you as much flexibility as you can, even on older images.
Original RAW file, the image was really dark from the use of an ND filter.
The result of the above image after being edited in Adobe RAW converter.
Editing your RAW image is a two-step process. The first step is converting it in a RAW converter. (Lightroom converts RAW images, as does Photoshop and many other image editing products.) Once you have made the corrections and subtle adjustments in the RAW converter, then you can open the converted image in Lightroom or Photoshop. You will then be editing on the best quality image possible. Image quality is almost the “holy grail” of photography. If you ask any photographer what the most important thing is for any image, it will most likely boil down to image quality. To be clear, when I say image quality I include sharpness, noise, dynamic range, color, tone, chromatic aberration and so on. Anything that adds to the overall look and feel of the image. Your image quality will be fantastic if you work carefully in your RAW converter and edit well in Photoshop. You can get good image quality in JPEG too, but you will be able to squeeze that much more out of the image if you shot in RAW.

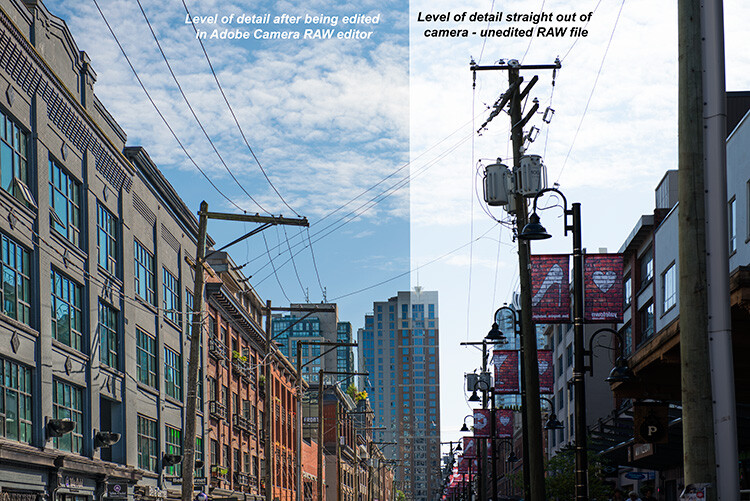
Look at the quality and detail of the scene after being edited in Adobe Camera Raw converter.
RAW is a great format to use if you plan on editing your images. If you shoot landscapes, fashion, food, architecture and even weddings you should be considering shooting in RAW. One caveat on using RAW for weddings – you don’t have to shoot the whole wedding in RAW, but shoot the important images or images where the light is tricky in RAW. That way you can be confident you have the shot and information you will need for editing later.
RAW requires a different workflow for your image processing. If you don’t want to spend too much time editing, then maybe RAW will not work for you. The reality is RAW files are bigger, but that’s because they capture so much more information. If you are skeptical, give it a try. Shoot some scenes in RAW and try the Adobe RAW converter. Lightroom also works with RAW files. You might find that you have more details and information in your image than you thought.
googletag.cmd.push(function() {
tablet_slots.push( googletag.defineSlot( “/1005424/_dPSv4_tab-all-article-bottom_(300×250)”, [300, 250], “pb-ad-78623” ).addService( googletag.pubads() ) ); } );
googletag.cmd.push(function() {
mobile_slots.push( googletag.defineSlot( “/1005424/_dPSv4_mob-all-article-bottom_(300×250)”, [300, 250], “pb-ad-78158” ).addService( googletag.pubads() ) ); } );
The post 5 Reasons To Should Shoot Your Landscape Images in RAW by Barry J Brady appeared first on Digital Photography School.
In unserer Arbeit als Fotografen stehen wir immer wieder vor großen Fragen, für die es leider kein Handbuch mit der „richtigen“ Antwort gibt. Zum Beispiel Fragen zum Umgang mit Kunden wie unsere heutige Frage, die wir neun Berufsfotografen gestellt haben: Bekommen Deine Kunden auch die Rohbilder zu sehen?
kwerfeldein – Fotografie Magazin | Fotocommunity
You might have seen some articles here on Digital Photography School about using the histogram when editing pictures in Lightroom and Photoshop, but it can also be a very handy tool when you are out shooting images as well. Most cameras have the ability to show you the histogram when you review your photos on the rear LCD screen, and some even allow you to see a real-time histogram in Live View. While this might seem a bit intimidating at first, learning to use the histogram when out shooting pictures can have a dramatic impact on your photography and help you understand how to get the right exposure for the photos you are taking.

Sorority Bid Day brought to you by the magical properties of the histogram.
In a nutshell, the histogram shows how much data is recorded for various Red, Green, and Blue color values in a picture. While you can usually see data for all three colors separated into discrete graphs, the one I find most useful for general shooting is the histogram that combines all three RGB values into one visual representation. A histogram shows how much data has been recorded across the tonal range of a photograph from very dark to very light. A spike in the graph means a lot more data has been recorded for those particular values of darkness or lightness, and a dip means that not much data has been saved. In general, a properly-exposed picture should have a histogram that looks something like this:
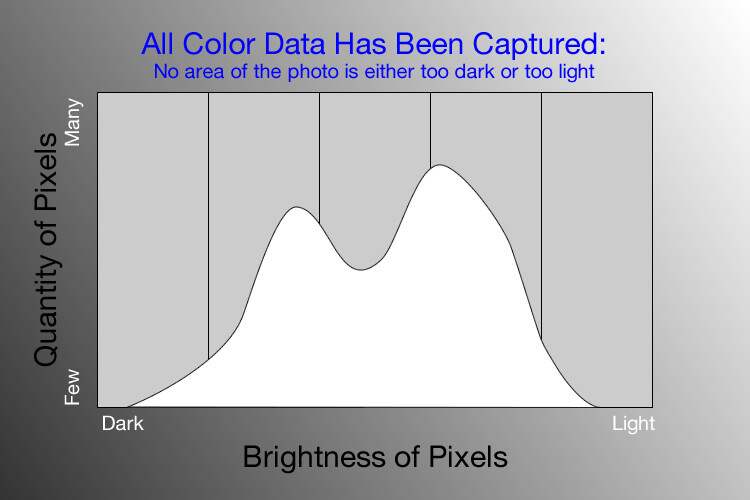
An example of a hypothetical histogram for a properly exposed photo.
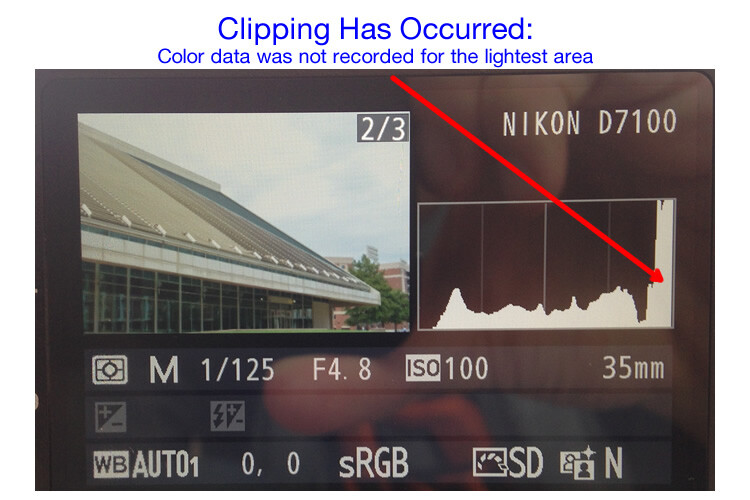
A histogram similar to this example would mean that most of the color data is concentrated in the middle: the greatest quantity of pixels is neither too dark nor too light. Most photos will have some darker pixels and some brighter pixels, but in general all the information captured by a camera’s image sensor should fall somewhere between the darkest of darks (i.e. very black) and the lightest of lights (i.e. very white). A histogram that is skewed to the right would indicate a picture that is a bit overexposed because most of the color data is on the lighter side, while a histogram with the curve on the left shows a picture that is underexposed. This is good information to have when using post-processing software because it shows you not only where the color data exists for a given picture, but also where any data has been clipped: that is, it does not exist and, therefore, cannot be edited. It’s also good information to have out in the field, such as in the following example:
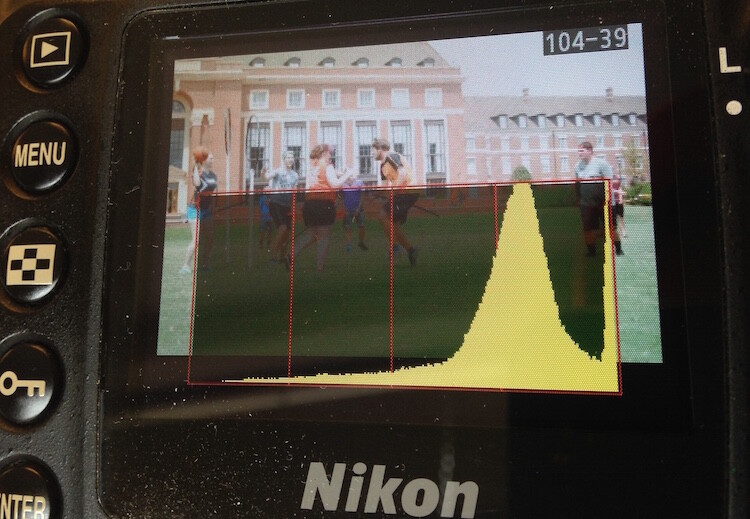
Most cameras allow you to overlay the histogram on top of a given photo during playback, or as you shoot the photo when using Live View.
I could tell right away that this picture of some college students playing Quidditch was a little overexposed, but looking at the histogram data right on my camera gave me additional information that helped me adjust my shooting on the spot. The large curve on the right-hand side tells me that most of the color information is concentrated on the lighter side, which is actually a good thing because more data is actually collected in the highlight portions of the image which can then be brought down later in a program like Lightroom. (This is a technique called expose to the right, which is a fantastic way to get a little more out of your photography if you are willing to put in a bit of time editing pictures on your computer.)
The problem with this image, as you can see in the above histogram, is that the graph literally goes off the chart on the right-hand side. This means that some of the highlights have been clipped: there is no longer any data that can be recovered, and no matter what I do in Photoshop or Lightroom there are some portions of my image that show up as pure white and can’t be edited. An example histogram from a photo that is clipped on both the darkest and lightest areas would look like this:

After taking the first photo and realizing that some of the data would be lost due to clipping, I was able to adjust my exposure settings and get a much better image:
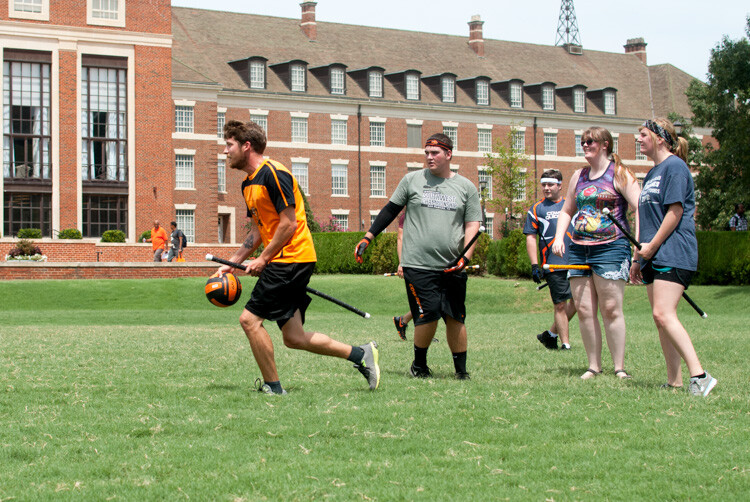
Quidditch isn’t only played at Hogwarts.
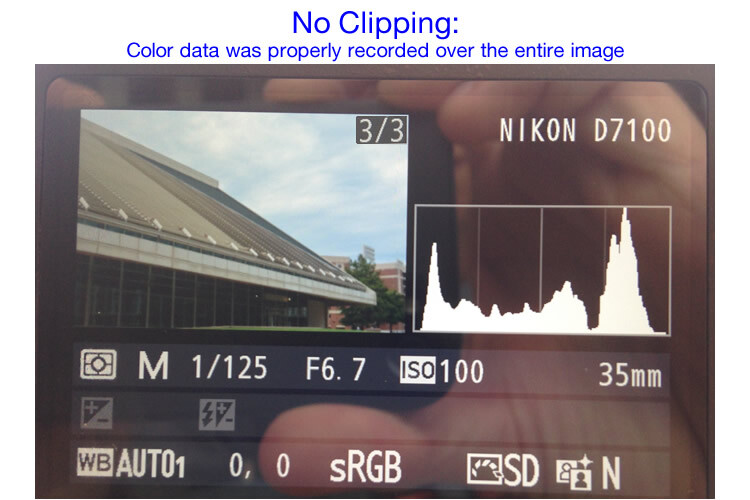
The histogram for this picture was also concentrated a bit more to the right-hand side, but right after I shot it I was able to see that no data had been lost due to clipping. This didn’t help much in the immediate moment, but it meant that I had plenty of information to work with later when editing the picture in Lightroom. As another example, here’s a picture of a unique building on the Oklahoma State University campus:

The Noble Research Center on the campus of Oklahoma State University.
When I looked at the back of my camera it seemed as though the photo was pretty good. The sky was a bit bright, but I thought everything would be just fine overall. This is similar to many situations I have been in when I thought I could tell simply by looking at the photo on my camera’s LCD screen if it was exposed properly, but a quick check of the histogram can yield much more information. Even though the above image seemed decent at first, the camera histogram told another story:
The histogram for the above photo indicated severe clipping on the highlights, meaning some parts of the photo were so bright that I wouldn’t be able to fix it in Lightroom.
Had I not looked at the histogram I would have never seen that a good chunk of the sky was clipped which meant there was no color data at all for the brightest portions of the photo. This would be a serious problem for my post-processing when I bring my pictures into Lightroom and adjust various parameters to get the image to look like I want. After looking at the histogram I re-adjusted my exposure settings and took another photo which had an improved balance of color data across the spectrum:
The same composition, but with different exposure settings that resulted in a better exposure with no clipped data.
One curious aspect of this image is that while the sky is now properly exposed, the glass panels on the building appear to be too dark. Looking at the histogram you can see that while there is certainly a lot of data on the darker portions of the image (hence the spike on the left-hand side of the graph), no data has been lost due to clipping. This means I had a lot of flexibility to improve the image in Lightroom, which resulted in the following finished photograph:

One nice thing about most mirrorless cameras, as well as some DSLRs when shooting in Live View, is their ability to give you a real-time indication of any areas of the image that will be over – or under – exposed. This is normally referred to as a zebra pattern and it essentially overlays a series of stripes over any portion of your image where data is going to be clipped. And remember, as I stated earlier, many cameras today have the ability to show you a live histogram that updates in real-time so you can see not only where the color data on your image is concentrated across the light/dark spectrum, but also alert you to any clipping that will happen when you take the photo.
These are just a few examples of how the histogram can be useful when you’re out shooting photos, not just when you’re editing them on your computer. How do you use the histogram, and what other tips and tricks do you have to share about using it to enhance your photography? Leave your thoughts in the comments below.
googletag.cmd.push(function() {
tablet_slots.push( googletag.defineSlot( “/1005424/_dPSv4_tab-all-article-bottom_(300×250)”, [300, 250], “pb-ad-78623” ).addService( googletag.pubads() ) ); } );
googletag.cmd.push(function() {
mobile_slots.push( googletag.defineSlot( “/1005424/_dPSv4_mob-all-article-bottom_(300×250)”, [300, 250], “pb-ad-78158” ).addService( googletag.pubads() ) ); } );
The post Using the Histogram to Take Better Pictures by Simon Ringsmuth appeared first on Digital Photography School.
Das Bild des Tages von: Lukas Stöver
Im Ausblick: Wahrheit hinter Instagrambildern, Steve McCurry und Wüsten der Welt.
kwerfeldein – Fotografie Magazin | Fotocommunity
[ By WebUrbanist in Art & Installation & Sound. ]

Starting with a model planet Earth the size of a marble, a team of filmmakers set out to simulate our entire solar system in motion and capture the results in a compelling short movie.

In normal images and models of the planets in our solar neighborhood, nothing is too scale – at scale on a piece of paper, planets becoming vanishingly small and effectively impossible to see on the page. Textbooks and other graphics misrepresent sizes almost by necessity simply because it would be impossible to depict things otherwise in a small visual field.

The resulting visuals distort our sense of the distance between celestial bodies. In the scale model featured above, set in the Black Rock Desert of Nevada, Alex Gorosh and Wylie Overstreet give the viewer a much greater intuitive understanding of the separation and size of these spatial objects.

“As we got farther and farther away it diminished in size. Finally it shrank to the size of a marble, the most beautiful marble you can imagine. That beautiful, warm, living object looked so fragile, so delicate, that if you touched it with a finger it would crumble and fall apart.” said James Irwin, Apollo 15 astronaut. He is one of only 24 people in human history have seen the full circle of the Earth with their own eyes.

Using LED lights, GPS calculations, a dirt disrupter and ultimately cars driving in circles to simulate the orbits at night, the team created a 1:847,638,000 scale model in which blips of light represent the various bodies in space.

One of the participants climbed a nearby mountain to film it all from above, while post-production overlays create a key for the video. Process documentation was made in part with a drone flying overhead. According to its creators, this is the first scale model of the solar system ever constructed.

Every city has its own unique sound, but until now those sounds have been less than musical. This unique project turns the city itself into an instrument.
Click Here to Read More »»

The island of Manhattan is a fascinating place on its own, but one artist has given it new life. This marble recreation of Manhattan is full of amazing details.
Click Here to Read More »»
![]()
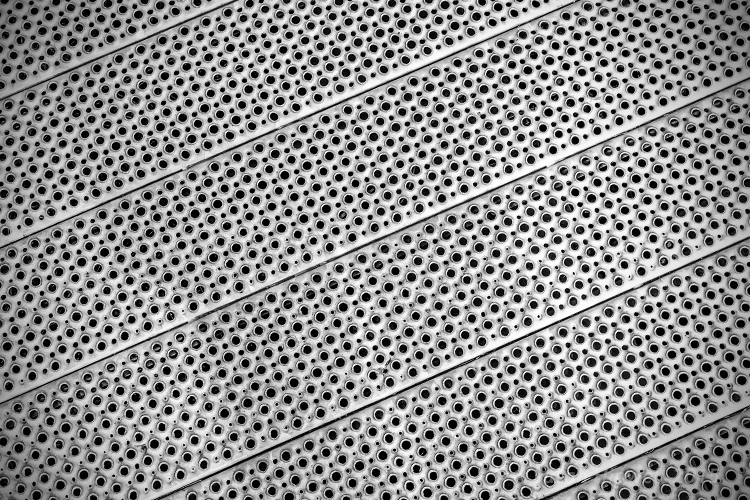
Applied to anything from the surface of your smartphone to the the sides of a skyscraper, the possible uses of this innovation for everyday surfaces are …
Click Here to Read More »»
![]()
[ By WebUrbanist in Art & Installation & Sound. ]
[ WebUrbanist | Archives | Galleries | Privacy | TOS ]
We’ve just expanded our real-world Olympus Tough TG-4 sample gallery with underwater images from the sparkling blue waters of Maui. The TG-4 is Olympus’ 16MP rugged compact with Raw support and built-in Wi-Fi with GPS, making it a truly road-ready travel companion. Read more
Articles: Digital Photography Review (dpreview.com)
You must be logged in to post a comment.