Today, in this digital age, your job isn’t done once you’ve taken the photos, you’re really only halfway there. You need to edit your photos. Luckily, using Adobe Lightroom, combined with some really high-quality presets, you can instantly start getting amazing results, rather than spin your wheels being frustrated trying to edit your photos.
But first – what is a Lightroom preset?

A Lightroom preset is simply a collection of photo edit settings inside of Lightroom that are bundled into a single click allowing you to edit photos far more efficiently than you would otherwise by repeating those same settings and editing steps one by one.
Here are 7 reasons why you’d be crazy not to use Lightroom presets:
Save Time
When using Lightroom presets, with only one click you’ll be able to instantly get your photos to an 85-90% edited state, and sometimes you’ll even be completely done with one click! Rather than edit each photo from start to finish, you can spend your time on the fine-tuning part of the editing process.
Simple to Use
Learning any new software can be intimidating, and take time to master. While it’s certainly important to always take strides at truly learning the program, using presets will let you instantly get started in Lightroom, and edit your photos simpler than ever before.

Variety
Does the photo look best in black and white or a sepia edit? Or maybe a vibrant color edit or a subdued vintage look? Using Lightroom presets will give you a ton of creative variety right at your fingertips so you can effectively try different edits and see which style is most fitting for a particular photo, or even full photo session. Quick tip – when you hover over a different preset, Lightroom will show you a preview of how that photo will look with that preset applied (in the Navigator box, at the top of the left panel in the Develop Module, see screenshot above).

Consistency
When you are editing an entire photo session, using the same presets across the whole photo shoot will give your images a more uniform and consistent look, as opposed to editing each and every photo one-by-one, which can yield varying settings and a disjointed look to your image set.
Completely Customizable
Have a preset you love, but you always have to slightly adjust the color or contrast? Or maybe your very own style has changed over time? No problem at all. Any develop preset you use inside Lightroom is completely customizable and it’s as easy as a couple mouse clicks.

Lightroom versus Photoshop
Presets work inside Lightroom and actions work inside Photoshop. Both programs have their place in a professional photographer’s editing workflow. However, Lightroom is the primary editing software of choice for both professionals and hobbyists alike. Not only is it far easier to use and learn compared to Photoshop, but within Lightroom all of your edits are non-destructive. That means that your original unedited photo is always stored in Lightroom so you can experiment as much or as little as you want, without ever degrading the quality of your original image.
Presets + Batch Editing = The Winning Combo

Example from the dPS 101 Lightroom Presets Pack
One of the greatest benefits of using Lightroom is its ability to edit a lot of photos very quickly by batch editing, or syncing, your settings from one photo to many at once. When you combine high-quality presets with batch editing in Lightroom you will be able to drastically cut down your complete photo editing time per session.
Now that you have a better understanding of how using Lightroom presets can dramatically reduce the amount of time you spend editing your photos, while getting you better results and increasing your creativity – it’s time to grab some presets for you to use inside of Lightroom.
Introducing the dPS 101 Lightroom Presets Pack
You can scour the web to research and find different Lightroom presets, you can choose to create your own, or you can make your life really easy and purchase the official Digital Photography School – 101 Lightroom Presets Pack that I’ve created.

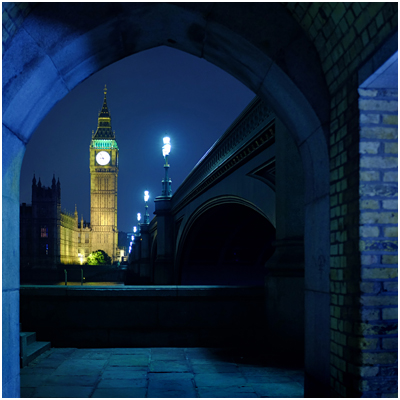
Example using the Summer Sun preset from the dPS 101 Lightroom Presets Pack
This ultimate preset bundle includes seven different themes, so you can easily find and use a preset that is the most fitting for your specific photo, without having to waste any time. You’ll find presets dedicated for portraits, stunning black and white & sepia presets, presets for landscape photography, street photography, vintage presets and much more.
It doesn’t matter if you are a beginner or professional, you’ll love these presets and the amazing results you’ll get from them. Click here to learn more and save big by getting them during this limited time introductory special promotion price.

Example from the dPS 101 Lightroom Presets Pack
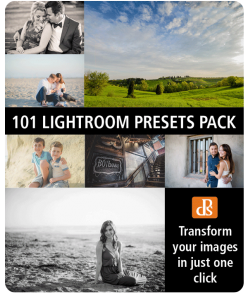 dPS 101 Lightroom Presets Pack
Cole’s handcrafted a brand new set of presets, exclusive to dPS.
- Instant Digital Download
- Guaranteed for 2 full months
- Pay by PayPal or Credit Card
For a limited time only get them at the introductory price of $ 20.
googletag.cmd.push(function() {
tablet_slots.push( googletag.defineSlot( “/1005424/_dPSv4_tab-all-article-bottom_(300×250)”, [300, 250], “pb-ad-78623” ).addService( googletag.pubads() ) ); } );
googletag.cmd.push(function() {
mobile_slots.push( googletag.defineSlot( “/1005424/_dPSv4_mob-all-article-bottom_(300×250)”, [300, 250], “pb-ad-78158” ).addService( googletag.pubads() ) ); } );
The post 7 Reasons Why You’d be Crazy Not to use Lightroom Presets by Cole Joseph appeared first on Digital Photography School.

Digital Photography School

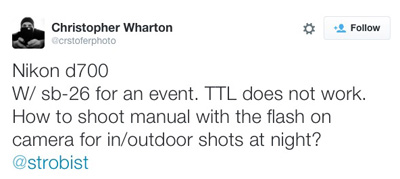
 Reader Christopher Wharton has a flash-camera combo that will not work in TTL mode, so how he can shoot run-and-gun events?


You must be logged in to post a comment.