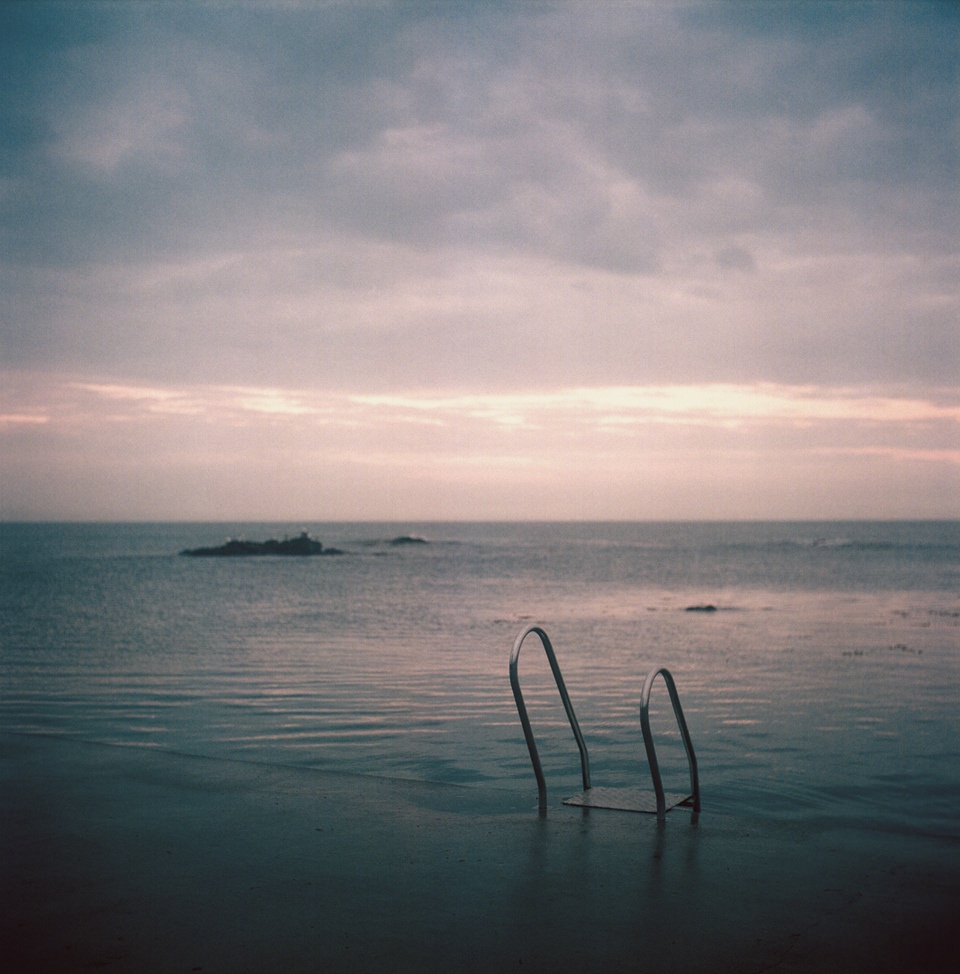
Das Bild des Tages von: Georg F. Wichmann
Im Ausblick: Albinismus, Katakomben von Paris und Photoshopper ärgern Mädchen.
kwerfeldein – Fotografie Magazin | Fotocommunity
Das Bild des Tages von: Georg F. Wichmann
Im Ausblick: Albinismus, Katakomben von Paris und Photoshopper ärgern Mädchen.
kwerfeldein – Fotografie Magazin | Fotocommunity
[ By Steph in Drawing & Digital. ]
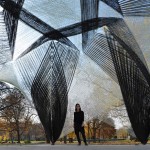
Each year, architects around the world design and construct temporary structures for events like the Milan Expo, showing off their skills in a setting that enables them to be more bold and experimental than they can be with more traditional architecture. Often interpreting a set theme, these pavilions use unexpected materials, play with spatial relationships and incorporate multimedia for an immersive experience.
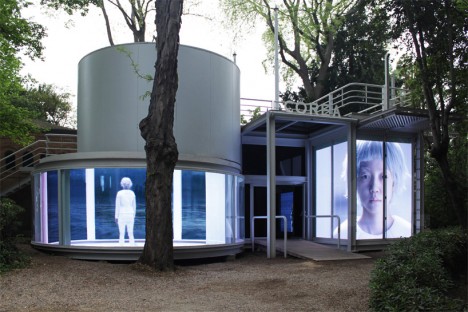

“An archaeological quest into human civilization,” this pavilion entitled ‘The Ways of Folding Space & Flying’ enchanted visitors to the 56th International Art Exhibition. Representing Korea, the pavilion by Moon Kyungwon & Jeon Joonho is part architecture, part film installation juxtaposing the past, present and future and can be experienced from both outside and in.
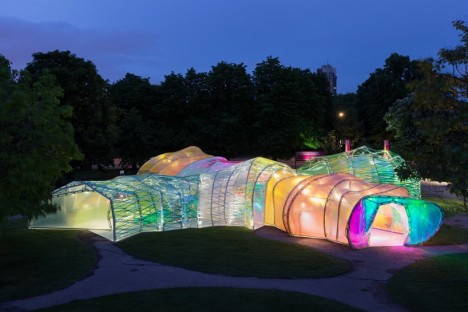
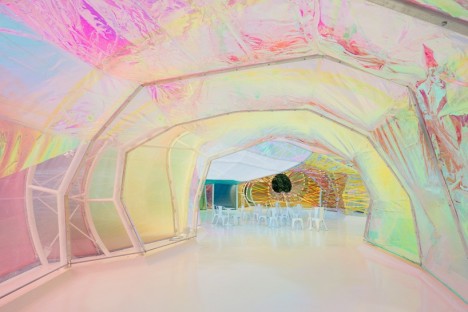
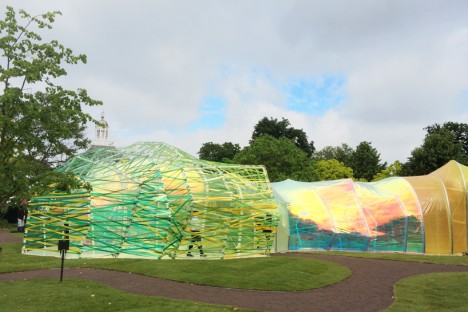
This year’s Serpentine Pavilion by Spanish studio Selgascano looks a bit like a stretched-out glow worm, glimmering in iridescent pastel shades. The polygonal frame is covered in panels of translucent florins-based polymer. “We sought a way to allow the public toe experience architecture through simple elements: structure, light, transparency, shadow, lightness, form, sensitivity, change, surprise, color and materials,” say the designers. “The spatial qualities of the pavilion only unfold when accessing the structure and being immersed within it. Each entrance allows for a specific journey through the space, characterized by color, light and irregular shapes with surprising volumes. This is accomplished by creating a double-layered shell, made of opaque and translucent fluorine-based plastic (ETFE) in a variety of colors.”
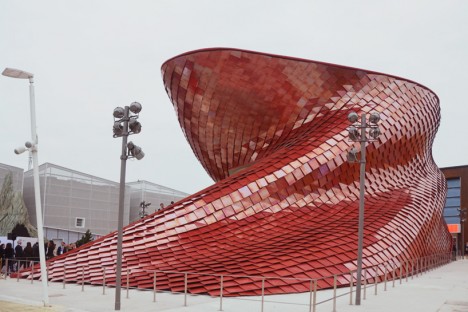
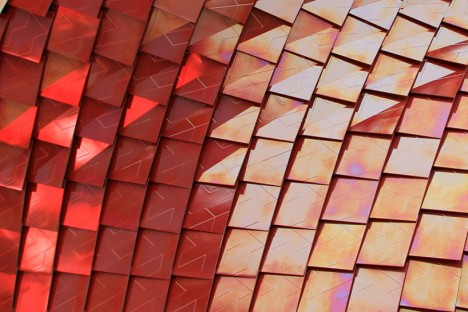
Representing China at Milan’s Expo 2015, the Vanke pavilion by renowned architect Daniel Libeskind explores the theme ‘feeding the planet, energy for life’ through the lens of Chinese culture. The design is influenced by the shi-tang, a traditional Chinese dining hall, as well as natural landscapes and the dragon, which is associated with farming. The pavilion is covered in over 4,000 red scale-like tiles with air purification properties, and inside, 200 screens are mounted to bamboo scaffolding, displaying video of city life contrasted with the slow-motion of a meal being prepared and consumed.
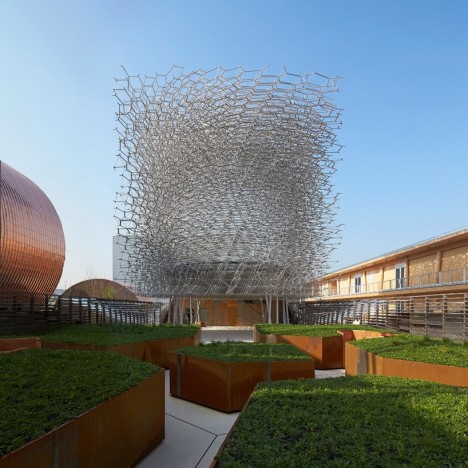
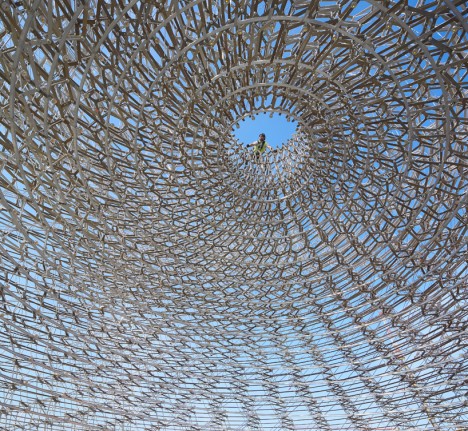
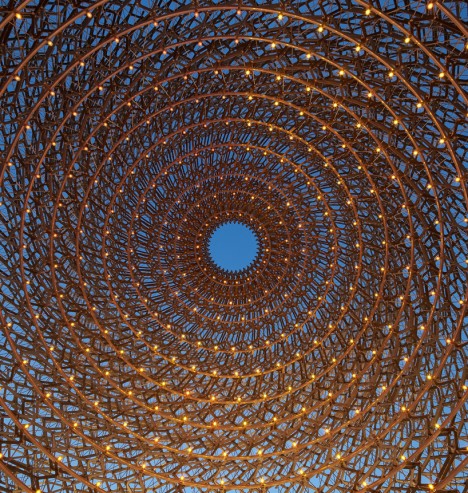
On display in Milan though October 31st, 2015, this pavilion representing the United Kingdom at Expo 2015 reflects the theme ‘Grown in Britain and Northern Ireland’ through a spiraling mesh of metal lattice. As visitors pass through it they experience five different settings inspired by orchards, meadows, terraces, the architectural program and the ‘hive.’ The whole thing buzzes, pulses and glows thanks to accelerometers and other audio-visual devices embedded in the structure, taking live signals from a real beehive.

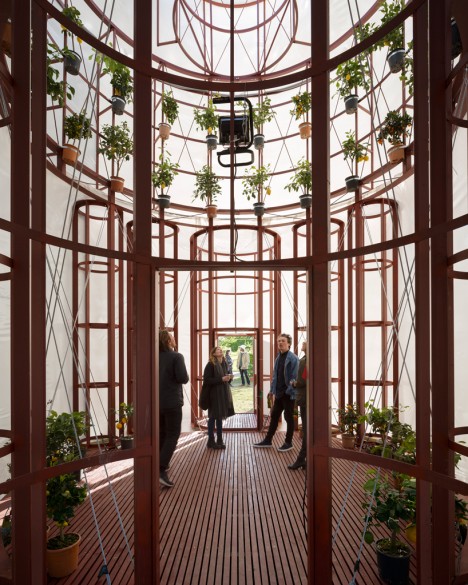
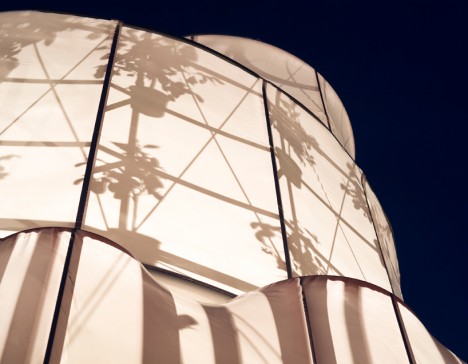
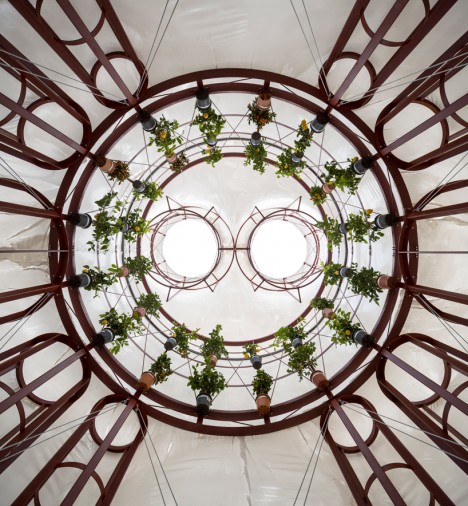
Translucent white fabric stretched across a wooden frame puts the silhouettes of a bunch of potted citrus plants on display once the interior is illuminated after dark at ‘The Orangery’ by Lenschow & Pihlmann and Mikael Streström. Taking inspiration from the floor plan of Rome’s San Carlo Alle Quattro Fontane Church, the interior is appropriately cathedral-like with its circle of suspended plants.
Before a new form of architecture can be executed on a large scale, it has to be demonstrated through smaller structures, making temporary pavilions an ideal …
Click Here to Read More »»

Temporary event venues needn’t be boring white tents, as these 13 incredibly creative and often eco-friendly examples prove with exciting, innovative design.
Click Here to Read More »»
A study in opposites, paper architecture renders what is normally solid and durable in delicate, temporary form, whether recreating intricate silhouettes of …
Click Here to Read More »»
![]()


[ By Steph in Drawing & Digital. ]
[ WebUrbanist | Archives | Galleries | Privacy | TOS ]
When I started in photography more than 10 years ago, the only viable option for editing images was Adobe Photoshop. At that time, 100% of my photo editing was done there.
A few years later, Adobe introduced Lightroom and I embraced it right away for its speed and organizational features. I immediately adopted it into my photo processing workflow and it was the first big transition that drastically changed my processing.
The next big change in my processing happened when I discovered HDR photography. As a photographer with a background in graphic design, I quickly saw the potential in the new processing technology and, again, I incorporated it into my workflow.

Canon 60D, HDR processed
By the end of 2014, after 10 years of shooting with a Canon DSLR, I had established my own photo editing workflow – one that I was comfortable with, that reflected my style of photography, and covered different scenarios of travel and landscape photography. Below is a list of four main processing techniques in my editing workflow, with the percentage of the total use for each.
The foundation of my natural looking HDR photography style, this technique is based on merging bracketed photos in Photoshop HDR Pro and later editing the new HDR image in Lightroom. The beauty of this method is that Photoshop HDR Pro does not change the pixels (luminosity, contrast, saturation) of the original images. Instead, it combines data from the bracketed photos into one enormous 32-bit TIFF image.
I outlined this technique in detail in one of my previous articles: Natural Looking HDR in Photoshop and Lightroom in 5 Easy Steps.

Canon 60D, HDR processed with Photoshop HDR Pro
Photomatix is the most popular, and matured standalone HDR program. It has a completely different approach compared to Photoshop HDR Pro. Besides standard HDR features like image alignment, de-ghosting and merging for HDR, it has unique image editing tools that allow me to create distinctive looks in my photographs.

Canon 60D, HDR processed with Photomatix
This technique is based on blending multiple images together in Photoshop using transparency masks. It gives me the most flexibility and control over image processing but, at the same time, it is the most involved and time consuming. I use it in the most complex cases when everything else has failed.

Canon 60D, digital blending with Luminosity Masks
When the light is not very dynamic, I use a single image and process it in Lightroom.

Canon Digital Rebel, single RAW image processed in Lightroom
The biggest change in my photography happened at the end of 2014 when, after shooting with a Canon DSLR for 10 years, I switched to Sony mirrorless. It was quite an adjustment. After shooting for so long with one brand, I had become extremely comfortable with it. During the switch, I had to learn how to work with something very different (more details on that topic here: 5 Lessons Learned Switching from DSLR to Mirrorless for Travel Photography).
But, I did not expect that the brand switch would dramatically change my editing. I was wrong.
After I returned from my first photography trip to Hawaii and California, where I put my new equipment through the test of real life scenarios of travel photography, I had 3000 brand new photos shot with the Sony a6000.
When I started to edit the new photos, I could see some differences. In general, the images were much cleaner and sharper with a higher amount of detail. These changes did not surprise me because the a6000 has a new generation sensor with a higher pixel count, and in combination with quality lenses from Sony and Zeiss, it could easily resolve a staggering amount of detail.
What surprised me was how the images behaved when I started to edit them. I could immediately see that the images were more responsive, meaning that I could push them much further, with more aggressive editing, and that I could recover more shadows and highlights from a single RAW image. I realized that I could process some images without using HDR techniques, which was not possible before.
This is when I started to look around trying to find the reason for the different behaviour. I found my answers on the DoX Mark website when I compared camera sensors. The dynamic range of the Sony a6000 sensor is wider by almost 2 stops (11.5EV vs 13.2EV) or 14%.

The difference is probably not a big deal if you are a wedding or street photographer but, for someone like me who specializes in travel and landscape HDR photography, this was a game changer. I saw the opportunity to streamline and optimize my digital techniques once again.
Now, six months later, below is my new modified digital photography workflow.
A major shift toward the single RAW Lightroom editing made me realize that it could be the perfect opportunity to optimize my workflow in order to save time on processing. I organized my Lightroom presets into four collections: Landscapes and HDR, Cross Processing, People and B&W. Now, I start the process of editing by applying different presets to the image trying to find the right look. When I find the one I like the best, I tweak it with standard Lightroom and Photoshop editing tools.

Sony A6000, Sony 10-18mm lens, Lightroom Preset Based Processing
With Adobe introducing Merge to HDR in Lightroom 6, I find myself using it more and more but I still use Photoshop HDR Pro.

Sony A6000, Zeiss 16-70mm lens, Lightroom 6 HDR Processed
Cleaner digital files allow me to push the images even further in Photomatix.
Nothing has changed here.
The switch from Canon DSLR to Sony mirrorless had unexpected consequences that drastically changed the way I edit my photos. In the end, the change was very positive, it allowed me to save time on processing and editing photos. Also, the extended dynamic range of the new sensor resulted in me taking fewer photos. I do not have to take five or seven bracketed shots anymore; in most cases, three brackets are all that is needed.
Have you made the switch? Have you noticed any changes in your processing workflow? Share with us your thoughts in the comments below.
googletag.cmd.push(function() {
tablet_slots.push( googletag.defineSlot( “/1005424/_dPSv4_tab-all-article-bottom_(300×250)”, [300, 250], “pb-ad-78623” ).addService( googletag.pubads() ) ); } );
googletag.cmd.push(function() {
mobile_slots.push( googletag.defineSlot( “/1005424/_dPSv4_mob-all-article-bottom_(300×250)”, [300, 250], “pb-ad-78158” ).addService( googletag.pubads() ) ); } );
The post How the Switch from DSLR to Mirrorless Changed How I Edit Photos by Viktor Elizarov appeared first on Digital Photography School.
LensRentals has embarked on a quest to investigate the complicated topic of sample variation among copies of the same lens. It’s the kind of fascinating, geeky stuff we’ve come to know and love from LensRentals, and in the latest round of tests they’ve taken a look at a group of short telephoto primes ranging from 85mm to 150mm. Read more
Articles: Digital Photography Review (dpreview.com)
There’s been a great deal of interest in the Sigma 24-35mm F2 Art lens since its launch last month. And who can blame the internet for getting excited over the world’s fastest full-frame zoom? With all of the appeal and high-end touches offered by Sigma’s ‘Art’ series, the 24-35mm just begs to be taken out for a spin – and DPReview’s Deputy Editor Rishi Sanyal did just that. See the gallery
Articles: Digital Photography Review (dpreview.com)
[ By WebUrbanist in Abandoned Places & Architecture. ]
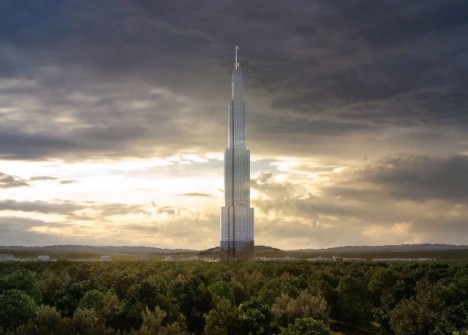
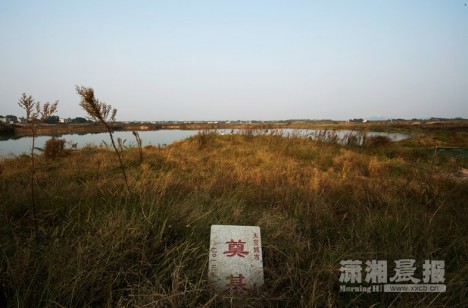
Ambitious plans construct Sky City in China, designed to be the highest skyscraper in the world and built in just 90 days, stalled at the outset over 2 years ago, leading to an unusual array of impromptu and informal adaptive reuses within and around the void dug for the tower, including an extensive fish farming operation.
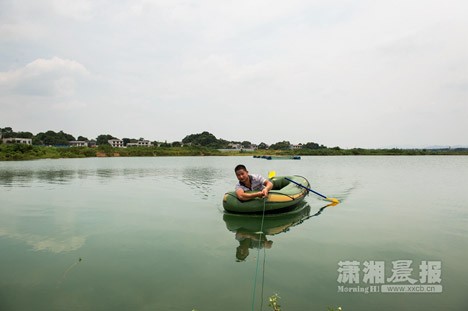
In the absence of other uses, the local community has found new functions for the apparently abandoned 280,000-square-foot foundation, while the ceremonial groundbreaking marker (below) increasingly resembles the tombstone for a deceased architectural dream (rather than the herald of a record-breaking construction project). According to local source Xiaoxiang Chen Bao, one entrepreneurial farmer has invested a significant sum into his fish farm, set in the expansive rainwater-filled void (effectively an artificial lake) formed by deeply excavated sections of foundation, while others are using areas of land on all sides to grow crops or dry grain.
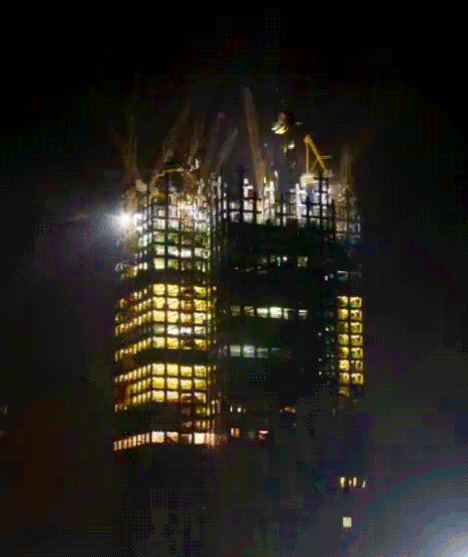
The tower was to stand 2,750 feet high in Changsha and its smaller sibling (Mini Sky City) has already been successfully built to 57 stories in just 19 days using innovations in prefabrication to rapidly speed up the process (time-lapse sequence shown below). Manufacturing many sections off-site, the development company was able to save significantly on costs but also to assemble the structure and facade in record time.
Permitting issues and safety concerns have held back the larger structure, however, and resulted in a number of locals turning the land toward other productive purposes. It is unclear at this time whether any of the issues are tied to the initial and smaller project.
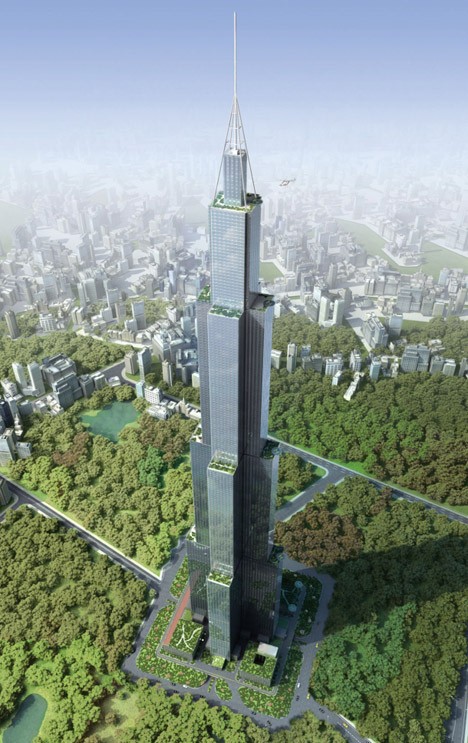
Billionaire Zhang Yue, the man behind both projects, claims that their plans will eventually go forward, but there is no official word from the local or national Chinese government to confirm his assertions as yet, nor any construction activity on or around the site to support such claims His company, Broad Sustainable Building, aims to revolutionize safe and speedy skyscraper construction, using both buildings as examples of their capabilities … or perhaps just the one should the latter be permanently abandoned.
Though the circumstances of their liberation seem somewhat more political than practical, the thousands of fish set to be freed into the wild may not care much …
Click Here to Read More »»

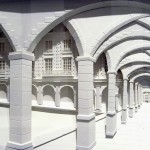
Did you know that brick or stone-clad buildings you see today almost invariably hide a steel support structure that does the actual work?
Click Here to Read More »»
The creation of the tallest building in the world has become such a status symbol, cities and countries have stopped revealing the planned height of their …
Click Here to Read More »»
![]()
[ By WebUrbanist in Abandoned Places & Architecture. ]
[ WebUrbanist | Archives | Galleries | Privacy | TOS ]
Vielleicht schreibt man in der Zukunft von unserer Zeit als dem Plastikzeitalter. Seit wir Kunststoffe herstellen, haben wir so viel davon produziert, dass wir unseren Planeten mit sechs Schichten aus Folie einwickeln könnten, berichtet Regisseur Werner Boote in seinem Film „Plastic Planet“. Eine unglaubliche Vorstellung, die das Problem verdeutlicht.
kwerfeldein – Fotografie Magazin | Fotocommunity
Nikon’s D810A is an astrophotography-oriented version of the D810. It’s the first full-frame camera dedicated to astrophotography, and is better able to capture the hydrogen alpha spectral line. It also expands long exposure options, and has garnered speculation as to improvements in low light capabilities. Take a look at its high ISO and color performance in our studio scene. Read more
Articles: Digital Photography Review (dpreview.com)
Photography is all about the light. As photographers, our aim is to capture and control the amount of light hitting the camera’s sensor to perfect a good photo.
When photographers talk about light, you will hear terms mentioned such as ambient, which is natural light. Note this type of light is always changing, it doesn’t remain constant. Split, Rembrandt, and Butterfly are some of the classic lighting patterns used for portraiture in a studio setup.

A LED torch with a paper snoot.
One of my favorite basic setups when I shoot outdoors is when the day is overcast (dull), which makes the light act like one big soft diffuser. The ambient light provides my main source of light (key light) and I use a white, silver, or gold reflector to act as fill.
This is in sharp contrast to shooting in a studio where artificial lights are used. The choice and range of lights will depend on whether you use flash or continuous lighting. The main advantage to this kind of setup is that you have complete control over the lighting, plus it doesn’t rain!
The best method I find in learning about lighting, be it natural or artificial, is to experiment. Recently, I was flipping through a camera magazine when this product caught my eye – The Ice Light 2 by Westcott. It stood out for two reasons: The concept and the price. I really liked the Stars Wars light-sabre appeal to it. It’s different, and has that wow factor, as does the price. It’s not cheap.
This is not a review of the Ice Light, but it did give me some inspiration for an idea. For less than $ 12.00 USD, I purchased this LED light which, surprisingly, has 140 lumen. I set myself a challenge to see how effective this light source could be when used for photography.

A small but powerful LED torch light.
How did I test it? I took some shots outdoors, as well as indoors, just to get some variety and scope to this project.
For my initial shots, it was 10:30 p.m. at night, not quite dark, but dusky. I went to a little park near where I live, placed the torch horizontal in the grass, and had the toy plastic Gorilla in a grassy verge, roughly a couple of feet away. I had the aperture at f/2.5, the ISO at 400, and the shutter speed at 1/50th.

A toy plastic gorilla in the grass.
Nearer home and again outside, I place this Lego figure on a garden wooden chair with slats. I had the torch underneath standing vertically. Just by moving my camera rather than the light, I was able to get a bit of flare that really added drama to the shot.

Cool Lego girl figure.

I placed the torch upright under a garden chair with slats.
Back indoors, I had my daughter hold the torch with paper wrapped around the end to form a snoot.

Using plain white printing paper wrapped around the torch to form a snoot.
I got her to move the torch around until I was happy with the light. I really liked the catchlights. The camera settings were: Aperture f/4.5, shutter speed 1/30th, ISO at 800, the focal length was 44mm.

Interesting catchlights from the torch with a white paper snoot.

The torch was placed in the centre of the book facing towards the camera.
I had the idea brewing for some time of trying to get that shot lit from the inside of a tent; the one that is ubiquitous in great landscape shots. I had a lot of fun doing this shoot, and would highly recommend you try to do the same! The plan was to have my daughter inside and get a nice silhouette of her against the wall of the tent. It didn’t go to plan, which was fortunate for me.
As a last resort, I got my plastic gorilla figurine and placed him inside the tent with the torch lying horizontal on the floor of the tent, only about 6 inches behind him. I was well chuffed (pleased) with the final result. It was even better than I had envisioned; especially as the gorilla is only 3.5 inches tall. I did have the camera on a tripod as it was dark. The settings were: ISO 800, aperture f/4, shutter speed 1/8th, and focal length was 40mm.

Fun with a toy gorilla inside a tent with a torch.
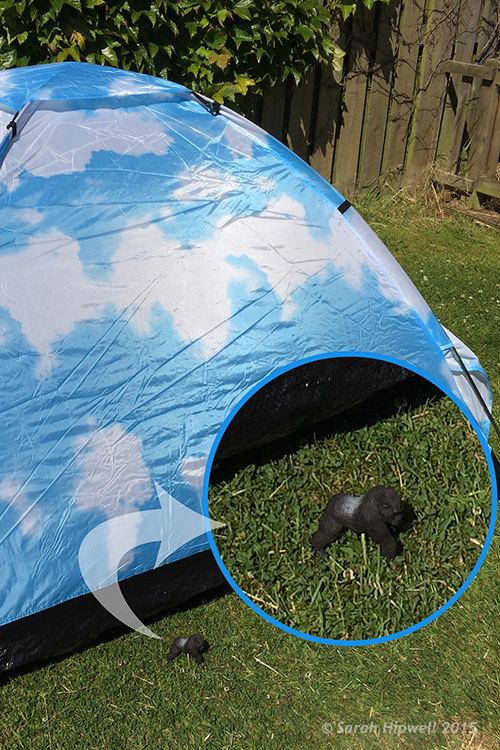
The gorilla is only 3 and half inches tall, small relative to the size of the tent.
To be honest, I wasn’t expecting this project to yield the results that it did. It has been the best $ 12.00USD that I’ve spent in a long time. It is now another must item to have in my camera bag.
What non-photography light sources have you used in your photography? Please share in the comments below.
googletag.cmd.push(function() {
tablet_slots.push( googletag.defineSlot( “/1005424/_dPSv4_tab-all-article-bottom_(300×250)”, [300, 250], “pb-ad-78623” ).addService( googletag.pubads() ) ); } );
googletag.cmd.push(function() {
mobile_slots.push( googletag.defineSlot( “/1005424/_dPSv4_mob-all-article-bottom_(300×250)”, [300, 250], “pb-ad-78158” ).addService( googletag.pubads() ) ); } );
The post How to Make Creative Images with a $ 12 LED Light by Sarah Hipwell appeared first on Digital Photography School.
Google launched the stand-alone Photos app with unlimited storage in May. Now it has announced it will be phasing out its predecessor, Google+ Photos. On August 1, the Google+ Photos Android app will stop working and soon afterwards the iOS and web versions will cease to be operational as well. Read more
Articles: Digital Photography Review (dpreview.com)
You must be logged in to post a comment.