RSS
 

Archive for June, 2015

Einfach nackt sein

07 Jun

Akt Portrait einer Frau

Ein Beitrag von: Miss Souls

Aktfotografie – Ein Bereich der Fotografie, der schon immer sehr kritisch betrachtet wurde und immer noch mit vielen Vorurteilen behaftet ist. Was bedeutet es, Aktfotograf zu sein? Nackte Menschen abzulichten? Reiz zu erzeugen, um damit Klicks zu generieren? Ich bin mir da nicht sicher. Ebenso wenig, ob ich, trotz meiner Erfahrung im Bereich der Aktfotografie, inzwischen behaupten kann, ich wüsste, worum es wirklich geht. Viel zu sehr schwanke ich selbst zwischen Vorstellung und Wirklichkeit.
kwerfeldein – Fotografie Magazin | Fotocommunity

 
Comments Off on Einfach nackt sein

Posted in Equipment


Die 5 Videos des Monats

07 Jun

Video ©Aileen Wessely

Unser Schwerpunkt in diesem Monat: Die Dokumentation und Beobachtung der Realität. Fotografie kann viel leisten, damit wir die Welt, in der wir leben, besser verstehen. Aber nicht alles kann mit einem einzelnen Bild abgebildet werden.
kwerfeldein – Fotografie Magazin | Fotocommunity

 
Comments Off on Die 5 Videos des Monats

Posted in Equipment


5 Steps to Rock the Brenizer Method

07 Jun

Pier brenizer

What is the Brenizer Method?

The Brenizer Method is named after wedding photographer, Ryan Brenizer. He didn’t invent the method but instead made it popular by using it with his wedding clients, and teaching others how to do it as well. For those who have been around photography for a while, you will recognize the process. Photographers have been stitching images together to create panoramas for decades. However, Photoshop and similar software have now made this method extremely simple for you.

Advantages of using the Brenizer Method

Creating an image using the Brenizer method takes more time than just capturing a single image, but the results are well worth it. When using this method, you will create an image with:

  • Very high resolution
  • Very shallow depth of field (it equates to using a lens that has an f-stop less than 1)
  • Great bokeh
Mermaid brenizer

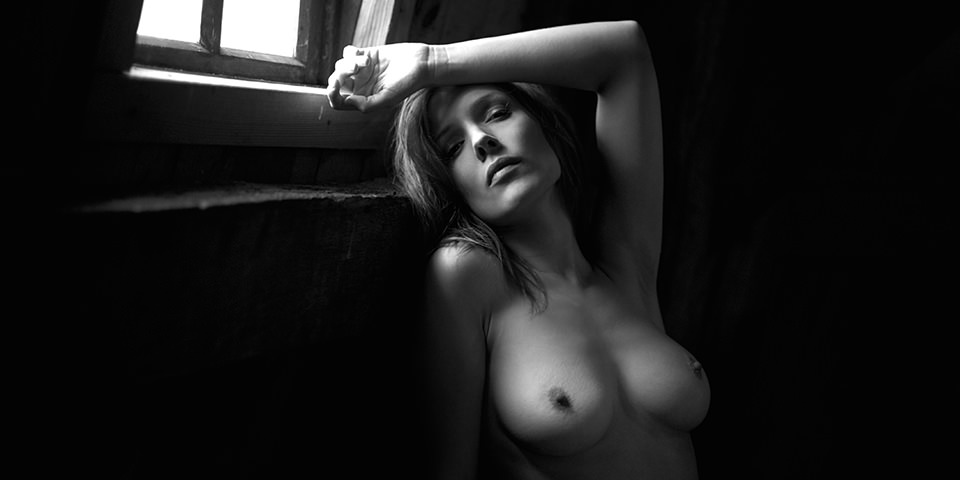
This image was created using 32 different shots and merged together in Photoshop to give it an extremely shallow depth of field.

PREPARING FOR THE SHOT

Once you’ve decided you want to try the Brenizer Method, you will need to decide where and what to photograph. Look for layers that will be interesting with a shallow depth of field. If you are shooting a subject, make sure the subject chooses a comfortable pose they can hold for up to 30 seconds.

Step 1 – Prepare Your Settings

Aperture – Shoot as wide as your aperture will allow. For some lenses that might be f/1.2 for others it may be f/3.5, and for the rest, it will probably be somewhere in between. The wider you can go, the more amazing effect you will achieve.

White Balance – You will want to choose any white balance other than auto. As you position your camera, auto white balance might change the color temperature as you move from shade to a brighter area or vice versa. Manually setting the Kelvin temperature is my preferred method. If you aren’t familiar with manipulating your white balance, here’s a great article to help you learn.

Focal Length – As you take these shots, you want your focal length to stay exactly the same. Shooting with a prime lens makes this easy, otherwise make sure to hold your lens carefully if it tends to zoom in and out easily.

Focus – Once you’ve set your focus on your subject, change it to manual and don’t touch it again until you’re done shooting your series.

SHOOTING YOUR SERIES OF IMAGES

Step 2 – Shoot Your Images Using an Organized Layout

Layout shooting

Capturing your images in rows from left to right (like reading a book) will give you greater chances of not having holes (gaps) in your images.

Shooting your series of images in an organized layout will help the images stitch together better in your editing software. When you first try this method, you might be tempted go out of order and continue adding as many images as you think you might need. When you do that, Photoshop might give you an image with some holes and extra pieces at the bottom of your picture.

Image with holes

I shot this image in a circular motion, instead of the row method shown above. Photoshop had a hard time properly merging the image. There were many extra shots it didn’t know what to do with, so I had to go in and manually piece some of the images together. Save yourself time and learn from my mistake.

Before you start shooting, think about your final image. Will it look best as a vertical, horizontal, square, or a panorama? Make sure to shoot enough shots to be able to crop it in your preferred orientation.

Step 3 – Overlap Your Shots

While you are shooting your series of images, make sure to overlap each shot by at least 1/3. That will give the software enough information to see where each image belongs when it does the stitching. Most people take between 20-50 shots in their series that will be compiled into one final image. Take as many as you need and overlap by more than 1/3 if you feel more comfortable with that. As you gain experience with the Brenizer method, you will probably find a way to get the same result with less shots.

PROCESSING

Step 4 – Batch Edit All the Images

When you are ready to process the images, load them into a batch editing software, like Lightroom or Adobe Camera Raw. Edit the first image (exposure, contrast, saturation, etc.), then sync the entire batch of images so the exact same editing has been applied to each image in the series.

Next, you are ready to export your images. Since you’re going to be merging so many images together, there is no reason to export these as high resolution files. Doing so, would only slow down the process in Photoshop. Export your images as JPGs, with the long edge between 700-1000 pixels, depending on how many images you’re going to be merging.

Step 5 – Merge the Images

Photoshop steps

1 – In Photoshop, click on File, Automate, and Photomerge. 2 – Leave the default settings selected and browse for your series of images. 3 – After the image merges, there are often extra images below the merged image. Sometimes they are extra and not needed because of the amount of overlapping, or sometimes the software doesn’t know where they belong and you’ll have to manually put them in their place. 4 – I decided that my image was fine without the extra images, so next I cropped out the excess to create the final image.

Finally, open Photoshop. Go to File > Automate > Photomerge… When the window pops up, keep the default settings of “Layout: Auto and Blend Images Together” checked. Browse for your images and hit “OK”. Then it’s a waiting game. Depending on your file sizes, and the number of images your computer is processing, this could take 1-10 minutes.

Note: Similar results can be created using other software. To save time, I’m just mentioning the process I use with Photoshop.

If you shot your series in an organized layout, your software should have been able to piece your image together well. All that’s left to do is crop your image to the orientation you were hoping to use (vertical, horizontal, square, or panorama) and save it as a JPG. Voila!

It may seem like a lot of steps your first time through, but with more practice it becomes second nature.

Your Turn

Have you tried creating an image using the Brenizer Method? What was your experience? Do you have any additional tips that would help those getting started? Let us know in the comments. Also, feel free to share your Brenizer Method images as well. We’d love to see what you create!

googletag.cmd.push(function() {
tablet_slots.push( googletag.defineSlot( “/1005424/_dPSv4_tab-all-article-bottom_(300×250)”, [300, 250], “pb-ad-78623” ).addService( googletag.pubads() ) ); } );

googletag.cmd.push(function() {
mobile_slots.push( googletag.defineSlot( “/1005424/_dPSv4_mob-all-article-bottom_(300×250)”, [300, 250], “pb-ad-78158” ).addService( googletag.pubads() ) ); } );

The post 5 Steps to Rock the Brenizer Method by Danielle Ness appeared first on Digital Photography School.


Digital Photography School

 
Comments Off on 5 Steps to Rock the Brenizer Method

Posted in Photography


Travelbox: Pop-Up Furniture Set Fits in 1 Cubic-Meter Trunk

07 Jun

[ By WebUrbanist in Design & Furniture & Decor. ]

mobile modular ssystem design

Combining elements of flat-pack furniture and traditional travel trunks, this pop-up furnishing kit for urban nomads comes complete with a bed, chair, table, storage space and even a bicycle for getting around town. For temporary city dwellers who move frequently for work or fun, this solution provides an all-in-one interior design alternative to selling and rebuying furniture or paying extra for furnished rental residences.

mobile box furniture travel

Weighing just 132 pounds and measuring under 7 feet long, 4 feet tall and just over 1 foot wide, the kit is designed to ship easily using conventional methods, able to be strapped to a car roof, packed in a container or shipped by truck, rail, boat or plane.

mobile aluminum travel box

Durable exterior aluminum construction, solid wood framing and careful planning help make the exterior robust and interior travel-ready. The container itself becomes part of the finished product, serving as storage, shelving and space divider all rolled into one.

mobile box house diagram

mobile interior design system

Its creator, Stephan Juust, is putting his time where his money is and currently taking the Travelbox on the road while he tours around Europe.  While it remains a prototype for now, his aim with this system is to ultimatley provide an alternative to buying and selling furniture when moving. At the same time, his solution offers surprisingly high-quality construction, crafty details and nice finishes that help make furnishings feel personalized and places really feel like homes.

Share on Facebook


[ By WebUrbanist in Design & Furniture & Decor. ]

[ WebUrbanist | Archives | Galleries | Privacy | TOS ]


WebUrbanist

 
Comments Off on Travelbox: Pop-Up Furniture Set Fits in 1 Cubic-Meter Trunk

Posted in Creativity


Get your photos featured in an upcoming Readers’ Showcase

07 Jun

We see the work of our talented readers every day when they post their images to our galleries, forums and challenges. Lately we’ve been showing off some of our favorite reader portfolios in a weekly showcase. If you’d like your photos to be considered for a future Readers’ Showcase, just drop us a line. Read more

Articles: Digital Photography Review (dpreview.com)

 
Comments Off on Get your photos featured in an upcoming Readers’ Showcase

Posted in Uncategorized


6. Juni 2015

06 Jun

Das Bild des Tages von: seismographie

Köpfe, die nebeneinanderliegen. Schwarzweißfotografie.

Unser Ausblick ist heute ein bisschen verkopft.
kwerfeldein – Fotografie Magazin | Fotocommunity

 
Comments Off on 6. Juni 2015

Posted in Equipment


6 Tips on How to do Horse Show Photography for Parents

06 Jun

The sport of horse riding and showing can be very rewarding and beneficial to a young child. However, capturing those memories to print and share with family and friends can be a challenge for parents. Basic horse knowledge is helpful not only in keeping your child and their horse safe, but others around them as well. The following are a few dos and don’ts to get you started successfully, and safely, photographing your child at horse shows.

#1 Avoid the use of flash

Bowman sun

Camera flashes from the audience during rodeos and exhibitions are common, and for the most part those horses are accustomed to many distractions. However that may not be true for the horse your child is riding. An experienced horse with an inexperienced or nervous rider, at an off-property show (and sometimes the excitement of a show at their home barn) may react differently from their usual calm, sensible self. A covered arena can be challenging in terms of lighting and on-camera flashes won’t effectively reach the far end. If they are riding in the morning or late afternoon one side of the arena should be sunny. Wait until the horse and rider are in the sunlit area before capturing the moment. Obviously, this will cut down on the number of images taken, but they should be sharper and brighter, and worth the wait.

#2 Make yourself visible to the horses

Do not hide behind a fence post, arena support, fence, etc. Wide arena supports can be tempting to steady yourself, but this is essentially playing peek-a-boo with a half-ton animal (that has a mentality of a young child) which your son/daughter is sitting on. Horses notice change and if an object or person has moved they may look for it; taking their attention away from the rider. In addition to being noted as a comment or error on the rider’s test, this could also create a dangerous situation if your child’s horse is a bit on the nervous side. Stand or sit out in the open – let them see you, and stay there until the test is complete. Standing on a lower step of a mounting block, outside the arena, will get your camera higher than the fence. But, position yourself during the time riders are entering and exiting the arena, and remain there for the duration of the ride.

Bowman arena

#3 Shoot hand held without a tripod or monopod

Do not use a tripod or monopod. Depending upon the type and location of the event there may be several horses, riders and their trainers, waiting to enter or exit the arena, return to stalls, etc. Extended tripod legs can be a tripping hazard for people, and a scary thing for horses. Fence railings, tables and tucking your arms into your body are good solution to stabilize your camera.

Bowman horse

Besides, most tests are over in a few minutes, so foregoing that extra gear will allow you to quickly rejoin your child. Larger shows often hire official show photographers who will take pictures inside the main arena (from a vantage point different from spectators) that you can purchase later. Additionally, if you are using a tripod or monopod you may be viewed as a professional (whether that is the case or not) by show officials who may ask that you refrain from taking any pictures if they feel you are in competition with the official photographer.

#4 Use a fast prime lens

DO buy, rent, or borrow the fastest prime lens you can – 50mm or 85mm preferred (keeps the horse’s head in proportion). A longer lens (85mm) also keeps your camera out of everyone’s personal space and avoids any possible flight response in the horse. There are many bomb-proof horses for young riders who will absolutely not react to anything (near or far), but you don’t want to test that out – especially with your child holding the reins or sitting on top of all that power.

A fixed focal length lens also means you won’t be able to adequately shoot across a large arena. Riding tests often have the horse and rider cover the entire arena, so capture your child when they are closer to you; details such as the rider’s hands, legs, and boots produce great images too.

Bowman hands

#5 Know the routine your child will be doing

DO learn the tests your child is riding. Tests in both English and Western disciplines require specific movements, to be performed at certain places in the arena. Being familiar with the tests will allow you to anticipate the next movement and be ready to shoot, especially when using a fixed focal length lens. Some movements are photographically more appealing than others, but simply ensuring that all four legs of the horse are visible, arena supports are not coming out of the rider’s head, and the focus is centered on the rider’s or the horse’s eyes, will improve your images. Test movement patterns can usually be found on the internet (In the states, the United States Equestrian Federation website is a good starting place for all disciplines).

Bowman test

#6 Take details shots outside the show ring

Do shoot the details outside of the show ring; the relationship between horse and rider, grooming/tacking up, show clothes, friends, bridle, stalls, etc., – all those moments leading up to and after riding the actual test.

Bowman showprep

Photographing activities of the entire day completes the horse show story, which the show’s official photographers do not usually cover. Using a 50mm or 85mm lens captures the action without being too close (not adding to a rider’s show nerves) and produces casual, natural photographs. Older, more experienced riders, often assist the younger riders with tacking up and grooming for shows (among their many other duties that day) held at their home barn. An experienced rider can be a valuable asset on show day and may already have an established relationship with your child.

Bowman boots

Horse show photography can be exhausting, dirty, and a continuous learning opportunity, but can also be an amazing experience. Dress comfortably, avoiding open toed shoes, and approach the day as an adventure that you and your child will remember forever.

googletag.cmd.push(function() {
tablet_slots.push( googletag.defineSlot( “/1005424/_dPSv4_tab-all-article-bottom_(300×250)”, [300, 250], “pb-ad-78623” ).addService( googletag.pubads() ) ); } );

googletag.cmd.push(function() {
mobile_slots.push( googletag.defineSlot( “/1005424/_dPSv4_mob-all-article-bottom_(300×250)”, [300, 250], “pb-ad-78158” ).addService( googletag.pubads() ) ); } );

The post 6 Tips on How to do Horse Show Photography for Parents by Sherry Bowman appeared first on Digital Photography School.


Digital Photography School

 
Comments Off on 6 Tips on How to do Horse Show Photography for Parents

Posted in Photography


Nikon D3200 firmware C 1.04 available

06 Jun

Nikon has released firmware 1.04 for the D3200. This update addresses an issue with the camera’s memory card slot, causing the access lamp to light for too long or the camera to give an error while accessing the memory card. Read more

Articles: Digital Photography Review (dpreview.com)

 
Comments Off on Nikon D3200 firmware C 1.04 available

Posted in Uncategorized


5. Juni 2015

06 Jun

Das Bild des Tages von: Herz.eigen

© Herz.eigen

Im Ausblick: A40, ein Film von Steven Spielberg und Nostalgie.
kwerfeldein – Fotografie Magazin | Fotocommunity

 
Comments Off on 5. Juni 2015

Posted in Equipment


Photographer creates picture of 100-man orchestra… with the same person playing each instrument

06 Jun

An Oslo musician and photographer has created a photo stitched together using 400 images, showing an entire orchestra with every instrument played by the same person. Violinist Alexander Light created the 200MP picture by shooting percussionist Heming ValebjØrg in every seat on a stage while he played the appropriate instrument for that position. Read more

Articles: Digital Photography Review (dpreview.com)

 
Comments Off on Photographer creates picture of 100-man orchestra… with the same person playing each instrument

Posted in Uncategorized