One of the best things about kids is also one of the most frustrating when it comes to photographing them; they are so full of life and energy they rarely sit still, which can lead to an abundance of blurry pictures and heavy sighs when you go back to review your images. Instead of smiling faces and cute outfits, you often end up with a memory card full of photos where their cute little faces are a mishmash of fuzzy pixels, and any details in their hair or clothes are hopelessly lost. This is a chronic problem with photos of kids from smartphones, but it’s all too common in pictures taken with more expensive DSLRs too.
One solution is to simply use the flash on your camera, but this has the unfortunate side effect of creating harsh shadows, poorly-lit backgrounds, and ghostly red-eye effects that have to be fixed on your computer. To get the types of photos of kids you’ve always wanted it’s important to know a bit about shutter speed, and look at some of the ways you can harness the controls of your camera .
Understanding Shutter Speed
The underlying problem of blurry kid pictures usually stems from your camera’s shutter speed; kids move quickly so a fast shutter is usually required to snap clear pictures. This is fine if you have plenty of light, but as soon as the sun goes down, or you find yourself indoors, your camera’s shutter slows way down in order to let in enough light for exposing – too slow for non-blurry photos of fast-moving children.
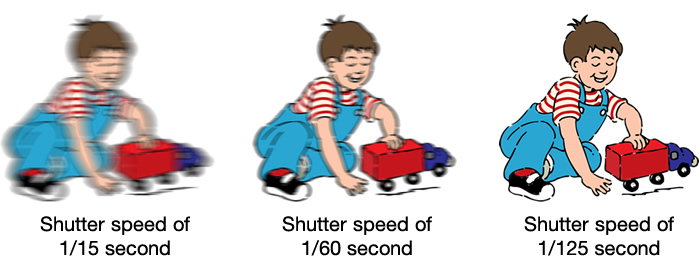
A faster shutter speed will result in sharper photos with less motion blur.
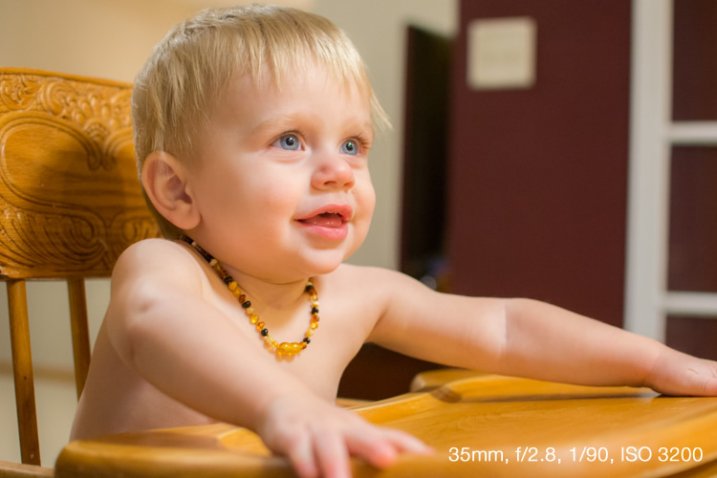
Unfortunately the solution is not always as easy as increasing your shutter speed, as this can lead to pictures that are underexposed if there is not enough light available. This is why your camera will often opt to use the flash if you are shooting in low-light situations on Automatic mode. Rather than decreasing the shutter speed your camera simply creates its own artificial light. If you’re using a kit lens with a focal length between 18-55mm a shutter speed of 1/90 is probably sufficient to capture blur-free images of little ones, though the exact value will change depending on the focal length of your specific lens and how fast the kids are moving. As a general rule I don’t use shutter speeds slower than 1/90 second when taking pictures of kids with my 35mm lens, but that usually means I have to compensate for low light in a few other ways. Here’s a few tips to help:
#1 Increase the ISO
There are three primary ways to control the amount of light that enters your camera:
- Aperture: Increase size of the opening in your lens so more light can pass through it.
- Shutter speed: Open the shutter for a longer period of time.
- ISO: Make the piece of digital film (sensor) in your camera more sensitive to light.
The first method is limited by the physics of your lens. Most basic kit lenses simply don’t have large enough openings, or apertures, to let in much light (unless there is a great deal of light already available i.e. outside during the daytime or in a brightly lit room). The second method is easy if your subjects are not moving. You can leave the shutter open for many seconds at a time and get a non-blurry shot if everything is standing still, but that rarely happens with little kids. The third method, raising the ISO, was not a viable solution until recent years when camera technology advanced to the point that you could greatly increase the sensitivity of your sensor without a massive loss in overall image quality. Camera sensors are now so good that you can use faster shutter speeds to get blur-free shots of kids (even if your lens does not have a wide aperture) simply by raising the ISO.
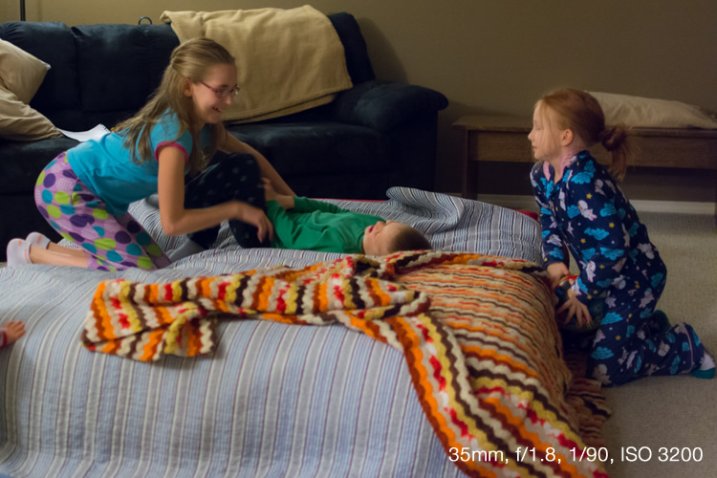
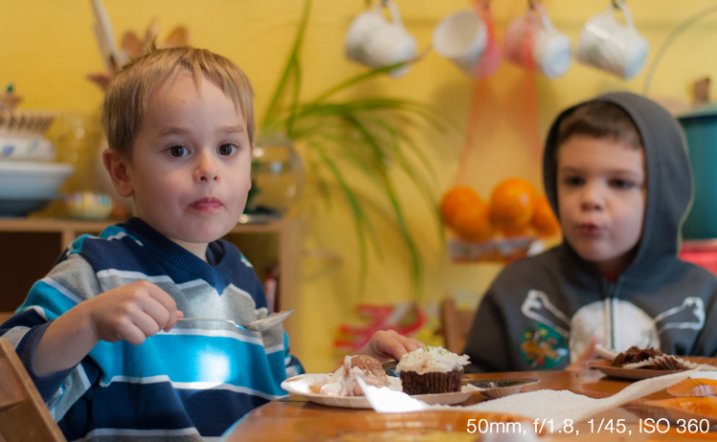
Shooting at ISO 3200 allowed me to get pictures of my nieces’ pajama party without using the flash.
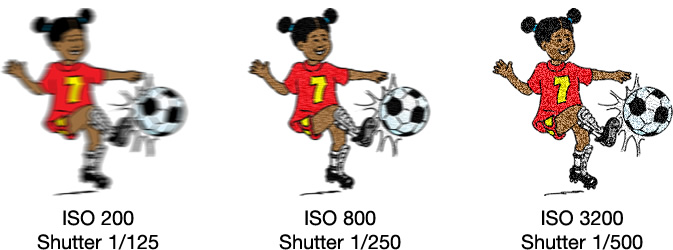
Until a few years ago most DSLR cameras were fine at ISO settings of 400, 800, or even 1600. Beyond that, photos started getting quite noisy and grainy, almost as though they were coated with a fine layer of colored sand. Now even basic consumer cameras like the Canon Rebel T4i or Nikon D3300 can go all the way up to ISO 6400 without too much detriment to their overall picture quality. Granted an ISO 6400 picture is never going to be as clean and sharp as one taken at ISO 100 or 200, but ISO 6400 essentially allows your camera to capture 64 times more light than ISO 100 (equal to 6 stops more). This means an image that would normally require a shutter speed of 1/15 second at ISO 100 could be taken with a shutter speed of 1/1000 second at ISO 6400 – a massive benefit if your goal is to capture pictures that are not blurry.
Shooting at higher ISO values means your photos will have a bit more noise and grain, but you will be able to use much faster shutter speeds. It’s up to you whether the trade-off is worth it, but for me it usually is.
One caveat to this technique is you simply cannot do it in Automatic mode. If you don’t feel quite confident to start shooting in Manual, try using the Program Automatic mode instead. Rotate your camera’s command dial to the P setting, then you are free to change the ISO while your camera figures out an appropriate shutter speed and aperture. The more you practice, the more you will get the hang of it, and start feeling comfortable with your particular camera’s capabilities at higher ISO values.
#2 Use a large aperture
I mentioned in the previous section that a wider aperture is one way to let in more light, and the best way to do this is with a prime lens. These lenses do not zoom in and out like the kit lens most cameras come with, but the trade-off is their extraordinarily large apertures – big enough to let in tons of light even at dusk, or in a dimly-lit room.
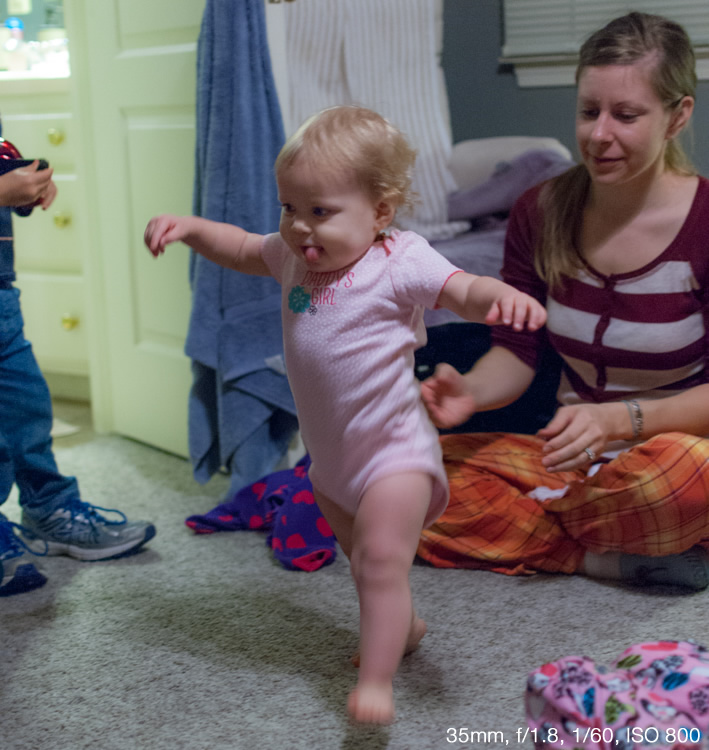
Shooting at an ultra-wide aperture of f/1.8 allowed me to get a picture of this girl taking her first steps. Using the flash would have resulted in washed-out colors and would have been quite a distraction for the little girl.
If you don’t have a prime lens you can still use wider apertures, but you will likely have to raise your ISO a bit more as well. Most kit lenses have apertures of roughly f/3.5 when zoomed out all the way and f/5.6 when zoomed in, which might not sound like much but it’s actually a massive difference (f/5.6 to f/2 is three stops or 8x less light so it is quite significant – in the example above it would mean shooting at 1/4 second or 6400 ISO instead). This just means you will have to move around a bit more to position yourself closer to the kids instead of standing across the room and using the telephoto end of your lens.
If you’re not entirely comfortable dealing with apertures and f-stops just yet, try using your camera in Shutter Priority (S or Tv) mode with auto-ISO. This lets you set the shutter speed while your camera figures out the best combination of aperture and ISO. As I said earlier, when taking pictures of kids with my 35mm prime lens I like to use a shutter speed of 1/90 second and faster, like 1/125 or 1/250, if they’re running around or jumping on furniture. The shutter speed you use will be different depending on your camera and the focal length you are using on your lens, but when you shoot in S/Tv mode with auto-ISO your camera will generally default to using the widest possible aperture and then start raising the ISO to get a good exposure. In other words, you are telling your camera “I want a fast shutter and no flash, so it’s up to you to figure out the biggest aperture and highest ISO to make this happen.” It doesn’t always work, but it’s certainly a good technique to try if you want clearer pictures of children.
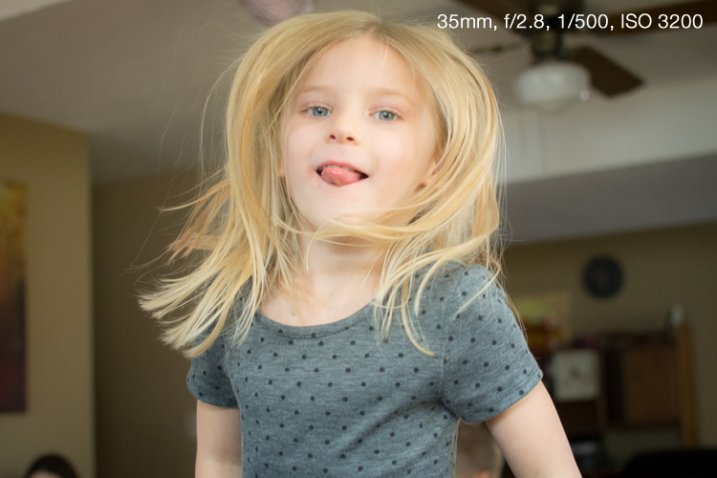
The only way to get a non-blurry picture of this girl jumping on her trampoline was to use both a wide aperture and fast shutter.
This might sound a little counter-intuitive, but if you shoot in Aperture Priority (A or Av) mode, you can tell your camera to use a large aperture but in order to get a good exposure it will usually give you a slower shutter speed. By contrast, shooting in Shutter Priority will force your camera to use the widest possible aperture every single time in order to get a good exposure at the shutter speed you set. (Unless of course there is already plenty of light available in which case it might select a smaller aperture, but you would still get the non-blurry photo you want.)
#3 Make better use of light
One of the best sources of light is available for free all day long right in the sky above you. However, while the sun is certainly the brightest light, it is also the least controllable. This means you have to find ways of making use of the light it does provide, which usually is a simple matter of repositioning yourself or your subjects. When working with adults this is fairly easy, but kids are another matter; they rarely go right where you want, and if they do they are not likely to stay there for long. If you’re the kind of person who likes to take pictures while resting comfortably on a couch you might find yourself with plenty of blurry, or excessively dark or light photos, as a result. If you get up and start roaming about the room you can not only get a better vantage point from which to take your pictures, but find ways of making much better use of the sunlight that is likely to be streaming in through the windows.
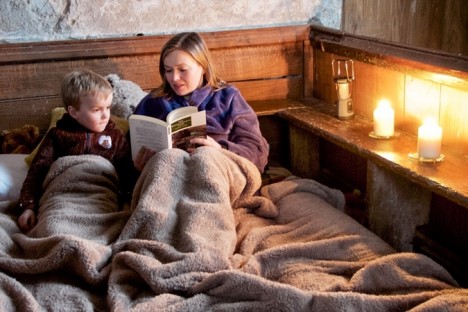
Sunlight was pouring in through a window just to the right of this photo, so I quickly found a location that took advantage of such a large amount of available light.
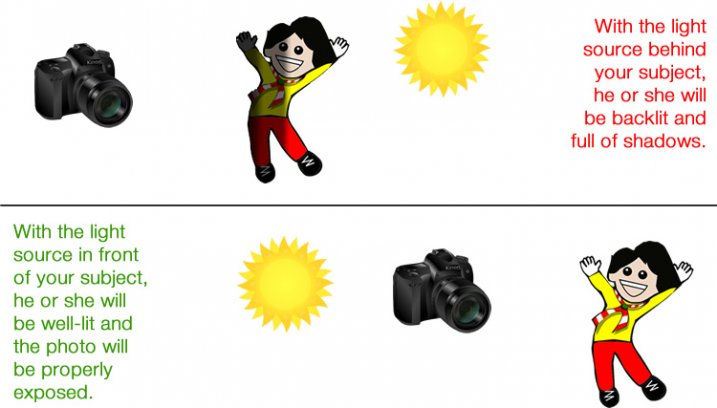
This technique works great even if you don’t have a fancy DSLR or other such expensive camera. I often see pictures of kids posted to social networks that are blurry because the shutter speed was too slow to capture the action, even though there is plenty of sun or other light available. The trick is to learn how to reposition yourself such that your subject is in front of you and the main source of light is behind you. This will help make sure your subjects (whether they are kids, adults, pets, plants, or anything else) are properly lit, while also giving you enough light to use faster shutter speeds.
This takes a bit of time to adapt to because you may be used to staying relatively still while kids run around and play. Once you start getting up, moving around, and learning to harness the available light instead of using the flash, you will see a dramatic improvement and far fewer blurry photos, even if you are using an iPhone or an inexpensive point-and-shoot camera.
Do you like taking pics of children? What are some of your favorite techniques for getting photos that are sharp, in focus, and not blurry? Leave your thoughts in the comments below.
googletag.cmd.push(function() {
tablet_slots.push( googletag.defineSlot( “/1005424/_dPSv4_tab-all-article-bottom_(300×250)”, [300, 250], “pb-ad-78623” ).addService( googletag.pubads() ) ); } );
googletag.cmd.push(function() {
mobile_slots.push( googletag.defineSlot( “/1005424/_dPSv4_mob-all-article-bottom_(300×250)”, [300, 250], “pb-ad-78158” ).addService( googletag.pubads() ) ); } );
The post 3 Tips for Avoiding Blurry Photos of Kids by Simon Ringsmuth appeared first on Digital Photography School.

Digital Photography School


You must be logged in to post a comment.