RSS
 

Archive for April, 2015

Chromatic Aberration – What is it and How to Avoid it

19 Apr

OziRig Cheetah Chromatic Aberration

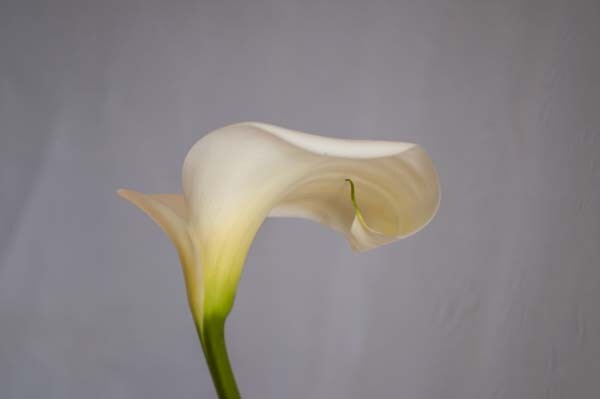
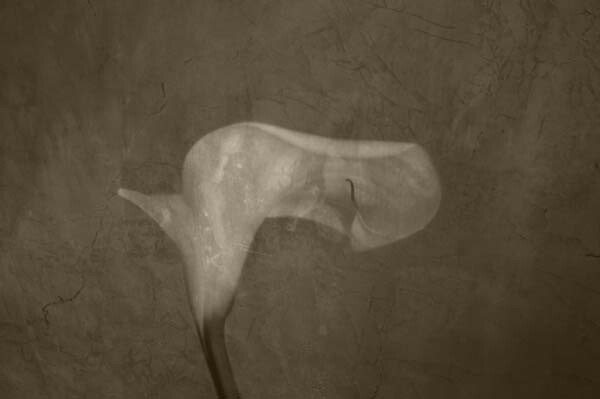
In the photo above, you may notice that the colors on the left-hand side appear to be showing fringes of green and red along the sharp edges of the subject; this is what is called chromatic aberration.

What is chromatic aberration?

Chromatic aberration (also known as color fringing or dispersion) is a common problem in lenses which occurs when colors are incorrectly refracted (bent) by the lens, resulting in a mismatch at the focal point where the colors do not combine as they should.

To help understand this a bit better, remember that the focal plane is your sensor’s point of focus; where all the light from your lens should rejoin together to be correctly detected by your sensor. The thing is, depending on the construction of your lens, your chosen focal length, and even the aperture that you’ve used, certain wavelengths (colors) may arrive at points before or after where the focal plane sits.

Ozirig ca dlsr illustration

When this occurs, you end up with the telltale color fringing around edges in your photograph; and although you can remove low levels of chromatic aberration in Photoshop and Lightroom, the reality is that each extra moment you spend on touching up a photograph is one moment less you have to get something else done!

OziRig Cheetah Chromatic Aberration Comparison

Why does chromatic aberration occur?

Chromatic aberration happens because your lens acts as a prism; bending light depending on the various properties of the glass, and much like the triangle-shaped one made famous by Pink Floyd, colors passing through it are split at different angles.

Ozirig ca prism diagram

Remember that light is actually made up of several different wavelengths (colors). So, for your camera’s sensor to detect the combined color of light, your lens needs to make all wavelengths of that particular ray hit the exact same point on your sensor.

This sounds simple, but you need to take into account the fact that various wavelengths (and thus various colors) will be striking your lens all at once and that each of these rays will behave slightly differently depending on the glass that it is passing through.

The feat of engineering required to correctly align all of these different light rays is usually achieved by the manufacturer’s use of a lens array. In fact, if you were to pull your lens apart, it wouldn’t be surprising if you found upwards of 16 lens elements all designed to correct for various things along the light’s journey between your lens and your sensor.

OziRig Lens Elements

Unfortunately, this is also where chromatic aberration tends to rear its ugly head. Hidden within the design of these lens elements are defects – either in the glass or the design of the lens itself – which under specific conditions may cause your photos to exhibit this type of aberration.

I’m not trying to say that you need to have a pro-level lens, in fact, the key point to keep in mind here is that all lenses suffer from chromatic aberration in one form or the other. What matters is whether or not your lens exhibits visible chromatic aberration, and whether in your particular case this is a deal-breaker or not.

Avoiding chromatic aberration defects

Chromatic aberration can actually be effectively removed in post-processing if you are shooting in RAW. However, good practice states that you should try and remove issues in-camera first, rather than creating more work down the line.

The good news is that if you are stuck working with a lens that exhibits some form of visible chromatic aberration there are several easy-to-understand strategies which can help you to remove or minimize the visible effect of it in your photos.

Avoid high contrast scenes

OziRig CA Cheetah High Contrast

Chromatic aberrations tend to flare up in high contrast scenes. Particularly guilty are shots against white backdrops, landscape shots against a bright sunrise, or, as in the example of this Cheetah, where the light source is behind the subject.

This means that sometimes there’s nothing to do except try and reframe your shot. Swap your backdrop out to something which better matches your subject’s primary color, or wait for more favorable lighting conditions. If you absolutely must capture this shot as-is, then swap over to RAW and get your fingers ready for the possibility that you may need to do some touch-ups in post-production.

Check your focal lengths

OziRig Chromatic Aberration Focal Length

Although it’s nice to have access to a wide range of focal lengths, the fact is that most zoom lenses will exhibit various aberrations at the shorter and longest extremes of their focal range. So being able to choose a different focal length will usually help to remove the issue of visible chromatic aberration.

Likewise, using a zoom lens at a wide angle will usually introduce not just chromatic aberrations but various other defects in your image. Instead, consider choosing a prime wide angle lens to handle the job, or, perhaps more practical for your case, make a panorama at a focal length that does not exhibit the chromatic aberration issue and then join the photos in post-production for a flawless result.

Stop down your aperture

OziRig CA Aperture

Although this will depend on the exact type of lens you are using, stopping down your aperture will usually help to play down the noticeable effects of most lens defects, including chromatic aberrations. Remember that you may need to consider dropping the shutter speed or boosting the ISO to compensate for the light loss if working in a non-studio setting.

If you have access to lighting or flashes, then be sure to experiment with the effect of boosting and adding in extra light.

Reframe your subject to the center of the image

OziRig Rhino CA Recrop

Chromatic aberrations tend to occur more frequently as you move further away from the center of the frame. This is generally as a result of the curvature of the lenses within the barrel. Therefore, being able to reframe your subject closer to the middle may help to reduce, or even completely eliminate, issues with chromatic aberration and other lens-based defects.

This means that you may need to crop your image after shooting to achieve the desired frame, which may be an issue if you absolutely have to maintain every pixel in your photo. If, on the other hand, you are working with small prints, or digital distribution, then the differences between resolutions are not as noticeable until you step down significantly.

So understanding chromatic aberration, how to avoid it, and what you can do about it will help you improve the final quality of your images. If you have any other tips or comments please share them below.

googletag.cmd.push(function() {
tablet_slots.push( googletag.defineSlot( “/1005424/_dPSv4_tab-all-article-bottom_(300×250)”, [300, 250], “pb-ad-78623” ).addService( googletag.pubads() ) ); } );

googletag.cmd.push(function() {
mobile_slots.push( googletag.defineSlot( “/1005424/_dPSv4_mob-all-article-bottom_(300×250)”, [300, 250], “pb-ad-78158” ).addService( googletag.pubads() ) ); } );

The post Chromatic Aberration – What is it and How to Avoid it by Joshua Burke appeared first on Digital Photography School.


Digital Photography School

 
Comments Off on Chromatic Aberration – What is it and How to Avoid it

Posted in Photography


The Latest Tech Trends in Real Estate Photography

19 Apr

6324 Castle Drive, Oakland, CA

Earlier this week I was checking out a new listing that Kelly and Marvin Deal with Grubb Company here in Oakland, CA have up for a home for sale in the Oakland Hills. Kelly and Marvin helped mrsth and I buy our home in Piedmont a few years back and are excellent real estate agents if you are looking to buy or sell in the East Bay, especially near Piedmont or Oakland.

In looking at the listing, I was struck by how sophisticated real estate photography is getting. I’d seen interactive home tours online before, but with the convergence of things like 360 degree cameras and drone photography, real estate photography seems to be moving to a whole new level. In this case they used drone cameras to get unique views of the property including dramatic aerial views showcasing the parklands around the property.

They also used a company called Open Homes Photography who is using 360 cameras to build not just interactive walk through tours of properties, but can even convert these 360 degree views into custom floor plan and aerial type dollhouse views.

Anyways, if you are doing real estate photography, check it out — and if you’re thinking of moving to Oakland, give Kelly and Marvin a call as well.

With housing in San Francisco and the Peninsula going nuts with the recent tech boom, on a relative basis Oakland is much more affordable. We moved to the East Bay in 2001 and over the last decade I think Oakland especially has been growing into a wonderful place to live and work. Great new restaurants seem to be popping up daily, art and food and culture are thriving and BART makes it super easy to get to the City quickly.


Thomas Hawk Digital Connection

 
Comments Off on The Latest Tech Trends in Real Estate Photography

Posted in Photography


18. April 2015

19 Apr

Das Bild des Tages von: Nils Starkmeth

Mann in einer Staubwolke verdeckt

Heute im Ausblick: Ein Geist beseelt einen Menschen.
kwerfeldein – Fotografie Magazin | Fotocommunity

 
Comments Off on 18. April 2015

Posted in Equipment


Applying a Texture Overlay to Your Images to Create an Antique Look

19 Apr

If you were to look at my computer you would find a folder called textures, and in that folder you would find hundreds of files. I take photos of things everywhere that I think will be good textures. I also make them, and try different things. You can do the same. Any time you see interesting textures in concrete, marble, or maybe cracked paint, take photos of them, add them to your folder for textures.

There are numerous reasons for adding textures to your photos, and one of the best is to give your work an old or antique look. Lots of old photos have marks on them or the emulsion has stained. Photos were often not treated with preservation in mind and they have started to look textured.

In this article we are going to look at how you can apply a texture overlay to your images to give them an aged look.

1-lily-texture-original

We are going to work on the above image of the lily. It has had basic processing done to it in Adobe Camera Raw before being opened in Photoshop CC (2014).

Cameras and lenses back in the day often didn’t produce super sharp images, so to start off we are going to make a duplicate layer of our image. I do this with the Ctrl+J, keyboard shortcut (Cmd+J on a Mac). There are other ways of doing this, such as; going to the menu at the top and choosing Layer, then clicking on Duplicate Layer, but I find the keyboard shortcut to be the easiest and quickest way.

11-lily-texture-original

10-lily-texture-original

Once you have that duplicate layer then go over to Filters and choose Blur, then Gaussian Blur as in the image above. You don’t want too much blur, or it will look like it is out of focus, and you don’t want too little or it will not be visible or obvious enough. I used 3.8 for the purpose of this image.

Next, you want to try and separate the flower from the background, you can do this with curves. Open a curves adjustment layer and use it to darken the image overall. Then using the Brush tool (which is located on your tool bar in Photoshop) on the layer mask, remove the adjustment from the flower as follows.

12-lily-texture-original

3-lily-texture-original

Click on the Brush tool, then set your foreground colour to black. It is the one with the two little squares at the bottom of the tool bar – the colour on top is the foreground color, the one on the bottom is the background color. Go to the curves layer you created in your layers panel and click on the white square in that layer (that is the mask), then go to your image and start brushing on the flower. You should see the flower getting lighter.

Add a warmer color to your image

Screen Shot 2015-04-13 at 11.52.55 AM
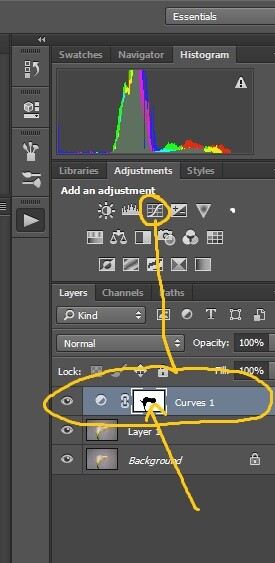
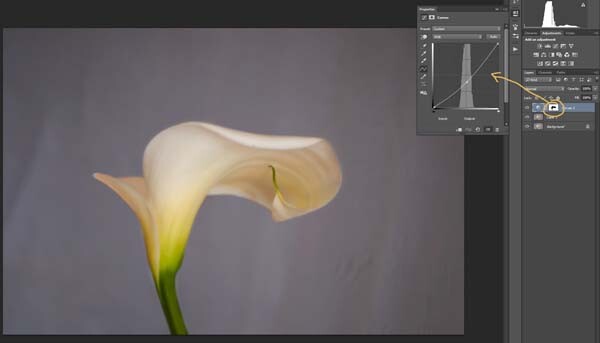
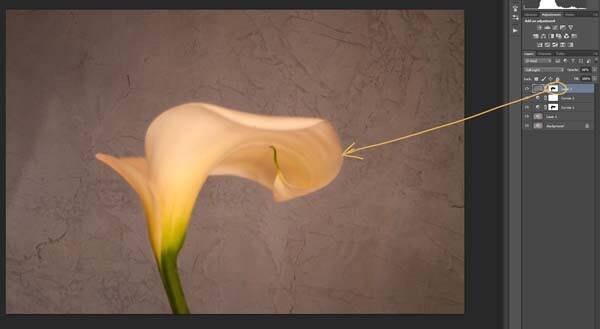
Next you are going to change the colour of the highlights. You don’t have to do this, but it is a nice touch and it helps create a warmer feel to the image.

Open another curves adjustment layer. At the top you should see a pull down menu that says RGB, click on that and choose Blue. Go to the curves line and up in the top right corner (the highlights) click on the dot in the corner and pull it down along the side line. Don’t go too far, but you should see the image turning yellow. Remember yellow is the opposite of blue.

4-lily-texture-original

Go back up to the curves window and click on red. You are going to do the same thing, except this time take the dot to the left and across the top. You don’t need to go very far.

Adding the texture overlay

Now it is time to find a texture overlay to put on top of your image. It is always going to be an individual thing and something that you need to work out. Here, I used a texture that I saw on the floor of a building in the city. I liked the cracked look of the floor so I took quite a few photos.

5-lily-texture-original

Open the texture file in Photoshop, then using the move tool (the first one at the top of the tool bar) click on the image and drag it over to the image you want to apply it to. You can copy and paste it as well, or use Place (which will add it as a SmartObject).

If you buy textures, or get free ones off the internet, you will often find they are too small for your image. But don’t worry about it because you are going to be blending it into your image, so it doesn’t really matter.

If you need to change the size of the texture overlay you can do this with the transform tool. You can find the Free Transform tool under the Edit button on the main menu across the top, where you found Layer and Filters. You can also the keyboard shortcut, Ctrl+T (Cmd+T on a Mac).  You will see a little grid go up around the texture so you can drag one of the corners to make it bigger, or smaller, depending on the size you require.  Press enter to apply the transform, or you can double click on it, or click on the move tool and press apply.

Blending the texture into your image

You will need to blend the texture so you can see your image underneath. The layer blend mode options are at the top of the layers panel, it is another drop down menu. The default option is set to Normal, so look for that. There are many options, for this tutorial however, we are going to use Soft Light. Once you change it to that blend mode you should be able to see the texture and the image underneath.

You can also change the opacity of the layer if you like as well. I usually change it slightly so the texture isn’t too strong. You can change the opacity in the window next to the options panel. Just make sure your texture layer is highlighted.

6-lily-texture-original

If you go to the bottom of the layers panel you will see a few things across the bottom.  If you click the rectangle one with the round hole in it you will give your layer a mask.  The mask means you can hide some of that layer from your image, like you did with the first curves layer.

Again, get your brush tool, make sure the foreground colour is black and paint over the flower.  You are now making the texture look like it is just on the background.

7-lily-texture-original

Next we are going to apply a texture to the whole image. This time it is one that will make the image look grungy, and dirty. You can find textures that have marks on them that look like smudges and grease. The one in this tutorial was a polished cement wall outside.

Add the texture to the image the same way you did the previous one. Blend it with the Soft Light Blend mode again. See how you feel about how the image looks, and if you decide it is too strong remember that the opacity can help make it less intense.

Adding a tint to your image

8-lily-texture-original

You will need to add a new layer, one that is transparent. At the bottom of the layers panel where you found the layer mask, you should see next to the trash bin a white square with a corner folded over, that is the new layer icon (see below). Click on it.

9-lily-texture-original

Next go to the tool bar and find the Paint Bucket Tool. Then go to the foreground colour and click on it. A popup window should come up and you can choose a colour to give your image a new tone. I would recommend you choose a grey, for this demonstration a mid tone grey with a hint of orange was chosen.

13-lily-texture-original

Now go to your image and click on it. The new empty layer should be filled with the colour you chose, and your whole image should look like a solid colour. Go to the blending mode for the new layer and change it to Colour. Your image should be transformed to monochrome. If you change the opacity of that layer then some of the original colour will come through, but that is up to you.

Here is the final image.

lily-with-textures

There are lots of other things you can do, but that might be best left for another tutorial.

If you prefer to watch this demonstrated you can check out the video below as I walk you through the same steps:

Have you tried using textures before? Do you have any favorite textures or sites for finding them? Please share in the comments below.

googletag.cmd.push(function() {
tablet_slots.push( googletag.defineSlot( “/1005424/_dPSv4_tab-all-article-bottom_(300×250)”, [300, 250], “pb-ad-78623” ).addService( googletag.pubads() ) ); } );

googletag.cmd.push(function() {
mobile_slots.push( googletag.defineSlot( “/1005424/_dPSv4_mob-all-article-bottom_(300×250)”, [300, 250], “pb-ad-78158” ).addService( googletag.pubads() ) ); } );

The post Applying a Texture Overlay to Your Images to Create an Antique Look by Leanne Cole appeared first on Digital Photography School.


Digital Photography School

 
Comments Off on Applying a Texture Overlay to Your Images to Create an Antique Look

Posted in Photography


Readers’ Showcase: Rodger Kingston

18 Apr

Regular DPR readers know that the comment section on a camera review can be, shall we say, a bit heated at times. Recently, something a bit different caught our attention in the Fujifilm X30 review’s comments. Rodger Kingston, a happy X10 and X20 user demonstrated that the baby X-series offered everything he needed for a self-published book of photography. See gallery

Articles: Digital Photography Review (dpreview.com)

 
Comments Off on Readers’ Showcase: Rodger Kingston

Posted in Uncategorized


Sony Semiconductor site gives glimpse of next-generation sensors

18 Apr

A 20MP Four Thirds sensor and a Stacked CMOS design for enthusiast compacts are likely to be just two of the sensors we can expect to see in cameras over the coming months. Sony’s semiconductor division has made these products public with the creation of a new website, which lists some of the chips it offers to potential buyers. Alongside many familiar-sounding sensors are examples we’ve yet to see in any cameras. Read more

Articles: Digital Photography Review (dpreview.com)

 
Comments Off on Sony Semiconductor site gives glimpse of next-generation sensors

Posted in Uncategorized


Bitte nochmal, ich hab geblinzelt!

18 Apr

(c)  Millo Salgado

Ein Beitrag von: Millo Salgado

Alles begann damit, dass meine Mutter das eine Bild, das ich von ihr gemacht hatte, sah, auf dem man sie mit geschlossenen Augen sieht und sie mich bat, die Aufnahme erneut zu machen.
kwerfeldein – Fotografie Magazin | Fotocommunity

 
Comments Off on Bitte nochmal, ich hab geblinzelt!

Posted in Equipment


28 Ethereal Images of Light Rays that Glow

18 Apr

To photographers light is the most important thing above all else. It is the ultimate prize to come home with a photo with “good light”.

One type of light that is truly ethereal is the phenomenon of rays of light. It is only possible for light rays to be visible in an image when certain atmospheric conditions exist; there must be some kind of particle suspended in the air for the light to bounce off such as dust, fog, or smoke.

Here are 28 images of light rays that have a certain glow about them. Enjoy!

Photograph Home by matt dinning on 500px

Home by matt dinning on 500px

Photograph Poland by Artur Magdziarz on 500px

Poland by Artur Magdziarz on 500px

Photograph Amazing Earth by Rick White on 500px

Amazing Earth by Rick White on 500px

Photograph The Valley of Light by Michael Shainblum on 500px

The Valley of Light by Michael Shainblum on 500px

Photograph A Journey to the Light by Rarindra Prakarsa on 500px

A Journey to the Light by Rarindra Prakarsa on 500px

Photograph Raging Light by Martin Kornmesser on 500px

Raging Light by Martin Kornmesser on 500px

Photograph Praying by La Mo on 500px

Praying by La Mo on 500px

Photograph The Cave by Tommy  Angelsen on 500px

The Cave by Tommy Angelsen on 500px

Photograph Dawning by Dylan Toh  & Marianne Lim on 500px

Dawning by Dylan Toh & Marianne Lim on 500px

Photograph heavenly autumn 7 by Bart Ceuppens on 500px

heavenly autumn 7 by Bart Ceuppens on 500px

Photograph Hold On Tight by Vichaya Pop on 500px

Hold On Tight by Vichaya Pop on 500px

Photograph Light shower by Martin Kornmesser on 500px

Light shower by Martin Kornmesser on 500px

Photograph Waiting for a New Life! by Mardy Suong Photography on 500px

Waiting for a New Life! by Mardy Suong Photography on 500px

Photograph Nori Othman by Mohammed Abdo on 500px

Nori Othman by Mohammed Abdo on 500px

Photograph Beams of Light by BP Chua  on 500px

Beams of Light by BP Chua on 500px

Photograph Peter's ray by Jarno Dijkstra on 500px

Peter's ray by Jarno Dijkstra on 500px

Photograph Better than Coffee by Tracey Harrison-Hill on 500px

Better than Coffee by Tracey Harrison-Hill on 500px

Photograph Upper Antelope Canyon by Victor Chen on 500px

Upper Antelope Canyon by Victor Chen on 500px

Photograph Descending by Thomas Conrad  on 500px

Descending by Thomas Conrad on 500px

Photograph Sunset With A Twist by Michael Shainblum on 500px

Sunset With A Twist by Michael Shainblum on 500px

Photograph Sonnenstrahlen im Wald by Leo Pöcksteiner on 500px

Sonnenstrahlen im Wald by Leo Pöcksteiner on 500px

Photograph The lake by Christian Wig on 500px

The lake by Christian Wig on 500px

Photograph morning by Alberto Melcangi on 500px

morning by Alberto Melcangi on 500px

Photograph Enveloping light by Stefan Andronache on 500px

Enveloping light by Stefan Andronache on 500px

Photograph Fresh Beginning by Scott Knox on 500px

Fresh Beginning by Scott Knox on 500px

Photograph Ray Of Light by Roland Guth on 500px

Ray Of Light by Roland Guth on 500px

Photograph Home is where the light is by Claudiu Guraliuc on 500px

Home is where the light is by Claudiu Guraliuc on 500px

Photograph Entrance by markus  on 500px

Entrance by markus on 500px

googletag.cmd.push(function() {
tablet_slots.push( googletag.defineSlot( “/1005424/_dPSv4_tab-all-article-bottom_(300×250)”, [300, 250], “pb-ad-78623” ).addService( googletag.pubads() ) ); } );

googletag.cmd.push(function() {
mobile_slots.push( googletag.defineSlot( “/1005424/_dPSv4_mob-all-article-bottom_(300×250)”, [300, 250], “pb-ad-78158” ).addService( googletag.pubads() ) ); } );

The post 28 Ethereal Images of Light Rays that Glow by Darlene Hildebrandt appeared first on Digital Photography School.


Digital Photography School

 
Comments Off on 28 Ethereal Images of Light Rays that Glow

Posted in Photography


Opinion: Can an Aperture user be happy with Apple’s new ‘Photos’ software?

18 Apr

One of the most talked about subjects for photographers using Macs to process and archive their photos is the loss of Apple Aperture and its replacement, simply known as Photos. This new software strongly resembles the iOS software of the same name and while it still offers some of the features from the enthusiast-grade Aperture, quite a few things are missing. Learn more about Photos – both what it offers and doesn’t – in this opinion piece from DPR Editor Jeff Keller. Read more

Articles: Digital Photography Review (dpreview.com)

 
Comments Off on Opinion: Can an Aperture user be happy with Apple’s new ‘Photos’ software?

Posted in Uncategorized


NAB 2015 Highlights

18 Apr

With over 100,000 attendees, the NAB Show (National Association of Broadcasters) can be a dizzying experience of cutting edge technology mixed with valuable information and practical tools. Though mainly focused on the broadcast and motion picture industries, the emergence of still cameras that shoot high quality video has driven the development of products and tools aimed specifically at DSLR/mirrorless filmmakers and video shooters, many of which were on display. Read more

Articles: Digital Photography Review (dpreview.com)

 
Comments Off on NAB 2015 Highlights

Posted in Uncategorized