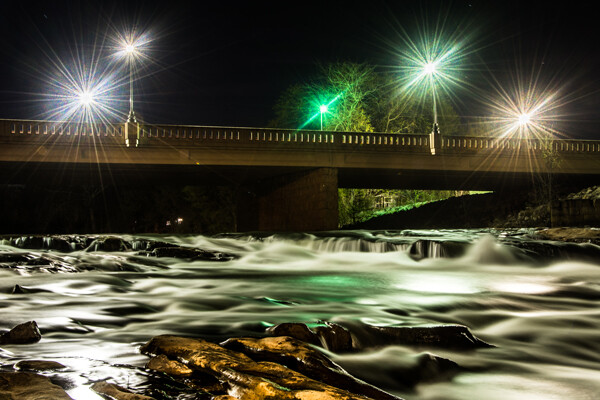
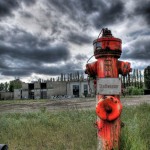
Mill Falls in Logan, Ohio. The main source of light for this scene was the street lights on the bridge over the river. The bridge was light painted with a high-powered spotlight. Light was also add to the rocks in the foreground. Exposure was 69 seconds. Aperture was set at f/14 to maximize the starburst on the street lights. This image won me a Photographers Choice award in the 2014 Shoot the Hills photo contest.
What is light painting?
Light painting is an imaging technique that uses a moving light source to add light to an under-illuminated subject while taking a long-exposure photograph. A scene or object can be brought to life by painting with a beam of light!
You, the photographer, becomes an artist, and instead of just capturing an image as presented, with light painting you create the image that the camera is capturing. Light painting may take lots of patience and practice to perfect, but the results can be very rewarding. But let’s not make this sound too complicated – light painting is a lot like any low light photography, except in this scenario we are putting an outside light source in motion to enhance an image. Let’s take a look at some of the basics for light painting photography.
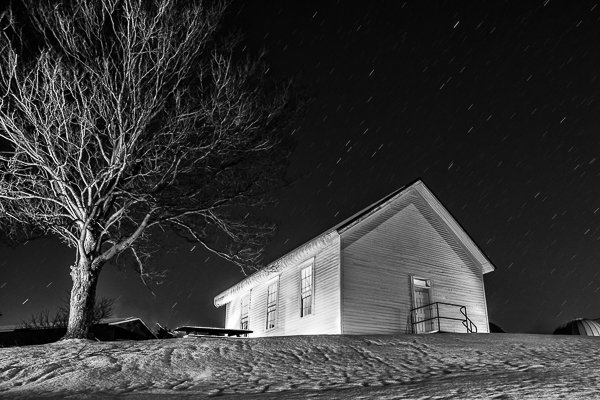
Schoolhouse in the snow – 170 second exposure, f/8, ISO 100. Notice the light coming from inside the school house, added from the outside by shining a flash light through windows on the back side of the building.
Tools
- Camera – Any digital camera capable of manual settings (Bulb).
- Tripod – One of the most important tools to produce light paintings is a sturdy tripod. In most cases your shutter is going to be open for several minutes and it is very important that your camera does not move during the exposure.
- Shutter release – Either use a cable release or a remote shutter release to begin your exposure. If you don’t have either of these, use your camera’s timer function to initiate the shot. To light paint, it is very important that you never touch your camera or tripod to prevent vibrations during the exposure.
- Stop watch – A stop watch or some other way of timing your exposures is helpful, since most of these exposures are going to require your camera set to Bulb.
- Light source – Many different types of lights can be used to do light painting. These light sources are your brushes and may include: flashlights, torch lights, lasers, glow sticks, flash or strobes, cell phones, or even candles. Just about anything that can produce light can be used as a brush to do light painting. Different light sources will produce different colors of light. For example, a LED light source will produce a cooler (blue) colored light, while a halogen source will produce a much warmer (orange) colored light.
- Color gels – Color gels can be used over your lights to alter the tint of your light and add color to your painting.
Exposure time 30 seconds at f/8
Camera Settings
- Mode – Use the Manual mode setting, which allows you to set your shutter speed and aperture.
- Image quality – Set your image quality to RAW, which allows you to capture as much information about your image as possible. (This is not a necessity if you are uncomfortable with shooting RAW, but is a recommendation.)
- White Balance – If you are wanting to balance your lighting to the light source, choose either the Incandescent or Tungsten setting. However, sometimes experimenting with other white balance settings can produce some interesting light effects. Daylight white balance is a good starting point if you want to use the color tones of your light sources. Auto White Balance is not recommended.
- ISO – Set to a low ISO, such as 100.
- F-stop or aperture – Stop down to f/8 or f/10, which allows you to get more depth of field and enables you to use a longer shutter speed.
- Shutter speed – Set shutter speed to Bulb, so your actual shutter speed will be determined by the amount of ambient light in the scene.
- LCD brightness – Lower the brightness of your LCD preview, because the normal setting is too bright at night and will make your image look bright when it is really under-exposed.
- Histogram – Use your histogram to help check your exposure. If the histogram charts heavily over to the left, your image is going to be mostly dark.
- Blinkies – Turn on your blinkies (highlight warning) to help you determine if your highlights are exposed properly. It is perfectly acceptable for your brightest highlights to have the blinkies if the rest of your image is properly exposed.
- Image Stabilization – Set to Off. With your camera on a tripod, having image stabilization turned on can actually fool your camera or lens and cause blurring in your image.
- Long exposure noise reduction – Recommended setting is Off. This setting can be set to On, but will cause your exposures to double while the camera takes a second black exposure to help remove noise. If your camera is set to a low ISO, the noise level will be low enough in most cases to make this setting unnecessary. Still, it is a good idea to check your noise level before you start, and some older cameras may require this setting to be On to get usable noise levels.
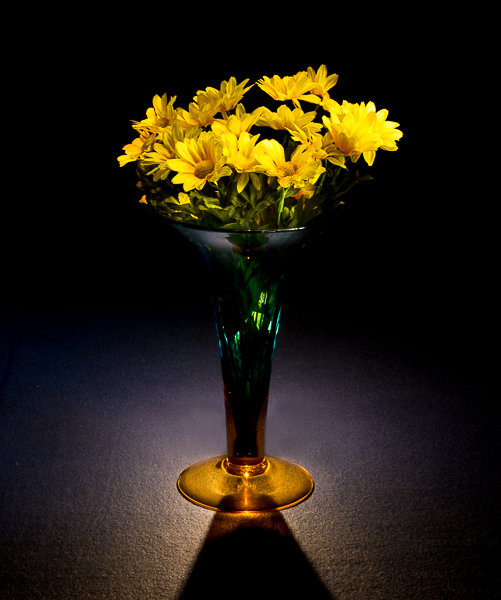
This vase was back lit with a candle and the flowers were painted with a small pen light. 30 second exposure, f/16 ISO 100.
Begin with ambient light
The first step before beginning any light painting is to determine the ambient light in your scene. Determining base exposures can be time consuming when you are experimenting with exposures that could be three to four minutes long. Here is a little trick that can help expedite this process.
- Set your ISO to six stops higher than the ISO you plan to use. Example, if you are planning to shoot at ISO 100, set your ISO to 6400.
- With your camera set at ISO 6400, experiment to find out how many seconds you will need to expose the ambient light of your scene. Every second of exposure at ISO 6400 is equal to one minute at ISO 100.
- So now set your ISO back to 100 and prepare to begin your exposure in minutes instead of seconds. Many cameras lowest ISO is 200 so 6 stops higher would be 12800, and if you cameras lowest ISO is 50, six stops higher would be 3200.
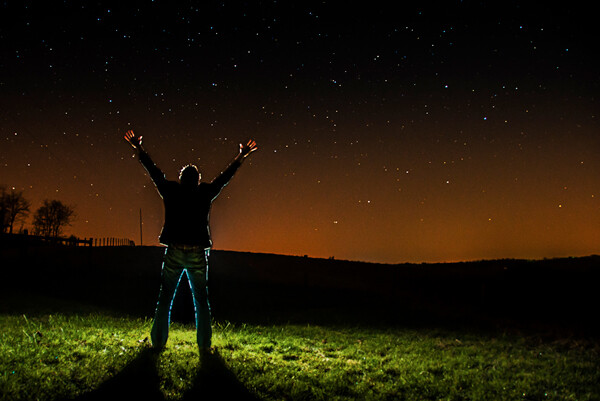
30 second exposure at ISO 800. In this image the ISO was increased to shorten the exposure to 30 second because any exposure longer then that would cause a noticeable blur on the stars. Light painting was applied from the front of the subject without letting the light shine directly back at the camera.
Focusing
Focusing your camera is an important step and in the dark it can sometimes be difficult to achieve. The simplest way to get your focus is to shine a light source to a spot in your scene that you have determined must be in focus. Using autofocus, place your focus point on the light and make sure your camera is focused on that point. Now change your camera from autofocus to manual and your focus will not change. But remember, if you move the camera you must turn your autofocus back and refocus. Back button focusing is another great way to achieve focus for light painting.
The Exposure
At this point, you have determined your exposure time and have your camera focused on your subject. It’s time to begin your exposure and start painting. Most cameras will allow you to set exposures of up to 30 seconds. For exposures over 30 seconds, set your shutter speed to Bulb. Use your cable release or remote to trigger your shutter open. Your shutter will remain open until you press the release again. Use your stop watch, or the timer on your phone, to time the exposure length.
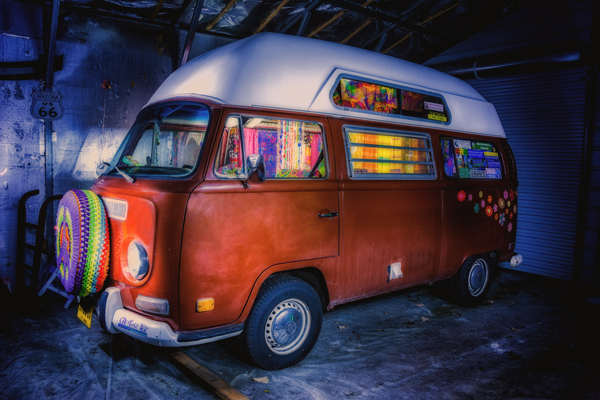
This vintage 1971 bus was painted using one LED flash light on the outside, with a second light used inside to light up the interior of the bus. White balance was set to Daylight, which cause the LED light to produce the cool blue cast around the bus.
Painting techniques
- Paint from the sides – Don’t just stand behind your camera and wave your light around over your image. Painting flat surfaces from the side will allow you to bring out the textures of the surface.
- Use lots of different angles – for instance, when painting the ground hold the beam low and pan the light over the ground. This will keep the ground from appearing flat and bring out all the details of the surface. Also, by adding light from many angles your resulting image will have an interesting three dimensional effect.
- Don’t stand between the camera and your light source or you will show up as a silhouetted ghost in your image.
- Wear dark non-reflecting clothing and keep moving. Again, you do not want to appear as a ghost in your image!
- Don’t shine the light source back at the camera, or else you will create a bright spot in the image.
- Use a flash light with a red filter when you need to check your camera to make adjustments. The red light will keep you from ruining your night vision.
- Different surfaces are going to react to light differently. Wood surfaces may require more light than shiny surfaces such as metal or glass, as rougher surfaces absorb more light than smooth surfaces.
- Keep your light moving. Move the beam in slow strokes to add light and make faster strokes in areas where less light is needed.
- Paint in up-and-down or side-to-side strokes, just like one paints with real paint.
- You are more than likely not going to get the shot you want on the first try, and it may take multiple attempts to get an image that you are satisfied with. For this reason, try to keep track of how much light you add to each surface. Develop a plan so that you can make adjustments to each exposure until you get the image you have visualized.
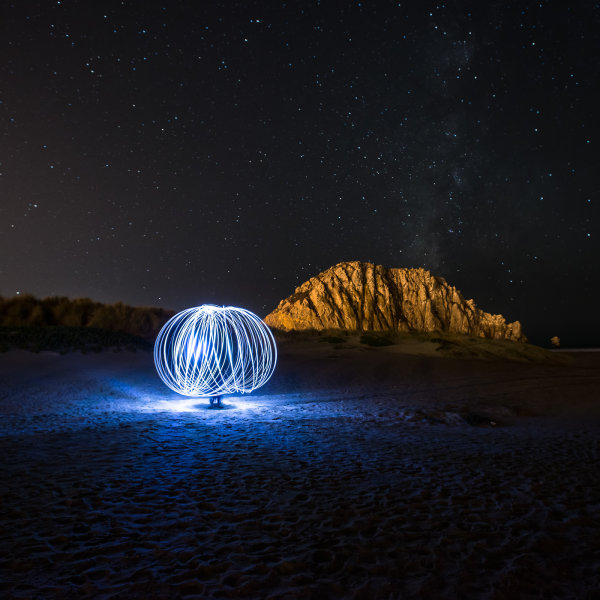
30 second exposure at f/5.6, ISO 1250 (to get the stars to show up). By Howard Ignatius
Be Creative
These are a few basic tips to help you get started with light painting. There is so much more you can do with this medium. Be creative and fearless about trying new things. Once you start to get the hang of light painting, there is no limit to the images you can create with your camera in the dark and a few creative light sources. Do you have any additional tricks or tips for light painting to share?
googletag.cmd.push(function() {
tablet_slots.push( googletag.defineSlot( “/1005424/_dPSv4_tab-all-article-bottom_(300×250)”, [300, 250], “pb-ad-78623” ).addService( googletag.pubads() ) ); } );
googletag.cmd.push(function() {
mobile_slots.push( googletag.defineSlot( “/1005424/_dPSv4_mob-all-article-bottom_(300×250)”, [300, 250], “pb-ad-78158” ).addService( googletag.pubads() ) ); } );
The post Beginner’s Guide to Light Painting by Bruce Wunderlich appeared first on Digital Photography School.

Digital Photography School


You must be logged in to post a comment.