RSS
 

Archive for March, 2015

Ein Beifallsorkan auf Martin Parr in Fotobänden 2

20 Mar

Eine Übersicht über viele Fotobände von Martin Parr

Nun folgt der zweite Teil meines Beifallsorkans, der den englischen Magnum-Fotgrafen Martin Parr nicht mit eigenen, sondern fremden Federn schmückt. Denn Parr ist ein besessener Sammler von Postkarten und Gegenständen. Aus diesem Hobby hat er großen Nutzen gezogen, indem er Bildbände mit den gesammelten Dingen produzierte.
kwerfeldein – Fotografie Magazin | Fotocommunity

 
Comments Off on Ein Beifallsorkan auf Martin Parr in Fotobänden 2

Posted in Equipment


Priime, The Best iPhone Photo Editor I’ve Ever Used

20 Mar

Priime is Liive -- Get It While It's Hot

Disclosure, I am an advisor to Priime and have styles included in their style marketplace.

Boom. Just a few hours ago Priime went live in the Apple iTunes App Store and already on launch day Apple is featuring it in their best new apps section.

What is Priime?

Priime is the best mobile phone editor I’ve ever used. I’ve been using it behind the scenes for the past few months and am blown away by how much better it is than anything else out for mobile editing today. The free app features a powerful suite of editing tools allowing you to enhance a lot of the basics around your photos: brightness, structure, contrast, warmth, tint, saturation, sharpness, highlights/shadows, vignette and fade. The app can also save photos up to 50 megapixel in size! I don’t know of any other app that can let you output such high res photos.

In addition to these tools, Priime has currated some of the best mobile photo styles available. These are styles developed by photographers for photographers. I have two styles for sale in the Priime marketplace — Americana and Neon. Neon can be a particularly tricky thing to shoot sometimes. I’ve taken over 10,000 photos of neon signs and this is my best attempt at an overlay that works especially well for signs.

The app gives you some great free starter styles. It will also make suggestions for what styles may work best with your photo after analyzing it.

In addition to my styles, Priime features styles developed by 30 other insanely talented photographers, each with their own unique way of processing the world through their iPhone.

Daniel Krieger, who shoots for the NY Times, is probably the best working food photographer in the world right now. If you are going to take photos of food, you are definitely going to want to get his filter. Vivienne Gucwa just put out a fantastic book of New York City photographs and has some amazing styles as well.

There is no Android version yet (it is on the roadmap), but the app is compatible with iPhone, iPad, and iPod touch.

One of the things that I think makes Priime different from other photo editing apps is that it was actually developed by photographers. I have known Art Chang for several years. We went and shot Death Valley with a bunch of Google+ photographers 4 years ago. He’s an amazing photographer and has especially done cool things with mobile. His Instagram stream is here. Art has a love for photography that I think gives the app a unique photographer driven perspective and street cred. Art’s co-founders are also all photographers — Loren Baxter, Andrew Ng and Joe Pestro.

Priime is sharing the revenue for their styles with the photographers who have developed them. I think that is a really cool thing. I can’t wait to see what other photographers are added as time goes on.

Anyways, check out Priime in the iPhone App Store. Here is a direct link to the app here. I’d love to hear what you think of it. Remember it’s Priime with two ii’s. :)

My Styles in the New Release iPhone App Priime

Priime Featured in the Best New Apps Section of the iPhone App Store


Thomas Hawk Digital Connection

 
Comments Off on Priime, The Best iPhone Photo Editor I’ve Ever Used

Posted in Photography


The Capital: Egypt Plans Largest From-Scratch City in History

20 Mar

[ By WebUrbanist in Architecture & Cities & Urbanism. ]

egypt the capital project

Slated to be constructed in just 7 years and cost $ 300 billion (more than the GDP of Egypt), this ambitious design for a brand new capital city of 5 million people is unprecedented – if completed, it will be a record-setting endeavor. And it is not just a conceptual vision, or at least not entirely- the site has been selected and a 100-square-kilometer test section has already been approved by the Egyptian government.

capital in cairo

capital incubator tech hub

The new capital-replacing city is described by its proponents as “the catalyst for an Egyptian renaissance” and “a momentous endeavour to build national spirit, foster consensus and provide for the country’s sustainable long-term growth.” Inspired in part by Silicon Valley, buzzwords about in the promotional materials related to the project, tentatively titled “The Capital.” It is intended to be a “smart city” and “hub of innovation” to carry its country into the future of technology and sustainability.

capital city cairo

capital city of the future

Transportation is to be a big component of the design, both within and beyond the city – it is meant to become both a hub as well as a walkable metropolis. Lessons are being taken from extant clogged and congested urban centers, particularly Cairo. However, it is not clear through the gloss and glamour just how these innovations will manifest themselves – there are some statistics, though, that are at least superficially impressive.

cairo new capital

Environmental friendliness is also high on the list, with plans to sustainable local food, use eco-friendly modes of power generation (wind and solar) and, of course, deal with waste and recycling in a green and efficient manner, avoiding a repeat of Cairo’s infamous “Garbage City.”

capital city images

capital urban design project

Some might question whether the futuristic renderings are really representative of what is planned or if they are simply designed to impress. Critics note that the scheme seems too good to be true, and may be intentionally positioned as a Utopian project in order to draw outside investors. Building a new city from the ground up may result in that space being more efficient, but it leaves one wondering what the country has planned for its former capital. Perhaps there is room for generosity in expectations, however – lessons learned and developers deployed in this massive construction project could be turned around afterward and reassigned to fix existing cities.

Share on Facebook


[ By WebUrbanist in Architecture & Cities & Urbanism. ]

[ WebUrbanist | Archives | Galleries | Privacy | TOS ]


WebUrbanist

 
Comments Off on The Capital: Egypt Plans Largest From-Scratch City in History

Posted in Creativity


17. März 2015

20 Mar

Das Bild des Tages von: Jonas Hafner

16289401370 © Jonas Hafner

Im Ausblick: Kompositionstipps, ein Simulator und surreale Häuser.
kwerfeldein – Fotografie Magazin | Fotocommunity

 
Comments Off on 17. März 2015

Posted in Equipment


Rapid Resin: Liquid 3D Printing Looks Like Morphing T2 Metal

20 Mar

[ By WebUrbanist in Conceptual & Futuristic & Technology. ]

carbon 3d rapid printing

Generating objects 25 to 100 times faster than traditional layer-based 3D printers, this new continuous-liquid approach to high-speed fabrication can create complex yet refined finished objects that are at once more pristine and quickly produced, all by harnessing oxygen and light to ‘grow’ results. Its inventors say their solution was inspired in part by a well-known, time-traveling, liquid-metal robot from a science fiction film and indeed both technologies may be poised to change the the future.

A group of scientists from the University of North Carolina have just published a paper in Science on the technology, filed for a patent and formed a company around it called Carbon3D, currently backed by $ 40,000,000 in funding. Essentially, a pool of photosensitive resin floating on a plane of dissolved oxygen provides the raw material bath, while a device suspended above draws resin up and out. The trick to hardening the substance as it is lifted lies in a UV light projector which emits a 2D cross-section of each layer, continuously changing shape as the device above is raised.

continuous liquid interface production

Watching it in action, it is easy to see how the idea came in part from the shape-shifting Terminator ‘upgrade’ first found in the second installation of the ongoing movie franchise. Emerging from a liquid pool, the resulting solid takes shape with remarkable speed.

continuous liquid printing

Effectively, each layer of the object is not only printed at once, but without delays in between – hence “continuous liquid interface production.” In contrast, normal 3d printers are limited in part by the printer heads that deposit materials one point at a time, moving along each plane before moving up to the next level. “Traditional 3D printing requires a number of mechanical steps, repeated over and over again in a layer-by-layer approach. CLIP is a chemical process that carefully balances light and oxygen to eliminate the mechanical steps and the layers.”

continous sped up printing

Moreover, unlike many current models, the continuous production method eliminates rough edges and forms a fully-solid object that, depending on the materials used, could result in a cleaner and stronger finished product. Indeed, the device supports a range of both solid and flexible polymers, giving it potential for all kinds of applications. “Parts printed with CLIP are much more like injection-molded parts. CLIP produces consistent and predictable mechanical properties, creating parts that are smooth on the outside and solid on the inside.”

liquid polymer resin print

Meanwhile, materials like “elastomers cover a range of needs, from the high elasticity needed for athletic shoes to the strength and temperature resistance needed for automotive parts.” Currently, the device on display is just a prototype, but once put into commercial production it could well be a pivotal piece in transitioning the 3D printing industry from a slow-growing niche to a full-fledged revolution for making everything from rapid prototypes to other useful objects at speed.

Share on Facebook


[ By WebUrbanist in Conceptual & Futuristic & Technology. ]

[ WebUrbanist | Archives | Galleries | Privacy | TOS ]


WebUrbanist

 
Comments Off on Rapid Resin: Liquid 3D Printing Looks Like Morphing T2 Metal

Posted in Creativity


Snazzy Engineer Prints, Limited Supplies!

20 Mar

Spruce up your digs and support awesome photographers!

We teamed up with a few of our fave photo makers to offer a limited run (hurry! hurry!) of their work printed up as big beautiful 3 foot x 4 foot Engineer Prints.

See Our Selection of Engineer Prints
(…)
Read the rest of Snazzy Engineer Prints, Limited Supplies! (0 words)


© Erin for Photojojo, 2015. |
Permalink |
No comment |
Add to
del.icio.us

Post tags:


Photojojo

 
Comments Off on Snazzy Engineer Prints, Limited Supplies!

Posted in Equipment


Understanding the Difference Between Photoshop and Lightroom

20 Mar

One of the most common questions I hear from people just starting out in photography is, “What program should I use to edit my photos?”. There are many free options such as iPhoto, Picasa, GIMP, and other commercial programs such as AfterShot Pro and Pixelmator but the most popular programs are Photoshop and Lightroom.

That question is usually followed by another, which seems quite logical, “What’s the difference between Photoshop and Lightroom?”. While the two programs do share many similarities, and are both widely used by the photographic community, they each serve a unique purpose and are quite different in some very major ways. Understanding what makes them similar, as well as different, can help you make an informed choice when selecting the right software for your needs.

PhotoshopLightroomQuestionMark

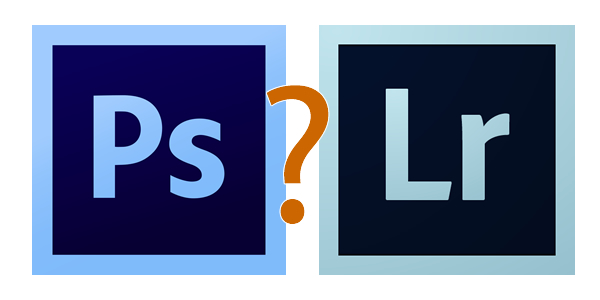
If you’re not sure what the difference is between Photoshop and Lightroom, you’re not alone.

Similarities

At the core level both programs do essentially the same thing, edit images. How they go about handling that task, as well as how you actually use each program, is quite different – but if you are simply looking for software that will allow you to alter, tweak, and enhance your photographs, either one will suffice. Both are capable of handling multiple file types such as: JPEG, PNG, TIFF, and a perennial favorite of many photographers, RAW. In fact both Photoshop and Lightroom use the Adobe Camera Raw (ACR) processing engine to handle RAW files. So, you can expect similar controls and editing options in both programs when doing things like adjusting saturation, working with curves, and correcting for lens distortions.

Both Photoshop and Lightroom are powerful additions to any photographer's digital toolbox, but understanding what makes each one unique can help you choose one that suits your needs.

Both Photoshop and Lightroom are powerful additions to any photographer’s digital toolbox, but understanding what makes each one unique can help you choose the one that suits your needs best.

Both programs also feature an extensive set of editing and manipulation tools allowing you to do everything from; basic edits like cropping and adjusting exposure, to advanced alterations such as working with brushes, tone curves, and graduated filters. You will find a variety of built-in effects in both programs that will allow you to instantly apply edits such as black and white, sepia, and other artistic styles. The two programs are quite powerful image editors. I know some photographers who use Lightroom exclusively and never touch Photoshop, as well as plenty of others who spend all day in Photoshop and never open Lightroom. However, in order to understand which one is best for you it might help to see how they are also quite different from each other.

Difference #1: File Handling

One of the most significant ways in which Lightroom is different from Photoshop is that it does not actually edit photos, nor does it move your images around to different locations on your computer. Instead all the changes you implement are kept in a separate file called the Catalog, which is sort of like a recipe book of instructions for how each photo should be processed. When you apply some type of edit, like a radial filter or adjustment brush, Lightroom is essentially keeping a log of the alterations in a database, while leaving the original image intact. It’s a technique called nondestructive editing, which stands in stark contrast to how Photoshop operates.

For example, several months ago I sent my father this photo I took of him, which I had subsequently edited in Lightroom.

simon-dad-edited

Since the original file was left unchanged I can go back and re-edit the photo any time I want. The edits in Lightroom are a set of instructions for how to process the file, similar to how a recipe is a set of instructions for making food like a cake or casserole. After you finish making changes to an image in Lightroom the photo must be exported at which point it can be printed, shared, or posted online. Because the original photo remains on your computer fully intact and untouched you can go back to Lightroom at any point in the future and re-edit the photo however you want.

Another benefit of this approach is that the catalog itself is quite small, often taking up only a few hundred megabytes on your hard drive even if you have several thousand images in Lightroom.

LightroomEditingWorkflow

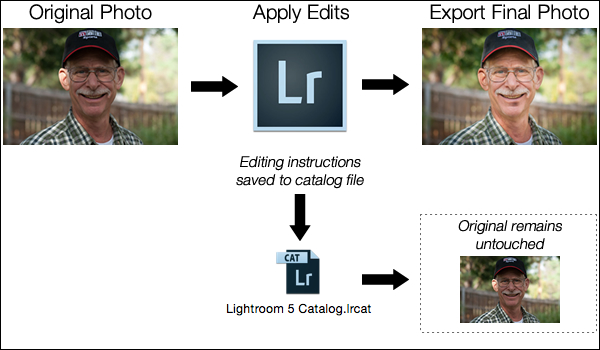
A basic diagram of the Lightroom workflow: editing instructions are stored in the Catalog file and no changes are made to your original images.

Photoshop, on the other hand, operates quite differently. When you edit a picture such as a JPG, PNG, or RAW file in Photoshop you are always working on the original file itself, unless you save a copy as a Photoshop PSD file that is usually several dozen megabytes in size. This PSD file contains all the changes made to a photo, and in order to share a given image it must then be saved to a final format such as JPG, PNG, etc. In essence, if you want to perform nondestructive edits in Photoshop you will end up with three separate files: the original camera RAW file, a PSD, and the final copy saved into a shareable format from the PSD. The process works something like this:

PhotoshopEditingWorkflow

A basic diagram of the Photoshop workflow: If you want to edit an image later it must be saved as a separate PSD file.

FileDifferencesThe two processes look somewhat similar on the surface with one major difference; in Lightroom all your changes for every photo are saved in one single, relatively small, catalog file. In Photoshop all your changes are saved in unique files for every single picture you edit. This means much more space on your hard drive will be taken up as you work with multiple files in Photoshop, and you will end up with multiple versions of each image as well. So why would you want choose to use Photoshop instead of Lightroom? In a word, power.

Difference #2: Editing Tools

Lightroom is kind of like an all-terrain-vehicle you might see on some farms. It’s fast, nimble, and can be used for a variety of tasks like hauling small objects and towing little trailers. But it simply cannot match the sheer power of a massive farm truck when it comes to getting big, serious jobs done like transporting massive bales of hay, pulling a horse trailer, or ploughing through mud and snow.

Nearly a decade ago Adobe realized that not everyone needed the capability of Photoshop, particularly photographers who were returning from events with hundreds of images to edit quickly. What this new generation of digital photographers demanded was the essential editing tools of Photoshop in one easy-to-use package which resulted in Lightroom.

PhotoshopLayers

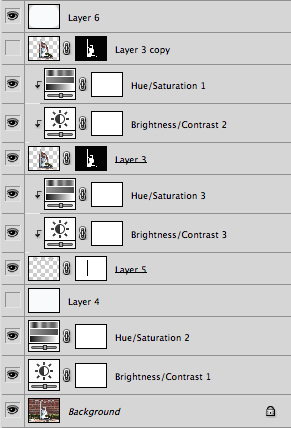
Photoshop uses layers, which can be intimidating for beginners but offers incredible versatility that Lightroom simply can’t match.

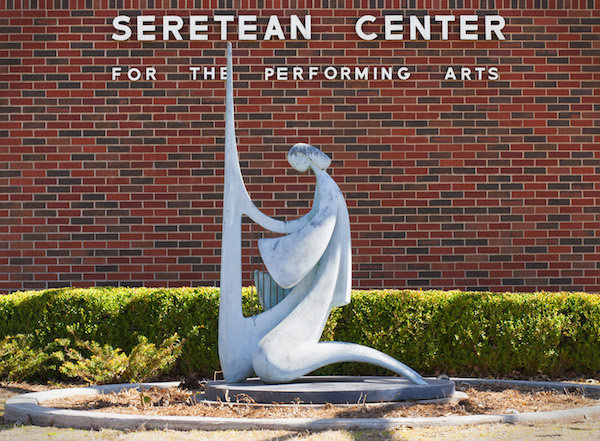
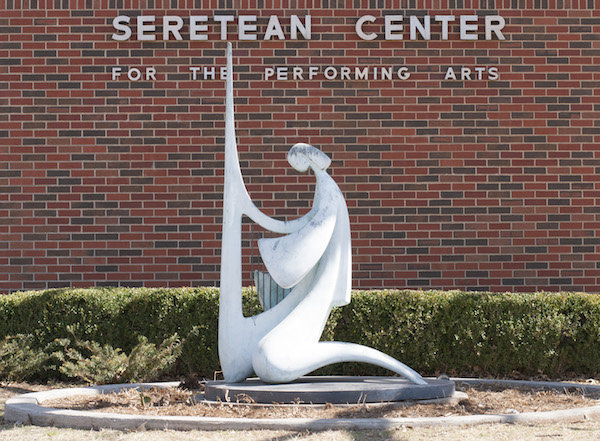
Photoshop contains a dizzying array of filters, brushes, and other tools that allow you to perform all manner of edits and changes to your images. But more than that, Photoshop operates by letting you create different layers on which your edits actually take place. For example, the image on the right shows the various layers I used to edit the image of the statue, and each layer can be edited independently of the others. This might look like a lot, but it is not uncommon for a digital artist to use dozens of layers when editing an image. Lightroom, by contrast, works in a much more linear fashion with no layers, fewer editing tools and less overall flexibility. Both programs contain a history panel that lets you step back in time to any of your edits, but working with layers gives you infinitely more control over exactly how you edit your image.

Case in point, let’s say you want to add a vignette to a portrait. In Lightroom it’s as simple as clicking the “Vignette” option and changing a few basic parameters like the amount, how big the untouched middle portion should be, and how gradually the vignette should fade from the center. It’s a quick no-fuss solution that is incredibly useful for all sorts of photography situations, and if you want a bit more control you can click on the Radial Filter for a few more options.

SereteanStatueFinal

After image


SereteanStatueOriginal

Before


To do the same thing in Photoshop would require adding a special layer to your photo called an Adjustment Layer such as  Levels. Then you’d adjust the levels to darken the image in the highlights and overall, and apply a mask to the layer to only darken the outer edges. You could also change the opacity of the layer (lightening the effect) or the Blend Mode,  or you could apply a Dodge and Burn layer – and that’s just the beginning. While all these additional steps might seem hopelessly convoluted, the more you learn how to use the tools Photoshop has to offer the greater degree of control you will have over the editing process.

LightroomVignette

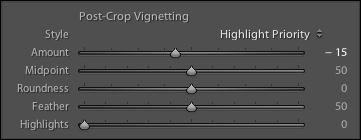
In Lightroom adding a vignette is as simple as clicking a button. In Photoshop it’s much more complicated but you get much more control as well.

With all of its options and features (including support for text, 3D graphics, and even video) Photoshop is ideal for almost any image-editing situation. Lightroom essentially distills Photoshop down to the tools that Photographers use most, which is one reason it is so appealing to many shutterbugs.

Difference #3: Workflow

Features and file options aside, the trump card that Lightroom has over its big brother involves its end-to-end workflow solution for photographers. Since it is designed specifically to address the needs of photography enthusiasts and professionals, it handles everything from importing photos from your memory card, to organizing, editing, sharing, and finally printing them. Lightroom has support for keywords and virtual folders to help you keep track of your images, and you can even use it to create a slideshow or photo book. Many photographers, even professionals, will go weeks or months without ever opening Photoshop, because Lightroom takes care of everything they need.

LightroomLibraryModule

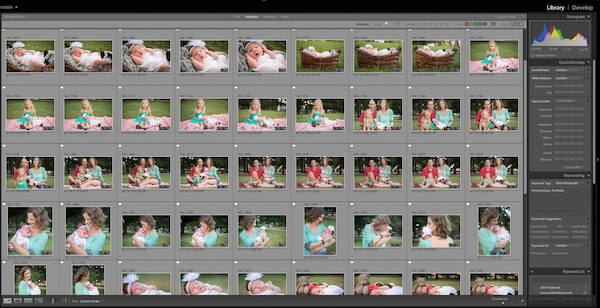
Lightroom’s Library module lets you quickly sort, organize, and manage all your photos.

On the other end of the spectrum is Photoshop which doesn’t transfer files, won’t organize your images, and certainly can’t make slide shows or photo books. But again, it’s all about the tradeoffs you are willing to accept. Nothing else can even come close to Photoshop in terms of sheer editing power. However, you can use Adobe Bridge to handle some workflow-based tasks like importing photos and organizing the digital media on your computer, which when paired with Photoshop, does offer a more comprehensive Lightroom-esque workflow experience. It’s not quite as streamlined as working in Lightroom alone, but it does provide a welcome degree of automation as opposed to manually organizing all your PSDs, JPGs, and other photos by hand.

Sometimes the best solution involves both programs. I used Lightroom to import this photo from my camera and do some basic edits, and then used Photoshop to add some more extensive tweaks.

Sometimes the best solution involves both programs. I used Lightroom to import this photo from my camera and do some basic edits and then used Photoshop to add some more extensive tweaks.

Which one is right for you?

By now you probably realize that this is a question only you can answer, and until recently it meant spending $ 150 on Lightroom or several times that amount on Photoshop. Thankfully, Adobe has made the decision much easier with its release of Creative Cloud and you can now get both programs for $ 10/month. If you don’t like the idea of subscribing to software, you can still buy Lightroom by itself, and Adobe has stated they will continue to sell the standalone version for all future versions as well.

This article could be much, much longer and in many ways it seems like I have just scratched the surface, but I hope you have a better understanding of what makes these programs similar and different.

What about you? What differences do you think are worth noting between both programs, and what purpose does each serve for you? Leave your input in the comments section below.

googletag.cmd.push(function() {
tablet_slots.push( googletag.defineSlot( “/1005424/_dPSv4_tab-all-article-bottom_(300×250)”, [300, 250], “pb-ad-78623” ).addService( googletag.pubads() ) ); googletag.pubads().enableSingleRequest();
googletag.pubads().disableInitialLoad();
googletag.pubads().collapseEmptyDivs( true );
googletag.enableServices();
} );

googletag.cmd.push( function() { googletag.display( ‘pb-ad-78623’ ); } );

googletag.cmd.push(function() {
mobile_slots.push( googletag.defineSlot( “/1005424/_dPSv4_mob-all-article-bottom_(300×250)”, [300, 250], “pb-ad-78158” ).addService( googletag.pubads() ) ); googletag.pubads().enableSingleRequest();
googletag.pubads().disableInitialLoad();
googletag.pubads().collapseEmptyDivs( true );
googletag.enableServices();
} );

googletag.cmd.push( function() { googletag.display( ‘pb-ad-78158’ ); } );

The post Understanding the Difference Between Photoshop and Lightroom by Simon Ringsmuth appeared first on Digital Photography School.


Digital Photography School

 
Comments Off on Understanding the Difference Between Photoshop and Lightroom

Posted in Photography


19. März 2015

20 Mar

Das Bild des Tages von: Johannes Huwe

16580493508 © Johannes Huwe

Im Ausblick: Schmerzliche Erinnerungen, ein Interview und Nordlichter.
kwerfeldein – Fotografie Magazin | Fotocommunity

 
Comments Off on 19. März 2015

Posted in Equipment


Atomos releases important firmware update for Shogun recorder

20 Mar

Atomos has released a major firmware update to the Atomos Shogun 4K external video recorder. The Shogun, already popular among filmmakers and professional videographers thanks to its 4K 10-bit ProRes recording capabilities, gains several important features that should appeal to motion picture shooters. The update, dubbed AtomOS6.2, adds important features such as 3D LUTs and Avid DNxHR/DNxHD recording formats. Read more

Articles: Digital Photography Review (dpreview.com)

 
Comments Off on Atomos releases important firmware update for Shogun recorder

Posted in Uncategorized


How to Organize and Photograph Events Like a Pro

19 Mar

The Main Event: How to organize and shoot events like a pro.

EVENTS MAIN

The Footy Show and image courtesy of Nine Network Australia © Gina Milicia 2015

If you own a camera and are known in your circle of friends as an enthusiast or a pro, there’s a really good chance you’ve been asked to photograph an event.

An event is basically any time a group of three or more people gather together to celebrate a milestone. This could be your best friend’s wedding, Uncle Dave’s 50th birthday, your next-door neighbor’s bar mitzvah, your cousin Maria’s engagement, a product or corporate event, or an awards ceremony. They’re all defined as events.

Event Montage

© Gina Milicia 2015

I’ve been shooting events for the last 25 years. In that time, I’ve been the official event photographer for the Australian Grand Prix, the Melbourne Cup, the Dalai Lama, Bvlgari, WWE Wrestling, the Logies (Australia’s Emmys), press conferences with rock stars, product launches for big brands, Uncle Dave’s 50th (great party!) and my cousin’s engagement.

The protocol I use to photograph events is the same for Uncle Dave’s 50th as it is for an A-list function. I’m going to share all the pre-event and event protocols, tips and techniques I’ve developed over the last 25 years – so you can photograph events like a pro too.

The “no more tears” gear check list

Rechargeable Batteries

© Gina Milicia 2015

Always ensure you have fresh batteries for your event. If you are shooting a lot of events and working with flash on-camera you may want to consider investing in rechargeable AA and AAA batteries for your flashes and other devices. They are a bit of an investment at the start, but eventually pay for themselves and are far more environmentally friendly.

“To be prepared is half the victory.” – Miguel de Cervantes

I always organize my gear the day before I shoot a big event. This is an extensive list based on all the items I’ve managed to forget over the years – and yes, there have sometimes been tears and yes, they did cause me stress.

  • Test all flashes, sync cables and radio slaves. (I once broke someone’s wedding! If you haven’t heard this story, you can relive my heartbreak here.)
  • Pack fresh batteries and spares.
  • Charge all camera batteries.
Melb Cup

© Gina Milicia 2015

In one of my early Melbourne Cup shoots, I was sent to the finish line to cover the presentation of the Melbourne Cup for its sponsor, Emirates. It had been a long day and I was still a bit green to this event caper. I completely overestimated my flash and camera’s battery lives and had to endure a stressful 30 minutes waiting to photograph “the money shot” with my camera blinking, “I’m about to die! Now feed me!”

My spare battery and charger were safely tucked away in my camera bag about 20-minute walk away. (Doh!) I managed to squeeze out five frames by turning the camera on and off. I got the shot, but it wasn’t fun.

  • Clean your lenses. Always check for dust, mould, scratches and smears. There’s nothing worse than having to retouch 300 shots because of gunk in the corner of the frame, or worse still, a large gooby that completely ruins a shot.
  • Fully charge your laptop, phone, and booster for remote locations.
  • Ensure you have all your cables, accessories and chargers for laptops, etc.
  • Pack two card readers and spare cables.
  • Carry extra memory cards and spare cards.
Cables

© Gina Milicia 2015

I once shot a wedding at a very remote Australian location. It was at the end of a long, hard week and I realized when I arrived that I had forgotten the USB cable for my card reader. I knew it was going to be a big wedding — the magazine wanted full coverage, from start to finish — and I only had enough memory cards to cover about half of it.

I sent my assistant out to the tiny country town’s shopping district in search of a cable or a card reader while I continued the pre-wedding shots. She rang every camera store within 20km (12.5 miles), but no luck. I ended up having to shoot with the limited number of memory cards I had, and treat it as if I was shooting with film.

I got there in the end, but that little oversight could’ve been very costly. Now I carry two memory card readers and put spare cables in my glove box camera bag, handbag and laptop bag.

Events 003

Nutella comes in a handy travel size. © Gina Milicia 2015

  • Put together a survival kit (water, tissues, deodorant, mints, snacks, protein bars, nuts, umbrella, blankets, spare warm clothes, and comfy shoes for the drive home). Events can go on for hours and often run over meal times. There’s nothing worse than being cold, tired, hungry or stinky at an event. Always pack an emergency kit to keep you going between meals and showers.
  • Read the run sheet, look up all shoot locations and work out the best travel routes. I always work out the best way to get to my gig the night before. Events can be stressful enough without having to worry about getting lost on the way.
  • Wash your car and fill the tank. Again, it’s all about minimizing stress. Events are usually dressy affairs, so it’s nice to turn up in a clean car. It feels better, too.
  • Pre-pack and recheck all lighting, tripods, stands, and accessories.
  • Ensure your gear is portable, lightweight and quickly and easily accessible. Here’s my personal event location kit: Roller bag, laptop, monopod or tripod, two camera bodies, 24mm-105mm f/4 lens, 70mm-200mm f/2.8 lens, 85mm lens, two speedlights, rechargeable AA batteries.
  • Have a safe spot to store the memory cards you use at the event. Mark them clearly so you don’t accidentally overwrite them.
  • Bring a hard drive for backup. If you have time and a safe place to do it, download your memory cards onto your computer and back them up at the same time. I have an in/out system that I use. Check out: Photography Workflow Tips – From Memory Card to Computer and Beyond for more info.
  • Keep drunken guests away from your table. Food and drinks don’t mix with and laptops. One spilled drink and it’s all over.
  • Don’t forget a pen and notebook to jot down important information.

Dress code

Your next clients may be among the guests at the event you’re shooting. You only have one chance to make a good impression, so make sure it’s a good one.

Events 4

© Gina Milicia 2015

I’d love to wear my favorite torn jeans and boots to every shoot I do, but I know that wouldn’t make a very good impression. I don’t want to embarrass clients by turning up in inappropriate attire, so I always check the dress code first.

I believe a good photographer should blend in with the guests. Don’t get me wrong, I’m not suggesting you turn up dressed like Paris Hilton. Rock out your own style, but maybe tone down the diamond tiara, nine-inch gold-plated heels and leopard skin jumpsuit.

Here are a few suggestions you may want to take on board:

  • Buy a great pair of really comfortable dress shoes. There’s nothing worse than wearing uncomfortable shoes on a long shoot.
  • The best color to blend in at an event is black.
  • Always carry a lint roller, safety pins, shoe polish and a sewing kit in your bag for those just in case moments. I once tore my pants just before an event.

Etiquette

Events 5

© Gina Milicia 2015

  • Never be seen eating or drinking at the event.
  • Food and drink should always be consumed away from guests (eat before you go).
  • Ask for the best place to store your gear (I often call the venue in advance to ask to have a space set up for me).
  • Don’t annoy guests and corner them and bang on with boring stories.
  • Only give out your card if somebody specifically asks for it.
  • Keep notes on a pad or your Smartphone so you can remember the names of key people.
  • Always ask guests if they mind you taking their photo. If people are deep in conversation, try and wait for a break before cutting in. This is tricky, especially for new photographers. Try, “Hello. Sorry for interrupting. Do you mind if I take a photo?” Tone is really important. Never be pushy and always have a huge smile on your face. Compliment guests on their hat, bag, shoes, or eyes, but do it sincerely.
  • If you’re working with other photographers, try and help them set up shots and work together. This is a small industry; chances are you will work together again and it’s always great to develop friendships with other photographers. This can be a lonely industry sometimes.
  • Never stand around looking bored. If you’ve run out of guests, shoot the food, band or signage.
  • Email shots of the band, flowers and food to the suppliers. This is a great way to value add for your client, a nice thing to do for the suppliers, and a great way to meet potential new clients.

Day of the event

Try and arrive 30 minutes, to an hour before the event. This will give you plenty of time to unpack your gear and compose yourself before the event starts. There’s nothing worse than arriving late and having to set up under pressure.

Do a quick reconnaissance of the location, take note of the lighting and try to pre-plan good locations for group shots and portraits. Set up your gear. Test and retest everything to make sure it’s working. Check that your memory cards are in your camera, the ISO is set to the correct setting, and your flashes are firing properly.

Read the shot list and check and double check you’re getting all your key shots. Continually refer back to this on the day. Cover every detail possible on the day: signage, food, gift bags, drinks, flowers, and table settings. This is a great opportunity to introduce your skills to other businesses, so make sure you forward these images to caterers, florists and designers.

Try and keep group shots to a maximum of five people. I often shoot people in groups of two, three and five. Take three to five frames when shooting groups of people because someone will always blink or pull a funny face. Tell the group you’ll take a few shots so they don’t look, or walk away, after the first frame. Keep talking while you’re photographing the group so you command their attention. Otherwise they’ll look the wrong way, start talking or eating, and ruin your shot.

Events 8

Using a long lens makes it really easy to capture candid images at events. © Gina Milicia 2015

People shots

Don’t be afraid to tidy people up (fix their jackets, ask them to stand in a more flattering way). Not every shot needs to be posed. Try and get a mix of candid images of people talking, laughing and enjoying the day. I find these shots are best done using a long lens when people don’t know you’re taking them. It’s very difficult to look discreet when you’re five inches away using a 28mm lens.

Try and shoot speeches with a long lens, no flash. This means you can be in a discreet position and take several shots of the speaker without annoying them with your flashes. I like to wait until the speaker looks up from their notes or smiles to acknowledge applause.

Avoid taking shots of people eating. I’ve yet to see someone who looks glamorous with a mouth full of food.

After the event

Events 6

© Gina Milicia 2015

  • Carefully back up ALL your files (Then back them up again when you get back to your office/base).
  • Do a final double check for random gear you might have left behind (I’ve lost two monopods).
  • Rehydrate and eat something before you process your files.
  • Send off any extra shots to caterers, florists or guests who may have approached you during the event.

Do you have any pre-event rituals that you use to help your day run smoothly? Is there anything I may have missed? I’d love to hear your suggestions.

googletag.cmd.push(function() {
tablet_slots.push( googletag.defineSlot( “/1005424/_dPSv4_tab-all-article-bottom_(300×250)”, [300, 250], “pb-ad-78623” ).addService( googletag.pubads() ) ); googletag.pubads().enableSingleRequest();
googletag.pubads().disableInitialLoad();
googletag.pubads().collapseEmptyDivs( true );
googletag.enableServices();
} );

googletag.cmd.push( function() { googletag.display( ‘pb-ad-78623’ ); } );

googletag.cmd.push(function() {
mobile_slots.push( googletag.defineSlot( “/1005424/_dPSv4_mob-all-article-bottom_(300×250)”, [300, 250], “pb-ad-78158” ).addService( googletag.pubads() ) ); googletag.pubads().enableSingleRequest();
googletag.pubads().disableInitialLoad();
googletag.pubads().collapseEmptyDivs( true );
googletag.enableServices();
} );

googletag.cmd.push( function() { googletag.display( ‘pb-ad-78158’ ); } );

The post How to Organize and Photograph Events Like a Pro by Gina Milicia appeared first on Digital Photography School.


Digital Photography School

 
Comments Off on How to Organize and Photograph Events Like a Pro

Posted in Photography