RSS
 

Archive for January, 2015

4 Ways to Use the Warp Command in Photoshop

27 Jan
Custom-mode-warp-command

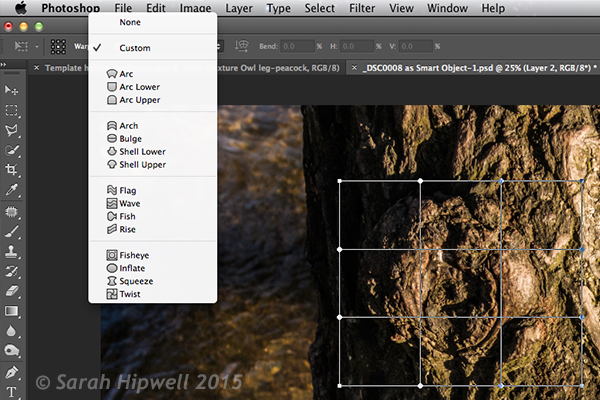
Warp command in Photoshop, showing the grid over a selection and the presets

What is Warp?

The Warp command was introduced in Photoshop CS2 along with Vanishing point feature. This meant an image, or part of one, could now be distorted or transformed into a new shape. You may have seen popular online tutorials where the warp command was used to create a realistic page curl in Photoshop?

How useful is the Warp Command as a photographer?

Honestly, to answer this question it will depend on the type of photography you specialize in, and to what degree you post-process your images. For a lot of photographers, the less time in front of the computer editing the better. I include myself in this group. That said, I rarely get that perfect in-camera shot that requires minimal processing after the fact. If you composite images together, do a lot of retouching, or you just simply want to know what this command does in Photoshop, then read on. I’ve put together five tips that you may find useful.

How do you access the Warp Command?

To access the Warp Command, you need to first have a selection or a layer selected (you cannot use your background layer, you must duplicate it first). Go up to Edit>Transform>Warp.

Screen Shot 2015-01-09 at 8.02.21 PM

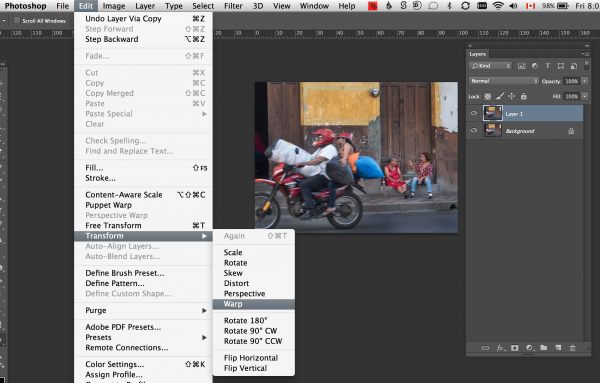
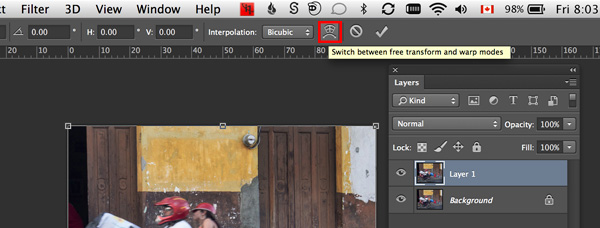
Alternatively, CMD+T on a Mac or CTRL+T on a PC. This brings up the Free Transform command. Click on the Warp mode button in the tool Options bar or right click within the Free Transform bounding box.

warp-mode-toggle

A grid with nine boxes appears with control points on the perimeter. The four corner square control points are similar to the bezier handles when using the pen tool. As you drag on those points, the handles appear. You can drag on the other points, and within the boxes to change the shape of the selection in any direction. There are also a number of built-in presets (see below).

Custom-mode-warp-command


Are the Puppet Tool or Liquify Filter alternatives to the Warp Command?

Well not exactly. Both have their merits when it comes to distortion but each have their own characteristics and differ again to the Warp Command. The Puppet Warp tool allows you to place points or pins systematically around a displayed mesh (polygons) which will create bending or warping points. The object or subject selected must be isolated from the background first. Puppet Warp can also be applied to a Smart Object.

The Liquify Filter will work on ordinary layers but If you convert your layer to a Smart Object, then the Liquify Filter won’t work in Photoshop versions up to CS6. However, Liquify does work with Smart Objects in Photoshop CC. The Liquify filter takes a bit of getting used to. When you open it, a separate dialog box appears, like a plug-in of sorts with its own set of warp tools. It works on pushing and pulling the pixels around, similar to a smear effect.

4 Ways of using the Warp Command

1. Wrapping

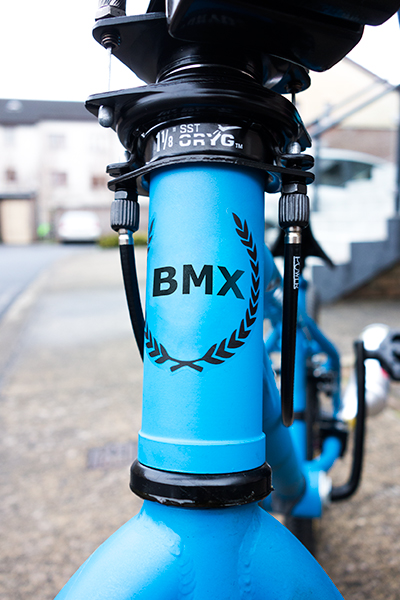
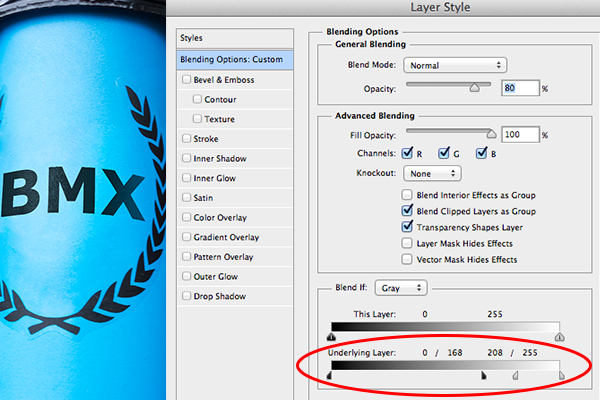
The Warp Command is great for wrapping text, logos, or even textures around cylindrical objects such as bottles to give it that 3-D look. For example, a bike has a lot of cylindrical shapes on it, the front forks, frame, etc. So any logos on a bike will look bendy to fit the shape it sits on. In the photo of the BMX bike which I deliberately shot wide(focal length-10mm) to emphasize the cylindrical shape of the tube. I removed part of the existing logo to illustrate how I wrapped some text around the front tube. Type ‘BMX’ on a separate later and convert this to a smart object. You will need to do this to access the custom mode of the Warp Command. By using the existing Logo as a guide, I was able to warp ‘BMX’ in place. I then applied the Blend-if layer style to the underlying layer to give it a more authentic look.

bmx-bike

A wide angle shot of a BMX type bike

bmx-logo-removed

I removed the centre part of the logo on the bike

text-wrapped-bmx-bike

I wrapped the letters ‘BMX’ around the front tube area of the bike using the Warp Command

Blend-if-mode-applied-to-BMX

Holding down the ALT key on Mac, Option key on a PC, will split the slider arrows to get a finer adjustment.

The Warp Command can also be used to wrap texture around an object.

Owl-peacock-texture-wrapped-around-leg

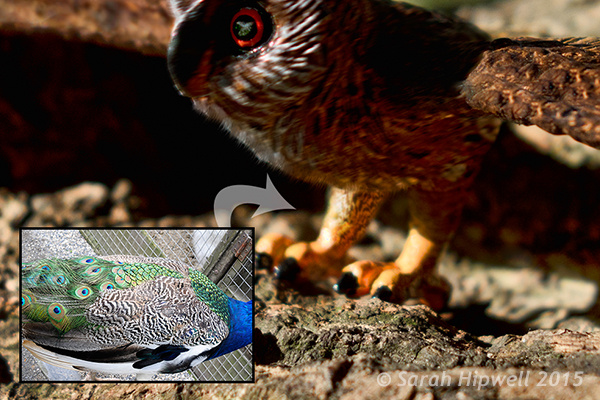
I used an image of a Peacock to add texture and realism to the owl’s leg

2. Duplicating a similar element in an image and distorting it to make it look different

When you use the Clone Tool to replicate a similar object or element in an image, it does a fantastic job. However, if you don’t want the cloned look, this is where the Warp Command is great for changing the shape of a duplicated element in an image, to give the appearance of a completely different one. I found this particularly useful when I used the same heron claw to replicate four Owl’s talons.

Owl-with-Heron-talons

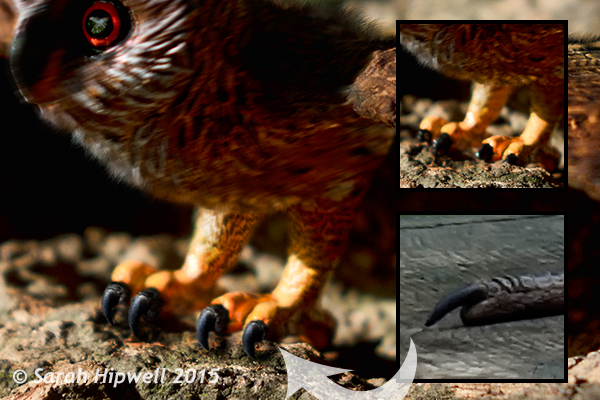
I used the same heron claw to manipulate four owl talons

3. Retouching – adding elements

Retouching an image can mean many things. Usually, it means removing or taking away parts of a photo so that the final image looks better. This includes removing imperfections and blemishes from a model or subject’s skin. It could also mean removing distracting elements from a photo, and the list goes on.

But what about adding to an image to enhance it? For example, you have a shot of a subject but you want to add volume to his or her hair. You can do this using the Warp Command by selecting part of their existing hair. Put the selection on a separate layer, make sure you convert that layer to a Smart Object (working non-destructively). You will then need to apply a layer mask to hide hard seams or obvious cloned areas.

Jacket-original

Photo of a jacket with a fur hood

Jacket-hood-fuller

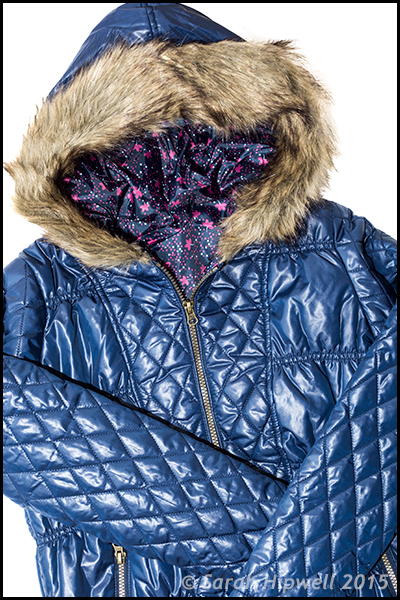
This is the same jacket but I’ve added more volume of fur to the hood by using the Warp Command

4. Retouching – removing things

The Liquify Filter is a choice for many retouchers. It is very powerful, but as I mentioned before, it does take a bit of mastering and Smart Objects cannot be applied to this filter, unless of course you use Photoshop CC. I find the Warp Command quick and easy to use. It does a great job of slimming areas on the body. Sometimes due to the angle of how a model or subject was photographed, it might require that you raise or lower a shoulder, for example to give symmetry or balance to the shot.

Take the Love Handles for example in the photo below. Make a quick selection using the Marquee Tool. Use CMD+J on a Mac or CTRL+J on a PC. This puts the selection on its own layer. Right click on the layer and convert it to a Smart Object. Hit CMD+T/CTRL+T, to bring up the Free Transform Tool, then click on the Warp mode button in the Options bar. Distort just enough to keep it real. Add a layer mask to hide any hard seams.

Love-handles

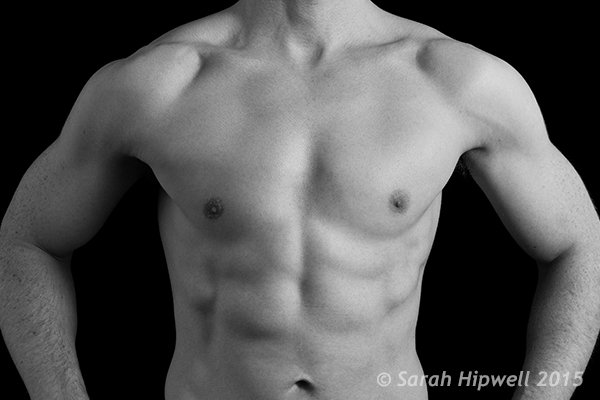
Even sport models can have slight ‘Love Handles’

Love-handles-removed

Love Handles removed using Warp

Warp-grid-love-handles

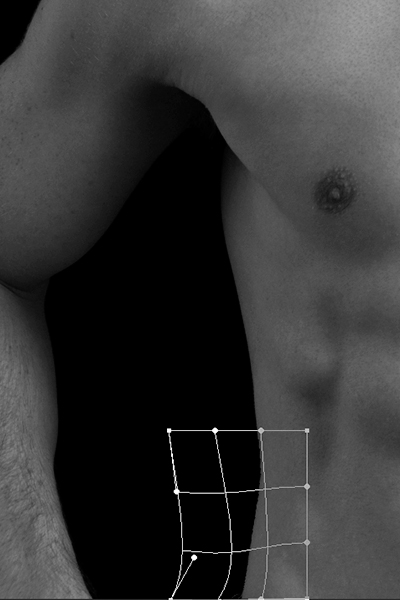
Careful nudging of the Warp Command to get rid of Love Handles

When using any of the distortion tools or commands in Photoshop, do so with restraint. A slight adjustment is often all that is required. It is this small change that can sometimes add a big difference to your image.

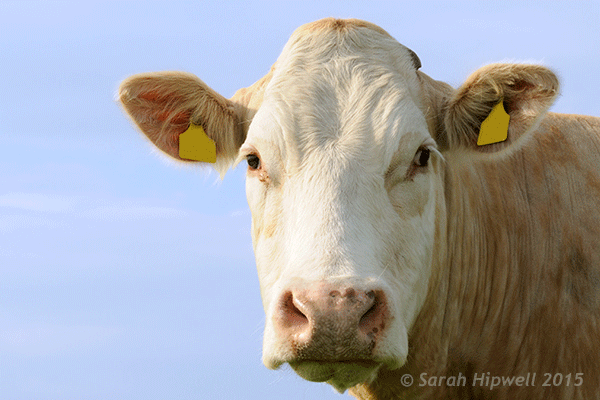
Just for a bit of fun, I produced the animated cow.gif to illustrate a slight adjustment where I made the nose smaller. I then went on to show no restraint by enlarging the eyes and making the jowls slimmer!

cow

googletag.cmd.push(function() {
tablet_slots.push( googletag.defineSlot( “/1005424/_dPSv4_tab-all-article-bottom_(300×250)”, [300, 250], “pb-ad-78623” ).addService( googletag.pubads() ) ); } );

googletag.cmd.push(function() {
mobile_slots.push( googletag.defineSlot( “/1005424/_dPSv4_mob-all-article-bottom_(300×250)”, [300, 250], “pb-ad-78158” ).addService( googletag.pubads() ) ); } );

The post 4 Ways to Use the Warp Command in Photoshop by Sarah Hipwell appeared first on Digital Photography School.


Digital Photography School

 
Comments Off on 4 Ways to Use the Warp Command in Photoshop

Posted in Photography


Learn From The Masters: Adams To Meatyard

26 Jan

The Masters


Hey FashionPhotographyBlog.com readers!


Need some inspiration? Look no further! Here are a few of the Masters of Photography. Tried and true, these men have stood the test of time. I’m a firm believer that you can’t call yourself a photographer unless you study the history of the medium and have an understanding of the masters – who they are and what they did that sets them apart from the rest. In my opinion, this applies to all areas of life, so here’s a cheat sheet to those commonly referred to as “The Masters.”  Who they are, what they did (and why they’re so awesome). I’ll even make it easy for you – they’re sorted alphabetically.


Ansel Adams


Adams, an environmentalist and symbol of the American West, is best known for his black and white landscapes. Adams initially developed the “Zone System,” a technique of determining exposure, development and contrast, to help his students create optimal prints. This technique became indicative of Adam’s style and results in the images we all known and love. Ansel Adams shot using a large format camera and is a founding member of “Group f/64″ – a group of “Modernist” photographers that shared a sense of style characterized by sharp-focus (largely uncommon at the time).

The work of Ansel Adams featured on Fashion Photography Blog (FashionPhotographyBlog.com)


Richard Avedon


Most well known for his images of fashion and portraiture, Avedon became an icon in the later half of the 20th century. Avedon is the master of minimalism, known for well lit portraits in front of a white background. Using the large format camera to his advantage, Avedon would use the time it took to compose a shot to get into his subjects head and pull out emotions that typically aren’t photographed by anyone but Avedon.


Along with Avedon’s work for all the big fashion magazines and designers, he is known for his series, “In The American West,” where he traveled the rural American West with a portable studio and typically used a large format camera, the sun and a white background to create some of his most iconic images. If you ever have the opportunity to see an Avedon print in person, seize it! His prints are beautiful. You can get lost in them. Be sure to take notice of the depth of field and tonal ranges.


 The work of Richard Avdeon (Davima with Elephants) featured on Fashion Photography Blog (FashionPhotographyBlog.com)

 The work of Richard Avdeon (West) featured on Fashion Photography Blog (FashionPhotographyBlog.com)

From “In the American West”


Bernd & Hilla Becher


A married German photography team, Bernd and Hilla Becher are known for their series of structures arranged in grids, referred to as “typologies”. They come from a school of “straight” photography, which depicts a scene as objectively as possible.


The Becher’s have also left their mark on photography through their teaching. Mentors to some other big names in photography such as Andreas GurskyThomas Ruff and Thomas Struth (check them out!) they’re considered one of the biggest influences in the history of photography.


 The work of Bernd & Hilla Becher featured on Fashion Photography Blog (FashionPhotographyBlog.com)


Henri Cartier Bresson


Considered to be the father of modern photojournalism, Bresson is known for coining the term “the decisive moment”. Bresson is known for developing a unique style of street photography that has influenced photographers to this very day. Bresson was a believer of composing his images, in camera, not in the darkroom and was an avid user of Leica 35 mm cameras, shooting only black and white film.


The work of Henri Cartier Bresson (Hyeres) featured on Fashion Photography Blog (FashionPhotographyBlog.com)
The work of Henri Cartier Bresson (Gare) featured on Fashion Photography Blog (FashionPhotographyBlog.com)

William Eggleston


Eggleston is one of two fathers of color photography. He is known for his aesthetic which transforms ordinary, mundane subjects into something extraordinary – by elevating the color to be the true subject due to the simplicity of his tangible subject.

The work of William Eggleston featured on Fashion Photography Blog (FashionPhotographyBlog.com) 
The work of William Eggleston featured on Fashion Photography Blog (FashionPhotographyBlog.com)


Walker Evans


Evans is most well known for his work documenting the Great Depression for the Farm Security Administration. Evans’ finds success in the fact that his images are relatively “objective” – well, as objective as a photographer can be.

The work of Walker Evans featured on Fashion Photography Blog (FashionPhotographyBlog.com)


Robert Mapplethorpe


Mapplethorpe is known for his huge black and white images of flowers and nudes. The homoeroticism and sexual energy apparent in Mapplethrope’s work has evoked quite some criticism and controversy.


The work of Robert Mapplethorpe featured on Fashion Photography Blog (FashionPhotographyBlog.com)
 The work of Robert Mapplethorpe featured on Fashion Photography Blog (FashionPhotographyBlog.com)

Ralph Eugene Meatyard


Meatyard is famous for his somewhat haunting images of masked people, most commonly children.  According to Meatyard, he felt that all people are connected and when you don a mask, it removes any differences.  Consider his work somewhat of a commentary on connectivity and individuality.  Despite declaring himself a “dedicated amateur,” Meatyard had been noticed in serious photography circles.  Unfortunately he died of cancer before the age of 50, with only around 14 years of photography under his belt.

 The work of Ralph Eugene Meatyard featured on Fashion Photography Blog (FashionPhotographyBlog.com)


Stay tuned for part two of the Masters coming up soon!


– Alana


Did you find Alana’s post about the Masters of Photography interesting useful? Do you agree with the selection? Is there any that you would add as your inspiration? Please leave your comments below in the comment section. We would like to know what you thought about this post. If you enjoyed this article, don’t go away as Alana has another post with even more photographic masters just around the corner on FashionPhotograhyBlog.comIf you want more photographic inspiration, check our post “My Top 10 Favorite Photographers“.


IMAGE SOURCE: 

Feature image & images 1: courtesy of Alana Tyler Slutsky.


Fashion Photography Blog

 
Comments Off on Learn From The Masters: Adams To Meatyard

Posted in Uncategorized


Unendliche Weite – Europas letzte Wildnis

26 Jan

© Patrik Spiesecke

Ein Beitrag von: Patrik Spiesecke

2.650 Kilometer. Diese Zahl sprang uns ins Auge, als wir unserer Reiseziel Kvikkjokk im Navi meines Autos eingaben. Anfang September 2014 begann unsere Reise zum Sarek Nationalpark in Schweden. Schon öfter war ich zuvor in Schweden gewesen und jedes Mal faszinierte mich dieses Land mit seinen großen Wäldern und zahlreichen Seen mehr. Somit war es nur eine Frage der Zeit, bis mich die Abenteuerlust auch in den wildesten Teil dieses Landes zog.

Schon zu Beginn der Planung war klar: Nicht allein und auch nicht ohne meine Kameraausrüstung! Schnell hatte ich auch meine beiden besten Freunde begeistern können, mit auf dieses Abenteuer zu gehen. Denn auch wenn der Sarek in Europa liegt, eine Reise dorthin ist nicht zu unterschätzen. Wanderwege sucht man vergebens, sein Handy hält man umsonst in den Himmel und Unterkünfte im Nationalpark gibt es nicht. Das heißt, man ist unterwegs ganz auf sich allein gestellt.

Somit ist auch klar, dass alles, was man mitnehmen möchte, einen die ganze Zeit begleiten wird. Jedes Gramm mehr wird man am Ende der Reise spüren und verfluchen. Das hieß auch, dass meine Kameraausrüstung abnehmen musste. Mit kam nur, was wirklich mit musste: Kamera, ein paar Akkus, Speicherkarten, ein Objektiv, ein kleines Stativ (das ich letztlich doch nicht brauchte) und die Kameratasche. Bei dem Objektiv fiel die Wahl auf das leichte Canon EFs 10 – 18 mm, da klar war, dass ich nur Landschaftsaufnahmen machen würde.

Eine Straße durch die Natur.

Wir kamen, nach über 30 Stunden im Auto, spät in der Nacht in Kvikkjokk an. Es regnete. Bis zum Morgen verbrachten wir die Zeit im Auto und versuchten, noch ein paar Stündchen zu schlafen. Am Morgen holte uns Björn, der in Kvikkjokk lebt, ab, um uns über den Gamajåhkå zu fahren.

Dies hatte ich zuvor mit ihm telefonisch ausgemacht. Es hatte etwas von „Ausgesetzt in der Wildnis“, als er uns mit seinem kleinen Boot über den Fluss fuhr und uns an der anderen Uferseite absetzte. Nun gab es kein Zurück mehr!

Zum Glück hatte es aufgehört zu regnen und die Stimmung war nicht mehr ganz so bedrückend. Zunächst sahen wir nicht viel von der letzten Wildnis. Ein schmaler Pfad führte durch den Wald den Berg hinauf. Es war Herbst im Sarek, anders als in Deutschland hatten die Bäume schon ihr Herbstkleid angelegt.

Wir kämpften uns auf ca. 700 Meter über Null, als der Wald langsam lichter wurde und wir am Gipfel des Hochplateaus ankamen. Hier verlor sich der kleine Pfad und es waren für lange Zeit die letzten Spuren der Zivilisation, die wir sahen.

Landschaft mit blauem Himmel und dem Schatten des Fotografen.

Da war sie! Die Wildnis! Die Ruhe! Die Weite! Die – was ist das? Gleich zu Anfang blickten uns etwa 20 Rentiere in die Augen. Irgendwie bedrückend. Vor lauter Erstaunen über diese tollen Tiere vergaß ich total, meine Kamera aus dem Rucksack zu holen. Denn die hatte ich noch immer dort verstaut. Im Laufe der Reise wurden die Begegnungen mit den Tieren allerdings zum Alltag und wir gewöhnten uns schnell an ihre Anwesenheit.

Erst nachdem wir noch ein paar Kilometer weiter liefen und wir einen Platz für unser Zelt gefunden hatten, fand ich die Ruhe, meine Kamera auszupacken, um endlich ein paar Fotos zu machen. Von nun an trug ich die Kamera immer vor meiner Brust, sicher verstaut in meinem ThinkTank-Holster. Denn hinten im Rucksack wird es mit der Zeit viel zu müßig, sie immer wieder rauszukramen.

Klar, irgendwann kann es auch echt nervig sein, immer dieses Ding vor der Brust zu tragen, aber letztendlich ist es die einfachste Lösung, schnell an seine Kamera zu kommen. Denn wer schon einmal einen 25-kg-Trekkingrucksack ständig auf- und abgesetzt hat, weiß, wovon ich spreche.

Ein Zelt in einer wilden Landschaft.

Ein weiterer Vorteil, den die Aufbewahrung vor der Brust mit sich bringt, ist, dass die Kamera stets sicher und trocken verstaut ist. Auch bei Regen kann man so die Kamera schnell mal rauszücken und genauso schnell wieder verschwinden lassen. Echt praktisch. Gerade im Sarek, wo sich die Wetterlage alle fünf Minuten ändert.

Ausgeschlafen sollte es am nächsten Morgen tiefer in den Sarek gehen. Laut Landkarte, denn ein Navi hatten wir nicht mit, standen uns rund 20 Kilometer bevor. Zu dem Zeitpunkt dachten wir noch, ein entspannter Tag läge vor uns. Dass dieser Tag allerdings alles andere als entspannt werden würde, ahnten wir nach den ersten zwei Kilometern.

Denn auch, wenn auf den Bildern nicht zu erkennen, glich die Landschaft vor uns einem kleinen Mond und das Tal, das wir durchquerten, bestand im Grunde nur aus Felsblöcken. So etwas hatte ich zuvor noch nie in solch einer Dimension gesehen. Wahnsinn! Als hätte jemand einen ganzen Berg zersprengt. Dazu kam die Sorge, dass irgendwem irgendetwas passiert.

Ein Wanderer auf felsigem Boden.

Felsige Landschaft

Gegen Abend erreichten wir letztlich doch sicher und unversehrt unser Ziel am Fuße des Habrés. Noch kurz bevor der Regen einsetzte, hatten wir unser Zelt aufgestellt und uns für den Abend vorbereitet. Frisches Wasser geholt, das Abendbrot vorbereitet und die Schlafplätze hergerichtet. An diesem Ablauf änderte sich auch die nächsten acht Tage nichts. Irgendwie spielt sich so etwas schnell ein.

Die ganze Nacht hindurch regnete es. Immer wieder wurde ich wach und versicherte mich, dass noch alles trocken ist. Unsere Rucksäcke fanden im Vorzelt ihren Platz. Meine Kamera allerdings hatte ich unten bei meinen Füßen verstaut. Irgendwie war mir das doch lieber.

Rotes Zelt in der Landschaft.

Als ich am nächsten Morgen das Zelt öffnete, blickte ich gegen eine graue Wand aus Nebel. Es hatte aufgehört zu regnen und der dichte Nebel verwandelte die Landschaft in eine schaurige Umgebung.

Leichter Nebel in felsiger Landschaft.

Den ganzen Tag löste sich der Nebel nicht auf. Erst gegen Abend, als wir erschöpft unseren dritten Lagerplatz erreichten, brach der Nebel auf. Das lag wohl am sehr starken Westwind. Nur mit Mühe konnten wir unser Zelt dieses Mal aufschlagen und es sicher im Boden verankern. Meist war es aufgrund der vielen Steine auch gar nicht so leicht, einen geeigneten Platz für unser Zelt zu finden.

Geweih vor nebliger düsterer Landschaft.

Am nächsten Tag, als wir gerade ein paar Meter unterwegs waren, fand ich dieses tolle Geweih am Boden liegen. Mit den vorbeiziehenden Wolken im Hintergrund ist es eines meiner Lieblingsbilder der gesamten Reise geworden, denn es zeigt einfach eindrucksvoll, wie wild und frei der Sarek heute noch ist und erinnert mich persönlich daran, wie zerbrechlich dieses gesamte Ökosystem ist. Daher appelliere ich an dieser Stelle an alle, die auch auf eine solche Reise gehen, verantwortungsvoll mit der Natur umzugehen und diese zu schützen!

Landschaft mit klarem blauen Himmel.

Die nächsten Tage passierten wir immer wieder große Blockfelder, Flüsse, steile Abhänge, weite Feuchtgebiete, Schneebrücken und dichtes Unterholz in den Tälern.

Mann mit roter Jacke an einem See.

Blick auf ein Flussbett und im Hintergrund ein Berg.

Durch die vielen Berge, die weiten Hochplateaus und die tiefen Täler bietet einem der Sarek eine Vielzahl von Motiven. Das raue und sich ständig wechselnde Wetter tragen ihr übriges zu den stimmungsvollen Bildern bei. Um meine Ausrüstung habe ich mir dabei nie Sorgen gemacht. Ich fotografiere mit der Canon 7D. Bei Regen, Sonne und Kälte. Bislang ohne große Vorsichtsmaßnahmen. Noch immer leistet sie die gleich gute Arbeit wie am ersten Tag.

See mit blauem Himmel.Zwei Wanderer.

Nach acht spannenden Tagen und Nächten erreichten wir nach zahlreichen Hindernissen wieder mein Auto. Wir waren froh, wieder festen Boden unter den Füßen zu haben, aber allen war klar: Sarek … wir sehen uns schon bald wieder!

Ich glaube, wer diese Strapazen einmal mitgemacht hat und als Belohnung dieses atemberaubende Gefühl von Freiheit erlebt hat, kommt davon nicht mehr los.

Bei der nächsten Reise werde ich allerdings den Fokus ganz klar noch mehr auf die Fotografie legen. Ich war oft einfach viel zu sehr von allem geflasht, als dass ich mich auf die Fotografie hätte konzentrieren können. Dies wird einem aber auch erst am Ende der Reise oder gar erst zuhause richtig bewusst.


kwerfeldein – Fotografie Magazin | Fotocommunity

 
Comments Off on Unendliche Weite – Europas letzte Wildnis

Posted in Equipment


Sunset Over West Maui

26 Jan
Sunset Over West Maui

Sunset light illuminates clouds over west Maui

This was taken on a trip a year back atop the peak of Haleakala. While many are lured to this location to see the sunrise one should not miss sunsets either. It’s not everyday you get to sit a top the world and see for up to 30 miles or more in every direction. While driving here with my son he wisely stated, “This volcano is too big!” It is gigantic (10,023 feet above sea level) and amazing even more when you think how far down it goes below the ocean (28,227 feet from the ocean floor). It’s only rivaled by Mauna Kea on the big Island of Hawaii, which by chance you can see looking in the opposite direction from this view.

Copyright Jim M. Goldstein, All Rights Reserved

Sunset Over West Maui

The post Sunset Over West Maui appeared first on JMG-Galleries – Landscape, Nature & Travel Photography.


Related Stories

  • Sunset Over West Maui – Enclosure
  • Haleakala Anti-Crepuscular Rays – Enclosure
  • Haleakala Anti-Crepuscular Rays
Feed Ads by FeedBlitz
powered by ad choices


JMG-Galleries

 
Comments Off on Sunset Over West Maui

Posted in Equipment


Fujifilm X-T1 Firmware Update: New Features

26 Jan

Fujifilm X-T1 firmware upgrade

In December 2014 Fujifilm released the latest firmware upgrade (version 3.00) for its X-T1 camera. More than a minor upgrade, the new firmware adds a number of new features that greatly enhance the camera’s capabilities. Let’s take a look at ones most likely to be of interest to X-T1 owners.

By the way, if you’d like to learn more about firmware (for all makes of camera) then read our article Updating Your Camera’s Firmware – What is it and Why It’s Important.

Electronic Shutter

A new electronic shutter allows you to take photos at shutter speeds of up to 1/32000 second (the fastest mechanical shutter speed available is 1/4000 second). This enables you to take photos in bright light with prime lenses at wide aperture settings, something the lowest available ISO speed of 200 (when shooting Raw) makes difficult.

Sports and action photographers shouldn’t get too excited though, as the rolling shutter effect may cause distortion in moving subjects.

Another advantage of the electronic shutter is that it is completely silent, something that street photographers (and others who prefer to work unobtrusively) may appreciate.

AF+MF

The X-T1’s autofocus is extremely accurate but there may be times when you want to override it. Now you can do so by enabling the new AF+MF feature. When it’s activated (you need to be in AF-S mode) press the shutter button half-way down to activate autofocus, then turn the focus ring on the lens to override the camera. Essentially, it lets you switch from auto focus to manual focus without having to move the Focus mode selector.

This will help you out in those rare instances when the camera’s autofocus fails to lock on the subject, or if you want to shift the point of focus (perhaps to utilize the depth-of-field bar that appears in the viewfinder).

Classic Chrome Film Simulation

Film Simulation settings are one of the strengths of the Fujifilm system and they seem to have been thought through a bit better than the equivalent settings from other manufacturers. The result is that the Fujifilm cameras have gained a reputation for creating excellent quality JPEG files.

Classic Chrome is Fujifilm’s latest Film Simulation setting, giving a faded, slightly vintage, high contrast look to the photo that you might expect from an older type of slide film.

Classic Chrome is also available in the latest versions of Lightroom and Adobe Camera Raw.

Fujifilm X-T1 firmware upgrade

A photo processed using the Velvia Film Simulation setting.

Fujifilm X-T1 firmware upgrade

A photo processed using the Classic Chrome Film Simulation setting. Note the difference in the hue and saturation of the colours. 

Natural Live View

The view of the subject seen through the X-T1’s electronic viewfinder (or on the LCD screen in Live View) is affected by the white balance and Film Simulation settings selected by you, the photographer. While this may help you visualize how the final photo will look, I’m sure you may miss the neutral view presented by optical viewfinders. Natural Live View fixes this by giving you a neutral view of the scene unaffected by Film Simulation, contrast or white balance settings.

The new EVF Color and LCD Color menu options also lets you change the hue of the electronic viewfinder or LCD screens.

Quicker Access to AF Frame Buttons

Now you can switch the active autofocus frame using the four selector buttons on the back of the camera, without having to press the bottom button beforehand. This makes adjusting the AF frame while looking through the viewfinder much easier.

The only downside is that the selector buttons can no longer be used to access functions such as white balance and Film Simulation selection. You can compensate for that by adding them to the Quick menu.

Fujifilm X-T1 firmware upgrade

With the new firmware upgrade, you can select the active autofocus frame using the four selector buttons, without having to press any other buttons first.

Customized Quick Menu Layout

Pressing the Q button on the back of the camera brings up a Quick menu with sixteen functions. The idea of the Quick menu is to give you rapid access to the most used menu items without having to navigate your way through the camera’s menu system. Now, with the latest firmware upgrade, you can choose which functions (from a list of 25) you’d like to appear in the Quick menu, and which order they are displayed in.

Fujifilm X-T1 firmware upgrade

The default Quick menu displayed with earlier firmware versions. After upgrading to version 3.00 you can customize the Quick menu with the settings you need to access the most.

More New Features

The full list of new features is available on the Fujifilm website.

Which firmware version do I have?

To see which firmware version your X-T1 camera has (I believe this works for all Fujifilm cameras) turn the camera off, hold down the Disp/Back button and turn the camera back on. The camera displays the currently installed firmware versions for both the body and lens.

Fujifilm X-T1 firmware upgrade

This Fujifilm X-T1 has firmware version 1.10 installed, and hasn’t yet been upgraded to the new firmware.

How do I install new firmware?

Start by going to this page on the Fujifilm website, scrolling to the bottom and clicking I Agree. You can download the new firmware file on the next page, which also contains instructions on how to load it into your camera. You’ll need a newly formatted memory card to do so.

Have you tried out the firmware update for the Fujifilm X-T1 yet? Please let us know what you think of it in the comments.


Mastering PhotographyComposition and line

My ebook Mastering Photography: A Beginner’s Guide to Using Digital Cameras introduces you to digital photography and helps you make the most out of your digital cameras. It covers concepts such as lighting and composition as well as the camera settings you need to master to take photos like the ones in this article.

googletag.cmd.push(function() {
tablet_slots.push( googletag.defineSlot( “/1005424/_dPSv4_tab-all-article-bottom_(300×250)”, [300, 250], “pb-ad-78623” ).addService( googletag.pubads() ) ); } );

googletag.cmd.push(function() {
mobile_slots.push( googletag.defineSlot( “/1005424/_dPSv4_mob-all-article-bottom_(300×250)”, [300, 250], “pb-ad-78158” ).addService( googletag.pubads() ) ); } );

The post Fujifilm X-T1 Firmware Update: New Features by Andrew S. Gibson appeared first on Digital Photography School.


Digital Photography School

 
Comments Off on Fujifilm X-T1 Firmware Update: New Features

Posted in Photography


Using Low Key Lighting in Your Portraits: Getting Moody On the Down Low

26 Jan

So you’ve been shooting for a while and you want to add a little more visual oomph to your shots, why not try a little low key? Low key lighting is a classic technique, a la where you use shadow and high contrast to show the shape of your model. Making the background dark can be super complicated or super Continue Reading

The post Using Low Key Lighting in Your Portraits: Getting Moody On the Down Low appeared first on Photodoto.


Photodoto

 
Comments Off on Using Low Key Lighting in Your Portraits: Getting Moody On the Down Low

Posted in Photography


Power up as you pedal with Ride-a-long

26 Jan

Extra photos for bloggers: 1, 2, 3

You know what would be awesome, other than laundry elves? A biking fairy that magically charges your phone as you ride.

The Ride-a-long is your non-magical and very real biking buddy that converts your leg work into juice for your phone. You’ll never have to worry about losing photo power on a ride again!

If your device is USB compatible, then it is Ride-a-long compatible. You can even detach the battery pack from your bike and take it with you for a power boost on pedestrian adventures.

Clap your hands if you believe in fairies … okay, actually put them back on the handlebars, you’ve got a ride to finish and a phone to charge!

Roll on over to grab your Ride-a-long
$ 129 at the Photojojo Shop


© Erin for Photojojo, 2015. |
Permalink |
No comment |
Add to
del.icio.us

Post tags:


Photojojo

 
Comments Off on Power up as you pedal with Ride-a-long

Posted in Equipment


6 Steps to Growing Your Photography Business Using a Recommended Vendors List

26 Jan

In this article I talk about a technique used in all types of business, but of course will relate it to photography. To make it easy to understand, I am going to discuss the technique specifically for wedding photographers. But it is important to know that the technique you will learn in this article can work for any type of photography niche or genre.

Wedding cake

Utilizing a business partner vendor list to grow your business

How so? By creating something of value to offer website visitors, which will in turn get them to give you their name and email address. When someone offers you contact information in exchange for something of value, they are now considered a lead. From there you have the potential to convert that lead into a paying customer.

Let’s break it down piece by piece. I’ll start with a list and then talk about each individually:

  1. Create a PDF document that is attractive to your potential customers. This PDF is intended to act as a conversion tool – a free offer.
  2. The offer utilizes a business partner vendor list by recommending preferred and partner vendors. This helps add more value to the download and also improves the relationship between you and the vendor.
  3. Create a way for site visitors to enter their contact information on a landing page, a magnetic spot like blog sidebars, or a pop-up box.
  4. Capture emails of website visitors, which then turn into quality leads (because they downloaded something specifically for their intention of hiring a photographer).
  5. The vendors included in the document are also likely to further promote the document.
  6. You now have huge potential of converting those leads into customers, via phone calls and email marketing.

Now let’s get into the nitty-gritty of each of those points. As mentioned earlier, this is geared to wedding photography. So if you are not a wedding photographer, take all I am saying and relate it to the type of photography you do.

Step one – create a PDF

The first step is to come up with a PDF document which you can offer for free on your website. Ideally it will contain everything that your potential customer would need to know about planning a wedding. It’s important that the document is branded to your business, and has an attractive design overall. You can use your letterhead (with logo of course), or a pre-made design for the task at hand (which I have made available) or templates from Keynote or PowerPoint. The important part is that your branding is in the design and that it won’t turn people away by looking unprofessional.

Photographer free pdf

Step two – utilize your list

Inside the PDF categorize it for different types of vendors. You may have a page of florists, and another for wedding venues that you recommend. Ideally make each a two-page spread if possible. One page would provide the information on the vendors, and the other page would contain your photography examples related to the vendor. Think of it like a portfolio of your best work combined with your recommended vendor list.

The beauty of this is that you are getting your photographs in front of couples planning their wedding. Your brand is there as well vendors, which the couple might also hire.

Step three – create the opt-in

Next up is creating a way convert website visitors into leads. This is a bigger section due to the complexity. By this point you will have already created the PDF, which leads will download. But the process of gathering the email addresses confuses many people.

The first step is to use an email marketing service like Mailchimp or Aweber. Both are fantastic. I personally use Mailchimp for its ease of use and pricing.

Both services offer a feature, which can automatically send emails based on certain actions. In Mailchimp it is called Automation, in Aweber it’s called Follow Up Series. There you will set up an automated email, which will be sent to anyone who signs up for the “Free PDF” list that you will have created. Definitely name the list something you will recognize immediately when logging into your account.

These services allow you to attach a PDF to an email, which is what I recommend. But if you are using a service that does not allow attachments then create a Dropbox or Google Drive link and include that in the email.

This is where the fun part starts. There are many places where you can place what’s called an opt-in form. That means, a form which asks a website visitors for a name and email address, or any other information you want to request like a phone number.
Note that the less information you request the higher your conversion rate will be – meaning, the more people will fill it out. So I typically ask for email addresses only (you will see why later).

The first place you want to place the opt-in form is on a landing page specific to the free PDF. The benefit of having a unique page for the document is connected to SEO (search engine optimization). A dedicated page can be filled with additional text and image content optimized to rank well on search engines. It can also increase the conversion rate (percentage of people who sign up compared to number of page visits) for the opt-in because there are no distractions from blog articles or other content available only your website. Services like Mailchimp and Aweber offer embed codes for your opt-in forms. You use it like you were copying and pasting HTML from YouTube, Vimeo or 500px.

The second place you can have the opt-in form is on your blog’s sidebar, or in a pop-up form. These are called magnetic areas because they draw the attention of a visitor’s eye directly to them. There are a few ways you can do the magnetic opt-ins. For sidebars you can use the standard embed code. Some services offer pop-up codes as well. For WordPress sites I recommend services like OptinMonster or Pippity, which come with many design options as well as timing and split testing so you can see what converts the best. I have helped a many photographers with this method.

Optinmonster

Step four – leads versus quality leads

Now that you have the PDF done, and everything set up for visitors to convert into leads – it is important to note the difference between a lead and a quality lead.

A lead is anyone who contacts you about anything. An example of a standard lead is a couple who contacts you for a price list. They might be interested in your services, but there is no way of knowing how interested they really are, how far along they are in their wedding planning, or how serious they are about you.

A quality lead is someone who has taken specific actions to do research and wants valuable information. For example, a quality lead would be a couple downloading your free PDF because it contains information specific to their needs. They understand that it will contain every vendor they need to know about to plan their wedding.

Quality leads have a much higher chance of converting into paying customers over standard leads. That’s because a quality lead is already more interested in your services than a standard lead.

Step five – inform your vendors

If the couple books a venue listed on your PDF, then it is highly possible they will mention you as a referral. Your vendor partners will appreciate that. So, be sure to send a copy to your partners so they know what you are offering potential customers. Then they are also more likely to promote it, and promote you.

Your best sales people are your brand advocates. Those are your customers and your business partners.

Biz partners

Step six – converting to customers

You have your free PDF and are converting site visitors into leads. You are utilizing an email marketing service as recommended. Next is where it really comes into play.

I mentioned earlier that I typically only ask for email addresses. That is because with email marketing you can learn more about your leads, so names and phone numbers are NOT essential. In fact, you may find that through nurturing those leads via email marketing that you will have more people contacting you than you contacting them.

After doing some testing, I came to the conclusion that sending one email a week to my list is most effective. You may find yourself in a different situation. But having an email marketing service that tracks statistics will help you identify the optimal sending scenario – days and times.

One effective trick I find for converting leads into paying customers is to ask a question, which warrants a reply. Whatever the question might be, you will find people replying. That is where the conversation really takes off. Something like this perhaps:

As a wedding photographer I am always so curious what types of gowns brides pick.  Please reply with the type of dress you will be wearing at your wedding.  Or if you already picked it out, I’d love to see a photo!

What have you learned

To wrap-up this article, I want to restate what you learned here and what your first step should be.

Your business partner vendors are more important than ever to your business. You can foster those relationships online, and offline, by creating a free PDF as described here. That PDF will be used as leverage for converting website visitors into quality leads. Using email-marketing you can nurture those leads and convert them into paying customers. All with a little help from a simple PDF that includes super valuable information.

New family

Once again, I used wedding photography as an example, so if you are not a wedding photographer then be sure to think hard about your vendor list and what your clients would need. Then start creating that document.

Hop to it!

Disclaimer: dPS does not agree or disagree with any recommendations made by the author. The author receives no extra compensation for these referrals and benefits in no way. He only recommends them because these are the services he uses – do your own due diligence when selecting any service for your business.

googletag.cmd.push(function() {
tablet_slots.push( googletag.defineSlot( “/1005424/_dPSv4_tab-all-article-bottom_(300×250)”, [300, 250], “pb-ad-78623” ).addService( googletag.pubads() ) ); } );

googletag.cmd.push(function() {
mobile_slots.push( googletag.defineSlot( “/1005424/_dPSv4_mob-all-article-bottom_(300×250)”, [300, 250], “pb-ad-78158” ).addService( googletag.pubads() ) ); } );

The post 6 Steps to Growing Your Photography Business Using a Recommended Vendors List by Scott Wyden Kivowitz appeared first on Digital Photography School.


Digital Photography School

 
Comments Off on 6 Steps to Growing Your Photography Business Using a Recommended Vendors List

Posted in Photography


2014 DPReview Readers’ Best Shots: People

26 Jan

Picking favorites is hard. Nevertheless, our readers were up to the task when we asked them to submit their best shots of 2014. We received over 1400 submissions, and it was no small job picking favorites. We didn’t need the reminder, but it underscored just how talented our readership is. Photos were divided into three categories and we settled on a small selection to feature in each.

Articles: Digital Photography Review (dpreview.com)

 
Comments Off on 2014 DPReview Readers’ Best Shots: People

Posted in Uncategorized


Understanding the Basic Sliders in Adobe Camera Raw

26 Jan

In this short video tutorial by Tuts+ you can get a quick overview of how the basic sliders work in Adobe Camera Raw. It has a great demonstration using a white to black grayscale image which shows what each slider does, and which parts of your image each are affecting. There is also a good indicator of why you want to be shooting RAW format instead of JPG, showing the same corrections done on both formats and the difference the the larger RAW file makes.

Enjoy the video:

For more Photoshop tips check out our post-processing section. The Basic sliders in Lightroom do pretty much the same thing, but they have slightly different names. Give it a try yourself and see if this helps make sense of the basic panel.

googletag.cmd.push(function() {
tablet_slots.push( googletag.defineSlot( “/1005424/_dPSv4_tab-all-article-bottom_(300×250)”, [300, 250], “pb-ad-78623” ).addService( googletag.pubads() ) ); } );

googletag.cmd.push(function() {
mobile_slots.push( googletag.defineSlot( “/1005424/_dPSv4_mob-all-article-bottom_(300×250)”, [300, 250], “pb-ad-78158” ).addService( googletag.pubads() ) ); } );

The post Understanding the Basic Sliders in Adobe Camera Raw by Darlene Hildebrandt appeared first on Digital Photography School.


Digital Photography School

 
Comments Off on Understanding the Basic Sliders in Adobe Camera Raw

Posted in Photography