Ein Beitrag von: TREBRON0815

kwerfeldein – Fotografie Magazin | Fotocommunity
Shutter speed is one of those things that is initially a problem to be solved, but once you do that it becomes a tool that allows you to take better and more creative photos.
First you should understand how shutter speed works and how to change it. You will need to make sure it is fast enough that your pictures turn out crisp. But once you’ve mastered those things, you can start using shutter speed to your advantage. You can slow it down to create a sense of movement, or speed it up to stop the action.
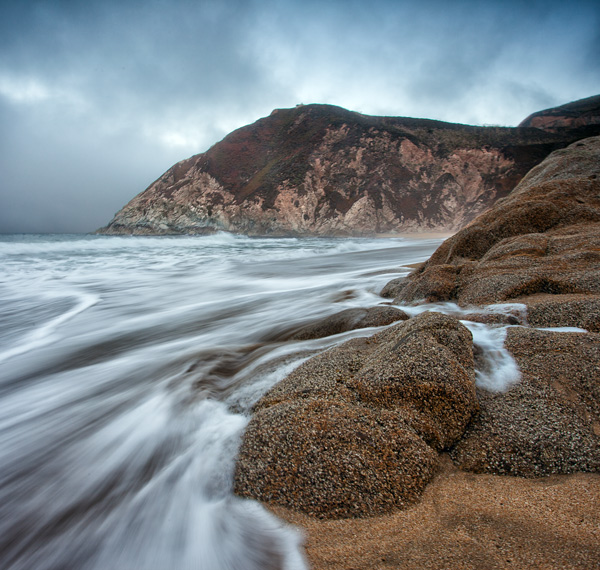
Grey Whale Cove: 1/4 second at f/16, ISO 100
This article will show you the basics of what you need to know regarding shutter speed and get you started with some creative effects using different shutter speeds.
Shutter speed is simply the amount of time the shutter inside the camera is open, allowing light onto the digital sensor to expose the picture. The longer you hold the shutter open, the more light is let in to the camera to expose the picture.
But holding the shutter open longer than a tiny fraction of a second has consequences. The camera must be held completely still during the exposure or the picture will be blurry. Without using a tripod or some other means of support, you cannot hold the camera still for longer than about 1/60th of a second and blur will start to creep in to the picture (more on this in a second).
Shutter speed is recorded in fractions of a second. So a shutter speed that says 1/60 (it may just show 60) means that when you take the picture the camera will open the shutter for 1/60th of a second. Most cameras have shutter speed ranges between 1/4000 of a second (on the short side) and about 30 seconds (on the long side). In addition, many cameras have a Bulb mode that allows you to hold the shutter open as long as you wish.
One of the first issues you will confront as a photographer is making sure your shutter speed is fast enough. If you have a tripod, this will not matter as much and you can leave the shutter open a long time (sometimes even several minutes). But assuming you are hand-holding your camera, a long shutter speed will introduce camera shake and make your image look blurry.
But how fast is fast enough? There is something called the Reciprocal Rule designed to help you with that answer. This rule states that your shutter speed should be at least the reciprocal of your focal length. That sounds complicated, but don’t worry it is easy to figure out. You just put a one over your focal length and that is your minimum shutter speed. So, for example, if your focal length is 60mm, just make sure your shutter speed is 1/60th of a second or faster. If you are zoomed in and your focal length is 200mm, make sure your shutter speed is 1/200 of a second or faster (remember to consider lens factor as well if you have an APS-C sensor) Any slower than that and it is time to break out the tripod (or raise open your aperture and raise the ISO).
1/200th at f/2.8, ISO 3200
The next question you will confront is how to change your shutter speed. The actual physical changing of the shutter speed is pretty simple, it’s typically done via a dial on top of your camera. The more important question is how are you to offset the change to shutter speed, assuming you are in manual mode (if you are in Aperture priority or Program mode the camera will make the change for you).
If you use a faster shutter speed, the shutter is not open as long so the camera gathers less light. So, without something else changing, your picture will be underexposed by using a shorter shutter speed. To make a proper exposure, additional light has to come from somewhere. You can add that extra light to offset the use of a faster shutter speed in one of two ways:
There are separate controls on your camera to make these changes. Use either of these methods to add more light to your exposure whenever you are shortening your shutter speed.
Now that you understand shutter speed a little bit, you will want to put it to use creatively. There are several ways to do this, and we will work through some of them from the faster shutter speeds to the slowest.
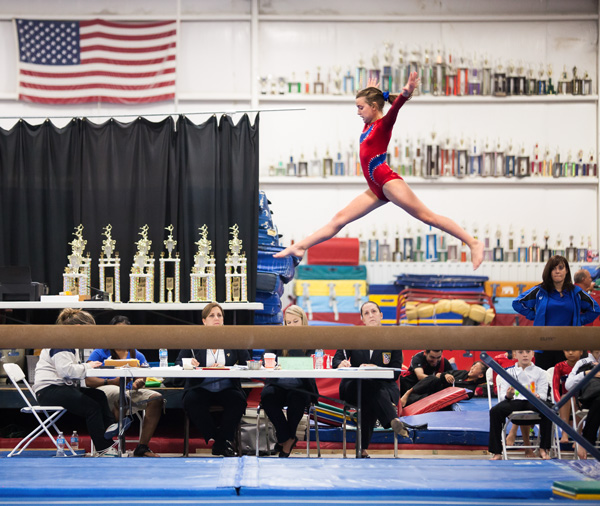
In times of high action or drama, you can stop the motion by using a very fast shutter speed.
To do this, you will want your shutter speed to be 1/250 of a second or faster. At times, like with the picture below of the water droplets being flipped through the air, you may want the shutter speed to be significantly faster. This particular picture was shot at 1/8000th of a second.
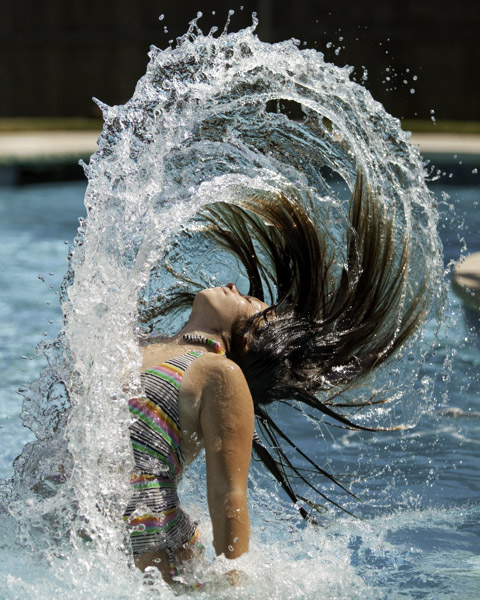
1/8000th at f/2.8, ISO 250
Accomplishing shutter speeds this fast, even on bright sunny days, will require offsetting moves. For example, you will need to open up the aperture to its widest setting. Doing so will result in a shallow depth of field, but in this sort of picture that usually won’t matter. You will also probably need to increase the ISO (a little on bright days, a lot on cloudy days or indoors).
Another key for these type of shots where you are stopping the action, is to anticipate the shot. With the speeds at which modern cameras shoot, you may often want to just hold the shutter button down and blast away, this rarely works though. The decisive moment is usually only captured by anticipation and triggering the shutter at precisely the right moment.
Another way to use shutter speed creatively in times of action is to pan the subject. Panning is where you move the camera during the exposure to follow the subject. Done properly (or when you get lucky) the subject is relatively sharp, while the background is blurred and conveys a sense of motion.
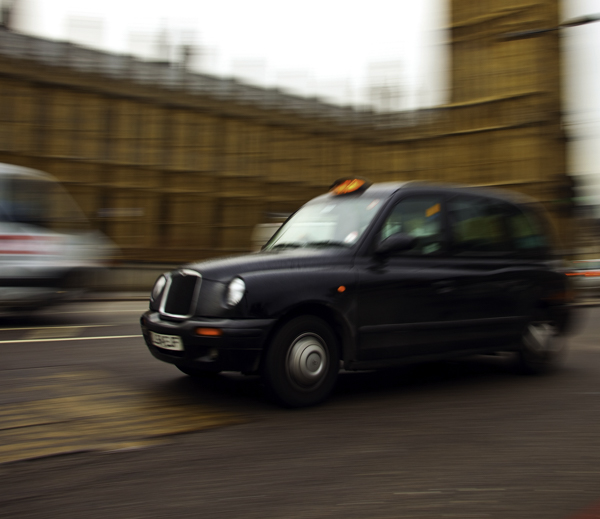
1/15th at f/7.1, ISO 50
Accomplishing this is usually best at slower shutter speeds between 1/8 and 1/30 of a second. Being able to slow down the shutter speed is typically welcome news, as it will mean you do not have to crank up your ISO, or make other offsetting moves. Getting a good result will frequently require at least a few attempts, while you gauge the speed, and other settings.
If possible, get your exposure set up before you attempt to pan. That way you are only thinking about the panning during the shot, as opposed to worrying about all your other settings.
Still another creative use of shutter speed is slowing it down to create a sense of motion. This is accomplished when the subject is moving slightly through the frame during the exposure. This idea is for the subject to be identifiable, but slightly blurred.
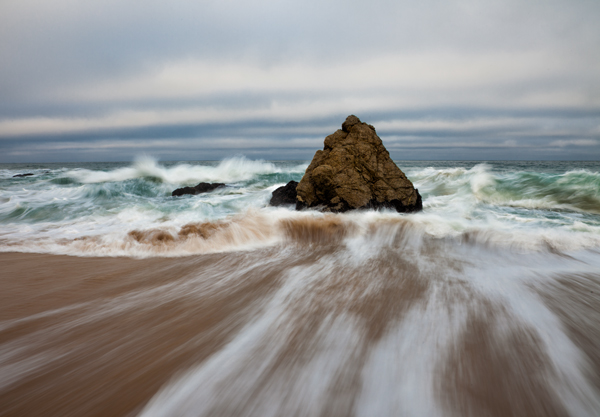
1/4 second at f/16, ISO 50
Shutter speeds for this type of shot are between 1/4 and 1/10th of a second. That is virtually always too slow for you to hand-hold your camera, so you will probably need to break out the tripod for this type of shot.
The final creative use of shutter speed we will cover here is a long exposure. This is where you hold the shutter open for a long time and allow certain parts of your picture to move through the frame. You will always need a tripod for this technique.
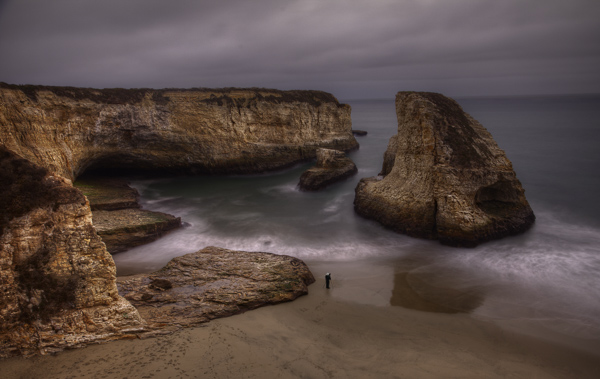
20 seconds at f/8, ISO 400
Long exposure shutter speeds are between 10 and 30 seconds. Most cameras offer you the ability to go even longer by using Bulb mode, where the shutter will stay open as long as you hold the shutter button down. A remote shutter release, which is always a good idea when you are shooting from a tripod, is almost a necessity for this type of shot.
Long exposure is a great technique whenever there is moving water involved, such as coastal scenes, rivers, and waterfalls. It is also great for streaking lights in night photography.
Whereas most of the time, your challenge with shutter speed is to get enough light into the camera; in this context getting the shutter speed you want usually involves the opposite problem. The challenge is to limit the amount of light entering the camera so that you can leave the shutter open a long time without overexposing the image. To do that, first close down the aperture to its smallest setting and use the lowest ISO setting on your camera. The lowest ISO setting is usually 100, but some cameras contain an expandable ISO range that will allow you reduce the ISO further, so be sure to check your camera’s menu for that.
But if those moves don’t restrict the light enough, you will need to use a neutral density filter. These are filters that restrict the amount of light coming into your camera. They come in different strengths, with typical values between two and 10 stops of light. Get one of these (or a few different strengths) and keep it in your bag if you think you will have any long exposures in your future.
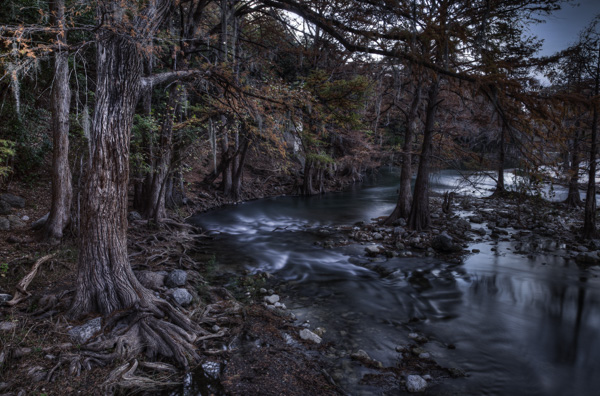
15 seconds at f/8, ISO 500
Once you have mastered the basics of shutter speed, it is a great tool for adding creativity to your photography. It is perhaps the most effective way to make our photos more interesting. So lock down the basics, and then give some of these techniques a try.
The post Tips for Using Shutter Speed Creatively by Jim Hamel appeared first on Digital Photography School.
[ By WebUrbanist in Art & Installation & Sound. ]

A work of art, genius and incredible effort, half of this replica structure appears to hang in mid-air, seeming at once a perfect aesthetic fit for its surroundings and completely disconnected from the laws of physics.

British artist Alex Chinneck and his crew spent over 500 hours and had to construct a 4-ton counterweight to balance this faux building in the sky – what appears to be solid stone is in fact a steel-framed copy of an historic structure also found at Covent Garden (the original is nearly 200 years old).


Chinneck is well known for his architecture-centric optical illusions, with this particular piece created as a play on the area’s “performance culture” – its proximity to theaters and performance spaces.


The construction process required a painstaking attention to historical details and materials in addition to grafting the appearance of age, wear and tear onto the fake structure. Another significant challenge: the seemingly haphazard breaking and slicing of everything from stones to windows and their frames.

From the artist: “The hovering building introduces contemporary art to traditional architecture, performing a magic trick of spectacular scale to present the everyday world in an extraordinary way. My objective was to create an accessible artwork that makes a harmonious but breath-taking contribution to its historic surroundings, leaving a lasting and positive impression upon the cultural landscape of Covent Garden and in the minds of its many visitors.”

As architects struggle to balance aesthetic appeal with practical considerations, many are finding the best way to create bold features is through optical …
Click Here to Read More »»

Sometimes, art is so large it can’t fit inside a building. These 12 architectural art installations transform the structures themselves into 3D canvases.
Click Here to Read More »»
Treating abandoned buildings and urban surfaces more like pages in a book than bricks to tag, this street artist brings an illustrator’s touch and …
Click Here to Read More »»
![]()


[ By WebUrbanist in Art & Installation & Sound. ]
[ WebUrbanist | Archives | Galleries | Privacy | TOS ]
In this article, nature photographer Erez Marom shares the story of his panoramic shot ‘Clouds over Skagsanden’, taken earlier this year in the Lofoten Islands in Arctic Norway. His article covers everything from preparing to shoot at the location, to the shoot itself through to final post-processing of the resulting image. Click through to read Erez Marom’s article ‘Behind the Shot: Clouds over Skagsanden’
Articles: Digital Photography Review (dpreview.com)
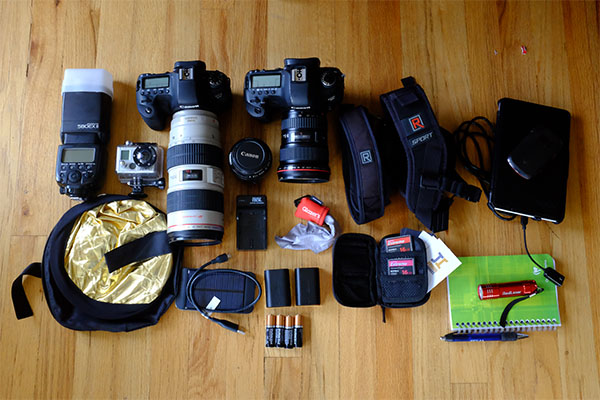
Even though the prices of digital photography equipment continue to fall significantly, it can be a tough to dole out a thousand plus dollars on a brand new camera or lens. On the positive side, camera gear (especially lenses) retains its value really well. As a result, there’s almost always a surplus of used camera bodies, lenses, and accessories. Before you take the plunge and buy used gear, be sure to understand that used equipment can be a bit tricky to assess in terms of quality and price. As a photographer who shamelessly has about 50% used gear in her collection, here are some methods I run through when contemplating a used camera purchase.
By now, just about every online camera retailer has a used section on their website. Availability of items is obviously variable, but a simple item check can pull up estimates for the current standard used prices of the items you want. Be sure to note the quality rating and commentary of each item, and see how it matches up to your expectations. Often, used items that are priced too low have some sort of cosmetic or mechanical problem, so if you think you’re getting an amazing deal, get suspicious. Another reason to be suspicious of outrageously low prices is that they might be grey market items, which essentially come with no factory warranties. The best way to check if it’s a grey market item is to find the serial number and reference it in the camera maker’s database.
The advantage to buying used gear online is that often the gear has been checked out and issued a rating by the retailer. There may also be some flexibility in terms of exchanges and returns in case you aren’t happy with your purchase. Be sure to double check and make sure you know who the seller is, especially on Amazon, which allows private sales to be made.
Scan local communities boards or publications, or see what’s listed in your local Craigslist directory. The advantage to buying used gear in-person is the ability to test the gear out before you buy it. Nervous about meeting a stranger for a business transaction? Choose a meeting place at a super public space like a mall or cafe. Also, I’ve found that many Craigslist sellers of camera gear in my area tend to be other professionals, and thus their names and corresponding web portfolios can be easily researched online prior to meeting in person. If you do opt for an in-person transaction, be clear on how to assess used camera gear yourself.
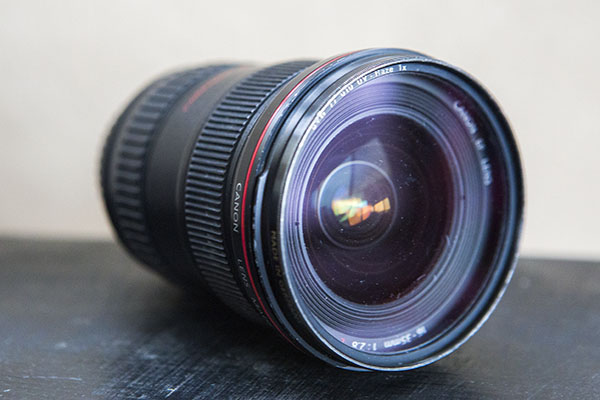
Lenses are relatively straightforward to assess in terms of quality. First, investigate the lens thoroughly and watch out for common problems such as fungus, dust, and scratches. Shine a light through the lens, and any imperfections should be visible. Note that some problems such as dust and small scratches will likely just be cosmetic damage and should not affect overall image quality. However, any signs of fungus on the lens is a deal breaker as it is incredibly difficult and costly to remove.
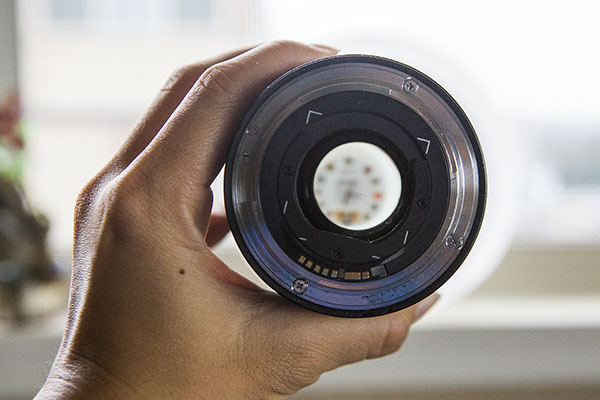
Second, do a mechanical test of the lens to see how it performs. It’s best to have your regular DSLR with you to see how it fits. Make sure the aperture blades on the ring are clean and can move freely, and try out both the zoom and focus rings. Depending on the lens model, it’s not uncommon for the rings to offer some resistance, but be sure sure they both operate relatively smoothly. Finally, check out the autofocus operation on the lens and make sure it is smooth.
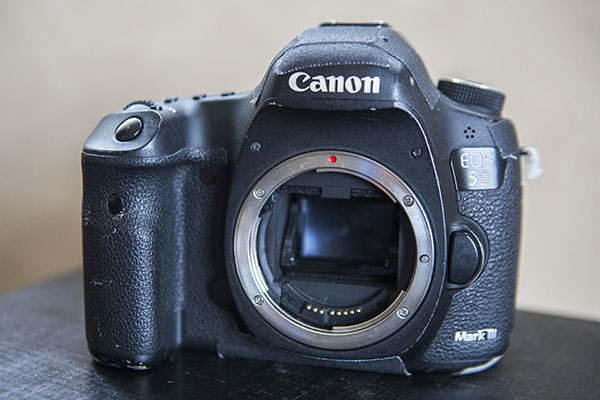
Used camera bodies can be a bit trickier to assess. While it’s perfectly normal for bodies to have physical signs of wear and tear, use your initial visual impressions of the camera as your first judgement. If the camera appears badly worn and used, it’s likely not looking any better on the inside. However, the most telling part of the camera body’s lifespan is the shutter, which is very expensive to replace. Sometimes people will sell their cameras when the shutter is about to die, meaning the new owner will have to drop a lot of extra money soon after to replace it. How to check shutter counts, as well as how many shutter counts are acceptable for a used body, depend on the camera make and model. Google searches and forums should offer some resources.
Autofocus is another aspect of the camera body that should be tested. Using a reliable lens that you bring with you, test out the camera and see how both single and continuous autofocus performs. While you’re at it, also examine the lens mount on the camera and make sure the lens mounts securely.
Whether you’re an amateur or a professional, it’s completely acceptable to purchase used camera gear. Just be sure to do your research and have a thorough understanding of the product you are considering buying. Always use reputable sources, and remember that if the deal seems to good to be true, it probably is!
The post How to Buy Used Camera Gear by Suzi Pratt appeared first on Digital Photography School.
Ein Beitrag von: Serena Wördenweber
Es gibt mittlerweile einige von uns. Diejenigen, die ihre sicheren Schreibtischjobs verlassen haben, um kreative Unternehmen in ihren Wohnzimmern zu starten. Wir sind jung, flexibel und entschlossen unseren eigenen Weg zu gehen. Ich habe auch ein solches Unternehmen in meinem Wohnzimmer. Nur ich, mein Rechner und mein Fotografie-Equipment.
Ich hatte eigentlich gar nicht vor mich als Fotografin selbständig zu machen; es kam einfach dazu. Ich habe etwas ganz anderes studiert, bin in den langen Semesterferien viel gereist und habe immer Fotos geschossen – mit einer Digitalkamera im Automatik-Modus, die schlechter war als unsere Smartphone-Kameras heute. Doch das war mir egal. Es ging mir darum, Momente festzuhalten, für mich zu behalten und zu fotografieren, was ich fühlte. Das ist immer noch so.

Irgendwann wurde mein Wunsch immer größer noch viel mehr zu fotografieren. Ich begann Kurse zu besuchen, nahm teil an einer Summer School an der Berliner Fotoschule F/16, machte ein Praktikum bei der Lifestyle-Fotografin Xenia Berg und erledigte unendlich viel Papierkram. Ich fand heraus, dass es gar nicht so schwer ist seinen Traum zu verwirklichen. Man muss einfach anfangen, weitermachen und bloß nicht aufhören.
Ich selbst bin noch am Anfang und arbeite erst seit einem Jahr als selbständige Fotografin. Ich habe mich auf Lifestyle-Fotografie spezialisiert, wobei ich am liebsten dokumentarisch und mit natürlichem Licht arbeite. Basierend auf meinen Erfahrungen habe ich einige Tipps zusammengestellt, die mir selbst vor einem Jahr sehr geholfen hätten.
Zeig Deine Arbeiten
Ich habe viele Projekte gemacht, nächtelang an meiner Website gesessen und alles zusammen gefriemelt. Rückblickend würde ich sagen, je schneller man seine Arbeiten anderen zeigt, desto besser. Nimm Deine Freunde mit auf Deine Reise. Der Prozess ist genauso interessant, wie Deine Arbeiten. Energie, Eigeninitiative und Mut sind inspirierend. Teile Deine Werke auf Blogger-Plattformen wie Tumblr, baue Dir eine Webseite (heute gibt es viele einfache CMS-Systeme, wie beispielsweise WordPress) oder nutze am Anfang einfach Deine Facebook-Seite.
Mach eigene Projekte
Gerade am Anfang hast Du reichlich Zeit und Energie für eigene Projekte. Sobald Du ein bestimmtes Maß an Bekanntheit erreicht hast, wird Dir die Zeit hierfür fehlen. Eigentlich ist das schade, denn bei eigenen Projekten hast Du alle Freiheiten. Du bestimmst Dein Image und Deine eigenen Richtlinien. Sei spontan, nimm ein paar Freunde mit und geh nach draußen. Wenn Du lieber mit einem Plan arbeitest, mach Dir ein Konzept und leg los. Fotografiere, was Du fühlst.


Nutze das Netzwerk
Es gibt unheimlich viele gute Blogs die heutzutage davon leben, Fotografen eine Plattform für ihre Arbeiten zu geben. Schau Dich um, bewirb Dich, reich eine Bildserie ein. Geh auf Dein Umfeld zu. Sei großzügig! Einer meiner Fehler war es anfangs, meine Arbeiten nur für mich behalten zu wollen. Mir war es vor allem wichtig, meine Bilder zu schützen. Ich wollte sie nicht auf Facebook teilen. Dass ist Unsinn.
Es gibt so zahlreiche Social-Media-Seiten, die Du nutzen kannst, um deine Arbeiten zu präsentieren. Mach das! Ich selbst habe einen meiner Grafik-Designer über Pinterest gefunden – auf seine Website wäre ich sonst nie gestoßen. Und ich wurde auch schon über Instagram engagiert – es lohnt sich also zu zeigen, woran Du arbeitest!
Feiere Deine Erfolge
Definiere Deine Erfolge und feiere sie. Das kann Dein erster bezahlter Auftrag sein, Deine erste Blog-Veröffentlichung, eine gelungene Bildserie oder ein gelungenes Foto. Mit jedem Erfolg kommst Du als Künstler weiter. Bau Dir Mut auf, um weiterzumachen. Vergleiche Dich nicht mit anderen, vor allem nicht mit denen, die schon dort sind, wo du hinmöchtest. Stecke dir Ziele und mach Dir bewusst, wenn Du sie erreicht hast.
Manchmal sitze ich vor meinem Bearbeitungsprogramm und mich macht ein Bild unheimlich glücklich. So zähle ich meine Erfolge: Ich drucke diese Fotos aus, manchmal einfach als Farblaserdruck auf DIN A3 aus dem Copyshop, manchmal als Fine-Art-Print (ich liebe theprintspace). Ich habe eine Mappe voll solcher Fotos. Sie motivieren und bestärken mich weiter zu machen.


Mach Fehler
Aus Fehlern lernt man. Das hören wir immer wieder. Und es stimmt. Manchmal aber machen Fehler ein Foto sogar einzigartig oder eröffnen einen anderen Blickwinkel. Ich schieße lieber ein richtiges Foto mit den falschen Einstellungen, als ein falsches Motiv mit den richtigen Einstellungen. Also sei mutig und mach Fehler! Lern aus ihnen! Noch besser, gib sie zu, sodass andere daraus lernen können.
Unterschätze Deine Kosten nicht
Fotograf zu sein bedeutet, viel Zeit in die unternehmerische Seite deiner Selbständigkeit zu investieren. Du wirst viel Zeit in die Vor- und Nachbereitung Deiner Shootings stecken müssen. Die Zeit hinter der Kamera ist nur ein kleiner Teil Deiner Selbständigkeit.
Wenn du Deine Preise berechnest, bedenke die Kosten Deiner Ausrüstung und die Kosten, die in Deinem Unternehmen stecken (Software, Programme, Onlinegebühren und Werbung). Berechne Deine Steuern, den Krankenkassenbeitrag und Deine Versicherungen. So ergibt sich der reale Preis Deiner Leistungen.
Schau Dich um, was Fotografen in Deinem Umfeld für ähnliche Leistungen nehmen und informiere Dich über Tagessätze von Fotografen, die in dem selben Bereich arbeiteten, wie Du.
Beweise Ausdauer
Sei Dir bewusst, dass nicht immer alles einfach sein wird. Ich vergleiche selbständig zu sein gern mit Rucksackreisen. Kennst Du das Gefühl, wenn Du beim Backpacking nach einer Überlandbusfahrt morgens um 6 Uhr ankommst, Durst hast, übermüdet bist und noch kein Hostel gebucht hast, in dem Du schlafen kannst? Du dann mit Deinem Rucksack auf dem Rücken zwei Stunden durch die Sonne herumirrst, auf einen unpräzisen Kartenauschnitt in Deinem Reiseführer starrst und noch immer kein gutes Hostel in Sicht ist? Manchmal fühle ich mich genauso.
Wenn man das Hostel dann gefunden hat, man ein paar Stunden schläft und dann eine Kokosnuss am Strand aufgeschlagen bekommt, hat sich alles lohnt. Alles. Das weiß ich. Behalte im Kopf, dass es ein Auf und Ab ist, selbständig zu sein. Es ist ein Abenteuer. Entwickle Selbstvertrauen in Dich und Deine Arbeit. So wird Dich eine Tiefphase nicht so leicht umhauen können. Mach einfach weiter! Der Weg ist wichtig, um anzukommen.


Sei Du selbst
Marketing. Das Wort mochte ich gar nicht. Bis ich einmal einen Satz hörte, der sich übersetzt ungefähr so zitieren lässt: „Marketing ist das Bauchgefühl einer bestimmten Person.” Das klingt doch schon viel besser. Hör auf Dein Bauchgefühl. Sei Du selbst. Sei ehrlich. Zeig wer Du bist. Du brauchst kein Vertriebler werden, um Dich zu verkaufen. Steck Deine Vision, Deine Person in Deine Bilder, in Deine Kommentare, und Deinen Online-Auftritt. Schaffe eine Online- sowie Print-Ebene, die Dich selbst ansprechen würde.
Schau nach links und rechts
Viele sagen, schau nicht nach rechts oder links. Ich mache das gerne. Es motiviert mich weiterzumachen. Wenn ich allerdings nach Inspiration suche, dann schaue ich zum Beispiel auf kwerfeldein. Ich lasse mich von Musikvideos, Bandcovern, Filmen oder Kochbüchern inspirieren. Frag Dich, wa die Künstler ausmacht, die Dich ansprechen? Was beeindruckt Dich an ihrer Arbeit und was inspiriert dich?
Mein Lieblingskoch zur Zeit ist Ottolenghi. Er kocht mit unbekannten Zutaten und mischt diese auch noch in einer Art und Weise, die ich außergewöhnlich finde. Das inspiriert mich. Und das hebt ihn ab von der Masse an Kochbüchern, die immer noch am perfekten Panna Cotta arbeiten. Das mag ich. Vielleicht lässt sich das auf eine gute Bildserie übertragen.
Sei Teil einer Community
Was mich als Fotograf am meisten weiterbringt, sind die Kontakte zu anderen Fotografen. Sieh sie nicht als Konkurrenten an, sondern als Teil Deiner Community. Sie sind mit an Bord. Heute gibt es unglaublich viele Quereinsteiger in den Beruf des Fotografen. Ich finde das bereichernd. Es bringt unglaublich viele Blickwinkel auf den Tisch. Befreunde Dich mit anderen Fotografen, tausch Dich mit ihnen aus. Gib Informationen preis, wenn Du gefragt wirst. Teile. Sei offen für andere, sie sind dann auch offen zu Dir.
kwerfeldein – Fotografie Magazin | Fotocommunity
The Nexus 6 is Google’s showcase phone for Android 5.0 ‘Lollipop’ and the first Nexus device made by Motorola. It comes with a dual-LED ring flash, a 13MP sensor with a fast F2.0 aperture, optical image stabilization and 4K video recording. DxOMark Mobile put the Nexus 6 through its image quality tests and has just published the results. Read more
Articles: Digital Photography Review (dpreview.com)
We knew it was coming but it wasn’t just the expectation that made the announcement from Flickr such an anti-climax. The declaration that the photo-sharing site will now provide its own way for members to license their images, following the end of its agreement with Getty, was also disappointingly short of details. Flickr’s members can sign up for the program at www.flickr.com/marketplace where the site’s “curatorial team will provide assistance, outreach and connectivity to help you get your photos licensed.” When those curators have found “exciting and credible opportunities” they’ll send a Flickr Mail to give the photographer details about the licensing program.
In addition to licensing opportunities with photo agencies, Flickr is also promising to showcase images on the Flickr blog and across parent company Yahoo’s properties. The sign-up page includes logos from the BBC, Reuters and The New York Times, as well as Gizmodo and Monocle.
At launch, that was all the information that Flickr made available. A discussion on Flickr Central, the site’s forum, was ignored by Flickr’s usually active community organizers even though participants talked favorably of car payments and vacations that the old Getty agreement had enabled them to fund. Few other details have been released so we don’t know how much photographers will be paid; how large Flickr’s own commission will be; whether images have to be exclusive; how they will be used; or what sort of photos are most likely to sell.

You must be logged in to post a comment.