RSS
 

Archive for October, 2014

Not Photoshopped: Distorted Images are Actually 3D Objects

30 Oct

[ By Steph in Art & Sculpture & Craft. ]

Robert Lazzarini 2

This skull is a three-dimensional object that you can hold in your hand, not an image that has been stretched and distorted in Photoshop. It’s one of many visually confusing sculptures by Robert Lazzarini, created in his Brooklyn studio after hours upon hours of research. Lazzarini often smashes objects to see how they change and fall apart before he goes about the process of distorting them with computer modeling and fabricating them anew.

Robert Lazzarini 1

Robert Lazzarini 4

Using bone dust to create his skulls, wood and steel to produce hammers and other materials that are appropriate for recreating the originals, Lazzarini painstakingly crafts each item in an altered form. Previously working with more free-form alterations manually, he now sticks to math for the most accurate results possible, with every detail in scale.

Robert Lazzarini 4

Robert Lazzarini 5

Robert Lazzarini 3

“In terms of subject matter, it’s representational, so people think it’s a type of Pop art,” Lazzarini told Blouin Art Info. “In some ways it is, but I think it really hinges more profoundly on the aftermath of Minimalism… One of the main problems of sculpture for me is its static nature. This kind of animation” [when the object changes as you walk around it] “for lack of a better word, gives the sensation that there’s activity where there really isn’t. It relates back to corporeally navigating something to understand it.”

Share on Facebook


[ By Steph in Art & Sculpture & Craft. ]

[ WebUrbanist | Archives | Galleries | Privacy | TOS ]


WebUrbanist

 
Comments Off on Not Photoshopped: Distorted Images are Actually 3D Objects

Posted in Creativity


Touchable Memories: 12 3D-Printed Aids for the Disabled

30 Oct

[ By Steph in Gadgets & Geekery & Technology. ]

3D Printing Disabled Touchable Memories 1

Increasingly affordable and accessible, 3D printing is enabling the creation of everything from simple straw holders to prosthetic hands for people with disabilities, whose quality of life can be greatly enhanced with a little technology. These 12 creations help the blind visualize memories, allow kids with muscular dystrophy to play video games, and even restore brain function after devastating accidents.

Touchable Memories: Tactile Photos for the Visually Impaired

3D Printing Disabled Touchable Memories 2

An affordable home printer called the Buccaneer can be used in conjunction with ‘Touchable Memories,’ a software by Pirate3D, to turn photographs into tactile 3D-printed objects. The project allows people who have lost their eyesight or been blind from birth to visualize the memories that were photographed, whether in relief form or as freestanding sculptures.

‘Magic Arms’ Exoskeleton

3D Printed Disabilities Exoskeleton

A little girl suffering from a rare congenital disorder that limits her ability to use her arms now has a ‘magic’ exoskeleton that aids her movement and enables her to lift objects. A team at the duPont Hospital for Children created a wearable 3D-printed plastic jacket that’s lightweight enough to be used by small children. Heavier, larger versions of the robotic exoskeleton are hard to use and expensive to replace as the children grow, but using 3D printing means it’s as simple as adjusting the dimensions on the 3D model and printing a new one.

Q-Ramp Modular Access System for Wheelchairs

q-ramp

Most cities aren’t exactly built with wheelchairs in mind, but for a few ramps here and there. Raul Krauthausen of Berlin, who uses a wheelchair full-time due to a genetic bone disorder, had trouble getting around Berlin on his own. Having purchased a 3D printer just for fun, he started envisioning how he could use it to improve his quality of life. The result is a portable, printable wheelchair ramp that’s easy to carry on the back of his chair. Krauthausen put the design up on Thingiverse so others can print their own.

Custom Game Controllers

3D Printing Disabilities Game Controller

Conditions like muscular dystrophy can weaken the muscles to the point that even using a game controller is too tiring. Tinkerer Caleb Kraft noted that the special controllers marketed to the disabled were grossly overpriced, and decided to come up with his own solution. His 3D-printed creation is not exactly robust enough for most of today’s more complex games, but it allows a child to play Minecraft.

Next Page – Click Below to Read More:
Touchable Memories 12 3d Printed Aids For The Disabled

Share on Facebook


[ By Steph in Gadgets & Geekery & Technology. ]

[ WebUrbanist | Archives | Galleries | Privacy | TOS ]


WebUrbanist

 
Comments Off on Touchable Memories: 12 3D-Printed Aids for the Disabled

Posted in Creativity


5 Tips for Creating Creepy Halloween Photos

30 Oct

It’s the most wonderful time of the year! For some people that is Christmas, but for other’s it means that it’s time for the goblins and ghosts and all of the scary creatures to come out of hiding and find their way into our everyday lives. Theme parks have Halloween themed nights, scary movies are on television, haunted house tours start having people waiting in line and of course, it’s time for photographers to break out of their everyday subjects and come up with something dark and sinister to shoot.

Here are some tips to help you when you are  preparing to shoot some creepy Halloween photos.

CreatingaHalloweenPhotoshoot_DigitalPhotographySchool_LoriPeterson

The fear of clowns is called Coulrophobia.

#1  Pick a theme

When you choose your theme make sure it is one that you know that you can do without scaring yourself. If you have a fear of something, picking that as your theme may not be the best idea. Just because the theme is for Halloween does not mean that you need to bring zombies or blood into the shoot if you do not want to. Your theme could encompass some of the phobias that people have, including clowns, spiders, cemeteries, dolls, or death.

You can make your theme as twisted and as dark as you feel comfortable doing. Remember that there are more themes out there than just clowns, ghosts, and witches. You might even use the photoshoot as a way to get over the things that scare you. Your fears of clowns might be a little more alleviated if you are helping a clown with their costume and makeup and then watching them use their iPhone during breaks.

#2  Scout your location

CreatingaHalloweenPhotoshoot_DigitalPhotographySchool_LoriPeterson_DiadelosMuertos

The fear of the dead is called Necrophobia and the fear of bones is Cartilogenophobia.

Find a spot that is in the woods (if you can) so that you can shoot without being disturbed. You can also do a photo-shoot in a cemetery, but remember that most cemeteries close at dusk and please be respectful of the gravesites. While you may not know the people, that is the final resting place of someone’s loved one. Don’t climb on the headstones as some are very fragile. Wherever you decide to shoot make sure you leave the place as you found it. If the perfect location is on private property, ask for permission to use it. Stay off train tracks (that’s dangerous and illegal in most states). If shooting in a cemetery, be mindful that on the day you decide to shoot that there might be people there for a funeral. Move away from them and be respectful of their grief and what they are going through that day. If you are shooting in a park or in the woods and are approached by people, explain what you are doing. Some people will ask for your business card so they can look for the images online.

# 3 Will you need costumes or props?

You need to figure out (based on your theme) if you will need to find costumes that are already made or create costumes yourself.  The best costumes are usually the ones you make. Take elements of your idea and figure out what parts of it you can create yourself. Then the costume is customized and won’t resemble anyone else’s work. You can also add props to really create your look and pull it together.

Sometimes your models for your shoots will have pieces that will work and you can add jewelry or scary elements. You can find fake blood or for some photo-shoots you can even call your local butcher shop and they may be willing to help you out with some real props. They won’t be as surprised as you might think if you tell them you are a photographer and you need a pig heart for a photoshoot. You might be the one surprised when they ask “Do you want the heart with the valves attached or not?”.

CreatingaHalloweenPhotoshoot_DigitalPhotographySchool_LoriPeterson_EvilQueen

The fear of blood is called Hemaphobia.

#4  Find Your Models

Most photographers have at least a handful of models that they call for photoshoots. Ask your models if they are interested in doing something different from their regular sessions. If you are using children, make sure that their parents understand how the shoot might be scary. When they arrive talk to them about what you are doing and make it fun for them. They are less likely to be frightened once they see any masks or props before they are used. Give your models breaks if they are wearing masks. They can get hot no matter what time of year it is and some vintage masks have a very rubbery smell to them. Let children handle the props being used before you even pick up your camera so that they are familiar with them. You can even show them how you want them to be held and what you are wanting to get from the images. Some children actually enjoy scary stuff and will be more than happy to jump in. Some might need a little more guidance and support from you, so make sure you are paying attention to them.

aubrey bw fb

Lori_Peterson_Unconditional

The fear of dolls is called Pediophobia.

#5 Think Outside of the Box

Witches, ghosts and other Halloween ideas might not be your cup of tea because they are always associated with Halloween. Start thinking of things that fall outside of the typical Halloween realm. In the Halloween movies you were scared of Michael Myers because you could not see his face (and for other reasons too, but you had no idea what lurked under that Shatner mask.). Find some scary masks at a costume shop or online. Look for a gas mask, Plague Doctor, or clown mask. You can even use your own imagination and modify them to make them even scarier. When you can’t tell the identity of the person under the mask there is mystery and a little fear too. Don’t be afraid to create your own props or take old dolls or masks and modify them for your photoshoot.

CreatingaHalloweenPhotoshoot_DigitalPhotographySchool_LoriPeterson_ThePlagueDoctor
The wonderful thing about doing these types of shoots is that you don’t just have to do them close to Halloween. You can work on your ideas at any point through the year and accumulate the props, masks, costumes, or whatever you need and build up to the shoot. You can scout for your location to figure out where you want to do your shoot and what time of year. Exploring your creative side with Halloween photo shoots can bring a new insight into the work you do and you can have a lot of fun with these types of shoots.

Use these tips to participate in the weekly photography challenge: Spooky images for Halloween

The post 5 Tips for Creating Creepy Halloween Photos by Lori Peterson appeared first on Digital Photography School.


Digital Photography School

 
Comments Off on 5 Tips for Creating Creepy Halloween Photos

Posted in Photography


Panasonic Lumix DMC-LX100 shooting experience published

30 Oct

We’ve just added more detail to our Panasonic Lumix DMC-LX100 First Impressions Review including a summary of our shooting experience. Read our updated preview of Panasonic’s latest enthusiast compact and find out how it fares in real-world shooting. Read more

Articles: Digital Photography Review (dpreview.com)

 
Comments Off on Panasonic Lumix DMC-LX100 shooting experience published

Posted in Uncategorized


B&W Challenge Day 1 – Point Reyes National Seashore Clouds

29 Oct

My friend Kelly Castro recently challenged me to the 5 Day B&W Photo Challenge on Facebook so I thought I would share my entries. The challenge is merely for fun and an exercise to think creatively. Having been in Dad mode the past several months I thought this would be a good way to get back in the game.

The photo above was taken in the Point Reyes National Seashore where I was tuning up and trying out some new gear. Taken mid-day on a bright sunny day I was trying out a Singh-ray More-Slo 10-stop filter. The effort was experimental and the output translated nicely to a textured black and white image.  Stay tuned for more B&W.

I should also note that the B&W challenge requires that I invite another photographer to take part each day. Today I nominate Richard Wong.

Copyright Jim M. Goldstein, All Rights Reserved

B&W Challenge Day 1 – Point Reyes National Seashore Clouds

The post B&W Challenge Day 1 – Point Reyes National Seashore Clouds appeared first on JMG-Galleries – Landscape, Nature & Travel Photography.


Related Stories

  • B&W Challenge Day 1 – Point Reyes National Seashore Clouds – Enclosure
  • Wilderness Protection – Only As Strong As The Wilderness Act
  • Wilderness Protection – Only As Strong As The Wilderness Act – Enclosure


JMG-Galleries

 
Comments Off on B&W Challenge Day 1 – Point Reyes National Seashore Clouds

Posted in Equipment


4 Tips for Photographing Bugs and Insects

29 Oct

Sometimes the most interesting things to photograph are right under your nose, even though you might have to look a little harder to see them. Bugs, insects, and other creepy crawlies might not seem like compelling subjects, but if you take a bit of time to examine the smaller creatures who inhabit the world around us, you might not only come away with new and exciting photographic opportunities but a renewed sense of wonder and admiration for the beauty of creation. If you have never tried this type of photography before, you can get started right away without any special equipment and these tips for photographing bugs might give you a few ideas to try out along the way.

butterfly-flower

#1 Keep your eyes open

This might sound obvious, but the first step in learning to take photos of insects is learning how to see them in the first place. Our six and eight-legged counterparts are all around us, but they don’t usually announce their presence with a trumpet blast. You often have to look just a little harder to see them, but you can great shots of bugs and insects on trees, shrubs, rocks, benches, buildings, or almost anywhere if you just keep your eyes peeled. The next time you head outside, whether it’s in a park or just in your own backyard, spend a little time examining the world around you to see if you can spot some of the amazing little critters that often go overlooked by us busy humans.

bee-flower

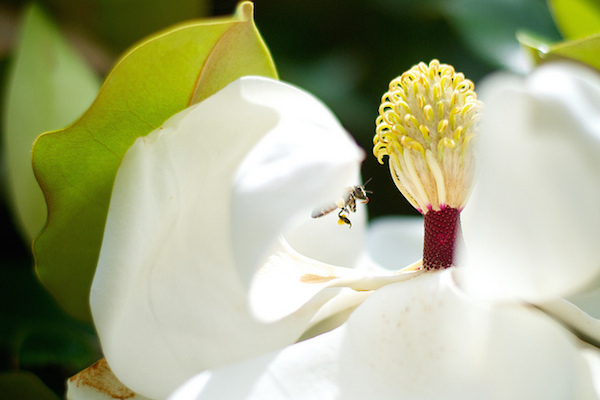
I wanted to get a closer look at some magnolia flowers, and noticed that they were full of bees. It took a while, but I finally got a shot of one of them on his way to gather some nectar.

Most days I have a fairly predictable routine involving work and home duties, and sometimes I get a little stuck when it comes to scratching my photography itch.  It can seem like there is just nothing new under the sun worth photographing, and it’s times like that when bugs are ideally suited to draw out a bit of creativity.  Sometimes I will find myself crouching down on the ground, straddling a fence, or perched atop a ladder in order to get a better view of these small critters.  It’s fun, challenging, and a great way to get some fascinating photographs.

#2 Be patient

While insects are great at giving you unique photographic opportunities, they aren’t so good at following directions. Most of bugs simply will not listen to perfectly reasonable requests like “Hold still,” or “Turn the other way.” To compensate for their lack of cooperation, you often have to simply wait until a good photo opportunity presents itself. This could mean watching a cicada explore a shrub, keeping your eye on a beetle as it blazes a trail across your lawn, or waiting for dinner to fly into a spider’s web. The slightest sound can disturb our tiny little friends, so take care to move about quietly and not intrude on what they are busy doing. If your camera has a long zoom lens, you can use it to get right up close and personal even if you are far away, but unless you have plenty of light your shutter speed might not be fast enough to capture the action.  In those cases bumping up the ISO is a good way to compensate, though your picture might end up looking a bit grainier or noisier than you prefer.

spider-grub

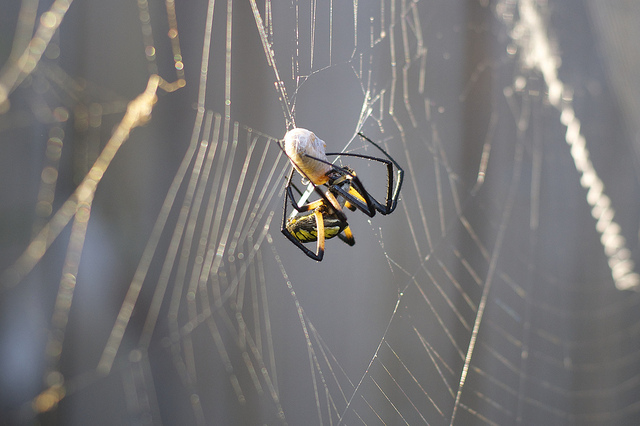
This garden spider built quite the web next to a fence, and his handiwork was rewarded when another bug wandered over to investigate.

Sometimes you have to keep an eye on a critter for quite a long time, and even after all your waiting they might just decide to scurry off or fly away.  This can be an exercise in frustration as you wait for what seems like hours with nothing to show for it.  Nothing is guaranteed when you set out to take pictures of insects, but if you can find a balance between shooting and waiting, you might be pleasantly surprised at the results you get.

#3 Capture the eyes, not just the insect

This tip might seem a bit strange, and it’s not always easy to accomplish, but if you can capture the eyes of an insect it lends an entirely new dimension to your photographs.  As the saying goes, the eyes are the window to the soul, and while this certainly holds true for humans it also works for animals and even bugs.  When you can get a shot of an insect’s eyes it can be almost like the two of are sharing a moment, watching each other and allowing you to be in the other’s space for a few brief moments.  Even though the insect might not care one bit about you or why you are pointing a rounded lens in its face, capturing its eyes will add an emotional hook to the image that would otherwise be lacking.

I don't know what this wasp was thinking, but judging by the look on his face I imagine it was something like "Leave me alone, and I'll leave you alone."

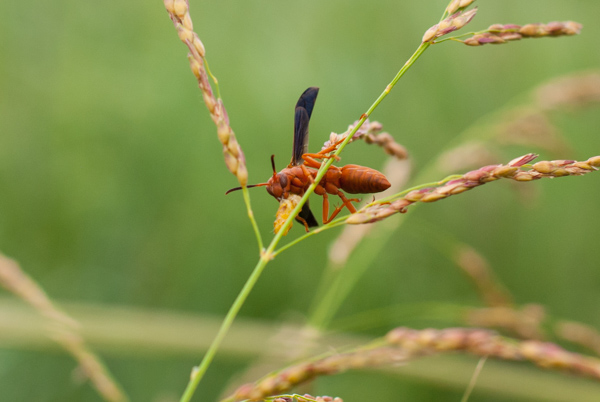
I don’t know what this wasp was thinking, but judging by his expression I imagine it was something like “Leave me alone, and I’ll leave you alone.”

katydid

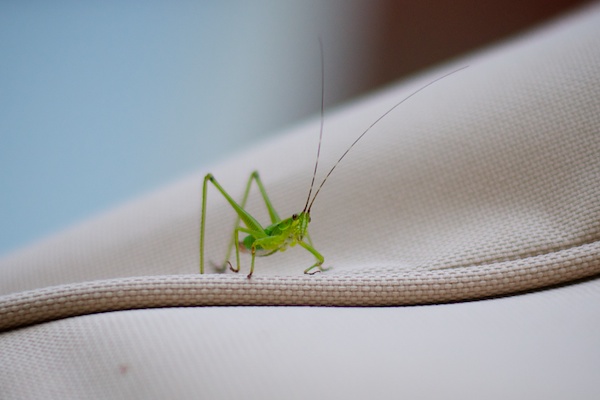
This katydid seems like an inquisitive fellow, or at least that’s what I tell myself based on the expression on his face.

I’m no entomologist, and I have no idea if these insects were thinking anything at all when I took their pictures, but seeing their eyes and faces lends a significant amount of depth to what would otherwise be just another photo of just another bug. It takes time and patience, but if you try to capture your insect subjects’ eyes you can draw your viewers into your photographs in new and compelling ways you may not have considered before.

#4 Alter your perspective

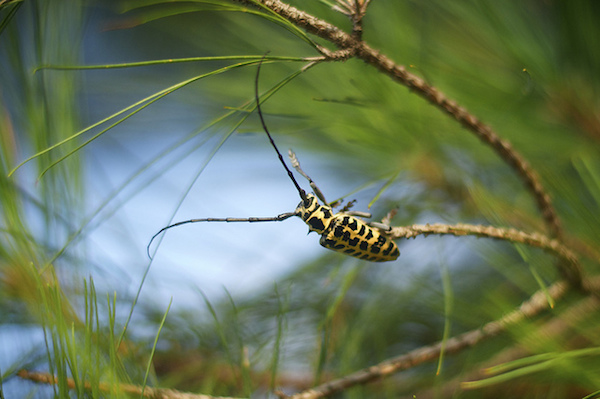
One of the biggest mistakes you can make when photographing insects is to stand above them and point your camera down. You might get some pictures of spiders, beetles, or giant ants, but they will probably not be nearly as interesting, compelling, or engaging as they could be if you simply tried a different angle. I followed this cottonwood borer for almost a half hour as he climbed all over a pine tree, all because I wanted to get the picture from a more unconventional angle. I could have just taken a photo while he was on a branch or the trunk, but shooting him from a low angle while he was stretching out his front leg made for a much more engrossing photograph.

borer

This technique can also be used to transform almost anything into a more captivating photograph. People, pets, familiar scenery, even common household objects can take on entirely new dimensions if you examine them from new and unfamiliar angles. Of course it works great with bugs and insects, but the next time you pick up your camera try it with almost anything around you.

Of course one of the best ways to get photographs of insects is to invest in a macro lens for your camera, and even though they can be quite pricey the results they produce are absolutely astounding.  All of the photos in this article were taken with either a 35mm or 50mm prime lens, which have minimum focusing distances of about 12 inches. Macro lenses can focus on objects right in front of the lens, which can give you some outstanding pictures of insects, bugs, or anything else for that matter. But even if you only have the kit lens that came with your camera you can still get some amazing images. If you have any to share, leave them in the comments below as well as any other tips you might have for getting pictures of our small little friends.

Some other options for doing macro shots without investing an expensive lens:

  • Reverse Lens Macro: Close Up Photography Lesson #3
  • Getting Up Close with Close-Up Lenses
  • Alternatives to Buying a Dedicated Macro Lens for your DSLR
  • Extension Tubes: Close Up Photography Lesson #2

The post 4 Tips for Photographing Bugs and Insects by Simon Ringsmuth appeared first on Digital Photography School.


Digital Photography School

 
Comments Off on 4 Tips for Photographing Bugs and Insects

Posted in Photography


Photographer’s notebook from Captain Scott’s last Antarctica expedition found

29 Oct

A notebook containing recorded details of plates shot by explorer George Murray Levick during Captain Scott’s final expedition has been found and restored by the Antarctic Heritage Trust of New Zealand. Discovered in melted snow outside the hut that was Scott’s base during the British Antarctic Expedition, the notebook is said to contain pencil-written details of ‘the dates, subjects and exposure details for the photographs he took during 1911 while at Cape Adare’. Learn more

Articles: Digital Photography Review (dpreview.com)

 
Comments Off on Photographer’s notebook from Captain Scott’s last Antarctica expedition found

Posted in Uncategorized


New service Mylio offers to synchronize your photographic life

29 Oct

Mylio, a subscription-based photo organization and storage program, is making a debut at this year’s PhotoPlus Expo in New York. Created by MyLO, a Bellevue, Washington-based company, Mylio offers cross-device access to a user’s collection of photos, without them having to change their storage structure. We’ve taken it for a test drive – find out our impressions and find out about the new service. Read more

Articles: Digital Photography Review (dpreview.com)

 
Comments Off on New service Mylio offers to synchronize your photographic life

Posted in Uncategorized


29. Oktober 2014

29 Oct

Ein Beitrag von: RICOW.de

streets of little italy © RICOW.de


kwerfeldein – Fotografie Magazin | Fotocommunity

 
Comments Off on 29. Oktober 2014

Posted in Equipment


Fall Foliage Photography Guide for Taking Better Autumn Photos

29 Oct

The world is filled with Red and Gold…Get out there and Shoot!!! So, as many of you know, I have never actually lived in a place with true fall. I’m from Los Angeles, lived in Hawaii, both of which basically are perfect always, did an eight year stint in North Dakota, where it’s frigid for ten months, then there’s a Continue Reading

The post Fall Foliage Photography Guide for Taking Better Autumn Photos appeared first on Photodoto.


Photodoto

 
Comments Off on Fall Foliage Photography Guide for Taking Better Autumn Photos

Posted in Photography