RSS
 

Archive for September, 2014

DxOMark Mobile report: Sony Xperia Z3 ties for first

21 Sep

The Sony Xperia Z3 is Sony’s latest waterproof flagship smartphone, picking up where the Z2 left off. Like that phone it’s 4K capable and also offers an atypically-large 1/2.3″-type sensor. Just like the Z2, that’s a 20.7MP Exmor RS stacked CMOS sensor nestling behind a 27mm equivalent F2.0 lens. All this has encouraged Sony to offer ISO 12,800, which it says is the highest of any smartphone. Learn more about how it performs

Articles: Digital Photography Review (dpreview.com)

 
Comments Off on DxOMark Mobile report: Sony Xperia Z3 ties for first

Posted in Uncategorized


21. September 2014

21 Sep

Ein Beitrag von: Alexander

Eine Frau in ein Tuch gehüllt steht mit dem Rücken zur Kamera vor einem nebligen Meer.


kwerfeldein – Fotografie Magazin | Fotocommunity

 
Comments Off on 21. September 2014

Posted in Equipment


Photokina 2014: Sony stand report

21 Sep

It’s the second day of the photography industry’s biggest tradeshow and we paid a visit to the Sony booth. Hoping to catch a glimpse of the Alpha QX1 ‘lens-style camera’ paired with a gigantic 70-200mm lens, Sony did not disappoint us. We also got our hands on a pair of new lenses. Take a look around Sony’s Photokina 2014 stand with us. Read more

Articles: Digital Photography Review (dpreview.com)

 
Comments Off on Photokina 2014: Sony stand report

Posted in Uncategorized


Behind the Shot: Spot the Shark

21 Sep

Nature photographer Erez Marom shares the story of his image ‘Spot the Shark’, taken at Breiðamerkursandur – ‘the ice beach’ in Iceland. In this article he explains how he set up and took the picture, and the post-processing steps required to get to the final result. Click through for the full story.

Articles: Digital Photography Review (dpreview.com)

 
Comments Off on Behind the Shot: Spot the Shark

Posted in Uncategorized


Photokina 2014: Hands on with Leica’s S & M (it’s not what you think)

21 Sep

Leica announced two new M-series rangefinders at this year’s Photokina, in addition to the Digital M-P released last month. The German company also unveiled a new medium-format S, which as well as high-resolution stills can capture 4K video. Naturally, we headed over to the Leica booth to get our grubby hands all over the new cameras. Click through to see more. 

Articles: Digital Photography Review (dpreview.com)

 
Comments Off on Photokina 2014: Hands on with Leica’s S & M (it’s not what you think)

Posted in Uncategorized


Step by Step Portrait Processing in Lightroom

21 Sep

Andrew’s ebook Mastering Lightroom: Book Four – The Photos is available now at a special price of 40% off for a limited time from Snapndeals. It’s an advanced guide to processing photos in Lightroom’s Develop module, explaining how to use Lightroom’s powerful processing engine plus Develop Presets and plug-ins to create beautiful images. This photo is one of ten case studies from the book.

Portrait processing in Lightroom

The story

When you are photographing someone who enjoys being in front of the camera, take advantage of it. This was a simple portrait to take and its strength comes from the model’s spirit, not fancy technique. I’ve worked with her before and know that she is good at creating different facial expressions. I asked her to give me a series and every time she changed her expression I took another photo. Experienced models will pose, pause until you take the photo, and then move onto the next one, making your job as a portrait photographer much easier.

You can’t see it in this photo but the model was holding a silver reflector slightly beneath her shoulders. The reflected daylight created a wonderful clean lighting effect that made processing the portrait much easier.

First steps

Here’s the original portrait as it appeared straight out of the camera. It was taken with an 85mm lens set to f/1.8, throwing the background out of focus.

Portrait processing in Lightroom

I knew from the start that I wanted the model’s expression to be the focal point of the portrait. The use of a short telephoto lens and a wide aperture has partly achieved that, but the photo required more work. The first task was to tackle the background. Although out of focus, its brightness was a big distraction. My main job here was to make the background darker so the viewer’s eye goes straight to the model.

My hope today is that by following this tutorial and applying the techniques I used to your own photos, you will learn how to create better portraits in Lightroom.

Step 1: Basic adjustments

I prepared the photo by going to the Camera Calibration panel and setting Profile to Camera Portrait. Next I went to the Lens Corrections panel and enabled Chromatic Aberration removal and Profile Corrections, setting Vignetting to zero.

I wanted clean, neutral skin tones, so I went to the Basic panel and moved the Temp slider slightly (from 4850 to 4520) to remove the warm tint.

Step 2: Add a vignette using the Radial Filter

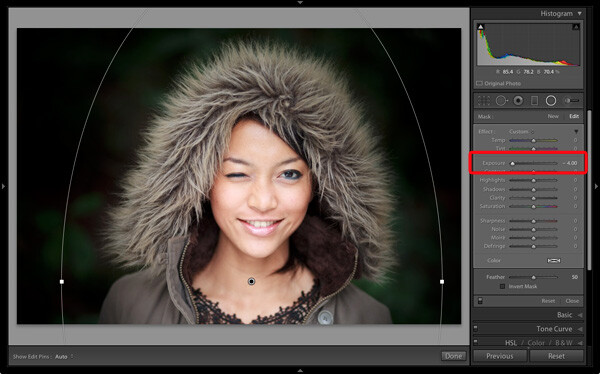
Next I used the Radial Filter tool to make the background darker. I placed the filter so that the top half surrounded the model’s face and shoulders. In this position the Radial Filter can be used to make the area either side and above the model darker, without affecting the bottom part of the portrait. I set Exposure to -4.0 to see the area affected by the adjustment.
Portrait processing in Lightroom

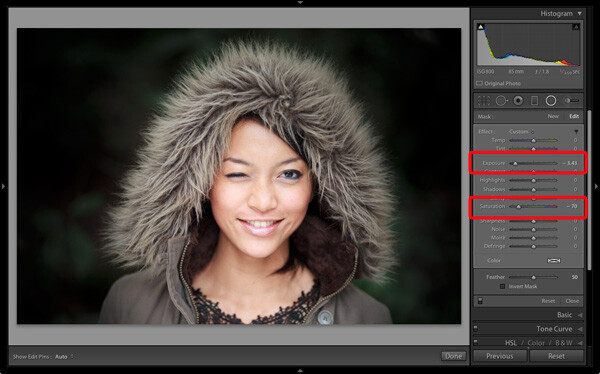
When I was happy with the position of the Radial Filter I reset Exposure to zero, then reduced it until the background went quite dark. I also set Saturation to -70 to remove colour from the background. How much you push the Exposure slider in this situation is always subjective. Some of you will want to retain a fair amount of detail in the background, others will be content to make it go completely black.
Portrait processing in Lightroom

Note: Radial filters are new to Lightroom 5. In earlier versions the best way to achieve a similar effect would be to place a Graduated Filter on either side of the model, and use Adjustment Brush adjustments to fill in the gaps. An alternative technique is to use the Post-Crop Vignetting tool, and lighten any areas that are too dark (such as the model’s shoulders in this example) with the Adjustment Brush tool.

Step 3: Refine the vignette with the Adjustment Brush

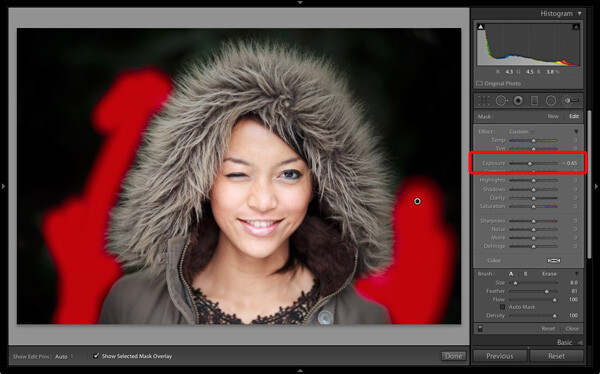
While the Radial Filter is an excellent tool for making backgrounds darker, it’s not perfect. The feathering required for a gradual transition may leave some areas of the background close to the subject too light. In this case there were still areas around the hood that were a little bright.

So I used the Adjustment Brush tool to select those areas and reduced Exposure (to -0.65) to make them darker. I didn’t have to be precise with the placement of the Adjustment Brush as the background was already quite dark and out of focus.
Portrait processing in Lightroom

Tip: If you find that the use of the Adjustment Brush is obvious, try setting Feather to 100 and Flow to 50%. This lets you build up the effect little by little instead of doing it all in one brush stroke.

Step 4: Retouching with the Adjustment Brush

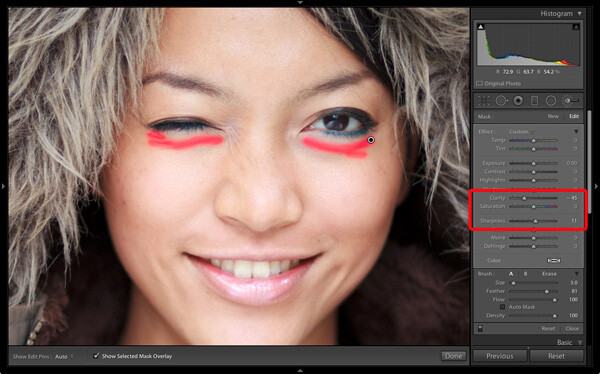
This portrait didn’t need much retouching, but there were still a couple of things I wanted to do. The first was to minimize the lines under the model’s eyes. Note that I didn’t want to get rid of them completely, as they are a natural part of her expression. The lines were created by her smile and winking action, and removing them would look unnatural.

I used the Adjustment Brush tool (zoomed in), and carefully painted over the lines under her eyes. I kept the brush size small so as not to affect the neighbouring areas.

Then I selected the Soften Skin preset from the Effect menu. Lightroom applied the skin smoothing effect at full strength by setting Clarity to -100 and Sharpness to +25. This was too strong. To reduce it, I clicked on the pin that marked the Adjustment Brush, held the left mouse button down and dragged the mouse left. Lightroom reduced the intensity of the effect by moving the Clarity and Sharpness sliders in proportion (this technique works with any setting from the Effect menu). I stopped when it looked right (Clarity -45, Sharpness +11).
Portrait processing in Lightroom

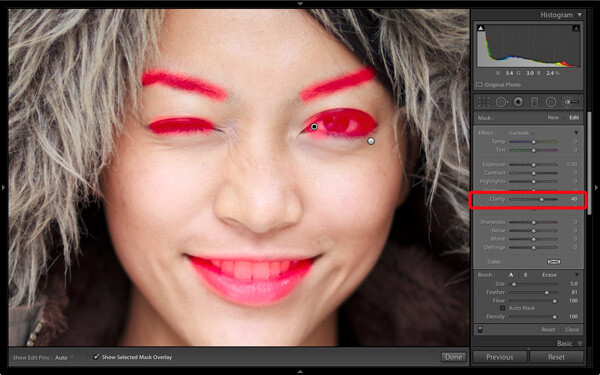
I created a new Adjustment Brush to cover the model’s eyes, mouth and eyebrows. I pushed the Clarity slider to +40 to bring a bit of extra sharpness and contrast to those areas. The screen shot shows the areas covered by the Adjustment Brush.
Portrait processing in Lightroom

Step 5: Framing the portrait

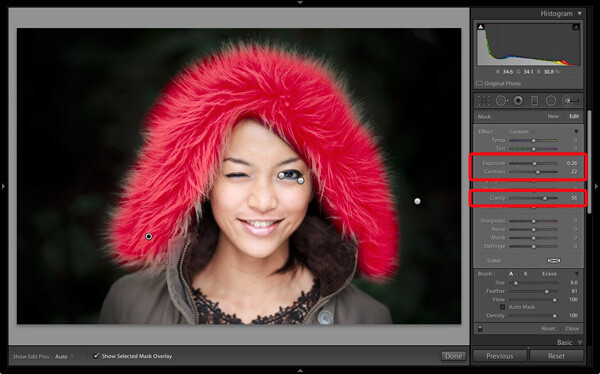
The model’s hood creates a natural frame for her face and is an essential part of the composition. I decided to emphasize it by using Clarity to bring out the texture of the fur.

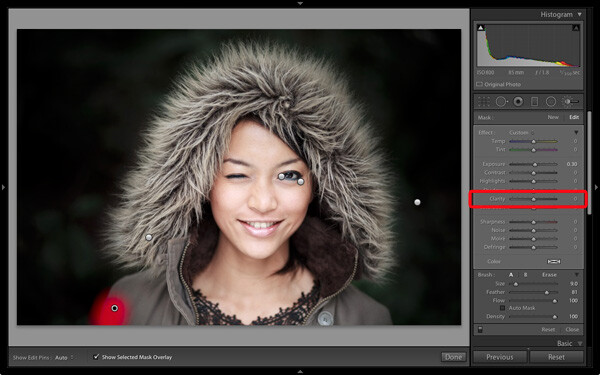
I created another selection using the Adjustment Brush tool and increased Clarity (to 56), Contrast (to 22) and Exposure (to 0.26). The hood is a frame that draw the viewer’s eye to the centre of the frame, and these adjustments help to emphasize it. I needed to find the balance between emphasis and distraction; highlighting the beautiful texture of the fur lined hood without pulling too much attention away from the model’s expression. This screen shot shows the area covered by the Adjustment Brush.
Portrait processing in Lightroom

Next I went to the Basic panel and reduced Vibrance to -14 to de-emphasize the colours a little more. Finally, I used a small Adjustment Brush to lighten the edge of the model’s right shoulder, which had been darkened by the Radial Filter adjustment earlier. The area covered by the Adjustment Brush is shown in the screen shot.
Portrait processing in Lightroom

Comparing before and after results

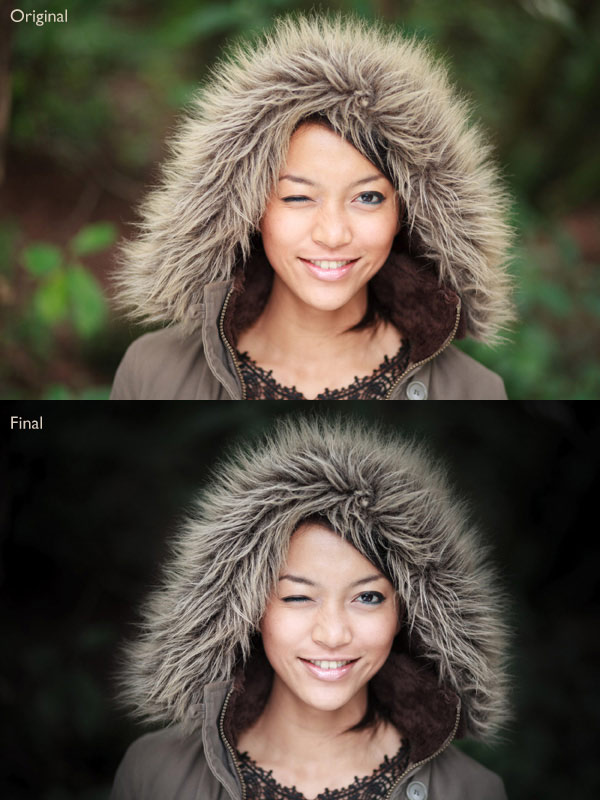
Here are the original and final versions together so you can compare them.
Portrait processing in Lightroom

What do you think of these processing techniques? There’s more than one way to process most photos – do you have any suggestions for an alternative interpretation of the original Raw file? Please let me know in the comments.
Mastering Lightroom: Book Four – The PhotosAndrew’s ebook Mastering Lightroom: Book Four – The Photos is available now at a special price of 40% off for a limited time from Snapndeals. It’s an advanced guide to processing photos in Lightroom’s Develop module, explaining how to use Lightroom’s powerful processing engine plus Develop Presets and plug-ins to create beautiful images. This photo is one of ten case studies from the book.

The post Step by Step Portrait Processing in Lightroom by Andrew S. Gibson appeared first on Digital Photography School.


Digital Photography School

 
Comments Off on Step by Step Portrait Processing in Lightroom

Posted in Photography


Creative Live hosts six days of free online photography classes

21 Sep

Creative Live is currently hosting Photo Week – six days of free photography classes. The event is ongoing through September 20th, and the interactive classes will be taught by professionals from various parts of the industry on a range of topics such as light painting, wedding and GoPro photography. Read more

Articles: Digital Photography Review (dpreview.com)

 
Comments Off on Creative Live hosts six days of free online photography classes

Posted in Uncategorized


Making the Most out of the Photography Stuff You Have Already

21 Sep

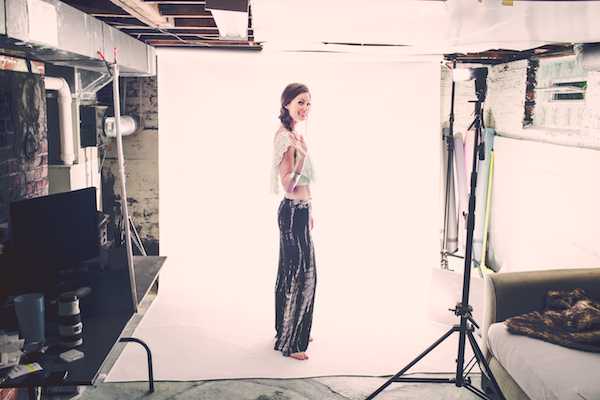
Several years ago I had a studio for about six months. It was really nice to have a space that I knew was always there, waiting for me to shoot in, should the need arise. The problem was that most of my shoots took place outdoors or on location, and when my trial lease period was over, I couldn’t rationalize staying on at the monthly rental rate. What didn’t occur to me at the time was that I had a perfectly good, albeit small, basement at my disposal. Due to the low, 80″ (6.6 foot) ceiling, the narrow, 10’x20′ shooting area, and the generally dark ambience of an unfinished basement, the thought of shooting down there had never crossed my mind. It wasn’t until I moved out of my studio and no longer had a place to store my gear, that I even ventured down there with my equipment.

IMG 8174

The setup began simply enough, with me doing little more than editing at a table down there. Over the months that followed, I did the occasional head shot or product shoot, quickly realizing that I didn’t need as much space as I originally thought. Sometimes a problem would arise, like when I needed to shoot a full body portrait of a guy who was over six feet tall. I began modifying the space accordingly, such as adding white panels to the overhead joists to reflect light.

I wanted a white seamless set up, but the backdrop stand legs were too wide to allow for the 8 foot wide white vinyl roll. Instead, I discovered that I could run a rod from the top of the air condition duct to a C-stand and just barely fit it in the space, pulling the sweep just out to the edge of my desk. This allowed a depth just long enough to light the subject and background separately, which meant I could accomplish a pure white background (if the space was any more shallow, the subject would be stepping in to the backdrop light, blowing them out with the light).

Tumblr navcq2zXA81qzpmooo1 1280

The other issue with a small shooting space is that you don’t have the space to back your lights off of your subject. As you may know, if you want soft light on your subject, you need to make your light source large and diffused or indirect. The problem was that if I added even an smaller umbrella to my strobe stand it meant that I’d have to lower the light the length of the radius of the umbrella, leaving my light at a max height of around five feet (too low). The narrow width of the shoot space also meant that I couldn’t simply hang up a white sheet and shoot through it, which is a common workaround in making a small light source larger.

IMG 8294

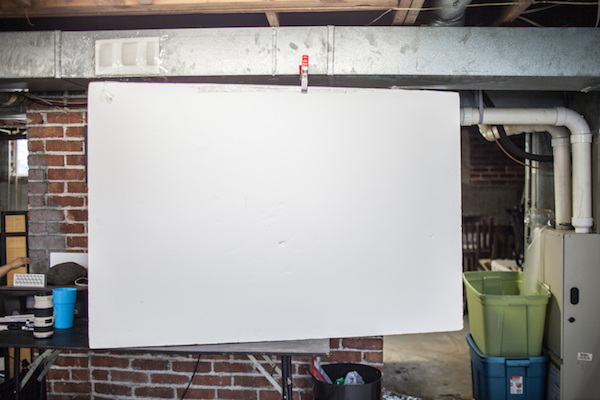
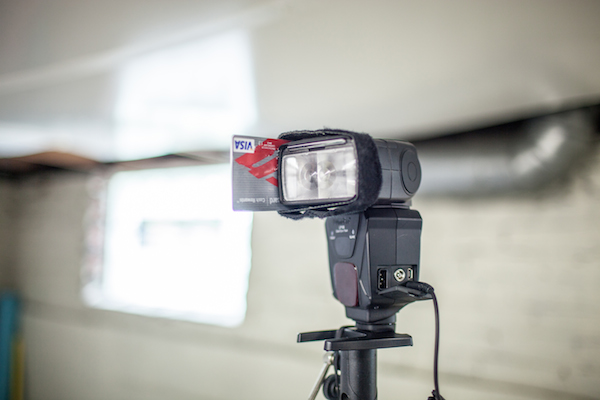
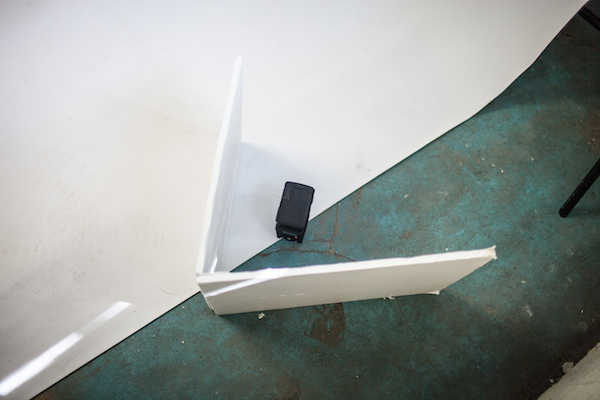
I eventually figured out as a solution which was to place a 40″x60″ white board on my desk, beside where the subject usually stands, and shoot light into the board, several feet in front of the subject. By securing a credit card, or something of a similar size and opaqueness, to the side of the strobe, and zooming the flash in to 105mm, I was able to get my light stand out of my view of the subject as well as create a large, reflected light surface, that ran all the way up to the ceiling. This large light source was fantastic in creating a giant catchlight in the subject’s eyes, sunglasses or any reflective surface. I also added a small, white v-flat to hide the background light, which also served in reflecting some of the light onto the opposite white wall, helping to further light the subject.

IMG 8288

IMG 8290

Keep in mind that within the small confines of this setup, the subject is pretty much fixed in one spot. If they were to move forward at all, the crosslight will create odd shadows on their face, or if they move backward, they would get caught in the harsh background light.

Tumblr navcq2zXA81qzpmooo4 1280

What sorts of innovations have you come up with to work within your space or equipment limitations? Share in the comment section below.

Links to other DIY projects for you:

  • DIY How to Build and Use a Reflector to Take Better Portraits
  • Light Tent Comparison – DIY Versus Kit Tents
  • A project for the New Year: How to make a DIY Ground Pod
  • 27 Amazing Macro Snowflake Images Shot with a DIY Camera Set Up

The post Making the Most out of the Photography Stuff You Have Already by Nick Fancher appeared first on Digital Photography School.


Digital Photography School

 
Comments Off on Making the Most out of the Photography Stuff You Have Already

Posted in Photography


Opinion: Bring on the 70-200mm equivalents

21 Sep

One swallow does not a summer make, said Aristotle, suggesting the dangers of looking for trends based on single examples. Even with this in mind, I’m pleased to see two manufacturers introduce 70-200mm equivalent zooms for APS-C cameras at this year’s Photokina. First Fujifilm introduced its 50-140mm F2.8 R, and then Samsung followed suit with its 50-150mm F2.8 S. I think these lenses make more sense than actual 70-200mms; let me explain why…

Articles: Digital Photography Review (dpreview.com)

 
Comments Off on Opinion: Bring on the 70-200mm equivalents

Posted in Uncategorized


Subtracting Art: Subjects Photo-Edited from Famous Paintings

21 Sep

[ By WebUrbanist in Art & Drawing & Digital. ]

venus-subtracted-gif

Anyone who has used Photoshop or similar programs knows these shifting dotted lines suggest a selection has been made and, in this case, something has been deleted.

scream-edited-again

As part of a series of digital art edits, Michael Guppy effectively disappeared the focal points of these works, selecting and removing key elements (while quietly filling in their backgrounds). He simply hooks the results into looped gif files a few frames long and the effect is complete.

edited mona lisa painting

edited photoshop classic art

For those of us with even a little exposure to art history, our imaginations do the rest, completing the pictures from memory by recalling a screaming figure here, a poised Mona Lisa there and seeing the man behind the apple reappear in our heads.

edited famous apple painting

Guppy has done many other pieces that play with digital culture, the internet, classics and icons, but perhaps one of his most entertaining creations can be seen in the video above, titled: The Most Viewed Image on the Internet. If you don’t ‘get it’ right away, well, just give it some time.

Share on Facebook


[ By WebUrbanist in Art & Drawing & Digital. ]

[ WebUrbanist | Archives | Galleries | Privacy | TOS ]


WebUrbanist

 
Comments Off on Subtracting Art: Subjects Photo-Edited from Famous Paintings

Posted in Creativity