RSS
 

Archive for August, 2014

Creating Swirly Bokeh with the Helios 44-2 lens

13 Aug

Hacking_Photography_Helios_44-2_Lens-0086

I recently bought a Sony A7 to compliment my Canon 6D DSLR. A friend convinced me that having small-form, full frame camera would be an entire different way of shooting. I value his opinion, so I picked one up. You can see how I used it in my last article:  when to trick your camera for the perfect exposure.

A New Love of Prime Lenses

I started off with a Sony 55mm f/1.8 and a 24-70mm f/2.8 lens that requires a Sony adapter. The 55mm shoots like a dream and is insanely light-weight.

The 24-70mm and adapter are super heavy and ridiculously front-heavy. It’s a great lens but after taking it out a few times, I concluded it wasn’t for me. I really enjoy having big apertures available for low light so I started looking for another prime lens.

A Lens Defect Leads to Awesome Bokeh

I was looking through photos on Flickr and noticed a few images in which the bokeh appeared to be swirling in a circular pattern. It was awesome and unlike anything I had ever seen!

I did some quick digging and found out this was called “swirly bokeh” and certain vintage lenses created this effect through a manufacturing defect. Well, this “defect” looked really cool to me and I wanted to incorporate it into my lens collection.

Meet the Helios 44-2 58mm f/2 Lens

sony a7, helios lens,

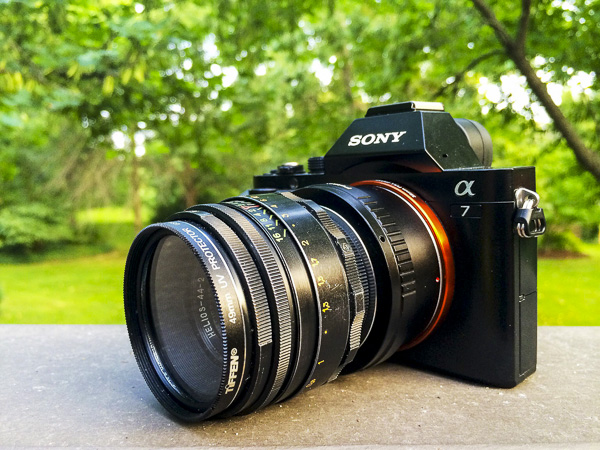
Sony A7 with Helios 44-2 58mm f/2.0 lens

I quickly found out that there is a cult following for a lens called a Helios 58mm f/2. This was a Russian-made lens that essentially tried to emulate a famous Zeiss one.

Several companies made these lenses over several decades, in the millions of units, so they aren’t exactly rare. This means they are really inexpensive because they are so common.

Where to Find the Helios 44-2 Lens

Out of the several models of these lenses, the Helios 44-2 model lens reportedly creates the “swirly bokeh” I was looking for. I did a quick search on Ebay and quickly found a ton of these for sale out of Russia and the Ukraine.

After looking at several of them I found one in excellent condition and ordered it for less than $ 50 including shipping. What a deal! I’ve seen plenty of people get even better deals on Ebay than I did.

Mounting it on the Sony A7 Camera

sony a7, helios lens, helios 44-2,

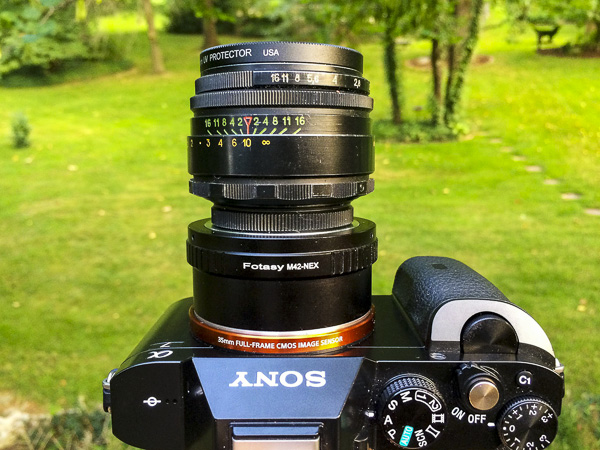
Mounting the Helios 44-2 to the Sony A7

These lenses were created for the Leica M-mount so I needed to get an M mount adapter for the Sony A7. I picked up a $ 10 Fotasy M42-NEX adapter which works perfectly.

It looks like a Franken-camera. I really dig how crazy this thing looks. Other photographers have stopped to ask what the heck this lens setup is.

Using Manual Focus and Manual Aperture Lenses

english setter, helios 44-2 lens,

The Sony A7 focus assist feature makes it easy to nail perfect focus each time.

I’ve never had a lens that was manual focus only, much less manual aperture. Instead of using a front or rear dial on the camera to choose your aperture, you grab a ring on the front of the lens to change it by twisting it to the left or right.

Some of you reading this are used to these type of lenses, but this was new to me.

Using the Manual Aperture Lens

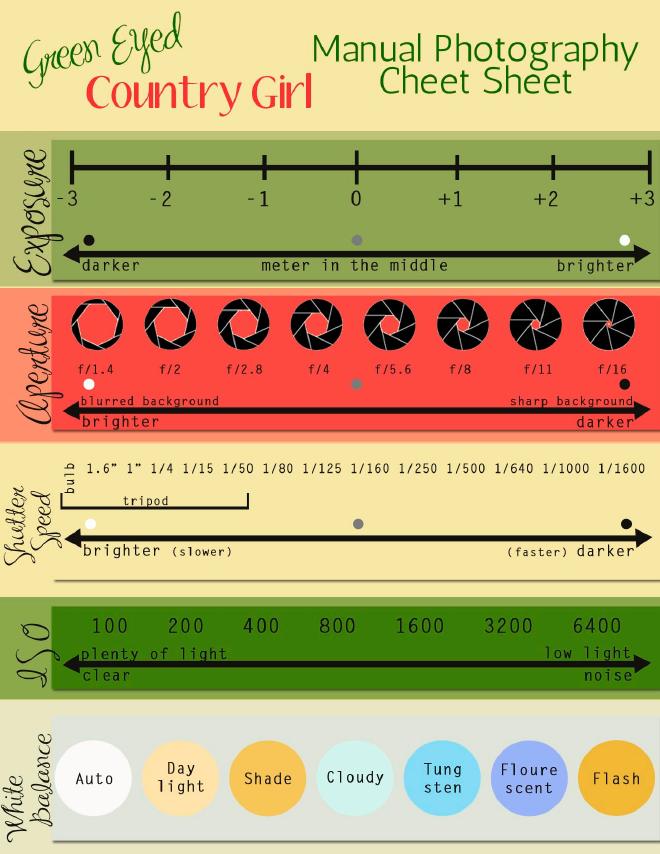
While the aperture ring took some getting used to it really slowed my photo-taking process down. The aperture ring on the front of the lens reads 16 on the left, then 11, 8, 5.6, 4, 2.8, and 2 as you turn to the right. Simply twist the dial to change the aperture.

Manual Focus Rocks with the A7 and the Helios 44-2

Hacking_Photography_Helios_44-2_Lens-0431

Light pole in a Missouri truck stop parking lot surrounded by corn.

The standard challenge with manual focus is trying to eyeball the focus correctly. You might think your subject is in focus but you might be just an inch or two out of focus.

The A7 has focus assist (also called focus peaking) that lights up in-focus sharp details in red so you know what part of the image is in focus. This makes it so simple.

Taking a portrait? Twist the focus ring until a person’s eyes are rimmed in red and guarantee the eyes are sharp in focus. It’s so easy its almost like cheating!

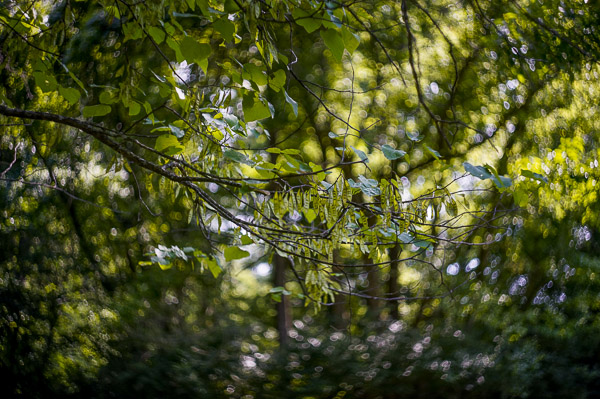
Finally – the Swirly Bokeh

Hacking_Photography_Helios_44-2_Lens-0100

This unfocused image shows the popular swirly bokeh effect

I bought the lens right before a two-week trip to St. Louis, Missouri to visit family. It arrived the day before we left so it was ready to go right away. After a quick test shoot I decided I was going to shoot this Helios 58mm 44-2 exclusively for the entire trip.

Finding the swirly sweet spot

I took the lens into my in-laws yard to find out how best to find the swirly spot. When you shoot wide open at f/,2 close up to the subject, the background is a beautiful, buttery, soft bokeh.

flowers

This image was shot up close which caused the background to blur too much for the swirl I was looking for. I aimed up at a leaf that was a little further away, still shooting wide open at f/2.

It isn’t swirly bokeh yet, but it definitely has more shape to it. I’m getting closer.

branch bokeh

I took another shot with a subject at mid range, perhaps 4-5 feet away while still shooting wide open at f/2.

swirly bokeh, helios lens, helios 44-2

Can you start to see the swirl shape in the background? This photo showed me I’m getting closer. It seems that you need some decent distance from your subject, and you need some background that can fall into swirly bokeh in the distance.

I aimed up at a birdhouse about 8 feet away, which conveniently had a cute little toad in the lower peep hole and took the shot.

swirly bokeh, helios lens, helios 44-2

Success! Apparently you need a pretty good distance in the background so the little light spots and details can register into that swirl shape. I’m really in love with this Helios 44-2 lens.

The Helios 44-2 lens is fast with the f/2 aperture, weighs next to nothing, and was incredibly inexpensive at less than $ 50 including shipping. Even at very small apertures, it tops out at f/16, the lens puts out beautiful images.

Mississippi river,

The first of many manual focus prime lenses

I’ve had such a great time with this lens that I’m going to purchase more manual focus primes. The glass creates very unique images and I can’t wait to pick up my next one.

Have you ever mounted older lenses with your DLSR camera?

If so let me know what lens(es) you have in the comments below as I’m looking to try out even more. Share your images too please.

The post Creating Swirly Bokeh with the Helios 44-2 lens by Mike Newton appeared first on Digital Photography School.


Digital Photography School

 
Comments Off on Creating Swirly Bokeh with the Helios 44-2 lens

Posted in Photography


Das Paradies am Ende der Welt

13 Aug

Ein Beitrag von: Christopher Wesser

Neuseeland! Heureka! Der heilige Gral der Landschaftsfotografie! Das Land, in dem man an der Westküste in Richtung Osten starten kann und durch Berge, Wälder, Felder, Seen, Klippen, vorbei an riesigen Farmen, Hobbit-Höhlen und versteckten Wasserfällen fährt und etwa drei Stunden später an einem verlassenen Strand an der Ostküste Fish & Chips genießt.

Es ist tatsächlich für jeden etwas dabei. Gerade für uns Europäer dürfte die kontrastreiche Landschaft, das Überqueren von Bergpässen und der typisch neuseeländische Urwald ein Wow-Erlebnis sein. Ja, das ist Neuseeland. Ganz Neuseeland? Nein, nicht ganz! Dem aufmerksamen Beobachter wird beim Bereisen dieses Landes nicht entgehen, dass man immer wieder mal auf rar gesäte Ansammlungen von Häusern trifft.

Für uns wohl zu groß, um sie „Dörfer“ zu nennen, aber doch noch irgendwie zu klein, um den Titel „Stadt“ zu verdienen. Und gerade diese Orte haben mich überrascht, weil ich sie so gar nicht auf dem Schirm hatte und sie mich durch den besonderen Charme und das ruhige Gemüt in ihren Bann zogen.

Mädchen auf einem Steg im Wasser

Steg im Wasser

Mädchen auf einem Steg im Wasser

Mädchen auf einem Steg im Wasser

Noch bei den Vorbereitungen hatte ich ganz andere Dinge im Sinn: Ich wollte Natur fotografieren, also musste zu meiner Kamera und den geliebten Festbrennweiten auf jeden Fall auch ein Weitwinkel mit in den Rucksack.

Dass mein Handgepäck sich durch die ganze Technik so anfühlt, als würde ich Ziegelsteine schmuggeln und das komplette Equipment während der Hin- und Rückreise zirka fünf Mal für Sicherheitschecks ausgepackt werden muss, daran hatte ich natürlich vorher nicht gedacht.

Aber irgendwie fehlte mir zu diesem Zeitpunkt noch die Erfahrung der Reisefotografie und ich hatte keine Ahnung, welche Ausrüstung mich in Neuseeland ans Ziel bringen würde.

Straße vor einer BerglandschaftSteg im Wasser

Mädchen vor einer Wand mit Aushängen

Frau sitzt an einem Kaffeetisch in einer Sofaecke

Frau sitzt an einem Kaffeetisch in einer Sofaecke

Eine wichtige Etappe meines Aufenthalts war der Besuch der Südinsel. Dort, so versprach mir meine Freundin, die selbst gebürtige Neuseeländerin ist, werde ich die Kamera angesichts der Landschaft überhaupt nicht mehr aus der Hand legen. Und sie hatte recht!

Das war Mittelerde, wie es mir Peter Jackson immer gezeigt hat, aber uns sollte eine kleine Überraschung erwarten, die das Highlight unserer Reise dargestellt hat. Man muss sich das so vorstellen: Man fährt von Queenstown aus zum nördlichen Ende des Lake Wakatipu.

Laut einschlägigem Reiseführer eine der sehenswertesten Strecken der Welt und tatsächlich muss ich sagen, dass ich in meinem Leben bisher noch keine 50 km zurückgelegt hatte, die schöner waren. Doch am Ende dieser Straße, wo man laut Reiseführer eigentlich umkehren und wieder zurück fahren soll, ist es für mich erst richtig interessant geworden.

Mitten im Nirgendwo taucht plötzlich ein Ortsschild mit der Aufschrift „Glenorchy“ auf und man wundert sich ein bisschen, wo man hier gelandet ist, weil man erst einmal nur ein paar Reiter auf ihrem Pferd überholt und zu seiner rechten zwei, drei riesige Farmen erspähen kann, die direkt am Fuße eines Berges liegen.

Ein paar Meter weiter fängt dann ein kleines Wohngebiet mit einladenden Holzhäusern an. Dunkler Asphalt ohne große Straßenmarkierungen, in jedem Garten ein kleines Boot und alles irgendwie rustikal.

Rote Hütte mit Beschriftung „Glenorchy“

Holzhütten

Tankstelle vor Berglandschaft

Tankstelle vor Berglandschaft

Der Nase nach fährt man an der einzigen Kreuzung nach links und landet auf einem Campingplatz direkt am Lake Wakatipu, der durch einen Holzsteg mit eigenen Straßenlampen begehbar ist. Auch, wenn dort so ein starker Wind ging, dass mich die herumfliegenden Wassertropfen in nur wenigen Sekunden durchnässten, erinnere ich mich vor allem daran, wie ich über den See blickte und das dahinterliegende Bergmassiv bewunderte.

In der Ferne ließen sich kleine Inseln im Nebel erahnen und ich versuchte, meine Kameratasche vor dem tobenden Wasser zu schützen, während ich Objektive tauschte. Der altbekannte Balance-Akt: In der linken Hand ein Objektiv, in der rechten Hand die Kamera. Jetzt ganz vorsichtig aufschrauben und bloß nichts fallen lassen. Beim Wechseln noch darauf achten, dass der Wind kein Wasser in die offene Kamera spritzt – geschafft!

Der Steg schrie förmlich danach, fotografiert zu werden. Es war wie ein roter Teppich, der die Fotografen auf den See führt, ihnen unterwegs ein wunderschönes Bergpanorama bietet und an dessen Ende man sich umdreht und auf die spärlich verstreuten Holzhäuser von Glenorchy blickt, die an einer Straße liegen, die ihrerseits wiederum nahtlos in einem Berg zu enden scheint.

Gleich neben diesem Steg hält Glenorchy eine winzige, hölzerne Halle für die Besucher bereit, in der man Informationen über die Geschichte der Stadt und des Sees erhält und die sich nicht so ganz zwischen „Scheune“ und „Sehenswürdigkeit“ entscheiden kann.

Uferlandschaft

Roter, alter Pick-up vor Berglandschaft

Roter, alter Pick-up vor einer Stadtkulisse

Finger zeigt auf eine Landkarte

Etwas weiter stadteinwärts gelangt man zum offensichtlich einzige Café der Stadt, in dem man sich aufwärmen und trocknen kann. Wobei das „The trading post“ irgendwie mehr als nur ein Café ist. Eine nette alte Dame verkauft hier neben Getränken in Blümchen-Kannen auch Bildbände und Romane aus Neuseeland, die sich wild in teils improvisierten Bücherregalen stapeln.

Wieder draußen auf den übersichtlichen Straßen verfluchte ich wie schon so oft zuvor mein Equipment. Ich schleppte gefühlte 20 kg auf meinem Rücken mit, wollte damit die Stadt erkunden und eigentlich gemütlich durch die Gassen streifen. Stattdessen fühlte ich mich wie ein Packesel und die meisten Objektive blieben sowieso im Rucksack.

Ich versuchte es kurz mit 50 mm, aber es war wie befürchtet irgendwie zu nah dran für diesen Zweck und meinen Bildern fehlten immer wichtige Elemente, die ich zeigen wollte. Jetzt hätte ich natürlich mein 17 – 40 mm aufschrauben können, aber wenn ich die Wahl zwischen Festbrennweite und Zoomobjektiv habe, dann entscheide ich mich ausnahmslos für Festbrennweiten.

Bleibt also ein weiteres Mal das 35 mm übrig und es stellte sich als das perfektes Werkzeug heraus, um Glenorchy so zu portraitieren, wie ich es wollte. Man sagt ja immer, bevor man fotografiert, sollte man die Kamera weglegen, seine Umgebung beobachten und unvoreingenommen sein Motiv finden (mit den Augen fotografieren).

Erst dann hält man sich die Kamera vor’s Gesicht und macht ein Bild. Und irgendwie scheinen 35 mm für mich die perfekte Brennweite zu sein, um das, was ich sehe, optimal auf ein Foto zu übertragen. Zudem hatte ich Glück, dass es ein bewölkter Tag mit vereinzelt durchdringenden Sonnenstrahlen war, der mir Glenorchy in einem wundervoll weichen Licht präsentierte. Ich hätte es mir nicht besser wünschen können.

Mädchen zieht sich vor einer Berglandschaft die Kapuze über den Kopf

Berglandschaft mit Palmen

Zwei Reiter auf einer Straße

Holzhütten vor einer Berglandschaft

So wanderte ich also durch die Straßen, fühlte mich irgendwie geborgen und weit weg von jedem Stress. Das Leben hier erscheint lebenswert, einfach und ein Stück weit unberührt von allem Negativen. Ich könnte schwören, die meisten Einwohner von Glenorchy verbringen ihre Tage damit, in Karo-Hemden Brennholz zu hacken und abends mit ihrem Boot auf den See zu fahren, Gemüse aus ihrem Gärten zu kochen oder eine Grillfeier auf den Straßen abzuhalten, auf denen sowieso praktisch keine Autos fahren.

Es ist eine kleine Zivilisation direkt an einem Bergsee in Neuseeland, die sich so gar nicht für die Probleme der Welt interessiert. Das Fotografieren in Deutschland bescherte mir im Laufe der Zeit die ständige Paranoia, dass ich jederzeit darauf gefasst sein muss, den Satz „Hallo?? Was fotografieren Sie da? Dürfen Sie das?“ zu hören.

Aber in Glenorchy sowie eigentlich in ganz Neuseeland blieben solche Dinge unausgesprochen. Im Gegenteil: Selbst, als ich meine Kamera in die Gärten oder auf die Häuser der Anwohner richtete, schenkte mir jeder, der mich bemerkte, ein warmes Lächeln. Man war wohl irgendwie stolz darauf, dass sich doch mal ein Tourist hierher verirrt und es ihm dann so gut gefällt, dass er die Straßen sogar auf Bildern festhält.

Hütten vor einer Berglandschaft

Feld vor einigen Hütten vor einer Berglandschaft

Mädchen unscharf vor einer Farm vor einer Berglandschaft

Einsame Hütte vor einer Berglandschaft

Auch die überdimensionierte Tankstelle mit Truck-Stop war stolz und präsentierte mir ihr filmreifes, quietschendes „Open“-Schild. Eine alte Katze überquerte schwerfällig die Straße, ohne überhaupt einen Gedanken daran zu verlieren, dass sie überfahren werden könnte und lenkt meinen Blick auf eine Touristeninformation, die wie ein Lucky-Luke-Set aussieht.

Gefühlt bin ich hier am Ende der Welt angekommen und es ist wider Erwarten wunderschön und friedlich. Es wirkt wie ein kleines Paradies, das sich die Dorfbewohner hier geschaffen haben. Was lustig ist, denn einige Kilometer die Straße runter kommt man tatsächlich an einen Ort namens „Paradise“ (kein Witz!).

Ich kann mir durchaus vorstellen, dass der typische Glenorchy-ianer hier sein Sonntags-Picknick abhält, im Diamond Lake schwimmen geht oder im Wald von Mittelerde (auch kein Witz!) seinen Hund frei laufen lässt.

Straße mit Schild „Glenorchy“

Mädchen unscharf vor einigen Hütten vor einer Berglandschaft

Ein einsamer Hof mit einer Holzhütte

Ein einsamer Hof mit einer Holzhütte

Das war’s aber dann wirklich. Mehr ist in Paradise nicht geboten. Die zwei Häuser, aus dem das Dorf besteht, übersieht man fast, während man sich auf die Schotter-Straße konzentriert und die Pferde beobachtet, die am Fuße der Berge ihren Auslauf genießen. Ein paar Meter weiter ist dann wirklich Schluss. Ende.

Maschendrahtzaun, der über einen Bach verläuft. Dahinter noch ein paar Hügel mit grasenden Schafen, die überhaupt noch nie irgendwas von einer Stadt oder Industrienationen gehört haben. Ein Bild, das man auf sich wirken lassen sollte, bevor man umdreht und sich wieder dem hektischen Leben widmet.

Die Welt hat ihr Bestes gegeben und ich habe tosend applaudiert. Ein besonderes Dankeschön an die Natur, ohne die das alles nicht möglich gewesen wäre.

Mädchen vor einer Landschaft mit See und Bergen

Steinküste eines Sees vor einer Berglandschaft

Waldrand mit toten Bäumen vor einem See mit Berglandschaft

Hütten vor einer BerglandschaftMädchen balanciert auf einem Stamm vor einer Kulisse toter Bäume

Diese Reise hat mir eine wichtige Lektion über das Fotografieren beigebracht: Es ist schon wirklich cool, wenn man viel Equipment und gute Objektive hat, damit kann man super Jobs durchziehen und ist schön flexibel bei allem, was man so fotografisch ausprobieren möchte.

Aber geht man auf Reisen und möchte eigentlich eher dokumentarisch festhalten, was da so passiert, dann sollte man das Zeug lieber Zuhause lassen. Zurück in Deutschland habe ich mir nach einiger Recherche die Fujifilm X100s* gekauft. Eine spiegellose Kamera, deren festes Objektiv etwa meiner 35-mm-Festbrennweite entspricht.

Die Kamera ist klein und bietet eine absolut nicht zu erwartende, überragende Bildqualität. Auf meiner nächsten größeren Reise wird sie mir erlauben, mein Gepäck viel leichter zu halten. Zudem ist sie so unauffällig, dass man damit auch mal an Orten fotografieren kann, an denen man mit Spiegelreflexkameras grundsätzlich gar nicht reinkommt.

Straße in einer Berglandschaft mit Schild „Paradise“

Straße in einer Berglandschaft mit einer Pferdeweide

Pferdeweide vor einer Berglandschaft

Bachlauf in den Bergen

Ob mir aufgrund der nicht vorhanden Möglichkeit, Objektive zu wechseln etwas fehlen wird, weiß ich jetzt noch nicht. Aber man hätte mir in Neuseeland theoretisch auch einfach das 35-mm-Objektiv auf meine Kamera festschweißen können und es hätte mich wenig gestört, deshalb bin ich zuversichtlich, dass sich meine kleine Fujifilm als perfekter Reisebegleiter herausstellen wird.

* Das ist ein Affiliate-Link zu Amazon. Wenn Ihr darüber etwas bestellt, erhält kwerfeldein eine kleine Provision, Ihr zahlt aber keinen Cent mehr.


kwerfeldein – Fotografie Magazin | Fotocommunity

 
Comments Off on Das Paradies am Ende der Welt

Posted in Equipment


12. August 2014

13 Aug

Ein Beitrag von: Ana Stefanovic

Ana Stefanovic


kwerfeldein – Fotografie Magazin | Fotocommunity

 
Comments Off on 12. August 2014

Posted in Equipment


Site news: New ‘Features’ index page

13 Aug

Hey you know that article you read on dpreview.com a couple of months ago that you really liked? What was it called again…? do you remember who wrote it…? Yeah, we hear you. Since we made some site changes earlier this summer it’s been pretty hard to find certain types of articles but we’ve been working on it, and we’re pleased to announce a new index page for non-review content. This is where you’ll find articles and news stories, arranged in categories according to theme – everything from interviews and show reports to accessory reviews. Click through to learn more.

Articles: Digital Photography Review (dpreview.com)

 
Comments Off on Site news: New ‘Features’ index page

Posted in Uncategorized


Nikon D810: A sport photographer’s impressions

13 Aug

UK-based sports photographer Guy Swarbrick specializes in shooting cycling events, but this summer he got the opportunity to shoot the Commonwealth Games in Glasgow Scotland. Just before the games he took delivery of Nikon’s latest full-frame DSLR the D810, and in this article he shares his experiences of using the camera. Click through to read his impressions of the D810, and take a look at some of his pictures. 

Articles: Digital Photography Review (dpreview.com)

 
Comments Off on Nikon D810: A sport photographer’s impressions

Posted in Uncategorized


Endless City: Skyscraper Wraps Upward with Walkable Ramps

13 Aug

[ By WebUrbanist in Architecture & Cities & Urbanism. ]

endless city vertical view

An urban pedestrian paradise, this conceptual design proposes to turn cities skyward with a system of flexible open spaces that gradually rise as floor plates curve up around its core.

endless city interior atrium

This winning  entry to the SkyScrapers & SuperSkyscraper Competition by SURE Architecture, dubbed Endless City, is more than just visually compelling – it also creates an argument about urban pathways and civic connectivity.

endless city floor plates

endless city top level

Its design boasts a series of sustainable strategies deployed throughout the structure, including passive energy, heating, cooling and lighting systems as well as advanced waste and water management.

skycraper - diagramme- structure OK

The structure is framed around a series of vertical steel-tress columns that in turn support a pair of ramps connected periodically by bridges.

endless city ramped section

The program features a mix of commercial, residential and institutional functions, with larger community areas mixed periodically throughout.

\SERVERwork 22013-033 Skycraper-London CompetitionCADLondon

endless city top down

The core concept, though, is to commingle these programmatic elements with circulation, allowing visitors and occupants to mix on its various levels and traverse the structure vertically – skyways taken to a new extreme. Its modular construction also theoretically enables further additions, allowing it to grow upward with time.

Share on Facebook


[ By WebUrbanist in Architecture & Cities & Urbanism. ]

[ WebUrbanist | Archives | Galleries | Privacy | TOS ]


WebUrbanist

 
Comments Off on Endless City: Skyscraper Wraps Upward with Walkable Ramps

Posted in Creativity


Was wäre, wenn wir die Welt verändern?

12 Aug

Ein Beitrag von: Elizabeth Haust

Ich studiere, um Emotionen und Gefühle zu reproduzieren, um mit Symbolen zu arbeiten. Das Wichtigste ist für mich Durst. Ich studiere einfach nur, aber ich strebe danach, Ideen und Gefühle durch visuelle Kunst zu zeigen.

Die meisten meiner Modelle sind meine Freunde. Manchmal reicht es schon aus, Sorgen in einer Person zu sehen, ein anderes Mal erschaffen wir aus Spaß eine neue Welt. Ich mache Fotos mit digitalen oder auch analogen Kameras, nur selten nutze ich dafür mein Mobiltelefon.

Wenn man so will, besteht meine Nachbearbeitung in Handarbeit. Ich bearbeite meine Bilder mit Bleistiften, Markern, Acrylfarben, Wasserfarben und allen, was ich so zur Verfügung habe, wie etwa Blut, Milch, Kaffee, Erde, Wein. – Ist das nicht eine entzückende Liste? Aber wenn es um Photoshop geht, bin ich ein ziemlicher Idiot.

Ich versuche nicht, die Welt zu verändern, aber was wäre, wenn wir es einfach versuchen würde? Ich möchte, dass Menschen Menschen werden. Ich möchte, dass die Leute Nationen und Unterschiede vergessen, sie an die Vermessenheit des Babylonischen Turmes erinnert werden. Ich möchte, dass sie ihren Durst wiederfinden und laut ihre Gefühle unter Postulaten über Ehre, Moral, Wahrheit, dem Guten und Vertrauen herausschreien, die heutzutage vollkommen vergessen sind.

Eine Frau in roter Jacke vor blauer Wand mit blutender Nase.

Eine Frau, nur mit Unterhose bekleidet, hockt auf dem Rücken eines Mannes auf einem Bett.

Eine Frau mit vielen Pflastern auf der Haut.

Eine Frau liegt auf dem Boden und hält sich einen Gewehrlauf unters Kinn.

Eine Frau, gekleidet in ein Wolfskostüm.

Eine Frau, gekleidet in ein Wolfskostüm.

Eine Frau vor einem Wasserfall.

Eine Frau liegt auf nassen Steinen.

Eine Frau liegt auf nassen Steinen in der Brandung.

Eine Frau zwischen großen Steinen.

Eine Frau liegt im Bett und raucht.

Eine Frau liegt auf einem kaputten Bett.

Eine Frau sitzt auf einem Bett, ein Mann kommt auf sie zugelaufen.

Ein Mann wirbelt wütend einen Fenstervorhang auf.

Eine Frau mit erhobenen Armen vor einem vorbeifahrenden Zug.

Mehrfachbelichtung: Eine Frau in einem Federkostüm.

Eine Frau in einem Federkostüm.

Eine Person mit Hasenohren und abstrakten Bildstörungen.

Eine Frau hat ein fliegendes Tuch über dem Kopf und wirbelt herum.

Ein Kind blickt eindringlich durch Tuchstoff.

Ich möchte, dass die Leute über ihre Komfortzonen hinausgehen, in eine Region, in der visuelle Inhalte nicht nur aus Kätzchen, Blumen und Essen bestehen, sondern etwas mehr, selbst wenn es einen ängstigt und mehr auslöst als nur Speichelfluss.

Ich möchte, dass die Menschen Gott finden – nicht in religiösen Institutionen, sondern in ihren Herzen. Sie sollen sich nicht auf falsche Propheten, politische Manipulationen und Propaganda verlassen. Als würden sie die Zeit anhalten, realisieren und aufmerksam werden.

Ich möchte aufbegehren und ich denke, dass jeder, der kreieren möchte, realisieren sollte, dass seine Kreation nicht nur ein Punkt sein sollte, sondern ein ganzes Wort, ein Wort, dass er oder sie wirklich fühlt. Ich nehme an, dass ein Künstler eher erzählen als auf leere Wände zeigen sollte.

Das einzige, was ein Mensch tun kann, ist Selbstentwicklung und Kunst und es spielt keine Rolle, in welchem Bereich er es tut, ob in der Kunst, der Fotografie, dem Kino, dem geschriebenen Wort oder einfach zuhause auf dem Sofa. Ich möchte wirklich lernen, zu sprechen und wir werden sehen, wie das sein wird.

PS: Ich würde all das nicht ohne meine Großmutter, meinen Großvater, meine Mutter, meinen Vater und meine ganze Familie tun. Ich weiß, das hier ist keine Oscarverleihungsrede, aber es würde ihnen gefallen und mir ist es sehr wichtig, das zu betonen.

Dieser Artikel wurde von Aileen Wessely für Euch aus dem Englischen ins Deutsche übersetzt.


kwerfeldein – Fotografie Magazin | Fotocommunity

 
Comments Off on Was wäre, wenn wir die Welt verändern?

Posted in Equipment


15 of the Best Cheat Sheets, Printables and Infographics for Photographers

12 Aug

Everyone loves cheat sheets, and photographers are no exception. Squeezed into a set of short tips, schemes, and definitions, a cheat sheet is a quick way to learn something, as well as refresh your knowledge about any particular subject. Moreover, now that infographics are an extremely popular format of delivering information on the Internet, cheat sheets can also be a source for visual inspiration.

Here is a large collection of some noteworthy cheat sheets, infographics, and printables for photographers. From shooting basics to photography marketing tips, every aspect of photography is covered in this round-up. No matter whether you’re an amateur or an experienced professional, below you can find some really helpful resources, all presented as easy-to-read checklists, infographics, and printable cheat sheets for your advantage.

Enjoy this compilation and don’t forget to bookmark this page for quick access to this exhaustive cheat sheet list. Note, you need to click on screenshots below in order to view the full cheat sheet since most images were cropped for proper fit.

Photography Tech and Creative Process

Learn the basics every photographer must know and save some useful tips and camera settings for quick reference. Click the links to see the original article and source.

#1 Photography 101 – Cheat Sheet and Camera Basics

01-full

#2 Shutter, Aperture, ISO Explained

02-shutter-apperture-iso-full

#3 10 Must-have wedding shots for every bride

(Click the image to get a larger view of this graphic)

04-wedding-shots-bride.jpg

#4 Portrait Lighting Examples

(Click the image to get a larger view of this graphic)

05-portrait-lighting-full

#5 Focal Lengths Cheat Sheet (click to see the whole article and cheat sheet)

06 focal lengths

#6 Capturing Perfect Wedding Photos

(Click the image to get a larger view of this graphic)

07-wedding-photos-perfect-full

#7 Manual Photography Cheat Sheet

(Click the image to get a larger view of this graphic)

08-manual-photography-full

#8 Landscape Photography Tips

DCM104.tips_cards

#9 Depth of field: Quick Memory Cheat Sheet

(click the link to read the full summary and see all the images)

10 depth of field

#10 Food Photography Guide

(click the link to read the full summary and see all the images)

11 food photography 01

11 food photography

#11 Photography Basics: Metering and Exposure

(Click the image to get a larger and full view of this graphic)

12 metering exposure

#12 Low Light Photography Tips

low light photography
Snapsort’s Low Light Photography Infographic – See more at: http://snapsort.com/blog/2011/04/05/low-light-photograph/#sthash.Sqx4QMsQ.dpuf

#13 Free Printable: Backlight and Sunlight

Backlight and Sunlight Cheat Sheet www.lightroompresets.com

#14 Guide to Manual Mode Magic

(Click the image to grab the PDF Printable file)

15-m-mode

#15 What is a macro lens? Magnification and minimum focus distance explained

(Click the image to get a larger and full view of this graphic)

16-macro-nes

Any useful resource I missed? Share your suggestions in the comments!

The post 15 of the Best Cheat Sheets, Printables and Infographics for Photographers by Julia May appeared first on Digital Photography School.


Digital Photography School

 
Comments Off on 15 of the Best Cheat Sheets, Printables and Infographics for Photographers

Posted in Photography


Manfrotto introduces Pro Light series of photo and video bags

12 Aug

Manfrotto has announced a new line of backpacks and accessories, the Pro Light series. The new line includes backpacks designed for both still photographers and videographers, holsters and rain covers, all designed with an emphasis on portability and versatility. The five styles of backpacks for still photographers offer side access for another route to your gear and are priced from $ 220 – $ 310 USD/£199.95 – £249.95 GBP. Read more

Articles: Digital Photography Review (dpreview.com)

 
Comments Off on Manfrotto introduces Pro Light series of photo and video bags

Posted in Uncategorized


How to Get More Referrals Than You Can Handle

12 Aug

Referrals are an incredibly effective way to build your business and get great clients. Referred clients are often more loyal, consistent, more suited to work with you and they often send more referrals your way. How do I know this?

By Leo Reynolds

Referrals work – but have a system

My partner Nicole and I have gotten 80% of our videography work from referrals. And it didn’t happen by accident, we created a system that ensures we don’t have to go out looking for our next gig. A system that we created at the start to have referral clients reaching out to us with projects they wanted us for. Talk about turning the tables! So now, I’m going to share with you our exact system and how you can implement it right now.

What to consider before you get started building your referral system

But before we get into the nitty gritty of our system, there are a few important things you need to consider. Let’s take a look at the questions below; they will help you frame your understanding of our system. Answer these questions before we dive in and you’ll be ready to start implementing this system as soon as you finish reading this article.

By Stefano Bertolotti

1. Why would someone send a referral your way?

Before you begin to ask for referrals, create a list of the benefits your clients experience when they work with you. These are the same benefits a referral client would experience if they worked with you as well. What are the social, emotional and professional benefits that go along with being someone who refers people in need to those who can help? In this case, the referral client is in need and you are the person that can help.

2. Who would make an ideal referral for you?

Write down the types of people who make great referrals. Your customers may have no idea whom to refer to you, so make it easy for them to send the right people your way.

3. Where would a client find a potential referral to actually send your way?

Write down the places where your referrers would meet or connect with good referrals for you. Your goal here is to help your clients, and other acquaintances, understand who in their lives will benefit most from a referral, and where they cross paths with these people. This makes it easy for the referrer to start thinking of people to refer to you immediately.

4. How should someone go about sending you a referral?

Empower your clients to have a simple conversation with a potential referral who will effectively connect them to you and what you do. You absolutely cannot leave this to chance. You must be able to articulate what you do in a way that truly connects you to the people you want to serve. This is absolutely essential.

Write down how you’d like people to refer their contacts to you. What do you want them to say? Create a short script for them- they’ll thank you for it as you just made things even easier for them. How do you want them to talk about what you do? What specific words and phrases do you want them to use? Get very specific. You decide how you want people to talk about you.

Just thinking about these questions and writing down your responses is going to put you ahead of most of your completion. Your answers to these questions will play a major role in implementing our getting more referrals system; so take it seriously.

The four step referral system

All answered up? Okay, let’s get into the four steps of the referral system.

At the bottom of this post, there is a link where you can download a checklist that goes along with this system. Go ahead and download it now and I’ll meet you back here once you have it open along with this post.

Downloaded and opened? Awesome! Let’s get started. This system is broken into four major steps:

By Shereen M

Step 1: Know when to ask for a referral

We recommend asking for referrals at the time of delivery of your project, when the quality of your work, and the experience of working with you is fresh in the client’s mind. The optimal opportunity to ask for referrals during this time is when the client compliments your work or asks you questions about your business.

Step 2: Know how to ask for a referral

The actual words you use to ask for a referral is critical to getting the referral you want. This is why we are just flat-out giving you a script you can use when asking for referrals:

I really appreciate all the positive feedback about my work. I always want to exceed my client’s expectations; it’s actually how I get most of my projects. Most of my work comes from referrals from clients like you.

Can you take a few minutes today to help me help others with their photography needs? Could you introduce me to three of your contacts that you think might need my expertise? By making these connections, sharing with them how much you enjoyed working with me and how happy you are with the results, I can continue to serve people I love working with.

Thank you in advance for the introductions and creating the potential for another great experience.

A few things are being said here in this script.

  1. Your work speaks for itself and is the reason you continue to succeed in your field.
  2. The client understands that giving you referrals is what is expected since that’s how you get most your work.
  3. The client starts to feel important and plays a critical role in creating connections and providing great experiences for others.
  4. The “thanks in advance” assumes that they will actually take action which sets up an expectation. The client understands you expect them to send you some referrals.

Step 3: Your post referral strategy

Once you get a referral, follow up with them ASAP. You don’t want to wait too long. Reply the next day at the latest. Many times your client referred them to you the same day they reach out to you. You will want to capitalize on that moment of good will and excitement.

Also, make sure you circle back to the referrer, thank them and tell them how the project is going. It shows how serious you take your business and they will send you more referrals in the future.

Step 4: Giving referrals to get referrals

By Nan Palmero

Don’t just sit around and wait for clients to send you over referrals after you ask them to. One of the best ways to get referrals is to give them. Who are the other service providers that serve your target market? Make a shortlist of people you can refer to?

Are you a wedding photographer that can refer a videographer or banquet hall manager to someone? Maybe even a client of yours? The next time you see someone who would be an ideal client for someone else, go ahead and make that referral. If you are giving your colleagues in your target market referrals, chances are they will want to do the same for you in return.

Final advice

This is a tried and true system. Use it. The key is to stay consistent and go through the steps of this system every time you have a client.

Not working with a client right now? You don’t need to wait to put this into practice. Reach out to past clients you haven’t already asked for a referral and use the script above. You can change up the first paragraph of the script with: “I was reviewing some of my past work in my portfolio and was reminded how much I enjoyed working with you as a client. I’m always looking for ideal clients like you to work with.”

You got this! Don’t hesitate. Use this system and start getting more referral work today.

Download the checklist

Remember, there is a nifty checklist that goes along with this getting more referral system. You can download it here!

The post How to Get More Referrals Than You Can Handle by Omar Zenhom appeared first on Digital Photography School.


Digital Photography School

 
Comments Off on How to Get More Referrals Than You Can Handle

Posted in Photography