Ein Beitrag von: Jörg Marx

kwerfeldein – Fotografie Magazin | Fotocommunity
[ By Steph in Gadgets & Geekery & Technology. ]

Instead of raining death and destruction, these 13 drones deliver defibrillators and piping hot pizza, save drowning victims, mix the perfect cocktails, clean ocean pollution and even take your selfies for you. The creators of these flying robots focus on how they can be used for the greater good, rather than remaining associated with war. After all, it’s hard to argue against the statement that a giant burrito is better than a bomb.


Your own personal robotic bartender will make you any drink, from tea just the way you like it to the perfect margarita, and then deliver it to you. The flying droid, by Kyiv National University of Construction and Architecture student Herman Haydin, can be activated with voice commands or via a smartphone or computer, and is equipped with navigation, WiFI and sensory body screens. It’ll even determine just how many calories should be in your drink to meet your needs.

Your pizza could get to you a lot fresher and hotter if the driver didn’t have to worry about traffic. Enter ‘DomiCopter,’ a Dominos drone that can deliver pies in heatwave bags over long distances without having to refuel. The company is currently testing the prototype at its headquarters.


Multi-media artist KATSU presented a series of abstract paintings created by drones at New York’s The Hole Gallery in April 2014. “The artworks in this exhibition are a completely new type of painting that has never been made before. As drone aircraft (drones) have become more affordable to consumers, KATSU has been working to develop a way to make them paint. Originally developing technology so drones could be programmed to write illegal graffiti, KATSU created the hardware and software to have a drone carry a spray paint can and a mechanism to press the can to emit spray. These pasts months he has experimented with the weight of the paint, the straw for the sprayer, the sensor for the can activation, the flight of the drone and different paint and surfaces to achieve the artworks he sought.”

Need a personal assistant to go to the post office, watch out for your safety in a questionable area, or scout out a parking spot? The Gofor concept envisions thousands of drones hovering around in the sky, just waiting to be summoned down to perform various tasks. While the technology to make this happen isn’t quite in place yet, graphic artist Alex Cornell makes a convincing case for the service.

Is a selfie still a selfie if it’s taken by a drone? An entire Vimeo channel exists solely for the ‘Dronies’ phenomenon of people using little flying robots to snap self-portraits. They’ve been taken everywhere from suburban parks to the Roman Colosseum, capturing the subject’s environment for a whole new dimension to what’s typically a pretty limited photograph. Anybody could stick a GoPro or similar camera onto a flying robot to try it out for themselves.

Everybody’s buzzing about Amazon Prime Air, which will bring the products you order from the mega-retailer to your doorstep in just 30 minutes via …
Click Here to Read More »»
From the MIT Senselab quadcopter and ETH Zurich self-assembling multicopter to DIY drones mounted with paintball guns, toy rockets and automatic weapons, …
Click Here to Read More »»

Scoff if you must, but with a dash of humor, two pinches of sarcasm, a few slices of conspiracy, and a large dose robotic reality, this is how Skynet really …
Click Here to Read More »»
![]()


[ By Steph in Gadgets & Geekery & Technology. ]
[ WebUrbanist | Archives | Galleries | Privacy | TOS ]

The recent release of Adobe Photoshop Creative Cloud (CC) 2014 (which is the 15th release of the product) got me thinking about my own workflow. Photoshop is an amazing piece of software. I have been using it commercially since version 5. However, I don’t necessarily think the latest version is the best one. I’ve just recently upgraded to CS6 and I’m loving it but I can’t see myself going the CC route just yet, as it doesn’t suit my business model.
The beauty of this software is the power that it can bring to your images, but it is a complex piece of software and coming to grips with it as a beginner can be daunting. Time and practice will be your allies in learning Photoshop.
As a photographer, Photoshop is the main editing software package I use in my photography workflow. Every photographer or designer has their own unique approach to editing images using Photoshop. I find this fascinating.
I’m constantly refining, and tweaking my editing workflow. I get such a buzz when I find an alternative method or a shortcut, that I wasn’t aware of before, which makes things more efficient. Having said that there are a lot of the features in Photoshop I wouldn’t use, and there are some that I use more than others.
Before I start editing my images in Photoshop, I open them with Adobe Camera Raw (ACR) since I shoot RAW format. I need to make basic adjustments such as exposure, white balance, correcting chromatic aberration and any lens distortion. From there, I take my images into Photoshop as Smart Objects.
The following tips for using Photoshop are my regular editing techniques in no particular order. These can be used in most versions of Photoshop. These are a small set of useful tips. I could have extended it by a dozen more.
Ten go-to editing tips for using Photoshop
To save time when you need a copy of a mask from one layer to another adjustment layer; when you’ve used the brush tool to create a mask. Simply hold down the Option key on a Mac or CTRL key on a PC, click on the layer mask and drag it to the adjustment layer in question. This makes a copy of the layer mask without having to redo the same again.

Normally in the Curves adjustment, you adjust points on the curve line which affect the image’s tonal range. The S-shaped curve is a classic tonal tweak for boosting contrast and color saturation. However, if you add a curves adjustment layer, change the blend mode to Soft Light and reduce the Fill down to approximately 55% (the reduction amount will depend entirely on your image & preference), this gives a similar boost to color and contrast. For demonstration purposes, I have left the Fill at 100%, so that you can see a difference as outlined within the white square.

Create a separate layer, change the blend mode (Mode) to Overlay and fill the layer with 50% gray. Name this layer “Dodge and Burn”. The Dodge and Burn tools are my go-to method for making selected areas of an image lighter or darker. Dodge is for lightening and the Burn tool is for darkening an area. Use a soft Brush and set Exposure to between 6-12%. In most cases, I leave Range set to Midtones. If you find that you have overdone it in the specific areas, just reduce the Opacity on the layer. The image on the right (below) shows the areas where I used the Burn tool to darken his arm, his face, and the bright spots in the background, and also where I lightened his back shoulder.

I find the Layer Comps feature in Photoshop invaluable. It is a useful guide to the different editing stages as a before and after comparison. It is so easy to overdo it and get carried away with over-editing your image. This has five stages from straight out of camera, to the final image.

Cmd+Shift+Alt+E (Mac) or Ctrl+Alt+Shift+E on a PC is the command to keep all the layers in a Photoshop file and make a merged copy on top of them. I find this particularly useful, especially at the end of my editing process, where I apply some sharpening or contrast by using a Topaz effect (plug-in for Photoshop).
This is found under File>Place. I normally work with multiple images in the same document. Therefore, I find using this method really handy as it imports the image as a Smart Object automatically, which is great for resizing the image without any degradation.
The Patch Tool was my favorite of the Healing Brush Tools in Photoshop CS5. But now that I’ve upgraded to CS6, the Patch tool has just gotten even better. You can now use the Patch tool to fill using the Content-Aware on a new empty layer. I prefer to set the Adaption to Loose. Make sure Sample All Layers has been ticked. The Healing Brush also feels more intuitive to use than before.

I seem to use this shortcut a lot. If I’m working on multiple images in the same document, I may need to resize one or two of the images accordingly. As I import my images using the Place command, this means they are converted to Smart Objects, so the resolution of the images isn’t affected when transforming or resizing.
Similar to the above point, the Warp tool is great for fine-tuning an element of an image, especially if you are working on composites. In the image below, I was using my own stock photo of Heron’s talons to replicate the Owl’s talons for the purpose of realism.

When you are retouching your image to get rid of dust and blemishes and so forth, you may need to zoom in as much as 300% or more. Open another window for the same document by Window>Arrange>New window for new_filename.PSD but keep it at 25% (or fit to window). This way, instead of zooming back out to see how the image looks and then zooming back in to resume your retouching, just click on the second window where you have the same document viewed at 25% (or fit).
Do you have another other go-to Photoshop tools or tips you’d like to share? What is in your workflow? Please share in the comments.
The post Ten Go-to Editing Tips for Using Photoshop by Sarah Hipwell appeared first on Digital Photography School.
Controlling your camera’s exposure is not only a fundamental topic to achieve good photographs, but it also becomes essential knowledge to be able to explore the creative possibilities of photography. You might have heard of aperture, shutter speed and ISO. These are the camera controls that directly affect exposure and, finally, how the picture turns out. You can use many Continue Reading
The post Get Intimate With Depth of Field: Using Depth of Field Creatively appeared first on Photodoto.
What makes a tripod a good travel companion? We test out five carbon fiber ‘travel’ tripods that while compact and light, are also comfortably tall and capable of supporting a reasonable amount of gear. This review covers five models, examining their features, functions and ergonomics in use both in the studio and out in the field. Click through to read the roundup.
Articles: Digital Photography Review (dpreview.com)
The Boeing 747 – or the ‘jumbo jet’ as it is commonly known, changed the world. The 747 first flew in 1969, and transformed modern air travel with its ability to carry more people – and more cargo – across the globe than any previous airliner, shrinking it in the process. Seattle’s Museum of Flight houses RA001 – the very first 747, which flew as a test airframe from its inaugural liftoff in 1969 through until the early 1990s. The museum is currently restoring RA001 both inside and out. Click through for pictures.
Articles: Digital Photography Review (dpreview.com)
Ein Beitrag von: Danielle Houghton
Einige Leute sprechen mit Tieren. Aber nicht viele hören zu. Das ist das Problem.
– A. A. Milne, Winnie Pooh
Eigentlich habe ich Tieren nie viel Aufmerksamkeit geschenkt, ich hatte nie ein Haustier und so waren Tiere einfach nie auf meinem Radar. Als ich also anfing, auf der Straße zu fotografieren, dachte ich anfangs gar nicht daran, Tiere in meine Kompositionen einzubringen.
Dann, während eines Online-Projekts der Photographers’ Gallery in London, stellte der britische Fotograf Paul Russel die Aufgabe: „Geh irgendwohin, wo Du vorher noch nie warst – zu einer Hundeschau, einem Polo-Turnier, einer Monster-Truck-Rally – und erinnere Dich daran, dass die interessantesten Dinge oft am Rande der „Haupthandlung“ passieren.
Als Reaktion zu dieser Aufforderung habe ich mich hinter ein Zirkuszelt begeben, ein paar eher „traditionelle“ Aufnahmen der Schausteller gemacht, bevor sie auf die Bühne gegangen sind und gerade, als ich wieder ging, machte ich dieses eine Bild:


Ich lachte etwas leise in mich hinein und habe nicht weiter darüber nachgedacht. Zu meiner Überraschung war es aber das Bild, das den meisten am besten aus dieser kleinen Serie gefiel und seitdem begrüßte ich Tiere in meiner Straßenfotografie sehr.
Wie die meisten Straßenfotografen war ich am Anfang ziemlich von Tauben eingenommen. Sie sind schon zu so etwas wie einem wesentlichen Bestandteil der Straßenfotografie geworden. Einige von uns glauben fest an die Theorie, dass es immer die gleiche Clique von Tauben ist, die rumfliegen und aus Spaß an der Sache für uns posieren.


Obwohl natürlich andere Vögel ganz natürliche Angeber sind. Und genauso natürlich sind Hunde über die Jahre ein ständiger Bestandteil der Straßenfotografie geworden. Sie bemerken mich oft sogar viel schneller als ihre Halter. Oder manchmal zumindest zur gleichen Zeit. Oder manchmal auch gar nicht oder sogar zu viel. Oder wie Groucho Marx mal sagte:
Außer Hunden sind Bücher der beste Freund des Menschen. In Hunden ist es zum Lesen zu dunkel.


Jetzt, da ich Tiere so gern in meinen Fotos habe, weiß ich auch die Rolle zu schätzen, die Pferde in Irland immer noch spielen. Sogar in der Stadt, in der ich lebe. Der Spaß und die Herausforderung an ihnen ist es, Aufnahmen zu machen, die weniger wie die beiläufigen, „normalen“ Aufnahmen von ihnen sind, sondern straßenfotografie-mäßiger.


Kleine Kinder zu haben, ist eine gute Gelegenheit, um im Zoo zu fotografieren. Ebenso, wie ich die Interaktionen zwischen den Besuchern und den Tieren, die sie sich angucken, beobachte, mag ich es, die kleinen Dinge zu entdecken, die uns daran erinnern, dass Tiere gar nicht so entfernte Verwandte sind.


Und da ich in Irland lebe, kann ich auch unsere Freunde, die Rinder, nicht ignorieren. Oder Plastiktiere, die sich manchmal in eine Aufnahme schleichen.


Meine bevorzugte Methode des Fotografierens ist es, komplett ziellos herumzulaufen, mich von Launen und Instinkten irgendwohin treiben zu lassen, aber mit einer sehr jungen Familie muss diese Art der Freiheit genau geplant werden und ist leider auch begrenzt.
Die Realität sieht so aus, dass ich normalerweise dort fotografiere, wo wir als Familie gerade sind. Dementsprechend finde ich mich oft in berauschenden Gemengen aus Familien und Tieren wieder. Persönlich finde ich nicht, dass sich das Fotografieren von Tieren sehr vom Menschenfotografieren unterscheidet – man muss schnell sein und das Beste hoffen, den Moment erwischt zu haben.


Natürlich können Tiere eher Angst vor einem haben, schnell wegfliegen oder -laufen, andererseits können sie aber auch nicht ihren Ärger zum Ausdruck bringen oder Dich darum bitten, Bilder zu löschen! Ein Pluspunkt, wenn man Menschen mit ihren Haustieren fotografiert, ist außerdem, dass sie einem den Vorteil bieten, zu glauben, dass man eher ihr Tier fotografiert und nicht sie.
Einige meiner Bilder passen sicher nicht in jedermanns Definition von „Straßenfotografie“, aber ich versuche meistens einfach, Tieren so zu begegnen, wie ich Menschen begegne und sie in Straßensituationen oder -kulissen zu zeigen.
Dieser Artikel wurde von Aileen Wessely für Euch aus dem Englischen ins Deutsche übersetzt.
kwerfeldein – Fotografie Magazin | Fotocommunity
[ By WebUrbanist in Design & Graphics & Branding. ]

Arguing that design is more art than science, this stunning short video provides a rapid-fire visual tour of principles all aspiring designers should keep in mind.
Matt Greenwood ties each example into the next, speeding through basics like lines and planes before covering balance, scale, texture, symmetry, then contrasting rules with randomness and much more.

It might not teach you to be a designer in less than a minute, but it does provide a dazzling introduction to basic concepts, showing and not just telling with useful and compelling (if quick) examples.

About the creator: Matt is a “freelance art director & motion designer based in Toronto with over 10 years professional experience. Working with After Effects, Photoshop, illustrator and Cinema 4D, [he] create[s] styleframes, storyboards, hand drawn illustration, 3D animation, matte painting and compositing for both broadcast and film work.”

If you are into speed-learning new things (and have a few more minutes to spare), you may also want to check out this 15-minute Animated History of Western Architecture as well as this short 100-second animation of 26 famous buildings.

Unusual fonts and fun typefaces are fantastic enough, but when you combine unusual typefaces with stop-motion animation you’ve got something really special.
Click Here to Read More »»

These six super-short videos are an architectural tour de force for visual learners bent on absorbing as much as possible in as little time as needed. Narrated …
Click Here to Read More »»

Mesmerizing as it morphs forms like some kind of architectural mutant, this latest take on the Walking City is a freshly-animated and anthropomorphic twist on …
Click Here to Read More »»
![]()
[ By WebUrbanist in Design & Graphics & Branding. ]
[ WebUrbanist | Archives | Galleries | Privacy | TOS ]
I bought the Sony A7 camera recently and have been taking it out quite a bit to get a feel for it.
My wife is starting a fashion blog so I thought I would take her out for a fashion shoot at the beach. I was shooting a high-contrast scene and realized. . .
Your camera always has the best intentions, but it doesn’t always get it right. Sometimes the sensor will think you want to expose a scene one way when you actually want it to expose it another.
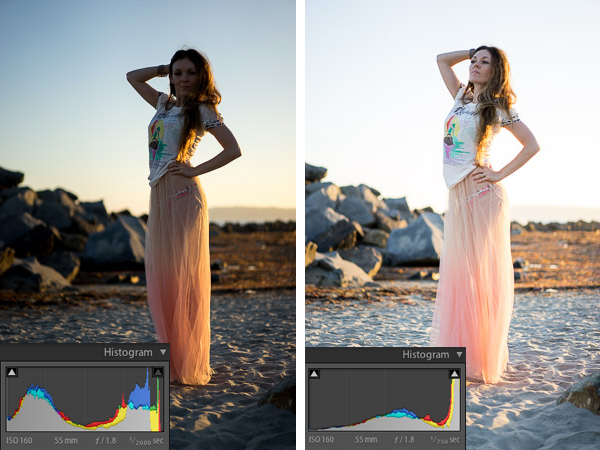
I’ll show you an example. I put the camera on aperture priority and shot this:
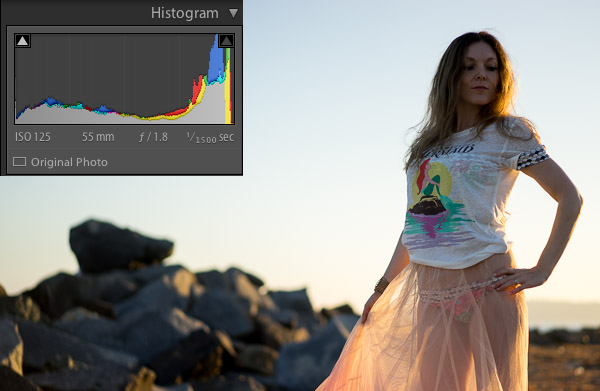
To most people, this image would be considered underexposed because the model is dark. This happens because the scene has a lot of contrast. In other words, there is a lot of bright pixels (the sky) and a lot of dark pixels (the rocks, ground, and model).
The camera sensor is trying to create an average of dark pixels to light pixels. The histogram shows the dark pixels on the left of the graph and the bright pixels on the right.
A “properly exposed” photo means the balance between the blacks and whites is mostly even. The graph isn’t pushed into the left wall which would be very underexposed, or pushed into the right wall which would be very overexposed. The problem is that to expose properly for the model we need more bright pixels, we need to increase the exposure. Sometimes you will need to trick the camera to get a good exposure.
Sometimes you just need a little bit more or a little bit less. In this case I had the ISO and the aperture exactly where I wanted them. I had my camera set up so the front dial controls the exposure compensation.
In this case, exposure compensation is set up to slightly change the shutter speed to either increase or decrease the exposure. I twisted the exposure compensation dial until the image looked good which was a shutter speed of 1/200.
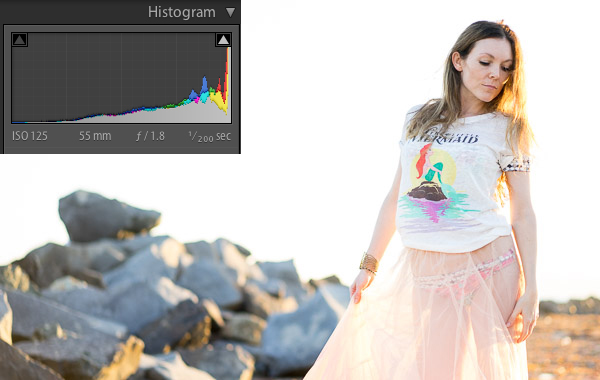
This looks much better. The model is properly exposed now but the sky is now overexposed. Because the sky is now white, you can see the histogram is pushed to the far right.
This typically means the image is overexposed but in this case it’s simply because the sky has a lot of white pixels in it that register on the right of the histogram. Let’s see it in another example:
I just used the exposure compensation to bump up the exposure again so the model was properly exposed and the sky was overexposed in the image on the right.
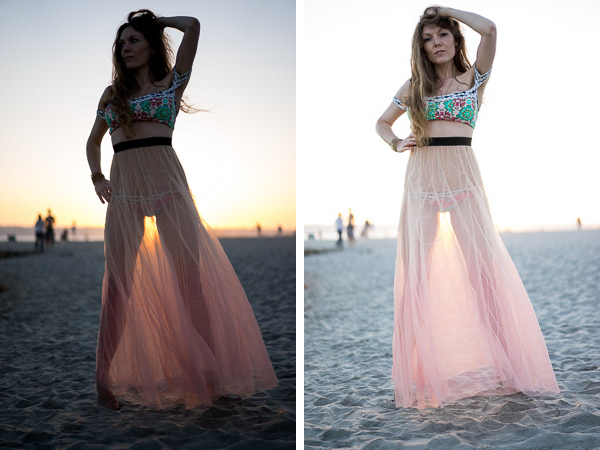
When you shoot with the sun behind your subject, the camera will sometimes struggle to decide whether to properly expose the background or the subject. The camera is trying to figure out which one you want exposed.
If you are shooting for a silhouette you can underexpose the subject to create a dark outline of their figure. If you want to properly expose the subject you will overexpose the background in high contrast light.
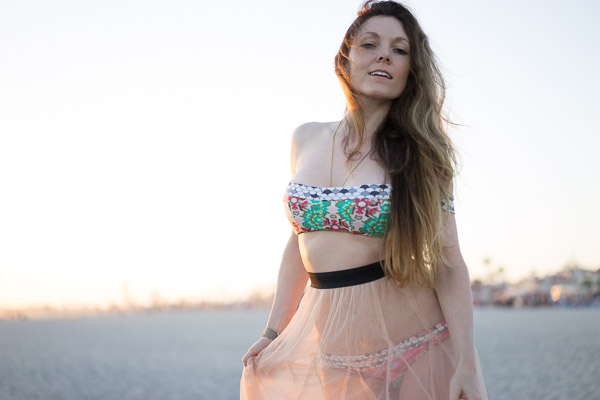
Ultimately it’s up to you how you would like the image to look. I like the high-key look of some of these images. The final touch once you have the light and exposure the way you like it is to edit the image.
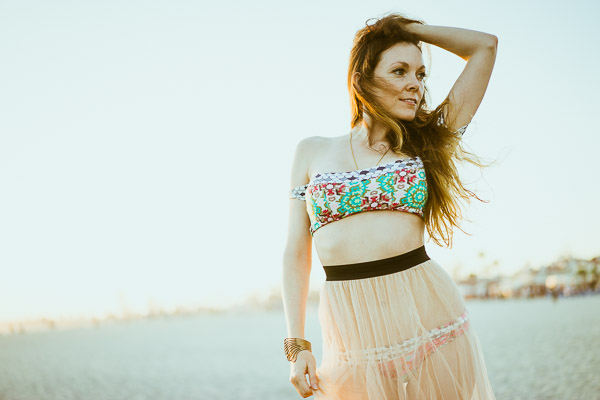
Here is one of my favorite photos straight out of camera:
I used one of the 1-Click Hacking Photography Lightroom presets in the Old School Color set called “Warm Film” and came up with this final image:
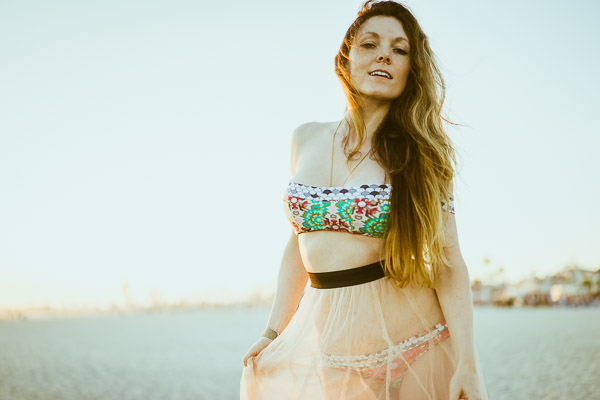
Overall it was a good shoot on the beach with my wife, I had fun running more tests on the Sony A7, and created some great images in the making!
The post When to Trick Your Camera to get a Good Exposure by Mike Newton appeared first on Digital Photography School.

You must be logged in to post a comment.