Ein Beitrag von: Tobias Knoch

kwerfeldein – Fotografie Magazin | Fotocommunity
Landscape and travel photography are closely intertwined with each other. Travel photography, as many sub-genres of art and photography are, is largely undefined and encompasses a wide range of people, locations, cultures and ideas, including landscape photography. Such kinds of photos express the feeling of time and place, its mood and atmosphere without geographic limitations. The borders between amateur and Continue Reading
The post 33 Inspiring Websites of Landscape & Travel Photographers appeared first on Photodoto.
Many modern digital cameras boast incredible ISO speeds. Where ISO 400 or 800 was the top speed in the film era, usually accompanied by grain the size of golf balls, today’s digital cameras can give you top ISOs of 6400, 12,800, 25,600 or even higher. Camera makers boast of these high speeds and use this information to increase camera sales.

Inexperienced photographers will be tempted to jack up the ISO on their new cameras, and keep it there. However, just because the feature is there doesn’t mean you should use it all the time. In fact, the best practice is to keep your camera set at its lowest ISO setting by default so you will capture the best possible image.
With experience you will learn that higher ISO settings are more appropriate when shooting sports, street photography, photojournalism, and low-light situations where you need to stop action. Low ISO images will be cleaner (no digital noise), have a wider dynamic range (more shadow and highlight details), and produce better color depth (smoother color transitions). This is a better choice for travel, landscape and portrait photography, where good detail and accurate skin tone are important.
There are two ways you can understand the effect of low versus high ISO on digital images: by reading lab test results, and by looking at sample images. DxOMark Labs is a great resource for sensor tests. It’s an independent lab that tests most current digital camera sensors and publishes the results on their web site. For sample images, you can make your own. Continue reading to learn more.
Run any number of digital cameras through a battery of image quality tests and you’ll see a clear pattern emerge. At the lowest ISO setting, the signal to noise ratio, expressed in decibels (dB), is highest. That’s good, it indicates the lowest digital noise. As you increase ISO, the dB level decreases. The lower the dB level, the higher the digital noise, which degrades the image.

By lmvphoto
Example: If a Canon EOS 70D has a 41dB result at ISO 100, 30dB at ISO 1600 and around 17dB at its top ISO of 25,600, the image with the higher dB will have less noise than an image with a 17dB measurement.
Note: keep in mind that most images when viewed at the recommended distance will appear clean as low down as 30dB.
Similarly, the dynamic range of a digital camera is widest at its lowest ISO. Depending on the camera, that range can be anywhere from 9 stops to around 14. Typically, with DSLRs, it is around 11-12 stops. In carefully exposed high-contrast scenes, both highlights and shadows will have more detail at low ISOs than at high speeds. In test result charts, dynamic range starts to decrease in more of a curve than a straight line; typically the first few ISO settings are acceptable, but once you pass ISO 800 or 1600 (depending on the camera) the range becomes more limited.
Dynamic range is acceptable at 10 stops or higher. Below that number shadows and/or highlights will become blocked up, especially in contrasty scenes.
Tip: RAW image capture is best for dynamic range. You can use the shadow and highlight sliders in your RAW image editor to reveal even more details in both the shadows and highlights, effectively stretching your camera’s dynamic range. The better your image’s dynamic range is, the more information you can reveal this way.
You may have noticed that some images that show the sky or other areas that should have smooth, subtle transitions, instead show subtle strips of color as the shading changes. This is called banding, and that’s what happens when the tonal range is limited. This is usually an artifact from compressing an image too much when preparing it for web use, but it happens in a more subtle form in photos that come straight out of the camera and, as above, this phenomenon is more apparent in high ISO images, but is imperceptible in low ISO photos.
A camera’s ability to capture subtle changes in tone and color (both expressed in bits) is best at its lowest ISO, and decreases steadily throughout the ISO range. Most DSLRs have a 21-24-bit maximum for color sensitivity, and it can degrade to half of that. Tonal range usually peaks at around 8-10 bit.
Enough of the geeky stuff, let’s look at some pictures to see how this plays out in the real world. While the images here were shot with a Canon 7D, you can run your own tests:
Here are two image comparisons at a range of ISO settings.
The effect of changing ISO is most obvious when you photograph people. In this example, the model was photographed on a sunny day while holding a reflector, against a low-key (darker) background. As the ISO setting is raised, the effect on her skin becomes obvious. Camera: Canon 7D with Canon 85mm f/1.8 lens.

ISO 100

ISO 100
At ISO 100 (above), skin tone is accurate, with good contrast. In the 100% detail shot, there’s good, natural falloff of light, showing a wide range of tonality and good detail in the darker areas. You can especially see this in the eyes.

ISO 800

ISO 800
At ISO 800 there is a subtle increase in contrast, an indicator that dynamic range has decreased slightly. Noise has not yet become apparent in the detail photo.

ISO 1600

ISO 1600
By ISO 1600 there is a little more contrast, but again, it is a subtle change. However, you can see the noise in the blow-up, and the smooth gradation from light to shadow is starting to become a bit rougher, indicating that the tone has degraded.

ISO 3200

ISO 3200
ISO 3200, at screen resolution it may still be hard to see the change when you compare this image to the one shot at ISO 100, but by ISO 3200 there is a pronounced decrease in highlight and shadow detail, and rougher color and light transitions.

ISO 6400

ISO 6400
By ISO 6400, the Canon 7D’s highest resolution setting, even at screen resolution a difference is visible. If you look in the details of the shirt and hair, you can see that shadows are more blocked up. A quick glance at the 100% detail is all you need to see the graininess and reduced range of color and tone.

Optimized
You can increase an image’s dynamic range by using your RAW image editor’s shadow and highlights sliders, which reveals more information in the highlights, and especially in the shadows. Compare this version of the ISO image with the ones above and notice how much more detail is visible in the shadows, thanks to tweaks done in the RAW image editor.
A scenic lookout in western New Jersey, shot in the middle of the day, at ISO 100, 800, and 3200 with a Canon 7D and Canon 24-70mm f/2.8L II USM zoom lens. While the dynamic range, tone and color only show minor differences here, the level of noise deteriorates at the faster speeds. After looking at these examples, you may wonder why anyone in their right mind would want to shoot above ISO 100 on a bright, sunny day. All samples are straight out of the camera.

ISO 100
At ISO 100, this is the full scene.

ISO 100
In this detail of a 100% blow-up of the ISO 100 image, there is no apparent digital noise, as expected.

ISO 800

ISO 800
At ISO 800, digital noise has started to become apparent in this 100% blow-up detail.

ISO 3200

ISO 3200
By ISO 3200, digital noise is obvious, and the overall image quality has deteriorated. The graininess covers up the loss of color quality and tonality somewhat.

While the samples above are unadulterated JPEGs, what happens if you try to coax more detail out of a shot in RAW? You get more detail in the shadows and highlights. Compare this shot to the original and you’ll see more detail in the sky (highlights) and in the bark and branches of the tree (shadows) on the right.
The bottom line? There may be times when you must pump up your ISO settings, and it’s nice to know that you have that option. But when you are shooting in daylight under normal shooting conditions, you will bring back higher quality images when you shoot at, or near, your camera’s lowest ISO settings.
The post The Secret to Capturing the Best Image Quality with Your Digital Camera by Mason Resnick appeared first on Digital Photography School.
„Schon seit meiner Kindheit bin ich von Tieren fasziniert“, erzählt der Fotograf und Bildbearbeiter Yago Partal. „Ich habe damals schon Stunden mit einer Enzyklopädie des Tierreichs verbracht, die mir meine Eltern geschenkt haben.“ Diese Faszination hat sich in seiner Kunst fortgesetzt.
Die Serie „Zoo Portraits“ entstand 2013 als Werbe-Kampagne und verbreitete sich sehr schnell viral im Internet, was den Fotografen dazu brachte, sie bis heute fortzusetzen und weiterzuspinnen. Auch war die Serie mit den Tieren in zu ihnen passenden Kleidungen schon in Tokio, Montral, Cambodia, Monaco und Paris in Ausstellungen zu sehen.


„Ich hätte nie mit einem solchen Erfolg gerechnet“, sagt Yago. „Ich habe einfach nur frontale Portraits von Tieren gemacht und sie spontan mit Kleidung versehen.“
Ein nicht unerheblicher Teil des Erfolgs kommt sicherlich auch daher, dass der Fotograf ein so glückliches Händchen und Auge für die Auswahl der Kleidung seiner Modelle hat. Man kann sich jedes der Tiere in genau dem Outfit gut vorstellen. Die Serie wächst auf seiner Webseite weiter.
kwerfeldein – Fotografie Magazin | Fotocommunity
Surfing tends to conjure up images of sun-soaked beaches and clear blue water. Surf photographer Chris Burkard looks for his subjects far north of the California beaches you’d normally expect. Cold water surfing pits surfers against the elements, with no more than a few millimeters of wetsuit between them and frigid water. Likewise, Burkard braves the sub-zero temperatures to capture them. SmugMug Films profiles Burkard in its latest episode. Watch the video and read more about the photographer in our Q&A with him. See video
Articles: Digital Photography Review (dpreview.com)
If you have ever shared a photo by email, or posted one online, you might have seen a three or four-letter extension at the end of the file name that looked like “.jpg” or “.jpeg”. Almost every camera – from cell phones to point and shoots to expensive DSLRs takes pictures in this format – with good reason. You can fit thousands of JPG photos on a memory card, and they are generally good quality and easy to view on a computer or mobile device. You don’t need any special software to open a JPG file, and if you do want to edit one, almost any application from iPhoto to Photoshop can do it. However, all DSLRs, and even some point-and-shoot cameras, are able to shoot in another format called RAW which has some incredible benefits for you. Some people swear by the RAW format, others use JPG, and some use both. There is no correct answer in terms of which one is better, instead it’s important to find a solution that works for you. To illustrate why you might want to show in RAW format, here are a few reasons I use it instead of JPG.

Different types of light (such as sunlight, fluorescent bulbs, or a camera flash) affect how colors show up in real life. Our brains are aware of these differences and adjust our perception of the colors accordingly, but your camera doesn’t always know what to do in these various situations. To fix this, it has something called a White Balance setting, which usually contains values like Auto, Daylight, Cloudy, Tungsten, and Flash. Unless you set the White Balance properly, your photos will often have a yellow or blue tint that is not always easy to fix. This is an important limitation of the JPG format, which tosses most of the data it deems unnecessary for a given photo and can make fixing the White Balanc a little tricky. Fortunately, in RAW the White Balance can be easily adjusted to suit the photograph because all the color data is saved.
When you snap a photo in RAW mode, the camera uses one of its White Balance settings as a starting point, but you are free to adjust it however you wish on your computer. Programs such as Lightroom, Photoshop, and Aperture have simple controls for adjusting the White Balance, and even though modern cameras are much better at getting it right on their own I still find myself tweaking the white balance quite often. For example, my camera calculated a White Balance for this photo of a child’s lamp at a value that I thought was far too yellow. Shooting in RAW gives me the flexibility to fix this, and with a few adjustments, I was able to get an image that was much more pleasing to me than the one my camera originally produced.

My camera applied a White Balance setting to the RAW file, but I didn’t really like it.

Using editing software I was able to change the White Balance to a cooler tone that was much more pleasing to my eye.
Shooting in RAW not only gives me the freedom to adjust the colors you see, but also to adjust the colors you don’t see. When a JPG photo is too bright or too dark (i.e. overexposed or underexposed), there is not much that can be done to save it because much of the data that was captured by the image sensor no longer exists. Cameras have all sorts of ways to help us get the right exposure when we take a picture, but sometimes things just don’t work out, and you might find that some of your most precious memories were either too dark or washed out. Since RAW keeps all the data when an image is captured, you have much more leeway in adjusting images after the fact.

The original photo was way too dark to be usable.

RAW allowed me to boost the exposure significantly to create a much better photo.
When I shot this picture of some flowers on a tree, I noticed after I got home that it was far too dark to be usable. If this was a JPG I would have been mostly stuck with the results. But, because I shot in RAW I was able to brighten the dark areas and produce a much better image. In JPG, the data from the dark areas would have been just that, dark. The same can be done for overexposed images too; if a picture is too bright or washed out, it can often be saved if it was shot in RAW.
A third reason I shoot in RAW is that I often like to make adjustments to specific colors in a photo. JPG stores 8 bits of information per color for Red, Green, and Blue–each of the three primary colors of light that make up every pixel in a given photo. Don’t get too caught up in the math here–all you need to know is that those 8 bits (2 to the power of 8, or 2x2x2x2x2x2x2x2) really mean that a JPG stores information for 256 individual shades of each of the primary colors. RAW, on the other hand, stores 4096 or 16384 shades of information per color, depending on whether your camera supports 12 or 14-bit files. These numbers might not mean a lot, but it’s easy to see that either of the latter numbers is far greater than 256. This means that since RAW gives us so much more information to work with, we have a lot more flexibility when editing the colors of our image.
This photo of a family friend (below) turned out fairly well, but I was not happy with a few elements. Her eyes were too dark and and the colors were not as vibrant as I would have preferred. Thankfully, RAW gave me the freedom to edit the picture in order to create an image that was not only more pleasing to look at, but more accurately reflected what I saw when I captured it. This is much more than simply throwing a filter over an existing image; RAW gives you access to the original color data, which allows for far greater control over the finished product.

The original is not bad, but not as good as it could be.

Shooting in RAW meant I had so much color data available that I was able to adjust the colors to create a more pleasing final picture.
Of course shooting in RAW has downsides too, most notably the file size. RAW files can easily take up 10 times as much space on your memory card as JPG files, which seems like a lot of wasted space if you don’t do a lot of editing or post-processing. To be honest, if you are just shooting pictures of a nature hike or your kids in the park, RAW might be overkill. It’s not that JPG files can’t be edited–they certainly can, as anyone who has ever used an Instagram filter will attest. They can be manipulated in Photoshop and other image editing programs as well, and there is enough color information in most JPG files for some editing wiggle room. But RAW gives you much more freedom to work, and even though the file sizes are much greater, the tradeoff is worth it, in my opinion.
You will have to make the decision for yourself, but whatever you decide, try to resist getting drawn into a RAW versus JPG debate–neither format is objectively better. The important thing is that you find a workflow that fits your shooting style and goals. At the end of the day, as long as you are taking pictures you like, that’s all that really matters.

I won a photography contest with this picture…and I shot it in JPG.
You might be just fine with shooting in JPG, and if that suits you, then don’t let me or anyone else tell you different. But if you have ever wanted to experiment with more advanced editing techniques or just coax a little more out of your photos than you might otherwise be used to, RAW might be just the ticket to a whole new world of photography awesomeness.
The post Raw Versus JPG – Why You Might Want to Shoot in RAW Format by Simon Ringsmuth appeared first on Digital Photography School.
[ By WebUrbanist in Design & Fixtures & Interiors. ]
A simple but provocative piece of dynamic home decor, this thundering cloud can be set to react to its environment, picking up cues from the weather or turning stormy on demand.
Designed and sold by Richard Clarkson, The Cloud is interactive light(n)ing piece made not just to look a thundercloud but also to create multicolored lights and generate customizable sounds. It can be set to automatic modes or manually operated by remote control to simulate different natural and synthetic effects.
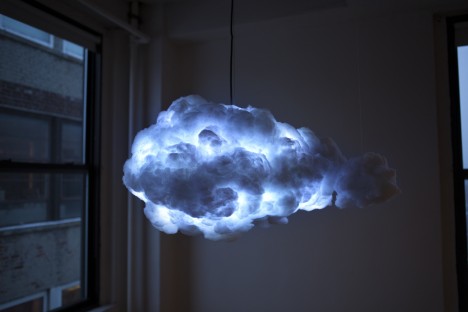
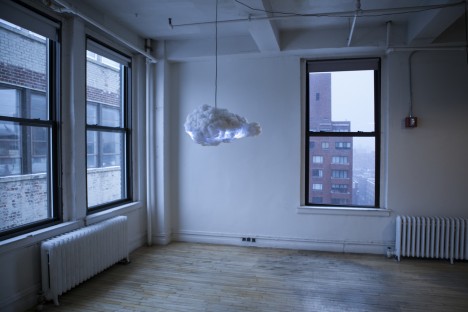
From its creator: “The Cloud is an interactive lamp and speaker system, designed to mimic a thundercloud in both appearance and entertainment. Using motion sensors the cloud detects a user’s presence and creates a unique lightning and thunder show dictated by their movement.”
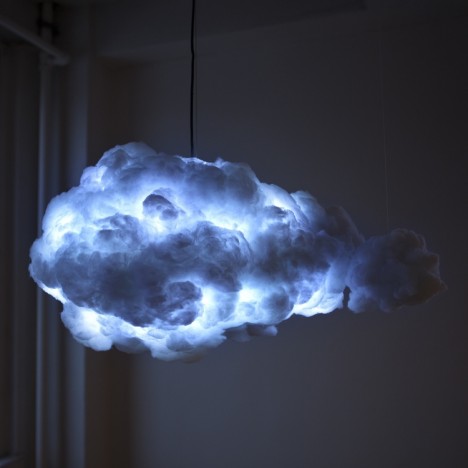
“The system features a powerful speaker system from which the user can stream music via any Bluetooth compatible device. Using color-changing lights the cloud is able to adapt to the desired lighting color and brightness. The cloud also has alternative modes such as a nightlight and music reactive mode.”

Sent into the atmosphere with a weather balloon, the Cloud Machine enables the user to influence the weather on a small scale.
Click Here to Read More »»

How would you like to forget about schedules and simply hop aboard the next passing cloud to leisurely float away? This odd concept proposes exactly that.
Click Here to Read More »»

A futuristic concept for a train station in Ukraine features a cloud-like hovering canopy filled with helium, which seems as if it could float away at any time.
Click Here to Read More »»
![]()


[ By WebUrbanist in Design & Fixtures & Interiors. ]
[ WebUrbanist | Archives | Galleries | Privacy | TOS ]
Nikon has released version 1.0.0 of Capture NX-D, introduced in beta form earlier this year. Capture NX-D is the first version of Nikon’s flagship Raw converter since previous developer Nik Software was bought by Google in 2012. The software features a new user interface, batch conversion and a non-destructive workflow that saves adjustments in sidecar files alongside the original image. Read more
Articles: Digital Photography Review (dpreview.com)
We’ve just completed our full review of the Nikon 1 V3, that manufacturer’s enthusiast mirrorless camera. The V3 offers an 18.4 megapixel 1″-type CMOS sensor, a significant gain in resolution over its 14.2 megapixel V2 predecessor. Since its introduction the 1 system has offered impressive auto focus and burst shooting capabilities – see just how well it performed in our testing. Read review
Articles: Digital Photography Review (dpreview.com)
[ By WebUrbanist in Architecture & Cities & Urbanism. ]
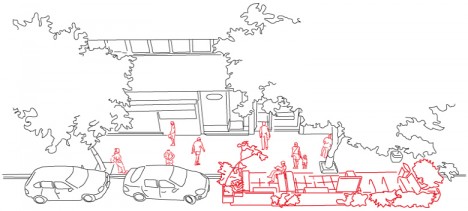
In a bold bid to change its urban landscape for good, Brazil’s biggest city has given a green light to citizen proposals to transform car parking spots into perpetual park spaces.
Cities around the world have sanctioned micro-parks on a limited basis (often for temporary use during environmental days and green festivals), but this legislation makes the provision a permanent mandate for São Paulo.
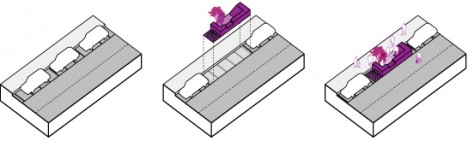
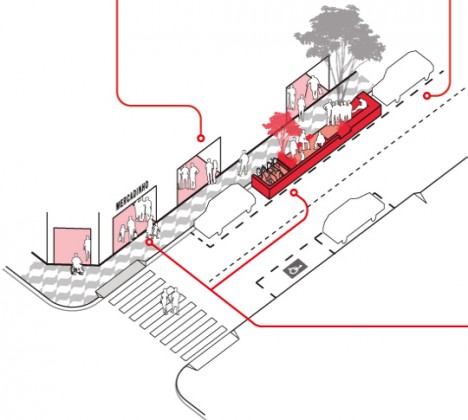
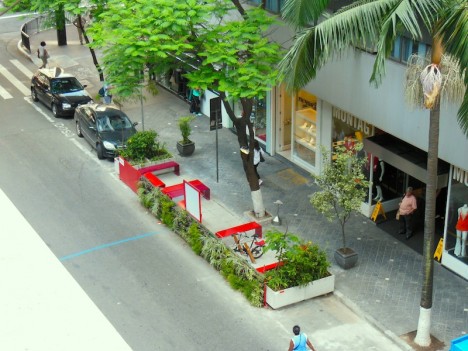
The law comes with style and usage guides but a broad mandate, allowing for a potentially huge variety of programmatic functions starting with but not limited to open seating and leisure space.
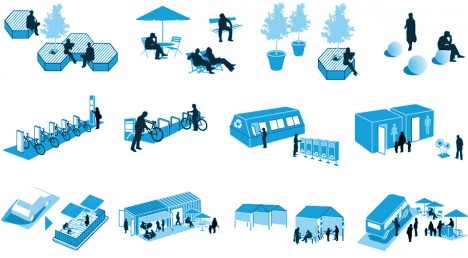
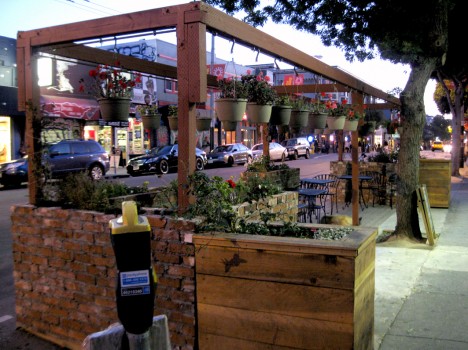
Other possibilities include: small commercial vendors under tents or in shipping containers, public pools and restrooms, recycling receptacle centers and bike sharing racks. The argument, in part, is that the public gains a great deal of additional benefit from open space, which can be shared, over parking spaces that are used only by a few individuals at a time (and even then indirectly).
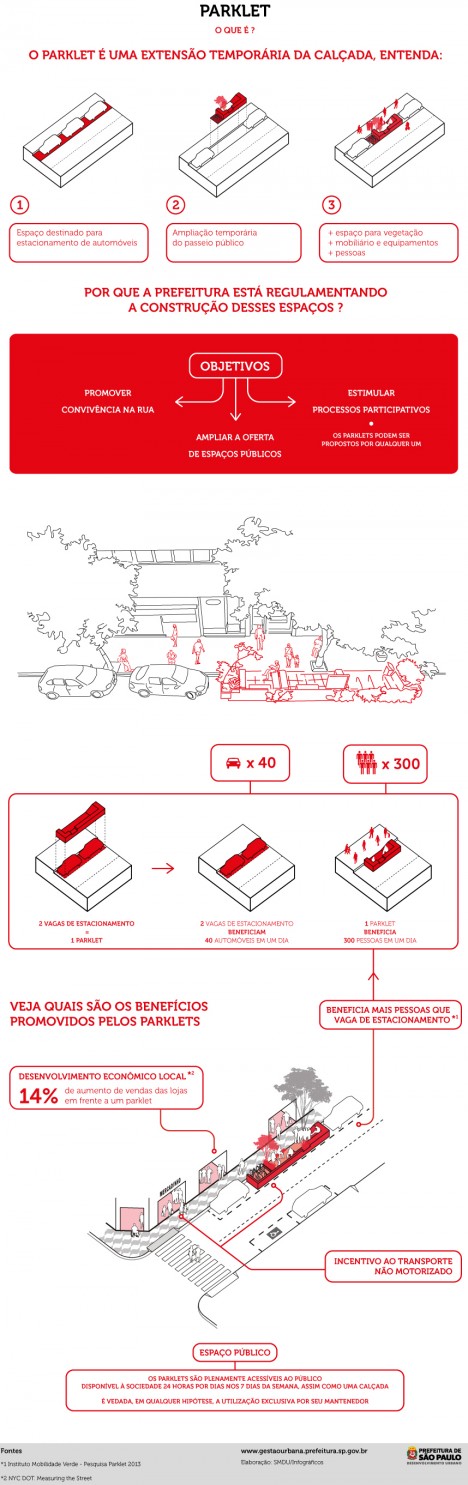
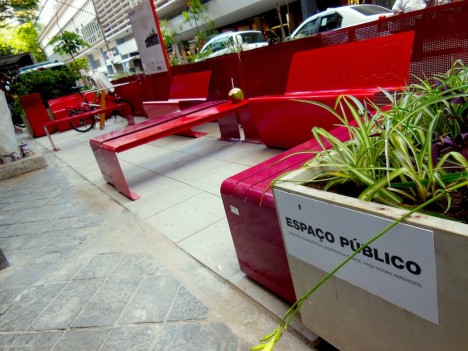
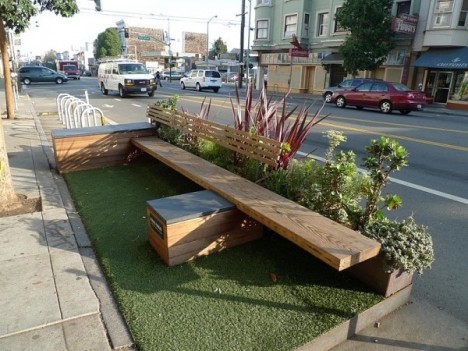
Suzi Bolognese of SB Design Studio summarizes the shift: “The parklets programme fits in perfectly with São Paulo’s attempts to promote a friendlier pedestrian environment, and involves replacing a parking space or two with a new public area. Parklets can incorporate benches, chairs, tables, trees, and bike racks for the public to use and enjoy. São Paulo has loved parklets so much it has integrated them into city planning policy. Now as a result of Decree No. 55,405, São Paulo has rules for the creation and maintenance of parklets, the first Latin American public policy on the issue.”

Most parking facilities are eyesores, designed with function in mind without paying heed to context or aesthetics. But in some cases, parking garages can be so …
Click Here to Read More »»

Ingenious and contagious, the idea is spreading: after it snows, document where cars do not go, then use that to understand where sidewalks and other public …
Click Here to Read More »»

Compact and portable, this crafty collaborative design-build project is part art installation and part impromptu gathering space. This student-built platform …
Click Here to Read More »»
![]()
[ By WebUrbanist in Architecture & Cities & Urbanism. ]
[ WebUrbanist | Archives | Galleries | Privacy | TOS ]
You must be logged in to post a comment.