RSS
 

Archive for July, 2014

Der Zauber von Nassplatten

23 Jul

Ein Beitrag von: Susanne Schug

Ich bin eigentlich überhaupt kein „Preisrätsel-Mensch“. Umso größer war dann die Freude über die Benachrichtigung am 8. Dezember – dem 29. Geburtstag meiner Tochter – dass ich ein Adventskalendertürchen hier auf kwerfeldein gewonnen hatte. Und dann war es auch noch das Nassplattenportrait – ein Unikat. Spontan kam mir der Gedanke an ein Mutter-Tochter-Portrait als zusätzliches Geschenk und so freuten wir uns gemeinsam auf Berlin.

In der Woche nach Pfingsten war es dann soweit. Wir trafen Daniel Samanns in seinem Atelier in Kreuzberg, wo es wunderbar nach Dunkelkammer roch – vertraut und doch irgendwie anders. Wir sahen ihm zu, wie er Glasplatten für die spätere Belichtung vorbereitete. „Auf die kommt eine zuvor angesetzte Lösung aus Schießbaumwolle gelöst in Ether“, erzählte er uns.

Das Bild liegt im Wasser.

All die ruhigen, konzentrierten Handlungen der Vorbereitung, Daniels Erzählungen, unser Kennenlernen – eine Art Ritual, das uns die Aufgeregtheit nahm und eine Art Sicherheit gab, vor der Kamera Haltung einzunehmen. Wir wussten inzwischen, dass die Belichtung zehn Sekunden dauern würde und dann standen wir endlich, Wange an Wange. Die Zeit des Stillhaltens fühlt sich würdig an, dann kommt die Entspannung – Spot aus.

Jemand hält ein flaues Negativ in die Kamera.

Daniel verschwindet kurz hinter einem schwarzen Tuch, für die Entwicklung, die nur sehr kurz dauert. Was wir dann sehen, ähnelt einem flauen Negativ. Das eigentlich Spannende passiert anschließend im Fixierbad. Ganz langsam verändern sich die Tonwerte, Milchiges wird zu echten Kontrasten. Dennoch wirkt es anders im Vergleich zu dem, was sonst auf einem Papierabzug zu sehen ist.

In verschiedenen Schalen liegen Bilder.Das fertige Portrait.

Wir erfahren, dass es eigentlich auch kein echtes Positiv ist, sondern nur so wirkt. Die Glasplatte ist von hinten schwarz beschichtet. Ein Trick, durch den aus einem Negativ ein Scheinpositiv wird. Und man sieht sich seitenverkehrt, also wie man sein eigenes Spiegelbild gewöhnt ist – vertraut sozusagen.

Im Internet gibt es eine gute Beschreibungen des Verfahrens, aber es zu erleben, ist jedoch viel mehr, als nur die Technik zu verstehen. Ich selbst kenne die Arbeit in der Dunkelkammer und habe über viele Jahre in meiner „Küchendunkelkammer“ die Nacht zum Tag gemacht, am liebsten mit DDR-Restbeständen von ORWO- und Argenta-Barytkarton. Es ist immer ein besonderer Moment, wenn man zuschauen kann, wie ein Bild entsteht, dennoch ist diese Nassplattentechnik unvergleichlich anders.

EEin Blick durch die Kamera.Ein Portrait-Foto in einer Schale.

Als nun – im wirklich heißen Berlin – die erste Aufnahme im Wasserbad lag, mussten wir sie immer wieder anschauen. Das Ergebnis faszinierte uns und zog uns magisch an. Wir hatten alle Lust auf mehr. Letztendlich machten wir noch zwei Mutter-Tochter-Aufnahmen und Daniel bot an, uns auch noch einzeln zu portraitieren. Dabei konnten wir ihn abwechselnd auch bei der Arbeit hinter der Kamera beobachten und das wunderschöne Bild auf der Mattscheibe sehen.

Im Nachhinein kann ich sagen: Es ist mir noch nie so leicht gefallen, zu posieren. Vielleicht liegt das an der totalen Entschleunigung bei dieser Art der Fotografie – jedes Portrait dauert etwa eine Stunde und zu beobachten wie das Bild entsteht, ist wirklich magisch.


kwerfeldein – Fotografie Magazin | Fotocommunity

 
Comments Off on Der Zauber von Nassplatten

Posted in Equipment


22. Juli 2014

23 Jul

Ein Beitrag von: iamunrecognized

Blick auf ein von der Sonne durchflutetes Feld.


kwerfeldein – Fotografie Magazin | Fotocommunity

 
Comments Off on 22. Juli 2014

Posted in Equipment


Shiny object: Leica T Shooting Experience

23 Jul

It’s not a surprise that Leica’s first autofocus mirrorless system camera is a thing of beauty – nor that it’s wildly expensive. The Leica T (Typ 701) uses a 16MP APS-C CMOS sensor, and its operation is almost entirely dependent on a couple of dials and a large touchscreen. It may be beautiful, but a camera can’t get by on its looks alone. See how it fared in our field testing. Read more

Articles: Digital Photography Review (dpreview.com)

 
Comments Off on Shiny object: Leica T Shooting Experience

Posted in Uncategorized


Taking your DSLR into the Backcountry Safely

23 Jul

In the Northern Hemisphere summer is finally here and that means it’s the beginning of camping season. It’s time to haul out the tent, the propane stove, the canoe, the bug hat and the DSLR. You visit all these beautiful places, gain a sense of peace and respect for Mother Nature, then come home and wish you were still there. Having beautiful, sharp images of the brutal trail you faced, the noisy bird that woke you at dawn, or the incredible sunset you experienced can make the experience all the more rich. The added bonus is you have some fantastic images you can hang on the wall and gaze at as you plan your next trip.

Back country photography5

Taking a DSLR into the back country isn’t as costly or as expensive as you would think. You don’t need the super high end gear. Your DSLR is fairly rugged, it can handle rain, heat, a few bumps, water, dust, campfire smoke, etc. It’s not as breakable as you might think. Whether you are hiking or canoeing/kayaking, taking your gear into backcountry is easy. I’ve been taking my DSLR into the backwoods of Northern Ontario for years and have never regretted the decision. It’s taken practice, but through trial and error, you too can find a system that lets you take your DSLR into the woods. When packing for a backcountry trip remember to consider the following.

How will you pack and protect your gear but make it easily accessible?

OPTION 1: A hard case

These are easy to access, and when closed properly are airtight. Your camera and lenses will be completely safe using this method. They are easy to access on the trail, just lift the lid. Hard cases can be adapted to fit a camera and a lens by removing some of the foam padding from within. You customize the case to your gear. The drawback is the added weight you will have to lug and the cases are awkward. Picture yourself dragging a tired body, a backpack containing a tent, food, clothing and a suitcase like object through the bush. It’s not easy. But if you want the 100% protected guarantee then this type of case is for you.

OPTION 2: A dry bag

This method doesn’t guarantee complete protection. If you capsize in a canoe or drop the gear into a river, dry bags don’t promise watertight protection. However, a dry bag is easy to strap to the canoe or kayak and can be packed into a standard tripping pack quite easily. The dry bag keeps it safe from the elements. The handle at the top makes it easy to carry. The trick is to create a padding system within the dry bag. I use an old foam mattress to pad my gear.

Back country photography1

Back country photography7

Basically, cut up the mattress to fit your camera and bag. You can wrap spare lenses in the same foam and place them in the bottom of the bag. Dry bags can be purchased in varying sizes so you don’t have to buy a new bag for each combination of gear. This method is the cheapest, it’s fairly accessible and it’s certainly the easiest to carry.

OPTION 3: A tripping pack designed for carrying camera gear

There are several tripping packs that are designed to carry your tent, clothes, food and camera gear. These are excellent at protecting your gear and are designed for just such an outing. The problem is they aren’t very waterproof. They do come with a rain cover, but let’s face it, the gear is ruined if you drop the bag in a lake. If you are just hiking, then this is a fantastic option, these bags are designed for this job.

The drawbacks come for those of us who are smaller in stature or female. Most of the overnight backpacking bags are huge and become difficult to carry, especially for women. Sometimes chest straps don’t sit where they should and can be very uncomfortable. Comfort on the trail is extremely important: you don’t want to be in agony. Whatever you choose, make sure the pack fits properly. The comfort factor is the key to an enjoyable hiking trip.

How far will you travel? Can you really carry all that gear?

Tripping in the back country is hard work. You have to carry everything you need. You want to make sure enjoy your trip. If you are crippled under the weight of carrying, or portaging your camera gear, it isn’t going to be fun. Pack light and smart. Try to limit yourself to a few lenses, a filter or two, a few batteries and memory cards.

Back country photography6

Make it a fun challenge, take along one lens. Do you really need your 85mm lens if your 70-200 range zoom will cover this focal length? Be frugal with what you carry. This will push you to be creative in the types of shots you take. Also, it’s important to take a tripod for super sharp shots. Investing in a lightweight model is a good idea. The lightweight versions are pricier but worth it.

Use Common Sense

If you are going on a trip and serious about taking some great photos then make sure you plan for it.

  1. Cut down the number of kilometres (miles) you cover in a day in order to build in some time for photography.
  2. Choose a route that has some beautiful photographic locations. Plan in advance and do your homework.Back country photography2
  3. If canoeing or kayaking plan a route that doesn’t contain huge multi-kilometre portages that will drain you of energy.
  4. Make sure you tie your camera gear to your canoe/kayak for added safety in the event you dump.
  5. Portage through challenging rapids to avoid soaking gear.
  6. If the weather is challenging, stay undercover. You can get moving tomorrow.
  7. Don’t take your gear out of its protective bag if the water is really rough, especially if you’re a novice paddler.
    Back country photography4

Finally, there’s one essential piece of gear that weighs almost nothing but you are guaranteed to regret it if you don’t take it. Always take a lens pen, and a couple of microfiber cloths, they are a must. Your gear will get dirty. Accept this fact now and simply remember to book your camera in for a thorough cleaning after you return. It will feel like a new camera afterwards, that’s a bonus.

It’s a little more work but it will be worth it. People will “oooh” and “ahhhh” at your photos, and who knows maybe you will inspire a friend to take same trip because they just have to visit the place they’ve seen in your photographs.
Back country photography3

The post Taking your DSLR into the Backcountry Safely by Erin Fitzgibbon appeared first on Digital Photography School.


Digital Photography School

 
Comments Off on Taking your DSLR into the Backcountry Safely

Posted in Photography


All Terrains: 3 Futuristic Land, Sea & Air E-Vehicle Designs

22 Jul

[ By WebUrbanist in Technology & Vehicles & Mods. ]

land sea air vehicles

This amazing all-terrain land variant is just the first of three compelling electric vehicles conceptualized with lightweight materials and green technologies and designed, respectively, for overground, aerial and underwater travel.

nimbus concept e car

nimbus offroad concept car

nimbus electric vehicle design

First of this series by Eduardo Galvani, the Nimbus features an electrical engine powered by a lithium-ion battery that works in parallel with a combustion micro-generator for recharging.

nimbus interior dashboard view

nimbus all terrain vehicle

nimbus on the road

Its structure is composed of carbon-fiber, titanium and aluminium, lightening its load. It also features rooftop solar cells and a regenerative brake mechanism helping it recover and save kinetic energy. Panoramic wraparound windows allow for views out in all directions, while key design elements are picked up in the dramatic sky and sea variants shown below.

Next Page – Click Below to Read More:
All Terrains 3 Futuristic Land Sea Air E Vehicle Designs

Share on Facebook


[ By WebUrbanist in Technology & Vehicles & Mods. ]

[ WebUrbanist | Archives | Galleries | Privacy | TOS ]


WebUrbanist

 
Comments Off on All Terrains: 3 Futuristic Land, Sea & Air E-Vehicle Designs

Posted in Creativity


Overcoming the Fear – Creating Better Travel Photography Portraits

22 Jul

Pick up Oded’s new Snapn Guide (a dPS sister company) Snapn Travel here for only $ 7. A lifetime of travel memories in a Snap.

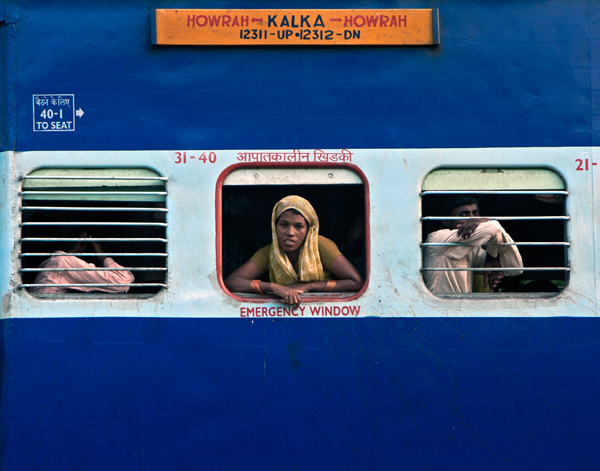
Traveling is fun and rewarding, but sharing memories of your journeys with friends, family and the world through your own beautiful images can be even better. Especially rewarding are images of the interesting people you meet along the way, because creating travel photography portraits can be an amazing addition to your portfolio.

But, if taking pictures of strangers while interacting with them makes you uneasy, maybe even feeling a bit of fear? GOOD! Then this article is for you.

F11A1011

The world of photography is divided between two groups of people: those who enjoy creating portrait photography and those who do not. Through discussion with my own students I have realized that only about ten percent of those who avoid portrait photography actually do not like it. The remaining ninety percent, so I discovered, are hiding, deep down inside, a photographer who really desires to shoot portraits, especially when he or she travels to interesting and distant places, meeting people from other cultures.

But it is not that easy. Let’s be honest, sometimes it’s super hard. So what we do is we wrap ourselves with excuses like: “I do not feel comfortable with this”,”I do not want to invade a person’s privacy” and as the “golden excuse” we used that one story of someone who shouted at us at some market in Morocco.

Blue guy

First, from my experience, getting yelled at (and all kinds of other problems) only starts when you take photos of someone from a distance and they catch you in the act.

Paprlika princeBut here is another fact: there is nothing like photographing someone from a close distance. The eyes, the feelings and the huge visual story potential within. Besides, when we work from a close distance while interacting with the person, we gain control of our tools as photographers: composition, background, the “decisive moment” and we also have that amazing ability to tell the photographed person: “you know what, let’s take one more shot”.

In 99% of my travel photography work with magazines, I photograph portraits from a close distance, without hiding myself or hiding the fact I am taking a photo. Now, some will say that when a person sees a camera, it affects the authenticity of the moment. I will address this issue later.

First rule: tell, do not just show

This is the # 1 mistake of bad travel photography: trying to show a story, instead of telling it. Creating a diary instead of evoking feelings. Here is the unpleasant truth; apart from our family and close friends, no one cares where we travel and who we meet along the way. If you want to succeed in exciting your viewers, you need turn to a different approach.

10

Before the digital era, it was enough if you traveled to the other side of the world and came back with images of people from some exotic tribe. You know, those “colorful” images, of people with a bone stuck in their nose. Today, when almost every corner of our planet has been photographed, this is not enough anymore and we have to return to the basics; to that one element that hasn’t changed since the beginning of time – a story.

We are just obsessed with stories. A person is not only clothes, a Cuban cigar or colorful sari; a person is an entire story. A story is a complex thing to create, so for the first step I will ask that your images be able to answer this question: how does the person in the image feel? Is it a comedy or a tragedy? Has he just finished a day of hard work or is he enjoying a vacation? Look at the person’s body language and listen to his voice. Try to convey the type of feeling you had while meeting this person.

134.jpg

Choose the right equipment

Remember the following equation – if you have a telephoto lens, you will to use it, because that is the easiest way of shooting people, from a distance. Instead, go with a wide lens (up to 50 mm for full frame, 35mm for cropped sensor). Also, try to avoid complicated and sophisticated equipment like flash and tripods. This will attract unwanted attention in the streets and you will be busy handling the gear instead of focusing on the story in front of you.

73 08

Read about the culture

Yes, in India they wear sari and in Cuba they smoke cigars. To get a more in-depth story of the culture, you have to learn about it first. Prior to your trip, do a brief study of the place you are about to visit. View images, read material and mainly, answer important questions like:

  • How will people react to the camera?
  • Do I need to pay for taking a picture?
  • Are there things that I should not photograph?

In order to answer these questions you can ask someone who visited the destination or look for information on the web. If you do not know anything about the culture, you will fall into the cliché of photogenic tourist traps. But if you come with knowledge, it will affect your photography. My editor at the National Geographic Traveler magazine calls this “photographic intelligence”. Go the extra mile and read about the history of the place, the religious system, the food and the local music, which leads me to our next tip.

F11A7455

Use the local music to your advantage

Recently I photographed a story on the Dominican Republic. It was the first time I worked on this side of the world and suddenly I felt as if I almost forgot how to take pictures. I did not approach anyone and at first, my photography did not come out well at all. So, I just listened to some local music on my headphones. I do not recommend staying with headphones all the time, because it cuts you off from the environment. But for the first day, it’s a great tip; it puts you in the groove and makes you feel good. In conclusion, on the first day of your trip, do not trouble yourself with approaching strangers. Relax, listen to the local music, get into the groove and warm up with easier image making: buildings, landscape, food, etc.

71

Get outside when the lighting is right

The meaning of “Photography” is drawing with light. Even the most photogenic person will not look good in unsuitable light. There are no rules about lighting – no “good” or “bad”. There is appropriate and inappropriate lighting, because light has varying qualities: color, direction, strength, softness, etc. According to most photographers, the best light for most situations is within the “golden hours”: around sunrise and sunset. If this is your first time approaching people in order to photograph them, let the light be on your side. Try adjusting the correct time to go outside. If you cannot control the time (like when on an organized tour) try to photograph people in the shade.

34

Force yourself – get out of your comfort zone

After a day of listening to the local music, getting the groove and warming up with easy shots, it is time to start working. Do not delay it, even if it is very hard for you. Just fake it until you make it:

  1. 72Choose: choose a person you would like to photograph. Don’t use excuses like: “I can’t find anyone special”. Just make the shot, even if it’s only for practice. It is very important that you choose a person who is not on the move, because you need to get ready BEFORE approaching him, so it will be easier in a static situation (a seller in market stand, or someone relaxing at the park)
  2. Get ready: know your lens and exposure. Think about the composition and background.
  3. Approach: ask the person if you can take their photo. You can ask verbally or just by lifting the camera and smiling, waiting for a smile back.
  4. Explain: it doesn’t matter if you are in NYC or Tibet; people want to know why you are taking their photo. You can tell them how much you liked their shop, pet, hair, etc., or just mention that you like portrait photography and you would like to take their photo. Usually this kind of good feedback will be enough.

Now, you might get a NO for an answer. That’s okay! Say “thank you” and then just “get back on the horse”, move on to the next person. You might get a YES. That’s wonderful! Relax, think about the framing and make the image.

F11A9627

So what about the authenticity of the moment?

It’s True. Usually when a person is asked to be photographed, they will put on a “mask”. You can call it their pose. Sometimes this pose might be the thing you are looking for. When photographing two men for a story I did in India for the National Geographic Traveler magazine, that pose (image below), which is so typical for the Rabari tribe men, was perfect for the story I wanted to tell.

Page 29 b

If you don’t want the pose, my solution – give your subject time and space. Do not stop him or her from making that pose. Give them a positive feedback and show them how nice the first photo came out. From my experience, after a minute or two, the masks fall. That is because someone eventually will enter your subject’s shop, or they will receive a phone call or anything that might make your subject forget you are still there. This is the moment of magic. This is when the best pictures happen.


Pick up Oded’s new Snapn Guide (a dPS sister company) Snapn Travel here for only $ 7. A lifetime of travel memories in a Snap

  • Learn how to bring the emotion of your trip home with you, not just a memory card.
  • Become a travel photographer instead of a photographing traveller.


The post Overcoming the Fear – Creating Better Travel Photography Portraits by Oded Wagenstein appeared first on Digital Photography School.


Digital Photography School

 
Comments Off on Overcoming the Fear – Creating Better Travel Photography Portraits

Posted in Photography


Großformatige Architekturcollagen

22 Jul

Der chinesische Künstler Yang Yongliang arbeitet mit digitalen Collagen aus Fotos. Dabei treibt er die in ihren Grundsätzen sehr einfache Technik weit über ihre gewöhnlichen Grenzen hinaus, indem er Hunderte, vielleicht Tausende Fotos zu dystopischen, dicht gepackten Architekturlandschaften zusammensetzt.

Düster und gleichzeitig voller Leuchtkraft sind seine kritischen Reinterpretationen chinesischer Städte. Meistens orientiert er sich an seinem Geburts- und Wohnort Shanghai, der sich rasant wandelt. Damit einher geht ein Wachstum der Einwohnerzahlen, die Zerstörung der Umwelt und der Verlust der historischen Kultur.

Yang Yongliang lernte in seiner Kindheit ursprünglich bei einem Maler, der ihm traditionelle Kunst und Kalligrafie beibrachte. Nach seinem Studium als Grafikdesigner lag es für ihn nahe, seine Ursprünge mit dem neu gewonnenen Wissen über verschiedene Softwares und die Fotografie zu verbinden.

Über den Umgang mit Zeit in seinen Werken führt er spannend aus, inwieweit sich die Konzepte der Wahrnehmung von Zeit im asiatischen und europäischen Raum unterscheiden. Während die westliche Kultur stets die Flüchtigkeit des Moments betont, wird Zeit in Asien eher als unendlich oder sich ständig wiederholender Zyklus wahrgenommen.

So kommt es auch, dass die Lichtquelle oft nicht gezeigt wird und etwa die Tageszeit sich nicht am Stand der Sonne ablesen ließe, während in der westlichen Kunst die Eigenschaften des Lichtes besonders wichtig sind. Daher nimmt Yang Yongliang seine Fotos meist bei starker Bewölkung auf, um einen ähnlich diffusen Effekt zu erzielen. Zeitlosigkeit.

Eine feinteilige Gebirgslandschaft, collagiert aus vielen Häusern.

Eine feinteilige Gebirgslandschaft, collagiert aus vielen Häusern.

Eine feinteilige Gebirgslandschaft, collagiert aus vielen Häusern.

Eine feinteilige Gebirgslandschaft, collagiert aus vielen Häusern.

Eine feinteilige Gebirgslandschaft, collagiert aus vielen Häusern.

Eine feinteilige Gebirgslandschaft, collagiert aus vielen Häusern.

Eine feinteilige Gebirgslandschaft, collagiert aus vielen Häusern.

Eine feinteilige Gebirgslandschaft, collagiert aus vielen Häusern.

Eine feinteilige Gebirgslandschaft, collagiert aus vielen Häusern.

Eine feinteilige Gebirgslandschaft, collagiert aus vielen Häusern.

Eine feinteilige Gebirgslandschaft, collagiert aus vielen Häusern.

Yang Yongliangs Portfolio umfasst außerdem Filmarbeiten, Installationen und Malerei, die Ihr auf seiner Webseite finden könnt.


kwerfeldein – Fotografie Magazin | Fotocommunity

 
Comments Off on Großformatige Architekturcollagen

Posted in Equipment


WTF Is Street Art? Poster Boy Hacks NYC Sign by High Line

22 Jul

[ By WebUrbanist in Drawing & Digital. ]

wtf is street art

If you have spent any time along the High Line Park in Chelsea, you will recognize this extremely prominent billboard that one artist had the audacity to climb and hack.

wtf street art dynamic

The original message (WTF is alternate side of the street parking anyway?) was selectively deleted to make way for a replacement question.

wtf street art gif

Working at night, Poster Boy risked discovery by people parking and picking up their cars in the directly adjacent lot, not to mention being highly visible from the street.

high line amphitheater view

During the day, visitors sitting in the over-street theater seats within the elevated park have a direct view of this huge black-on-yellow poster. It is doubtful the change will survive long, so check it out while it lasts!

halloween pumpkin carved cone

wolverine movie subway ad

movie poster ad hack

Known for his creative edits of local signage and hacked infrastructure, Poster Boy has a huge collection of photos you can browse of his work, ranging from small stickers added in unusual contexts to whole-billboard transformations.

Share on Facebook


[ By WebUrbanist in Drawing & Digital. ]

[ WebUrbanist | Archives | Galleries | Privacy | TOS ]


WebUrbanist

 
Comments Off on WTF Is Street Art? Poster Boy Hacks NYC Sign by High Line

Posted in Creativity


SCADpads: Parking Garage Turned Tiny House Village

22 Jul

[ By Steph in Architecture & Cities & Urbanism. ]

SCADpads tiny house village 1

Just how livable can a 135-square-foot micro-house really be? That’s what an interdisciplinary group of students, faculty and alumni at Savannah College of Art and Design set out to learn with ‘SCADpad,’ an experiment that has turned a parking garage into a village of tiny houses.

SCADpads tiny house village 2

SCADpads tiny house village 3

The larger question that the team wanted to answer was, how can design change the world? SCADpad is an example of transforming an uninhabitable space into sustainable and efficient housing using the millions of parking spaces in the United States that are typically vacant at any given time.

SCADpads tiny house village 4

SCADpads tiny house village 5

SCADpads tiny house village 6

Each of the three SCADpad units has its own theme and visual identity reflecting the college’s global footprint, with a common green space fostering a sense of community. It took 10 months to design and develop the project, from its architectural footprint down to the remote home controls.

SCADpads tiny house village 7

SCADpads tiny house village 8

Artists from SCAD helped design and decorate the interiors, including large-scale paintings, making these tiny houses visually dazzling, but it’s clear that they’re pretty practical, as well.

SCADpads tiny house village 9

SCADpads tiny house village 10

Students, faculty and special guests lived in the SCADpads from April through June of 2014, documenting the experience on Instagram.

Share on Facebook


[ By Steph in Architecture & Cities & Urbanism. ]

[ WebUrbanist | Archives | Galleries | Privacy | TOS ]


WebUrbanist

 
Comments Off on SCADpads: Parking Garage Turned Tiny House Village

Posted in Creativity


Ready for its close-up: Panasonic Lumix DMC-FZ1000 Review

22 Jul

If the Sony Cyber-shot DSC-RX10 premium superzoom was a game-changer, the Panasonic Lumix DMC-FZ1000 changed the game yet again when it was introduced last month. With its 1″-type 20.1MP CMOS sensor and 25-400mm equiv. F2.8-4.0 lens it’s an ideal candidate for travel, offering a larger-than-average sensor and generous zoom range. With 4K video recording and a lower MSRP, it gave the already-impressive RX10 a run for the money. Read more

Articles: Digital Photography Review (dpreview.com)

 
Comments Off on Ready for its close-up: Panasonic Lumix DMC-FZ1000 Review

Posted in Uncategorized