RSS
 

Archive for June, 2014

Overview of Some of the New Features of Photoshop CC June 2014

22 Jun

Photoshop_CC_icon.pngRecently Adobe announced their newest incarnation of their flagship product, Photoshop Creative Cloud (CC). Some of the new things look really interesting and I can see a lot of applications for them.

In this video French photographer Serge Ramelli goes over some of the new features that you may find useful including:

  • selections based on focus area
  • new spin blur and path blur
  • content aware fill improvements (added color tone consideration)
  • warp tool improvements

For a more extensive list of the new features let’s hear what Adobe instructor Julieanne Kost has to say in this official video from Adobe:

For a full list of all the new features and changes visit the Adobe website.

When Adobe first introduced their Cloud membership program there was a lot of backlast from photographers. You can no longer just buy Photoshop, you have to buy into the monthly option, and many photographers found it more expensive ($ 49 USD/month for the whole Creative Suite or $ 29.99 just for Photoshop) than simply upgrading once every two years, or every second version.

Adobe’s listened and responded with the Photoshop Photography program, which at the time of this article is $ 9.99/month USD and as of June 18th is available to anyone, amateur or pro. That price will get you both Photoshop CC and Lightroom 5 (the current version).

Where do you you stand on this?

Do you use Photoshop?

Have you upgraded to the Cloud or are you hanging on to an older version? Is there a new feature that puts it over the top for you to take the plunge?

Let us know where you stand on this issue and what software you plan to use moving forward.

More Photoshop tips

  • 5 Creative Ways to Process Infrared Photographs in Photoshop
  • 3 Easy Steps Using Photoshop to Making your Images POP
  • 4 Tips for Post Processing Efficiency in Photoshop
  • How to Make a Signature Brush in Photoshop
  • 5 Easy Photoshop Tips for Beginners

The post Overview of Some of the New Features of Photoshop CC June 2014 by Darlene Hildebrandt appeared first on Digital Photography School.


Digital Photography School

 
Comments Off on Overview of Some of the New Features of Photoshop CC June 2014

Posted in Photography


High ISO Compared: Sony A7S v. A7R v. Canon EOS 5D III

22 Jun

A7S_seattle.jpg

The A7S is Sony’s newest entry in its full-frame mirrorless lineup. But where the ‘R’ in A7R stood for resolution, the ‘S’ in the 12MP A7S stands for sensitivity, topping out at an impressive maximum ISO sensitivity setting equivalent to ISO 409,600. We’ve had an A7S for a couple of days – just long enough to create a real-world comparison of high ISO stills from the camera against the 36MP A7R and Canon’s EOS 5D Mark III. Click through to see the results.

News: Digital Photography Review (dpreview.com)

 
Comments Off on High ISO Compared: Sony A7S v. A7R v. Canon EOS 5D III

Posted in Uncategorized


browserFruits Juni, Ausgabe 4

22 Jun

Liebe Leser, Ihr werdet sicher bemerkt haben, dass sich kwerfeldein immer wieder ein klein wenig verändert. Das liegt daran, dass wir kontinuierlich daran arbeiten, unser Magazin zu optimieren und Euch den Besuch unserer Seite einfacher, besser und auch schneller zu ermöglichen. Wir sind übrigens auch offen für Vorschläge, die Ihr gern in den Kommentaren vermerken könnt. An dieser Stelle gilt unser Dank unserem Haus-Designer Daniel Ehniss, der ständig unsere Ideen umsetzt und uns auch konzeptionell unterstützt.


Fotospecial: Füchse

Flickr

500px

http://500px.com/photo/74242917/where%27s-my-dinner-by-megan-lorenz?from=popular&only=Animals” target=”_blank”>


Deutschsprachig

• Das Ehepaar Matt Blum und Katy Kessler versucht mit ihrem „The Nu Project“ Körperideale von Photoshopfiltern und Schönheitswahn zu befreien.

• „The Waiting Game“ heißt die Serie von Fotograf Txema Salvans, der Sexarbeiterinnen in Spanien fotografierte, wartend an Landstraßen und entlang der zahlreichen namenlosen Highways.

• Die Deutsche Welle zeigt ein paar sehenswerte Auszüge von Bildern, die auf dem Lumix-Festival in Hannover nur noch bis heute gezeigt werden – insbesondere die, die der Gesellschaft einen (kritischen) Spiegel vorhalten.

• Letzten Samstag ging ein Ruck durch die Fotoszene, denn es verstarb Robert Lebeck, ein wichtiger Zeitzeuge, der unter anderem Elvis Presley, Romy Schneider und Willy Brandt dokumentierte. Überall wurde über das Werk des Fotografen berichtet, so auch im Spiegel, Stern und der Zeit. Aktuell gibt es von ihm auch ein Stern Portfolio*, das im März dieses Jahres erschienen ist.


International

• Bei Viewster könnt Ihr den via Crowdfunding finanzierten Film „Get The Picture“ in voller Länge ansehen, der, basierend auf dem gleichnamigen Buch des Foto-Redaktreus und einzigem Executive Editor der Agentur Magnum Photos John G. Morris, die Kriegsberichterstattung vom zweiten Weltkrieg bis zu 9/11 nachzeichnet und mit vielen ikonischen sowie weniger bekannten, aber kraftvollen Fotos illustriert. Unbedingt ansehen!

• Die Webseite Travel by Drone sammelt Aufnahmen von (privaten) Flugdrohnen. Es entsteht eine Weltkarte, auf der die verschiedenen Flüge markiert sind und angesehen werden können. Natürlich könnt Ihr dort auch Eure eigenen Drohnenflüge als Youtube-Video der Sammlung hinzufügen.

• Wir haben ein schon etwas älteres, aber dennoch interessantes Video-Interview mit Tim Walker gefunden.

• 27 Nachrichtenbilder von der Fußballweltmeisterschaft in Brasilien.

• Joris van der Ploeg hat eine sehr simple, aber emotionale Serie von sich umarmenden Paaren fotografiert.

• Hier könnt Ihr noch einmal einen Blick in eine der schönsten Bibliotheken riskieren, die es leider nicht mehr gibt.

• Achtung, süße Meerschweinchenportraits.

• Andreas Feininger fotografierte 1945 New York City – bei Nacht und in Farbe. Dieses Blog stellt einige seiner Arbeiten vor, die es dem Betrachter leicht machen, sich in die Zeit zurückzuversetzen.

• Das Projekt Daily Overview zeigt täglich ein Satellitenbild einer Region auf der Erde. Nicht nur sind die Muster mitunter von abstrakter Schönheit, sondern sie geben uns auch die Gelegenheit zu einem Blick von außen auf uns selbst.


Neuerscheinungen und Tipps vom Foto-Büchermarkt

Buchtipps

• Toll: Der Bildband „Heimat? Osteuropa in der zeitgenössischen Fotografie“* wird im Feuiletton der FAZ vorgestellt und das macht Lust, den Band vom Kerber-Verlag doch direkt vorzubestellen.

• Dirk Brömmel zeigt Schiffe von oben und lässt sie auf verschiedenen Farben schwimmen. Fünf Kategorien – Frachtschiffe, Personenschiffe, Schiffe auf dem chinesischen Kaiserkanal, Gondeln in Venedig und die schwimmenden Märkte in Thailand – wurden von fünf Designagenturen zu eigenständigen Kapiteln formuliert. Der Bildband heißt „Kopfüber“* und ist für 48 € im Kerber-Verlag erschienen.


Wettbewerbe

• Der Alfred Fried Photography Award 2014 sucht Bilder, die ein friedvolles Zusammenleben repräsentieren. Der Fotopreis ist mit 5.000 € dotiert und kostenfrei. Einsendeschluss ist der 5. September 2014.


Zitat der Woche

If you can smell the street by looking at the photo, it’s a street photograph.

Bruce Gilden –

Mehr Zitate


Videos

Video: Ein kurzer Blick hinter die Kulissen des In-Public-Workshops in Paris. Herausgeber Martin wäre jetzt gern dort.


* Das ist ein Affiliate-Link zu Amazon. Wenn Ihr darüber etwas bestellt, erhält kwerfeldein eine kleine Provision, Ihr bezahlt aber keinen Cent mehr.


kwerfeldein – Fotografie Magazin | Fotocommunity

 
Comments Off on browserFruits Juni, Ausgabe 4

Posted in Equipment


Thecus N2560 NAS storage for photographers – review

22 Jun

This will be an overview of the N2560 and also a little bit of practical advice for people that have a computer with almost zero disk space remaining, and no clue what to do about it!

Let’s start with the Thecus N2560 network attached storage (NAS) that we were sent to try out.

Thecus N2560 NAS on Amazon

The N2560 is a relatively small (when compared with the Synology 1512+) NAS device that holds two 3.5″ SATA disk drives, and sits quietly (20db) in the corner of your home office serving your images, document, media – whatever. When idle, the little guy only uses 9W of power and 14W under load, so it’s also reasonably electricity efficient.

simon pollock photography melbourne

Let’s look at what a NAS is if you have never used one, or considered using one. Lets say you have a wireless (or non-wireless) router in your home that you use to connect to the internet and that router has a spare network port (the rectangular looking one) Well, in very basic terms, you connect the N2560 to that spare port and with a little configuration, you’re able to access the drive space from your home network without being physically attached to the NAS itself. With the Thecus, and many other brands, you can also use their configuration service to set up your NAS to allow you to connect from outside the house, on the go.

The Thecus is a multi-award winning device and has shown me great performance with 2GB of memory and the 1.6Ghz Intel Atom processor, and while I tried to run a small Lightroom catalogue, raw image library on the N2560. While it was a bit slow across my network (wired, 1Gb cat6 network via an Apple Airport Extreme )  it was useable for smaller Lightroom libraries, and adds a load of flexibility, too. With the T On The Go, iOS app (there are Android versions of Thecus apps, too, rejoice!) you can upload (you can auto upload photos you take with your iPhone, you can also turn it off and ask it to only upload via Wifi etc – well thought out!) download, manage, stream media etc. (audio types will like the Thecus’ ability to playback FLAC audio files).

Thecus N2560

There’s really not a lot to say about the device aside from it can be a bit tricky to configure if it’s your first time – I had a handful of IP Address issues (What’s an IP Address? They’re the things inside your network that tell other things where everything is, basically – kinda like digital street numbers) Once configured though, it’s not skipped a beat and I’ve been running it alongside my beautiful direct connected Promise R8 and my primary Synology NAS for just over a month.

The Thecus N2560 performs really well, with good speeds for a network connected device at this price point, and I have no complaints with it. If you’re interested, you can read all of the tech specs on the website and learn all you need to know about the N2560 but I thought I’d take this in a slightly different direction and talk about some of the things you can do with a NAS in a photographic environment.

Your computer is FULL and you need to do something!

So you’re at that point where your computer is almost full up with your data, there are multiple paths you can go down to sort this out, but let’s focus on two – direct connected external disk drives and NAS.  But first, a couple of things about your computer being FULL!

Some people might say “my computer is out of memory!” There are two things they could be talking about:  (1) HD space (hard drive or hard disk, both are acceptable) is where the stuff you load onto your computer, like programs, music, photos etc go to live, or (2) Memory or RAM on the other hand is the stuff that your programs all load into and run.

An analogy if you will.Disk space are the seats in your car – when they’re full, you need a trailer or a bus (external disk or NAS). Memory is like the engine in your car, it makes the car run and you can upgrade it to make your car go faster if you need to. (Mmmm – turbo!) – If you’re still confused, ask questions in the comments, I don’t bite!

So, why would you want to buy an NAS?

With a traditional external disk drive, you can plug it into your computer, load things onto it and download things from it. In most cases this is the quickest way to backup, aside from having a disk physically in your computer, directly connected to your computer’s brain – so to speak. There are multiple ways you can connect drives these days, too, just to add a splash of confusion to your choices – USB, Firewire, Thunderbolt being a few of the ways. They have different benefits and speeds.

So, why would you buy an NAS? (and sure, with some external drives you can do these things, too)

  • Use Windows or Mac where most direct drives are one or the other
  • You have the ability to connect from outside your house (personal cloud – on the go)
  • You can use iOS / Android apps to view the contents of your NAS (photographs!)
  • Cloud backup / USB3 backup to the Thecus (USB one touch button) Backup people, I’ll say it again – backup!
  • Media playback on your TV / Audio playback on your Hifi.

Here’s a scenario where my NAS came into its own recently – I was showing a client some portraits for the set of images I’d taken. They were the images I’d chosen that worked for what she wanted. We came to the end of the viewing which was via my iPad in her house, and she asked if there was another specific photograph that she had in mind from the shoot – turns out there was. As I’d put the entire unedited folder into the “working directory” on my NAS, I connected to the internet via my iPhone hotspot and browsed the NAS to show her the set of images that I’d not chosen. We found her photograph and everyone was happy!

The one thing that the NAS is not is a 100% foolproof backup – you must remember this. Sure, the Thecus is a two-drive unit and depending on how you set up those two drives (raid 0, 1 or JBod, I’ve talked about this before – not this time), you do get some redundancy, but always have multiple copies of important stuff – you don’t know the pain of losing a backup until you’ve lost client work that you can’t get back, or worse, family photos that mean a lot and are irreplaceable. If i’ve said it once, I’ve said it a thousand times – backup people! 

It’s all too technical for me!

It’s really not! You can see below the open door on the front of the little N2560, it takes two disks which are very easy to put in – you put the little slider bits on the sides of your disks and they simply pop straight in. The drives I’m using at the moment in all of my NAS devices are the WD Red NASware drives – I’m aware that all disks are either dead or dying from their first spin up (as my old boss used to say) and that any drive can and will completely fail when you need it the most, but so far I’ve had no problems with these disks. (I also use the WD My Passport Pro Thunderbolt external, all good there, too) With the drives in, you power her up after connecting your network cable (supplied) and follow the prompts basically. I mentioned I had a little trouble, and coming back from that trouble was slightly trickier than other devices (Synology, I’m looking at you) I’ve configured previously with slightly better graphical interfaces and directions. Once your config is complete, you’re set to use your Thecus as a local disk folder, media server, personal cloud, photo server etc.

N2560 Raid

You can see above the little blue USB port I mentioned in the points above. You can plug a USB 3 disk (also USB2 and 1 backward compatible) into the device and use the one-touch backup to take the content from that USB drive into the Thecus NAS, so if you are out shooting and backing up to an external USB drive, you can plug it into your NAS when you get home and with a button press, the data copies across – handy.

N2560_ANGLE_LARGE5

In conclusion, I’d say NAS isn’t for everyone, but if you’re looking for a well priced, entry level NAS to introduce into your digital workflow, this little Thecus N2560 would be a decent option. I’ve opted to give the NAS 4.5 stars because in my experience, the operating system could be a little easier to use – but then, maybe it’s just me!

The post Thecus N2560 NAS storage for photographers – review by Sime appeared first on Digital Photography School.


Digital Photography School

 
Comments Off on Thecus N2560 NAS storage for photographers – review

Posted in Photography


Air Stylus turns your iPad into a graphics tablet

22 Jun

airstylus.jpg

Avatron, the developer of Air Display, has today released a new iPad app. Air Stylus extends your computer screen to your iPad display and, in combination with a pressure-sensitive pen, turns the latter into a graphics tablet that works with a range of imaging applications including Adobe Photoshop and Apple’s Aperture. Read more

News: Digital Photography Review (dpreview.com)

 
Comments Off on Air Stylus turns your iPad into a graphics tablet

Posted in Uncategorized


Social Seating: 14 Public Benches Foster Urban Interactions

22 Jun

[ By WebUrbanist in Art & Installation & Sound. ]

social bench curved center

Breaking, bending, twisting and warping wood, this ongoing series of installations fosters new forms of interaction within cities, challenging that most iconic piece civic furniture: the public bench.

social bench v shape

social bench facing seats

social bench lounge chair

Award-winning artist Jeppe Hein from Copenhagen (currently working in Berlin) has installed his Modified Social Benches at indoor galleries and outside in cities around the world.

social bench street series

social bench interaction examples

social bench dual seats

To their creator, these are about more than just sculptural expression – on their origins: “Out of investigating architecture, communication, and social behavior in the urban space, a series of bench designs was born.”

social bench pillow roll

social bench city park

social bench skate boarder

Some engender specific and calculated responses, like sitting and facing your seatmate or climbing to reach an elevated seat suspended above. Others are more like puzzles or mysteries – it is up to the user to figure out what to do with them.

Next Page – Click Below to Read More:
Social Seating 14 Public Benches Foster Urban Interactions

Share on Facebook


[ By WebUrbanist in Art & Installation & Sound. ]

[ WebUrbanist | Archives | Galleries | Privacy | TOS ]


WebUrbanist

 
Comments Off on Social Seating: 14 Public Benches Foster Urban Interactions

Posted in Creativity


Varieté: Eure geliebten ungeliebten Bilder

21 Jun

Vor einer Woche haben wir Euch dazu aufgerufen, uns Eure geliebten, aber viel zu wenig beachteten Bilder zu zeigen. Wir Redakteure haben uns all Eure Kommentare angesehen und unsere persönlichen Lieblinge herausgesucht. Herausgekommen ist eine Auswahl, bei der wir uns wirklich fragen: Wie können diese Fotos denn nur so wenig Beachtung gefunden haben?

Oft sind es Bilder, die durch Zufall entstanden; ungeplant und ohne Konzept, aber an denen Emotionen hängen. Gefühle, die wir zum Teil sehr gut nachempfinden konnten und weshalb uns die Auswahl alles andere als leicht von der Hand ging. Denn unter den Kommentaren sind noch einige weitere Perlen, die wir nicht alle zeigen können.

Deshalb wie immer der Aufruf: Schnappt Euch eine Tasse Tee und seht Euch alle Einreichungen an.

Eine Katze sitzt auf einer Mauer und schaut durch ein Gitter.

Anette Siegelwachs schrieb:
Auf Reisen liebe ich planlose Spaziergänge, sich treiben zu lassen und überraschen zu lassen von dem, auf was ich treffe. An dem Tag, als das Bild entstand, zog es mich in enge Gassen, die wie leergefegt vor mir lagen. Ein Teil der Häuser zerfallen. Dann, ganz plötzlich, fiel mein Blick auf zwei Katzenaugen hinter Gittern und mit einem Mal, als sich unsere Blicke trafen, hatte ich das Gefühl, die Zeit bleibe stehen. Nichts rührte sich. Stille. Eins. Ein Moment, der mich ungemein fesselte und für mich so vieles zum Ausdruck brachte.


Ein Mann steht auf der Straße, den Rücken zur Kamera. Er hält einen Koffer in der Hand.

Florian Wenzel schrieb:
Das Foto ist bei meinem 52 Wochen Projekt entstanden. Das Bild passt nicht so gut zu meinen restlichen Fotos, was wahrscheinlich ein Grund dafür ist wieso es weniger Beachtung bekommen hat. Für meine Verhältnisse habe ich in dem Foto auch mehr auf die Symetrie geachtet, als ich das in meinen anderen Bild mache. Mir ist dieses Foto wichtig, weil es meine derzeitige Situation beschreibt. Ich weiß nicht wohin mich mein Weg führen wird, ich habe keinen Plan. Diese Ungewissenheit ist das, worüber ich mir tag täglich den Kopf zerbreche.


Durch ein Autofenster sieht man einen Stier.

Christiane schrieb:
Das Foto ist im letzten Jahr auf der Autobahn zwischen Madrid und Málaga entstanden. Für mich ist das Bild der Ausdruck des Gefühls, auf fremden Straßen unter heißer Sonne ins Ungewisse und Neue unterwegs zu sein, kurz gesagt von (Urlaubs)Freiheit und Glück. – Dazu kommt sicher auch, daß der Osborne-Stier auch Erinnerungen an wunderbare große Ferien in meiner Schulzeit weckt.


Zwei Pferde stehen auf einer Wiese und sehen in entgegengesetzte Richtungen.

Oliver schrieb:
Als ich die Szene sah, dachte ich sofort: Das wird ein spannendes Bild. Ich bin von größerer Entfernung auf die beiden Pferde zugelaufen und habe immer wieder abgedrückt, weil ich Sorge hatte, die beiden könnten sich durch meine Annäherung gestört fühlen und ihre Position ändern. Haben sie aber zum Glück nicht. Es war das erste und einzige Mal in meinem Leben, dass ich schon vor dem Abdrücken wusste, wie das Ergebnis aussehen sollte.

Es konnte jedoch niemand bisher meine Begeisterung darüber teilen. Ich glaube, dass ich Dinge in die Szene hineininterpretiere, die andere nicht sehen oder für unspannend halten. Zudem ist das Bild evtl. zu undramatisch – kein HDR, kein schwarz-weiß, kein spektakulärer Himmel … Mir gefällt es jedoch in seiner Symmetrie und Undramatik.


Eine Person am Meer steht klein am Horizon zentriert im Bild.

Kati schrieb:
Ich war das erste Mal alleine im Urlaub, in Belgien und habe auch einen Tag in Oostende am Strand verbracht. Es war Mai, nicht das beste Wetter und deshalb waren ziemlich wenig Leute unterwegs. Dieses Bild entspricht auch genau meiner damaligen Stimmung: nach einigen Tagen allein unterwegs habe ich mich doch ziemlich klein, verlassen und verloren gefühlt…

Vielleicht mögen es die meisten Menschen deswegen nicht, weil sie mit etwas konfrontiert werden, worüber man nicht so gerne redet oder nachdenkt, was aber genauso zum Leben gehört.


Eine Frau hält einen Tierschädel vor ihre Brust.

Lisa-Marie Kaspar schrieb:
Es war ein kühler Tag im März als ich mit meiner kleinen Schwester zu den Magnolienbäumen gegangen bin. Sie waren teilweise schon geöffnet, aber nicht ganz. Der Frühling hatte gerade erst angefangen. Wir haben viele Bilder gemacht, später hat uns auch noch eine Katze zugesehen und sich auf das ein oder andere Bild geschlichen. Besonders dieses hier liegt mir am Herzen. Ich weiß nicht mal genau warum. Ich liebe das schwarz-weiß, die Körnung, die Dunkelheit darin. Womöglich ist das aber genau das, was die meisten Menschen nicht mögen. Es ist kein gestochen scharfes Bild, das vor Farben und Leben sprüht. Aber für mich ist es genau das, was es ausmacht.


© Armin Oehmke

Armin Oehmke schrieb:
Dieses Bild ist vor gar nicht so langer Zeit entstanden, und ich weiß, dass es völlig unscharf ist. Für mich transportiert es gerade deshalb fast ausschließlich Emotionen, man wird nicht so sehr von kleinen Details abgelenkt, da diese fast vollkommen verschwimmen.

Entstanden ist es an einem Wundervollen Frühlingsnachmittag, an dem schon sommerliche Temperaturen herrschten. Eigentlich waren wir mit Shooten schon fertig, doch auf dem Rückweg entdeckten mein Model und ich eine winzige Lichtung in der sich nur ein einziger dicker weicher Lichtstrahl bündelte. Wir beschlossen noch ein paar Bilder zu machen, um den Film voll zu bekommen, worauf ein zweiter und noch ein dritter Film folgte. Doch leider scheint außer mir dieses Bild niemandem so recht gefallen zu wollen.


© Jonas Hafner

Jonas Hafner schrieb:
Mein geliebtes ungeliebtes Bild entstand im Oktober letzten Jahres. Ich hatte mir an jenem Tag vorgenommen einige Ganzkörperportraits auszuprobieren. Für das Bild band sich das Model die Haare zu einem Zopf zusammen, der anschließend ihr Gesicht verdeckte. Das Sonnenlicht traf vor allem ihre Hände und so entschied ich mich in der späteren Nachbearbeitung für die farblose Variante, um den Kontrast noch zu verstärken.

Warum die Resonanz auf dieses Bild so gering ausfiel, lässt sich nur vermuten. Vielleicht ist das Bild zu trist, zu dunkel, zu still oder einfach langweilig? Vielleicht verbinden die Leute mit meiner Fotografie auch schlicht und ergreifend etwas anderes und vielleicht ist genau das der Grund, warum ich dieses Bild so mag. Es ist einfach anders.

Irgendwie ist es trotzdem ein schönes Gefühl, wenn ein Bild nicht den Erwartungen gerecht wird. Man hat gerade deswegen das Gefühl auf dem richtigen Weg zu sein…


© Alexander Görisch

Alexander Görisch schrieb:
Mir gefällt an diesem Bild das Zusammenspiel von dem Namen des Geschäfts ‘Denkstein’ die Tatsache das sich die Person auf den Kopf greift (denken) und noch dazu eine Glatze hat (Stein). Ich denke das dieses Zusammenspiel vielen nicht auffällt, für mich sind das die interessanten Zufälle der Street-Fotografie.


Wir denken, die Auswahl zeigt wieder, dass es nicht auf Likes ankommt. Viel positives Feedback heißt nicht gleichzeitig, dass ein Bild gut ist. Und keins nicht, dass es schlecht ist. Es heißt einfach nur, dass es manchmal weniger Menschen auf den ersten Blick anspricht. Auf den zweiten würden sie sich vielleicht auch verlieben, aber oft klicken auch wir einfach viel zu schnell weiter.


kwerfeldein – Fotografie Magazin | Fotocommunity

 
Comments Off on Varieté: Eure geliebten ungeliebten Bilder

Posted in Equipment


‘Kodak City’ documents former imaging giant’s headquarters

21 Jun

kodak_2007_1.jpg

While many American cities have experienced the pains of a large population shift from the urban core to suburbs, there’s a poignancy to the abandoned storefronts in downtown Rochester, New York. The city’s name is inextricably tied to the name Eastman Kodak. Swiss photographer Catherine Leutenegger spent time photographing Rochester and Kodak’s headquarters, first in 2007 and again in 2012, and answered a few of our questions about the project. See gallery

News: Digital Photography Review (dpreview.com)

 
Comments Off on ‘Kodak City’ documents former imaging giant’s headquarters

Posted in Uncategorized


5 Creative Ways to Process Infrared Photographs in Photoshop

21 Jun

Digital cameras have made the process of infrared photography relatively simple and very accessible, compared to the days of shooting with infrared film. No darkroom is required and all you need to get started is an infrared filter on your lens (click through to read my article on How to do Surreal Digital Infrared Photography Without Expensive Gear or Camera Conversions) and to mount your camera on a tripod. Maybe you’ve tried digital infrared photography already. You’ve learned all the correct infrared shooting and compositional techniques so you know you have great images in your camera, but how do you transform those strange looking red or violet frames into stunning infrared photographs?

Here are 5 creative ways to process your digital infrared images in Photoshop to create arresting photos in color, and Black and White.

1) Color infrared one-click post-processing method

_DSC5456AsShot

As shot, before Auto Tone

This is the quick and instant method. Open your image in Photoshop and go to Image> Auto Tone. Look at the difference this one click makes! In fact Auto Tone should be the first thing you do to all your infrared images.

infrared image with autotone applied

Same image after Auto Tone has been applied

This has become a perfectly delightful infrared image. It has a variety of textures and colors for interest. However you may want to further process it to add more WOW and impact. The next step adds a few more tweaks that will help you do this.

 2) Color infrared gradient method

After you apply Auto Tone, you can also apply a Gradient Layer and set the blending mode to Soft Light, or Hard Light – you’ll need to experiment a bit depending on the tonal qualities of your original image. You can also adjust the opacity of this gradient layer.  If you are familiar with layer masks, you may want to mask out any areas where the gradient might be too strong.

Here is the same image with the Gradient Layer added. Can you see how it adds a little more depth and drama?

infrared image with post processing added.

Infrared Image with a Gradient Layer Added

gradient-tool
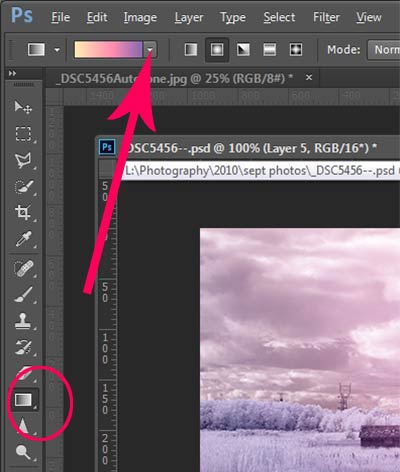
To add a Gradient Layer, go to your Layers palette, and click on the new layer icon at the bottom (it’s the one that looks like a sheet of paper with the corner turned up) or you can use  the keyboard shortcut Shift+Ctrl+Alt+N.  I find it quicker to use the icon in this case. While this new layer is active, go to the Tools palette and select the Gradient tool. On the context menu on top of the window you’ll see the Gradient library and you can select your pre-set gradient from there.

Now, back on your layer, drag your mouse to get the gradient on your image.  Select the blending mode to soft light or hard light and then adjust the opacity. This is where your artistic eye comes into the picture.  Play around with these settings until you have something you like.

Here is another infrared image processed the same way. You don’t have to use the same gradient each time – experiment a bit and see how things turn out. It’s art after all!

infrared image with a gradient texture.

3) Using the Camera Raw filters and the Channel Mixer

One of the key concepts in infrared photography is to have a very distinct separation of color tones between the sky, and your high infrared reflecting subjects. This is usually the grass and foliage in your scene, or it could be buildings or other subjects that reflect infrared light because of their paint or construction materials.  But it’s important to have this separation because you need the sky to be dark, and you’ll want the foliage to be light, if not pure white.

Happily, in Photoshop you can give a tonal boost to your images in a couple of way,s in addition to the Auto Tone setting.  After you’ve applied Auto Tone, look for the Camera Raw Filter under Filters. If your image is not a RAW file you can still use these adjustments, although it is best to shoot RAW when capturing infrared photos.

In the Camera Raw Filter, to get this color separation between the light and dark areas of your image, use the the Basics filters and  HSL/ Greyscale Slider to adjust the colors until you get a clear difference between the cyan and red shades.

 Original image as shot:

1as-shot-infraredimage

After applying Auto Tone and Using the Camera Raw Filters:

2cameraraw

Notice how these adjustments bring out the red in the sky and the blue in the leaves.

Now to the Channel Mixer

Go to Image>Adjustments>Channel Mixerchannelmixer

Here we will “swap” the channels to get a nice  blue sky and red or purple, and in a few quick steps, white foliage. Your Channel Mixer will look like this:

In the Red Output Channel, change the Red slider from +100 to 0, and the Blue slider from 0 to +100. Change the Output Channel drop-down to Blue, and make the Blue slider +100 and the red slider 0.  Your image will look something like this:

3infraredwithchannelmixer

There is a clear color difference now between the blue sky and the red foliage.  It doesn’t matter if the foliage of your image is purple and  the sky blue, as long as you can see a clear difference in colors with the sky having some shade of blue.

Now the last part. Go back into your Raw Filters, and in the Basic panel, move the White Balance Color Temperature slider to the left to get a nice blue sky.  In the HSL/ Greyscale tab, use the sliders in the Saturation tab to desaturate the colors of your foliage.  Your image should have a blue sky and white leaves and grass. Gorgeous!

The final image

4infraredwithcameraraw2-FINAL

 4) Instant Black and White infrared processing

This is a “quick and dirty” method for getting the classic infrared look from your captures. You’ll get the tell-tale light colored foliage, and dark skies. For best results your image should have a clear sky with some clouds for effect. Overcast skies detract from the image, leave things without enough contrast, and very flat. No clouds make the sky seem like a vast black void – not too interesting.

2Stepprocessingblackandwhiteinfrared
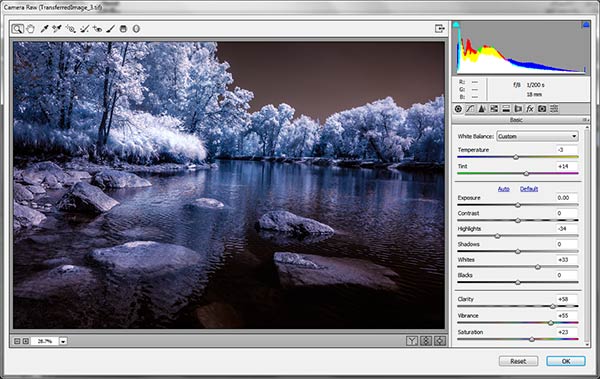
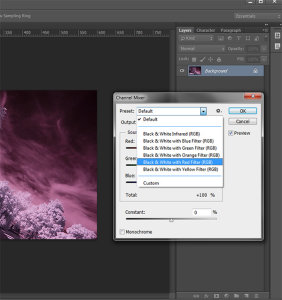
Classic black and white infrared images tend to be non-contrasty, so from an artistic perspective a blue sky with wispy or puffy clouds can really add interest to your image, create a powerful story, and keep that soft contrast intact.

  1. Open your image in Photoshop
  2. Go to Image>Auto Tone
  3. Next go to Image>Adjustments>Channel Mixer>Black and White with Red Filter (From there you can adjust the sliders to get the effect you want)
  4. To get the classic infrared glow, check to make sure that in the Tools palette the colors are set to the default – black foreground and white background. To be sure, a simple way to set this is to hit the letter D to reset the colors to the default state.
  5. Then duplicate your layer (Ctrl J), and go to
  6. Filters>Filter Gallery>Artistic>Diffuse Glow
  7. In the Diffuse Glow filter, set the sliders so you can see some halo glows around the white areas of your image. You will have to adjust these to suit your image but it will create the classic graininess and glow of film infrared photos.

If the glow amount is too strong and you’re getting blown out highlights, you can decrease the opacity of your glow layer in the Layers Palette. A little experimentation goes a long way. Remember your History palette in case you want to go back a few steps.

4blackandwhiteinfraredFianlwithglow

5) Advanced Black and White infrared processing

This is the method I use most for processing Black and White infrared images. It’s easy and it gives you far more control of your final result.

  1. Open your image in Photoshop
  2. Go to Image>Auto Tone
  3. Now create an adjustment layer for Color Balance.
  4. Layer> New Adjustment Layer> Color Balance

Again, the idea is to get as much color distinction between the sky and any foliage. Color Balance provides an addition method of doing this – in Black and White processing, as well as for color.

  • Move the sliders for Midtones, Shadows and Highlights until you have a nice, distinct separation of your color tones betweeb your foliage and your sky.
  • Finally add a new adjustment layer for Black & White
  • Layer> New Adjustment Layer> Black & White
  • Now use the sliders to get the full range of Black and White tones, paying special attention to maintaining detail in the white highlights in the trees, while making sure that the dark areas also have some detail
  • To apply the infrared glow, follow from Step 5 in the first method.

This image is called CREEP. Can you see why?

blackandwhiteinfrared

flowerheartCW

I love the softness and translucency of Black and White, infrared photography. Post-processing really brings out all the infrared characteristics that draw viewers in, and gets the emotions flowing. Using these five processing techniques will get you off to a fine start, but these are only five of many ways you can process your digital infrared images in Photoshop. If you have a favorite post processing formula I’d love to see how you do it. Post your infrared shots too.

The post 5 Creative Ways to Process Infrared Photographs in Photoshop by Alex Morrison appeared first on Digital Photography School.


Digital Photography School

 
Comments Off on 5 Creative Ways to Process Infrared Photographs in Photoshop

Posted in Photography


Des Wassers Weite

21 Jun

Wasser bedeutet Leben. Selbst wir Menschen bestehen zu einem Großteil aus Wasser, sind umgeben davon und können uns nicht davon trennen. All das wissen wir. Im Kopf. Wurden in der Schule vielleicht bis zum Erbrechen mit Zahlen vollgestopft. Vier-Elemente-Lehre, Biologie, Chemie, Erdkunde. Jaja, Wasser, gähn.

Als jedoch der Kanadier Edward Burtynsky sich aufmachte, ein Projekt über die Zusammensetzung aus Sauerstoff und Wasserstoff zu erarbeiten, trieb ihn jedoch nicht der rein wissenschaftlich-kognitive Wissensdurst an. Er wollte begreifen, was Wasser mit unserer Erde macht. Wie es aussieht, wenn Wasser nicht da ist, wo wir es erwarten. Und darauf aufmerksam machen, dass wir mit Wasser sehr sorgfältig umgehen müssen.

Die Abbildungen des Künstlers sind allesamt unkonventioneller Natur und fließen zusammen in einen Strom seiner Wahrnehmungen, für die er den Aufwand nicht scheute, Abstand zu nehmen und die Erde aus dem Helikopter oder Flugzeug mittels Großformatkamera zu betrachten. So entstand die Serie WATER. Ein Hingucker, nicht nur für Chemie-Laboranten oder Greenpeace-Advokaten.

Oil Spill #5 | Q4000 Drilling Platform, Gulf of Mexico, June 24, 2010

Oil Spill #5 | Q4000 Drilling Platform, Gulf of Mexico, June 24, 2010

Blick in einen Großbrunnen, leer.

Stepwell #4 | Sagar Kund Baori, Bundi, Rajasthan, India, 2010

Polders, Grootschermer| The Netherlands, 2011

Polders, Grootschermer| The Netherlands, 2011

Flood Control | LeveeMAASVLAKTE, Rotterdam, The Netherlands, 2011

Flood Control | LeveeMAASVLAKTE, Rotterdam, The Netherlands, 2011

Xiaolangdi Dam #3 | Yellow River, Henan Province, China, 2011

Xiaolangdi Dam #3 | Yellow River, Henan Province, China, 2011

Greenhouses| Almira Peninsula, Spain, 2010

Greenhouses| Almira Peninsula, Spain, 2010

Ein Damm spuckt eine breite Fläche Wasser nach rechts aus.

Xiaolangdi Dam #1 | Yellow River, Henan Province, China, 2011

Blick auf einen langen Fluss, der von oben aussieht, wie ein Baum.

Colorado River Delta #2 | Near San Felipe, Baja, Mexico, 2011

Cerro Prieto Geothermal Power Station | Baja, Mexico, 2012

Cerro Prieto Geothermal Power Station | Baja, Mexico, 2012

Burtynsky, der aus der Ukraine stammt, ist ein Fotograf, der in seinen Werken die Natur weder beschönigt, noch den Teufel an die Wand malt. Und dennoch zeigt er beides: Das Wunder der Natur und das, was wir Menschen daraus gemacht haben.

Mit seiner Art und Weise zu fotografieren und dem besonderen Sujet hat er sich mittlerweile einen Namen gemacht und ist dadurch auch TED Prize Gewinner 2005 geworden.

Das Buch zum Projekt „Water“ ist mittlerweile vergriffen, aber dennoch gebraucht über Amazon* zu beziehen.

Courtesies: Galerie Stefan Roepke, Koeln / Galerie Springer Berlin / Metivier Gallery, Toronto

* Das ist ein Affiliate-Link zu Amazon. Wenn Ihr darüber etwas bestellt, erhält kwerfeldein eine kleine Provision, Ihr zahlt aber keinen Cent mehr.


kwerfeldein – Fotografie Magazin | Fotocommunity

 
Comments Off on Des Wassers Weite

Posted in Equipment