RSS
 

Archive for February, 2014

50K Creative Profesisonals Creating Their Websites Code-Free in a Flash with Webydo, See Why

24 Feb

Some of you may have already heard about Webydo, and some of you may have not, but that’s alright. You’ll probably be hearing plenty more about it in the future. Webydo’s a web-design platform that lets people create pretty rad-looking HTML websites that have a built-in CMS, too. And they’re able to do all of this without even knowing the Continue Reading

The post 50K Creative Profesisonals Creating Their Websites Code-Free in a Flash with Webydo, See Why appeared first on Photodoto.


Photodoto

 
Comments Off on 50K Creative Profesisonals Creating Their Websites Code-Free in a Flash with Webydo, See Why

Posted in Photography


Pano Selfie Is The New Selfie

24 Feb

Extra photos for bloggers: 1, 2, 3

You’ve pretty much mastered the selfie … impeccable arm extension, flawless duck face, precision head tilt.

All that perfection can get boring.

It’s time to make the switch to Pano Selfies.

Give your selfies some edge with distorted perspective, glitchy stitching and guaranteed laughs from all who see ‘em.

It’s easy!

1. Put your camera into Panoramic mode or fire up any auto-stitching pano app.

2. Point your camera at your face and start the pano. It can be tricky since you have to use the back-facing camera, but practice makes perfect (or a bit easier).

3. Move you camera from one side of your face to the other. Use your whole arm, don’t just tilt the phone. Add wiggles, bumps, move the camera closer/farther from your face or change your expression as the phone passes by, for max silliness.

4. Share! Throw your masterpiece onto the web with #panoselfie.

5. Check Out Others’ Pano Selfies and Have a Chuckle


© laurel for Photojojo, 2014. |
Permalink |
No comment |
Add to
del.icio.us

Post tags:


Photojojo

 
Comments Off on Pano Selfie Is The New Selfie

Posted in Equipment


Kaiserslautern Royal

24 Feb

Ein Beitrag von: Jan Bechberger

Nicht den Niedergang ostdeutscher Städte und Kommunen will ich zeigen. Auch nicht den Blick etwa auf das abgegraste Thema der ehemaligen Schwerindustrie im Ruhrgebiet richten oder auf die vielerorts eher unglücklichen, aber ebenfalls bereits viel gezeigten Missstände im urbanen Raum von Großstädten.

Viel mehr geht es mir um den aktuellen Zustand westdeutscher Mittel- und kleiner Großstädte. Inwieweit hat sich das Stadtbild ehemals recht prosperierender Kommunen mittlerweile gewandelt? Ist die vielerorts exorbitant hohe Verschuldung der Städte auch im urbanen Umfeld erkennbar?

Ist der Ort meiner Kindheit und Jugend noch ein Ort, an dem ich auch heute noch leben wollen würde? Mit solchen Fragen im Kopf machte ich mich auf den Weg und durchstreifte zentrale Innenstadtbereiche und diverse Wohngebiete meiner Geburtsstadt Kaiserslautern immer und immer wieder.

Kaiserslautern Royal © Jan BechbergerKaiserslautern Royal © Jan Bechberger

Und so konnte ich im Frühjahr 2013 Stück für Stück das Bildmaterial für meine Serie „Kaiserslautern Royal“ zusammentragen. Das Projekt war zugleich die Abschlussarbeit meines Studiums an der Neuen Schule für Fotografie in Berlin, das ich im vergangenen Herbst beendete.

In meinem Projekt ist es mir wichtig, Bilder zu präsentieren, die bespielhaft sein sollen und die auch an anderen Orten entstanden sein könnten. So spare ich bewusst typische Wiederkennungsmerkmale aus, im Fall von Kaiserslautern etwa das Rathaus oder unser bekanntes Fußballstadion.

Kaiserslautern Royal © Jan Bechberger

Darüber hinaus nutze ich einen dokumentarischen Stil und arbeite mit vermeintlich gewöhnlichen Ansichten aus dem urbanen Raum der knapp 100.000 Einwohner zählenden pfälzischen Kommune.

Die einzelnen Bilder der Reihe habe ich mit Bedacht und viel Geduld komponiert, sie sind menschenleer und zeigen subtile Zeichen des Verfalls. Auch das Licht und die Witterung sind mir stets wichtig.

Kaiserslautern Royal © Jan Bechberger

So musste ich zahlreiche Orte wiederholt aufsuchen und versuchte dabei stets, so etwas wie das unter Fotografen bekannte „Becher-Licht“ zu nutzen, also nur bei bedecktem Himmel zu fotografieren. Ich wollte keine strengen Schatten oder übertriebenen Kontraste, eher suchte ich eine Art neutrales Licht.

Konkret rangiert Kaiserslautern derzeit auf Platz drei der am höchsten verschuldeten Städte in ganz Deutschland, hinter Oberhausen und Pirmasens.

Kaiserslautern Royal © Jan BechbergerKaiserslautern Royal © Jan Bechberger

Ohne näher auf die vielschichtigen Gründe und Ursachen eingehen zu wollen, so ist der schlechte Zustand Kaiserslauterns deutlich und ohne lange danach suchen zu müssen sichtbar: Leerstehende Läden, Büros und auch Wohnungen, Ramschläden und Ein-Euro-Kaufhäuser.

Auch in zentralen Wohngebieten sieht es eher traurig aus und wer genau hinschaut, der kann ihn sehen, den schleichenden Verfall und den verblassten Glanz längst vergangener fetter Jahre.

Kaiserslautern Royal © Jan BechbergerKaiserslautern Royal © Jan Bechberger

Hinzu kommt aktuell der Bau einer komplett überdimensionierten Einkaufs-Mall mitten in der Stadt. Anders als der zukünftige Betreiber der Mall sind sich Experten einig, dass ein solches Einkaufszentrum weiteren Leerstand von Geschäfts- und Gewerbeflächen nach sich ziehen und somit zu einer weiteren Verödung der Innenstadt beitragen wird.

So möchte ich mit meiner Fotoserie neben den inhaltlichen Aspekten auch eine Atmosphäre transportieren. Wer sich darauf einlässt, der kann vielleicht die Tristesse der Orte spüren.

Kaiserslautern Royal © Jan Bechberger

Und wie schon gesagt: „Kaiserslautern Royal“ soll ein Beispiel sein und ist als Auftakt zu weiteren Serien über Städte ähnlicher Charakteristik und Größe gedacht. Nach Oberhausen, zum Beispiel, wollte ich immer schon einmal fahren und in Pirmasens, so habe ich mir sagen lassen, soll es eine interessante und sehr fotogene Fußgängerzone geben.


kwerfeldein – Fotografie Magazin | Fotocommunity

 
Comments Off on Kaiserslautern Royal

Posted in Equipment


Shooting Raw with the Nokia Lumia 1020

24 Feb

nokia10202.jpg

The Nokia Lumia 1020 comes with one of the best smartphone cameras we have tested. After installing the Nokia “Black” firmware update you can now also capture images in DNG Raw format. Just how much more detail can you squeeze out of it? Find out on connect.dpreview.com

News: Digital Photography Review (dpreview.com)

 
Comments Off on Shooting Raw with the Nokia Lumia 1020

Posted in Uncategorized


Animating Van Gogh: World’s First Fully-Painted Feature Film

24 Feb

[ By WebUrbanist in Art & Photography & Video. ]

animated-film-comes-alive

It is a fantastic endeavor and nearly finished – a movie made up of 56,800 stop-motion paintings, all presented in the style and told by the characters of the tale’s protagonist: Vincent van Gogh.

animated-van-gogh-film

The first full-length feature of its kind, Loving Vincent uses van Gogh’s own techniques to explore the life and death of the artist, “through his paintings and by the characters that inhabit them.”

van gosh painting studio

As its creators explain, “the intrigue unfolds through interviews with the characters closest to Vincent and through dramatic reconstructions of the events leading up to his death.”

van gogh character still

This production by Breakthru Films features 120 of the artist’s paintings and draws its plot from 800 letters, using them to flesh out a deeper picture of this often-misunderstood painter whose work goes well beyond his most famous Starry Night and Mona Lisa.

van gogh movie trailer

In van Gogh’s own words: “Well, the truth is, we cannot speak other than by our paintings” – these industrious filmmakers are taking him at his word, and animating his images and subjects to tell his story.

van gogh loving vincent

Breakthru was founded by Oscar award-winning animator Hugh Welchman. Unfortunately, the project did not raise sufficient funds on Kickstarter, but given how far they have come one can only hope the work does not end in tragedy.

Share on Facebook


[ By WebUrbanist in Art & Photography & Video. ]

[ WebUrbanist | Archives | Galleries | Privacy | TOS ]


WebUrbanist

 
Comments Off on Animating Van Gogh: World’s First Fully-Painted Feature Film

Posted in Creativity


World Press Photo 2014 Winners Announced

24 Feb

Each year World Press Photo holds their annual competition to find the best images of the year in photojournalism and documentary photography. They showcase the winners on their website as well as host a traveling exhibit. I’ve been luck enough to personally see the exhibit twice, in two different cities, along my travels.

On February 14th the World Press Photo winners were announced

John Stanmeyer About A Photograph from thinkTank Photo on Vimeo.

John Stanmeyer, World Press Photo winner for contemporary issues, is our photographer this week on About A Photograph. John talks you through his award winning photograph – enjoy!

Please visit About a Photograph.com for more information on John and the entire series of “About A Photograph”

With thanks to John and Triple Scoop Music.
Produced by Kurt Rogers and Deanne Fitzmaurice.
Sponsored by thinkTankPhoto.com

This is a screenshot of their website

world-press-2014-winners

Head over to view all the 2014 award winners here!

Even if you are not into documentary or journalistic photography, you can’t help but find these images haunting, stunning, and sometimes shocking. Photography has long since been an important tool in documenting our lives and times. See what these, often brave (or stupid) photographers bare witness to and capture with their cameras for the world to see.

Documentary photography has also historically played a role in social change. You just have to think about the images of the starving children in Africa to realize that’s true. Only after the images showed up on the media, did the world take notice and do something to help.

So do your part – go see the winning images. Really look at them. Not just for their technical and artistic qualities, but look at the meaning in those images. Be inspired to create deeper, more meaningful images yourself.

Enjoy!

For more on documentary and street photography try these tips:

  • Vivian Maier – The Secret Nanny Street Photographer: BBC Documentary Part 1
  • Focus on Willem Wernsen ~ Philanthropist Photographer
  • Documentary Photography – Six Tips for Creating a Legacy

The post World Press Photo 2014 Winners Announced by Darlene Hildebrandt appeared first on Digital Photography School.


Digital Photography School

 
Comments Off on World Press Photo 2014 Winners Announced

Posted in Photography


6 of Lightroom’s Hidden Treasures

24 Feb

Lightroom is very popular for post-processing lately. In this article I will go over a few of Lightroom’s hidden treasures. See if you use these, or maybe you have some others you can share with us in the comments section.

1. Virtual Copy

In Lightroom’s develop module you can have any number of something called Virtual copies. The advantage is that each copy can use a different arrangement of settings to make the image look different; thus you can compare several options to see which gives the best results.

Virtual copies are not a copy of the original image, but a set of instructions copied from the original file, to which further instructions are added. It is not a duplicate image file; it is only the instructions written previously on the original, copied, and kept as a separate instructional file format, very tiny in size. You can backtrack and start over, or you can continue editing where you left in the current virtual copy you are editing.

To create a new virtual copy Click Ctrl + ‘ on PC (Command + ‘ on Mac) OR right click the image thumbnail and choose “Create Virtual Copy”

In essence it is different instructional files acting on one single original image, to produce different images as per the different processing strategies you apply (you then need to export each to create separate final files). Virtual copies are an intelligent way to try out different things without duplicating your originals, and consuming hard disk space.

Lightroom hidden treasures tips 01

This screen shot from filmstrip shows the Virtual Copies. The page flip symbol
(circled in red) on the bottom left corner of each image is the sign for Virtual Copy.

2. Soft Proofing

This has been one of the most sought after features in Lightroom for long time. Press “S” on your keyboard as you work in the Develop module and your working image’s background turns into paper white (you can change that as well). The photograph will appear as if it is on paper, and a notification shows “Proof Preview” on the top right of the image area.

To check if your image has any colour problems, take a look at the histogram. The clipping indicators are turned into two symbols; one on the right corner is a print colour warning, and the left one is a monitor colour warning. Too much of a particular colour in your image will give you a warning on the same histogram (click the paper and monitor symbol), that those colour regions are unable to make it into print medium. This means you have to reduce the colour intensity of that particular colour.

Lightroom hidden treasures tips 02

This screen shot shows the paper symbol on top right and the monitor symbol on top left of the soft proofing window (both are circled in red).

By clicking “Create Proof Copy” you will be able to create a Virtual Copy of the present settings and after the correction you can compare it to the changes after correcting the colours. You can apply colour profiles too based on the printer you are using. Press “S” again to exit Soft Proofing mode.

3. Smart Previews

Smart Preview, as the name suggests, is a smarter way of working when you have hard drive space constraints (say you are working on your laptop but your files are in the external harddrive). Smart Preview creates high res – low size file which can be used for working purposes. The moment you want to export the photographs, connect your external hard drive and export it from the original.

This tool will be highly useful for people who have already accumulated a lot of files, and utilized hard disk space. The moment you import, the option will be there. If you click the tick box to create Smart Previews, Lightroom will create and store them in a separate folder where your working instructions (your LR catalog) will be stored. The moment you connect your external drive, you will have an option to discard the smart preview files. Before discarding, the instructions will all be written on to the original files.

Lightroom hidden treasures tips 03

This screen shot shows the original file without Smart Preview

Lightroom hidden treasures tips 04

This shows the screen for the same file with Smart Preview (circled in red)

4. Lights Out

One of the least used tools in Lightroom; comes with a simple shortcut. Simply press “L” on your keyboard and the entire screen dims (80% dim), except the image area. Press “L” again and the screen will go to pitch black except your image portion. The smart thing about this is that when you first press the “L” you can continue working with the 80% dimly lit, panel sliders. You can also set what percentage you want for your Dim Level by going to your Preferences settings (see below).

Lightroom-hidden-treasures-tips-08

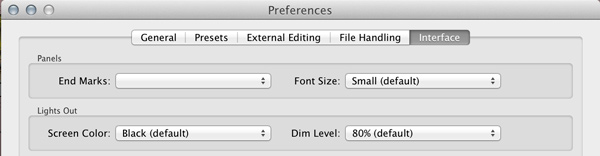
Set your Dim Level percentage in Preferences, here

When you press “F” for full screen you have to wait for resizing the image to full screen. But when you press “L” for lights off it is done in a snap.

5. Target Adjustment Tool (TAT)

This tool is available in the Develop module’s Tone Curve and Colours sections. This is one intelligent tool to adjust the tonal values directly on the image, when you do not know which sliders to adjust. You pick the tool from the panel and adjust the image directly by pressing and holding the mouse button, while you drag up or down as you may wish. The changes appear instantly as you drag.

It is available in the colour section as well, where you can adjust the colour values (Hue, Saturation & Luminance). Click the tool from the panel, place it over the image where you want to make adjustments, while pressing and holding the your mouse button. In B&W conversion you can also adjust the black, grey and white values by adjusting the tones darker or lighter, in a similar manner as you did for colour.

Lightroom hidden treasures tips 05

This shows where to find the Targeted Adjustment Tool in the Curves panel

Lightroom hidden treasures tips 06

When the tool appears with up and down arrow marks, as seen here, it means the tool is activated.

6. Visualize Spots

As you use your camera, with the passage of time, the sensor tends to accumulate dust over itself. The dust spots become visible on your image and reduce its quality and appeal. As there may be any number of reasons for not cleaning the camera sensor, every time you see a spot there is a tool in Lightroom to clean them, at the image level.

You are probably aware of the cloning and healing tool, which is on the top of the Develop module – second tool from the left, below the Histogram. You can use this tool for obvious reasons and also for correcting the sensor dust spots. Press “Q” (keyboard shortcut) to activate the tool and look at the bottom of the image (see below).

Lightroom hidden treasures tips 07

This screen shot shows the image after the tool is activated

Click the check box adjacent to Visualize Spots and the image turns into an inverted monochrome one which show the dust spots more clearly (if you do not see the toolbar or that option press “T” to show the Toolbar). You can adjust the intensity of the brightness to find the dust spots using the slider next to Visualize Spots, on the toolbar. This is an easy way to find the dust spots and correct them by cloning the nearest best place.

Do you have any other Lightroom tips or hidden treasures that you use? Please share in the comments below.

For more on Lightroom check these articles:

  • Why Lazy Photographers Should Use Lightroom Smart Collections
  • 3 Uses for the Radial Filter Tool in Lightroom 5
  • 4 Not-so-Secret Tricks to Speed up Your Lightroom Workflow

The post 6 of Lightroom’s Hidden Treasures by Navan Viswa appeared first on Digital Photography School.


Digital Photography School

 
Comments Off on 6 of Lightroom’s Hidden Treasures

Posted in Photography


23. Februar 2014

24 Feb

Ein Beitrag von: blaueaster

© blaueaster (flickr)


kwerfeldein – Fotografie Magazin | Fotocommunity

 
Comments Off on 23. Februar 2014

Posted in Equipment


Rolling Stop: 10 Abandoned Roller Skating Rinks

23 Feb

[ By Steve in Abandoned Places & Architecture. ]

abandoned roller skating rinks
These abandoned roller skating rinks once saw social interaction mesh seamlessly with healthful recreation backed by a toe-tapping musical soundtrack.

Faded Starlight

abandoned Starlight Roller Rink Utah(image via: Arbyreed)

Pretty much all that remains of the former Starlight Roller Skating Rink and outdoor dance hall are the bandshell, ticket booth and concrete outdoor “dance floor”. Located between Toquerville and Pintura just off the old Cedar City highway (now I-15), the Starlight was built in the early 1940′s as an open-air dance hall and/or roller skating rink, the latter activity taking precedence as the Big Band era closed.

abandoned Starlight Roller Rink Utah(images via: Arbyreed)

According to the oldest resident of Pintura (likely a former patron), the Starlight Roller Skating Rink was abandoned in 1953 as the Korean War was drawing to a close. Credit Utah’s arid climate for preserving the facility’s remnants and credit Flickr user Arbyreed for these spectacular photos taken in February of 2010.

Alberta Blues

abandoned roller rink Calgary Alberta Canada(image via: Michael Oliver)

Who could imagine a roller skating rink wouldn’t be able to thrive in Calgary, Alberta? Oh, just about everyone: this is CANADA, a place where real skating is done with ice skates and nobody pays for the privilege… during Calgary’s long cold winter, at least. Props to Flickr user Michael Oliver for the disturbing yet delightful image above.

A View To A Bushkill

abandoned Bushkill Park roller rink(images via: TheUnknownCameraman)

Bushkill Park had a good run – the Easton, PA-area amusement park was open from 1902 through 2004 – but severe flood damage inflicted by Hurricanes Ivan and Wilma caused the storied park and its signature roller rink to close pending a massive renovation nobody thinks will actually occur. Almost a decade after the worst flooding in a century, Bushkill Park remains stubbornly comatose.

abandoned skates at Bushkill Roller Rink(images via: TheUnknownCameraman)

If Bushkill Park’s owners need funds to jump start the clean-up they might try selling off some of the roller rink’s massive inventory of skates before they rot away. Check out this video from TheUnknownCameraman to virtually experience exploring the post-apocalyptic rink.

Beaten Down In Eatontown

abandoned Eatontown Roller Rink(images via: Legend Has It… and Atlanticville)

The former Eatontown Roller Rink in Eatontown, New Jersey closed in 2005 and has been quietly deteriorating ever since. Well, not exactly EVER… on February 19th of 2009, high winds caused part of the building’s roof and side walls to collapse. The Eatontown Roller Rink’s rather sudden demise may have been a blessing for its owner, who was planning to demolish the moldering roller rink anyway. Now it won’t take quite so long.

Next Page – Click Below to Read More:
Rolling Stop 10 Abandoned Roller Skating Rinks

Share on Facebook


[ By Steve in Abandoned Places & Architecture. ]

[ WebUrbanist | Archives | Galleries | Privacy | TOS ]


WebUrbanist

 
Comments Off on Rolling Stop: 10 Abandoned Roller Skating Rinks

Posted in Creativity


Confluence of Wildlife and Man – A Story from the South Platte River

23 Feb

I was looking at paintings by Nancy Rynes, a Colorado artist. I like her texture series and, especially, the picture called “Confluence”. Two red hawks sitting on a wall covered by graffiti. For me the confluence means here the coming together of wildlife and man made objects. It reminds me an old story from the South Platte River paddling – encounter of a young eagle sitting on old trashed car.

I really hated those cars from 1950s and 1960s when I started to paddle the South Platte River years ago. Then, having no choice, I accepted them and started to photograph them. At least they were put into the river for a reason – to protect river banks. It seems that wildlife is accepting them too.

Car Photography Session on the South Platte River
South Platte River – Another View or How to Photograph the River?

Here is my eagle story originally posted in 2007.

October 15 was my first day on the South Platte River in the fall/winter paddling season of 2007. I paddled upstream from Kersey in the Thunderbolt kayak. After exploring the Lone Tree Creek I paddled back down river to Kersey. It was just before sunset when I decided to shoot some pictures of old cars dumped there to protect river banks.

I squeezed my kayak into some standing backwater and started shooting. I didn’t notice anything unusual, but I did sense somebody’s presence …


bald eagle South Platte River

eaglet bald eagle south platte river kayak Colorado

Not farther from me than a length of my kayak there was an old truck and a young eagle was sitting on the top of it. I kept shooting my pictures. However, looking at a beak and powerful talons, I didn’t feel very comfortable balancing my tippy kayak in the front of that chick. Judging from the time stamps in my pictures I spent 12 minutes there. During that time the eaglet did not make the slightest movement.

I wished I had a better camera than my Pentax Optio W10. It was getting dark, so I backed up leaving the eagle on his truck.

I have seen adult bald eagles many times during my paddling on the South Platte, but it was the closest and most exciting encounter. As a first guess I assumed that I saw a juvenile bald eagle. After searching internet it seems that it is quite difficult to distinguish between immature bald and golden eagles. Some comments I got indicate that it was the golden eagle. So, who is that chick?

Breeding Bald Eagles in Colorado

… from the Center for Biological Diversity:

Bald eagles commonly nested in and around Rocky Mountain National Park as late as the 1950s (117). By 1974, just one pair remained in the state (93). The population remained perilously low through the 1970s and 1980s, began growing in 1986 and reached a peak of approximately 65 pairs in 2006 (2, 69, 93, 96). One-third of Colorado’s nesting bald eagles occur east of the Continental Divide in the South Platte River watershed (115). Other breeding concentrations include the Yampa River upstream of Craig, the White River in the vicinity of Meeker, the Colorado River upstream of Kremmling, and La Plata and Montezuma counties.

Bald Eagle – Nesting & Young from American Bald Eagle Information.

Other bird stories and pictures:

Do Wild Turkey Swim? A Photo Story of White Water Turkey Hen for Thanksgiving
Are My Paddlings Days Over?
Blue Heron – Bird Photography from a Racing Kayak with Pentax Optio W10 Camera?
From the Love Life of Canada Goose in My Paddling Pond: Rivals or Mates?


paddling with a camera

 
Comments Off on Confluence of Wildlife and Man – A Story from the South Platte River

Posted in Photography