RSS
 

Archive for February, 2014

Elevate your movement: Cinetics Axis360 review

26 Feb

Cinetics_Axis360.jpg

Panning, tilting and sliding are essential actions in both photography and video. To elevate the quality of camera movement, particularly in video, you need professional-grade equipment, and it’s usually very expensive. But the folks at Cinetics aim to bridge the gap with the Axis360, an affordable, motorized tripod head and slider to help photographers create dynamic video and time-lapse photography. Read our review

News: Digital Photography Review (dpreview.com)

 
Comments Off on Elevate your movement: Cinetics Axis360 review

Posted in Uncategorized


10 Incredible Bird Photography Tips for Beginners

26 Feb

What is the most important factor in getting your bird photographs noticed by a large audience? Is it the camera or the lens or the bird?

Bald Eagle Flying Away With A Catch

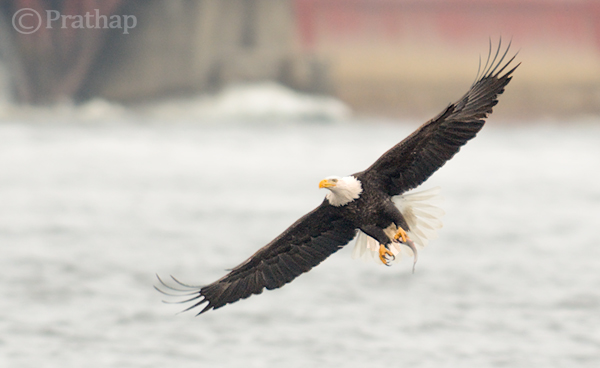
Imagine you have a Canon 1DX or Nikon D4 and 800mm lens. You have been to a place to photograph the magnificent Bald Eagles. Everything seems perfect! Isn’t it?

But, what if you do not know what makes a good bird photograph? Do you think just by shooting a burst of photographs will give you the best photographs? Definitely not…you may get snapshots but not photographs.

“There is nothing worse than a sharp image of a fuzzy concept.” – Ansel Adams

Today you will learn some of the core principles of Bird Photography that will give you an understanding of what makes a good bird photograph.

1. You Don’t Need Expensive Lenses for Great Bird Photography

A great bird photograph does need several factors such as:

  • Quality and Direction of the light
  • Composition
  • Knowledge about the bird and its activities
  • Background
  • Knowledge about the gear you are using
  • Proper Settings
  • Proper Exposure
  • Your position
  • 3 + 1 Ps (Patience, Perseverance, Practice + Passion)

You see, it takes a lot more to become a good bird photographer. A decent APS-C or DX format camera body with telephoto lens of up to 300mm is more than sufficient to really get great bird photographs.

It is important to realize that bird photography is much more than just the camera or the lens. There is no denial of the fact that the longer the lens, the easier it is to photograph birds which are skittish. But, the lens itself cannot make a great bird photograph.

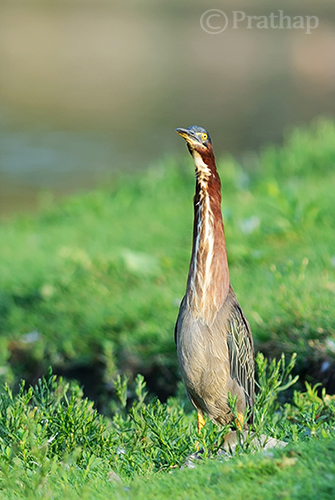
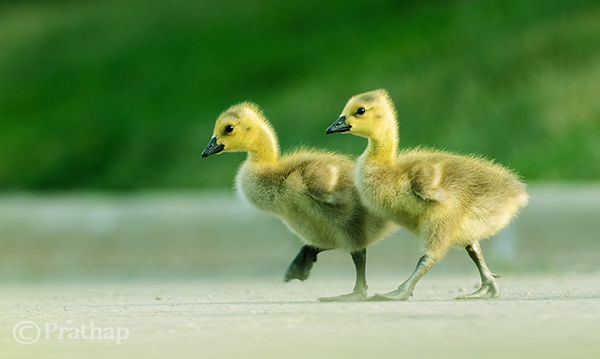
But, if you do not have a longer telephoto lens, nothing stops you from taking a great photograph of birds like Mallard ducks, geese, gulls, and herons that are easily approachable. If you cannot take a close-up of a Bald Eagle, nothing stops you from taking a unique photograph of a Bald Eagle in its habitat.

Everything boils down to how you view the situation. “Is the glass half empty or half full?”

2. Light and Composition

Green Heron Standing TallPhotography is all about light. Light has few characteristics that will make a photograph wonderful.

Early morning and late afternoon light is usually the best time for bird photography. The light during these times is soft. As a bonus, the birds are very active as well.

Soft light has some wonderful characteristics like:

  • It does not cast harsh shadows on the bird
  • It brings out a glow to the bird’s plumage
  • It gives the catch light in bird’s eye

Composing a bird photograph helps you to convey your message in the best possible way. Bird Photography composition is generally very simple. Following a few basic composition principles will help you make a difference:

  • Use rule of thirds composition to place the bird off-center
  • Use color contrast by aiming for complementary background
  • Fill the frame with the bird
  • Use a clean background

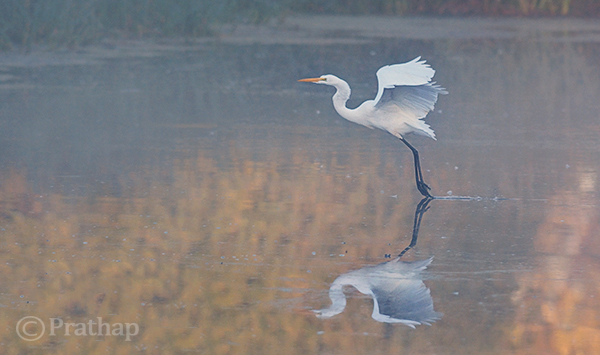
3. Transport the Viewer into the Bird’s World

We see our world at 5 to 6 feet high, but birds see the world in few inches to few feet. To get a feeling of the bird’s world, then you need to get down to their level!

Go Low and Go Slow…

Always try to photograph the birds from their eye level, except the birds in flight of course. It has greater benefits that will overshadow any of your complaints like I can’t bend down, lie down etc. Some of the obvious benefits are:

  • You get more intimate photographs of birds since you will get an eye contact
  • You will get pleasing blur both in the foreground and background
  • You make the bird less scared since you can hardly move
  • You will transport the viewer into the bird’s world

Goslings Crossing the Road

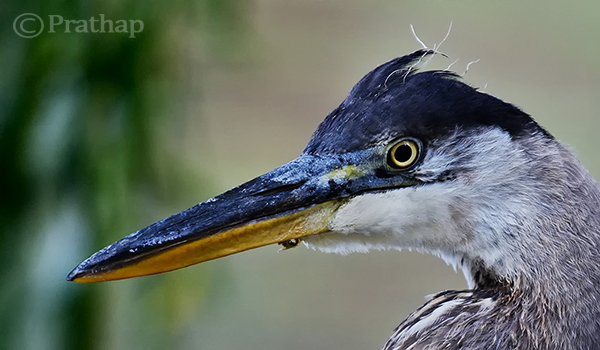
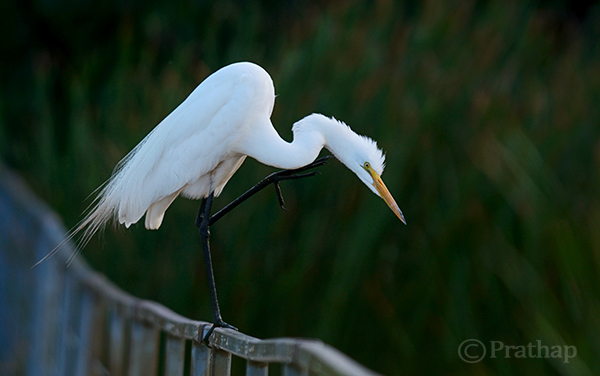
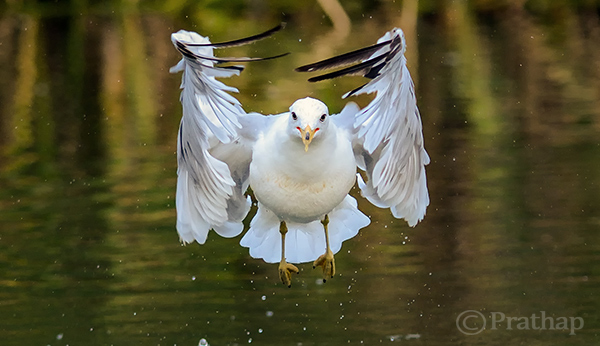
4. It’s all in the Eye

Take a look at any photograph of a bird. What is the first thing you want to see? It’s the eye…right?

We tend to make an eye connection with any living being. It is no different with birds. The eyes are the windows to the soul. If there is no light in the eyes, then they look dull or lifeless. Birds look lively when there is light in their eye.

This light in the eye is called a catch light.

Sparrow perching on a tree branch

By following few guidelines you can easily get better bird photographs:

  • Always keep the bird’s eye in sharp focus
  • Check for a catch light in the bird’s eye (easy to get if the bird is front lit)
  • Make sure to photograph from bird’s eye level

5. Fill the Frame

In bird photography, mostly we photograph an individual bird. While photographing individual birds, it is always a good idea to fill the frame with the bird.

Advantages of filling the frame with the bird are:

  • It is easy to focus on the bird
  • It is easy to achieve a pleasing blur or bokeh effect in the background
  • It is easy to properly expose for the bird
  • It is easy to compose in the field

Juvenile Blue Heron Close Up

6. Tell a Story

Storytelling in bird photography should not be confused with the stories that run for pages. Storytelling is a way to express the time of the day, mood, place or activity of the bird in one photograph. Viewers should be able to picture themselves in the scene.

Simply put, a photograph with bird and its surrounding will give a better sense of story than just the bird filling the frame. Though, it may not always be true.

Great Egret in Misty Morning

Here are few tips you can follow while you photograph a bird in its habitat:

  • Make the bird an integral part of the photograph by including its natural habitat
  • Show the interaction of birds if there is more than one bird in the photograph
  • Indicate the weather conditions by including either snow, rain or mist
  • Take photographs during sunrise and sunset
  • Show season by including flowers in bloom, autumn colors, or snow

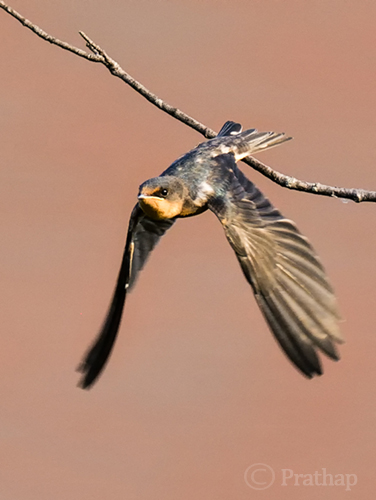
7. Capture their Action and Behaviour

Birds are always in action. They hardly sit idle. Capturing birds in action involves more effort and patience compared to photographing perched birds.

Here are few tips to capturing birds in action:

  • Photograph early in the morning or late in the afternoon when birds are very active
  • Use burst shot mode to take several photographs during the action
  • Track the bird until focus is locked before pressing the shutter
  • Learn to anticipate the action either by observing or reading about them

Juvenile Blue Heron with a Fish

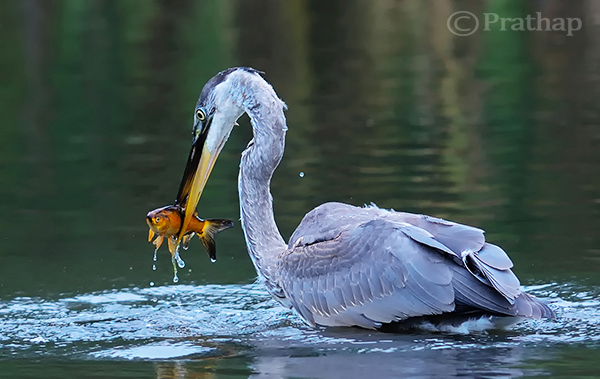
Birds tend to ignore you when they are very hungry. It is very easy to photograph them in action during these times. But, care should be taken not to disturb them and maintain considerable distance.

Capturing bird’s behaviour is much tougher than any other aspect. Generally because birds become alert the moment you are in their sight.

The alert bird is always trying to fly away and rarely will you see its behaviour. You can observe actual behaviours of a bird when it is comfortable. There are few ways to make the bird comfortable:

  • Use a natural place to hide, like a bush or tree or something that obscures you
  • Wait patiently until the bird ignores you
  • Visit the location several days in a row, until the bird becomes comfortable with your presence or you get the right opportunity

Juvenile Great Egret Behavior

Remember to research and learn everything about the bird you are photographing. This will definitely make you a better bird photographer and also you will enjoy knowing about the bird.

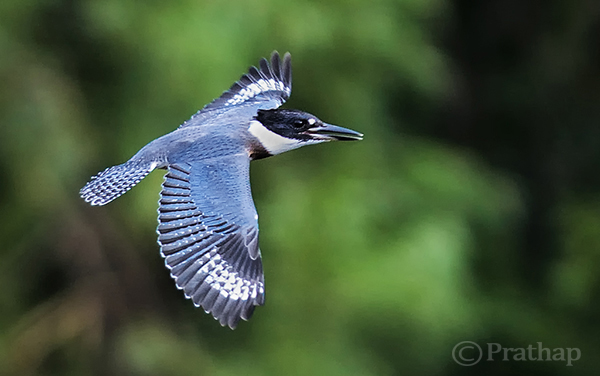
8. Capture their Magnificent Flight

The most interesting part of bird photography is capturing their magnificent flight. This is a very tricky aspect for beginners and pros alike. It is not easy to take flight photographs that will wow viewers.

The success with birds in flight photography largely depends on the bird as well as the technique that one employs. Smaller birds are generally very erratic in their flight and also a bit difficult to track since they are generally too small in the frame. But the larger birds are slightly less swift and are not as difficult to track.

If you want to be successful with flight photography, start with the larger, slower moving birds. Learn all the field techniques to capture the perfect photographs of these birds.

Belted Kingfisher in Flight

Here are simple tips that will help you capture those magnificent flight photographs:

  • Learn about the bird’s flight patterns
  • Know their landing and taking off patterns
  • If there is more than one bird, it is almost always the case that if one flies, the rest will follow the suit
  • Track the bird for a while and let the camera achieve focus before pressing the shutter
  • Use Aperture Priority so that you do not have to worry much about the changing light conditions

9. The Background Makes the Picture

This is one of my favourite topics which I repeat often. What are your thoughts on this? – Is it the background or the bird which makes the picture?

Go through all your favourite bird photographs and see it for yourself. Let me know what you think, in the comments below.

Except extreme close-up portraits of birds, every other type of bird photograph will look great when the background is clean and complementing the bird.

Seagull the Eagle

It is very important to keep a check on the background while taking bird photographs. Just follow these simple tips:

  • Avoid taking bird photographs when the background is too distracting
  • Avoid taking bird photographs when the background is plain and boring
  • Wait for the bird to assume a good position or you change your position to get an interesting background
  • Choose maximum aperture values to throw the background completely, or slightly out of focus

10. Practice with Common Birds

I urge you to practice with common birds. You might have understood by now that the techniques are not dependent on camera, lens or the bird. I was using 18-200mm lens for first 4 years. I learned and practiced most of my birding techniques with common birds like seagulls, Mallard ducks, geese and herons.

I spend most of my time photographing these common birds, and I gave myself a challenge to make some unique photographs of them, that has fuelled my passion so long. I put more importance on learning and practicing photography, than whatever gear I possess. I am very glad to say that I learned most of the photography basics here at Digital Photography School.

I hope my story so far is an inspiration to you to embrace the beauty of these common birds.

Wrap up

Barn Swallow Taking OffFocus your time and energy in learning all the core principles outlined above. Prove it to yourself that you have so much passion to go out and photograph the birds every day, or as often as you can.

Remember that proper techniques will always outsmart equipment. Make every attempt to make amazing photographs of the common birds. Enjoy photographing birds. That is the secret to success.

Share your experience with us. Do you go out very often to photograph birds? Do you think technique outsmarts the equipment? I would be glad to answer any questions you have. Do let us know if you have any other suggestions on bird photography.

The post 10 Incredible Bird Photography Tips for Beginners by Prathap DK appeared first on Digital Photography School.


Digital Photography School

 
Comments Off on 10 Incredible Bird Photography Tips for Beginners

Posted in Photography


Smear Campaign: Guerrilla Artist Remixes Adverts with Acid

26 Feb

[ By WebUrbanist in Design & Guerilla Ads & Marketing. ]

vermibus repainted art poster

Mutating works of public advertising with corrosive acid, this cunning urban interventionist hijacks posters from bus stops and subway stations, then adds his own message into the mix.

vermibus steals ad poster

vermibus process

Vermibus takes posters then employs solvents to remake each surface in his studio, dissolving inks and colors already there and reusing materials from each de facto ‘canvass’ to make something new.

acid remixed street art

vermibus berlin movie posters

He then puts his transformed works back where he found the original or, in many cases, an entirely different site, city or even country, blending them back into the urban environment.

vermibus disturbing art example

Having taken them off the streets, Vermibus brushes the idealized figures, slowly morphing them into surrealist versions of their former selves. He has repeated this unusual artistic process in various major cities, including and beyond his home town of Berlin.

vermibus metro stop art

vermibus mobile metro installation

Sometimes the commentary is clear – a model made intentionally skeletal, for instance – while others evolve (or devolve) into abstractions and parodies that seem almost inhuman.

vermibus surreal figure remodel

The three fascinating short films embedded throughout this article (above and below) show his process, various examples of his work around Europe and his organization of and participation in the No-Ad Project. “Using a dubious inter-rail ticket, Vermibus set out with a set of 90 keys and his pallet of solvents to physically and temporally hijack the Western Worlds of advertisements in the name of fine art.”

Next Page – Click Below to Read More:
Smear Campaign Guerrilla Artist Remixes Adverts With Acid

Share on Facebook


[ By WebUrbanist in Design & Guerilla Ads & Marketing. ]

[ WebUrbanist | Archives | Galleries | Privacy | TOS ]


WebUrbanist

 
Comments Off on Smear Campaign: Guerrilla Artist Remixes Adverts with Acid

Posted in Creativity


The Experience of Newborn Photography at the Hospital by Kim Rix

25 Feb

I often get asked what my favourite age to photograph is, and although my honest answer is “it’s difficult to choose’. I would have to say that photographing babies, (especially newborns) is a magical experience. Being part of those first days of life and sharing the journey with the parents at such a special time […]
dslrBlog

 
Comments Off on The Experience of Newborn Photography at the Hospital by Kim Rix

Posted in Photography


Nikon releases beta version of next-generation Capture NX software

25 Feb

shared:NikonLogo.png

Nikon has released a beta version of an update to its Capture NX software, a product which has been relatively stagnant in recent years. Capture NX-D is the first version of Nikon’s Raw converter to be made since previous developer Nik Software was bought by Google in 2012. The software features a new user interface, batch conversion and a non-destructive workflow that saves adjustments in sidecar files alongside the original image. Find out how to try Capture NX-D for yourself.

News: Digital Photography Review (dpreview.com)

 
Comments Off on Nikon releases beta version of next-generation Capture NX software

Posted in Uncategorized


A Guide to Lighting Indoor Sports

25 Feb

Newspapers may be circling the technological drain at this point, but for 150 years they were king of the hill. And the 20 years I spent there proved to be a great ride as well as a non-stop idea lab.

Today we'll take a look back at how we developed our multi-budget solutions for lighting winter indoor sports—specifically in high school gymnasiums. Lighting indoor sports opens up a whole new world as compared to trying to shoot available light. You can both freeze action and define the quality of the light in a much better way than the spotty existing overheads.

And for the sake of argument, let's assume only one rule: no on-camera direct flash. Because that looks horrible. Other than that, any lighting scheme is fair game for exploitation. Also, I don't have access to all of my sports archives at the papers so we'll be sticking to cookbook-type lighting diagrams to visualize placement and coverage.

Read more »
Strobist

 
Comments Off on A Guide to Lighting Indoor Sports

Posted in Photography


25. Februar 2014

25 Feb

Ein Beitrag von: Roger

Hong Kong from the Peak © Roger


kwerfeldein – Fotografie Magazin | Fotocommunity

 
Comments Off on 25. Februar 2014

Posted in Equipment


Nikon announces flagship D4s professional DSLR

25 Feb

D4s_58_1.4_front34l.png

Nikon has released an update to their flagship D4 pro DSLR: the D4s. While not a major upgrade to the camera (hence the ‘s’ in the name), the D4s packs more processing power, a refined autofocus system, faster continuous shooting, and more video features (including 1080/60p support). Two other items pros will appreciate are a ‘small’ Raw size and a noticeable improvement in battery life compared to the D4. The camera will be available in early March for $ 6499.95 / £5,199.99.

News: Digital Photography Review (dpreview.com)

 
Comments Off on Nikon announces flagship D4s professional DSLR

Posted in Uncategorized


Nikon D4s: CP+ Hands-on and interview

25 Feb

DSCF1245.jpg

Nikon has officially launched its new flagship DSLR, the D4s. Offering a number of improvements over its predecessor the D4, the D4s features greater ISO sensitivity in stills and video mode, a new 60p video capture option and some minor design changes. At the recent CP+ show in Yokohama, Japan editor Barnaby Britton was able to sit down with the new camera and two of the men responsible for creating it. Click through for a hands-on tour of the D4s and insights from its creators. 

News: Digital Photography Review (dpreview.com)

 
Comments Off on Nikon D4s: CP+ Hands-on and interview

Posted in Uncategorized


Liebeserklärung an eine Tochter

25 Feb

Ein Beitrag von: Martina Fenske

Ich liebe meine Tochter. Und ich liebe die Fotografie. Folglich wurde die Kombination aus beidem zu einer Leidenschaft mit regelrechtem Suchtpotenzial. Seit zwei Jahren arbeite ich, angeregt durch Martina Mettners Buch „Mutterblicke“*, an einem Projekt mit meiner Tochter. Ein Projekt, das mich schon manches gelehrt hat.

Seit jeher begeistern mich Portraitfotos, vor allem ältere, recht nahe Schwarzweiß-Aufnahmen. Mit Vorliebe studiere ich die Ausdrücke eines Gesichtes und das Licht, das die Züge betont. Es ist in gewisser Weise auch meine Art zu fotografieren geworden. Wo immer ich mich auf der Suche nach Motiven befinde, ziehen mich Gesichter magisch an. Somit liegt es auf der Hand, dass ich vor allem meine Tochter portraitiere.

Emotionen © Martina Fenske

Irgendwie ist es fast schon seltsam, aber ich ertappe mich oft dabei, dass es Ganzkörperaufnahmen eher selten in die engere Auswahl schaffen. Immer wieder sind es ähnliche Ausschnitte, die meine Aufmerksamkeit fesseln.

Dabei gebe ich bewusst weniger internes Familienleben preis, wie Sally Mann es beispielsweise zeigt. Meine Fotos sind selten Momente aus dem Alltag, sondern meist eher geplante Aufnahmen.

Gern arbeite ich mit Zöpfen, die an vergangene Zeiten erinnern, da dies zu beabsichtigten Assoziationen führt. Die Wahl der Location kann sehr unterschiedlich ausfallen.

© Martina Fenske

Bei sehr kaltem und unschönem Wetter gibt es gelegentliche Shootings im Studio, wobei ich dies nur als letzte Option wähle, da es die Bewegungsfreiheit meiner Tochter und meine spontane Kreativität einengt.

Mittlerweile arbeite ich am liebsten mit einer Lichtqualität, wie ich sie bei bedecktem Himmel hinter großen Fensterscheiben oder am Waldrand bzw. im Wald habe. Mir gefallen klare Konturen und schöne Schattenverläufe, was bei zu diffusem Licht so nicht möglich wäre.

Ich habe keine Hemmungen, mit ISO 1600 oder mehr zu arbeiten, gibt es doch den Fotos die altertümliche Anmutung, die sie haben sollen.

© Martina Fenske© Martina Fenske

Wie schon erwähnt, habe ich eine echte Schwäche für Schwarzweiß-Fotos, weshalb die meisten Aufnahmen auch so gehalten sind, da hierbei der Blick auf das Wesentliche fällt – die Art, wie das Licht das Gesicht umspielt.

Vor Ort greife ich nur gelegentlich ein, lasse meine Tochter spielen und einfach Kind sein. Manchmal drängt sie mich regelrecht zu neuen Versuchen und erstaunt mich mit einer perfekten Umsetzung. Ein andermal kippt die Motivation plötzlich in bodenlose Unlust mit allen dazugehörenden Emotionen, die eine mittlerweile 5-Jährige nur zu bieten hat. Auch das gehört dazu.

Motivation

Noch hat das Projekt keinen Namen. Doch mit jedem Blick durch den Sucher entdecke ich Neues an meiner Tochter, blicke ich tiefer in meine eigene Seele und komme der Wahrheit über mich und meine fotografische Motivation ein Stück näher.

Anfangs war ich hauptsächlich davon angetrieben, schöne Portraits fürs Familienalbum anzufertigen. Natürlich immer fröhlich lächelnd. ?Nicht, dass dies zu schlechten Ergebnissen geführt hätte, aber es war zu wenig von meiner Tochter und auch von mir – schließlich sind unsere Gene ziemlich ähnlich – darin zu sehen.

© Martina Fenske© Martina Fenske

Also fing ich an, sie nachdenklich, traurig, frech, trotzig zu fotografieren. Und nicht immer gleich das Handtuch zu werfen, wenn unerwünschte, echte Emotionen sichtbar werden.

Mittlerweile löst nicht mehr jedes Bild die großmütterlichen Begeisterungsstürme aus wie zu Beginn, aber so ist es eben mit der Wahrheit: Sie gefällt nicht jedem. Ich bin der Wahrheit über mich selbst dadurch näher gekommen. Erkenne immer mehr, dass ein Teil von mir eher tiefgründig, sensibel, introvertiert, ja fast schon melancholisch ist.

© Martina Fenske

Meine Tochter zeigt mir viel von mir selbst, ob es mir gefällt oder nicht. In den Fotos kann ich dem eine Gestalt geben, was ich zu sehen beginne und kann lernen, auch Vorteile in Charakterzügen zu sehen, die in unserer westlichen Gesellschaft nicht gerade en vogue sind.

Durch das Fotografieren – oder doch durch meine Tochter? – bin ich weiter gekommen. Davon profitiere ich als Persönlichkeit und als Fotografin bei meinen Auftragsarbeiten. Mich selbst zu kennen ist unerlässlich, will ich den Fotos einen unverwechselbaren Anstrich verleihen.

© Martina Fenske

Ich denke, ich bin auf einem guten Weg, mich mit meinem Hang zur Melancholie, meiner Introversion – die mir bei größeren Aufträgen oft im Weg steht – auszusöhnen und diesen Wesenszügen sanften Ausdruck zu geben. Wohin das Projekt sonst noch führen wird? Ich bin gespannt. Denn manchmal überkommt mich die Sehnsucht, andere an meinen Fotos, Empfindungen und Ansichten teilhaben zu lassen.

Ansichten, die alles andere als objektiv sind – die Blicke einer Mutter eben.

* Das ist ein Affiliate-Link zu Amazon. Wenn Ihr darüber etwas kauft, erhalten wir eine kleine Provision, Ihr zahlt aber keinen Cent mehr.


kwerfeldein – Fotografie Magazin | Fotocommunity

 
Comments Off on Liebeserklärung an eine Tochter

Posted in Equipment