RSS
 

Archive for February, 2014

Winters’ Road to Seeing Finally Shipping

02 Feb

The seemingly mythical Dan Winters: The Road to Seeing is finally, actually in stock and shipping from Amazon. But even now, over a month after release, they are saying it might take an extra 1-2 days to process.

Because Curse of New Dan Winters Book, I guess.

Seriously, this thing disappeared pretty much as soon as it arrived (pre-orders?) and was never planned to be a big press run. So if you want it, you best make hay while the sun shines.


Strobist

 
Comments Off on Winters’ Road to Seeing Finally Shipping

Posted in Photography


3 Minutes with Portrait Photographer Alex Huff

02 Feb

The beauty of portrait photography is that it is as diverse as its subjects and often takes its cues from traditional paintings. One photographer who has found such inspiration is Alex Huff who is today’s guest on “3 Minutes with…” .

Butterfly Tattoo

Describe your photography in 100 words or less

My photography style strives to depict simple beauty with some influence from Dutch Golden Age paintings. The purpose of this particular collection is to showcase individual tattoos in the same frame as the objects and subjects they are designed after. This has allowed my models to revisit symbols that influenced them to get their ink in the first place. My goal is to photograph tattoos in a way that is true to their natural colors and gives them the same life and depth as the items they represent. I describe this process as my “tattoography”.

What gear/software do you use?

I use the Nikon D800 DSLR, 24-70mm f/2.8 & 85mm f/1.4 lenses, Elinchrom D-Lite monoheads, and SB-910 flashguns. My favorite modifiers are the Elinchrom 39″ Deep OctaBox, the Photoflex Extra Small OctoDome with eggcrate, and the Westcott 7′ parabolic umbrella. I edit almost entirely in Adobe Lightroom.

AlexHuff_Tattoography-6

What’s one quick tip that you’d give people interested portraiture photography?

My quick tip to portrait photographers would be to constantly reassure your model, especially while “chimping” or checking your monitor. As an occasional model myself, I understand how discouraging it is to witness a quiet, grimacing photographer behind the lens. Keep it lively, even if you are panicking inside. I also highly recommend letting models see their images halfway through a shoot and don’t be afraid to take their suggestions.

CherryBlossomMea

What three photography sites or photo blogs do you recommend?

Strobist – this blog always reminds me that lighting is creative and doesn’t have to be complicated.
Juxtapoz – they tend to feature a lot of tattoo photography which helps me keep up with how other people approach that subject.
The Unprofessional Photographer – This is my unconventional go-to. Sometimes you just gotta laugh. (Editor’s note: warning may contain crude or x-rated content, visit at your own risk!)

To view more of Alex Huff’s photography visit her web site: alexandriahuff.com

The post 3 Minutes with Portrait Photographer Alex Huff by Jim Goldstein appeared first on Digital Photography School.


Digital Photography School

 
Comments Off on 3 Minutes with Portrait Photographer Alex Huff

Posted in Photography


3 Uses for the Radial Filter Tool in Lightroom 5

02 Feb

One of the most powerful new tools in Lightroom 5 is the Radial Filter tool. Here are a few examples of how you can use this tool creatively inside your workflow to help draw attention to your subjects. If you don’t have Lightroom5, you can use multiple graduated filters to draw attention, but it’s not as easy, and the results can be hit or miss.

#1 – Off-center vignetting (beginner tip)

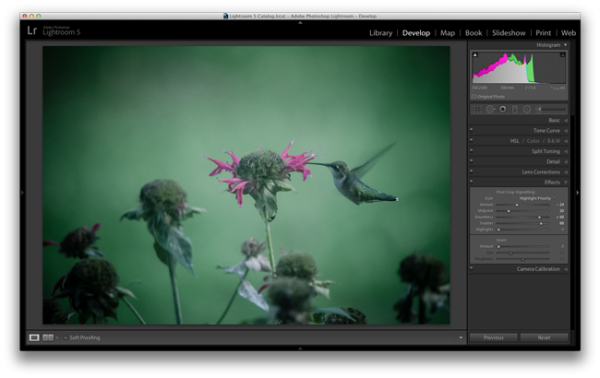
Let’s face it, Lightroom’s post-crop vignette leaves a lot to be desired, especially if you want your vignetting effect to be applied a bit off-center, allowing you to draw focus towards your subject.

Let’s look at an example and see how the radial filter tool compares to the post crop vignetting effect of old.

Hummingbird-before

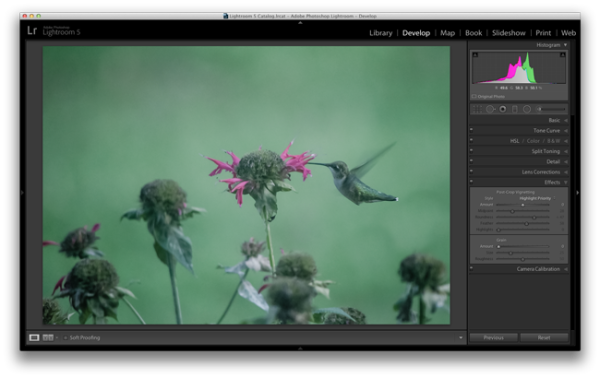
Original photo with no effect

PostCropVignette

Post-crop vignette applied

With the post-crop vignetting tool what you’ll immediately notice is that the effect occurs out from the midpoint of the frame ,and there is no way to off-set this midpoint so that you would be able to have a more customized effect.

Enter the Radial Filter Tool…

Radial-Filter-Vignetting

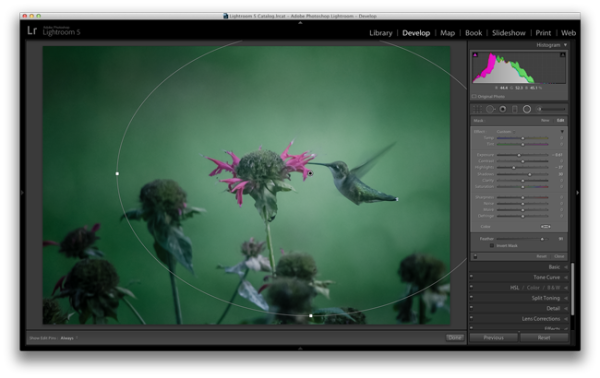
To apply a Radial Filter press Shift+M on your keyboard or select the circular icon below the histogram. This will open up a drop down filled with a handful of sliders. If you’re familiar with Lightroom’s other filters this won’t seem all that foreign to you. To add a filter to your image click and drag it into your image. You don’t have to worry about sizing it properly right away as you can always resize, move, and rotate it later within the image.

Applying the vignetting effect is going to depend a lot on your own style and the image you are processing, but the three sliders that you will want to typically play around with are: exposure, highlights and shadows. In the photograph above, a strong vignette was applied by dropping both the exposure and highlight sliders down, but the shadows slider was raised slightly to compensate for the drop in the other two just a bit. With that said, this is something that you’ll want to play around with on your own images and find out what works for them and your own personal taste.

#2 – Adding highlights and brightness to draw attention (mid-level tip)

While adding your standard vignette is all fun and great, there’s more power to this tool than that, so let’s step it up a notch and take a look at another way you can draw attention to your subject with a Radial Filter.

Take this rather boring photograph that I snapped while on a hike through the forest for example.

Invert-Radial-Filter-Before

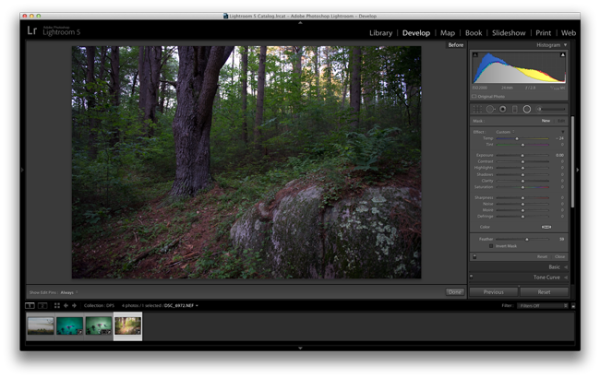
By applying a Radial Filter and some other Basic Tab modifications I was able to liven the shot up quite a bit and draw attention to the large tree that had caught my eye while on the hike.

invert-radial-filter

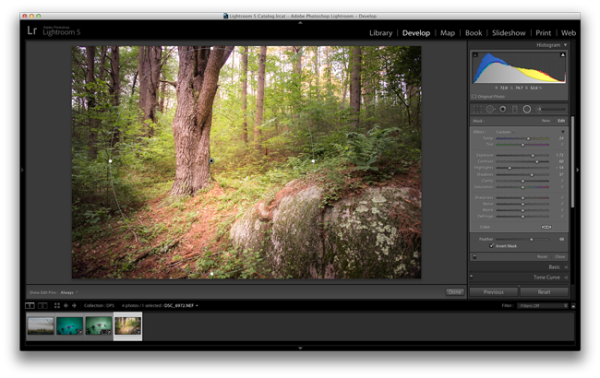
To achieve this result you’ll want to once again add a Radial Filter to your image, but this time make sure you check the “Invert Mask” checkbox. This checkbox allows the effect of the filter to be applied from the middle of the filter instead of from the edges of the image.

Again, this is another area where artistic choice is left wide open, but you can see how the tool is more powerful than simply a vignette effect creator. You have the power to control more than just the brightness of the edges of your frame, as seen above, where there are contrast and temperature adjustments happening inside this filter allowing for a more dramatic look.

#3 – Stacking multiple radial filters for more dynamic results (advanced tip)

Finally, once you’ve mastered one radial filter, you might try stacking more than one filter to create even more dynamic results. To add a second filter to an image simply click “New” and then click and drag within your image as you’ve done before. Each filter can be controlled and selected individually by clicking on its respective dot (gray for unselected, black for selected). By having individual control over each radial filter you can really start to draw your viewer’s eye where you want it to go.

As an example, let’s look at where I left off on the hummingbird photograph from earlier.

Radial-Filter-Vignetting

The original radial filter does a nice job of darkening the sides of the photograph and applying a fairly generic vignetting effect to the photo, but what else can be done?

radial-filter-tool-stacking

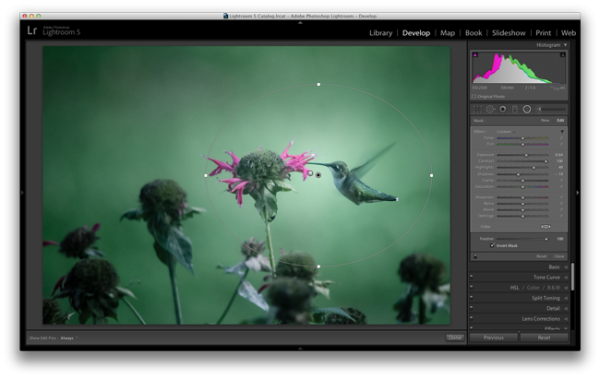
By applying a second radial filter to the image and using the invert feature that I talked about above, I’m able to add a small bright point right at the meeting of the bird’s beak and the flower.

What creative ways have you used the Radial Filter Tool?

Have you had time to play around with the new Radial Filter tool yet? What other creative ways can you think of using it? Share below in the comments section.

The post 3 Uses for the Radial Filter Tool in Lightroom 5 by John Davenport appeared first on Digital Photography School.


Digital Photography School

 
Comments Off on 3 Uses for the Radial Filter Tool in Lightroom 5

Posted in Photography


Die Realität ist interessant genug

02 Feb

Ein Beitrag von: Marek Wykowski

Fotografie ist nur ein Medium. Wenn Du etwas sagen willst, kannst Du es malen, singen, aber Du kannst auch fotografieren. Es ist nicht wirklich wichtig, welches Medium Du wählst, viel wichtiger ist der Inhalt Deiner Arbeit.

Mein Interesse an der Fotografie begann recht unspektakulär mit dem Fotografieren meiner Familie. Nachdem ich erste Erfahrungen gemacht hatte, las ich mich ins Thema ein und entwickelte ein wachsendes Interese für den Fotojournismus.

© Marek Wykowski

Zu dieser Zeit fand ich die Arbeiten von Magnum-Fotografen wie Alex Webb, Paolo Pellegrin und Henri Cartier-Bresson spannend. Durch das Studium ihrer Bilder lernte ich einiges über Bildkomposition, Bildgestaltung und die Wichtigkeit des Lichtes.

Des Weiteren begann ich, Fotobücher zu kaufen, was zu einer Erweiterung meiner Interessen beigetrug. Ich bemerkte, wie mich dokumentarische Fotografie mit einem stark persönlichen Bezug mehr und mehr anzog.

© Marek Wykowski

Für mich sind Fotos vor allem dann ansprechend, wenn sie erst auf den zweiten Blick ihre volle Tiefe offenbaren, den Betrachter langsam in sich hineinziehen und die Vorstellungskraft anregen – und das alles, ohne sofort die komplette Geschichte zu erzählen. Beispiele solcher Wirkung finden sich bei Joel Sternfeld, Alec Soth, Guy Tillim oder Clare Richardson.

Ich glaube ganz stark daran, dass ein Fotograf so viele Arten der Fotografie wie möglich ausprobieren sollte, um die zu finden, die zu seiner Persönlichkeit passen. Und ich meine, dass dies nicht mit logischem Denken erreicht werden kann.

© Marek Wykowski

Man muss einfach versuchen, herauszufinden, welche Art der Fotografie einen am zufriedensten macht. Außerdem kann man von jedem dieser Experimente etwas für die zukünftige Arbeit lernen.

Da ich meine Freiheit sehr wichtig finde, ist der optimale Weg für mich, herumzulaufen und ganz langsam nach Bildern zu suchen. Geschichten in meinem Kopf zu spinnen und darauf zu warten, bis alle Elemente des Bildes zusammenpassen, um ein gutes Foto zu kreieren.

© Marek Wykowski

Ich bin eine visuelle Person, achte stark auf eine sorgfältige Komposition und schätze den Wert facettenreicher Farbschattierungen. Ich bevorzuge natürliches Licht und vermeide eine exzessive Nachbearbeitung der Aufnahmen.

Für mich ist die Realität interessant genug. Und wenn man Geduld hat, auf eine spannende Szene zu warten, wird man mit einem großartigen Foto belohnt.

Dieser Artikel wurde von Martin Gommel aus dem Englischen ins Deutsche übersetzt.


kwerfeldein – Fotografie Magazin

 
Comments Off on Die Realität ist interessant genug

Posted in Equipment


Topographic Interiors: Pair of Stacked Plywood Storefronts

02 Feb

[ By WebUrbanist in Design & Fixtures & Interiors. ]

wood storefront

This set of two spaces in Osaka, an information hub and public cafe, each employs layers of horizontal wooden sheets that stack up vertically to form seating, shelves, standing desks and work surfaces.

wood plywood design japan

Japanese architect Kengo Kuma worked with their client, a regional restaurant guide requiring a physical presence in a space open to the public, to shape both essential elements and opportunities for unexpected interactions.

wood interior custom space

wood layered ply seating

Alternating layers of recessed and black-edged boards create a heightened contrast with their bright, naturally wood-colored counterparts sticking further out from the walls.

wood layered desk shelves

wood separated storefront japan

Both rooms are set in the bottom of the same structure but are separated by outdoor space, so their common (and unusual) material language helps them connect across the void.

wood layered exterior view

wood custom casework system

By using light colors and through bright illumination, people passing between the rooms are meant to find them surprising, distracting and engaging. The composition was made, in part, to draw in pedestrians on their way through the central passage that bisects the spaces, a visual ‘hook’ for busy commuters in the bustling city.

Share on Facebook


[ By WebUrbanist in Design & Fixtures & Interiors. ]

[ WebUrbanist | Archives | Galleries | Privacy | TOS ]


WebUrbanist

 
Comments Off on Topographic Interiors: Pair of Stacked Plywood Storefronts

Posted in Creativity


1. Februar 2014

02 Feb

Ein Beitrag von: Juste Pixx

© Juste Pixx


kwerfeldein – Fotografie Magazin

 
Comments Off on 1. Februar 2014

Posted in Equipment


Exposure: Chef April Bloomfield on smartphone food photography

02 Feb

Screen_Shot_2014-01-27_at_5.33.06_PM.png

Chef April Bloomfield is an avid smartphone photographer who has made something of an art posting largely behind-the-scenes shots of the work done in her kitchens. Rather than express horror at the low quality of food photographs swirling out on the Internet, Bloomfield embraces the medium, advising potential culinary photographers to hold out for good lighting or hold off altogether. Click through for a sample of her images on Connect.

News: Digital Photography Review (dpreview.com)

 
Comments Off on Exposure: Chef April Bloomfield on smartphone food photography

Posted in Uncategorized


Sony releases firmware update for QX10 and QX100

01 Feb

qx100.png

Originally announced in December 2013, Sony has now made available firmware updates for the QX10 and QX100 cameras that clip on to the front of your smartphone. Version 2.0 adds full HD movie recording and expands ISO settings on both cameras. The QX100 also gains an extra Shutter Priority mode. Get the update

News: Digital Photography Review (dpreview.com)

 
Comments Off on Sony releases firmware update for QX10 and QX100

Posted in Uncategorized


31. Januar 2014

01 Feb

Ein Beitrag von: Lukas Leonte

© Lukas Leonte


kwerfeldein – Fotografie Magazin

 
Comments Off on 31. Januar 2014

Posted in Equipment


Weekly Photography Challenge Portrait of a Lady

01 Feb

This week and next we are featuring a series of articles on portraits. Earlier today I shared some portraits of women for you to enjoy and get inspired by. So you can probably guess what the weekly photography challenge is, right?

You got it – portrait of a lady!

By Ryan Seyeau

Surely there’s a lovely lady in your life that deserves a great portrait of herself. Now’s the time to create one of her, maybe as a gift. Or perhaps if you are a lady, a self portrait is in order.

Use natural light or flash, whatever you prefer and are most comfortable using. Practice your lighting skills. Try shooting or processing in B&W. Experiment with some LR Presets or try out some new processing tips like adding a texture overlay.

Here are a few images to get you thinking, spark the ideas.

By Chris Bailey

By Wen Chen

By Zuhair A. Al-Traifi

By Dan Finnen

By Michael Yan

By Priscilla Santana

By Alex Dram

By Mysi(new stream: www.flickr.com/photos/mysianne)

By Kris Kesiak

By Elizabeth Anne

By dawolf-

By acearchie

By Ji?í D?cký

When you’ve created your masterpiece please share!

Once you’ve taken your “portrait of a lady” we’d love to see them in comments below. Simply upload your shot into the comment field (look for the little camera icon in the Disqus comments section as pictured below) and they’ll get embedded for us all to see or if you’d prefer upload them to your favourite photo sharing site and leave the link to them.

The post Weekly Photography Challenge Portrait of a Lady by Darlene Hildebrandt appeared first on Digital Photography School.


Digital Photography School

 
Comments Off on Weekly Photography Challenge Portrait of a Lady

Posted in Photography