RSS
 

Archive for January, 2014

How To Make A Magical VineUsing Stop Motion

16 Jan

When we first saw Matt Willis of yelldesign’s flawless stop motion Vine videos, we thought, “How in the world does he even…?”

So we asked him … AND HE TOLD US!

It turns out he doesn’t use any fancy apps or software or even voodoo. He just uses Vine, his phone and know-how.

He was kind enough to share his know-how with us and you too!

Matt gave us step by step instructions on how to make an apple disappear into a tabletop (and how to pull it back out again). No magic required.

Learn Matt’s Pro-tips for Wow-Worthy Stop Motion Vines

(…)
Read the rest of How To Make A Magical Vine
Using Stop Motion (570 words)


© laurel for Photojojo, 2014. |
Permalink |
No comment |
Add to
Using Stop Motion”>del.icio.us

Post tags:


Photojojo

 
Comments Off on How To Make A Magical VineUsing Stop Motion

Posted in Equipment


16. Januar 2014

16 Jan

Ein Beitrag von: Nanne Springer

Far Above Us And Way Below © Nanne Springer


kwerfeldein – Fotografie Magazin

 
Comments Off on 16. Januar 2014

Posted in Equipment


World’s Coolest Dorms: 7-Story Circular Student Housing

16 Jan

[ By Steph in Architecture & Public & Institutional. ]

World's Coolest Dorms 1

Many college dorms – especially at public schools – are little more than prison-like rows of cheap, boring housing with no architectural interest to speak of. That’s definitely not the case at Tietgen Student Hall in the Ørestad district of Copenhagen, a circular seven-story building measuring 288,000 square feet with 360 rooms.

World's Coolest Dorms 2

The circular shape enables all rooms to face outwards with a view of the courtyard, emphasizing equality and community. It also lets in lots of natural light. Each of the rooms has either a French window or a balcony.

World's Coolest Dorms 3

Communal facilities on the ground floor include 30 kitchens, each with four fridges and two stoves, as well as music rooms, a bike storage room, a gym, a computer room, a study hall, an assembly hall, and outdoor sports areas. There are also sewing, bike and wood workshops.

World's Coolest Dorms 4

Completed in 2006 and designed by Lundgaard & Tranberg Arkitekter, the building looks more like a luxury apartment complex than college housing. “The house itself says what the idea behind it is: community,” say the architects. “You can walk all the way round on all floors. No hallways are a dead end; no doors are locked. The house does not turn its back on anyone.”

Share on Facebook


[ By Steph in Architecture & Public & Institutional. ]

[ WebUrbanist | Archives | Galleries | Privacy | TOS ]


WebUrbanist

 
Comments Off on World’s Coolest Dorms: 7-Story Circular Student Housing

Posted in Creativity


Reverse Lens Macro: How to use it as a Great Learning Tool

16 Jan

Reverse lens macro photography 03

Reverse Lens Macro: How to Use It as a Great Learning Tool

Yesterday one of my friends called me late and told me that he was going to buy a DSLR and asked me which one he should choose. As a friend, I knew that this was his first camera and he was in fact a complete stranger to the field of photography. I told him to buy a good compact camera in order to get used to the basic concepts of photography and to buy a DSLR only when he feels his equipment is limiting his creativity.

On the other hand are the people how have already bought an SLR, but get confused and overwhelmed by the level of control these cameras offer, and the sheer amount of effort they have to put in to make their photographs look beautiful. I write this article for those people who bought a DSLR, and are in distress seeing none of their photos looking as good as someone else’s.

Considering that you have bought a DLSR and are delving into some advanced levels of photography, let’s see how an interesting and fun technique known as reverse lens macro can teach you a great deal about your camera, light and in effect make the art of photography.

Reverse lens macro photography 01

The basic trio of photography

Before understanding reverse lens macro let’s take a look the basic trio that every photographer needs to know to take a well exposed shot:

  1. Shutter speedreverse-lens-macro-photography-02.jpg
  2. Aperture
  3. ISO

Shutter speed is in essence the duration for which light falls on the camera’s sensor, shown in most cameras as 1/250th or 1/30, lower the denominator, the longer the duration.

Aperture is the opening in the lens which controls the amount of light entering your camera and the area in your image which is in sharp focus (aka depth-of-field) usually shown as f/5.6 or f/7.1. The lower the number, the more light getting to the sensor, and smaller the area in focus.

ISO determines just how sensitive your camera’s sensor is to the light falling on it. ISO usually ranges from 50 to above 100,000 in number. Large numbers represent high sensitivity.

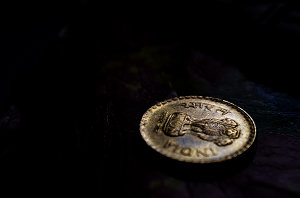
Macro and reverse lens macro

Macro photography is a beautiful way to capture subjects as it gives you a very different and up-close perspective of photography. What macro photography does is to help us see the small world around us in a big picture. What your lens in its normal state does is to make the big world around you small, so just think what it will do when used reverse mounted? Yes, make the small world even BIGGER. But the fact is that dedicated macro lenses cost a fortune which puts it out of the reach of many of us. Reverse lens macro technique allows you to get really close without having to lighten your wallet on expensive lenses.
To take reverse lens macro shots, you have to reverse mount your kit lens (as depicted in the picture below).

Reverse lens macro photography 07

HOW DOES REVERSE MACRO TEACHES YOU ABOUT THE ART OF PHOTOGRAPHY?

Everything is a double-headed sword. So is reverse macro, though it allows us to get really close to your subject it also means you have less light at your disposal, a very tight frame, and a very narrow area which is in sharp focus (depth-of-field). Less light means you will have to adjust shutter speed, aperture and ISO to get good exposure and nice depth of field.

But the best part lies ahead, when you reverse mount your lens, the camera loses all the electronic means to communicate with the lens, so you will have to move your camera back and forth to get your focus right and you have to use the small lever on the back (now front) of the lens for controlling the aperture. An interesting point to be noted is that the actual focal length (55mm gets you closest to the subject for 18-55mm lens) of a lens in normal operation is also reversed, meaning that you can get closest to your subject when the lens is at its widest (18mm for the same lens). Now when you look through the viewfinder you will see the magic unfolding right in front of your eyes!

Reverse lens macro photography 06

Reverse lens macro photography 04

Suddenly your viewfinder becomes a visual textbook through which you will see all the subtle changes that aperture, shutter speed and ISO makes on your image and how subtle changes to these can bring amazing clarity and depth to your images. At first this may seem a difficult task because of the extreme stillness needed to take them successfully and clearly, but “practice makes perfect”, doesn’t it?

The interesting part being that you can apply the information you learn, when you use your camera normally. Obviously this can also be learned with time and effort but rest assured many get bored or disheartened because their photos are not looking good before they understand how to use the camera. Reverse macro, as mentioned earlier, magnifies the world beyond what our eye can see. It is because of this magnification that the effect the changes you make to (shutter speed, aperture, ISO) have on our image becomes more apparent than in “normal” use. When doing reverse macro I recommend not using a tripod because that way you will also learn to keep your hands steady (a boon when shooting in dim light).

Reverse lens macro photography 05

So because you get to see the magic of light unfold right in front of your eyes it registers quickly, and with practice becomes rather instinctive. This will startlingly improve the way you approach photography and ultimately your photos.

As Ansel Adams, a master of photography said “A Good photograph is knowing where to stand”. Understand where you stand now (as a photographer) and where you have to be standing to take photographs that exude beauty and share the emotion of the frame with the viewers.

Happy clicking!

The post Reverse Lens Macro: How to use it as a Great Learning Tool by Sharath Prakash appeared first on Digital Photography School.


Digital Photography School

 
Comments Off on Reverse Lens Macro: How to use it as a Great Learning Tool

Posted in Photography


15. Januar 2014

16 Jan

Ein Beitrag von: Tom Blatt

Karavane, Wüste, Himmel, Dünen, Sand, Himmel,


kwerfeldein – Fotografie Magazin

 
Comments Off on 15. Januar 2014

Posted in Equipment


Failed Jungle Utopia: 7 Abandoned Wonders of Brazil

16 Jan

[ By Steph in 7 Wonders Series & Global. ]

Aandoned Brazil Main
The remains of Henry Ford’s failed rubber-producing city, two rusting theme parks, intricate colonial facades and a railroad that set the scene for 7,000 deaths are among Brazil’s fascinating abandonments. Whether set deep within the Amazon or in the thick of some of the world’s busiest and most metropolitan cities, these 7 abandoned wonders amaze and intrigue.

Abandoned Christmas Theme Park: Albanoel

Abandoned Brazil Park Albanoel 1

Abandoned Brazil park Albanoel 2

Cidade Albanoel is a Santa Claus-centric park dreamed up by local politician Antonio Albano Reis, who was known as the ‘Santa Claus of Quintino.’ Meant to be the largest themed attraction in Brazil, the park would have also had a bunch of other teemed areas, like a replica of an Old West town. A plot of land the equivalent of 460 football fields was purchased and work began. Water slides were constructed, foundations were laid for the Western town, and Santa Land was completed.  But Reis, the money, brains and motivation behind the project, perished in a tragic car accident just outside the gates in 2000, and everything came to a screeching halt. Since Santa Land was already done, it opened to the public, but closed after just a few short years.

Drowned Church of Old Petrolândia

Abandoned Brazil Petrolandia Church 1

Abandoned Brazil Petrolandia Church 2

Here’s a nice example of an abandonment that’s actually way more interesting and beautiful after its loss to the forces of nature than it was to start. The church of old Petrolândia currently resembles some sort of ancient ruin, a series of brick-accented arches rising from blue-green waters. Most of the town was relocated due to the construction of a dam for a new hydroelectric plant. The remains of the rest were flooded, now lost beneath the surface, with the exception of this one tall structure.

Fordlândia: Henry Ford’s Failed Jungle Fantasy

Abandoned Brazil Fordlandia 2

Abandoned Brazil Fordlandia 1

In 1928, Henry Ford trumpeted an idealized American city, in the middle of the Amazon: come live at Fordlândia, he told potential employees, and enjoy steady, profitable work in tropical paradise. The prefabricated industrial town was established near the city of Santarém, Brazil as a rubber factory to make tires for his booming car company, so Ford could avoid reliance on British rubber (sourced in Malaysia.) But there were problems right from the start. The land was rocky and infertile, and Ford failed to hire managers that knew how to work it or had any idea how to avoid problems like blight and pests in a rubber tree plantation.

Few Americans were actually convinced to go, especially since Ford forbade women, alcohol and tobacco within the town limits. Indigenous workers weren’t thrilled about being given hamburgers to eat and American-style accommodations, and they weren’t exactly treated well. On top of all that, Ford never even stepped foot on the plantation.

Then, in 1945, synthetic rubber became available. The whole Fordlâlndia project was nixed without ever producing an ounce of rubber for the company, the structures left behind in the jungle. The decaying town included a hospital, power plant, library, hotel, golf course and dozens of employee houses, some of which are still standing. Ford lost over $ 200 million in today’s money on the enterprise.

Skyscraper Slum: Edificio Sao Vito

Abandoned Brazil Edificio Sao Vito 1

Abandoned Brazil Edificio Sao Vito 2

From the time it was built in 1959 until it finally came down in 2011, Edificio São Vito was the city of São Paulo’s largest vertical slum. Referred to by locals as Treme-Treme (shiver-shiver), the 27-story structure was initially meant to provide cheap and efficient accommodations for students, professionals, immigrants and travelers, with 624 apartments measuring about 300 square feet each. But by the 1980s, those apartments were split into multiple units to accommodate thousands upon thousands of low-income inhabitants. There was no trash or sewer service, so waste was simply dumped out the windows. The building turned into one big death trap once one of the three elevators stopped working, and as crime rose, residents began to  leave in droves. It stood virtually abandoned for years until officials finally demolished it.

Next Page – Click Below to Read More:
Failed Jungle Utopia 7 Abandoned Wonders Of Brazil

Share on Facebook


[ By Steph in 7 Wonders Series & Global. ]

[ WebUrbanist | Archives | Galleries | Privacy | TOS ]


WebUrbanist

 
Comments Off on Failed Jungle Utopia: 7 Abandoned Wonders of Brazil

Posted in Creativity


15 January, 2014 – Bower Cine Lenses

15 Jan

 Whether you’re shooting with a DSLR, Compact System Camera (CSC) or large sensor interchangeable lens video camera, you probably have discovered two things about lenses. Those that are designed for still cameras are far from ideal when used for cine work, and lenses designed for cine work are very expensive. Explore the alternatives in this article. Read . . .


Explore The Land Of Polar Bear – Luminous-Landscape’s Svalbard Workshops this July


You can win an all-expenses paid photographic expedition to Antarctica, along with air fare from anywhere in the world. The value of this prize is $ 15,000.

The Luminous Landscape wants you to try any of our more than 60 training or travel videos and our new free video player. Each purchase is an entry, and an annual subscription that includes all previous as well as new videos counts as six entries. The winner of a free lifetime subscription is also chosen from each month’s entries.

FIND OUT MORE 


The Luminous Landscape – What’s New

 
Comments Off on 15 January, 2014 – Bower Cine Lenses

Posted in News


50 Things I Try to Avoid in Street Photography

15 Jan

street-photography-tips-03

I am a huge proponent of negative learning, that you can learn more by taking on the opposite approach. Philosopher Nassim Taleb calls this “via negativa”. It is the idea that the best way to gain “happiness” in life isn’t chasing what makes us happy, but by vehemently avoiding what makes us unhappy (a long commute to work, a horrible micro-managing boss, poisonous and negative “friends”, and an expensive house mortgage).

I also believe strongly that one should never listen to “rules” of anything in life (especially street photography). However, below is a list of things (which has personally helped me) I avoid in street photography . Pick and choose what resonates with you, and leave the rest:

50 Things I Try to Avoid in Street Photography

  1. “Chimping” (checking the LCD screen) after taking photos on the streets
  2. Using more than one lens for street photography (I prefer a 35mm)
  3. Not mixing my digital and film photos in a project
  4. Letting the number of “favorites” or “likes” dictate whether a photo is good or not
  5. Letting criticism affect me negatively. Rather, I try to use it to empower me to find weaknesses in my work.
  6. Uploading a photo online publicly without having at least 3 people critique it in-person first
  7. Spending a lot of time looking at photos online ; rather I spend more time looking at photo books
  8. Leaving the house without a camera
  9. Hesitating before taking a street photograph
  10. Cluttered backgrounds
  11. Showing my bad photos (I have tons of them)
  12. Shooting more than one type of film at a time (Kodak Portra 400 for color, Kodak Tri-X for black and white)
  13. Going a full day without taking a photographstreet-photography-tips-01
  14. Involving myself in online debates about the definition of “street photography”
  15. Meeting my photography friends without some new work to show them and get critique on
  16. Charging money for my photos
  17. Taking a photo of someone on the streets without saying “thank you” by smiling at them
  18. Not to focus on single images. Rather, I try to focus on projects
  19. Looking at gear review sites (when I’m bored) unless I’m serious about buying a new camera
  20. I don’t own more than one lens for my camera (only a 35mm)
  21. I don’t care about sharpness
  22. I don’t like bokeh in street photography
  23. Forgetting how lucky I am to be able to go out and take photos
  24. Taking boring photos
  25. Taking check-in luggage when I travelstreet-photography-tips-02
  26. Comparing myself to other photographers
  27. Developing my film for at least 3 months after I shoot it
  28. Uploading photos online until letting it “marinate” for at least 6 months to a year
  29. Not to falling into the trap that buying a new camera will make me suddenly become more “creative” and “inspired” in my photography
  30. I don’t mind asking for permission to take someone’s photo in the street
  31. I don’t check comments on my photos more than once a week
  32. Spending more time on social media, and less time out shooting on the streets
  33. Leaving comments or critiques on other people’s photos that are shorter than 4 sentences long
  34. Only taking photos of people
  35. I rarely take photos of homeless people
  36. Taking photos of street performers
  37. Deleting photos (unless they are really nice or the photo is boring)
  38. Taking the film out of my camera when someone asks me tostreet-photography-tips-04
  39. Shooting to please my critics
  40. I ultimately don’t shoot for anybody else but myself
  41. Making excuses when a photo doesn’t work
  42. I don’t like photos without emotion
  43. Recommending zoom lenses in street photography
  44. Recommending lenses longer than 50mm for street photography
  45. Shooting wide open on the streets (generally at f/8-f/16)
  46. Recommending selective color or HDR for post-processing street photographs
  47. I don’t mind “killing my babies” (photos that I think are good but really aren’t)
  48. Shooting in bad light without a flash
  49. Sharing more than one photo a week on social media
  50. I don’t think you should listen to everything in this list. Rather, make your own! :)

Editor’s note: what things do you try and avoid when you’re doing photography of any kind? Share your list with us in the comment section below!

The post 50 Things I Try to Avoid in Street Photography by Eric Kim appeared first on Digital Photography School.


Digital Photography School

 
Comments Off on 50 Things I Try to Avoid in Street Photography

Posted in Photography


The Smart Guide to Creating Your Portfolio the Right Way

15 Jan

Your photography portfolio should be a collection of your work that will encompass your entire career, or it can focus on a single theme or medium. Most photographers who have been at it a while tend to have multiple portfolios that cover a myriad of compositions, mediums and client need aspects. Many of the best will have tens of portfolios, Continue Reading

The post The Smart Guide to Creating Your Portfolio the Right Way appeared first on Photodoto.


Photodoto

 
Comments Off on The Smart Guide to Creating Your Portfolio the Right Way

Posted in Photography


FLight Pollution

15 Jan

FLight Pollution – Stars and Satellites and Planes, Oh My!

When looking up in the night sky it can be an awe inspiring experience, but it can also be alarming. While many people focus on light pollution being an issue an equally alarming issue is FLight pollution (Flight + Light = FLight pollution). This doesn’t get much attention primarily because few photographers photograph and present sequences of images to highlight the problem. While much of my time  is spent cloning plane and satellite trails out of my fine art star trail photography, I thought it would be good to share what the night sky actually looks like over 90 minutes. As you’d imagine there are a good number of flights that pass overhead in 90 minutes and at night you can see them all.

Location Info:

This particular photo was taken of the Minarets in the Sierra Nevada mountains near Mammoth Lakes, CA.


Copyright Jim M. Goldstein, All Rights Reserved

FLight Pollution

The post FLight Pollution appeared first on JMG-Galleries – Landscape, Nature & Travel Photography.


Related Stories

  • FLight Pollution – Enclosure
  • Best Photos of 2013 by Jim M. Goldstein
  • Best Photos of 2013 by Jim M. Goldstein – Enclosure
Feed Ads by FeedBlitz
powered by ad choices


JMG-Galleries

 
Comments Off on FLight Pollution

Posted in Equipment