Month: October 2013

  • Yellow Submarine: Abandoned Car Turned Colorful Street Art

    [ By Steph in Art & Street Art & Graffiti. ]

    Yellow Submarine Abandoned Car 1

    An abandoned car left to rust by the curb in São Paulo, Brazil became a ‘yellow submarine’ art installation for World Car Free Day, turning an eyesore into an attraction. Junkers sitting around in public places can be a depressing sight, but this car is anything but thanks to a creative paint job and a bunch of potted plants.

    Yellow Submarine Abandoned Car 2

    ‘Yellow Submarine’ is the fourth urban intervention of ‘Ocupe Carrinho’ (Occupy the Car), a movement that aims to alleviate the urban blight of abandoned cars through cheerful transformations.

    Yellow Submarine Abandoned Car 3

    Founded by Felipe Carrelli, Ocupe Carrinho helps call attention to a common problem in the city of São Paulo, where cars are often abandoned due to the high cost of owning them. Carrelli and his crew turn the cars into public art with a bright makeover that extends to the asphalt around them.

    Yellow Submarine Abandoned Car 4

    The Yellow Submarine began when someone contacted the crew through their Facebook page to let them know about a car that had been sitting in the same spot for three years. Of course, the name is a nod to the song by The Beatles, but it also refers to the city’s flooding issues due to poor stormwater management.

    Share on Facebook


    [ By Steph in Art & Street Art & Graffiti. ]

    [ WebUrbanist | Archives | Galleries | Privacy | TOS ]


    WebUrbanist

  • What The Duck #95

    wtdlogo_big.jpg

    We’ve been fans of Aaron Johnson’s comic strip ‘What the Duck’ for years. ‘WTD’ is one of the best satirical comic strips in the world, and it’s published here every week, as well as being included in our weekly newsletter. Barbed, topical and always amusing, we hope you enjoy WTD as much as we do. 

    News: Digital Photography Review (dpreview.com)

  • Actions: Efficient Editing or Cheating?

    Learning to use Photoshop can be overwhelming to some people. There are so many functions and so many tools that it can seem like you will never really understand how to use it. You search online for videos and tutorials, but even then, depending on your version of Photoshop you still may feel lost.

    When photographers discover actions for Photoshop it’s sometimes like hitting the photography jackpot. They speed up your workflow. You can get more done. You can achieve different effects with them, but sometimes other photographers will tell you that it’s basically cheating in Photoshop.

    Are you cheating yourself or your client when you use actions?

    Most actions require a bit of tweaking when you use them to get the effect that you want. It’s very rare that once actions are played that they are perfect. This way a photographer can adjust them to get the look they desire for their images. When photographers use actions that require the tweaking of their images, they are learning more than just using the slider, they are learning how parts of Photoshop works. They are learning about blending modes, adjustments, curves, etc.

    Photography is about finding your art and doing it your own way. Using an action does not compromise the vision of your art. You still make the decisions about how the end product looks. There are some people who will disagree and say that actions are cheating because you don’t have to learn to manually adjust everything by hand. You can get clean dishes by using a dishwasher or washing them by hand, is one way cheating? You still achieve clean dishes. Isn’t that the goal?

    Some photographers use different actions combined with hand editing. They have learned Photoshop over time and figured out what works for their editing needs. You can even make your own actions by combining the actions you use the most and your own hand editing. It takes a little practice to get the technique down, but once you do you will speed up your own workflow go even faster. I have incorporated actions and hand editing and now when I do a photo shoot I typically know what type of look I am going to want for the final images. Whether I achieve those looks by hand editing or by actions or a combination doesn’t matter to my client. They just want beautiful images. You can even use actions multiple times or use different actions in a combination to achieve your desired look.

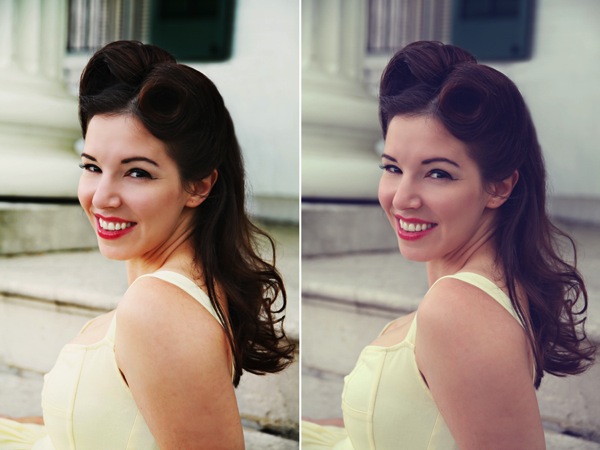
    For this vintage type look I used Blue Ginger from Florabella Classic Workflow twice.  The second time I only used it at 10%.

    For this vintage type look I used Blue Ginger from Florabella Classic Workflow twice. The second time I only used it at 10%.

    So, you decide that you want to look into actions, but then you Google them and are overwhelmed by the options that are out there. What’s next? How to choose? Well, this depends on the look you want for your images. Look at the images that are posted using the actions and see if they reflect your style and your images. There are some free actions out there, but most you have to purchase. Some are relatively inexpensive and there are some that are very expensive. For some people it’s very hard to commit to buying expensive actions without testing some first. There are some action developers that post some free sample actions for you to use so that you get an idea of how their actions work.

    For this complete vintage look I used Pioneer Woman's free set. I used Vintage and changed the edge burn to 74%, vintage blur to 84%, midtone bump to 85%, and turned grain off. Then I used the Old West action and just decreased the overall action to 37%

    For this complete vintage look I used Pioneer Woman’s free set. I used Vintage and changed the edge burn to 74%, vintage blur to 84%, midtone bump to 85%, and turned grain off. Then I used the Old West action and just decreased the overall action to 37%

    Whether your purchase your actions or use free actions the only thing you need to be sure of is that they are working with your overall images and that they are reflecting your style. As you learn Photoshop you may start creating your own actions that help your workflow and truly reflects your style and your artistic vision, or you may stick with what is working. Only you can decide what works best for your business, your images, and your clients.

    A few recommended places to download free actions:

    • Colorvale Actions
    • Pioneer Woman
    • My Four Hens (Look for the freebie tab on their Facebook)

    You can also purchased actions from:

    • Colorvale
    • My Four Hens
    • Wish Photography
    • Florabella

    Post originally from: Digital Photography Tips.

    Check out our more Photography Tips at Photography Tips for Beginners, Portrait Photography Tips and Wedding Photography Tips.

    Actions: Efficient Editing or Cheating?

    The post Actions: Efficient Editing or Cheating? by Guest Contributor appeared first on Digital Photography School.


    Digital Photography School

  • Ricoh announces limited edition GR with wood grip and extra accessories

    GR_LE_003.png

    Ricoh has announced a ‘Limited Edition’ GR camera, which features a ‘high-end’ design plus bonus accessories. The Limited Edition GR’s magnesium-alloy body comes in a ‘metallic vintage green wave-tone finish’ and features a ‘marbleized ebony grip patterned in burl wood’. To sweeten the deal, Ricoh is including a lens hood as well as a leather case and strap, all of which complement the camera’s color scheme. Click through for a closer look.

    News: Digital Photography Review (dpreview.com)

  • Fake Banksy: 40 Forgeries Sold in 1 Hour on Streets of NYC

    [ By WebUrbanist in Art & Street Art & Graffiti. ]

    fake banksy art sale

    Just last week, real Banksy art was offered for sale in Central Park to an uninterested crowd, with only a few passers by unwittingly picking up signed pieces worth thousands of dollars or more. Today, a shop selling pure copies complete with a legally-notorized Certificate of Inauthenticity managed to sell forty works in less than sixty minutes to dozens of NYC buyers … they even sold the price sign. The actual Banksy sale had a dismal three customers in seven  hours.

    fake banksy inauthenticity certificate

    This pop-up stall was set up in the same location and offered similar works for sale at an identical price. The video above tells the story well. Crowds gathered, lines formed and people stopped to take pictures – almost an exact reversal from the bored looks and barely interested buyers of the prior sale. Some people did double-takes, not sure whether it was a hoax, or another Banksy head-fake that might net them a five-figure profit.

    fake banksy central park

    fake banksy artist credits

    Part faux art sale, part performance art, the production made its point: the hype surrounding Banksy has bled into the public consciousness of the city, and people have gone from unaware to eager as a result. Meanwhile, at 60 dollars a canvass (times 40 sales equals $ 2,400), the creators made not just a point but a handy financial return on their time and money for future projects.

    real banksy art sale

    Meanwhile, for those who missed the real sale, feel free to view the frustrating footage above. Many have watched it and wished they had stopped to take a closer look. Still, who knows – perhaps with a limited run of 40,  even this run of secondary knock-off works will have some street value after the dust settles on the sidewalks.  At the very least, they will look just as good on your wall as the real thing.

    Share on Facebook


    [ By WebUrbanist in Art & Street Art & Graffiti. ]

    [ WebUrbanist | Archives | Galleries | Privacy | TOS ]


    WebUrbanist

  • 22 October, 2013 – An Appeal for Divergence and Simplicity

    Mark Dubovoy’s latest essay is an appeal for DIVERGENCE instead of CONVERGENCE for those photographers not interested in video. It is also an appeal for badly needed and apparently forgotten simplicity in Pro cameras of all kinds.


     WIN AN ANTARCTIC EXPEDITION
    WORTH USD $ 15,000 

    …
    The Luminous Landscape – What’s New

  • Triggertrap shows off new Redsnap modular camera triggering system

    Redsnap_Coke_Empty.jpg

    Triggertrap, maker of several camera triggering tools, is seeking support via Kickstarter for another product aimed at trigger-happy photographers. Redsnap is a modular triggering system that starts with the Redsnap base block to which you can add sensor blocks, each designed for a different kind of photography. Four sensor blocks are currently in the works, including a high-speed laser sensor, high-speed sound sensor, high-speed light sensor and a Passive Infrared Sensor. Learn more on connect.dpreview.com.

    News: Digital Photography Review (dpreview.com)

  • School’s Out Forever: 12 Crazy DIY Converted Bus Homes

    [ By Steph in Architecture & Houses & Residential. ]

    Converted Buses Main

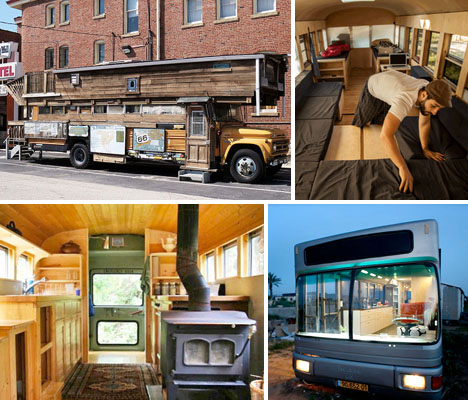
    Flimsy, factory-made RVs have nothing on these totally customized, cozy buses converted into compact rolling homes. Dusty, run-down clunkers of school buses and city buses may not look like much at first, but creative DIYers transform them into comfortable living spaces complete with wood floors, transforming furniture, wood stoves and full bathrooms with hot showers.

    Waldmire Road Yacht

    Converted Buses Road Yacht

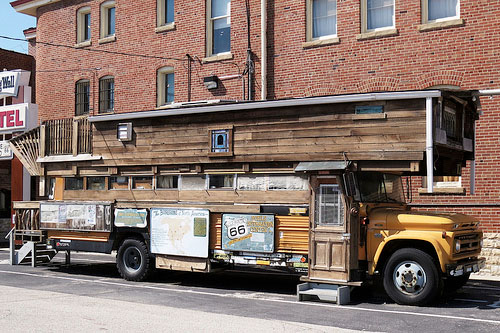
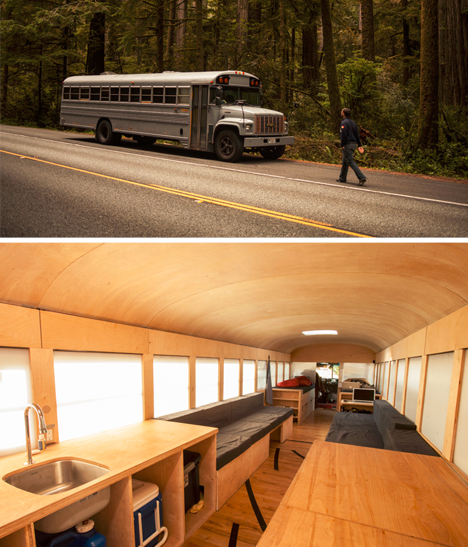
    This amazing half-wooden contraption is a converted school bus known as the ‘Waldmire Road Yacht,’ built by Rob Waldmire, who traveled in his handcrafted creation for decades along Route 66. It’s now part of the Route 66 Hall of Fame Museum in Pontiac, Illinois.

    Run-Down City Bus Converted to DIY RV

    Converted Buses City Israel 1

    Converted Buses City Israel 2

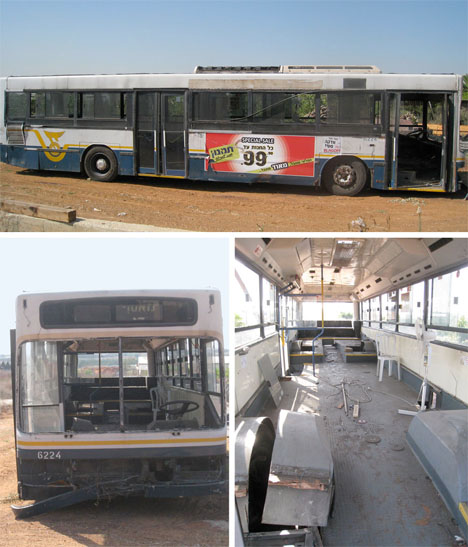
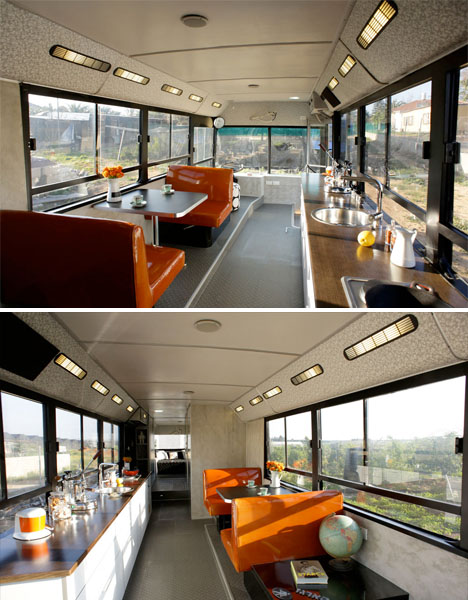
    This city bus seemed beyond saving when two Israeli women initially found it, but they saw the bones of their own highly customized DIY RV. The women tore out the interior and gave it a fresh, modern new look with pops of bright color.

    Bus to Minimal Mobile Home

    Converted-Buses-Minimal-Mobile

    Converted Buses Minimal Mobile 2

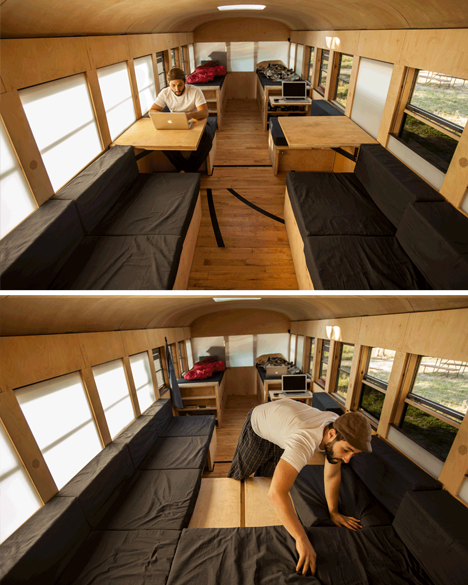
    Tired of just drafting imaginary buildings in studio courses, architecture student Hank Butitta decided to get his hands dirty: he bought a bus for $ 3,000 and completely transformed the interior, spending $ 6,000 to improve it with an array of transforming modular features. Those include a bed system that unfolds in various ways for different sleeping configurations, lots of hidden storage, and seats withs egret flip-up and slide-out panels.

    School Bus Turned Home That Sleeps Ten

    Converted Buses Solar Power Ten

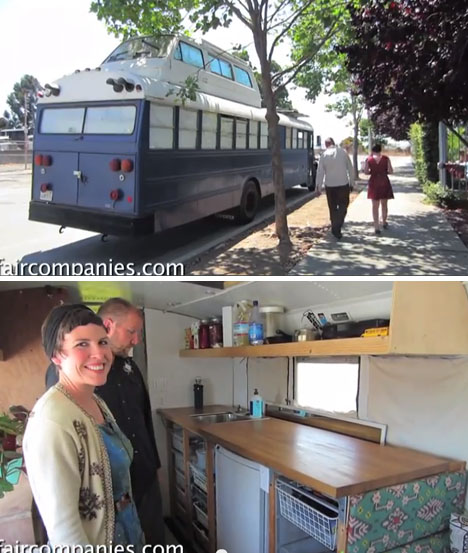
    ‘I think my mom’s reaction was, ‘this isn’t the sixties,’” says co-owner Rachel of the bus she converted with her partner Richard. It may not be conventional, but this living situation allows them to go wherever they please. Buying a school bus cheap gave them a blank canvas, and they designed every detail of their new home – which has transforming beds to sleep up to ten.

    Next Page:
    Schools Out Forever 12 Crazy Converted Diy Mobile Homes

    Share on Facebook


    [ By Steph in Architecture & Houses & Residential. ]

    [ WebUrbanist | Archives | Galleries | Privacy | TOS ]


    WebUrbanist

  • Falling for Waterfalls

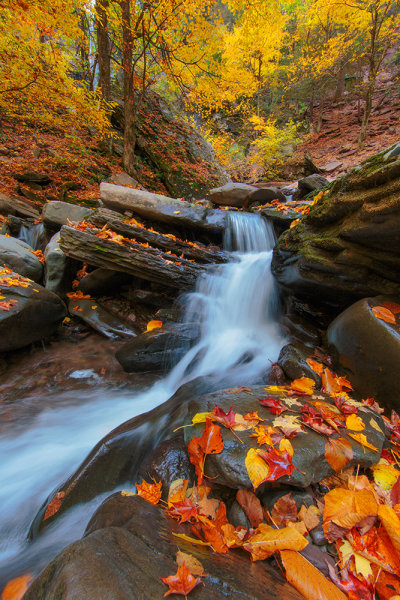
    A small cascade at Kaaterskill falls in upstate New York. It's important to balance the long shutter to blur the water, with the need for keeping the foliage sharp.  While blending two exposures will accomplish this, I preferred to try and capture the scene in one exposure.  Exposure was 1/3 second, f/22, ISO 100. EF 14mm f/2.8L II with EOS 5D Mark III.

    A small cascade at Kaaterskill falls in upstate New York. It’s important to balance the long shutter to blur the water, with the need for keeping the foliage sharp. While blending two exposures will accomplish this, I preferred to try and capture the scene in one exposure. Exposure was 1/3 second, f/22, ISO 100. EF 14mm f/2.8L II with EOS 5D Mark III.

    While the northeastern Unites States isn’t a wealth of dramatic vistas ripe for the landscape photographer’s choosing, one thing  we do have plenty of here are waterfalls.  The list is endless- from Niagara Falls in northwestern New York, to the plethora of waterfalls that can be found in the Catskills and Adirondacks, to Great Falls in Paterson, New Jersey. These provide ample opportunity to photograph them, as many run year-round.

    I always carry a few things when photographing waterfalls. I like to get that milky look to the water, and for that of course you need a long exposure and for that you need a tripod to hold the camera steady. Next, I carry a polarizing filter.  This allows me to control reflections, whether they be from shiny rocks glistening with water on them, or to control reflections on the water in the landing pool. I also keep a chamois in my bag to keep the lens dry. Depending on how hard the falls are flowing, and how big the cascade, mist can be a problem.  Finally, I keep a set of neutral density filters handy.  As I mentioned, I like a nice, milky look to the water, and if there’s too much light, I won’t be able to slow the shutter down enough to get that look unless I use the filters. I generally keep 3, 4 and 5 stop ND filters with me.
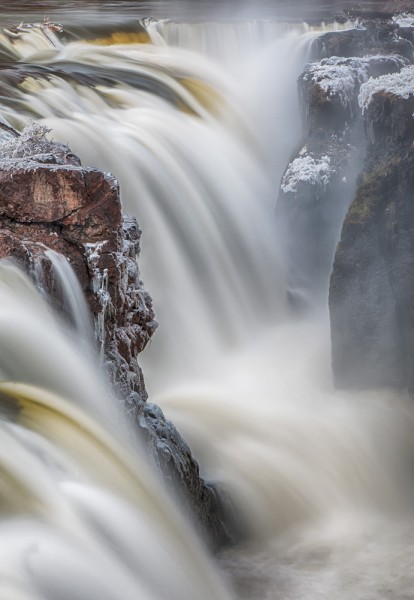
    Great Falls in Paterson, NJ. Photographing these falls in late winter, I was able to capture frost forming on the rocks from the spray.  Exposure was 2 seconds, ISO 100, at f/22. EF 24-105 f/4L IS, with EOS-1D Mark III.

    Great Falls in Paterson, NJ. Photographing these falls in late winter, I was able to capture frost forming on the rocks from the spray. Exposure was 2 seconds, ISO 100, at f/22. EF 24-105 f/4L IS, with EOS-1D Mark III.

    When photographing waterfalls, the first thing to consider, as with all subjects, is the light. I find photographing waterfalls in flat, even light, such as on an overcast day, to be ideal.  Ultimately, you don’t want the waterfall in direct sunlight.  Direct sunlight on a waterfall has a tendency to create such a high contrast scene that either your highlights are blown out, or your shadows are blocked up. Flat, even lighting allows you capture the full range of detail in the scene without losing detail in the highlights or shadows.

    Next, you need to consider the look of the water you want. While I prefer that milky, fantasy-like look, you may prefer more detail.  Try a variety of shutter speeds to see what works best for you. I find 1 second to 30 seconds works well, but much will also depend on how much water is flowing over the falls. More water rushing faster will not require as slow a shutter speed as less water flowing at a slower pace will.
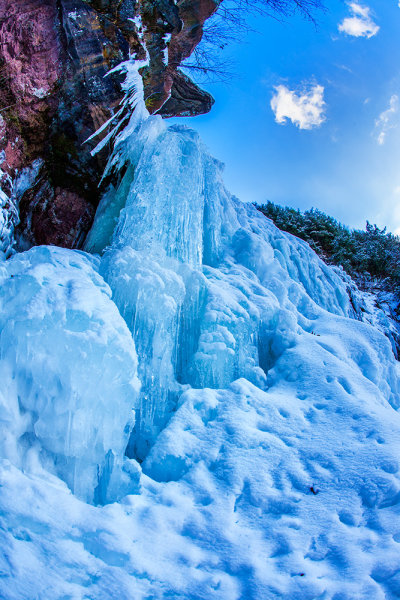
    I hiked up these falls in mid-winter- a treacherous, icy hike that almost resulted in injury! This was the base of the tallest cascade, frozen almost solid. It pays to visit these locations year round to get different perspectives. Exposure was 1/20, f/16, ISO 100. EF 15mm f/2.8 Fisheye with EOS-1Ds Mark III.

    I hiked up these falls in mid-winter- a treacherous, icy hike that almost resulted in injury! This was the base of the tallest cascade, frozen almost solid. It pays to visit these locations year round to get different perspectives. Exposure was 1/20, f/16, ISO 100. EF 15mm f/2.8 Fisheye with EOS-1Ds Mark III.

    Waterfalls change with the seasons.  In the spring, when snow is melting, waterfalls will be fuller and faster flowing. Some waterfalls only flow at this time. Others run year round, but the amount of flow changes.  And in the winter, depending on the climate, some falls can freeze into columns of ice that create an entirely different spectacle.  It pays to revisit these falls at different times of year, to take advantage of all of the opportunities a particular waterfall presents.

    One last thought: While many of the waterfalls I’ve photographed are easily accessible, many others require some arduous hiking. Try to get as much information as possible on a new location before going there, and be prepared for anything.
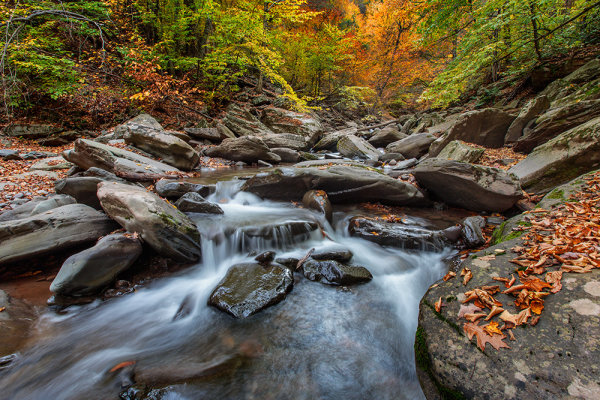
    This was another small cascade that I found on the way up to the upper falls.  These smaller cascades present great opportunities to really create dynamic compositions, layering the foreground, middle ground, and background, and using the leading lines of the water. Exposure was 1 second at f/16, ISO 100.  EF 16-35mm at 16mm with EOS 5D Mark III.

    This was another small cascade that I found on the way up to the upper falls. These smaller cascades present great opportunities to really create dynamic compositions, layering the foreground, middle ground, and background, and using the leading lines of the water. Exposure was 1 second at f/16, ISO 100. EF 16-35mm at 16mm with EOS 5D Mark III.


    Post originally from: Digital Photography Tips.

    Check out our more Photography Tips at Photography Tips for Beginners, Portrait Photography Tips and Wedding Photography Tips.

    Falling for Waterfalls

    The post Falling for Waterfalls by Rick Berk appeared first on Digital Photography School.


    Digital Photography School