Ricoh has unveiled their new Theta digital camera, which can take 360-degree panoramas with its two ultra-wide-angle lenses. The stylish and thin Theta can be controlled via your iOS device after you’ve downloaded the appropriate app. There’s no live preview of the photo you’re about to take, so you have to cross your fingers and hope for the best. If you’re using your smartphone to capture the image, the photo will be automatically downloaded to your mobile device. Click through for more details – and samples – on connect.dpreview.com.
Imagine if your DSLR, and indeed all affordable cameras had very small sensors, and could only shoot JPGs; highly compressed and in a limited colour space. Imagine if only very expensive medium format cameras could shoot raw with large sensors.
That’s been the case till recently in the world of video. Small sensors, no depth of field to speak of, restricted colour space, and baked JPG type images. Not a pretty picture – literally.
Now a small Australian company, Blackmagic, has a series of moderately priced cameras that can shoot raw video. We have been working with the Blackmagic Cinema Camera in MFT mount, and our First Impressions report is now online.
"Having been to Antarctica with Michael and Kevin, I would say after having traveled the world and shot nearly my entire life as an exhibiting photographer, it was one of my highlights in my life and I talk about it, all the time. The images and experience of seeing something visionary and nearly extinct from the world, to see and experience the wildlife and scenery that does not fear humans is amazing. The images I shot there won me two Smithsonian awards and nearly 18 other international awards". – Tim Wolcott
Find Out More Now These Expeditions Will Sell Out Quickly. They Always Do
Lexar has introduced a new 64GB MicroSDXC UHS-I card and a reader hub capable of copying data from four memory cards simultaneously. The new 600x MicroSDXC card is capable of 90MB per second transfer speeds, and will be sold bundled with a USB 3.0 reader. The card reader hub, called the ‘Professional Workflow Reader Solution,’ uses one USB 3.0 port to transfer data from four (separately sold) memory card readers. SDHC/SDXC UHS-I, UDMA 7 CompactFlash, and XQD card readers are available for the hub’s four bays. Click through for more detail about the new card and reader hub.
We’re at the IFA trade show in Berlin this week, checking out new tech aimed at photography enthusiasts. One stand-out is the latest flagship smartphone from Sony, the Xperia Z1 (which had the codename of ‘Honami’). Sony’s certainly put the focus on imaging here with an F2.0, 27mm equivalent lens and a 20.7 megapixel, 1/2.3″ BSI-CMOS sensor, as well as a new physical shutter button. Read about our first impressions of the device on connect.dpreview.com.
Sony has released the API for developing mobile apps to control a number of their Wi-Fi equipped digital cameras. Developers will now have access to camera control, and could create things like Photo Uploaders and Time Lapse Control, according to Sony. Currently supported cameras include the NEX-5R/T, NEX-6, and the recently announced QX twins. Learn more at connect.dpreview.com.
[ By WebUrbanist in Architecture & Houses & Residential. ]
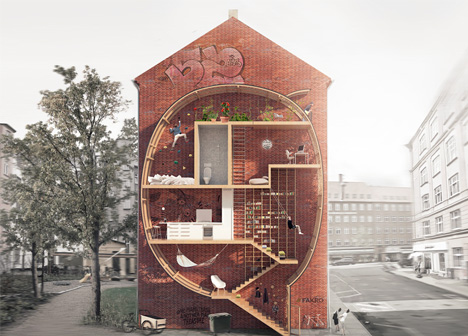
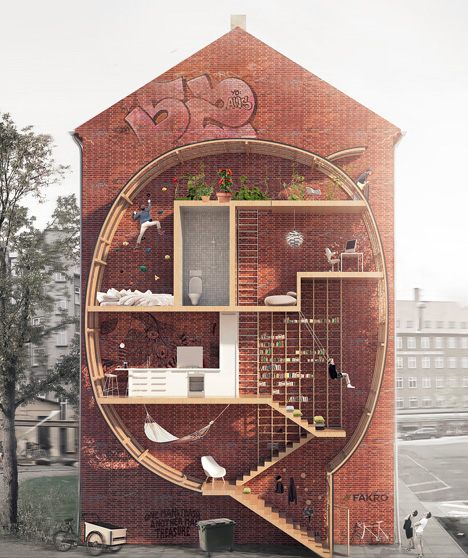
Playful yet thought-provoking, this project asks: what do we do with small leftover spaces in cities … particularly in urban areas where even a few square feet of real estate can cost a fortune?
Live between Buildings by Ole Robin Storjohann and Mateusz Mastalski won first place in a Loft 2 competition held by FAKRO, which challenged contestants to rethink loft living and material efficiency without sacrificing light and space.
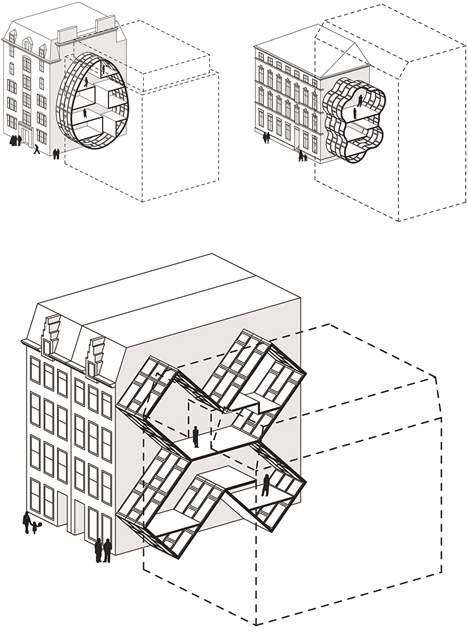
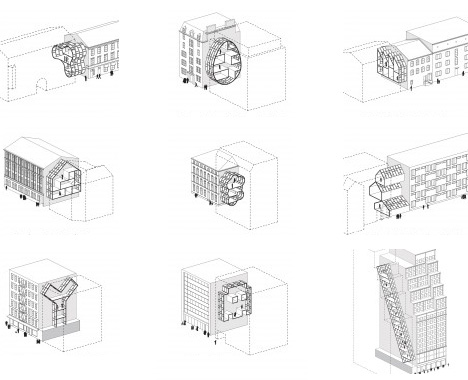
Their various prototype proposals have nearly no ground footprint, being instead suspended in part or entirely between existing structures. In testing the idea, they took actual buildings and voids, abstracted and simplified their forms, all to show how such interventions would work in major cities from New York and London to Amsterdam and Tokyo.
A wide selection of shapes suggests many possibilities using modular pieces, including half-serious and semi-practical suggestions, such as egg and X shapes, as well as outright silly ones, like a Christmas-tree home or cloud-bubble house, more intended just to illustrate the potential flexibility.
Out of a variety of compelling entries, just why did this pair win the award? “The Jury appreciated the way the basic idea – creating small infill-dwellings in-between existing buildings – has been worked out in extended research, thus providing models for various housing types in different cities. The plan can be realized entirely out of roof windows (with some technical adjustments) and offers an innovative idea for using empty spaces in urban fabric. The possibility of shapes is endless. The project was very beautifully drawn and communicated on a single sheet, the section describing both the architectural idea and the exciting occupation of the proposed building.””
[ By WebUrbanist in Architecture & Houses & Residential. ]
By Gina Milicia – author of our brand new Portrait Lighting eBook.
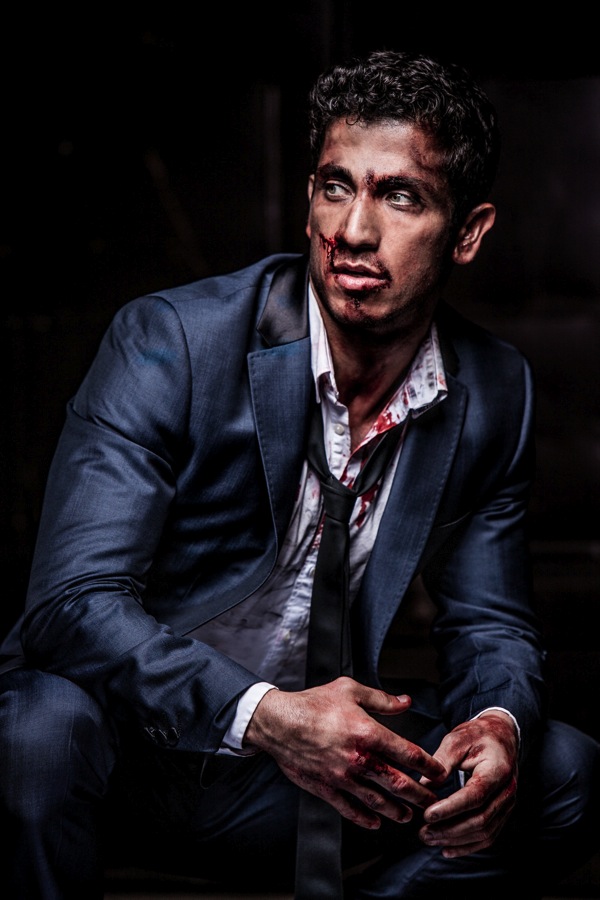
Welcome to Fight Club. The first rule of Fight Club is: you do not talk about Fight Club.” -Chuck Palahniuk, Fight Club
Australian actor Firass Dirani in my Fight Club inspired shoot @firassd (twitter) @firazzle (Instagram).
Most of my inspiration for photo shoots comes from Movies, art and popular culture.
Ever since I saw the movie Fight Club I’ve always wanted to do a fight Club inspired shoot.
My aim was to create a really cool, gritty, edgy looking shot. I could have achieved this look using several different techniques but opted for my new Rotolux deep Octabox with my Elinchrom Ranger Quadra battery operated light system.
For this shoot I worked with Melbourne make up artist Mia’Kate Russell an incredibly talented special effects make up artist. Her brief was to make Firass look like he’d just been in an old school fistfight – busted up but still looking incredibly cool.
If you are thinking of trying something like this then I suggest you check out your nearest school of hair and make up. Special effects make up like Mia used on Firass is taught at these schools and students are often looking for the opportunity to test out their skills.
Another version you may like to try is to just scuff the face up using dirt to give that gritty look. That’s the technique I used for this shot of Lachy Hulme who was playing a trapped minor in the TV Movie Beaconsfield.
A good Make Up artist will take your portraits from OK to amazing. This is definitely a relationship you should invest in and nurture.
The location I chose was an old warehouse near my actual studio. I had gone out scouting a week earlier. It’s important that you always have your locations worked out ahead of time rather than hoping it will all fall into place on the day of the shoot.
Some places will incur a hire fee to work in others you may get permission by finding the owners and just asking (which is exactly what I did to get access to this amazing warehouse!)
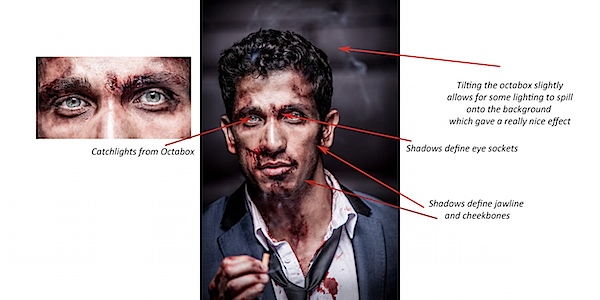
If a softbox and a beauty dish got married and had babies they would probably have little rotolux deep octaboxes. I love these light shapers because
They combine the softness and narrow spread of a soft box with the beautiful bone structure defining qualities of the beauty dish. It’s the best of both worlds.
For this image of Firass I converted my Octabox to a beauty dish by removing the outer diffuser and inner bevel and adding the beauty dish attachment.
I could have also just used a beauty dish but I prefer this softer style of lighting.
Here’s some visuals on how I took the shots (click to enlarge).
For this shot I’m using my:
Canon 1DS MK111, with my 70-200mm f2.8L series Lens
2x Pocket wizards
I used fill flash from my Elinchrom Quadra lights with a Rotolux Deep Octabox
My settings for this shot are:
ISO is set to 100
Lens focus length is 200mm
Aperture is F/ 4* @ 1/200th of a second**
* I selected a wide aperture of F4 on my long lens because I wanted my background to be out of focus. I could have shot wide open at f2.8 but decided to play it safe at f4 as I find it really difficult to get my models eyes sharp at f2.8 using a long lens and focusing in low light.
** I shot at a very fast shutter speed of 1/200th sec because I wanted to keep my background really dark and moody.
This shot would also work using a Speedlight + Softbox without internal bevel.
If you want to increase the amount of shadow in eye sockets, jawline and cheekbones remove the reflector or replace it with a black cutter.
And here’s one more shot from the shoot.
Get more portrait lighting tips from Gina’s new dPS eBook – Portraits: Lighting the Shot.
Post originally from: Digital Photography Tips.
Check out our more Photography Tips at Photography Tips for Beginners, Portrait Photography Tips and Wedding Photography Tips.
How to Create this “Fight Club” Inspired Portrait using One Light
If romantic comedies have taught us anything it’s that getting a beautiful bouquet of flowers is pretty darn special.
Flowers brighten up your day, but they tend to do that one pesky little thing — dying once they’re cut.
Making flowers out of photographs is a fun and cheeky way of telling that special someone you are smitten.
Plus, these flowers will go on living as mini photographic reminders of beautiful things that have happened in your life.
Learn how to make a super fun and simple bouquet of photo flowers to cheer up your living space, a loved one, or a stranger on the street. (Because we’d all like to feel like we’re in a romantic comedy once in a while.)
Learn How to Make Flowers out of Photographs
Why It’s Cool
Flowers are beautiful and the tend to make everyone pretty stinkin’ happy.
It’s awesome how placing a vase of flowers in a room makes it feel a little more put together than it did before.
These photo flowers will achieve that higher level of design sophistication all the while displaying images of things you love.
They’re simple and elegant with a touch of whimsy that’ll make all your friends ask “How did you do that?”
The best part of the photo flowers is that they will live forever. They wont go rotting away in a vase that you just keep “forgetting” to clean out.
Ingredients:
Photos you want to turn into flowers*
Scissors
Floral Wire
Floral Tape
Glue
Pen or Pencil
Circular object for tracing
*Photos printed on computer/copy paper or vellum work the best.
STEP 1: Round and Round
Use a circular object to trace a circle on your printed image.
Choose carefully where you trace, as the middle of the circle will be the middle of the flower.
STEP 2: Get to Cutting
Time to get crafty. Take up your scissors!
Cut out the circle you just traced.
Don’t worry if it’s not perfectly cut out. The imperfection will add to the charm of the flower.
STEP 3: Go Halfsies
Fold the circle in half.
STEP 4: And Again…
Fold the half-circle in half.
You’re getting so good at this.
STEP 5: One more time
Fold it in half again.
Your circle will now look like tiny little fan.
STEP 6: Shape it up
Cut the top of the circle from end to end to create a cone shape.
The finished result will look an ice cream cone.
You can play around with how you cut the top as this will be your petal shape. Try a few shapes to see what petal cut out you like best.
STEP 7: Make Your Mark
Unfold your circle and you will find 8 petals.
Mark off your least favorite petal and the top half of the petal next to it with a pen or pencil.
STEP 8: Just a Little off the Top
Cut out those one and a half petals. Buh-bye petals.
You will be left with 6 and a half petals.
The half petal will be the anchor of your flower (and it will look a little like a triangle).
STEP 9: It’s all Coming Together
Put a dab of glue on the half petal.
Glue the petal next to it (across the gap) on top of the triangular half petal.
STEP 10: Create Some Texture
Pinch each petal, making a crease down the middle to give them a little extra texture and shape.
STEP 11: A Little Loopy
Make a simple loop in the top of the floral wire with your scissors.
STEP 12: A Flower Grows
Poke the end of the floral wire that does not have a loop in it through the center of the flower.
STEP 13: The Finishing Touch
Cut a 2 inch strip of the floral tape and wrap it around the base of the flower to secure it to the top of the wire.
Yippee! You just made your first flower out of a photo! Feels good, right?!
If you aren’t super stoked on your first attempt don’t give up hope. It may take a couple of tries to get the hang of this. Don’t discard the flowers you don’t like ’cause they will look cute among the flowers you do like when they are all put together in a bouquet.
Taking It Further
Print your photos double sided so that you will have images on the top side of the flower as well as the bottom side of the flower.
Make a garland of photo flowers by twisting the wire together.
Make all types of flowers. A quick google search on how to make paper flowers will give you a plethora of tutorials on crafting different types of flowers.
Make a wreath or head piece of photo flowers.
Related posts:
DIY: Turn Digital Photos into Vintage-like Prints with Mulberry Paper Extra photos for bloggers: 1, 2, 3 What is it…
Frame Your Photos with a Paper Craft Photo Globe Extra photos for bloggers: 1, 2, 3 With the holidays…
DIY Photo Wrapping Paper — Wrap Gifts in Your Very Own Photos! Extra photos for bloggers: 1, 2, 3 Free shipping on orders over $ 100!…
Von fast allen geliebt, von vielen gehypt, aber nur von wenigen angewendet.
– Analoge Fotografie – Ari und ich mittendrin.
Was soll das Ganze hier? Im Prinzip möchte ich Euch meine Sammlung analoger Kameras vorstellen. Und das anhand von Fotos, die ich mit diesen Kameras von Ari gemacht habe. Als wir uns damals kennenlernten, stand sie bereits hauptberuflich, vor allem aber mit Leidenschaft, als Modell vor der Kamera.
Jedes unserer gemeinsam entstandenen Werke wird von mir immer mit dem benutzten Kameramodell in der Beschreibung veröffentlicht. Denn jeder Apparat hat seine eigenen kleinen Besonderheiten und diesen Charakter findet man auch in den Fotos wieder. Ich möchte auf diese Weise meine alten Schätzchen in den Vordergrund holen und vielleicht sogar etwas Interesse an der Technik schüren.
Kamera: Zeiss Ikon Ikonta
Denn das ist es, was mir an der analogen Fotografie so gut gefällt: Der Umgang mit diesen wundervollen alten Fotoapparaten und beim Bild die Reduktion auf das Wesentliche. Deswegen nutze ich auch am liebsten Schwarzweiß-Filme wie den Kodak Tri-X oder den Ilford HP5 Plus. Und je älter die Kamera ist, umso mehr Spaß macht mir das Fotografieren mit ihr.
Eines meiner absoluten Lieblingstücke ist die Zeiss Ikon Ikonta M (Mittelformat 6×6) aus den 30er Jahren, die auch rege von mir genutzt wird. Im Kleinbild-Bereich tendiere ich stark in Richtung Osten. Meine 4 Prakticas sind mehr sehr ans Herz gewachsen und es geht nichts über das Kalaschnikow-artige Auslösegeräusch einer Zenit ET. Als perfekte Reise- und Streetkamera hat sich aber die Yashica FX3 Super herausgestellt. Klein und kompakt, aber mit überragender Verarbeitung und toller Abbildungsleistung.
links: Praktica Super TL1000; rechts: Yashica FX3
Allerdings war aller Anfang schwer. Das Wort Leidenschaft beinhaltet ja ganz klar das Wort „Leiden“. Meine Leidenschaft zur analogen Fotografie begann im jugendlichen Alter, als ich eine Zeiss Ikon Contessa und eine Praktica SuperTL1000 als Familienerbstücke geschenkt bekommen hatte und nicht wusste, wie sie funktionieren.
So wanderten sie erst einmal in die Vitrine und sahen gut aus. Zum Glück blieben sie dort nicht lange und nach vielem Rumprobieren kamen dann auch tatsächlich Fotos dabei raus. Die waren weder gut noch künstlerisch wertvoll. Und aufgrund der defekten Belichtungsmesser auch entweder zu dunkel oder zu hell. Wie gesagt, mehr Leiden als Leidenschaft.
Kamera: Praktica MTL5B
Auch wenn mich die Lehrer in der Schule immer als lernresistent charakterisiert haben: Im Laufe der Jahre hatte ich mich weiter in die Thematik eingearbeitet und nach und nach den Umgang mit der analogen Technik erlernt.
Eine regelrechte Eigendynamik hat das Ganze aber erst nach dem ersten Shooting mit Ari bekommen. Nachdem ich die Dias abgeholt und gescannt hatte, gab es kein Zurück mehr. Das war es, wonach ich immer gesucht hatte. Blinker links und Überholspur!
Seitdem sind wir beide vor und hinter der Kamera ein perfektes Team. Viel Spaß mit den Fotos – alle analog und alle mit viel Leidenschaft. Nur jetzt ganz ohne Leiden!
Das Titelbild entstand mit einer Zeiss Ikon Contessa.


 Use a circular object to trace a circle on your printed image.
 Time to get crafty. Take up your scissors!
 Fold the circle in half.
 Fold the half-circle in half.
 Fold it in half again.
 Cut the top of the circle from end to end to create a cone shape.
 Unfold your circle and you will find 8 petals.
 Cut out those one and a half petals. Buh-bye petals.
 Put a dab of glue on the half petal.
 Pinch each petal, making a crease down the middle to give them a little extra texture and shape.
 Make a simple loop in the top of the floral wire with your scissors.
 Cut a 2 inch strip of the floral tape and wrap it around the base of the flower to secure it to the top of the wire.


You must be logged in to post a comment.