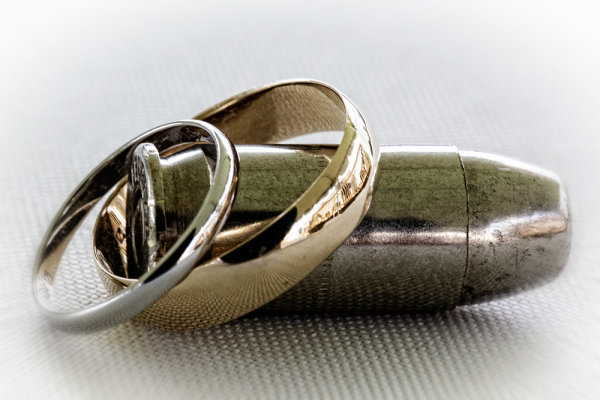
This bride and groom are both serving in the army, and both are gun enthusiasts. I asked the groom if he had their guns handy, and a bullet, and came up with this shot as one of the ring shots. This shot was taken in available light, under a tent outdoors. EOS 5D Mark III with EF 100mm f/2.8L IS; ISO 2500, f/16, 1/125.
In my career in photography, I’ve chosen not to focus on weddings as a business model, and shoot only a few every year. I try to avoid being “traditional” in my approach to weddings, mixing traditional shots or types of shots with my own approach- which may or may not have been borrowed from other photographers I have worked with.
One such shot is the ring shot. It is what’s known as a detail shot, and while this may not be the most important shot of the wedding, it is one of the shots that helps sets the tone of an album, and can allow for a lot of creativity if you have the time. If the shot fails, it will definitely be noticed.
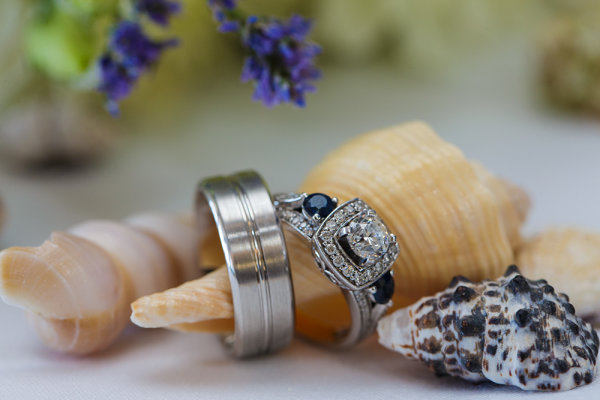
The bride and groom in this wedding had a special affinity for the beach, and brought a beach theme to their wedding. Shells were scattered about the tables. I selected a few and quickly shot the rings on a table. The room was brightly lit with daylight pouring in the windows nearby, and I set my flash to bounce off the ceiling to add just a touch more light. . EOS-1D X, EF 100mm f/2.8L IS. ISO 800, 1/250, f/5.6.
There are many ways to go about these types of shots, some more cliche than others. The one that always comes to mind is a shot of the rings resting on the invitation, or the rings casting a shadow of a heart on a Bible opened to 1st Corinthians. My preference is to find something personal that connects the rings to the bride and groom, or else I’ll pull something from the theme of the day. It may take some digging with your clients to find that personal connection- maybe a story about how they met, or something they share together, but once you find it, it can make shooting the ring shot a lot more fun. If I can’t find a personal connection, I’ll use flowers, the bouquet, or a even a champagne cork. Be creative. There are a lot of ways to photograph wedding rings that will make them stand out.
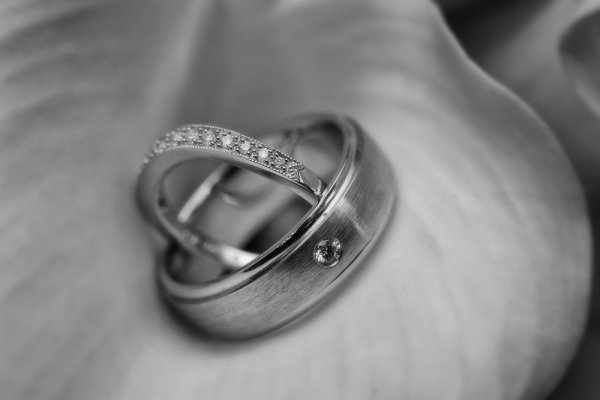
There was no overriding theme at this wedding, and as a second shooter I didn’t have time to get to know the bride and groom. I found a flower arrangement and played with several arrangements before settling on this one. EOS 5D Mark III, EF 100mm f/2.8L IS. I bounced the flash off the ceiling for this shot. ISO 800, f/8, 1/200.
Technically, while a macro lens is helpful, it’s not absolutely necessary. You can highlight the rings in whatever setting you choose, but be careful not to let them get lost in the setting. Typically I use a Canon EF 100mm f/2.8L IS macro lens, but any lens that will let you get fairly close will work, depending on your composition. Ideally, I would use off-camera flash every time, but weddings tend to me fast moving events, and there isn’t always time to do it the way you’d prefer. In this case, I’ll set up a small reflector or bounce card to bounce the flash and give a better quality light. I will often try several angles to get different looks. Outdoor weddings during the day are a bit easier. I’ll look for a shaded area and shoot the rings in the available light.
Ring shots are often my most fun shot of the day. There’s no one stressing about their hair or makeup, and no one trying to pull their attention in a different direction. So use the ring shot as your moment of peace on an otherwise busy day, and have some fun with it.
This shot was also from the military wedding. The bride and groom are knife enthusiasts as well. The groom gave me one of his knives and I played with a few arrangements before shooting this one. EOS 5D Mark III, EF 100mm f/2.8L IS. ISO 3200, f/9, 1/125.
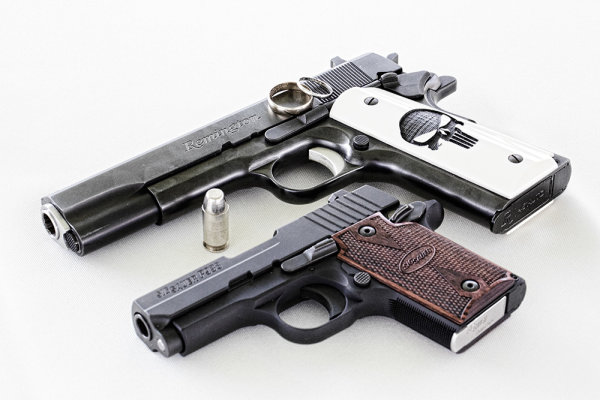
This is another set up from the military wedding. His ‘n’ hers .45′s. This shot doesn’t require a macro lens, though I used the EF 100mm f/2.8L. EOS 5D Mark II, Ef 100mm f/2.8L IS. ISO 3200, f/16, 1/160.
Post originally from: Digital Photography Tips.
Check out our more Photography Tips at Photography Tips for Beginners, Portrait Photography Tips and Wedding Photography Tips.
Wedding Photography: Shooting The Rings


You must be logged in to post a comment.