As camera manufacturers attempt to counter the onslaught of a smartphone-in-every-pocket mobile photography movement taking the place of point-and-shoot cameras, some solutions seek to combine the two devices. Our sister site, connect.dpreview.com has pulled together a handful of these ideas – now in production or still in development – for your interest (and, possibly, amusement). Are these technological wonders that you’ll spend your hard-earned cash for, or are they destined for the recycle bin?
Apple has released RAW Compatibility Update version 4.08 for Aperture and iPhoto ’11. This update adds support for the Canon EOS 70D, Fujifilm X-M1, Sony RX100 II and five additional cameras. You can download the new software via the System Update feature in Mac OS X or via the source link on the following page. There you’ll also find a full list of the newly supported cameras.
Are camcorders obsolete? For out in my review of the new JVC PX100 – Revenge of the Camcorder.
"Having been to Antarctica with Michael and Kevin, I would say after having traveled the world and shot nearly my entire life as an exhibiting photographer, it was one of my highlights in my life and I talk about it, all the time. The images and experience of seeing something visionary and nearly extinct from the world, to see and experience the wildlife and scenery that does not fear humans is amazing. The images I shot there won me two Smithsonian awards and nearly 18 other international awards". – Tim Wolcott
Find Out More Now These Expeditions Will Sell Out Quickly. They Always Do
Compact and portable, this crafty collaborative design-build project is part art installation and part impromptu gathering space. This student-built platform pushes people to think about the flexible potential of public space – it also showcases the power of group brainstorming and rapid prototyping.
Facilitated by Izmo in Italy, participating students followed a process-oriented approach. They were presented a framework for construction – a metal-framed rectangle – divided into four quadrants. Each of these sections was assigned to a group along with a set of discarded building materials ready to be reused and a time limit for construction.
The cut, pasted and painted result looks somewhat like a three-dimensional patchwork quilt. Its various sides feature fold-out furniture, sliding drawers and secret slots from which various interactive objects are deployed on demand. The structure itself sits on wheels and is sized to fit into public parking spaces or other small and slim sites.
About Izmo itself: “The name Izmo originates from the word isthmus, a thin strip of land that joins two areas. Our research topic is in fact the territory: where interactions take place between individuals and public space . Our mission is to link the territories, the people with the land and the citizens with each other. We do this, for instance, through projects of urban design, installation; organization of seminars, meetings and workshops; and development of Web platforms. In all cases, the projects designed by Izmo come from reading and from listening to people and places that will benefit from our operations.”
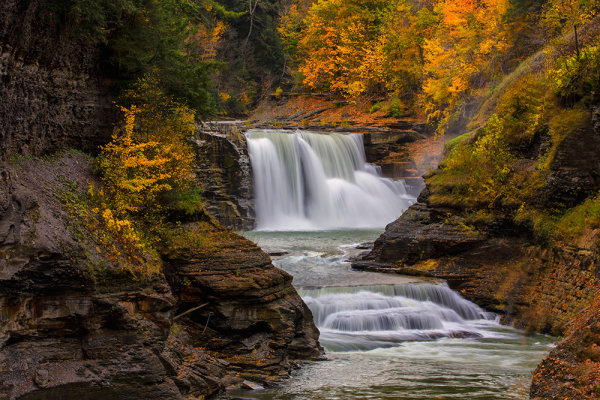
For this image of Lower Falls in Letchworth State Park in New York, I knew I wanted a creamy look to the falls. They were flowing well so I knew a moderately slow shutter speed would give me what I wanted. I also knew as I composed it that I wanted the falls framed by some of the gorgeous colors of the fall foliage. I set my exposure based on two things- I wanted a slow shutter speed and I wanted deep depth of field. EOS 5D Mark III, EF 70-300 f/4-5.6L, ISO 100, f/25, .3″.
A good friend of mine is passionate about photography, and she recently acquired a reminder of the way she approaches photography. A tattoo that wraps around her bicep that states simply “Shoot With Intent”. This is one of the biggest lessons a beginning photographer can learn. It’s very easy to go out with a camera, set it on AUTO, and come back with some nice, perhaps even great images. Today’s cameras make that fairly easy, even without shooting on full auto. If you’re using aperture priority or shutter priority, just allowing the camera to come up with an correct exposure, you can still great images without considering all aspects of the exposure. However, without considering all aspects of the exposure and allowing the camera to make decisions for you, you’re not really shooting with intent.
I wanted to capture this image of trees reflected in the Merced, but the water was undulating just enough to cause problems with the reflection. A slower shutter speed helped smooth the ripples and give me a better reflection. EOS 5D Mark III, EF 70-300 f/4-5.6L, ISO 100, f/16, .3″.
Shooting with intent means you take into consideration all aspects of the image you’re creating. It starts with the lens you choose to put on your DSLR and carries all the way from subject and composition, to shutter speed, ISO, and aperture, you think through every aspect of the shot, and how those variables will affect the image. Let’s assume you’ve chosen a lens, a subject, and decided how you want to compose the image, since those are the two most basic aspects of creating an image. You look through the viewfinder, or on the LCD screen, and you decide where things should go in the frame. That’s about half of the decisions you need to make right there.
Next, you need to consider the three aspects of exposure- aperture, shutter speed, and ISO. This is a balancing act where you need to prioritize what’s most important to you. Take your aperture. Let’s say you’ve decided you want everything in focus. You’ll want to select a smaller aperture, say, f/11 or even f/16 to provide the greatest depth of field. But then what about your shutter speed? If you’re in Aperture Priority mode, the camera will figure that out for you. But if there’s something moving in the shot- trees blowing in the wind, a waterfall, or waves on the ocean, or even people- is that something you want to just leave to the camera?
You can still be in Aperture Priority and pay attention to your shutter speed. Let’s assume you’re shooting a water feature. If you want smooth, misty water, you’ll know you need a slower shutter speed. But how slow? That depends on what the water is doing, and on how you want the water to look. That’s where your INTENT comes in. If you still want some definition in the water, you’ll want a slightly faster shutter speed that allows for that. How fast depends on how fast the water is moving. If you want that milky look to the water, you’ll want a slower shutter speed. Again, how slow depends on the water’s movement.
The point is, before just allowing the camera to set the shutter speed, or the aperture, or anything else, regardless of what mode you’re in, figure out what it is you really want out of this capture. Decide what your intent is, and double check what the camera is doing to be sure that your intent is carried through. And if it isn’t? Change it.
Make sure your images say what you meant to say. Be sure your intent is clear.
Post originally from: Digital Photography Tips.
Check out our more Photography Tips at Photography Tips for Beginners, Portrait Photography Tips and Wedding Photography Tips.
[ By WebUrbanist in Architecture & Public & Institutional. ]
In a bold yet beautifully contextually move, this embedded mountaintop museum structure is part of a series of buildings set high in the mountains of Tyrol, Italy, and designed by Zaha Hadid Architects.
Visitors ascend the slope from below, enter a glazed above-ground space, then pass through subterranean exhibit rooms and come out onto an observation deck with stunning views down the steep sides of the mountain below.
The sixth of the set, Messner Mountain Museum is situated at the peak of Mount Kronplatz above a regional ski resort. It is designed to educate visitors on the discipline of mountaineering and celebrate the world’s greatest rock faces.
Aside from its sinuous aesthetic, the strength of this design relies on sequential experience – movement through the building provides an appreciation for both the site and the subject matter of the museum. It works, quite literally, on a number of levels.
From the architects: “A composition of fluid, interconnected volumes, the 1000 sq. m. MMM Corones design is carved within the mountain and informed by the geology and topography of its context. A sharp glass canopy, like a fragment of glacial ice, rises from the rock to mark and protect the museum’s entrance”
[ By WebUrbanist in Architecture & Public & Institutional. ]
When it comes to movies, editing is kind of a big deal.
Without it, we wouldn’t have twist endings. (Looking at you, M. Night.) We wouldn’t have out-of-order movies to entertain our brains (Marty McFly 4ever). We wouldn’t even have beginnings, middles, and ends!
Frankly, movies would be pretty weird and probably not very good at all without editing.
Thanks to Instagram’s 4.1 update, you can now upload videos to Instagram, meaning a whole new world of video editing has opened up!
Sound, filters, transitions, sequencing — there is so much you can do to an Instagram video before uploading it. And awesomely, you can do it all on your phone.
Consider this guide an editing workshop that’ll turn your Instagram videos into cinematic artworks served 15 seconds at a time.
10 Tips for Editing Instagram Videos
You Can Now *Upload* Vids to Instagram
Instagram must’ve read our minds with the 4.1 update because we were like Man, wish we could upload #tbt vids!
Now, you totally can. You can upload any video that’s in your phone’s library, and with a quick file transfer, you can even upload videos that are sitting on your computer (we’ll show you how in the guide below!).
Being able to upload video opens up a whole new world! It means that you can get way more precise about how you shoot and edit your videos because you can use outside apps, add sound and video effects, splice together clips, and speed up or slow down your footage.
Read on to learn how to which tools and apps are the handiest, how to optimize shooting and editing within Instagram itself, and how to make a workflow for churning out really great videos!
Pre-req reading: Check out our essential guide to Instagram video if you haven’t yet. It answers all the questions you might have about Instagram video and also give you ideas to start.
How to Get Videos onto Your Phone
Shoot it on your phone.
Shooting videos on your phone is obviously the fastest way to get videos onto your phone.. But did you know there are lots of options besides shooting within the Instagram app?
Yeah! It’s actually quite refreshing to shoot video outside the Instagram app.
You’ll pick how you shoot your video based on what you want your end-result to be like. Here are a couple options and why you’d use them:
Your phone’s native camera app.
Use this to shoot multiple clips that you can then arrange in the order you’d like in Instagram. This gives you more freedom with time and set-up because you don’t have to shoot in order like you do in the Instagram app. (Also, you don’t have to fear accidentally losing your work-in-progress while working in the app!)
A filter app.
Use this to get a different look besides the filters that Instagram offers. We dig Vintagio (Android & iOS) and 8mm (iOS). Or you can even layer filters to come up with your own feel.
An advanced video editing app.
Apps like iMovie (iOS) equip you with extra tools that give you more precise editing tools and control over sound and transitions. If you find yourself using one of these often, then you might end up shooting through these apps to make it seamless.
PRO-TIP: When you upload a rectangular video (which is what most other apps shoot in), your video will be cropped in Instagram. Instagram crops to center your video, so while you’re shooting, just envision that either side of your video will be lopped off.
Transfer files from your computer to your phone easily.
Maybe you have phone videos that you long ago saved to your computer. Maybe you have vids you shot on your DSLR. Maybe you have childhood vids transferred from old VHSs.
Whatever it is, your video’s trapped on your computer, and you need to get it to your phone so you can share its amazingness with all of your Instagram followers STAT.
The file might be too big to email to yourself and bothering with cables can be cumbersome and take time.
Here’s how to do it the e-z way:
Use an iFlash Drive to transfer files. This is a spacious drive (up to 16GB) that lets you quickly transfer files between your phone and your laptop. One end connects to your phone, the other a USB.
Use an EyeFi SD card to wirelessly send vids straight from your DSLR and onto your phone. (IT DOES THAT.) You can see how it works in the vid above!
Use an app like Dropbox (Android & iOS) or Cloud to store in internet-space and download it on whatever device you want, whenever you need it. If you have a iThingies, you can also use iCloud to sync your files across computers and devices.
Make Your Video Legit with Transitions
Instead of having your video abruptly switch from scene to scene all choppy-like, you can use transitions to give your video a more cinematic, elegant flow.
Use objects as a clever transition.
One really clever way to transition scenes is to use objects as a divider between two completely different shots. Check out the vid to the right to see how cool this effect is!
How to do it? Pan your camera horizontally across your first scene and place your transitional object at the end of it. (We used bags as our objects in the sample video above. Yours can be anything — a tree, a person, a telephone pole.) When your video pans half-way through that object, cut the scene.
Now, go to a new location for your next scene, and place the same object at the start of the new panning scene. Start shooting at the halfway mark of the object where you stopped your previous scene and end the scene halfway through the next object. Repeat for however many scenes you want to sequence together. The end result will look like one seamless pan that completely changes location between objects. That’s movie magic, baby.
PRO-TIP: Measure how far your object is away from your camera, so that you can make it consistent from one scene to the next.
BONUS IDEA: Place a piece of paper over your phone lens to give yourself a black screen between scenes. You can also pull it away and allow your camera to adjust exposure and come into focus as you’re filming — this ends up looking like a dreamy fade-in. Check out our example.
Use apps to add transitions between scenes.
Apps are great because they give us access to tools that previously only pros had. Case in point, iMovie (iOS) and WeVideo (Android & iOS) give you options for placing transitions between video scenes.
You can do a simple fade in/fade out, text (think silent movies!), and all the transition types that you never really thought about but have probably seen on TV or in movies.
Pull focus a.k.a. Changing depth of field
Pulling focus is this fancy thing cinematographers do to get movie-watchers to pay attention to a particular part of the screen or to spice up a moment with visual drama.
You’ve seen this in movies when an out-of-focus shot suddenly comes into sharp focus or when something that’s in the foreground falls out of focus and the background comes into focus instead.
Pulling focus can also mean simply keeping your subject in focus as they move within your shot.
The cool thing about all of this? You can do it on your phone! Here are two ways:
Tapping to focus.
While your phone doesn’t have much of depth of field to work with, you will still notice certain parts of your shot going in and out of focus as you move your phone. This is especially true if one subject in your shot is a lot closer to your lens than everything else in the shot.
As you move or as your subject moves, pay attention to how your focus changes, and tap your screen to keep what you want in focus nice and sharp. You might *want* something to fall out of focus, so tap a different part of your screen to get them to fall out of focus.
Using a telephoto phone lens for dramatic depth of field.
Watch the video above to see just how dramatic of a focus shift you can get with a telephoto phone lens! Because it’s telephoto, you get a nice range of depth of field. It also has a focusing ring that lets you control exactly where focus falls in your shot.
Another way to do it is by using an iPhone SLR lens mount to shoot phone photos and vids with SLR lenses. You read right — you can shoot videos using your SLR lenses mounted onto your phone.
Chopping & Sequencing Clips
The editing choices you make can really make your video stand out from the rest. Remember Memento? Yeah, those guys were nominated for best film editing at the Oscars for the super clever way they edited the story out of order. Now bookmark that in your brain, and get your tapping finger ready.
Plan your video.
When it comes to editing, the best thing you can do is to plan out what you’re going to shoot before you even start. This can be as quick as taking out 30 seconds to come up with a vision for your video in your mind.
Questions to ask yourself: What are you trying to get across in your video? What will the beginning, middle, and end be? How long should each clip be, so that you can fit your entire story into your time limit? Maybe your idea’s worth spanning over more than one Instagram post — how many?
Chopping.
Maybe your clip is too long or you want to sequence a bunch of clips together, but they don’t quite start or end the way you want them to. Go to town like a lumberjack on a tree trunk: chop. it. down.
How? Instagram lets you trim down video clips. After you load a video, hit Next. Then use the slider to shorten the video to the length you want. Move the video timeline underneath the slider to indicate exactly which part of the video you want to crop down to.
Most phones’ native camera apps also already have simple editing tools that let you shorten your video clips down just how you like them. In iOS, view a video in your library, and move the slider on each end of your video clip’s timeline to where you’d like it. Then hit the “Trim” button that appears in the top right corner.
Sequencing.
Sequencing is all about the order of your clips and how you transition between them. If your video is spur of the moment, you can edit as you shoot within Instagram by viewing your video and the going back to the previous screen to delete and add scenes.
However, if you’re shooting something more complex, there’s a disadvantage to editing together clips as you go within Instagram. You can’t rearrange the order of videos you’ve already placed into your Instagram video. So if you wanted to be able to do that and get more precise with how your clips transition and the order that they play, then you’ll want to use a video editing app like iMovie or WeVideo. If you work better on the big screen, you might even edit it on your computer and then transfer the file back to your phone.
Fast & Slow Motion
Slow motion is the raddest. Everyone and their mom knows it. While there has yet to emerge one great app that gives you the kind of slow-motion effects you see coming out of a Phantom Flex camera, there’s no harm in pushing the limits of slow-motion tools that currently exist in apps.
We were able to speed up the video above using Vintagio. Because the speed up and slow down tool only lets you change the speed a little bit, we ran the video through the app twice to speed it up doubly. You can do the same thing for slowing down your video.
Keep in mind, it won’t look as smooth as other slow motion videos because your phone just doesn’t shoot video at a high enough frame per second. Again, there’s no harm in playing with what you have, so experiment!
We haven’t found a great Android app for slowing down or speeding up video, but if you know of one, let us know.
Oh yeah, and if you’re into editing video on your desktop, Twixtor is a tool that manipulates video to make it look like it was shot at a higher frame per second than it actually was. In short, it gives you a slow motion effect without having to use an expensive slow motion camera.
Adding Music, Sound Effects, and Muting
One amazing advantage to being able to upload videos to Instagram is that you can edit sound on your videos before you post them!
Depending on what app you’re using for video editing, you can control the sound in your videos in all kinds of ways.
Here are some ideas:
Mute or lower the sound in your video
Record narration or sound effects to lay over your video
Import music from your phone’s library
If you’re wondering which apps do what, here’s a quick rundown. iMovie and Vintagio give you the ability to control volume on your video. The iMovie app in particular lets you lay over a narration or any recording that you make, as well as import music and sound effects.
Meanwhile, WeVideo doesn’t let you edit sound within the phone app, but the app syncs your video to the desktop app, which gives you sound editing options. Vintagio comes with pre-selected music that you can play over your video, too.
Filters, in Apps and By Hand
Instagram video comes with a set of squeaky new filters, but what if you’re looking for something different?
Outside apps.
8mm and Vintagio do a good job of covering specific film looks based on time period. For example, if you want a black and white ‘20s silent film look vs. a warm 70s vibe.
If those aren’t enough iMovie and WeVideo have filters, too. And if you’re into experimentation, overlap filters across apps to make your own awesome filter! You can even name it after your favorite celebrity cat.
Filters by hand.
DIY the dang thing. We’re talking hold up anything that looks like it could potentially Shooting a horror vid? Hold up some red glass over your lens.
Want to make it lo-fi? Grab some plastic to give your video dreamy vignetting.
Want to give your video a warm tint Coen brothers style? Use your sunglasses to wash your video in color. If you’re into these ideas, check out our roundup of 10 DIY Filters on the Cheap.
Dreamy lens flares.
We’ve played around with how to create intentional lens flares. Here are two fun and easy ways to do it:
1) Lens whacking is a videography technique that’s similar to free-lensing. You remove the lens from your DSLR and slightly move it away from the camera body. The purpose here is to let light hit the camera sensor to create moving light leaks, which we can attest are very pretty and –heck we’ll say it– dreamy. If you shoot on a DSLR, here’s a guide with samples.
Since phone’s don’t quite work this same way, you can still create the illusion of light leaks by having your subject backlit and letting your phone’s auto-exposure shift with the movement of your camera or your subject. This can create rays of light in your video that can look quite lovely.
2) Sprinkling water either directly on your lens or onto a clear sheet in front of your lens. Try something like a pane of glass, mylar or anything clear. Here’s our full guide on playing with water for lens effects.
360-Degree Time-lapses
Time-lapses are cool, but have you ever seen a panning time-lapse? It’s dually impressive! It’s one of those effects that stops you in your tracks because you wonder, How’d they do that?
If you’re not sure what a panning time-lapse is, it’s when your camera pans across a landscape and simultaneously shoots a time-lapse.
Two popular ways to make a panning time-lapse is by using a slider that moves your camera horizontally or by using a rotating mount that turns your camera 360-degrees.
We were able to make the 360-degree time-lapse above with a simple rotating mount called the Camalapse. You can use this mount with any camera that has a tripod thread, but we mounted our phone by pairing it with the Glif (a tripod mount for iPhones).
Just grab a time-lapse app, like Lapse-It (Android & iOS), set up how long you want to shoot your time-lapse for, twist the Camalapse (twists similar to a kitchen timer), and let ‘er go. In the end, you’ll get a rad video that all your buddies will be asking you about.
PRO-TIP: Because time-lapses are usually slow-paced, we sped ours up by running it through Vintagio’s speed-up tool two times.
STOP-MOTION & Editing Photos into Video
If you’re using the internet right now, there’s a good chance you’ve seen a stop-motion or two. Stop-motions, when well done, have the power to blow people’s minds, and that’s a good thing!
Stop-Motion Tips.
We have so many tips in our Ultimate Guide to Stop-Motion, but here are the essentials. Of utmost importance, keep your camera still. Put it on a tripod or set it somewhere where it absolutely won’t move.
Aim for consistent lighting. If this is going to take a while, shoot in a place where your light isn’t moving (i.e. the sun traveling across the sky), unless o’ course that’s what you want.
If you’re shooting and editing within Instagram, tap lightly and quickly to record, so you don’t accidentally make each clip too long. For smooth movement, each clip should be as brief as you can shoot it.
To get more precise, you can shoot individual photos for each frame in your phone’s native camera app, and then import the photos to create a video in iMovie or WeVideo. This’ll let you throw out any mess-up shots or figure out if you need to reshoot a particular part of the stop-motion.
PRO-TIP: A camera phone remote can make shooting tiny clips easier and also prevent you from accidentally moving your phone while tapping.
The Quickie Slideshow — Your Life in Instagram Flashed Before Your Eyes.
You might’ve heard about Pummelvision. It was a web app that took all of your Facebook or Flickr photos and turned them into a lightning-fast slideshow. It was like watching your life flash before your eyes! We cried, not kidding.
Everlapse is a similar idea, but it takes your most popular Instagram photos and turns them into a short reel that you can share on Instagram. We’re getting verklempt just thinking about all the memories.
Instagrammers with Vid Skillzzz
Hopefully at this point, you’ve abandoned this article and are outside shooting and maybe will not read these words until hours from now (which we’re fine with because OMG you should be out shooting!).
And if not, your brain’s about to be so full of ideas they’ll start to leak out your ears/eyeballs/face. Why will that happen? Because gathered up a list of amazing Instagram videographers for your personal inspiration.
@megancignoli — A photographer/director with a jelly-worthy talent for stop-motion. Girl’s got creativity *and* patience.
@nazfilms — A cinematographer who makes incredible experimental Instagram videos completely shot and edited on his iPhone. Watch with sound. Also, watch for his just started #flickstagramseries.
@bythebrush — A painter who needs to get into movie-making stat. Especially good for inspiration on transitions between scenes, as well as music use.
@pinot — An illustrator & animator whose animations makes us question reality.
@teresa_franco — A nurse who can wield a macro phone lens like a pro. Check out her amazing insect videos.
@mariamsitchinava — An editorial photographer who turns her stills into gorgeous filmic vignettes.
@cole_rise — While this photographer/pilot doesn’t have a lot of videos up right now, he’s one to watch.
@rokuthecat — Just because.
Related posts:
Pro-Tips for Shooting Better Instagram Videos Extra vids for bloggers: 1, 2, 3 “Well that’s weird,”…
FlipClips — Print Your Short Videos into Magical Flipbooks If you bought your digital camera in the past few…
10 Tips to Make Your Phone Photos Amazing; Plus, Our New Phoneography Blog! Phoneography is the best. No matter where you go, you’ve…
Perhaps one of the most important things we do as portrait photographers is preserve memories. While the digital era and its ever-evolving technology have made it easier to ensure that the photos we take today will last longer than their analog counterparts, there are still things we can do to help preserve memories captured before the advent of the pixel. Several years ago, I came across a sizable collection of very old family photos and started scanning them. Unfortunately, some had already been damaged to one degree or another. Fading, creasing, staining, and tearing had all left their marks, and the fact that some of these photos were close to 100 years old did not help their cause. At first I wasn’t sure what to do about them, but closer inspection made it clear that restoring many of these photos would not be as difficult as I initially thought. With the help of only three or four Photoshop tools, I was able to bring this photo of my great grandparents back to life.
STEP 1 – ASSESS THE DAMAGE
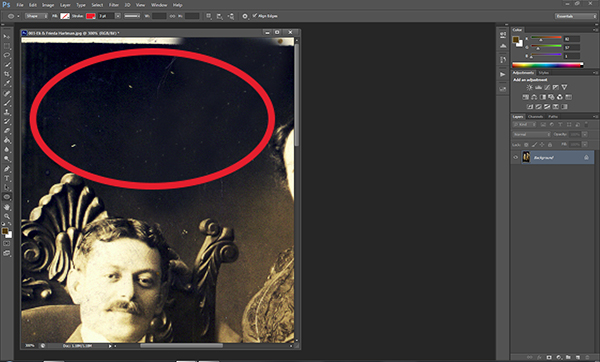
Once the image has been scanned, open it in Photoshop to assess the damage and formulate a plan. A good rule of thumb when editing any sort of photo is to tackle your global edits first, before worrying about specific target areas. I like to make overall tonal adjustments first. If I clean up dust, rips, and creases first, I run the high risk of those imperfections reappearing later when I adjust tone and contrast to the entire image.
Open the image in Photoshop and assess the damage.
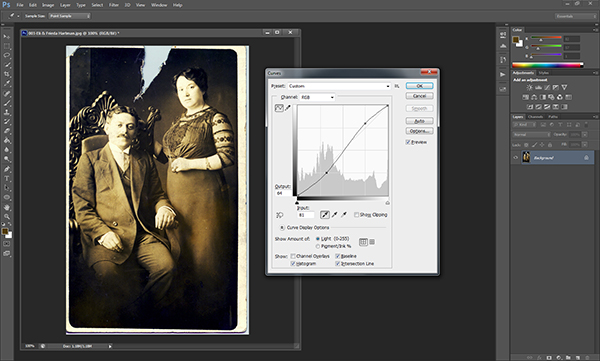
STEP 2 – LEVELS & CURVES
As with almost everything in Photoshop, there are so many ways of doing just about everything. When I first started doing this kind of work I used the Levels adjustment. I prefer using the Curves adjustment, though, because it lets me set the levels and adjust the contrast from within the same dialog. By using the droppers below the graph, you can do a quick Levels adjustment, bringing the tone of the image back under control. Using the black dropper, I click on what I see as one of the darkest points in the image. You’ll see an immediate improvement in the overall appearance of the photo. For purposes of fixing this photo, I don’t need the white or gray droppers. Once I’ve adjusted the levels by setting the black point, I tweak the contrast of the entire image by creating a slight “S” curve. Don’t panic if you push the adjustment too far. You can turn the “Cancel” button into a “Reset” button in any Photoshop dialog box by holding down the ALT/OPTION key.
Select the black dropper on the left and click on the darkest part of the image to adjust the levels.
Adding a slight “S” curve will add some needed contrast.
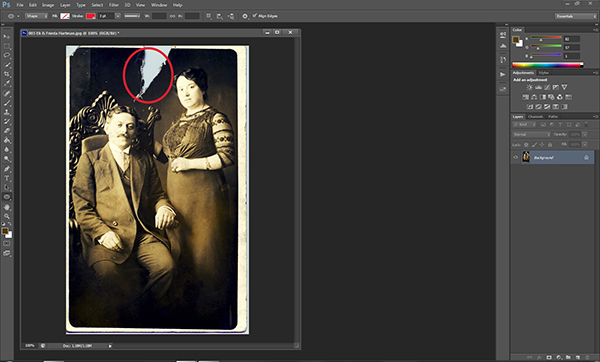
STEP 3 – TACKLE THE DETAILS
As far as global adjustments go, this particular image really only needed a small levels and curves adjustment. Once that’s been addressed, we can zoom in on the image and start addressing the details. For this photo, the next step is dealing with that big tear at the top. For this part of the repair I’m relying on the Clone Stamp tool (keyboard shortcut: S). Be sure to zoom in kind of tight to make sure you have a good view of the area. You’ll be using the tool to sample similar nearby pixels to copy and fill in the damaged area. Start with the edges and work your way in towards the middle and then up towards the top. Be sure to change your sample area as you cover more of the tear in order to ensure that the tones and shading are consistent. Don’t worry about keeping a straight edge at the top of the photo. We’ll be cropping that out later.
Now it’s time to zoom in really tight and deal with small things like dust, scratches, stains, and creases. In earlier versions of Photoshop, the best tool for this part of the job was the Clone Stamp, and in some situations that might still be your best bet. Ever since the introduction of the Spot Healing Brush, however, cleaning up dust and scratches has never been easier. The spot healing brush reads the surrounding pixels and uses that information to cover up and repair minor damage. As with all detail adjustments, be sure to zoom in pretty tight. This will let you make the repair with fewer and– more importantly– less noticeable clicks.
Use the zoom tool to make sure you catch all of the small imperfections.
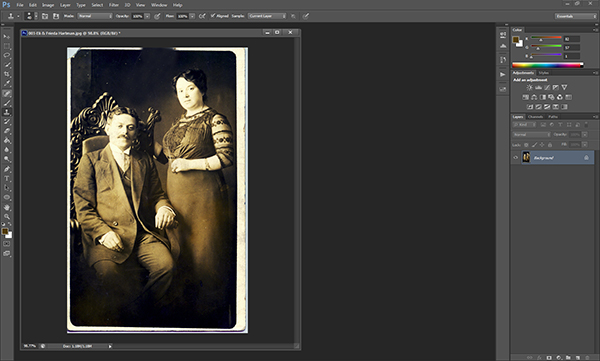
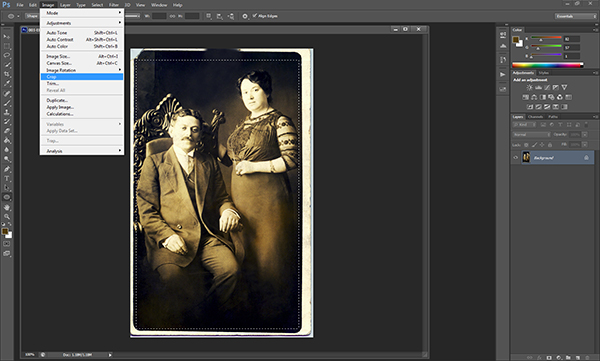
STEP 4 – CROP FOR A CLEAN EDGE
Once we’ve addressed the damage we’ll zoom back out and use the Marquee tool to crop out the extraneous edges of the original scanned photo, creating new, clean edges.
STEP 5 – ADMIRE YOUR RESULTS
Rescuing a memory is always gratifying. I never knew the people in this photo, but I know that without them I wouldn’t be here. That alone makes the time spent restoring this photo well worth it. With a little practice, edits like this will become a streamlined process. Don’t be afraid to try it.
Post originally from: Digital Photography Tips.
Check out our more Photography Tips at Photography Tips for Beginners, Portrait Photography Tips and Wedding Photography Tips.
Wieder einer dieser unzähligen, unsäglichen Ratgeber, die Meisterhaftigkeit versprechen, in Wahrheit aber nur des Lesers Bestes wollen: Sein Geld? Um dann so schnell zu veralten, dass der Wald weint, dessen Bäume dieser Redundanz zum Opfer fallen?
Nun, dass wir dieses Buch schon zwei Mal in unserer Adventskalenderaktion verlost haben, will etwas heißen. Also schauen wir doch einmal, was sich unter seinem quadratischen Deckel verbirgt.
Wer den Blick durch den Schachtsucher auf die Mattscheibe einer 6×6-Mittelformatkamera kennt, versteht zunächst einmal die seichte visuelle Anspielung auf dem Cover. In fetten Lettern lesen wir spiegelverkehrt den Titel „Wie Bilder wirken“*.
Der Autor George Barr, Arzt und künstlerischer Fotograf in Personalunion, hat seine Bilder bereits mehrfach veröffentlicht und führt seit Langem einen Blog, in dem er über Fotografie schreibt und das Wissen weitergibt, das er sich über die Jahre angeeignet hat.
Mit diesem Buch geht es ihm aber nicht, wie man vermuten könnte, darum, mehr Augäpfel für seine eigenen Bilder zu gewinnen. Viel mehr hat er eine Sammlung von Bildern anderer Fotografen, die ihn selbst inspiriert haben, zusammengestellt und sich gewissermaßen auf kuratorisches Terrain begeben.
Jedes der 52 vorgestellten Fotos wird auf je einer Seite präsentiert und auf der gegenüberliegenden schildert Barr zunächst seine eigene Sichtweise und erläutert, was für ihn die Güte des Bildes ausmacht.
Auf der folgenden Doppelseite kommt dann der jeweilige Autor zu Wort und schildert in Ich-Form seine Sicht auf und Motivation für das präsentierte Bild, stellt sich anschließend mit einer kurzen Biografie vor und verrät, welche technischen Mittel er verwendet hat.
Im Folgenden nun eine kleine Auswahl der im Buch vorgestellten Bilder. Allen voran Joe Cornishs „Traigh Eias Barra“. Das Bild ist eine landschaftsfotografische Perle und eine kompositorische Wohltat, aufgenommen an einem schottischen Strand.
Mitch Dobrowners „Shiprock Storm“ zeigt die überwältigende Schönheit eines natürlichen Phänomens – eine Wolke scheint hier sanft auf dem schroffen Gipfel eines steilen Berges zu liegen.
Das Bild visualisiert durch die Nuancen in seinen Kontrasten und Tonwerten zwei sehr gegensätzliche Elemente in einem zarten symbiotischen Moment.
Kim Kauffmans „Fugue“ fasziniert dadurch, dass das Bild nicht eindeutig als ein Foto anmutet. Zu sehr scheinen hier die Grenzen zwischen Foto und Zeichnung zu verschwimmen.
In Wahrheit handelt es sich gewissermaßen um die zeitgenössische Interpretation eines Photogramms, einen kameralosen Direktscan gefalteter Papierbögen.
Gelungen finde ich, wie George Barr mit seiner Auswahl an vorgestellten Bildern ein weites Spektrum aufspannt, sowohl unter technischen Gesichtspunkten betrachtet als auch im Bezug auf ihre Genres – von Architektur und Stillleben über Portrait und Landschaft bis zu abstrakter Fotografie wie Konzeptionskunst ist alles vertreten.
Das Buch demonstriert die vielfältige Einsatzfähigkeit des Mediums Fotografie und die meisten der präsentierten Bildbeispiele sind in der Tat qualifiziertes Augenfutter.
Dazu kommt, dass man es nicht unbedingt linear durchlesen muss. Da es prima in visuelle Häppchen portioniert ist, lässt es sich auch ohne Weiteres bequem durcheinander lesen wie ein Blog.
Fazit: „Wie Bilder wirken“* ist also kein Nullachtfünfzehn-Ratgeber und kann jedem etwas geben, der qualitätvolle Inspiration für das eigene Schaffen sucht. Neu kostet das Buch 39,90 €.
* Das ist ein Affiliate-Link zu Amazon. Wenn Ihr darüber etwas bestellt, erhalten wir eine kleine Provision, Ihr zahlt aber keinen Cent mehr.


You must be logged in to post a comment.