RSS
 

Archive for July, 2013

Urban Apps: 13 Interactive City Maps, Tools & Guides

15 Jul

[ By Steph in Gadgets & Geekery & Technology. ]

Urban Apps Main

Chances are, even if you’re a lifelong resident of a particular city, you don’t know every nook and cranny, every food truck location, or the lore of every interesting local building. Apps for smartphones, tablets and other gadgets are making big urban centers feel smaller than ever, making it easy to catch a ride, find cheap eats, check out street art and make new friends.

Eat Cheap – Roaming Hunger

Urban Apps Roaming Hunger

Find out where your next meal is parked with Roaming Hunger, an app that shows real-time food truck locations in your area. The app not only displays the trucks on a map, with their hours at that location, but also allows you to sort results by meal, and browse menus. Additional apps are city-specific, like Street Food App, which currently shows schedules for Boston, Calgary, Edmonton, Ottawa, Toronto and Vancouver.

Maps and Travel Guides – City Maps 2Go

Urban Apps City Maps 2Go

Want access to maps while traveling abroad, without gobbling up roaming data or lurking in a spot that offers wi-fi? City Maps 2Go downloads maps for the cities of your choice for offline use, including millions of POI (restaurants, bars, hotels etc.), 500,000 Wikipedia entries for sites and attractions, and travel guides. It’s avaiable for iPhone, iPod touch and iPad.

Connect – MeetMe

Urban Apps MeetMe

Among the most popular apps to show you who’s nearby and looking to meet new people, MeetMe gives both social butterflies and the shy an easy way to connect. You’ll probably find more people looking to date than to make new friends, and it might be easier to just walk up to someone and introduce yourself than spend your time scrolling through photos, but hey – whatever works.

Avoid Your Friends – Hell is Other People

Urban Apps Hell is Other People

Maybe, instead of making new friends, you want to avoid the ones you already have. There’s an app for that, too. Hell is Other People will show you where your friends are based on check-ins on Foursquare, Facebook, Instagram and other networks, and provide ‘safe zones’ where you can hang out without being recognized. Of course, it only works if your contacts are avid users of social media, and you might find yourself relegated to unexpected places in the city.

Find Street Art – 1AM Mobile

Urban Apps Street Art

This free photo app called 1AM Mobile lets users pinpoint, share and discover street art in their own communities before it’s gone, as it often is within days or weeks of completion. Shoot photos of street art and the app will map them, date them and credit you as the photographer before sharing them worldwide.

Next Page:
Urban Apps 13 Interactive City Maps Tools Guides

Share on Facebook


[ By Steph in Gadgets & Geekery & Technology. ]

[ WebUrbanist | Archives | Galleries | Privacy | TOS ]


WebUrbanist

 
Comments Off on Urban Apps: 13 Interactive City Maps, Tools & Guides

Posted in Creativity


DxO Optics Pro 8.3 with Samsung NX, Go Pro, and smartphone support

15 Jul

opticspro8logo_large.png

DxO Labs has released version 8.3 of its Optics Pro RAW conversion and image correction software, adding support for the Samsung NX system, GoPro cameras, and the most popular smartphones. The Samsung models added are the NX10, NX11, NX20, NX100, NX200, NX210, and NX300, along with the EX-1 and EX-2 compacts. The GoPro HERO3 line (Black, Silver, and White editions), and the HD HERO2 are also now covered, along with the iPhone 4, 4S and 5, and the Samsung Galaxy S3 and S4 smartphones. Click through for the full press release, including download links.

News: Digital Photography Review (dpreview.com)

 
Comments Off on DxO Optics Pro 8.3 with Samsung NX, Go Pro, and smartphone support

Posted in Uncategorized


Photo Gift Ideas That Every Photographer Should Know About

15 Jul

When it comes to exchanging gifts with friends or family members, we really are spoiled for choice. Ironically, this abundance of novel ideas makes it near impossible to hone in on that one perfect gift for a loved one. Whatever you chose, it is always the thoughtful and personal gift ideas that are the most touching and well received. And Continue Reading

The post Photo Gift Ideas That Every Photographer Should Know About appeared first on Photodoto.


Photodoto

 
Comments Off on Photo Gift Ideas That Every Photographer Should Know About

Posted in Photography


Augenschmaus: Parmigiana di Melanzane

15 Jul

Ein Beitrag von: Krautkopf

In der italienischen Küche werden meist aus wenigen, dafür sehr aromatischen und frischen Zutaten unglaubliche Gerichte gezaubert, die dazu einladen, Leibspeisen zu werden. So auch das köstliche Parmigiana di Melanzane – ein einfacher, aber wundervoller Auberginenauflauf aus Süditalien, bei dem man am liebsten den Teller ablecken möchte.

© Susann Probst & Yannic Schon

Portionen: 2- 3
Zubereitungszeit: 75 Minuten

Zutaten

3 große Auberginen
1,5 kg frische Tomaten
100 g Parmigiano Reggiano
200 g Büffelmozzarella
1 Zwiebel
1 – 2 Knoblauchzehen
1 Handvoll frisches Basilikum
1 TL Honig
Olivenöl extra vergine
Salz, Pfeffer

© Susann Probst & Yannic Schon

Zubereitung

Die Auberginen in etwa 1 cm dicke Scheiben schneiden und mit etwas Salz bestreuen. Anschließend in eine Schüssel legen, mit einem Teller beschweren und für eine halbe Stunde ziehen lassen. Hiermit entziehen wir der Aubergine ihre Bitterstoffe.

Inzwischen die Tomaten häuten, vom Strunk befreien und in kleine Stücke schneiden. Knoblauch und Zwiebel schälen und klein hacken. In etwas Olivenöl anschwitzen, die Tomaten hinzugeben und zu einem Sugo einkochen lassen.

Mit Honig, Salz und Pfeffer abschmecken. In der Zwischenzeit können wir uns wieder den Auberginen widmen. Mit kaltem Wasser kurz abspülen und danach mit einem Küchentuch gut trocknen.

© Susann Probst & Yannic Schon

Im Originalrezept werden die Auberginen in Olivenöl ausgebacken. Um unser Parmigiana etwas leichter zu machen, braten wir sie aber ohne Öl von beiden Seiten in einer Grillpfanne an. Nun muss noch der Mozzarella in Scheiben geschnitten und der Parmesan gehobelt werden und dann kann das große Schichten beginnen:

In eine mit Olivenöl ausgepinselte Auflaufform legt Ihr als erstes eine Schicht Auberginen. Darauf kommt etwas Tomatensauce, einige Basilikumblätter, anschließend alles mit Parmesan bedecken und Mozzarella Scheiben belegen. So verfährt man, bis alle Zutaten aufgebraucht sind.

Die oberste Schicht Auberginen wieder mit Tomaten, Basilikum und beiden Käsen belegen und ab in den auf 200 °C vorgeheizten Backofen damit. Nach 30 – 35 Minuten, wenn Euer Parmigiana goldgelb gratiniert ist, haben sich alle Aromen zu einer wunderbaren Geschmacksbombe verbunden.

© Susann Probst & Yannic Schon

Fotorezept

Wir haben beide eine Ausbildung in Werbestudios gemacht und dort ausschließlich mit Blitzlicht gearbeitet. Seit wir selbstständig sind, fotografieren wir unsere Food- und Stillleben-Aufnahmen jedoch fast nur noch mit vorhandenem Licht. Dank großer Fenster und weißen Wänden bekommt man so – allein mit dem Tageslicht – ein schönes natürliches Licht. Hier und da haben wir einen Aufheller benutzt.

Um das rustikale Flair des Gerichtes zu unterstreichen, haben wir als Untergründe alte Holzbretter und grobe Stoffe gewählt. Hier darf auch mal gekleckert werden, um die Bilder möglichst authentisch aussehen zu lassen. Eben so, als säße man gerade ganz gemütlich mit Freunden und einer Flasche Rotwein zusammen. Damit die Farben der Zutaten richtig leuchten, ist alles in hellen Tönen gehalten.

~

Du hast auch ein leckeres Rezept und die passenden Food-Fotos dazu, die einem das Wasser im Munde zusammenlaufen lassen? Dann werde einfach selbst Teil von „Augenschmaus“!


kwerfeldein – Fotografie Magazin

 
Comments Off on Augenschmaus: Parmigiana di Melanzane

Posted in Equipment


Urban Fabric: Stretched, Stitched & Suspended Mobile Home

15 Jul

[ By WebUrbanist in Global & Urbex & Parkour. ]

fabric mobile urban home

Imagine rooms that expanded and compressed depending on occupancy, then stretch your mind to conceptualize a whole home that works the same way – it folds virtually flat then unfolds as you move through it.

fabric home nomadic urbanists

Thi sultra-slim temporary dwelling design, dubbed Cocoon by Tanya Shukstelinsky, is early-stage and essentially conceptual at this point. It is nonetheless compelling as an idea and prototype for nomadic urban explorers – a thin and lightweight way to slip oneself in between buildings or into other cracks in a city.

fabric hanging home design

A series of handholds and other slim elements are stitched into place to create horizontal and vertical spatial dividers as well as other essential domestic elements like stairs, seats, sleeping platforms … even a fillable bathtub. Then, of course, like a tent without poles, the entire structure can be packed up into a highly portable unit, too.

fabric temporary portable shelter

Giving a new, more literal meaning to the phrase ‘urban fabric’, the designer writes: “I came up with an idea for a space between two stitched layers of fabric. A person who lives in the space can move upon the stitches. The stitches are dividing the fabric into different areas – dining area, sleeping area and bath.” 

Share on Facebook


[ By WebUrbanist in Global & Urbex & Parkour. ]

[ WebUrbanist | Archives | Galleries | Privacy | TOS ]


WebUrbanist

 
Comments Off on Urban Fabric: Stretched, Stitched & Suspended Mobile Home

Posted in Creativity


6 Accessories to help you Improve your Landscape Photography

15 Jul

At the most basic level, all that you need to take landscape photographs is a camera and a location.  One of the reasons that landscape photography is so popular is that it is so accessible, without the necessity for the newest camera bodies or most expensive lenses.  You can pick up any entry-level DSLR and kit lens and be able to make great landscape images.

However, there are a few extra tools that, if included in your camera bag, will help you improve your landscape photography in terms of both your technique and resulting images.  Below is a selection of accessories that serious landscape photographers do not leave home without and the majority are cheaper than a basic kit lens.

1. Tripod

This has the potential to be the most expensive item on this list, but it is probably the most crucial accessory for every landscape photographer.  They come in all weights and sizes, and therefore costs, however a tripod can be key to ensuring you can capture sharp landscape images.  A lot of landscape photographs are captured at the beginning and end of the day, under low light conditions, meaning that it is not always possible to handhold the camera and still achieve shake-free images.  Also, a tripod is a good way of becoming more methodical in your approach to composing your landscape images, forcing you to slow down and critically assess the view through your viewfinder

2. Graduated ND Filters

Graduated neutral density (ND) filters are crucial for balancing the exposure between bright sky and dark land, overcoming the limited dynamic range of most DSLR sensors.  Generally, half of the filter is darker to reduce the amount of light allowed though across half of the frame.  Without them, if you expose for the sky the land will be in silhouette or if you expose for the land, the sky will be blown out.  You can use exposure bracketing to overcome this, however that will then require more time spent in front of a computer blending the multiple exposures.  Using graduated ND filters allows you to capture both the sky and land, correctly exposed, in one shot.

ND Grad fitlers

Graduated neutral density filters.  A ‘hard’ grad is shown on the left, a ‘soft’ grad is shown on the right.

Check out this recent article on the basics of choosing, buying and using graduated ND filters.

3. Hot shoe spirit level

Probably the cheapest accessory on this list, but a valuable tool none the less.  Just slide the spirit level in to the hot shoe to help ensure your horizons are perfectly level.  Some of the latest cameras now come with in-built level gauges, however they struggle to match the fidelity of an actual spirit level.

Hot-shoe spirit level

A three-axis hot shoe spirit level

4. Remote Shutter Release

A remote shutter release allows you to release the shutter, when your camera is on a tripod, without touching the camera and introducing any movement.  Also, as these remotes allow you to lock the shutter open, they are very useful if you want to make exposures over 30 seconds, using ‘bulb mode’.  In some instances, the remotes also have a digital display telling you how long the shutter has been open or a programmable timer mode so you can define the exposure length before taking the shot.

remote shutter release

Remote shutter release – if you avoid the official accessories from the big brands, you can find these relatively cheap on eBay.

5. Neutral Density Filters

Similar to the graduated filters mentioned above, however in this instance, the entire filter is of uniform density, meaning that light is blocked out across the entire frame.  You can get them 1-stop, 2-stop or 3-stop densities if you want to marginally slow the shutter speed for shooting waterfalls or introducing some movement, or you can get them as dense as 10-stops for seriously long shutter speeds.

10 stop neutral density filter

An example of the use of a 10-stop neutral density filter to achieve a long exposure time of 5 minutes

6. Polarising filters

Polarising filters are often used to increase the saturation of blue skies, however they are more useful in suppressing reflections from non-metallic objects, such as foliage or water.  This helps to increase the saturation of foliage, even on overcast days, and remove glare from the surface of any water in the scene, revealing detail below the waters surface.  An invaluable tool when shooting landscape scenes that include water.

Effect os using a polarising filter

A polarising filter was used to reveal the detail in the stones beneath the surface of the heavily reflective lake

The items above could almost be considered the essentials to go along with your camera and lens.  There are options that cater to all budgets meaning that you can build your self an effective landscape photographers toolbox without breaking the bank, and once you start using them, you will find you can exert much greater creative control over your landscape photography, and improve the images you make.

Post originally from: Digital Photography Tips.

Check out our more Photography Tips at Photography Tips for Beginners, Portrait Photography Tips and Wedding Photography Tips.

6 Accessories to help you Improve your Landscape Photography


Digital Photography School

 
Comments Off on 6 Accessories to help you Improve your Landscape Photography

Posted in Photography


Verbunden

15 Jul

Für seine Serie „Bounded by bounding colours“ suchte der italienische Fotograf Alessandro Polia Liebespaare. Mit Hilfe eines einfachen Farbstriches verband er das Paar miteinander und ließ den Strich an der Wand weiter verlaufen. Die Idee ist simpel, funktioniert aber hervorragend.

Die Paare haben sich vor Ort für ihre Lieblingsfarbe entschieden, eine Farbe, die ihre Liebe symbolisiert. Alessandro selbst hat sich ebenfalls zusammen mit seiner Freundin in der Serie verewigt. Wer davon er ist, verrät er allerdings nicht.

bounded by bounding colors © Alessandro Polia

bounded by bounding colors © Alessandro Polia

bounded by bounding colors © Alessandro Polia

bounded by bounding colors © Alessandro Polia

bounded by bounding colors © Alessandro Polia

Alessandro Polia ist eine Art Allroundtalent. Er arbeitet nicht nur als freier Fotograf, sondern auch als Art Director bei McCann. Nebenbei singt er in einer Rockband und ist Spielmacher in einem Basketball-Team.

Weitere seiner Bilder könnt Ihr auf seiner Homepage, bei Behance oder auf auf Facebook entdecken.


kwerfeldein – Fotografie Magazin

 
Comments Off on Verbunden

Posted in Equipment


14. Juli 2013

15 Jul

Ein Beitrag von: marcgrafie

Jenn


kwerfeldein – Fotografie Magazin

 
Comments Off on 14. Juli 2013

Posted in Equipment


Highest Steam: 9 Abandoned Railroad & Train Bridge Trestles

14 Jul

[ By Steve in Abandoned Places & Architecture. ]

abandoned train trestles
Durable by design and situated by necessity in difficult to access locations, train trestles are often all that remain when railroads are closed and abandoned.

Tallulah Falls Railway, Georgia

Great Locomotive Chase Tallulah Falls train trestles(images via: DukeWayne.com and Photography-On-The-Net)

Georgia’s Tallulah Falls Railway operated over a span of nearly 90 years – from September 1st, 1871 to March 25th, 1961. You may have seen the railway from your living room as it was featured in several films including 1951′s I’d Climb the Highest Mountain and the 1955 Walt Disney production, The Great Locomotive Chase. As well, 1972′s epic film Deliverance featured two of the main tourist attractions the Tallulah Falls Railway was built to serve: the waterfall at Lake Tallulah Falls and the scenic view from Tallulah Gorge. Guaranteed to make you squeal!

Tallulah Railway Georgia train trestle (image via: Je Kemp)

In order to keep trains running on the straight & level along the railway’s 58 mile stretch from Cornelia, Georgia to Franklin, North Carolina, more than 40 wooden trestles and one series of steel and concrete trestles had to be constructed. It’s little wonder the railway closed due to a mounting and unsustainable debt load. One of the railway’s now bridge-less steel and concrete trestles is shown above, courtesy of Flickr user Je Kemp.

Duluth, South Shore & Atlantic Railroad, Michigan

Marquette Michigan wooden abandoned train trestle (images via: Andy Larsen Photography and Beaded Heron)

A combination wood and steel trestle and pocket dock was constructed in 1931 to bring iron ore to ships waiting in Marquette, Michigan’s lower harbor. The dock officially closed on December 31st, 1971 when ore shipments were diverted to Escanaba and the railway, trestles and dock subsequently fell into disrepair. In the early 2000′s, redevelopment resulted in portions of the trestle and dock being demolished. Kudos to Beaded Heron who captured the wooden portion of the trestle standing in majestic solitude after the adjoining steel dock had been salvaged.

Denver, Northwestern and Pacific Railroad, Colorado

Rollins Pass Colorado Devils Slide train trestle (images via: Gather/Winston W and The Long Ranger/Justin Simoni)

In 1903 when the Denver, Northwestern and Pacific Railroad first laid rails across the Great Divide at Colorado’s 11,660 foot high Rollins Pass, it was hailed as a triumph of American railway engineering. Twenty-five years later, another engineering triumph – the Moffat Tunnel – negated the need for the Rollins Pass line and the rail bed was converted to accommodate road traffic.

Devils Slide Trestle train Colorado(image via: Colorado4x4.org)

Supported by the east and west Devils Slide Trestles, the route has been off-limits to cars and trucks since 1990 when a rock slide blocked the Needle’s Eye tunnel. Hikers and bikers are still allowed to cross the over-a-century-old wooden train trestles, though one might end up meeting the Devil himself should he or she take an unexpected slide.

Next Page:
Highest Steam 9 Abandoned Railroad Bridge Trestles

Share on Facebook


[ By Steve in Abandoned Places & Architecture. ]

[ WebUrbanist | Archives | Galleries | Privacy | TOS ]


WebUrbanist

 
Comments Off on Highest Steam: 9 Abandoned Railroad & Train Bridge Trestles

Posted in Creativity


How to use the new Radial Filter Tool in Lightroom 5

14 Jul

Radial Filter Before and After

Adobe PhotoShop Lightroom version 5 was released in June, and I’ve been digging into the new features. In this article I’ll share some tips for selective editing with the new Radial Filter tool.

The Radial Filter allows you to draw an ellipse around an area of an image, and apply edits to the area outside or inside the ellipse. This is a great technique for highlighting portions of an image.

Radial Filter Settings

Lightroom 5 Radial Filter Settings
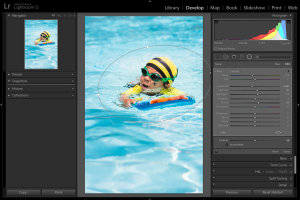
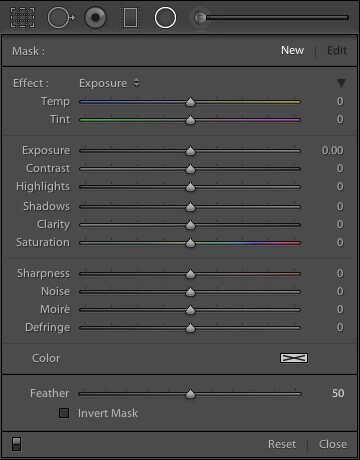
The Radial Filter tool in Lr 5 gives you the same set of standard adjustments as the Graduated Filter and Adjustment Brush. Note that this screenshot is from an image that is using the 2012 process. Read more about process versions here.
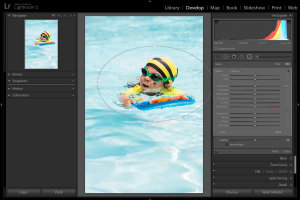
Keyboard Shortcut: Shift M

If you read my article on improving your Lightroom workflow, you’ll remember that I’m nuts about keyboard shortcuts. The shortcut for accessing the Radial Filter tool is Shift M. Just remember that the shortcut for the Graduated Filter is M, so Shift M makes sense for the new Radial Filter. After all, if you took a Graduated Filter, and curled it into a circle, you’d have the new Radial Filter tool.

Using the Radial Filter Tool

In the above photo of my son enjoying a summer day at the pool, I used the Radial Filter to make the water a little darker, and a little more blue, without changing the exposure or white balance over the subject. This has the effect of emphasizing the subject by making him brighter and warmer than the rest of the image.

Lightroom 5 Radial Filter Usage
1. Select the Radial Filter tool and draw an ellipse around the subject. Start by clicking at the center of the subject, and dragging outwards.

Lightroom 5 Radial Filter Usage
2. If necessary, rotate the ellipse. Hover your mouse just outside the ellipse until the cursor changes to that rotation indicator thingy, then click and drag.

Lightroom 5 Radial Filter Usage
3. Apply the desired settings. In this example, I’m cooling the white balance, reducing exposure, and increasing contrast, highlights, and clarity. Increased clarity often make water look more interesting by bringing out the reflections.

Lightroom 5 Radial Filter Usage
4. Feather the adjustment. Feathering the adjustment is important to ensure your image looks natural, not “Photoshopped.” Feature is 50 by default, I’ve found that for more image, I like it around 85 or so. Note that after increasing the feather, you may need to back and increase the size of the filter.

Inverting the Mask

Lightroom 5 Radial Filter Usage
When the Invert Mask box is not checked, your edits apply to the area outside the ellipse. If you check the Invert Mask box, your edits apply to the area inside the ellipse.

Conclusion

By varying the exposure, contrast, and white balance of the subject, relative to the setting, you can direct the viewer’s gaze and increase the impact of your photo. I hope this simple example has given you some ideas of how to incorporate the new Radial Filter tool into your workflow. I appreciate feedback, please comment below or feel free to connect with me through Facebook or Google+. I’ll do my best to answer questions and reply to comments.

Post originally from: Digital Photography Tips.

Check out our more Photography Tips at Photography Tips for Beginners, Portrait Photography Tips and Wedding Photography Tips.

How to use the new Radial Filter Tool in Lightroom 5


Digital Photography School

 
Comments Off on How to use the new Radial Filter Tool in Lightroom 5

Posted in Photography