RSS
 

Archive for June, 2013

Five Ways to Get In with the Photo Community

21 Jun

[Today’s guide comes from rad photographer and Photojojo buddy, Helena Price!]

If you’re a photographer or aspiring photographer-to-be, building community with other photogs is an essential part of getting your work noticed and building your name in the photo world.

Before being a full-time freelance photographer, I built communities for companies and products for a living, and I’ve been an active part of communities ranging from tech to food to photography.

I’ve distilled down everything I’ve learned over the years into the five fundamental ways to start building and connecting with a photo community.

What is the “photo community,” you ask? It’s however you define it. It’s a big social web of photographers, both online and offline, who know each other, inspire each other, and help each other make the best work they possibly can.

You should most definitely be a part of it, and here’s how.

How to Connect with the Photo Community

p.s. Wanna boost your creativity? Our pals at Maine Media are offering some way cool photography and filmmaking workshops designed for just that.

1) Do some research.

before There are many kinds of photo communities out there, big and small. It’s up to you to decide what part of the photo community you’d like to surround yourself with and why. Is it pro photogs with big fancy cameras? Is it Instagrammers? Is it people in your own town? People who love photographing food, or skateboarding, or music? Go after whatever interests you the most, and see where it takes you.

2) Find your inspiration.

beforeThe easiest way to do this is on the interwebs. Follow folks who create work that inspires you. How to find them, you ask? There are many ways, ranging from googling “awesome food photographers,” to browsing Tumblr’s photographer spotlight or Instagram’s suggested user list. Subscribe to their feeds, watch the way they create and post their work, and take good notes.

3) Go make some stuff.

before For every moment you spend networking, you need to spend double the moments making things. Your photo inspirations are who they are because of the work they’ve created, so go take that inspiration and make some work of your own. By constantly improving and sharing your craft, you’re constantly increasing the likelihood that other people will find and like your work too.

4) Support others.

beforePhoto karma is real. In all communities, what you put in will often dictate what you receive down the line. Go like people’s work. Leave genuine, attentive, supportive comments. Don’t post asking for likes or follows, because that’s not what this is all about (and if you haven’t realized by now, people really hate that). Help people spread the word about their projects and exhibitions. If you’re a supportive member of the community and making great work of your own, people will notice you and you’ll soon find support coming back your way.

5) Reach out and say hi.

beforeThe easiest way to connect with people in the photo community is to simply send them a note. Find three (or more!) people whose work you love, send them an email/message/comment, and tell them you dig their work. But not in a “I love you FOLLOW ME CHECK OUT MY GALLERY” kind of way. In a genuine, I’m-not-asking-anything-in-return kind of way. You will not only make the recipient’s day, but that person will likely remember your name for a long time to come.

Have any other tips to add? Tweet them at us at @photojojo!

Related posts:

  1. 10+ Awesome Ways to Upcycle Vintage Photo Gear Extra photos for bloggers: 1, 2 They say one man’s…
  2. Two Great Ways to Publish Your Own Magazine June’s Photojojo made possible by… ~Have a cool photo product…
  3. Ten Ways To Look Fabulous in Pictures Photojojo is hiring! We’re hiring!Photojojo is looking for a creative,…


Photojojo

 
Comments Off on Five Ways to Get In with the Photo Community

Posted in Equipment


Secret Speakeasy: Abandoned Water Tower Nightclub in NYC

20 Jun

[ By WebUrbanist in Culture & Cuisine & Global. ]

secret water tower bar

New York has a long history of hidden and illicit venues – one that did not stop when prohibition was lifted. There is the innocuous pizza shop where dialing the right number in their phone booth lets you through a secret door into the pub. Or the various hole-in-the-wall places where you add your number to a wait list and hope for a call. And then this, the now-defunct bar inside an abandoned water tower in Chelsea.

secret speakeasy new york

Per the New York Times (images by Benjamin Norman), “The Night Heron was an invitation-only nightclub held illegally in a water tower atop a vacant building in Chelsea.” Guests had to make their way through a deserted building, then climb up a ladder to reach their destination.

secret hidden room bar

All-nighters were common for this bustling little sweet spot, with last guests being let in as late as three in the morning. Live music reverberated within the wooden slats of the tightly-packed circular interior, with bottles of whisky reinforcing the retro (albeit a bit hipster) vibe of the whole affair. Alas, all good things must come to an end – particularly when they are a little less than legal in the first place.

Share on Facebook


[ By WebUrbanist in Culture & Cuisine & Global. ]

[ WebUrbanist | Archives | Galleries | Privacy | TOS ]


WebUrbanist

 
Comments Off on Secret Speakeasy: Abandoned Water Tower Nightclub in NYC

Posted in Creativity


20. Juni 2013

20 Jun

Ein Beitrag von: Roger Albani

Treppe © Roger Albani


kwerfeldein – Fotografie Magazin

 
Comments Off on 20. Juni 2013

Posted in Equipment


Just Posted: Ricoh GR Review

20 Jun

GR.png

Just Posted: Our review of the Ricoh GR, compared with the Nikon Coolpix A. We’ve already reviewed the conceptually similar Nikon Coolpix A and concluded that in some respects it was it out-gunned by the Ricoh, so what does that mean for the GR? We’ve delved into the Ricoh’s menus to get to grips with what it’s capable of and explored a range of its interesting features. Read our comparative review to see how it performs and what we concluded about the Ricoh.

News: Digital Photography Review (dpreview.com)

 
Comments Off on Just Posted: Ricoh GR Review

Posted in Uncategorized


20 June, 2013 – Wide Angle Options for Sony NEX

20 Jun

Just published today is our latest report – Wide Angle Options for Sony NEX, by Rich Kattlemann. There are more alternatives than you might think.


The Luminous Landscape – What’s New

 
Comments Off on 20 June, 2013 – Wide Angle Options for Sony NEX

Posted in News


Cosina says Voigtländer Nokton 42.5mm F0.95 will be available in August

20 Jun

nokton_42-5mm_0-95.png

Cosina has announced that its Voigtländer Nokton 42.5mm F0.95 will be available in August, and will be priced at ¥123,900 in Japan. This ultra-fast short telephoto ‘portrait’ lens is for Micro Four Thirds cameras only, and will offer similar photographic characteristics to an 85mm F1.9 lens on full frame in terms of angle of view, depth of field control, and background blur. It has a 10-bladed diaphragm, and features manual focus and aperture operation – the latter can be made clickless for movie recording.  

News: Digital Photography Review (dpreview.com)

 
Comments Off on Cosina says Voigtländer Nokton 42.5mm F0.95 will be available in August

Posted in Uncategorized


Wüste Landschaften in der Al Rob‘a al Kali

20 Jun

Ein Beitrag von: Mark Robertz

Sand, Sand, Sand und noch einmal Sand – soweit das Auge reicht. Die „Al Rob‘a al Kali“ oder kurz Rub genannt, steht für das „Leere Viertel“. Sie gilt als die größte Sandkiste der Welt. Die Wüstentour führte durch die omanischen Ausläufer der Rub im Südosten der Arabischen Halbinsel und gewährt Einblicke in die morgenländische Landschaft zwischen Moderne und Tradition.

Oman © Mark Robertz

Auf dem Weg in die Wüste

Mit dem Geländewagen starten wir, nach einem Abstecher auf den Suq am darauffolgenden Morgen, in der Hauptstadt Muscat, am Arabischen Meer. Als Landschaftsfotograf begleitete ich im Dezember 2012 für den Münchner Wüstenspezialisten Bedu Expeditionen eine Reisegruppe mit ihren Geländefahrzeugen in die Rub. Wüste ist in dem Sinn zwar kein Neuland für mich, allerdings bin ich aus der arktischen-eisgeprägten Wüste Spitzbergens andere Temperaturen gewohnt.

Ich bin optimistisch und lasse mich in den kommenden Tagen überraschen. Auf abenteuerlichen Pisten folgen wir dabei historischen Handelsrouten, vorbei an Siedlungen, deren Grundmauern bereits Jahrtausende vor Christ Geburt gesetzt wurden. Durch das Hadschar-Gebirge (was übersetzt das Steingebirge bedeutet) nähern wir uns der Rub entlang der Grenze zu den Vereinigten Arabischen Emiraten.

Oman © Mark Robertz

Die letzten Siedlungen liegen bereits einige Autostunden hinter uns, während wir hier und da Ölfelder am Rande der Piste passieren. Am späten Nachmittag erreichen wir die ersten Dünenfelder. Während unser Guide sich mit dem einheimischen Fahrer um das Lager und ein Abendessen kümmert, genießt jeder von uns auf seine Art die faszinierende Stimmung in dieser Parallelwelt.

Ich schnappe mir meine Fotosachen und mache mich auf den Weg, den 40 Meter hohen Dünenkamm hinter uns zu erklimmen. Majestätisch erheben sich die farbenfrohen Sandberge. Je nach Blickrichtung präsentieren sich die Sandstrukturen in den unterschiedlichsten Farbnuancen. Die Sonne im Rücken erleuchtet alles rot, während mit dem Blick Richtung Sonne den Sand farblos weiß erscheint. Bei seitlichem Licht leuchten die Dünen in einem satten Orange.

Oman © Mark Robertz

Die kommenden Tage eröffnen uns ungeahnte Einblicke fernab menschlicher Siedlungen. Wir genießen die nächtliche Stille unter dem großen Sternendach. Wer Lust hat, zählt die Sternschnuppen beim Einschlafen allein auf (s)einer Düne und lässt sich morgens von den ersten Sonnenstrahlen wecken.

Ich baue mein Stativ samt Kamera etwa 15 Minuten vor Beginn der blauen Stunde in der Morgendämmerung auf einem der umliegenden Höhenzüge auf und versuche, die Schatten der vergangenen Nacht mit dem ersten Tageslicht zu fotografieren.

Im Allgemeinen nutze ich während der Wüstenreise wie gewohnt die Dämmerungsphasen zum Fotografieren. Hier besteht am ehesten die Chance auf einzelne Wolkenzieren, damit der unendlich weite, blaue Himmel nicht so leer wirkt.

Die Mittagsstunden zählen, wie zu Hause, mit ihren harten Kontrasten nicht zu meinen liebsten Lichtsituation. Dennoch zücke ich die Kamera, um die ungewohnte Weite als Motiv mitzunehmen.

Oman © Mark Robertz

Nutze ich für gewöhnlich wann immer möglich ein Stativ, arbeite ich im Wüstensand überwiegend aus der freien Hand. Das Stativ, samt Fernauslöser sowie verschiedener Filter, kommt erst in den Dämmerungsphasen zum Einsatz. So kann ich in den Fahrstopps zügig auf mögliche Motive reagieren.

Oman © Mark Robertz

Der Weitblick durch die Wüste, ganz gleich ob in der Ebene oder hoch oben auf der Düne, alles überblickend, lädt geradezu zur Panoramafotografie ein. So entstehen einzeilige Panoramen bestehend aus zwischen 12 und 29 hochformatigen Einzelaufnahmen. Mal aus der Hand, dann wieder vom Stativ. Einziger Wermutstropfen: Das nachträgliche Entfernen der Sensorflecken, denn die vermehren sich mit jedem Objektivwechsel natürlich unweigerlich exponentiell.

Zurück in der vielgeschätzten Zivilisation galt unser Augenmerk als erstes einer warmen Dusche. Zu dritt ziehen wir gegen Abend in die Stadt und gönnen uns einen Besuch beim Barbier: Einmal rasieren mit anschließender Kopf- und Gesichtsmassage. Ein arabischer Genuss, auf den niemand von uns verzichten möchte.

Auf dem Weg zurück zum Flughafen in Muscat erkunden wir das Plateau am Al Jabal al Akhdar, stoßen auf verlassene Bergdörfer und Gärten mit ihren Faladsch, den traditionellen Wasserversorgungen. Am Flughafen angekommen, lassen wir bei einem Kaffee die vergangenen Tage Revue passieren.

Wir durchquerten schroffe Gebirgszüge sowie tiefe Schluchten auf unbefestigten Pisten, erkundeten uralte arabische Lehmfestungen mit ihren Verteidigungsanlagen ebenso wie wir uns durch das Treiben der Suqs bewegten. Die unendliche Weite der Rub allerdings hat uns völlig in ihren faszinierenden Bann gezogen.

Es kommt uns vor wie ein Märchen aus eintausendundelf Nächten. So schön könnte die Arbeit eines Landschaftsfotografen immer sein, auch als begeisterter Nordlandfan …

Oman © Mark Robertz

Wissenswertes zum Reisen im Sultanat Oman

Zu erreichen ist das Sultanat im Direktflug mit Oman Air von München oder Frankfurt (sieben bzw. acht Flugstunden) aus. Die Gepäckrichtlinien sind mit 30 Kilogramm (auch auf mehrere Taschen verteilt) recht großzügig bemessen. In Muscat angekommen, finden sich in der Flughafen-Vorhalle alle bekannten Autovermietungen. Wer Touren abseits der Asphaltstraße plant, benötigt zwangsläufig einen Allrad!

Die Zeitverschiebung beträgt drei Stunden (Gulf Standard Time, GST). Wer für die GPS-Nutzung die Kamerazeit umstellt, wählt die Zeitzone „Abu Dhabi, Muskat“. Diese beträgt vier Stunden Vorsprung.

Das Wüstenklima bietet für (m)ein mitteleuropäisches Temperaturempfinden von Mitte November bis Anfang bzw. Mitte März je nach Region angenehme 24 – 33 °C. Die Nachttemperaturen können in der Wüste bis auf ca. 5 °C absinken. Wer einen Abstecher in die Hochlagen des Hadschar-Gebirge um den Al Jabal al Akhdar oder Jabal Shams einplant, sollte auf alle Fälle warme, winddichte Oberbekleidung mitnehmen.

Hier können die Nachttemperaturen durchaus in den Minusbereich abfallen. Autofahren im Oman ist im Vergleich zu anderen arabischen Ländern sehr gesittet, ja fast schon rücksichtsvoll. Wichtig bei der Mietwagen-Reservierung ist, auf die enthaltene Kilometerpauschale zu achten. Entgegenkommend sind die Benzinpreise. Für 80 Liter Super bezahlten wir im Schnitt unter 20 €.


kwerfeldein – Fotografie Magazin

 
Comments Off on Wüste Landschaften in der Al Rob‘a al Kali

Posted in Equipment


How to Create a “Soft Portrait” Preset in Lightroom 4

20 Jun

Introduction

The following is an excerpt from the SLR Lounge Lightroom Workflow System Workshop on DVD, a system designed to increase your post production speed by 5 to 10 times! Click here to learn more.

A portrait image includes a subject (Usually their faces) as the primary focus. When we edit portraits, we do not want to sharpen fine details too much as this will of course enhance pores and blemishes on the skin. Instead, we want a soft, gentle look for our portrait images.

In this tutorial, we will show you how to create a “Soft Portrait” preset in Lightroom 4. This preset will make our portraits more flattering, because we will tell it to smooth out the highlights in our images, and reduce the appearance of imperfections on skin and other semi-smooth surfaces. This “Soft Portrait” preset is the same preset we use at Lin & Jirsa Photography to fit our needs for wedding and portrait photography, however you may want to change some of the settings to fit your own personal style. We hope that the tips in this tutorial will help you develop your own style of editing portrait images!

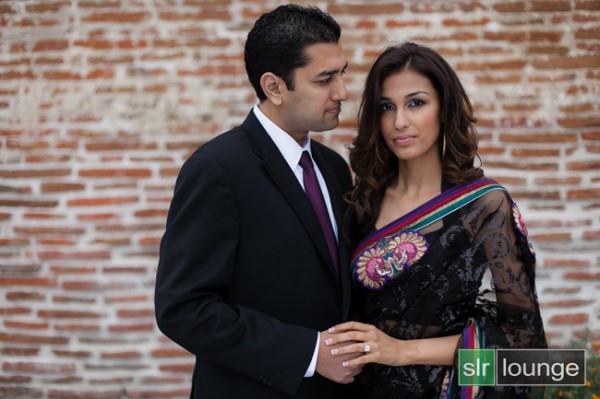
For this tutorial, we will use this standard portrait as our example.

origina 650

The Standard Import Preset Settings

For this tutorial, first select a basic standard portrait that you would typically shoot. Make sure that the portrait you choose is properly exposed with an accurate white balance, as an incorrectly exposed image will cause the preset to mis-represent the average photo you take.

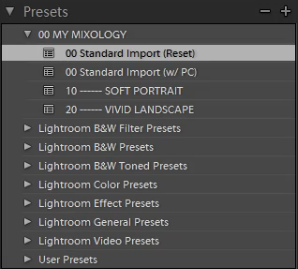
Whenever you create a new preset for something specific such as protraits, we recommend that you start with another, standardized preset that has settings similar to what you’re going for in this image. So for example, we will select our original “Standard Import” preset to help us create the “Soft Portrait” preset.  For more information on how we created our “Standard Import” preset, click HERE.

We will base the “Soft Portrait” Standard Color Preset off of the Standard Import Preset, so we have selected “00 Standard Import (Reset)” in our Presets Panel. The Presets Panel can be found on the left of the Lightroom Develop module.

02-ligthroom-4-standard-import-preset

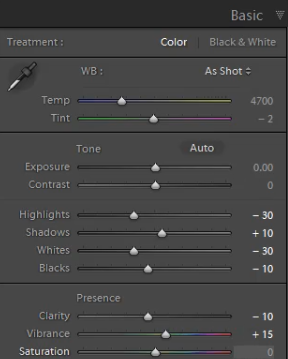
If you do not have the Standard Import Preset, these are the settings for it. Simply dial in these exact settings in the Basic Panel. To expand and collapse the Basic Panel, press “Ctrl + 1.”

03-lightroom-4-standard-import-preset-settings

Basic Panel Adjustments

Next we need to adjust the Basic panel settings to create the “Soft Portrait” look that we’re going for. Reduce the Highlights to -30. With the Shadows, bring them down to +10. Decrease the Whites to -30 and raise the Blacks to -10. These settings will smooth out the overall highlights in the portrait. Next, adjust the Clarity down to -10 to really smooth over the larger, harsher detail tones and to smooth out things like skin tones. Do not pull the Clarity down too much, because you will eventually lose important details in your portrait and create a “painted” or “smudged” look.

For Vibrance, we will leave it at +15. You can choose the amount of Vibrance to fit your own style, but we recommend not adding additional Vibrance if your portrait already has too much color in the skin. A high amount of Vibrance adds color to the skin which can make the portrait look unflattering, especially in mixed lighting!  Sometimes, if your images are too clear and crips, you may want to dial the Vibrance down as far as -10 or so.

Your Basic Panel adjustments should look similar to the settings below.

04-lightroom-4-soft-portrait-standard-color-preset-basic-panel-settings

Tone Curve Adjustments

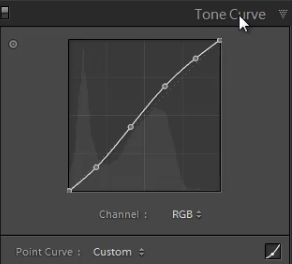
Next, we are going to adjust the Tone Curve in the Tone Curve Panel. To expand and collapse the Tone Curve Panel, press “Ctrl + 2.” To boost the overall contrast in the portrait, create a slight S-Curve. We recommend having at least 4 points on the Tone Curve so that you can control every quadrant. From left to right, these points will provide secondary control of your Blacks, Midtone Shadows, Midtone Highlights and Whites.

To create the slight S-Curve, pull down the Blacks a little bit, then pull up the Midtone Shadows and the Midtone Highlights. Finally, pull the Whites slightly down and to the right. Your Tone Curve should look similar to the one below, but feel free to adjust these points to fit your style.

05-lightroom-4-tone-curve-adjustments

Detail Panel Adjustments

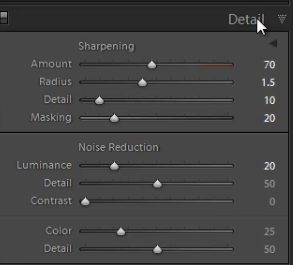
To expand and collapse the Detail Panel, press “Ctrl + 5.” The Sharpening settings from the Standard Import preset should be good enough for your portrait, but always zoom into the subject’s face to make sure everything looks fine. If you find that skin tone is a little too “crunchy”, consider dialing down the Detail slider before the actual Amount.

Next, adjust the Noise Reduction settings. Bring the Luminance up to 20. Do not bring up Luminance too high as this will once again kill detail in your image. However a conservative amount is helpful, even for images captured at your lowest ISO.

Setting Luminance to around 15-20 maximum creates a nice softening effect, especially over the pores of skin, while leaving major detail (such as eyelashes, etc.) intact. Even though the Luminance Noise Reduction is a minor adjustment, it plays a very important role in helping to smooth out the skin tones in a portrait.

(Of course if you’re shooting your portraits at higher ISO’s for whatever reason, you may need to increase this slider even higher!)

06-lightroom-4-detail-panel-adjustments

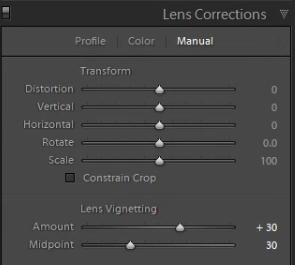
Lens Corrections Adjustments

To expand and collapse the Lens Corrections Panel, press “Ctrl + 6.” After adjusting the Noise Reduction settings, we need to check the vignette of our portrait. The vignette refers to the darkness or brightness of the edges of an image. If you want to apply a faint amount of vignetting correction in general, we can leave the Lens Vignetting settings from the Standard Import Preset.  (Of course some photographers like to add vignetting to portraits, so this is going to be a subjective decision!)

07-lightroom-4-lens-vignetting-adjustments

Saving the “Soft Portrait” preset

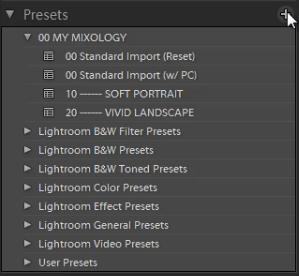
Now that we have finished dialing in the settings for the “Soft Portrait” preset, we need to save this preset. First, click on the “+” sign in the Presets Panel.

08-lightroom-4-create-new-preset

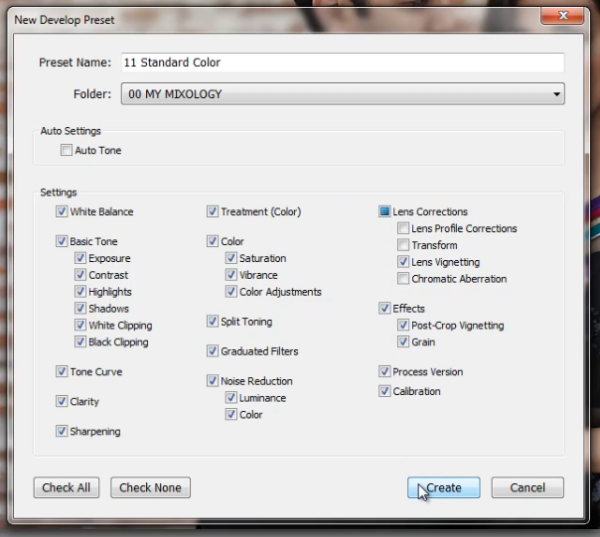
The New Develop Preset dialogue box will appear; name the preset “11 Standard Color.” Select “Check All” to select all the settings. However, make sure that “Auto Tone” has not been selected. Next, un-check “Lens Corrections,” “Lens Profile Corrections,” “Transform,” and “Chromatic Aberration” because we do not want to sync these specific settings across every portrait we have.  (We recommend creating separate presets to manage those settings.)

Press “Create” once you are done. Your New Develop Preset Dialogue Box should look like the one below!

09-lightroom-4-new-develop-preset-settings

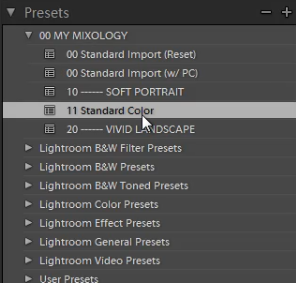
As you can see below, it may be a good idea to organize your presets by numbers, two or three digits is usually enough.  Either way, the goal is to have these default-related presets appear up towards the top.

10-lightroom-4-presets-panel-standard-color-soft-portrait-preset

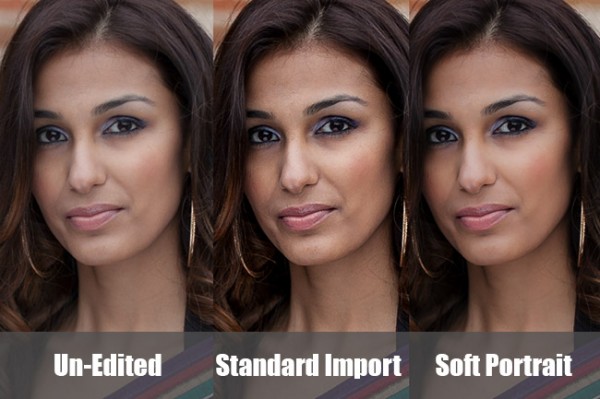
This is what our final image looks like with the “Soft Portrait” Standard Color Preset applied.

soft portrait 650

Below you can see a cropped comparison of the original un-edited image in it’s muted, RAW state, as well as the “Standard Import” and “Soft Portrait” presets for comparison:
side-by-side

Conclusion

Once again, the goal with creating a preset such as this is to minimize the amount of work we need to do on a per-image basis.  With a preset like this, in theory you should be able to breeze through a portrait session doing batch corrections to settings such as White Balance and Exposure, only pausing here and there to tweak other settings individually.

It will take time to fine-tune the preset to your own personal taste, however this general rule can help:  If you find yourself applying the same adjustment to more than 50-60% of your images from a certain type of photography, then that adjustment should be put into a preset!  It’s better to perform slight changes on 20-30% of your images than to perform major corrections to 70-80% of your images!

The SLR Lounge Workflow System Workshop on DVD

The SLR Lounge Workflow System Workshop on DVD takes everything that we taught in the Lightroom 4 A to Z Workshop on DVD and builds by teaching you how to maximize your shooting and post processing efficiency and workflow. This 7 hour DVD covers data safety procedures, file management, culling standards and overall develop techniques to increase your post production efficiency by up to 15x! In fact, using this Workflow System we can cull and edit over 1,500 images per hour! Don’t believe us, watch the teaser video! The Workflow System is also available as a part of the Lightroom 4 Workshop Collection. To learn more, click this link.

Post originally from: Digital Photography Tips.

Check out our more Photography Tips at Photography Tips for Beginners, Portrait Photography Tips and Wedding Photography Tips.

How to Create a “Soft Portrait” Preset in Lightroom 4


Digital Photography School

 
Comments Off on How to Create a “Soft Portrait” Preset in Lightroom 4

Posted in Photography


Vattenfall, Greenpeace und interaktive Fotografie

20 Jun

Ein Beitrag von: Holger Weber

??Als wir die Anfrage von Greenpeace bekamen, ein Kubikfoto zum Thema Braunkohletagebau zu produzieren, war das natürlich extrem cool. ?Man denkt sofort an riesige Maschinen, gigantische Löcher in der Landschaft, trashige Dörfer und skurrile Bewohner – ein gefundenes Fressen für jeden Fotografen!? Da unsere Produktionen extrem konzeptabhängig sind und jede Szene mit anderen Szenen verknüpft werden muss, steht vor der Fotografie (ja, ist natürlich immer so) sehr pingelige Recherche.

Kubikfotos sind übrigens auf Fotos und Film basierende, wirklich interaktiv erlebbare Welten, durch die sich der Betrachter nahezu frei bewegen kann. Wir haben dafür ein eigene Software entwickelt, die es uns erlaubt, auch sehr große und komplexe Projekte zu realisieren und alles an Funktionalitäten des Web 2.0 einzubinden.

Aber zurück zum Anfang. Da Greenpeace ebenfalls extrem genau und wahrheitsgemäß arbeiten muss, verbrachten wir die ersten Tage vor dem Rechner, dann weitere Tage vor Ort, um zu gucken, wo man was fotografieren kann, welche Leute etwas sagen wollen und wie das Thema überhaupt aussehen kann.

?Und plötzlich waren da keine tollen riesigen Maschinen mehr, sondern stählerne Monster, keine gigantischen Löcher, sondern die totale Zerstörungen einer wunderschönen Landschaft, keine trashigen Dörfer, sondern uralte gewachsene Kulturen und keine skurrilen Bewohner, sondern liebenswerte Menschen, die um ihre Heimat kämpfen müssen und das gegen die Regierung, eine steinreiche Lobby und die Behörden.

© Holger Weber
Der Tagebau Welzow-Süd, ein Ende der Grube sucht man am Horizont vergeblich.

Vattenfall © Holger Weber
Kein Tornado. Diese Katastrophe ist dauerhaft, allein in den drei Kraftwerken in der Lausitz werden jährlich über 52 Millionen Tonnen Braunkohle zu CO2 verwandelt.

Welzow Süd  © Holger Weber
Kippengelände: Hier wird über viele Generationen kein Mensch mehr leben können.

© Holger Weber
Eines von vielen Dörfern, die durch den Tagebau zum Geisterdorf werden.

Atterwasch © Holger Weber
In Atterwasch wurde die Installation einer Solaranlage auf einem unter Denkmalschutz stehenden Gebäude nicht genehmigt – ist ja auch verständlich – allerdings soll das gesamte Dorf inklusive der über 700 Jahre alten Kirche nebst Friedhof dem Tagebau weichen.

Proschim © Holger Weber
Proschim setzt schon lange und voll auf nachhaltige Energien und kann mit Solar-, Wind- und Biogasanlagen komplett die umliegenden Dörfer und Städte mit Strom versorgen. Proschim kommt natürlich auch unter den Bagger. Nein, das ist leider kein Witz.

Nochten © Holger Weber
Der Tagebau Nochten mit dem Kraftwerk Boxberg. Was aussieht wie ein Acker sind mehrere Meter hohe und kilometerlange Kippenfurchen.

Jänschwalde © Holger Weber
Der Tagebau Jänschwalde. Würde man die Förderbrücke aufstellen, würde sie den Eiffelturm um 180 m überragen.

Verockerung © Holger Weber
Das Rot kommt nicht aus Photoshop, sondern zeigt die durch den Tagebau entstehende extreme Verockerung, die sich auf den Spreewald zubewegt und alles Leben im Fluss über Jahrzehnte vernichtet.

Weißwasser © Holger Weber
Mitten im Märchenwald: Der Weißwasserurwald. Die Naturfotografen werden ihn kennen. Wer ihn sehen will, kann das nur noch hier, weil …

© Holger Weber
… er direkt hinter uns abgeräumt wurde. Diese Eiche war locker 300 Jahre alt.

Warme Hände © Holger Weber
Schön warme Hände sind garantiert, wenn man mit Stahl- und Alustativen arbeitet.

© Holger Weber
Beim ersten Locationcheck bei -12 °C ohne Türen in der Cessna.

Betreten verboten © Holger Weber
Für einige der Bilder haben wir uns tief in das „Betreten verboten“-Gelände gewagt, aber die Mitarbeiter von Vattenfall haben uns meistens sehr großzügig übersehen.

?Die Produktion lief über ein gutes halbes Jahr mit mehreren Aufnahmeterminen vor Ort. Wir haben insgesamt 271.000 MB Rohmaterial und 12.550 Dateien produziert, die wir zu einer 80 Szenen, 350 Dateien und 264 MB umfassenden Welt zusammengebaut haben. Das Ergebnis ist jetzt unter www.braunkohle.info explorierbar.


kwerfeldein – Fotografie Magazin

 
Comments Off on Vattenfall, Greenpeace und interaktive Fotografie

Posted in Equipment


19. Juni 2013

20 Jun

Ein Beitrag von: Jan Weiss

© Jan Weiss


kwerfeldein – Fotografie Magazin

 
Comments Off on 19. Juni 2013

Posted in Equipment