RSS
 

Archive for May, 2013

Vertical Horizon: Urban Photographs Turn City Upside Down

08 May

[ By WebUrbanist in Art & Photography & Video. ]

vertical horizon hong kong

Hong Kong has to be one of the most-photographed cities on Earth, but these shots present a rarely-seen perspective by documentarians or pedestrians … unless they look straight up.

vertical urban photo shoot

From Vertical Art Space: “Romain Jacquet-Lagreze is a French graphic artist with a Masters in multimedia and art from East Paris University. His interest in photography began during his period of working in Los Angeles and Tokyo, and subsequently blossomed into a passion after his arrival in Hong Kong.”

vertical urban built environment

His Vertical Horizon series emphasizes the vast scale of tall structures, but also the “heterogeneous character” of the built environment – traditional alongside modern, scrappy versus refined, small set against large.

vertical city landscape photos

While some of his images are taken from the top down, or at an angle, many of the most powerful ones are straight-up vertical captures. Somehow, these more predictable approaches lack the striking gravitas of their deceptively-flat  cousins.

Share on Facebook


[ By WebUrbanist in Art & Photography & Video. ]

[ WebUrbanist | Archives | Galleries | Privacy | TOS ]


WebUrbanist

 
Comments Off on Vertical Horizon: Urban Photographs Turn City Upside Down

Posted in Creativity


Adobe Photoshop CC: What it means for photographers

08 May

shared:AdobeLogo.png

Yesterday’s announcement by Adobe that it will cease ‘perpetual license’ sales of Photoshop and its Creative Suite counterparts has generated considerable backlash here on dpreview and across the web. With such a significant change in store, we spoke today with Adobe VP of Creative Solutions, Winston Hendrickson for his response to the uproar.

News: Digital Photography Review (dpreview.com)

 
Comments Off on Adobe Photoshop CC: What it means for photographers

Posted in Uncategorized


How to Photograph a Steaming Cup of Coffee

08 May

Ever wanted to photograph a steaming cup of coffee?

Steaming Coffee 01

Maybe not – but it could be a fun little evening project to hone your skills.

Here’s a video from the team at Learn my Shot to show you how to do it.

Post originally from: Digital Photography Tips.

Check out our more Photography Tips at Photography Tips for Beginners, Portrait Photography Tips and Wedding Photography Tips.

How to Photograph a Steaming Cup of Coffee


Digital Photography School

 
Comments Off on How to Photograph a Steaming Cup of Coffee

Posted in Photography


Google Glass inspires etiquette guide and SNL mockery

08 May

Screen_Shot_2013-05-07_at_10.51.22_AM.png

While the sketch comedy television show Saturday Night Live mocked the awkwardness of Google Glass wearers this week, the Wall Street Journal offered up an etiquette guide for Glass wearers. Even Google’s Executive Chairman Eric Schmidt has warned we will have ‘develop some new social etiquette’ to accommodate the new technology. WSJ’s advice covers when and where to don the wearable tech, and more tips for early adopters. Read on at connect.dpreview.com. 

News: Digital Photography Review (dpreview.com)

 
Comments Off on Google Glass inspires etiquette guide and SNL mockery

Posted in Uncategorized


HTC One camera first look: Imaging features

08 May

htcone.png

After our recent Smartphone Super Shootout we are working full steam ahead toward our comprehensive camera review of the HTC One, the Taiwanese manufacturer’s new flagship smartphone which features a 4 ‘ultrapixel’ sensor, a fast F2.0 lens and optical image stabilization. Unti then, we offer up a close look at the new phone’s imaging features.

News: Digital Photography Review (dpreview.com)

 
Comments Off on HTC One camera first look: Imaging features

Posted in Uncategorized


Flying Penguins: Photography in Antarctica

08 May

King-Penguins-Passing-on-Beach.jpg

DPReview reader Eric Lew is a keen wildlife photographer, and recently returned from a trip to Antarctica. He shared some recollections, advice and photographs in a post on our forums, but we thought what he wrote was so good it deserved a wider audience. Click through for Eric’s 2-page article ‘Flying Penguins: Photography in Antactica’ and find out how you too can publish articles like this on dpreview.

News: Digital Photography Review (dpreview.com)

 
Comments Off on Flying Penguins: Photography in Antarctica

Posted in Uncategorized


7. Mai 2013

08 May

Ein Beitrag von: Daniel Stark

© Daniel Stark


kwerfeldein – Fotografie Magazin

 
Comments Off on 7. Mai 2013

Posted in Equipment


Odd-Wheel Wonders: 11 Novel Vehicles with 1 or 3 Wheels

07 May

[ By Delana in Technology & Vehicles & Mods. ]

odd wheeled vehicles

We’ve gotten accustomed to the idea of vehicles having two or four wheels. However, not all vehicle designers are so restrained in their ideas. All of these conveyances are unique because of their lack of the conventional wheel count, making do (and even making a scene) with just one or three.

The Leanster Motorcycle

leanster motorcycle

What’s the easiest way to make a motorcycle safer? Add one more wheel, of course. The Leanster from Brudeli Tech is a strange-looking bike that lets users make incredibly tight turns without the danger of falling over. The Leanster is somewhere between a motorcycle and a four-wheeled ATV, but somehow managers to look cooler than both.

UX-3 Commuter Unicycle

ux-3 unicycle

It wasn’t long ago that unicycles were reserved for the likes of circus performers. But this Segway-like motorized unicycle from Honda, called the UX-3, brings the unicycle firmly into the consumer market. It’s driven like a Segway, so all you have to do is sit down and lean slightly to tell it which way to go. It might take a little while to figure out how to ride the UX-3 without tipping over (or feeling like you’re about to), but once you master the trick you’ll never want to walk anywhere again.

Next Page:
Odd Wheel Wonders 11 Novel Vehicles With 1 Or 3 Wheels

Share on Facebook


[ By Delana in Technology & Vehicles & Mods. ]

[ WebUrbanist | Archives | Galleries | Privacy | TOS ]


WebUrbanist

 
Comments Off on Odd-Wheel Wonders: 11 Novel Vehicles with 1 or 3 Wheels

Posted in Creativity


Getting Landscapes Sharp: Focus Stacking

07 May

A key aspect of successful landscape photography is image sharpness.  Usually, it is desirable to ensure that all elements of a scene, whether close or far, are captured in sharp focus.  This can prove to be challenging and, if not achieved with the click of the shutter, cannot be corrected later during post processing.

One approach that is often taken is to use the smallest aperture available, e.g. f/22, to obtain the largest depth of field.  Whilst maximising the depth of field is a good intent, using such a small aperture will actually result in softer images due to an effect known as diffraction.

Most lenses are at their sharpest when used at apertures between f/8 and f/11 and whilst hypefocal focussing may allow you to capture an entire scene acceptably sharp in one image using these apertures; it is always still a compromise between a number of factors and there will be times when you cannot generate enough depth of field to capture a whole scene at optimum sharpness.

That is where focus stacking comes in.

Focus stacking is the technique of stacking (or blending) a number of images that have been focussed at different points throughout a scene to give a final image that contains the sharpest portions of the originals, seamlessly blended into one.  It isn’t as laborious as it sounds and can give really good results, rendering scenes far sharper than possible in just one exposure.

Focus Stack Initial Image

The initial image, shot at f/8, lacked front-to-back sharpness as there was not sufficient depth of field. ISO100, f/8, 2 secs

In the field…

As you will be stacking the images into one, aside from the point of focus, you want the individual photographs to be identical in all other respects.  Therefore, it is best to have the camera positioned on a tripod and use a remote release.

Using your optimum aperture (can easily be determined for a given camera/lens combo using focus charts, however you will most likely find that f/8 is a good starting point), take the required number of images focussed at different points throughout the frame.

A minimum of two images are required, i.e. one focussed for the foreground and one focussed for the background, however an additional third image, focussed for the middle ground can also be a good idea.

Focus stack comparison foreground

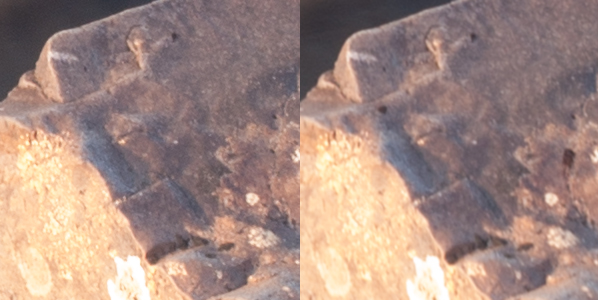
A comparison of a 100% crop of the foreground from two images, one focussed for the foreground (left) and one focussed for the background (right).  Both shot at ISO100, f/8, 2 secs.

Focus stack comparison background

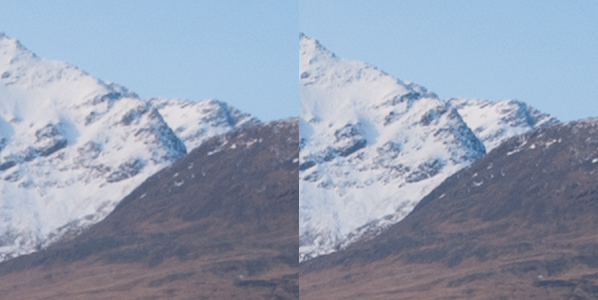
A comparison of a 100% crop of the background from two images, one focussed for the foreground (left) and one focussed for the background (right).  Both shot at ISO100, f/8, 2 secs.

Back at home…

Open the two images in Photoshop and create a new file that contains both images as different layers, in the one file (to make life easier, name the layers accordingly, e.g. near, far).

Select both layers and go to Edit > Auto-Align Layers to ensure both images overlay perfectly.  Select the ‘Auto’ option, and deselect the ‘Vignette Removal’ and ‘Geometric Distortion’ options.

Then select Edit > Auto-Blend Layers, and choose ‘Stack Images’, ensuring ’Seamless Tones and Colours’ is selected.

Focus stack auto blend dialog box

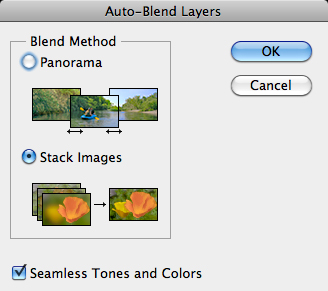
The Auto-Blend dialog box

At this point, Photoshop will determine the sharpest portions of each image to incorporate into the final image, and apply a mask to each layer.  Below you can see the layer masks applied to the two images.  In this instance, you can see the rocks in the lower portion of the image are the main area selected by the layer mask for the ‘near’ layer whereas the rocks in the middle distance and the background mountains are incorporated from the ‘far’ layer.

Focus stacks layer masks

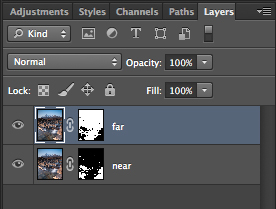
The automatically generated layer masks, applied to each layer, includes the sharpest portions of each layer (shown in white).

It is worth checking the image at 100% zoom to ensure that there are no strange artefacts caused by poor blending of any moving grasses or branches.  These can be fixed by manually painting white or black on to the relevant layer mask (remember: white reveals, black conceals).  For those using Elements, if you are only using 2 or 3 images, it is possible to do the blend manually using layer masks and white/black gradients.  In some instances, it actually gives better results, with fewer ‘blending artefacts’ to do the blend manually.

Once you are happy with the blend, merge the layers to give your final, focus stacked image.

Focus Stack final image

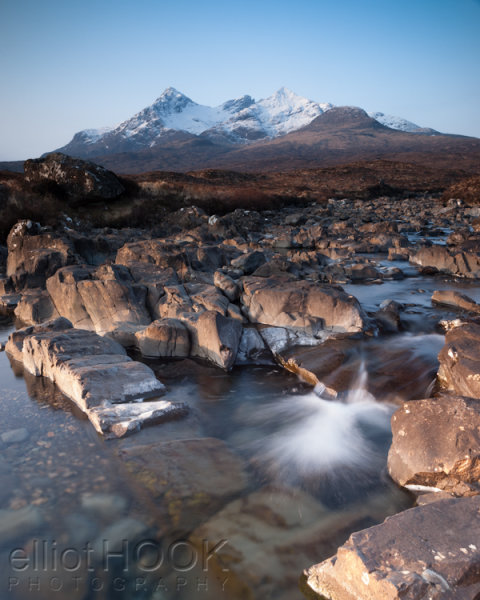
The final image with good sharpness from the foreground rocks right through to the mountains in the background

It may not be immediately apparent when showing images at web resolutions, but the difference in the overall sharpness when using optimum apertures and focus stacking is astounding when printing images.  To be able to focus stack, it only takes a little more forethought when out capturing the scene, and a few short processing steps when back at your computer so why not give it a go the next time you are out photographing landscapes.

Post originally from: Digital Photography Tips.

Check out our more Photography Tips at Photography Tips for Beginners, Portrait Photography Tips and Wedding Photography Tips.

Getting Landscapes Sharp: Focus Stacking


Digital Photography School

 
Comments Off on Getting Landscapes Sharp: Focus Stacking

Posted in Photography


A New Life by Carlos Urbina

07 May

First of all this is a very personal photo because he is my baby in his birth, I will not write anything of medical conditions, my wife or my personal feelings, I will try just narrate, if I can, an objective photographic feeling about taking this event. The truth is that it is very difficult taking this picture because I was totally scared, I had been in my other two sons births and I thought I could have some experience but the event transcended me again, First I had to attend the operating room rules you have to change your cloth and leave all your things in the changing room, I left even my lens cap, I set my Camera in time priority mode to 1/200 and set my ISO to 1600 and flash off I thought I was ready.

a-new-life-by-carlos-urbina

A nurse called me and instructed me to wash my hands, but without my lens cap the water splashed all over my lens, I tried to clean my lens with the coat but it was an awful clean, but there wasn’t time I entered the operating room and my wife was there with all the crew of doctors, I took my wife´s hand and I wasn´t able to be stable with one hand and all the stress and I was trying first of all not to be intrusive. On the other side, and also comes to mind that time I think the camera helps a lot because it gives me a “scenic task” and it made me to lose some stress thinking in the situation, but personal feeling transcends everything and I forgot about the photos and just thank God everything was fine.

Sunrise in my D day

The second image was taken I think 15 minutes after my baby´s birth I was alone in the hospital room, alone, euphoric walking side to side of the room and I went to the window and a beautiful sun was raising behind the trees joining me in my loneliness, but the sight from that building wasn’t so beautiful, so I switched to a 100-300 lens and shot bracketed pictures for taking as much sun as I could.
Sometimes, if not always, the events are much greater than the images, but the images are great keeping these events latent.

Photographer since 1993 also electronic engineer and actor, I was born in Mexico City in 1974 and I had traveled to different parts of Mexico seeking to discover its wonders.
http://www.flickr.com/photos/curbina74/

dslrBlog

 
Comments Off on A New Life by Carlos Urbina

Posted in Photography