In Part One of the Light Painting Tutorial I went over how to do the photography part: equipment, camera settings, set up, lighting, potential pitfalls, and step by step instruction on how to do light painting shots. In this article Part Two, we’re going to take a look at how to combine multiple exposures in Photoshop.
WHAT YOU’LL LEARN IN THIS TUTORIAL
- how to create one big layered file of all your images
- what layer settings to use to “turn the lights on” with each added image
- how to get rid of any unwanted areas of each image
- how to easily “dim the lights” on any shots that were too bright
- saving your final combined image as a masterpiece
Combining images in Photoshop is surprisingly quick and easy
What you need to do this:
- a series of images of the same subject, shot with the same angle of view (you didn’t move the tripod), with each image lit just a little differently
- Photoshop (CS or Elements) or some other photo editor that uses layers
- a basic knowledge of how to use layers, blend modes and masking in your photo editor
- a computer with good memory and speed – creating multi-layered documents can sometimes slow down your computer if you have an old processor, not enough RAM (put as much in as your computer will hold, I have 6gb and want more but I’m maxed on my 6 year old MacBookPro) or your hard drive is overly full (you want your hard drive never to go over 75% full max, otherwise it will bog down).
Note: if your computer is slow you may not need a new one: just upgrade your RAM and get a bigger hard drive or empty a bunch of stuff off and see if that helps.
STEP ONE OPENING YOUR FILES AS LAYERS
If you are using Adobe Lightroom, you can open your original files directly from Lightroom into Photoshop (wherever I mention Photoshop you can use CS, Elements or your usual editor that has layers capabilities). I do find however that if you are shooting Raw opening 12 or more Raw files into Photoshop really tends to bog it down. So in this case I have exported JPGs first and then opened those into Photoshop. If you are opening from Lightroom directly follow these steps:
- select all the images of your scene so they are highlighted
- right click on one of the thumbnails
- from the pop up menu choose “Edit in” and then “Open as layers in Photoshop” like shown below in Figure #1
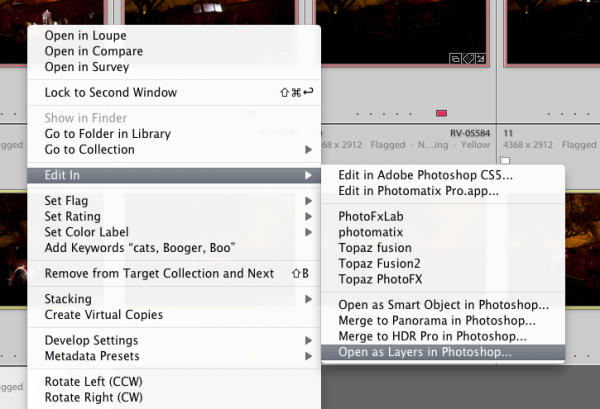
Figure #1
If you are using Photoshop you will follow almost the same steps using Bridge (or the mini browser where you can see your thumbnails)
- select all the images of your scene so they are highlighted
- go to the Tools menu
- select Photoshop > Load files into Photoshop layers (as shown below in Figure #2)
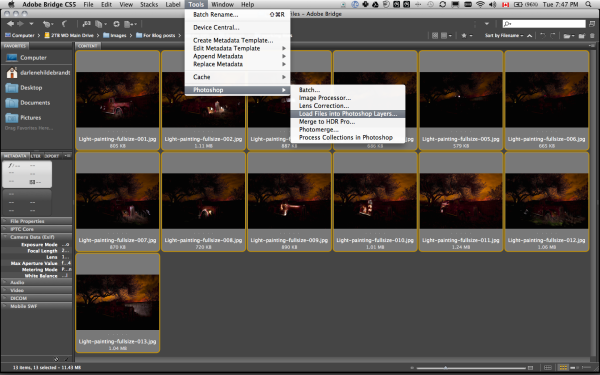
Figure #2
STEP TWO ALIGNING THE LAYERS
Once you have all your files opened as layers into one document in Photoshop you want to make sure they are perfectly aligned. If you used a tripod and it didn’t move they should be pretty close, but we want to make sure they are perfect. Follow these steps:

Figure #3
- Turn on just your bottom layer by clicking and holding the Option or Alt key on your keyboard, then clicking on the little eyeball icon (next to the thumbnail of the layer) of the bottom layer. That will make that one active and hide all the others. (See Figure #3 right)
- Next one by one turn on each layer by clicking the eyeball next to them. If you notice that any of the images seem to jump a bit as you do that, you’ll want to run an alignment. If not but you just want to be sure anyway, continue on to the next step
- Select all your layers, click the bottom thumbnail, then shift>click the top one so all layers are highlighted (as shown below in Figure #4 below)
- Align the layers by going to the Edit Menu> Auto align layers (see Figure #5 below) and just choose the auto method from the pop up box. If it adjusts any of the layers you may have to crop the result to get rid of any odd edges.
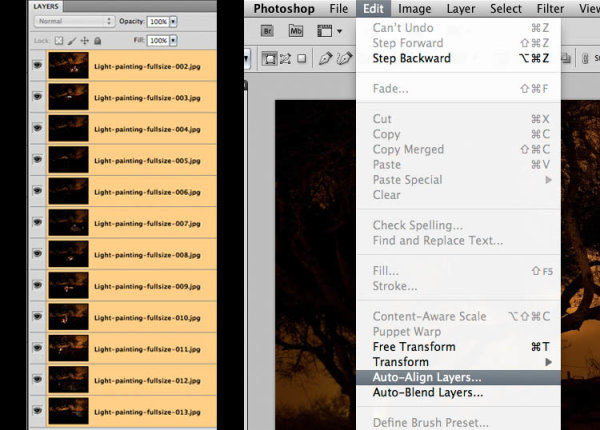
Figure #4 left – Figure #5 right
STEP THREE BLENDING THE LAYERS
Now that your images are aligned perfectly we’re ready to do some magic! In this section we’re going to “turn on the lights” from each image one by one. Here’s how:
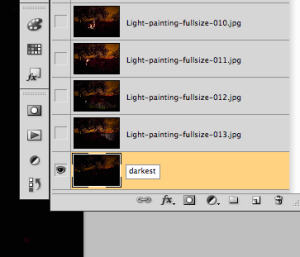
Figure #6
- find your darkest image by going through each layer one at at time. This should be the image you shot before you added light with your flashlight. The base image you created in Part One of the Light Painting Tutorial.
- drag the layer with your darkest image to the bottom of your layers panel. Just grab the thumbnail for the layer and drag and drop it below the bottom one. You can rename that layer “darkest” if you like by double clicking on the layer name and typing in your new one. See Figure #6 right.
- turn on the layer just above the bottom one and make it your selected layer – use the eyeball icon, they should all be turned off except your “darkest” layer and the one above it now
- change the blend mode of the selected layer to “lighten” – you do this by going up to the pull down menu in the upper left corner of your layers palette, right under the tab that says “Layers” and to the left of where it says “Opacity”. See Figure #7 below.
- copy the layer style – right click on the layer itself and choose “copy layer style”
- change the blend mode of all other layers to lighten – select all other layers, right click and choose “paste layer style”. That is the only way I know of to change them all quickly without having to do them individually, one by one. See Figure #8 below.
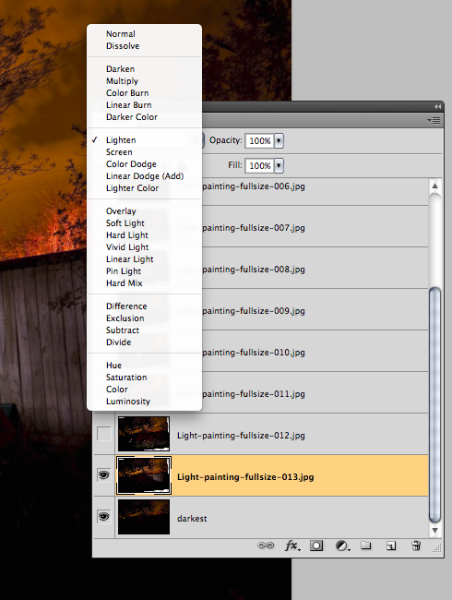
Figure #7
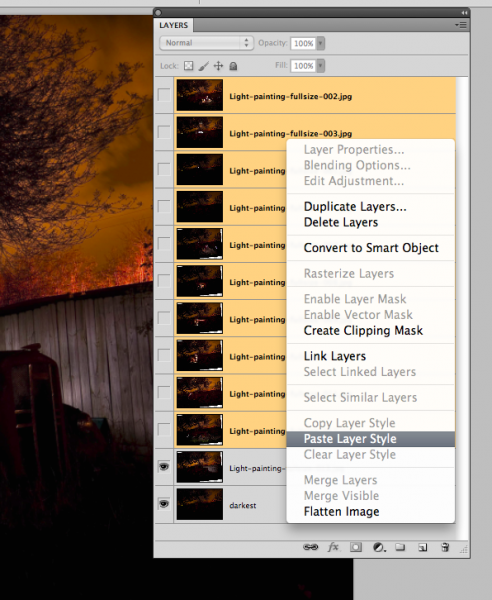
Figure #8
TURNING ON THE LIGHTS
Now if you click on each of the Eyeball icons for the layers above, you will see the lights turn on in the different spots you painted in each exposure. In the example of the firetruck here are a few views of the overall image as I turn on a layer above one at a time.

REVIEW AND REFINING THE IMAGE
I’ve skipped a couple here, but you get the idea. Notice how as I turn each subsequent layer on a new part of the truck is magically lit up. There are a few issues however, as it’s never, or rarely perfect right out of the camera. But we can fix those things easily too using layer masks. Do you notice the following issues in the image above?
- a few stray light bugs in places we don’t want them (on the fence to the right of the truck)
- the sky got overly bright as well (caused by some of the exposures being longer than the “darkest” base layer)
- there are some double images of the tree branches in a few places (caused by wind and the tree moving from one exposure to the next)
To fix any issues and clean up the image follow these steps:
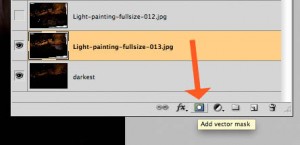
Figure #9
- turn on just the bottom layer again (alt/option click the eyeball for that layer)
- turn on each layer one at a time, let’s do the one above the bottom one first
- review the image and look for any issues such as – areas that got too light, stray light bugs, your body showed up in the photo, etc.
- create a layer mask by clicking on the “layer mask icon” in the bottom of the layers panel. See Figure #9 right. ***Important to note: you can do this two ways. Just clicking it directly will create a mask that shows the whole layer (mask will be white). Alt/option clicking on it will make the layer hidden or “masked” (mask will be black). If you only have a few issues to “paint out” use the direct click method. But if you have a lot of issues you need to paint out, I suggest using the second method so the mask hides the layer and then you just paint in the good areas. Either way you’ll get the same result just with less painting or adjustments needed so choose the method that is best for each layer.***
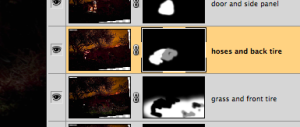
Figure #10
- paint on the mask to show or hide the parts you want – TIPS: hit the “D” key on your keyboard, that will set your swatches to the default black/white for foreground and background colors. Then hit “B” to get your brush tool. Select a soft edge brush so you don’t get a harsh line where you paint on the mask. Paint at 100% using Black to over areas you want to hide and switch to white for areas you want to show. To switch the foreground/background colors back and forth use the X key. Here’s what it looks like – make sure you are painting ON the mask not the image. You’ll be able to tell because there will be little corner markers around the mask and not the layer thumbnail. See Figure #10 right.
- repeat for each layer – turn it on, add a layer mask, paint to hide and show the areas you want. TIP: if you want to see what it looks like without the layer mask (especially useful if you are using a black mask and painting IN areas you want to show), hold SHIFT and click on the mask itself. A red X will appear and the mask is just disable. Do the same to turn it back on.
- if any of your images appear too bright you can tone them down by simply lowering the opacity of that layer, or by painting over the parts that are too bright with the layer mask to partially hide them (just set your paintbrush opacity to 20% and brush over that area gently)
This is what my layers look like with the masks added and areas painted to show only the bits I want from each exposure. Remember to save your file in two formats: PSD to preserve all the layers, and a final JPG you can use for printing or sharing online (you may have to make a smaller one for email sharing).

SUMMARY AND REVIEW
Okay so it seems like a lot of steps but once you get the hang of it, then it really doesn’t take that long to make something you can wow your friends with. They’ll be asking you “how’d you do that?!” in no time! Let’s take a look at the steps in short form again:
- open your files as layers into one document
- align the layers in perfect registration
- change the layer blend modes to “lighten” (all except the bottom layer)
- add a layer mask to each layer and paint in areas you want, or hide areas you don’t want to appear in the final image
- save as a layered PSD file
- flatten and save again as a JPG (full resolution, no compression)
I hope you enjoyed this two part series, once again here is the final image.
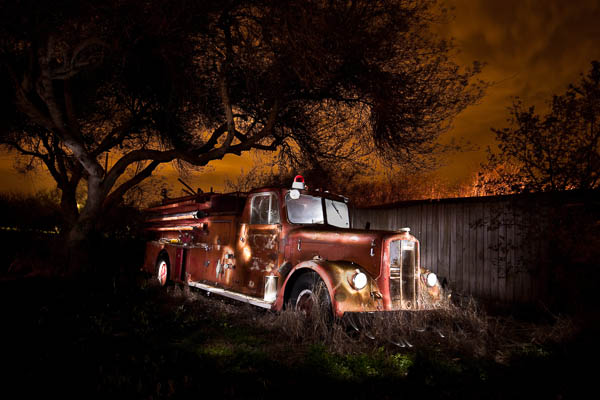
“1956 Le France Pumper” Corpus Christi, Texas
Post originally from: Digital Photography Tips.
Check out our more Photography Tips at Photography Tips for Beginners, Portrait Photography Tips and Wedding Photography Tips.
Light Painting Part Two – Photoshop

Digital Photography School


 I am happy to announce that Strobist’s video series, Lighting in Layers, has by special arrangement been adapted for the video tutorial site Lynda.com. Those of you who are Lynda subscribers can now view the videos there. (This includes Lynda’s many corporate subs, so check with your company.)
You must be logged in to post a comment.